STAR WARS™ Empire at War: Gold Pack

STAR WARS™ Empire at War: Gold Pack

193 ratings
Empire at War: Remake 4.0+ Space-battle Guide [Outdated]
By SoLock and 1 collaborators
*NOTICE*: THIS MOD HAS BEEN UPDATED TO 5.0. THE NEW UPDATE IS STANDALONE. FOR THOSE WHOM WISH TO CONTINUE USING 4.0+, THIS GUIDE WILL REMAIN VALID.

This guide breaks down each factions mainline warships in as comprehensive, yet graspable way as possible. For simplicity sake specialty ships (i.e. escort carriers) will not be included in this listing. Fighters of all types are also not included; in this mod most ships feature a garrison relative to the power and tech level of the ship they spawn from, therefore their impact will be accounted for in the guide if not explicitly stated otherwise.

This guide has been a long time coming so we appreciate your support, feedback and time. A link to the mod will be posted at the bottom of the guide under 'References' if you need a fresh copy.

May the Force ever serve you!
Cheers!
11
3
2
6
3
3
2
2
2
2
   
Award
Favorite
Favorited
Unfavorite
Legend
Some short hand is used within the guide. Here is a brief overview of them:

GC: This stands for Galactic Conquest, the main campaign for your chosen faction.

SK: This stands for Skirmish mode, a quick battle if you will for single player. You won't see this in the guide very much, but just in case you do.

Stats: There will be a visual statistic summary of the specific vessel discussed under that topic. It will precede the graph that displays a ship's relative capabilities within the ranks of 1-10. Unit Powers are not considered for the ranking as they alter the original stats of the vessel or provide buffs to themselves or other units. This list will comprise of the following categories:

Attack: Combines a ships total damage capabilities; from indirect damage such as ion cannons to missiles and garrison squadrons, if applicable.

Defense: Combines a ships total defensive suite; from flak cannons and shields to armor health and durability.

Range: A simplified estimation of a ship's effective range. Some vessels' weapons will not fire if the target is too close; this is accounted for in the ranking.

Versatility: This rank calculates a ships relative impact on any given battle it participates in, as well as its ability to fill multiple roles. This is purely based on the in-game stats and the ranks described above. Strong deviations may occur based on faction played, ship used, as well as the general make-up of allied ships in support of it. As such, view this stat with a grain of salt as a player's use of a vessel can alter its versatility considerably.
Empire: Frigates
About
Designed to overwhelm and conquer, Imperial ships are meant to shoot at a distance and specialize in commander oversight and force in numbers.


----------------------------------- Frigates -----------------------------------
Gladiator
AKA: The Wimp


-Not much can be said about the capabilities of the Gladiator and its Advanced Garrison variant; it's cheap and can be deployed quickly and in large numbers, but there's not much under it's belt in terms of direct combat. They do have at least one thing going for them; fighters. It's cheaper and more effective to deploy these instead of a dedicated carrier unit as it has some weapon systems and mediocre shields to fight off an assault for a little while for reinforcements to arrive.

-Recommendations: Keep away from the front-lines; they'll get shredded by anything bigger than them. Utilize as a support ship in case of stragglers bypassing the front-line or supplement a station's fighter defenses. In GC, replace them with a more capable, versatile vessel or always have a more powerful ship as a companion.

Base Variant
Stats
Rank
Attack
1
Defense
2
Range
2
Versatility
1

Advanced Garrison
Stats
Rank
Attack
1+1
Defense
2
Range
2
Versatility
1

Vindicator and Enforcer
AKA: The BB Guns


-The Vindicator and its brother, the Enforcer, is an improvement over what the Gladiator lacks, with the obvious trade-off of fighter capability. This is a worthwhile endeavor with the Enforcer relatively decent at standing on its on if need be, but not against multiple opponents.

-Recommendations: Use them to screen and pester other frigates as they can be decent tanks and distractions from your more powerful vessels. There's no shame in having up to three of these guys in your fleet, but make sure you have a good fighter compliment or a cruiser to back them up.

Vindicator
Stats
Rank
Attack
3
Defense
2
Range
2
Versatility
3

Enforcer
Stats
Rank
Attack
3+1
Defense
2+1
Range
2
Versatility
3

Acclamator I-II
AKA: The Kamikaze


-You will love and hate this vessel and here's why. Great speed allows them to chase down fleeing frigates with an impressive array of attack-based weaponry or initiate fleet battles by being the vanguard. While overall great in these aspects, you'll find them getting picked off by bombers and fighters pretty quickly or their shields knocked out by ion weapons. At a cost of 10k - 12.5k, you might want to invest in the Victory instead, which is cheaper and more versatile.

-Recommendations: Make them the first to spot and engage enemy warships, and don't be picky. These guys are made to be expendable whilst allowing your stronger ships to get within range to finish the job. They're also decent against stations if need be.

Acclamator I
Stats
Rank
Attack
4
Defense
3
Range
4
Versatility
4

Acclamator II
Stats
Rank
Attack
4+1
Defense
3+1
Range
4
Versatility
4

Victory
AKA: The Swiss Army Knife


-I might be just a tad bias for this ship, but here goes. Anti-fighter? Check. Anti-Frigate? Check. Anti-cruiser? Hit from range first; Check. Anti-Capital? Meh, but the enemy will need to give up an arm and a leg to win. Out of all the vessels in the Imperial armada, the Victory stands alone as the take-on-all-comers and the premier versatile ship an any fleet. A few glaring weaknesses is any vessel that can counter missiles, out-run it, or shoot at it out of range. Outside of a few dedicated and specific ships, not many fit those criteria.

-Recommendations: There isn't a single fleet in GC or SK where I don't have at least one Victory-class frigate. With the ability to take on any target at long range and enough speed to get right in the face of any vessel accompanied with great shields, all strategies are good with this guy around.

Victory
Stats
Rank
Attack
5
Defense
4
Range
6
Versatility
9

IEC Frigate
AKA: The Sniper


-So we've all had at least one CoD match with a camper, right? Introducing the Empire's version for a measly 5k (Tech lvl 3 required). As if the empire didn't have enough long range firepower, this frigate would be the dynomite to a barrel filled with fish. An excellent compliment of fighters protect against strike runs and mid-range cannons against corvettes that got lucky enough to close the distance. Like snipers in any game, shields and armor don't mean jack squat once enemies are in optimum range.

-Recommendation: For obvious reasons, keep at a distance from the battle and don't let the spawned fighters wander too far. While effective against capital ships, they excel at assassinating cruisers and frigates. I recommend having two of these in your attack fleet to easily add lethality.

IEC Frigate
Stats
Rank
Attack
8
Defense
3
Range
8
Versatility
5
Empire: Capitals


-------------------------------- Capital Ships ---------------------------------

Procusator
AKA: The Blitzer


-During testing I've recently discovered it is the fastest firing capital ship in the Imperial armada. As nearly all ships larger than a corvette within the Empire is slow firing, this makes the Procusator a unique ship, albeit an easily replaceable one. As the first iteration of a true SD before its classic namesake, the Procusator is an excellent backbone for any early-game fleet. While you are, tactically, better off purchasing the ISD for only 5k more than the Procusator at 13k, if you wish to save your reinforcement ceiling for more varied vessels this ship is a great substitute heavy hitter.

-Recommendation: Pairing this ship with two Accalmators will net you some surprising results. Charge that group, fighters included, at the enemy's front line and watch the fire works. You'll take some damage, but trust me "you should see the other guy".

Procusator
Stats
Rank
Attack
5
Defense
4
Range
5
Versatility
4

Imperial Star Destroyer (ISD) I-II
AKA: The Canon (get it?, lol)


-Not many words can do this classic ship justice; Star Wars isn't Star Wars without an ISD showing up. The ISD was the inspiration for this guide as I've found many players having trouble understanding this mod's version of the warship. To be clear, the ISD and its variants are NOT meant to be in the front lines. With a cost of 18k-25k, do they have active participation in the battle? Yes. Should they be the focus for which to build your fleet around? Yes. Should I use them in close-range combat? Short answer: no. Can they handle themselves in close-range combat? Short answer: yes.

-Recommendation: Keep your ISD capital ships out of the firestorm that is the front-lines and at a decent range. For range reference, use a Victory, Accalmators or Vindicators as a buffer and supplement the low fire-rate of the ISD. This adds several layers of defense not only against other ships, but fighters as well, the latter of which the ISD is deathly allergic to. The ISD1 is best used at broadside firing arcs, while the ISD2 is capable of firing at all angles and better at close range if need be.

ISD I
Stats
Rank
Attack
6
Defense
4
Range
7
Versatility
5

ISD II
Stats
Rank
Attack
6+1
Defense
4+1
Range
7
Versatility
5+1

Allegiance
AKA: The Fortress


-For an astounding cost of 50k and a long build time, the Allegiance is a literal tank meant to 1v3 anyone with the guts to try. Capable if dishing out firepower second only to a lvl 3 station and SSD's, and the strongest shields of any mainline vessel. Despite the impressive portfolio, they follow a similar strategy to the ISD's as well as feature meager ion weapons against shields, harming their overall effectiveness. They're great at intimidation, poor on execution.

-Recommendations: The extreme cost to build and lack of doing anything other than soak damage make fielding this ship en masse wasteful. In GC, I recommend having one at your key shipyards or choke points with a compliment of lesser ships. Never leave this ship by itself if you can help it. And keep those pesky fighters away, too.

Allegiance
Stats
Rank
Attack
7
Defense
7
Range
7
Versatility
5

Torpedo Sphere
AKA: The Siege Gun


-As a tech 5 artillery vessel, the Torpedo Sphere Siege Platform surely lives up to its name. Its proton torpedo launchers allow it to fire at a range more than twice as long as a standard Star Destroyer. The Torpedo Sphere's torpedoes have a AOE effect, capable of blowing up multiple hardpoints at a time. It is also one of the few units that outrange Golan III station's torpedoes, so it can safely demolish enemy space stations after you clear out defense forces. However, its launchers are extremely slow and carries a small amount of laser weapons, making it hard to protect itself from almost any enemy that gets close.

-Recommendation: Put these valuable artilleries (if you ever got more than 1 of these in a fleet) behind your main battle line, and watch your enemy's capital ships get blown up from afar. TSSP's firepower is enough to destroy large targets, so the front fleet should do their best to prevent any enemy (especially bombers) from getting through.

Torpedo Sphere
Stats
Rank
Attack
10
Defense
5
Range
10
Versatility
3
Rebellion: Frigates
About
Survival. Victory against immeasurable odds. Ships of the Rebellion focus on fighter superiority and adaptable multi-roles.


----------------------------------- Frigates -----------------------------------
EF-76 Nebulon B
AKA: The Icon


-Perhaps the most recognizable frigate, aside from the AAF, in all of Star Wars; you know, the one where Luke got his mechanical hand. That one. At a cost of 3.5k, this vessel follows a similar role here. Not good at combat by a massive margin, it's serves the Rebel fleet as pure support; repairing ships and warding away fighters.

-Recommendations: Keep them from the front-lines, but close to your fleet for maximum efficiency. Having up to three in a fleet is a great strategy as you are likely to lose at least one in a major battle.

Nebulon B
Stats
Rank
Attack
1
Defense
1
Range
1
Versatility
2

MC-30c Frigate
AKA: The Trailblazer


-The Mon Calamari 30c Frigate has two weapons; it's two torpedo cannons and its engines. Why engines you ask? Try catching up to a group of these guys after they just took pot-shots at you from a distance, I dare you. No, really, if you know a frigate that's faster, please tell me. It is important to note however that their weapons do not bypass shields like most missiles, and while effectiveness is not negated, it does take longer to do lasting damage the harder the target.

-Recommendations: Hit and run in pairs; simple and easy with this ship. But if you're not a fan of constantly managing these guys from dying but ensuring they remain useful, you can pair this ship with a Tide Frigate to protect it and knock down shields simultaneously while the MC-30c camps out in relative peace.

MC-30c Frigate
Stats
Rank
Attack
4
Defense
1
Range
4
Versatility
2

CEC CD-273-class Frigate and the BAF-4 Frigate
AKA: The Raven (left) and the Falcon (right)


-I've combined these two as I found most often they fill the exact some role with some worth-while differences. The CEC will more often than not be your mainline assault frigate at its budget cost of 7.5k, boasting impressive missile range slightly longer than the BAF-4, however it sacrifices armor and shields. The BAF-4 costs 10k and has less range but is better at defending itself should it come to that, as well as having additional armaments to take down opponents.

-Recommendations: Pairing these two is tempting but NOT advised, as they do the exact same thing in terms of roles. I find myself using the CEC for station and outpost defense due to it's superior range, and I use the BAF in my assault fleet paired with damage soakers and fighter protection.

CEC Frigate
Stats
Rank
Attack
4
Defense
3
Range
5
Versatility
3

BAF-4 Frigate
Stats
Rank
Attack
5
Defense
4
Range
4
Versatility
4

The Tide
AKA: The Arrowhead


-Costing you around 8.2k, the Tide frigate is extremely effective at its two roles; tank and shield cracking. These guys can absorb an impressive amount of damage before their shields fail, all the while its own ion cannons do unreal damage to enemy shields effective against any target. It's not built for doing hull damage so be mindful of placement.

-Recommendations: The Tide frigate is a secret golden goose. As one of the few ships specifically specialized to down shields, you'll want to preserve their presence as long as possible. That being said, it's a good idea to have them at the forefront of an initial attack and then pull them back, as well as keeping at least two in your assault fleet as you're likely to lose one if your not careful.

The Tide
Stats
Rank
Attack
3
Defense
4
Range
4
Versatility
4

The AAF Frigate
AKA: The Bulwark


-Never back away from a fight with an AAF frigate in your arsenal. As your primary tank frigate, you'll want these guys to attract as much attention as possible. With a cost of 12k, slow movement and the highest shield defense available in its class, this frigate won't be doing much else. Rely on other ships to do hull and shield damage and while it has bombers, its effectiveness is highly situational.

-Recommendation: I found they are best used paired with a high damaging ship like the BAF or CEC to make up for its own poor output. Have a group of 2 BAF's and an AAF to soak damage is the best balance I've found so far.


AAF Frigate
Stats
Rank
Attack
2
Defense
6
Range
3
Versatility
3
Rebellion: Capitals


-------------------------------- Capital Ships ---------------------------------

MC-80A
AKA: The Moderator


-The MC-80A will be the ship heading the defense of your fleet. With low 1v1 capability you'll want these guys to screen fighters mostly, as their cannons are far more effective against them than capital ships. Despite this, their advantage in shield protection should not be understated and can hold their own for a good while in time for reinforcements.

-Recommendations: Spread them around your fleet, up to 3 of them, to maximize their 320-degree firing arc, with at least one at the front lines. As excellent fighter-screeners, having an MC-80A in your fleet will help guarantee fighter supremacy, if you hadn't already, and adding decent firepower against smaller vessels.

MC-80A
Stats
Rank
Attack
4
Defense
5
Range
4
Versatility
4

The Liberator
AKA: The Incisor


-I seriously debated adding this ship as it functions as a carrier more than anything, which I would normally exclude from this guide. But after a long internal debate, and equally long testing of its capabilities, I decided I'd be doing the Rebel faction a disservice leaving it out.

The Liberator is perhaps the greatest example of a multi-role vessel as you'll find in the Rebel armada. With the ability to launch a large amount of fighters, plus stun ships with ion cannons AND equip with minor laser cannons, this ship is best served as a last ditch effort to turn the tide back in your favor.

-Recommendations: As mentioned previously, the Liberator is a carrier first and everything else suffers reduced effectiveness. Should you find yourself about to lose, send it in with at least one attack-based ship to protect it. It will stun the opposing ship and weaken shields while your escort takes advantage. I find myself doing this as an ambush on previously engaged vessels more often than not.

The Liberator
Stats
Rank
Attack
3
Defense
3
Range
3
Versatility
4

MC 80
AKA: The Brawler


-The Mon Calamari 80 class capital ship is identical to the 80A counterpart with the primary differences is increase shield strength and number of armaments. The role they fill is complicated, but the simplified version is to attract as much attention a possible. Their shield regeneration is the highest in the game and capable of soaking an unreal amount of damage, while its single weakness is ion cannons. Don't go into a fight with these guys expecting damage output; while they can do decent damage, you should have other ships do that instead.

-Recommendations: No more than 2 ships in a fleet, it's not worth the cap space. With their integrated shields (non-targetable) they are fantastic tanks and should always be in the front lines baiting enemy capital ships. Couple them with an attack-based ship and the Tide frigate and you have the start of a well rounded fleet.

MC 80
Stats
Rank
Attack
5
Defense
7
Range
4
Versatility
5

The Dauntless
AKA: The Pulverizer


-'Bullet-hell' is another nickname you can have for this ship. As the structure of this vessel hints at, broadside angles are its bread and butter and is equip with all turbo cannons. In short, anything the size of a frigate or larger will get shredded despite its lack of ion guns. It is slow though and lightly shielded so keep it safe.

-Recommendations: The Dauntless cruiser should be one of your main attack vessels and has impressive firing range, so keep at a relative distance at broadside angles on both sides. It is extremely allergic to most opponents smaller than a frigate, (i.e. will miss fighters and moving corvettes by 90%), so keep them far away.

The Dauntless
Stats
Rank
Attack
8
Defense
3
Range
7
Versatility
4

The Nebula and the Endurance
AKA: The Archon and The Keeper (below)


-These two ships are brothers and compliment each other like it; occasional disagreements but they get over it in the end to succeed.

The Nebula (Archon) likes to get in the thick of it, picking fights and taking names. He has a slow fire rate relative to most other attack ships so keep this in mind. To make up for it, he has a specialized cannon that is equally effective against shields as it is against armor.

The Endurance (Keeper) on the other hand likes to hold position, spewing out fighters and launching the occasional missile. He likes to guarantee fighter supremacy so treat him like a carrier and he'll support his brother's recklessness whenever possible. He's not weak though and is capable of getting out of risky scrapes if it comes to it.

-Recommendation: These vessels pair excellently. The formation I use is to have the Nebula at a slight angle ahead of the Endurance. This serves the purpose to help protect the Endurance, who's overall range is slightly better but output lacking, yet still contribute damage to enemy ships. This also helps to make sure all angles are covered, as the Nebula has near 360-firing angle while the Endurance is weaker directly from the rear.

The Nebula
Stats
Rank
Attack
7
Defense
5
Range
5
Versatility
5 (6* paired)

The Endurance
Stats
Rank
Attack
7-1
Defense
5
Range
5+1
Versatility
5 (6* paired)
Criminal Underworld: Frigates
About
Three factions, One goal. The Black Sun, Hutts and Zann Consortium rise together to stick it to the Galaxy where the light never shines. Their ships don't give a sh*t about enemy shields, specializing in missile-based weaponry and mid-range combat.

Disclaimer: There are a few ships designated as frigates but serve roles better described as corvettes. Their impact on fleet battles are significant enough that they will be listed under the 'Honorable Mentions' tab instead.


----------------------------------- Frigates -----------------------------------

Solar Sailor Frigate
AKA: The Stinger


-Small, nimble and a little cowardly, the Solar Sailor is a pest on the battlefield. Equip with a single proton launcher and powerful engines, these guys are the bane of ships their size and smaller. They can even attack while running with rear-angled turbo-lasers and can deploy turrets as further deterrents for attack or defense.

-Recommendations: Don't be afraid to use them aggressively. In SK, their turrets are sturdy and as a group can face-off most opposition reliably, making this ship quite adaptable. Best used in numbers of 3-5 to get the most out of them.

Solar Sailor Frigate
Stats
Rank
Attack
2
Defense
2
Range
3
Versatility
3

The Tarrada Frigate
AKA: The Yacht


-The Tarrada is the main vessel tasked with screening fighters and smaller targets. With fast missiles and decent laser cannons, these ships are good at what they do, but suffer against larger targets.

-Recommendations: Great to have at least 2 in any given fleet to maintain fighter superiority and to protect ships that don't feature their own garrison. Keep them right in the middle of your fleet to optimize their wide firing angles.

The Tarrada Frigate
Stats
Rank
Attack
2
Defense
3
Range
3
Versatility
3

The Javelin
AKA: The Specter


-The Javelin is a fast support-based ship, despite its armaments. It specializes in de-buffs, missile defense and screening opposing frigates from your other vessels. They can dish out decent damage too if the situation calls for it, as well as chase down fleeing and weakened ships.

-Recommendations: Their small, streamlined size makes them hard to hit; use this to your advantage against smaller, inaccurate frigates. Your likely to lose one during a good-sized battle so have 1-2 more on standby.

The Javelin
Stats
Rank
Attack
3
Defense
3
Range
3
Versatility
3

Darran-Tan Cruiser
AKA: The Fishtail


-Interesting shape aside, (keeping this guide PG), this ship is unwieldy, slow but strong. Its shape, however, allows the Darran-Tan to utilize its impressive array of heavy weapons to penetrate enemy vessels in just the right way, releasing its frustrations right when you need it. While keeping it safe should be priority, it has a decent refractory period. (ok I'm done)

-Recommendations: Position it near the rear of your fleet for optimum efficiency (didn't mean that to be funny). It is extremely allergic to fighters and fast corvettes, but excels at taking down larger ships and outposts.

Darran-Tan
Stats
Rank
Attack
5
Defense
3
Range
5
Versatility
4

The Dor'bulla Cruiser
AKA: The Scorpion


-Your mainline frigate for every fleet; defense or assault, this ship is built for mid-range combat. While alone, it's woefully unremarkable; but place it with a compliment of other vessels and it quickly reveals itself as a 'jack of all trades'. Comparative to the Empire's Victory frigate, its drawback is it has less range and weak all alone, but makes up for it by filling any role perfectly in a given fleet.

-Recommendations: Always pair this ship with another of a different type or role to maximize its average yet effective versatility. Because of the many possibilities, I encourage you to experiment for what works for you. My personal favorite is pairing it with Javelin and Tarrada frigates to be as rounded as possible while having speed and maneuverability on my side.

The Dor'bulla
Stats
Rank
Attack
5
Defense
4
Range
4
Versatility
4 (3* alone)
Criminal Underworld: Capitals


-------------------------------- Capital Ships ---------------------------------

The Chelandion-class Destroyer
AKA: Jabba's Palace


-Ok, don't tell me this ship doesn't remind you of Jabba's pleasure barge in 'Return of the Jedi'. Anyway, this ship is your primary flagship for any fleet. Like most ships of the Underworld it is equip with missiles and nearly every known armament, making it an effective deterrent against attacking vessels and even fighters if need be. It takes a 'great at all, master of none' approach to combat.

-Recommendations: Despite its advantages, don't be too eager to throw them at the front-lines. Best to keep them in the center of your fleet to optimize their 320-degree firing angles and to deal with enterprising fighters and corvettes that try to target your critical vessels

Chelandion
Stats
Rank
Attack
6
Defense
6
Range
5
Versatility
5

The Principality-class Battleship
AKA: The Wraith


-Move over ISD, there's a new king in town. Perhaps my new favorite capital ship in the game, the Principality is your heavy weapons platform for its class. With heavy turbo-lasers, quad turbo-lasers and forward-facing torpedo launchers, you'll be hard pressed to find a ship to match its damage output without resorting to SSD's. Close or long range, this vessel will mess sh*t up.

-Recommendations: It has some manageable weaknesses; namely it has a noticeable lack of shield-busting weapons and an allergy to fighters. While face-front it is difficult to hit, this vessel is optimized for broadside angles, negating the former benefit for optimal firepower. They work great in groups of 2 (3 if you have the cap space), with the necessary protection of a carrier and a few Javelins.

Principality
Stats
Rank
Attack
7
Defense
4
Range
7
Versatility
5

The Kandosii-class Dreadnought
AKA: The Megaladon


-If you want a capital ship with a bit more tactical flexibility than the Principality (how dare you! jk), then the Kandosii is for you. I'll admit however, this vessel is improved in the ways that matter comparatively; greater range, shield-punching missiles and unrestricted firing angles, opponents will have a hard time taking this ship down.

-Recommendations: Up to you to either replace the Principality with the Kandosii as damage dealer or pair them together with the latter acting as a buffer. Don't be afraid to let this vessel hit the front-lines though, as it has a fighter garrison and significant defenses to last.

Kandosii
Stats
Rank
Attack
7
Defense
5
Range
8
Versatility
6

The Sabaoth
AKA: The Sabertooth


-Your primary fighter support vessel, the Sabaoth will be your protection against fighters, granting you a tactical edge. Like most ships that fill this role, they aren't built for one-on-ones, but can keep its own if necessary.

-Recommendations: Protection against damage-dealing ships is key to this vessel's survival. They can supplement the firepower of your ships well, but their focus should be fighter-screening.

Sabaoth
Stats
Rank
Attack
4
Defense
5
Range
5
Versatility
4

The Keldabe-class Dreadnought
AKA: The Gargoyle


-Oh 4.0, what have you done? This ship used to be a powerhouse on par with the Kandosii but with the 4.0 update, the Keldabe has been downgraded to a support-fire role. By no means weak, however key weapon systems are unable to fire at medium ranges, namely the two huge mass drivers on either side. It has 4 smaller versions at its very front but unless the enemy is shieldless you'll barely notice. In all other aspects, this isn't a vessel you'll want to get in the way of.

-Recommendations: Either get these guys to the front-lines to do close range damage or pester enemy outpost's and capital ships with ranged fire. They also work great as tanks if need be.

Keldabe
Stats
Rank
Attack
6
Defense
6
Range
5 (7* long-range
Versatility
5

The AGSA-class
AKA: The Ram


-One of the strongest seige vessel in game, you will really want its gigantic cannons to crack open any fortress system you encounter in your conquest. No longer the old glass cannon with only a handful of hardpoints, the new Aggressor is flanked by numerous turbolasers and can fend off some attackers by itself. Its axial ion and plasma cannons can quickly bring down enemy's shield and destroy even the toughest hardpoint in several shots.

-Recommendations: Even with increased survivability granted by new hardpoints, AGSAs should still be protected by other vessels. While their turbolasers can destroy frigates alike, they are too inaccurate against fighters and too weak against capitals. Best to be put away from frontline and fire behind some trustworthy buffers.

Aggressor
Stats
Rank
Attack
8
Defense
4
Range
8
Versatility
3
Heroes, Captains and Admirals: Introduction


Intro:
Faction heroes have as much potential to turn the tide of battle as a large battlecruiser or in some cases an SSD, and while this seems like a bold statement, allow us to detail why in the next few sections. As you've likely found out, specific heroes can be upgraded and/or purchased once the prerequisite planet/tech level is achieved.

As stated in the game, many of the hero bonuses stack together, however I want to detail how this is accomplished and why it's built this way. The game calculates multiples of the same bonus (10% or 0.1) individually from the base amount. For example the Victory has 10,000 shield-points so the calculation would look similar to:

=(10000*0.1)+(10000*0.1)

This would mean the Victory has 12,000 shield points from its standard 10,000 when both a Captain and Admiral are present. However, such an effect would not increase further if there were two or more of either. This limitation can be partially bypassed via Hero Pairing, which will be explained further in another section.

The equation shown and how the game calculates the bonus is formatted this way for a far simpler reason than you'd think. Some Heroes have negative effects to stats, and as such to prevent the scale of bonuses from leaning too far on one side or the other, they are always calculated from the vessels base value first before being added and applied.

To conclude, every hero, especially the upgradeable ones, requires understanding the small but noteworthy mechanics with each. It is also important to note that each upgrade, for the heroes that have it, will be considered as its own entity within the guide so as to maintain accuracy in relation to the ships that they use and their change in abilities with each upgrade.

NOTE: Only heroes that provide fleet bonuses will be listed.

Captains and Admirals


Captains and Admirals are supplementary minor heroes, no doubt, but this limitation is also their greatest strength. As mentioned in the tool-tip description the bonuses they bring will stack with any hero not identical to another captain or admiral. The potential for complete overkill cannot be underestimated under the right conditions, allowing you to dominate with otherwise insufficient forces. Captains command an Enforcer-class Vindicator, providing 10% increased shields and 20% bonus to movement speed to all ship classes frigate and below. An Admiral commands a ISD1 and provides the same bonus but to all ship classes, effectively doubling the bonuses to corvettes and frigates.

-Recommendations: Besides resource limitations there isn't a reason good enough NOT to pair these two in as many fleets as you are able. Keeping them out of harms way is essential so post them at your spawn point and keep 'em there, only engaging if absolutely needed. If you decide to employ multiples, warp them in when one of the same type is destroyed to keep the bonuses in effect.

Enforcer: Captain
Stats
Rank
Attack
3
Defense
2 (+1 *paired)
Range
2
Versatility
3

ISD I: Admiral
Stats
Rank
Attack
6
Defense
4 (+1 *paired)
Range
7
Versatility
5
Imperial Heroes
DISCLOSURE: Due to Steam's character limit, each hero will be discussed with their starting level and their max level only. This will still account for any whom have only 1 or 2 upgrades (original purchase and/or upgrade.)


Darth Vader
Black Squadron
Ship: Tie Fighter Squadron
Level: 1
Upgrade Planet: Kuat
--Fleet Effects--
+25% Speed to Squadrons
Stacks with ALL Officer types

Recommendations: Your most elite squadron at the start of the game, Black Squadron, led by the iconic Dark Lord himself, should be at the forefront of the first 1-5 of your earliest battles in nearby systems, especially if starting from a single planet. Beware; despite having massively increased health compared to similar fighters, the Black Squadron will still suffer heavy casualties against anti-fighter weaponry.

The Devastator
Ship: ISD 1
Level: Max
Upgrade Planet: Kuat
--Fleet Effects--
+33% Speed to Corvettes and above
+30% Damage to Corvettes and above
-30% Shield to Corvettes and above
-50% Range to Corvettes and above
Stacks with ALL Officer types

Recommendations: At this stage, Vader makes every battle about striking first and hard with little desire to draw things out. Depending on the ships that make up your fleet, you can become a glass cannon or a fast-moving wall of firepower. Recommend you start with frigates to get an idea of his in-game effects.

Baron Soontir Fel
181st Imp. Fighter Wing
Ship: Tie Fighter Squadron
Level: 1 and Max
Upgrade Planet: Coruscant
--Fleet Effects--
+25% to Armor, Shields, Speed, Damage and Range to Squadrons
Stacks with ALL Officer types

Recommendations: The 181st appears over Coruscant once Tech 2 is acquired. Like the Black Squadron, his bonuses amplify fighters greatly, however due to when you're able to get him you may rarely use him in the long run. Personally, I've only used him in defense of outposts that I didn't want to lose but didn't have the resources to defend adequately. Reinforce him with at least 7x bombers, 12x fighters and a few corvettes and watch them tear sh*t apart.
Addendum: At max level the 181st fields the Elite TIE Defender-class fighters.

Admiral Screed
Clone War Hero
Ship: Gladiator Frigate
Level: Max
Upgrade Planet: NONE
--Fleet Effects--
+10% Shields to Corvettes and above
+20% Speed to Corvettes and above
Stacks with ALL Officer types

Recommendations: Your first iteration of a minor Admiral, Screed is available at the start of a new game and is quickly outclassed by heroes with higher tiered vessels. However, because he can stack with all other commanders he is still better than the minor admirals you can purchase later. Utilize Screed as a support admiral, as his ship is originally designed for this role and keep him near the galactic core, just in case you need hero support from incursions.

Grand Moff Tarkin
Havelon
Ship: Modular Taskforce Frigate
Level: 1
Upgrade Planet: Kuat
--Fleet Effects--
+10% Shields to Corvettes and above
+20% Speed to Corvettes and above
Stacks with ALL Captains

Recommendations: Instead of taking up a planet's orbital build slot, the Modular Taskforce cruiser acts as mobile surveillance in GC and FOW remover and support unit in-battle. As such they are exceedingly weak to anything larger than a single patrol squadron. While he has his uses at his current level, best to upgrade him asap as MTC's are easily affordable/replaceable and the Grand Moff deserves better.

Executrix
Ship: ISD 1
Level: Max
Upgrade Planet: Kuat
--Fleet Effects--
+10% Shields to Corvettes and above
+20% Speed to Corvettes and above
Stacks with ALL Captains

Recommendations: Boasting 5k more shield points than a standard ISD, Tarkin flexs his full military might on opposing factions. However, due to his inability to gel with other admirals I end up leaving him as the primary defender of Kuat. His assault capabilities shouldn't be underestimated, though; those extra shield points come in handy.

Admiral Piett
Judicator
Ship: Procursator SD
Level: 1
Upgrade Planet: Kuat
--Fleet Effects--
+15% Damage to Frigates and above
-30% Speed to Frigates and above
Stacks with ALL Officer types

Recommendations: Piett's effect on fleet battles is a matter of battle speed preference. His presence will cause battles to move at a turtle's pace, and while the increased damage helps, it takes a long time for ships to move into range or chase down targets. Pairing him with a Hero or Admiral that negates his debuff is strongly recommended whenever he is present.

Executor
Ship: SSD
Level: Max
Upgrade Planet: Kuat
--Fleet Effects--
+15% Damage to Frigates and above
-30% Speed to Frigates and above
Stacks with ALL Officer types

Recommendations: See 'Executor Tab' for best tactics.

Grand Admiral Thrawn
Stalwart
Ship: Victory Frigate
Level: 1
Upgrade Planet: Kuat
--Fleet Effects--
+20% Shields to Corvettes and Frigates
+40% Speed to Corvettes and Frigates
-20% Shields to Capitals and above
-40% Speed to Capitals and above
Stacks with ALL Officer types

Recommendations: The enigmatic Grand Admiral Thrawn is fantastically represented in this mod. True to his nature in the lore, placing him in command of warships larger than a frigate and you'll find yourself punished for it. On the other hand, field smaller ships and watch them out-maneuver and overpower larger ships with ease.

Admonitor
Ship: ISD 2
Level: Max
Upgrade Planet: Kuat
--Fleet Effects--
+20% Shields to Corvettes and Frigates
+40% Speed to Corvettes and Frigates
-20% Shields to SSDs
-40% Speed to SSDs
Stacks with ALL Officer types

Recommendation: Now fielding a ISD2, Thrawn's adaptability has taken a hit, however his effectiveness has not and is now much hard to take down. Suppress the temptation to field larger ships just because he has one; stick with frigates as your heavy-hitters and you'll run circles around larger fleets.

Palladium Hoytt
Corulus
Ship: ISD 2
Level: 1 and Max
Upgrade Planet: Kuat
--Fleet Effects--
+10% Shields to Corvettes and above
+20% Speed to Corvettes and above
Stacks with ALL Captains

Recommendation: Following the same rules as minor admirals, unable to gel with others of the same rank, Palladium commands an ISD2 and is best used to defend or assault enemy way-stations and choke-points.

Grand Admiral Zaarin
Predominant
Ship: ISD 1 + Vindicator (x2)
Level: 1 and Max
Upgrade Planet: Kuat
--Fleet Effects--
+10% Shields to Corvettes and above
+20% Speed to Corvettes and above
Stacks with ALL Captains

Recommendation: Zaarin is a bit unique as he automatically spawns two captains fielding Vindicator frigates while he commands an ISD1. Use his subordinates as fighter protection or cannon fodder; they will be replaced in the next battle so long as Zaarin lives.

Lord Cronal
The Singularity
Ship: ISD 1
Level: 1 and Max
Upgrade Planet: Kuat
--Fleet Effects--
+10% Shields to Corvettes and above
+20% Speed to Corvettes and above
Stacks with ALL Captains

Recommendation: As the only Hero-level SD capable of traveling undetected, Lord Cronal is a powerful addition to your command structure. Don't be shy in letting this sneaky bast*rd reign terror behind enemy lines; pair him with a single Titan-class Battlecruiser for that Skyrim-level 100+ stealth damage.
Imperial Heroes Continued
Admiral Daala
Gorgon
Ship: ISD 1
Level: Max
Upgrade Planet: The Kessel System
--Fleet Effects--
+25% Damage to Corvettes and above
-40% Shield to Corvettes and above
Stacks with ALL Officer types

Recommendation: The elusive Admiral Daala can only be found at the Maw Installation within the Kessel Cluster. As she is quite isolated from the rest of the Empire, she represents the only significant threat to the eastern galaxy, as well as occupying a valuable stronghold. Her vessel, the Gorgon, has massively increased rate-of-fire compared to standard ISD's and is therefore extremely powerful in either attack or defense. Utilize minor admirals and captains to counter her shield debuff.
Rebel Heroes
Admiral Akbar
Home One
Ship: Home One
Level: 1 and Max
Upgrade Planet: The Clamari System
--Fleet Effects--
+40% Speed to Bombers, Corvettes and Frigates
+30% Shield to Bombers, Corvettes and Frigates
+20% Shield to All units
Stacks with ALL Officer types

Recommendation: "I am with you." Admiral Akbar's presence on the battlefield greatly boosts the survivability of all unit classes, making him a must-have for any assault fleet. It's important to realize that he is NOT an attack ship and should only be used to eliminate enemy shields, so position him carefully for maximum effect. In addition, due to the size of his vessel he has a much larger field of view compared to similar-tiered commanders, further enhancing his defense against ambushes and strike runs. Best to let your fighters take full advantage of this.
Addendum: At level 1, he fields an MC-80A and is best used to counter enemy squadrons.

Leia Organa
Tantive IV
Ship: CEC CR-90 Corvette
Level: Max
Upgrade Planet: NONE
--Fleet Effects--
+10% Speed to Corvettes
+15% Shield to Corvettes
Stacks with ALL Officer types

Recommendation: The influential princess of Alderaan flexes her aggressive negotiation to inspire nearby corvettes, making her the bane of all opposing squadrons. Instinct might tell you to keep her pinned to a single planet, but I encourage you to use her more assertively. With her, attack is the best defense. Now you know why the Rebel AI spams corvettes; they are hard to deal with when she's present.

Luke Skywalker
Womp-rat Marksman (lol, jk)
Ship: X-Wing
Level: Max
Upgrade Planet: NONE
--Fleet Effects--
+15% Shield, Armor and Speed to Squadrons
Stacks with ALL Officer types

Recommendation: Similar to his father, Vader and his Black Sqaudron, Luke should be used early and often as you expand. Because of the Rebellion's focus of fighter superiority, not having him in your fleet is the same as you unconsciously making the game harder for yourself. The first 7-10 attacks you run on planets should have him present.

Rogue Squadron
Elite Fighter Squadron
Ship: X-Wing
Level: Max
Upgrade Planet: NONE
--Fleet Effects--
+25% Shield and Armor to Squadrons
Stacks with ALL Officer types

Recommendation: The Rebellion's counter to the Empire's 181st Squadron. Do to his isolated location at Hoth, he is crucial to its defense. While he doesn't equal the effectiveness of 181st, he is the only hero in this area so preserve him for as long as you can.

General Jan Dodonna
Victory
Ship: Quasar Fire Carrier
Level: Max
Upgrade Planet: NONE
--Fleet Effects--
+15% Shield Republic and A-Wing Squadrons
+10% Speed Republic and A-Wing Squadrons
Stacks with ALL Officer types

Recommendation: Gen. Dodonna is a unique hero as his bonuses are far more specific, only applying to A-Wings and Republic-aligned fighters (i.e. E-wing) as well as providing minor info on enemy fleets in GC for nearby systems. This makes him highly situational as most ship garrisons at most carry A-wings as their interceptors. In order to use him effectively you will need to tailor a fleet specifically for him.

Garm Bel Iblis
Peregrine
Ship: Dreadnaught Heavy Cruiser
Level: Max
Upgrade Planet: NONE
--Fleet Effects--
+20% Damage to Corvettes and Frigates
-35% Shield to Corvettes and Frigates
Stacks with ALL Officer types

Recommendation: Garm adopts a more aggressive role comparable to 'risk vs reward'. His affects on frigates and corvettes will prompt you to consider carefully what types of ships you'll field with him present; being defensive will not help you. Despite commanding one of the smaller attack vessels in the Rebel fleet, do not underestimate it's hardiness and increased damage potential, capable of squaring off with most enemy frigates and win.

General Madine
Independence
Ship: MC80 Home One
Level: Max
Upgrade Planet: NONE
--Fleet Effects--
+15% Damage to Capitals
-10% Shield to Capitals
Stacks with ALL Officer types

Recommendation: Madine is the fire to Akbar's water. The Independence is modified with enhanced weapons, making it distinctly different to the OG Home One. However, be aware that this is still a Home One and therefore meant to down shields in most situations. Pairing Madine and Akbar together is still a fantastic strategy as Akbar completely negates Madine's penalty whilst gaining damage increase.
Underworld Heroes


NOTE:
The Underworld heroes are the most divided of all heroes in the sense that their bonuses DO NOT stack with other factions; (i.e. Hutt Admiral bonuses only affect Hutt-aligned vessels, etc). Compared to the other factions, the Underworld faction isn't as comprehensive, not even able to access minor admirals. This makes sense as they are a conglomeration and not technically militarized.

As a result I've lifted the restriction regarding Heroes with no bonuses. I will include Heroes that I've found to be most useful based on their abilities and total impact. In addition the current upgrades available for Heroes are not bound to any planet; simply fulfill their requirements (tech, shipyard and command base).


Jabba the Hutt
Blood Diamond
Ship: Tarrada Frigate
Level: 1 and Max
Upgrade Planet: UNRESTRICTED
--Fleet Effects--
+15% Speed to All units (Cartel only)
+15% Damage to All units (Cartel only)
Stacks with ALL Commander types

Recommendation: First and foremost the majority of ships you'll have access to throughout your GC campaign will be Hutt Cartel. As a result he is key to every theater of war you open and should spearhead the initial conflicts whenever you seek to expand. At this level he is best used against fighters and small frigates.
Addendum: At Max level he commands a Darran-Tan cruiser as his role shifts to damage output and best used against small outposts.

Tyber Zann
Merciless
Ship: Aggressor SD
Level: 1 and Max
Upgrade Planet: UNRESTRICTED
--Fleet Effects--
NONE

Recommendation: The self-proclaimed 'King of the Underworld', Tyber Zann's fame is rivaled only by that of Jabba. Despite not having fleet bonuses, do not underestimate his ability to turn the tide of battle with his cloak and enhanced weapon systems. He also has a passive ability to pass through asteroids unaffected; use this to launch surprise attacks on ships and outposts.
Addendum: At level 1 he commands a Javelin Frigate. Seriously, upgrade him ASAP, no joke. He's useless at that level.

Cpt. Jarid Sykes
The Corrupted
Ship: Ventator SD
Level: 1 and Max
Upgrade Planet: Mandalore
--Fleet Effects--
+10% Shields to Capitals, Frigates, Corvettes and Fighters
Stacks with ALL Commander types

Recommendation: I advise waiting to upgrade Jarid till mid-game, even if you've captured Mandalore. Jarid Sykes is plenty powerful at level 1 with one of the most versatile capital ships in the game, and versatility is your greatest strength early on as the Underworld. Once you've established yourself however, don't hesitate to trade for indomitable strength. At max level he commands a Keldabe battleship, the End of Days, the perfect juggernaut for defending key systems and choke points. Because of this he is the 3rd most powerful hero you'll have.

Durga Besadii Tai
Darkcruiser
Ship: Chelandion
Level: Max
Upgrade Planet: UNRESTRICTED
--Fleet Effects--
+15% Speed to All units (Black Sun only)
+15% Damage to All units (Black Sun only)
Stacks with ALL Commander types

Recommendation: Your 2nd most powerful hero (sorry Tyber), Durga commands 1/3 of all the units you'll use, that being the Black Sun. He is therefore a priority to acquire asap to make your campaign easier. Commanding a Chelandion his ship is enhanced with stolen kyber-tech; 6 forward facing beam cannons sit on its bow, giving it a substantial edge against capitals and cruisers 1v1. Best use is to have him on the opposite sides of the galaxy to Jaba, this allows an even spread of power and bonuses you have access to since they don't mix anyhow. Use him as an anti-capital and field a support fleet around that.
Hero Pairing: Introduction
Hero Pairing is a strategic technique you've likely been doing unknowingly and haven't consciously put much thought into. Cpt. and Adm. heroes are an easy example of this. Don't worry, there's no shame it; in fact you've already got a head start on the foundation for other pairings.

In the next sections we will detail the best pairings for Heroes, both minor and major, that will optimize the best bonuses as uniformly as possible. Be aware that this will not be fleet specific (i.e. fighter fleet, capital ship fleet, etc). However, for organizational reasons they will be categorized by Damage, Defense and Speed. In addition, it will be assumed that the minor heroes Captains and Admirals are already a part of the pairing make-up.

Captain vs Admiral:
A critical understanding needs to be conveyed here: Cpt. and Adm. ranks are expressed literally in this mod and DO NOT occupy the same space (pun intended) when pairing exclusions are involved. For example: Grand Moff Tarkin stacks with ALL Captains, meaning in order for his bonuses to remain in full affect he must be the ONLY admiral-level Officer in that fleet; some heroes may exclude captains but stack with admirals. For Tarkin this means you can stack as many captain-level officers with him as you want. However, this also means if another admiral-level Officer occupies the same fleet and affects the same categories, the one with the highest percentage for each category will overrule the other. If they don't affect the same category, both admiral bonuses may apply but not stack.

But don't be deceived. Stacking, and by extension pairing, must occur by DIFFERENT units/heroes. With the above example, you can't spam Vindicator-class Captains; the bonuses from his unit type will apply once. However, should you find a different captain-level Officer, the bonuses will add from that unit type one time, etc. This creates balance from making the game too easy during the mid-late game. It also encourages you to think carefully where you'll place your most impactful officers while deepening the game's strategy requirements without feeling tedious.

Conclusion:
We wish to remind our aspiring readers that the bonus percentages are NOT added by themselves. Please review the 'Hero Introduction' tab for the formula of what this would look like as this list will not contain a break-down of the total bonuses, nor will Pairings be ranked by usefulness of best-to-worst. Hero Pairing is a matter of player preference, and as such this list will only contain recommended pairs to encourage your ability to freely chose how to incorporate them.

DISCLOSURE: Underworld Heroes will not be listed as their roster does not yet offer meaningful pairing opportunities. As soon as the developers expand on the Underworld more they will be promptly added, but until then....sorry. I've got to prioritize for now.
Imperial Pairings


NOTE: Please assume all heroes are at max level, not listed in any particular order and those that don't stack with same-rank heroes will be taken into consideration. Heroes may appear in multiple categories, others not at all due to them providing the same bonuses as another, in which case the hero with the highest tiered ship will make the list.


Attack Pairs
  • Darth Vader (+30% dmg, -30% shield, +33% speed, -50% range)
  • 181st Imp. Fighter Wing (+25% fighter hp, dmg, shield and range)
  • Admiral Piett (+15% dmg, -30% speed)
  • Admiral Daala (+25% dmg, -40% shield)

Defense Pairs
  • Grand Admiral Thrawn (+20% shield, +40% speed, +30% range for frigates&corvettes)
  • Admiral Screed (+10% shield, +20% speed)
  • 181st Imp. Fighter Wing (+25% fighter hp, dmg, shield and range)

Speed Pairs
  • Grand Admiral Thrawn (+20% shield, +40% speed, +30% range for frigates&corvettes)
  • Grand Admiral Zaarin (Do not purchase separate Captains; he brings his own automatically) (+10% shield, +20% speed and +10% shield, +20% speed (Captain))
  • 181st Imp. Fighter Wing (+25% fighter hp, dmg, shield and range)
  • Darth Vader (+30% dmg, -30% shield, +33% speed, -50% range)
Rebel Pairings


Attack Pairs
  • Garm Bel Iblis
  • General Madine

Defense Pairs
  • Admiral Akbar
  • Leia Organa
  • Luke Skywalker
  • Rogue Squadron

Speed Pairs
  • Admiral Akbar
  • General Jan Dodonna
  • Leia Organa
Super Star Destroyers: Introduction


Intro:
Let's not kid ourselves; SSD's, Star Dreadnoughts and specific Battlecruisers are fleet killers capable of wiping out nearly any opposition single-handed. You know it, I know it and we all play the Empire to prove it. However, it's important to manage the pros and cons of such massive warships as this mod amplifies their weaknesses in conjunction to their power.

In short, the bigger and more powerful it is the more vulnerable it is to its weaknesses. In addition, some of the largest have multiple phases of combat dependent on the amount of damage taken.

Some short hand is added within this section of the guide. Here is a brief overview of them:

BC: This stands for Battlecruiser. While there are a few BC's in prior categories, the ones mentioned below standout for their capability and build limits.

SSD: This stands for Super Star Destroyer. Enough said.

SDrN: This stands for Star Dreadnought. Had to get creative to make this one easy to read, make sense and not be an eyesore. Feedback encouraged.

SSD's, SDrN's and BC's require a slightly different ranking system; lifting the 'no abilities considered' restriction and increasing the minimum and maximum ranks within 10-20:

Support: This stat modifies the Defense classification to emphasize a vessels ability to defend itself when alone or with other ships. The lower this stat, the less likely a vessel can remain effective without support from other ships. NOTE: all other defensive factors are still accounted for.

Maneuverability: This stat replaces Versatility as it's far more important to properly position SSD's for them to remain effective. This includes speed and turn rate.

Range: The ability to target enemy positions relative to itself (aka shooting at multiple targets simultaneously) is added to the range stat, providing an important dynamic between target distance and maneuverability.

Credit to Contributor: Elimm for testing all the BC's and SSD's.

Battlecruisers


Titan-class Battlecruiser
AKA: The Phantom


-The Titan is a low-tier BC and doesn't do as high damage as you'd expect, but provides unique opportunities that shouldn't be underestimated. It's one of the fastest BC's on the market, and with the ability to cloak at will allows players to create their own advantages to turn the tide of battle.

-Recommendation: This ship is one of the few that can act with minimal support effectively. Ambush tactics that sacrifice lesser ships to distract enemy forces are encouraged. Cloak it out of sight, engage your other forces, then send the Titan to flank critical targets for great damage; rinse and repeat until victory, just watch for fighters/bombers.

Titan
Stats
Rank
Attack
12
Support
14 (17* with fleet)
Range
13
Maneuverability
18

Mandator II-class Battlecruiser
AKA: The Claymore


-Swift, well armed and economical, the Mandator II is like a downgraded Executor. Unlike any other sluggish SSD, this ship is fast enough to move alongside much smaller ships, allowing it to easily relocate to better positions with its escorts. In addition of standard weapons, the Mandator II also carries several missile launchers on its broadside, which are quite effective against any kind of targets.

-Recommendation: The main advantage of this ship is quick maneuver and low price, but they come with the cost of low durability. Instead of fighting another SSD, you may want it to lead the fleet and spearhead an assault against smaller targets. Its missiles are capable of cleaning swarms of fighters or hitting flanking enemies, but it is always a good thing to have support fleet at its side.

The Mandator II
Stats
Rank
Attack
14
Support
15
Range
14
Maneuverability
18

The Annihilator and Purifier Battlecruisers
AKA: The Basilisk (Purifier below)


-A near polar opposite to the Titan, the Annihilator and the Purifier are BC's designed entirely for combat. With sufficient support of other ships, post this vessel right in the middle of your assault or defense fleet to create a wall of firepower.

-Recommendation: This ship is surprisingly quick and decent at all ranges. Utilize this as much as you can to get the drop on overzealous attackers or a fast guerrilla run on a vulnerable outpost. Both ships require extremely close range combat in order to properly utilize its array of weapons however, the Purifier is slightly better when it comes to range with more turbo lasers, but sacrifices efficient damage output compared to the Annihilator.

The Annihilator
Stats
Rank
Attack
14 +1
Support
16
Range
13
Maneuverability
18

The Purifier
Stats
Rank
Attack
14
Support
15
Range
13+1
Maneuverability
18

Praetor-class Battlecruiser
AKA: The Bastion


-The Praetor-class BC made a sacrifice in terms of firepower in exchange for its exceedingly durable shield and armor. Being a defensive ship, it is more than capable of protecting itself from all kinds of enemy units with its wide variety of weapons. The Praetor's defenses make it a reliable shield to tank damage for its support fleet, as it can even outlast other BC's in similar situations.

-Recommendation: The toughness of this ship surely worth its price, and it will work like a fortress in the center of your fleet. It may be a good opportunity to hit the enemy with other ship with great firepower when your enemy is focusing on this battlecruiser. Send the Praetor into enemy fire if you want, they can't take it down easily.

The Praetor
Stats
Rank
Attack
13
Support
17
Range
14
Maneuverability
14

The Subjugator
Subjugator-class Battlecruiser
AKA: The Malevolence (literally)


-The Subjugator-class battlecruiser is the king of all one-on-one combat. Despite its relatively weak conventional firepower, the ion pulse cannon can render whoever it hit basically disabled and defenseless in the following battle. With little need of support fleet, this ship can handle almost every kind of enemy all on its own, if engaged head on.

-Recommendation: The Subjugator is highly versatile, and can easily gain an advantage in both battlecruiser duels or fleet combat with its ability. To use it well, read the tooltip carefully and make sure you have a good aim before the shot. Be aware not to be attacked from the rear and that this BC lacks normal ion weapons, making it weak against multiple heavily shielded ships. Moreover, in contrast to its appearance, the range of the ion cannon blast is only slightly longer than its conventional weaponry, so estimating the position of firing will be critical.

The Subjugator
Stats
Rank
Attack
14
Support
17
Range
13
Maneuverability
16

Zann's Subjugator-class Battlecruiser
AKA: The King Cobra


-Zann's Subjugator serve the role of faction-exclusive BC for the Underworld. It shares all secondary weapons with standard Subjugator, and adds several FLAK cannons, which only activate with its ability. The most prominent change on Zann's Subjugator is the replacement of Ion Pulse Cannons into two hilariously massive ion cannon turrets. These weapons can also deal massive amount of shield damage and inflict a stun effect even more effective than the original Subjugator's ability, although for a much shorter duration.

-This ship is applied with phase transit mechanism, having 4 phases in total. Its secondary weapons are not affected in transit, but the shield generators may be destroyed in Phase 2 and ion turrets are vulnerable in Phase 3. All four phases of Zann's Subjugator own the same two abilities, allowing it to activate FLAK cannons and interception system.

-Recommendation: With all the new weapons, Zann's Subjugator is even more versatile than the original one. The ion turrets allow it to quickly switch targets while keeping the direction of the ship; Its anti-fighter ability and massive fighter garrison (replenishes in every phase) can protect it from most fighter attacks. It doesn't really rely on escorts, so feel free to add whatever you think fit in the fleet. It doesn't suffer the same weakness against shield-focused fleet like the original Subjugator due to the decent firing rate of the ion turrets, but it is still vulnerable from flanking attacks.

Zann's Subjugator
Stats
Rank
Attack
16
Support
18
Range
15
Maneuverability
15
The Executor
Executor-class Star Dreadnought


Phase 1: Conqueror
-The Executor bear its full might at Phase 1: Dozens of heavy batteries, numerous missile launchers, this SSD is good against most kinds of vessels, excels at dealing with larger capital ships by concentrating all the heavy turbolasers at them.

-Recommendation: The firing range of the Executor stretches across the entire battlefield, so feel free to let it hit any targets at your will. However, due to the lack of anti-air firepower, the Executor will have a hard time engaging starfighters, so prepare a support fleet for such a scenario.

Phase 2: Striker
-The Executor's shield and main batteries are lost until next repair, it relies on missile launchers to deal damage in Phase 2. Missile launchers act identical as in Phase 1, which are sill deadly against any hardpoint that hide behind shield. The new magpulse missile ability can significantly reduce enemy firepower within a period of time.

-Recommendation: Utilize the missile launchers to hit critical targets. Be aware that missiles do not fire toward the ship's bow, maneuver is required to maximize output. Theoretically magpulse missiles will replace all weaponry during activated period, but it can be shut down manually.

Phase 3: Wrath
-Upon reaching Phase 3, the Executor begin to unleash its final fury. All secondary guns are now extremely inaccurate, while becoming horribly fast and provide AoE damage. It can easily wipe out any remaining fighters or corvettes alike in the field and cause significant damage to anything else, but at the price of durability.

-Recommendation: Blindly destroy everything in sight, starfighters are no longer a problem. Remaining TIE swarms can use this as an opportunity to hit the enemy, but this stage may not last long if enemy still have sufficient firepower due to the fragility of each turret.

Phase 4 & 5: Beacon
-Losing all its firepower, Executor is now nothing but a beacon for reinforcement fleet. Some Imperial vessel will appear to support, while the Executor take damage with its very vulnerable remaining hardpoints. The time for decision has come: retreat or call for emergency reinforcements.

-Recommendation: It is run, fight or die. With the Executor's reinforcements it is possible to win the fight, even against multiple capital ships. However, if anything went wrong you may permanently lose this Star Dreadnought.

The Executor
Stats
Rank
Attack
19
Support
14 (16* with fleet)
Range
20
Maneuverability
14
The Viscount
Viscount-class Star Defender


Phase 1: Star of Mon'Calamari
-The Viscount serves as the Shield of the New Republic. This ship is equipped with exceedingly durable defenses, as well as SDrN level weapons and massive fighter garrison. With the help of its speed boost ability, the Viscount has the fastest speed among all SDrN's.

-Recommendation: The Viscount is designed to counter enemy SSDs, and it is capable of deal with most enemy single-handedly. Even with all its characteristics, this ship's lower rear is extremely poor-protected due to its shape, so put it at a good position if you are preparing for a harsh fight.

Phase 2: Vengeance
-The Viscount sacrifices its defenses and mobility for devastating damage and fighter swarm in Phase 2. 12 torpedo launchers will be the nightmare of any large enemy unit at its side, and the countless many starfighters and support crafts are overwhelming for almost anyone.

-Recommendation: Similar to Executor's missiles, the torpedoes get their best firing arc at broadside, but they can also fire forward with less efficiency. The fighters do have a great total number, but they came out slower than in Phase 1, so wait for them to gather up for better results.

Phase 3: Last Breath
-The Viscount have its shield back in Phase 3, and becoming basically a downgraded Phase 1. While keeping all its guns, its shield is 50% weaker, having no more fighters, and the ship remains immobile. It also have a repair ability for friendlies, but don't rely on it too much due to its low efficiency.

-Recommendation: You may want to use it like Phase 1, but its anti-air capability will be lower if the fighters from Phase 2 are not available. Recommend support ships to cover the Viscount's rear and fend off enemy fighters.

Phase 4: Defender of the Republic
-The Viscount charges the shield up again in Phase 4, but this time it can be sacrificed for a massive AoE pulse. This new ability will drain all your shield and damage to all nearby enemy, giving Viscount a great advantage against enemy corvettes and fighters.

-Recommendation: Considering the AoE pulse's damage is not affected by remaining shield, you may want to activate the ability after the shield soak enough damage. The blast will not happen if the shield is down, so don't hold it until the literally last second.

-WARNING: The shield blast ability sometimes cause the game to shut down immediately. Recommend save before engage in battle.

Phase 5: Hope
-Even in its last phase, the Viscount can still fight back. Even with all the heavy turbolasers and ion cannons destroyed in Phase 3 and 4, Viscount's Phase 5 still keep all its standard lasers, keeping it quite a threat for enemy ships.

-Recommendation: The ship's population value has decreased to 70 since Phase 4, so you may want to deploy support fleet to keep the ship survive until repair. The escape ships do nothing but increase cinematic effects, so you can just ignore them.

The Viscount
Stats
Rank
Attack
17
Support
20
Range
16
Maneuverability
19 (3* after Phase 1)
The Eclipse
The Eclipse Star Dreadnought


Phase 1: The Emperor's Throne
-The completion of the Eclipse practically marks the end of the game. The fully armed and operational Eclipse can use its superlaser to wipe out almost any single target that it can fire upon, and its conventional weapons are also powerful enough to deal with anything else. The lack of anti-air weapon may be a weak point to exploit, but numerous cannons and TIE swarms can also do the trick.

-Recommendation: While removing enemy capital ships with the axial superlaser, the Eclipse should also focus on enemy fighters. The Eclipse's guns are good enough to hit anything larger than bombers, so agile "fighter-bombers" will be more annoying. TIE swarms can easily get rid of standard fighters, but they are extremely weak against AoEs, so destroy every AoE units before putting swarms in combat.

Phase 2: Rainstorm
-Even the axial weapon and Octuple batteries are lost, the Eclipse is by no mean weak against capital ships. The Eclipse make up for the firepower it lack with two aggressive abilities, and are able to melt through any remaining enemy ship with rain of heavy turbolasers. However, the disadvantage against fighters is still presence, as there's only one new fighter swarm each phase after Phase 1.

-Recommendation: Eclipse Phase 2 act like your normal battlecruiser. The first ability temporarily replace all weapons with heavy turbolasers and the second increases firing rate. Use both ability simultaneously to achieve max output, but watch out for overkill.

Phase 3: Final Order
-At the cost of numerous weapons, Phase 3 is the final phase Eclipse which can order the axial superlaser to fire. Comparing with previous phases, its firepower is weaker than ever, the superlaser charges much slower and may be inoperable at random moment, and it is now even weaker against starfighters due to the loss of cannons.

-Recommendation: The remaining weapons on the Eclipse, along with repaired superlaser, is still enough to deal with a number of capital ships. Though even a handful of fighter may now cause large trouble, the Eclipse's population value decrease to 75 in Phase 3, allowing you to deploy more support unit.

Phase 4: Reborn
-With shields and about half of the weapons magically back online, a very furious Sith Lord unleash his power on enemy vessels. "Lightning Strike" act like Admiral Piett's proton beam but deal superlaser-class damage, and "Lightning Storm" create a massive storm that continuously deal damage to enemy frigates and below. Imperial ships also appear like in the final stages of the Executor, but they can benefit from the Eclipse's powerful abilities and fire support.

-Recommendation: Use the abilities wisely, which seems quite obvious: remove critical hardpoints and shield with Lightning Strike and clean up smaller units with Storm. All allied units can fight majestically due to a 25% buff on everything provided by the Eclipse. You may want an anti-capital support fleet in this phase to destroy enemy capital ships that can't be affected by the storm.

Phase 5: Decree
-The Eclipse has lost all its weapons, but another wave of reinforcement is on the way. The good news is the abilities and buffs from Phase 4 are still there, and the ship itself is still almost as durable as a battlecruiser, so the Eclipse can still put up a fight.

-Recommendation: Evaluate your enemy carefully. The Eclipse's further decreased population value is beneficial for reinforcement fleet, you can still form a formidable force along with summoned escorts. But the Empire died in arrogance, none will want the same mistake.

The Eclipse
Stats
Rank
Attack
20
Support
14 (18* with fleet)
Range
19
Maneuverability
12
Single-Planet Start Strategy
To make progress on 1-planet with the Empire, follow these starting steps (based on my 'Hard-mode' experience and 90 planets):

1.- Turn Coruscant into a temp. Credit world for the bonus credits and a single trooper/vehicle factory.

1.5- Build as big a fleet as fast as you can and swarm Byss, then Bilgringi.

2.- Devote Byss to full credit production. It is permanently safe from being targeted. Upgrade Bilgingi to lvl 2. DO NOT LEAVE SHIPS THERE. Treat it as an alarm to warn of approaching fleets.

3.- It's tempting to head for Brental due to proximity but DON'T. Head to Rendili and convert to credit world, then Corellia for production speed bonus.

3.2- The following steps require good timing and patience (3.2 - 3.7); Your goal is to capture the remainder of the core worlds, starting with Brental. Resources will be stretched and it might take 1-3 attempts as the AI knows Brental is a gateway to the Core.

3.4- The AI usually forgets about Alderaan for some reason so it should be an easy target, however prepare for a hard fight at Kuat.

3.5 Turn Kuat into full military production; seems obvious but there's another obscure reason for this later.

3.7- Finally, conquer Neimoidia and hold position. All gateways to the core should be covered, if Bilgringi hasn't fallen yet, and you should be strapped for credits and ships. This is the patience part. Make sure to Fully upgrade Corellia to a bastion world or your production will be cut by around 30%.

3.8- You'll be playing tug-of-war with the AI for the Northern-most planets you've captured, but your goal is to increase your tech-lvl to 2. It is global, meaning the AI will upgrade as well, but defense with be much easier once complete.

4.- You now have a critical choice; Zeltros or Loronar, (Manaan is a deathtrap; AVOID IT for now).

4.1- (Loronar Route)- This is the hard route but could net you a lot of gross income in the long run, however taking it reopens the gateway to the core and can be attacked from 3 locations. Fortify to lvl 2 then regroup.

4.3- Conquer Bespin and convert to credit world at lvl 2 and regroup for a hard push on Fondor and turn it into a fortress.

4.5- By now, Lorona is probably getting hammered (not the fun kind, actually it might be depending on your perspective), anyway, reallocate resources to field a temp. defense fleet there, then attack Mimban to relieve the pressure. Time this right and you've now re-secured the East-most core. Manaan never attacks in my experience and only acts as the AI's rally point to transfer ships from the far East to the core, and now you've cut one of those paths.

4.6- TAKE A BREAK! YOU'VE BEEN PLAYING FOR 3 HOURS STRAIGHT BY THIS POINT! But I digress.

4.7- Conquer Thyferra and Yag'Dhul and convert to worlds based on faction needs. This secures the South-most core.

5.- It is optional to take Atzerri due to the risk of a small bottleneck but might serve you as another alarm for attacking fleets. Also, lvl up tech to 3 if you haven't already. (End of Loronar Route).

5.1- (Zeltros Route)- Here is the reason you captured Kuat and militarized it. From there you can launch consecutive attacks extremely quickly from perfect safety. While doing so, lvl up tech to 3.

5.3- Devote 2/3rds of your forces to Zeltros and fortify to lvl 3, then split 2/3rds again to attack Loronar. If strong enough immediately take Mimban, then return to fortify Loronar. And at this point you should see why you should avoid Manaan early in the game; you've now boxed it in.

5.4- Feel free to release your frustrations on Manaan for an easy win. No one likes a trojan horse.

5.5- With the South and Southeast now secure, devote ships not playing tug-of-war or build a new fleet, if you have the cap for it, to assault the Hapes Cluster and convert to credit/military hybrid.

5.7- You have the option to hold position, as the East is now secure, or expand to Onderon/Dxun but you'll need to play tug-of-war for it from then on. DO NOT ATTACK Kashyyk unless your ready for a campaign Eastward.

5.9- Attacks on Bilgringi should have pretty much stopped or become rare for inexplicable reasons as the AI ignores it Mid-game and beyond, hence the benefit of taking it early after surviving initial retaliations. If you wish to open a new theater of war you have a clear gateway, but be careful not to overextend your fleets to quickly this direction; if you lose Bilgringi you'll be trapped and surrounded.

6.0 Congrats! You've made progress from 1 planet to many. From here, plan your campaign as you normally would. Each play-through is different so be prepared to repeat steps as you learn timing, fleet make-up/recovery etc.

I hope this helps, and May the Force ever serve you!
Honorable Mentions


This section is reserved for:
-Vessel's that have the capacity to make significant enough impacts on battles but not enough to warrant a spot in the main guide.
-Functions or classified in a manner initially excluded within the guides' parameters (i.e. a Corvette with high Versatility potential).
-Ships who's fleet functionality, when used by clever commanders, is expanded beyond its normal capabilities.
-Vessels that ALL factions have access to after acquiring the correct tech level and/or planet.
-Any other vessel type, function, role or usage deemed worthy of noting.

NOTE: SSD's and Heroes are excluded from this section.


Lancer Corvette:
The Lancer-class frigate serves as a highly capable tech 3 anti-air corvette for Empire. Holding more than 10 point defense lasers on its small hull, this ship can effectively wipe most incoming starfighters and clean out incoming ordinances when operating in groups. While covering friendly capital ships being their advantage, they may not be able to follow their allies due to their slow speed.

DP-20 Corvette:
The DP-20 is the most critical piece in the ocean of light vessels under a Rebel commander's command. Their properties of fast-moving, small size and two concussion missile launchers make them a nightmare for almost every ship that rely on several critical hardpoint and lack good point defense ability. They may die quickly in a massive battle, but not before giving a hard punch under precise command.

Interceptor IV and Interceptor V:
Although they are easily overlooked corvettes, Interceptor-class can still be a powerful component in your fleet. They are cheap, fast and fragile as all corvettes do, but their missiles/torpedoes make them quite a threat for even larger targets when come in large numbers. They also hold turbolaser weaponry, which is better in combating corvettes (and above) than anti-fighters.

Nebulon Hammerhead:
They are just the Zann version of Nebulon-B, having identical defense stats, one more turbolaser hardpoint and a Z-95 garrison, at the cost of 500 more build cost and 1 more pop value. These changes does not influence its overall role of a small supportive unit, but its new buzz droid ability may help more in anti-air combat.

Zann Hammerhead:
The Zann Hammerhead is equipped with powerful mass drivers, which is basically turbo-lasers, as its description said. These mass drivers are similar to ISD's main guns, while the ship it self was poorly protected and can easily be destroyed when exposed to enemy fire. These Hammerheads should act in groups and keep away from front line to maximize their role of fire support.

Marauder-class:
If an Underworld or Rebellion commander want an early artillery ship, I would say this is it. The turbolasers onboard the Marauder are able to fire rapidly and have a range even longer than ISD's heavy turbolaser, but their close defenses are rather weak. As a frigate their firepower is insignificant alone, but when multiple of them concentrate fire they can easily snipe enemy from afar.

Munificent Frigate:
This frigate is an expression in polarity. Alone it is completely useless and you shouldn't blame yourself for going with a better option; however, a group of 5 or more can decimate even the most hardiest of capital ships. With hard-hitting, fast-firing cannons, the Munificent is an expendable glass-cannon swarm unit meant to vanguard any fleet. Be prepared to replace them often.

Recusant-class Destroyer:
This vessel is a great well rounder compared to other options within the CIS ships. Excellent attack via medium/heavy turbo-lasers and missiles, good defense with the inclusion of anti-missile counters and its thin construction forces attackers to expose themselves to get good hits in. As a med-to-long-range attack-support vessel, the Recusant excels at base defense first, then acting as an anti-capital and anti-frigate and pestering enemy outposts at a distance and firing at 320* angles. As a side note, there are two versions: one light and one heavy. Take your pick, each accomplishes the same task with effectiveness comparable to their tech level. Level 1 can take out most ships Frigate and below with light lasers and FLAK cannons for fighters, while level 2 is the inverse of that, Frigate and above with heavy turbo lasers and missiles bays replacing the FLAK cannons.

Lucrehulk-class Capital ship:
There are two versions of this ship; carrier and battleship. Honestly though, in a full scale battle both are equally effective in all the areas that you'd care about. The only one that would care which you pick is your wallet. Anyway, despite my previous statements I rarely employ these in GC. Slow, abhorrent maneuverability, and if the crescent connected completely it would literally look like a moving target. All that said makes this ship a great tank/aggro vessel capable of absorbing intense, sustained damage and allows your faster and more effective attack ships work safely.

Providence Capital Ship:
As a combined carrier/destroyer, positioning this vessel can become a conundrum or a nightmare. I (SoLock) play on hard mode so the latter is my life, but for you others out there here's best practices: Scan the battlefield for a good opportunity to spawn them, it will immediately launch fighters and default to carrier mode if not in range to an enemy. However, not too close that your fighters and bombers get wiped out before helping. They have a slow fire rate, just higher than Imperial ships but still less than rebels, as well as a short range, making them effective 1-v-1'ers at broadside. Isolate your target and sick this bulldog on 'em. Ambush is a great strategy to start getting the hang of them.

Venator-class SD:
Despite it's size, lower hard-point count and slightly weaker armor than the imperial SD, the Venator SD can surprise you with its capabilities. Torpedoes that bypass shields, light and heavy turbolasers, and a sizable hanger boasting mid-tier squadrons, this vessel is more than capable of defeating capital ships larger than itself in a fair fight. While it has its weaknesses, as previously mentioned, I would go as far as to say the Venator has the highest potential versatility for its class in the game. Manage its weakness to bombers and low armor effectively and you've got a capital ship designed for any and every scenario.

Sith Dreadnought:
Despite it's massive size the Sith Dreadnought has high versatility and plays extremely well with other ships. Unlike other warships of it's class, it acts like a carrier > tank > damage-dealer all in one. If deploying this vessel, change your battle tactics to a phase-like structure. Carrier: Deploy its massive fighter bays to quickly counter enemy fighters; they are weak but numerous. Tank: let it lead the first strike in phase 2 to aggro attention and use remaining fighters to weaken enemy ships. Damage: as the final phase when all your ships are engaged, have this vessel target the weakest ship/structure for quick finishes.

Secutor-class SD:
There are two variants to this vessel: Republic and Imperial. The Republic version is comparatively better at the time of writing with superior accuracy, fast fire-rate and a torpedo launcher at the bow. As a heavy SD it is equip with powerful turbolasers and, despite its arrowhead shape and weapon emplacements, can fire at 360* angles. Both variants function differently then other SD's this size as its main cannons will only fire at ONE target at a time, making it an excellent anti-capital/anti-frigate option. It's also a perfect tank with a preference toward enemy space stations like the Golan platforms, allowing you to take the heat off more versatile ships.
References and Acknowledgements
DISCLAIMER: Please keep in mind that we are not Developers; simply avid players who have spent a worryingly amount of time playing this game.

We do not know coding or technical bugs, nor do we promote one faction against another or prefer one. Should you have errors, bugs, glitches or other issues, please refer to the appropriate support resources provided by the Devs. In addition, the mod for the game is in on-going development and as such the information can and will become outdated at some point. We will strive to keep the information relevant as long as possible.

As a final note, the observations made for these classes are subjective to our individual play testing and we are more than happy to be corrected. Adjustments will be made according to the most updated version of the game and therefore subject to change.

*NOTICE*: This mod has been updated to 5.0. The new update is standalone; link below.

Remake 4.0 mod Link:
https://gtm.steamproxy.vip/sharedfiles/filedetails/?id=1770851727

Remake 5.0 mod Link:
https://gtm.steamproxy.vip/sharedfiles/filedetails/?id=3372762649

Discussion Forum:
https://gtm.steamproxy.vip/workshop/filedetails/discussion/1770851727/5561388294347460121/
82 Comments
SoLock  [author] 25 Oct @ 9:17pm 
@Eternal Shade: Yeah I found that out pretty quick after including it here. I'm just leaving it in the hopes one day it'll become official. Fingers crossed....
Eternal Shade 24 Oct @ 3:50pm 
The mod has not been officaly updated. That version is a leak(and a bit broken)
Elimm  [author] 28 Dec, 2024 @ 12:57am 
@Doktor ᵺ Kranium Doomstacks are things that need... specific solutions, which as you said should not be manually dealt, and therefore is not quite included in this guide. However I personally recommend baiting and preventing such stacks, by placing relatively small defense forced at the boarder to make ai come in smaller fleets, or stop the fleets form building by stopping your capital fleet above enemy planets, draining their economy.
Sele-ioz 24 Aug, 2024 @ 2:16am 
I think we're playing a different game here :)))
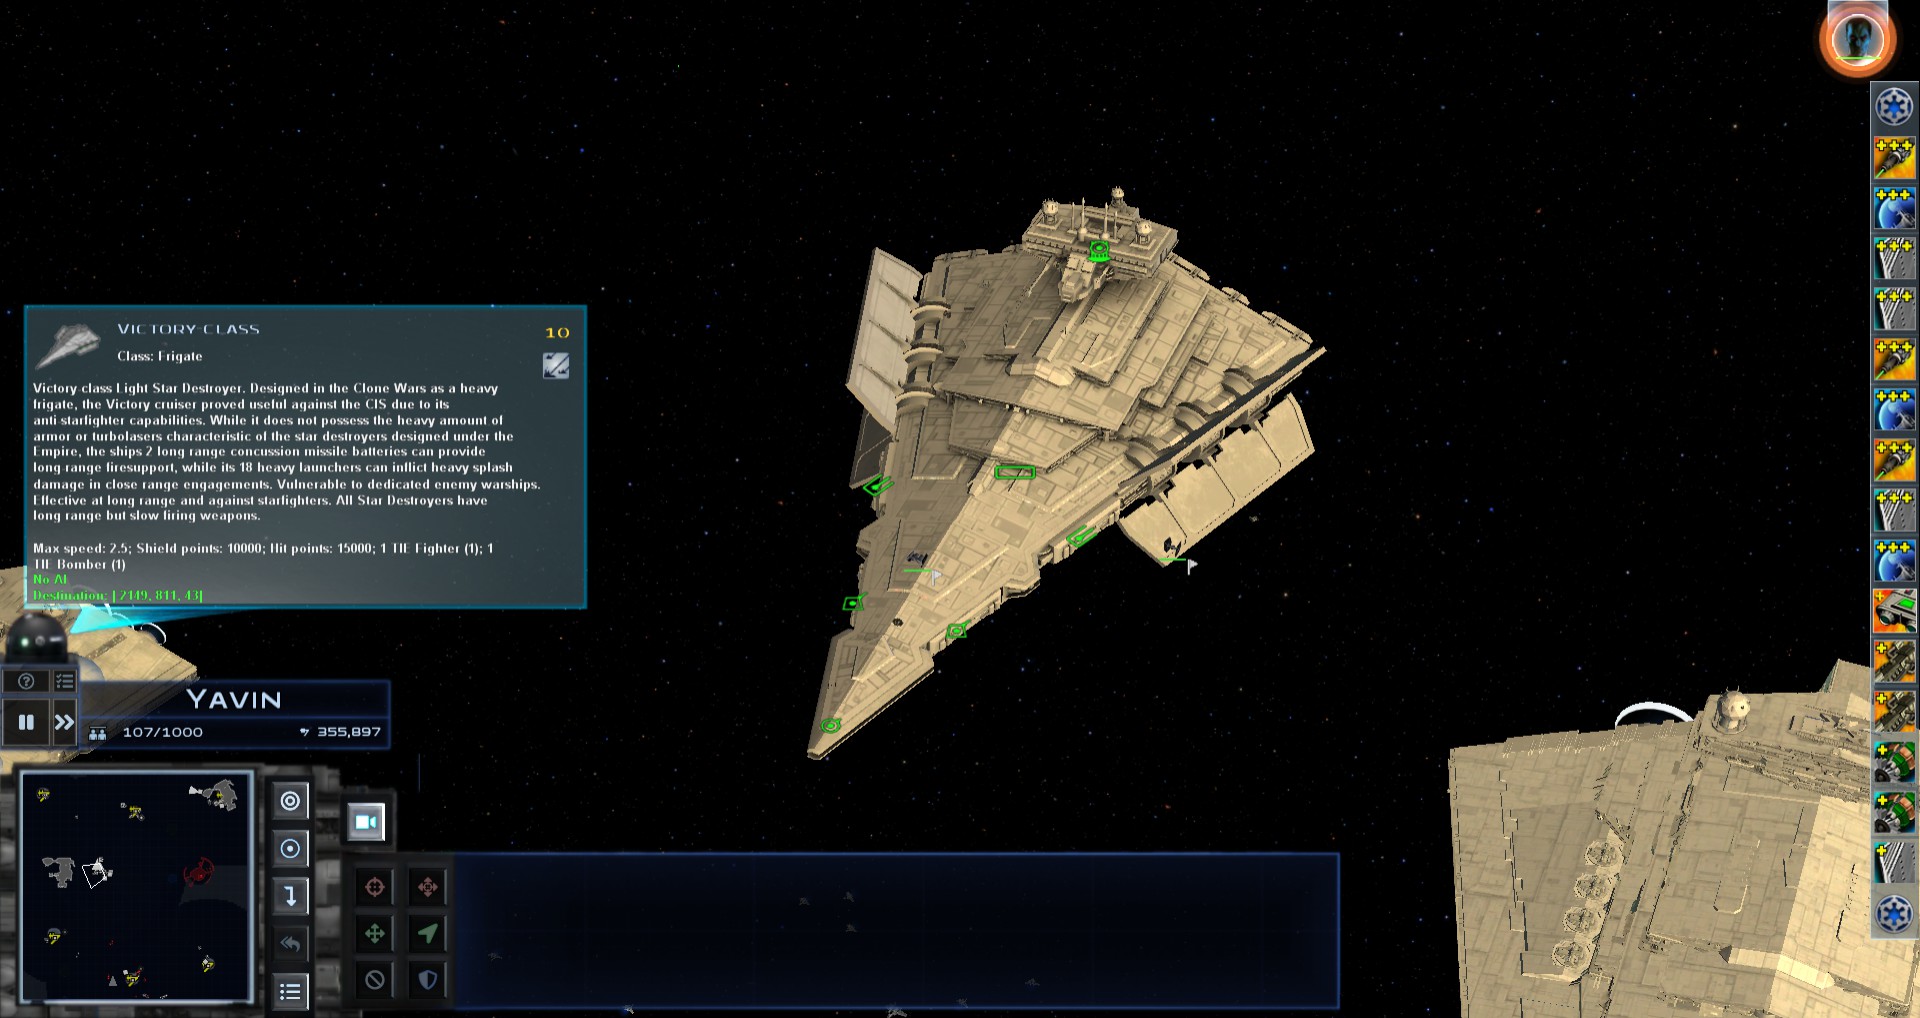
I keep seeing "You need one or two of these in your fleet" but that just doesn't work for me. Emipre is throwing 1000 popcap doomstack with like 30 star destroyers and 40 tie defenders endlessly. Aything short of a pure capital ship + extreme anti starfighter build falls flat on it's face as anything less than a capital ship is instantly vaporised.

You can't use these beautiful, mixed fleets with interesting combinations, varied stuff like a nice roleplay... i think it's the mod's fault for this. Being on a defense is a looot worse... you don't get to choose the ships you defend with, the AI chooses for you, and you either have a fixed tactical cap fleet to get your combo, or you exceed it and the AI leaves you vulnerable via ship selection.

The best bet is having your 1500+ popcap pure keldabe fleet and just autoresolving, it's just not worth your real life time to fight a 1000 popcap star destroyer armada for a whole ass hour
SoLock  [author] 23 May, 2024 @ 6:31pm 
@Mister Lobos: So, tested the Rebel's DP 20 Gunboat. One of the most annoying ships I've dealt with. Had 4 of them surrounded by frigates and capitals and it took me 20 minutes! Was on the hardest AI, but still.

As the Empire: The most you can do against them is tracker beam them to slow them down, if you can get close enough. Then use hybrid fighters (bombers are too slow and the gunship will destroy them first) to take them down and Tartan gunship to provide missile defense.

As Underworld: Actually really simple. Use the Turbo-Sailer gunship; their ability to strafe while firing makes it difficult for the DP 20's guns and missiles to lock on. Supplement the attack with a few ugly squadrons and your set.
SoLock  [author] 23 May, 2024 @ 10:18am 
@Mister Lobos: I haven't encountered that before. I'll run some tests later today and get back to you.
Mister Lobos 16 May, 2024 @ 6:01pm 
any tips for how to deal gunboats spam?(the dp 20)
SoLock  [author] 14 Mar, 2024 @ 7:20pm 
@Jacobtovar2842: Big guns. A LOT of big guns. Playing on hard mode I've resorted to bait tactics: Getting the enemy fighters away is key so your bombers can get in there and destroy the torpedo bays. Bait the enemy with your tankiest and fastest frigates and spam them while your fighter/bombers (Defender squadrons recommended) go to town. Once the torpedos are destroyed bring in your ion-focused ships and capitals to down the shields and do hull damage.

If you don't have the cap space for all that, spam your fighters instead as bait and use artillery marauders (x10 if you can) and hit the G3's from range starting with the torpedos, (by the grace of God, always take out the torpedos first).
jacobtovar2842 14 Mar, 2024 @ 5:01pm 
Any tips to take on a Golan 3 as Empire (Tech 3)? Keep getting overwhelmed by fighters and that stupid planetary gun thing
SoLock  [author] 19 Jan, 2024 @ 5:01pm 
@ Rick Grimes: They are. As artillery cruisers, their uses are situational and they have a slow reload.

The normal variant is good at taking down capital ships and bases; Average speed missiles with good accuracy and notable damage, but weak against anything smaller than a frigate

The advanced variant is best used against bases and large structures; Very slow, very inaccurate high damaging missiles with an AoE as big as a corvette. The AoE makes it an option to take out fighters (only if they are already engaged); the slow reload renders 2nd and 3rd attack rounds nearly pointless if directly attacked.