Jupiter Hell

Jupiter Hell

120 ratings
Jupiter Hell guide - (updated: September 2022 - Sylph)
By sylph
September 2022 update - added a 'quick guide' at the start, to quickly get players winning games. Feedback appreciated; I wrote it after noticing plenty of new players coming here, but hope it doesn't feel like it's 'getting in the way'.

August 2022 update - added info re: area-specific 'manufacturer' perks, branch missions/rewards, and the end-of-moon bosses.
Further edits to come, but I've at least began to include the 2022 content.

23 jan update - added more to the advanced tactics section, including an exploration of aim and dodge, and how they interact.
- trimmed down some wordy sections
- added info on exalted enemies

Coming soon -
- trimming down more guide sections,
- Regrouping all whizkid advice into a single section.
- exotic weapon info
- unique weapon info
- more 'advanced tactics'
8
6
3
5
2
2
   
Award
Favorite
Favorited
Unfavorite
Introduction
Important note - this guide is, like, a year old at least!
While a ton of the stuff here will still be relevant, particularly tactics, lots of balancing has been done since the bulk of this was written, so expect major discrepancies when specific skills and weapons are discussed. Particular areas that 'age' this guide are mods from advanced stations (vampiric etc?), and certain master skills (headshot is great, survivor isn't the OP skill it was when this was written, etc)

BTW, If anyone wants to update this, I should clarify that anything I write about this game (and chaosforge roguelikes in general) is totally public domain - FOR the community. So go nuts copy/pasting as much of this content as you possibly want, I wouldn't possibly mind!

Hi there!

This is a basic first attempt at a Jupiter hell guide. My intent here is to cover a lot more depth and detail than I managed in my basic tips video (which is linked in this section, and I'd recommend watching it before reading too much further.) I hope it's somewhat helpful...
I wrote a guide years ago for Doomrl, and I'm hoping this guide can be as useful for JH players!
First of all, I have a video featuring a bunch of Jupiter Hell tips that you might want to check out here:
https://youtu.be/qzTWe5k-uTg
I also just recorded a more advanced video with commentary, that explains tactics and game mechanics you might have missed: https://youtu.be/SFI9SFXgufE


I'm Sylph, a big Jupiter Hell fan, always trying to push myself to play at the most competitive levels I'm able. I've been playing JH since release. In fact, I was a *huge* fan of the game's spiritual predecessor, Doomrl. I played Doomrl with a similar competitive drive, along with a handful of other players that pushed the limits of the achievements in that game. I've been working on this for a good while, in the hopes of creating a decent resource that covers enough areas of top-level play. While I was by no means anything like 'the best', at Doomrl (that's Tormuse!), and likewise there are plenty of JH players way better than me (Deemzul especially, but tons of others), I at least try to keep my finger on the pulse when it comes to tactics and strategies, and hope I can do a good job of sharing them so that we can all be awesome at this fantastic game!
(There's also an old, rather outdated tips and tricks video I made almost 2 years back, but maybe you'll get something from it? here: https://youtu.be/7eMT5nfIa-I )

Before more detail, I'm going to post a 'short' guide, to get new players winning. Be very ready to skip the next chapter if you're getting wins and want a proper, detailed guide.
A very short Jupiter Hell guide:
First, here's a VERY short (1 chapter) guide for new players that want to start winning most of their games on normal and hard. Skip this section if you're here for more detailed guidance.

Character objectives:
1) A character needs enough damage and durability to deal with 1v1 fights, without losing medkits. Early on, a hunting rifle + SMG strategy can be enough, but as time goes on you need traits. It's possible to over-invest, so a sort of 'ideal' needs to be reached, where *most* easy encounters can be beaten without bleeding medpacks, but you don't have to waste traits trying to 1-shot everything - all levels restore some HP, so it's OK to get a bit hurt! If you usually run out of medkits, you're probably skimping on (1) and will 'bleed' health until medkits run out, and you lose.
2) A character needs enough durability or 'emergency' options to survive the 'oh no' moments. These moments come maybe once every floor or 2... Unlike 1v1 situations, a player unlucky enough to run into a huge enemy ambush, reaver patrol, nasty exalted pack, or warlock/medusa nemesis can find survivability and emergency options most important. High defense, escape (stealth/smoke) and AOE (grenade) options can be skills or items. If a single 'unfair' encounter ends your runs, you're probably not getting enough (2).
3) Extra skills should be invested to power the character up for the late-game. Often through intelligence (tracking enemies, exploiting route choices, using modpacks, or on Nightmare+ difficulty just knowing the map!) or resouce-gathering (ammo etc). This area covers 'pay now, benefit later' skills like whizkid, scavenger, and army surplus. In short, when you are able to not bleed health from the little fights (1), and able to survive the big fights (2), 'spare' points should be invested for the future.

I find that achieving 1), then 2), and then finally 3), tends to guarantee victory.

Classes:
It's also important to know that not all classes were created equal... Soldiers are better than surveyors and mechanics when it comes to fighting wars with demons!
- The marine can remove pain (helping with (2)), but his 'angry mofo' skill and inbuilt healing is pretty much a direct solution to (1) (particularly on top difficulties). I find the marine strongest for beginners and experts alike. He also gets access to both of the 'core' defensive skills - hellrunner, and cover master. (These 2 skills are almost non-negotiable for survival, but they don't play well together! One only works while moving, the other only works when staying still, so pick only 1.)
- The scout can be a great class - Stealth is crucial- invisibility can help with (2) by escaping danger, and the criticals help with (1). Scout stealth is weird in that it's more forgiving for new players when it comes to (2) (surviving tough encounters), but requires experienced knowledge to know when the 'sneak attack' crit is needed for (1).
- Technician, OTOH, has limited mobility... Their defensive skill (smoke) takes a turn to kick in, and doesn't help much if enemies are close/surrounding, so it has to be used WAY before it's needed. His defensive trait (cover master) also requires that the player be in the right position to work BEFORE combat, since moving without hellrunner is dangerous. This makes the tech a poor choice for players that aren't yet familiar with many tactical intricacies. They *can* be effective (and TONS of fun), but even at a top-level of play they're certainly not the best class. For a beginner, the tech is a class that has an unforgiving class skill, a tricky defensiv strat, trouble escaping, and no great damage boost!
(This is outdated - buffs to headshot made techs much better (OP!))

Skills:
Similar to classes, not all skills are equal! There are some that are very strong. The scout's 'ghost' (or just scout stealth in general) is great for (1) because of the way that it gives a reload and critical hit, and offers escape options for (2). Wizard+toxicologist for the technician has a similar advantage since infinite poison clouds help (1), and the fact that the gas blocks line of sight also helps (2). Survivor, for the marine, gives an incredible boost to attrition with HP regen, and 'warns' (saves) a new player with an on-screen warning where other characters would die!

Weapons:
In Callisto, hunter rifle and grenade launcher are great. Later on, auto-calibrated 762 assault rifle/plasma rifle are good. Combining long (rifles) and short range (SMG / shotgun) weapons works well. Seek fast swap times (grenade launcher/pistol/SMG/ knife/ bulkMod) for your 'emergency' weapon when enemies are too close for your long-range rifle to hit accurately.

Tips:
Advice for a player that hasn't yet got their first win:
- Don't play hard! Not only is it not really designed for non-victorious players, you'll find that you improve your skills most quickly when success chance is closer to 50%.
- Don't firefight with enemies that have cover. Retreating and setting up an ambush is miles more effective, so:
- Learn to set up shotgun ambushes on alerted/wounded opponents:
- The top-right health bar (flashing section) tells you whether your shotgun will kill the target. If it won't kill, 1 step closer into melee is wiser to stop the enemy shooting you. (Former humans have a weak slap in melee)
- Don't waste your time waiting ages (pressing w) to get enemies into your line of fire. The enemies aren't stupid in this game, and won't wander far into your kill zones without good reason.
- Use multitools wisely. These are the game's 'currency'. Using them from inventory to repair is often only good when you MUST save that armour. Repairing at an orange station is much better value. Spending 2 multitools on a medkit is a bargain. Spending 1 tool for a full heal is an *absolute* bargain (and can often be optimal 2-3 times on one floor!). Spending 3 tools on a stimpack can be crucial for fire/bleed/acid immunity and class resources (scouts etc). Spending 2 tools on a mod pack can be bad, or game-changingly good, depending on which modpack. Best mods are often (a)Aim assist(-ed scopes), (b)Durable, (p)meshed, (b)fire-resist, (b)guard (for melee); and for whizkids (b)barbed, (b)autoloader, (p)acid shield, (b)efficient, or (a)+criticals). Buying ammo with multitools can sometimes be useful (shotgun shells lategame etc). Spending multitools on (gas)grenades can be amazing, if inventory allows. Compared to the above, wasting 3 multitools on +max hitpoints is a tragic waste of an incredibly valuable resource, and a reason for SO many failed runs!
- Inventory management is extremely important. More than 2 stacks of an ammo type is usually too much. Grenades are great, but since they clog up inventory, you have to USE them, not hoard them. It's much better to hoard medkits. Different moons have different 'common' ammo types, and learning these helps. (Callisto: shells, 40mm grenades, .44, and 9mm. Europa: 7.62 and rockets. Io: 7.62, cells, and rockets)
- Gas grenades are *amazing*. Hell, smoke grenades, despite feeling like they do nothing, will actually turn a 'maybe game over' fight into a trivial task if used well (fire a shotgun into the smoke to use them offensively). Gas grenades block LOS, also do damage, and due to the fact that damaging enemies enrages them and makes them seek you out, a gas thrown in front of an enemy will usually result in a gruelling march through poison that spells death for even the strongest enemies. This is perhaps the easiest answer to a medusa. Gas grenades=incredible!
- Familiarising yourself with enemy senses takes practice, but to start you off, be aware that enemies have certain senses that they favour, and become aware of you when you create stimulus for their senses. Planning, positioning, hunkering, and knowing that visual senses have slow reaction times (aim!) can be crucial here.
Tactics - clearing a room
To begin a comprehensive guide, I'll walk through fundamentals. More advanced tactics will come later. My intention here is to help show readers how many tactical options they have available to them, by diving right in with a tactical walkthrough:

-= Tackling a room of hostiles. =-
----------------------------
When a player first starts out, it isn't always clear how to approach even the somewhat simple situations that the game presents (particularly if the tutorial was skipped.)
One of the reasons for this is actually how finely the gameplay has been 'balanced' to encourage adaptive tactics. While this is great from a gameplay angle, since it allows a lot of variation and strategic decision making during play, it can actually be quite confusing for a newcomer!
As such, this section will try to describe roughly how a player should be approaching the game. Let's start out with one of the most basic and common situations imaginable - dealing with a room in early Callisto...

Opening the door:
When approaching a closed door, the first thing we want to do is ensure that the door has a good cover position to one side of it (imagine leaning around the corner of the wall to fire through the door, safe from return fire). Specifically, the cover position we want to use will be the tile diagonally adjacent to the closed door, or to put it another way, the cover tile shares 1 corner vertex with the door tile. If the door has such a space next to it to fire from, ensure that space isn't blocked by a barrel or a box (safely destroy said object if it is). If, on the other hand, the door has no appropriate space to fire from (perhaps the door is at the end of a corridor?) then it's usually best to find another route. Always remember that you can also shoot doors, which is often useful if the door is at the end of a corridor.
So with that in mind, we should be able to find a way of tackling this room using cover from the doorframe. Suitably prepared, take a guess at the best weapon for the room (if you think it's a small room, might shotgun be a good choice? If you think it's a long corridor, maybe a rifle? If you've seen an enemy flashlight quite close or the door is being attacked, perhaps a SMG would be best?) Another consideration is whether we want to:
- Destroy the door or open the door: Destroying it can have the advantage of keeping the player in cover from the start of the ensuing fight, but it has a number of disadvantages to balance that. Less important (*see note later) are the facts that the door can no longer be closed if destroyed, and that destroying the door depletes some of our ammo supply. More important disadvantages are our weapon's current magazine not being full when the firefight begins (particularly important for shotguns), and that the 'side' of cover that we are using was chosen blind - we couldn't see the position of the enemies in the room before we chose our cover position (more details on how that's important coming up!) More often than not, this means *not* destroying the door is a good decision, but there are occasions where you'll want to, the most obvious being a near-dead character not wanting to risk even a single turn of dodge+cover enemy return fire.
So, with a decent weapon ready, we can now open the door and take a look inside...

- Examining the room:
At this stage, I've watched many players immediately start to tackle the room. That's usually a bad idea - the game is turn based! Make a note to slow down and assess the room before acting.
The most common first action to take against a populated room is to step aside into the cover we talked about previously, but it's certainly not always the best action, so a little examination can pay off.
- Shotgun surprise, for example! If the enemies in the room can be killed with a single shotgun blast, then you'll actually take *more* damage in this encounter by seeking cover! If you *do* think a shotgun start seems like a good idea, take the time to check the enemy health bars in the top-right of the HUD. You can press 'tab' to cycle between enemies, and it doesn't take long to ensure that all of them will be killed by your shotgun. Even if they *can* all be killed by your shotgun, you still don't want to fire just yet; enter targeting mode (t), and pay attention to the flashing floor tiles that represent the area the shotgun will hit. You'll quickly notice that the default aim of a shotgun is very often quite bad. Adjust until you can hit all of those enemies before firing - sometimes even though they are close enough to be killed, you can't get all of them, in which case shooting might not be as good an idea as:
- Take cover! This is very often the way to tackle a newly opened room. By taking cover we hugely reduce the damage we're taking from the enemies. Before taking cover, though, have a think about which side of the door you want to take cover on. Usually (and somewhat counter-intuitively for a lot of us) the better side to take is the one that lets you see *less* enemies! Part of the reason for this is obviously receiving less return fire, but even if there are 2 or even only a single enemy, it's still often better to run into cover that prevents you from seeing them. Why? Well, imagine that you move into the cover that still allows you to see the enemy; all the enemy needs to do now is move up to their side of the doorframe (so that they are 2 tiles vertically and 2 tiles horizontally removed from you). Effectively the enemy has now completely mirrored your door situation, and is getting exactly the same (great) cover as you are. Just by choosing the wrong side of the door, you've completely removed the advantage that cover would give you! If, on the other hand, we take the side that blocks out line of sight to the enemy, we can simply wait for them to try to come through the door, at which point we can attack them at a relatively close range while being well protected, which is a fight you should easily win! Let them have it!

- Cleaning the room from cover:
Ok, now we're at about the place where the room has no close-range threats. This is a great time to switch to a rifle, and start attacking enemies deeper in there. Knowing when an 'aim/hunker' action is beneficial can help, but it's not a huge priority - you can win on easier difficulties without any knowledge of the hunker/aim mechanics. What *IS* an important thing to know is:
- Checking enemy firearms. Most of the enemies you'll be seeing in callisto can hold firearms, and your HUD displays their weapon. The weapons are most certainly not equal, and at this stage in your room-clearing mission you should be paying attention to the highest threat enemies first. Rifles (Hunter rifles and 9mm auto) usually make the highest priority targets. Next to consider are often shotguns and grenade launchers; I say consider, because the distance between them and you, and their time-consuming firing/reloading mechanics, can often make these weapons low-threat provided you're paying attention. .44 pistols are a tricky one - they hit really hard, just like hunter rifles, and are one of the few enemy weapons that can actually crit for *massive* damage. However, those that carry pistols often also carry a riot shield, which can prevent some of your weapons from killing them in a timely fashion, which is why I often prefer to leave .44 pistol wielding enemies until after the riflemen are dead, especially if the pistol user is far away. Finally, we have the 9mm pistols and SMG users - these tend to fire at you from a good distance with very weak attacks. The 9mm SMG enemies can be quite dangerous if they're up close and you have no cover, but assuming we approached this room well that shouldn't be an issue now, and you can sometimes even take advantage of the cover by using 'hunker' to force their reload, due to the small SMG clip size. Speaking of hunker..
- Tactics - clearing a room (continued)
- Hunker/Aim: When we've selected the ideal target, take a moment before pressing the trigger to glance at the top-right HUD display. This time we're probably paying more attention to the 'toHit' and even 'crit' sections than we did when using a shotgun. Generally speaking, it's usually better to just shoot than aim, but there are many exceptions. Most exceptions don't become important until later, but there's one that is a big factor from the very start - 9mm auto rifles! These things kill former humans on Callisto with 3 bullets, and fire 3 bullets per salvo. This means they kill *if* all 3 shots hit. Even a single miss, though, and it'll take 2 turns to land the kill. Even with a high accuracy like 70% (which is typical of medium-range combat), it's pretty rare to land all 3 hits. This means a 9mm auto rifle usually takes 2 turns to kill a former human. If we hunker instead of firing, that aim will skyrocket, usually to 100%, high enough to ensure the kill next turn. Doing things this way means that we still kill the target in 2 turns, but use half the ammo we normally would (which is perhaps more important with regards to time spent reloading than it is inventory ammo depletion). *Far* more importantly, though, this means that during the turn in which the enemy fires at us, we have the 'hunker' bonus, which nearly doubles the protection of the cover (It goes from 70% protection to 82% protection). Before long recognising these situations becomes second nature, and those bits of health and ammo saved from hunker will all add up, much like all the other little optimisations we're going over here, provided you don't get reckless, approaching situations with care and by the (this) book.
Of course, things don't always go according to plan - we might have our firefight interrupted by unexpected visitors, the need to reload our weapon, a sudden approach from a fiend, a sight-blocking smoke screen from a sentry, a build up of pain from the enemy attacks (which makes our offense pitiful), or perhaps most common: our favourite target getting into cover of their own! When these things happen, it can sometimes pay to change our approach:

- Backing away from the door:
this is most often what I do if I fired a shotgun, but enemies are still standing. If we didn't move back, and just reloaded on the spot we'd been firing from, the cover *would* absorb a lot of the damage, but we'd certainly be at risk of losing some health! 'Ok ok' you say, 'but when I move back to my old cover spot by the door, wont I still take a turn of return fire?' - Well, yes, but there are at least two reasons that backing off to reload is better. The first is that while moving we have a 'dodge bonus' in addition to the cover. This means the turn of being shot at throughout our reload process is more well-protected. The second is that usually, after we reload, we can wait where we are (a little further away from the door frame). The enemies in the room will undoubtedly be *pissed* at you for shooting up their friends, so they'll come through the door to get at you; check their health bar as they do... Technically, they have cover against *you* in this position (you should be 1x2 tiles away from them, or a knight's move in chess).
.@..... @:player ###o### o:enemy #.....# #:wall
However, the shotgun is powerful enough to kill many Callisto enemies despite their cover in this scenario. They are also often wounded from the firefight before you moved aside to reload. You can tell whether your shotgun will kill or not by again glancing at the enemy health bar in the top-right HUD, and if it's a kill (their whole health bar is flashing) then let rip.
(Bonus info - the HUD display very kindly only shows a full-flashing bar if the shotgun blast is going to be fatal: Even if a >100hp enemy will be left on only 1hp after your shot, the HUD display will show a solid (ie. not flashing) block on their health bar. Use this info the ensure that your shot is definitely fatal.)
If, on the other hand, your shotgun will not kill the target (maybe they have armour, or a riot shield?), then rest assured you're still fine - provided you do NOT fire your shotgun! Instead, just move 1 tile closer so that you're in their melee range. Human opponents will respond to your move by trying to attack you with their somewhat inaccurate, pitifully-weak melee attack instead of shooting you! This leaves you to fire a point-blank shotgun at an enemy that no longer has cover! Take this opportunity to 'target' your shotgun at a tile that will damage a lot of enemies in the room instead of using the terrible auto-targeting on the guy next to you. (Oh, and don't worry too much about the *other* enemies firing guns while the close-up guy does his slap - a lot of their bullets will actually hit the guy in the doorframe! The way cover in JH works means that the guy in the door functions as soft cover, increasing your protection in your doorframe cover position. You will also have a dodge bonus from moving last turn, and hard cover + soft cover + dodge is great protection! Added bonus from the fact that a 'miss' due to cover will redirect the shot to the cover, in this case the enemy!)

Provided you repeat the above actions you'll quickly find that the room is empty of enemies, and you can proceed!
Whew! That was a lot of writing for what is actually 5-10 seconds of gameplay! And I didn't even cover all the options involved in a situation as basic as opening a room and shooting the bad guys inside!

I'm aware that this probably sounded super-basic, but my hope was to give an idea of the many options available to the player on every single turn of the game, along with some idea of what to prioritise. Perhaps it also serves to highlight how many tiny optimisations can be made in every little situation in the game.


As I'd mentioned near the start of this section, many players that I've watched playing JH immediately start to press buttons to tackle the room. I imagine that they've recognised; either through their own practice and experience or watching others; a tactic that worked, and concluded that it's *the* tactic (or at least an acceptable tactic) to approach such a situation with. In reality there are tons of factors that change the ideal action... Even though many of these choices only result in *tiny* differences; 2hp here, 4hp there; they all add up to a huge difference throughout the course of the game! For example - optimal play (on almost all difficulty levels) can result in a pretty consistent 3-4 stacks of healing items by the time Callisto is cleared.
(By 3-4 stacks I mean, for example, 5 small medkits, 1 large medkit, and 2 stimpacks)
Sure, there are times where there's a little more or a little less, but the point is, making all these tiny little optimisations results in a *huge* wealth of items to take with you further into the game.

Without these thoughtful decisions, when you get to the later levels where health powerups become more scarce, it will very much feel like the game just doesn't provide the resources needed to win most of the time. In fact it's a result of literally thousands of misplays!

I'm pretty confident that being 'good' at Jupiter Hell, the closest thing to 'skill' of a player, is mostly about identifying situations where the hero is in danger, and finding solutions that reduce or eliminate the damage taken.


(* note regarding closing doors:
There are some very skilled JH players that often like to close doors. It certainly helps keep track of enemy movement and can close up sight lines, but I personally don't do it much -I don't like how it prevents some escape routes, and the time it takes is a big problem on top difficulties. I feel it's important to mention this since I called being able to close a door a 'less important' downside to destroying it. Many great players highly value being able to close a door!)
Improving your skill in jupiter hell
-= Improving your skill in Jupiter Hell =-
------------------------------------
Well, First up I hope my info and advice in this guide can help! That's why I wrote it (and made tips videos) after all!
Here, though, I'll try to touch on what I feel will help a player improve their skills more rapidly. This section by its nature is obviously *hugely* subjective, so take it all in only with the knowledge that it's one opinion, and I'm very much aware that everyone's brain is pretty unique (& uniquely pretty!)

Perhaps the most important 2 things I'd recommend to improve your skill more quickly are:
1 - Play on a difficulty that you can complete often, it let's you learn faster. This is different to a lot of games where lose more = learn more. I've seen too many new players pumping the difficulty up so high that not only are their success chances minimal, their chances of even realising what on earth they did wrong are minimal too! I feel this is the case because they're not allowed to:
2 - Experiment with sub-optimal play to learn JH mechanics thoroughly. Try forcing yourself to hunker/aim lots, switch weapons, buy things you don't normally buy at stations/terminals, try other skills, use items, weapons, or armour that you don't usually use, and even let enemies shoot you to see their attack patterns! You'll learn *tons* doing this, provided your difficulty setting doesn't immediately kill you for it!

In short, there are a lot of things in the game, like smoke grenades, the hunker/aim mechanic, the difference between enemy melee and ranged attacks etc, that are important to experience to improve your skill, but that a player can completely miss out on if not actively experimenting. If you like you can hear me waffle more about this subject in the 'additional writing' section at the end of this guide.
Classes
Class overview:
I believe that the classes are better evaluated based on what they *don't* do than what they do...
Marines don't hack well.
Scouts don't turtle well.
Technicians don't move well.

- (Put another way:
- Marines move and turtle
- scouts hack and move
- technicians turtle and hack. )

With those in mind, let's go over specifics...


The Marine
------------
The marine is the self-healer of the campaign - a sci-fi equivalent to the paladin archetype. Marines are probably the most straightforward of the classes. That's not to say that they are simple - Jupiter hell's mechanics are very well designed to keep a player thinking even if you're strictly playing 'by the book', which a marine tends to be geared towards. If the marine had a 'niche', I'd call it healing. He isn't as evasive as the scout, nor as stationary as the technician, but he is uniquely able to heal well from the get-go, and has plenty of traits that improve on his ability to fight his way through wounds that would have killed the other characters. Notably, the marine can take both 'cover master' and 'hellrunner', which are 2 skills that tend to encourage a static or mobile tactical approach, respectively (although almost all the important marine skills make him take hellrunner!)
I'd argue that the marine is 'the best' class. He's both good for beginners, and great at the top level of challenge.

Marine breakdown:
- Marines get a ton of health. You can often get away with less medkits
- Adrenaline takes some serious getting used to - it heals you far more if you are in pain (and reduces that pain), but...
- Fury is wasted if you're at the max. If you don't want to waste it you'll have to use it for a little heal, but remember that you get health at the end of every level, and sometimes need adrenaline to remove pain. If you want more hitpoints, use fury on adrenaline when you KNOW that 'danger spikes' are far away!
- You don't always have a strong escape option in an ambush, but adrenaline helps you 'fight it out' when in danger; grenades are often more valuable than medkits here.
- 3 weapon slots usually means strategising weaponry very differently. I often carry around a gun just to fire the ammo I'm likely to pick up, but 'long range, emergency short range, AOE' is another solid approach.
- Max hitpoint increases aren't terrible with marines. (I'm not saying they're good, just not always terrible. ;) )


The Scout
------------
The scout has a lot of mobility skills, and playing a scout tends to be about knowing when to keep distance and when to close. They are a great class, and they do great in many special situations, often immediately winning fights that would be difficult for other characters to even survive, but in contrast scouts can sometimes struggle to 'break even' in the more basic 'stand up (take cover) and fight' exchanges. Without cover master, the scout often feels more fragile than the other classes, but stealth and hellrunner work very well as survival options.
The scout certainly challenges the marine for overall power, particularly the stealth skill, which is invaluable for helping newer players recover from mistakes, but can also be incredible for making it through high-difficulty challenges (even entire levels) that are too difficult to fight your way through.

Scout breakdown:
- Scouts carry very little weaponry. This can mean learning a different weapon-carrying strategy. A close and long range weapon approach works well.
- Scouts have an unprecedented ability to escape danger. Stealth trivialises many ambushes and makes a scout very forgiving with pathing misplays or ambushes.
- Scouts rely on speed for defense. Taking ranks in hellrunner is *incredibly* useful, and a single point in 'dash' is almost necessary - it's their most important defensive ability, with one point allowing a player to safely escape danger and outrun / kite any enemy.
- Scouts can get 'locked' in a cycle of repeated damage. Healing items that restore energy (stims) are often a higher priority than normal, since stealth is often the only way to break free.
- The weight of the armour is very limiting for scouts, given that their only defense skill is speed-related. Combat (heavy) armour isn't always an upgrade over the lighter suits.
- Scouts probably rely more on their class resource than other classes. This makes stimpacks proportionally more important for scouts. In fact, buying a stimpack at red stations is an awesome idea for a scout!

The Technician
---------------
The technician is the most 'stationary' of the classes. Technicians feature plenty of strong abilities, but their biggest disadvantage tends to be their difficulty escaping danger. This can be particularly deadly with melee enemies. The tech's gas cloud, in particular, is great in that as well as blocking sight and suffocating fires, it also hides the tech's odour, and (as any invisible scout will tell you) many enemies track using scent. The most important point about learning to play the tech is that, with no movement increasing abilities, as well as a rather low damage output that encourages getting rushed down, they need to recognise and react to danger *before* it is upon them. This can often make technicians require a little more game understanding to reach success, and for this reason I probably wouldn't advise them as a class for a new player's first game. The tech's class ability is almost useless when enemies are in melee range or surrounding, and while they are strong when dug in and positioned well, they can fall very quickly in less favourable positioning situations.
For all the tech's strengths, their lack of raw damage, slow speed, and limited escape options perhaps put them behind the other 2 classes for overall power.

Technician breakdown:
- Disassembling weapons to remove their modpack is tons of fun. You basically put 1 mod on everything!
- Techs are the most stationary class. Cover master can helps this playstyle.
- Techs have few ways of increasing their basic damage, which combines with their static playstyle to make them vulnerable to aggressive mobs.
- Toxicologist isn't just for wizards, and goes a long way to give any tech a very powerful attack as well as a 'get out of jail free' card. It's not the only path though, you can play without 'tox', or even substitute it with grenadier.
- Getting whizkid without prerequisites means techs are easy to 'go whizkid' upon finding one of those dream modding items like medi-fibre armour, cybersuit, or scrapgun.
- Techs benefit hugely from inventory space - they need, and gain benefits from, medpacks more than other classes, and their quick throwing makes them value grenades more than usual, too.
Skills (overview) & tier list
'Best' traits:
A very common question from new players is 'which traits should I pick'. The answer is obviously really subjective, and hugely dependent on player preferences, game difficulty, and the RNG seed that determines enemies and items dropped.
That being said, in a good-faith attempt to try to answer the very general question, I'll offer the following:

1. Master traits are great!
Unlike JH's predecessor Doomrl, Jupiter Hell has very little reason for a player not to pick a master trait! In fact I sometimes take the master right on the level 6 levelup!
2. There are some 'core skills' for the early game.
Before master traits are available, some skills are head-and-shoulders above others. This is obviously subjective, but I consider 'hellrunner' and 'cover master' 'core skills', that are hugely powerful, and somewhat determine the way a character will be played. Since these skills don't play terribly well with one another (one works while moving, the other requires a player to stay still), I tend to advise choosing 1 early.
On most difficulty levels, they are quite well matched. On Nightmare and Apocalypse, though, hellrunner feels slightly better. Regardless, it's a good idea to pick one of these early; just a single level in cover master, when used well, will save you hundreds of hitpoints and help get through Callisto. Likewise, Hellrunner allows a player to retreat and take many fights as a 1v1, saving tons of HP.
3. Not all classes are equal.
In my opinion (plus a lot of communication with some great JH players), I feel that marines are more powerful than the other 2 classes. Scouts are interesting in the way that, while not particularly powerful, they have a class skill that is very forgiving for new players - stealth can erase major player mistakes. For a new player, the marine is *so* strong that they're probably the best character despite the scout's forgiving class skill, but both are good contenders for a 'first character'. The technician isn't too strong, and has a very unforgiving class skill, which probably makes them a poor choice for new players.
4. Not all master traits are equal.
If you want a very rough and subjective idea of what the 'best' master traits are for a class... Try 'survivor' for a marine, 'ghost' or 'sniper' for a scout, and 'wizard+toxicologist' for a technician. These are the skills I find strongest across all difficult levels.


Master skill Tier list:
---------------------------
This is my *very* rough, *very* subjective ranking of the game's master skills. Opinions will vary wildly here, but it should at least serve as something of a guideline for a new player to decide whether your chosen master is helping you or holding you back. Due to the subjective nature of rating skills like this, I've tried to approximate between the skills I've found successful, and those that see regular success in the community. I'll note the ones that had noteable disagreements in the detailed skill breakdowns next section, and I'm always interested in hearing more discussion here.

After discussing this subjective list, I finally decided to split it in 2; the nature of difficulties with respawns changes the game's fundamental priorities, where speed becomes more desirable, and skills that spend time or are limited by position fall behind.
(Inferno probably resembles the ultra violence list, with a boost to builds that boost damage early.)


Tier
'Easy' to 'Ultra Violence'
'Nightmare!'+'Apocalypse!'
S
Sharpshooter*↑, Survivor, Wizard
Sharpshooter*↑, Survivor, Ghost
A
Ghost, Onslaught
, Vampyre, Onslaught
B
Vampyre, Sniper, Fireangel
GunKata, Fireangel, Sniper
C
ArmyOfDarkness, GunKata, Entrenchment
Wizard, ArmyOfDarkness, Bulletstorm
D
Assassinate, Gunrunner, Bulletstorm
Gunrunner, Entrenchment, Assassinate
F
Blademaster
Blademaster

(Note - sharpshooter is currently very speculative, but I feel it might need to be raised even more. I've got to do more testing and gather more opinions, as I've only got a reasonably small sample size, but it feels incredibly strong with the right weaponry (namely strong pistols (SMG sharpshooting was recently nerfed, I believe)). )

(Don't avoid using a skill you like just because it's 'low tier' btw - they are all good enough to beat ultra-violence 100% of the time with practice!)


Detailed skill breakdown.
----------------------------
I'll briefly go over every skill with each character now, offering my opinions on their value and use scenarios.
I've sorted master traits into tiers, SABCD & F. This is *completely* subjective, it will no doubt clash with a ton of other users, so take it with a pinch of salt. I'm hoping it just offers a bit of a guide as to which traits are definitely viable. I should also note that I've rated them based on my perspective, which is primarily nightmare play. This makes a big difference for some skills (gunrunner being a good example). Rest assured that, at the very least, if I rate a skill as C or better, it's reasonable to expect to beat UV with it almost every time, and beat nightmare every few tries.
- Marine skills (basic)
Skilled
- The marine's 'skilled' trait can be surprisingly effective. It offers a valuable heal at the end of each level, which can help counteract the limited healing in Io and beyond. It also greatly increases the healing from adrenaline, though this is only ever notable when suffering from 'pain' at the time of activation. All in all a good place to put spare points.

Ironman
- Offers extra health and bleed resistance. The extra health is somewhat low, and while bleed resistance is an extremely valuable ability, only 50% is really required, which many marines easily reach with a power mod on armour. More than 1 rank in it is generally a pretty poor idea; outside of hitpoint-craving builds (and even then, there are usually better options than ironman 2 and 3.)

Furious
- Gives a moderate damage bonus while under the effects of adrenaline, and increases fury capacity. The damage bonus is nice, but is sadly eclipsed by the 'always on' damage buff from angry mofo. Sure, you might think angry mofo requires low health to work, but in practice you tend to get *far* more damage out of angry mofo, even when trying to use furious with ideal timing. This isn't a terrible skill, but it's outclassed by others for most marines.

Hellrunner
- An absolute powerhouse of a skill. Offers incredible defence, as well as a good escape/kiting mechanism to save the character from many 'certain death' situations. Hellrunner is also a marine requirement for angry mofo, making at least 1 rank close to non-negotiable. Rank 2 and 3 are very strong provided the character isn't too weighed down by heavy armour.

Son of a Gun
- The crit chance is a reasonable damage buff for a marine that uses rifles, but is somewhat unreliable. The increase to pistol range profiles is extremely situational. All things considered this is a very middle-of-the-road damage buff for a marine, but an essential prerequisite for pistol-specialist gunslingers.

Reloader
- Reload times on empty weapons can be addressed far more potently with a bulk mod, which is also often a requirement for later effects in the hands of a whizkid. This makes the first and second ranks of reloader close to pointless for anyone able to use a bulk mod on their favourite weapon! Rank 3 has a few other niches of use (fresh Mag weaponry etc), but even then, there's no way you could justify 3 trait points for such a small gain! One to avoid - unless you're taking it as a prerequisite for army of darkness, in which case it's obviously necessary (and somewhat useful).

Sustained fire
- The fact that the bonuses are dropped when a player does anything other than shoot really limits this skill. For such a huge tactical cost, the damage bonus would have to be significant. Rank 1 really isn't, rank 2 and 3 *would* be nice, if they didn't take such a huge amount of time to build up! The way the maths works out gives certain weapons more benefit than others with this skill. 9mm auto rifles are quite poor, Chainguns aren't bad, 7.62 assault rifles are good, hyperblasters and plasma rifles are great. Scoped rifles *would* be ok were it not for the clash with aiming (it resets this skill), same goes for any 1-shot weapons. This skill wouldn't be a bad source of damage in a pinch, if marines didn't already have 2, superior skills for upping their damage (angry mofo and furious).

Tough as nails
- Gives 1/2/3 extra armour, and reduces pain effects. This skill can be great when combined with good armour (especially with the archreaver's carapace relic), but most of the time it's only worth taking as a prereq for cover master.

Rip and Tear
- The obligatory marine melee trait. Hugely increases melee damage based on current fury. The secondary effect (extra fury) is pretty much never worth taking the skill for alone, so save this for characters that are using melee combat.

Army Surplus
- An excellent source of ammunition, provided you remember to actually equip the correct gun before opening chests! Due to the balancing act that is ammo sustenance in JH, just one rank of this is often enough, and also unlocks the awesome 'whizkid' trait. A second rank usually generates enough ammo to maintain even the more ammo-hungry strategies. This is a great skill for any marine concerned about ammo.

- Marine skills (advanced + master)
Cover Master
- I've made a few mentions of cover master so far in this guide, for good reason. It's one of the most important skills in the game. The defence bonus from hunkering is huge, and cover master makes it pretty trivial to get a hunker bonus in a vast majority of firefights on non-respawning difficulties. While it's still great on nightmare and apocalypse, the time-critical nature of the respawning exalted enemies makes taking a good corner and waiting a much less viable strategy, which weakens cover master somewhat. Still, even on high difficulties, the extra defence just 1 rank in this affords the player is huge. The second rank is more specialised, offering value to players that use a scoped rifle for a main combat weapon. All 3 ranks also offer resistance to AOE attacks, which becomes more and more significant the further the character progresses. By the time a strong character is in Dante, AOE accounts for a good chunk of damage taken, and without cover master it's very hard to resist. Consider this a '1 point wonder' to carry you through a game where you don't take hellrunner (why?!), and invest extra points where circumstances demand.

Gunslinger
- *Hugely* increases the damage output of a pistol-wielding character. A gunslinger puts out a frightening amount of damage, but sadly this tends to shoehorn a character into pistol speciality, which can feel like an inconvenience or wasted points when nice rifles, shotguns etc are encountered. A particular problem is that the plasma pistol (Io tech) is not really any stronger than the 7.62 sidearm (Europa tech), and this can lead to a somewhat weak late-game. As such, I consider gunslinging a kind of 'buy now, pay later' trait - it makes for a powerful early game, and can be a great way to cut into the later game if you struggle in Callisto and Europa.

Bloodhound
- It's *very* easy to overlook this skill, but it's really strong. Any enemies that are seen will be tracked indefinitely. It also allows a player to detect enemies through walls, which will then trigger the indefinite tracking. This skill is perhaps the best for characters that want to play with beyond-visual-range combat, using long-range AOE attacks to fight enemies that can't fight back. 1 rank is enough for the majority of the utility behind the skill. Rank 2 feels little different, and while rank 3 feels *very* strong, I have a hard time justifying 3 traits spent on skills that don't improve combat - it can lead to a character struggling to fight certain lategame enemies.

Field medic
- Increases the healing given by medpacks and stimpacks, and increases the speed at which they are used. In total a rank of this skill is 8 hitpoints per small medpack/stimpack. In a typical game I usually find myself using about 10 of those if I make it right the way through to the end. That means 80 hitpoints total per rank, provided you bought field medic early. This feels really bad to me, and when you also consider the need to purchase 'ironman' really early, its utility really struggles to compete. I'm open to ideas to the contrary, but in my experience this is never a good idea.

Whizkid
- There is a section dedicated to whizkid in this guide. Generally speaking, for a marine, it's a great skill *if* you have need or army surplus. If, on the other hand, you aren't expecting any ammo problems, then it's hard to advise whether or not whizkid is worth 2 trait points to reach for. It probably comes down to how many modpacks have dropped, and how moddable your equipment is. If you're using all exotics, it's gonna be mostly useless!

Angry motherfúcker
- Perhaps the very best non-master damage boosting skill in the game. Angry mofo increases damage based on missing health. In a typical run, provided you don't use medkits until you need them, 2 ranks will be giving something like a +50% bonus to your attacks. The third rank helps you survive on lower hitpoints, but outside of survivor, I don't even find it necessary (provided you have the situational awareness to identify when you are in danger of being KO'd in a single turn - watch our for those CRI plasmas!)

Running
- Unlike many skills, running is far better at rank 3 than rank 2 or 1. It's a *huge* investment to get this maxed, but doing so affords the marine an absolutely incredible active ability. Any time you can spare a good few traits, beeline for this - not only does it hugely help combat, it also allows dashing to exits like the scout!

Onslaught - B tier master
- One of the game's 'fire while moving' skills, this one works with rapidfire weapons. Don't feel committed to chainguns though - while spinning up a chaingun is great, this works fine with assault/plasma rifles too (and doesn't suffer such ammo problems with those). While it sounds great on paper, the problem with onslaught very quickly becomes apparent while playing - the first 'shot' of a firefight must be done with absolutely no advantage from your master trait at all (compared to many master traits that just kill a target outright on the first shot), then subsequent shots only have any kind of an advantage if you are able to move to a position where you can still see a target, which is rarely the case, or move quickly enough to prevent return fire (which is very effective). Without additional movement speed, onslaught is a terrible master trait. However, combined with hellrunner, exosuit, and most importantly the running skill, it becomes one of the very strongest.

Bulletstorm - D tier master
- The marine's pistol trait. Makes pistols (and SMG/autos) fire more bullets. *Huge* damage boost, but even with the discounts, runs into massive ammo problems later on. I found it really hard to rate this skill, since the damage bonus *is* quite large, but ultimately I felt that the ammo problems and other disadvantages put it behind some other primarily damage-boosting skills. Then there's the fact that to use the skill optimally you need to invest SO many points into gunslinger:3, army surplus:1, and arguably whizkid. In short, if you want huge damage, you're better off with other classes or builds, but bulletstorm is perhaps the marine's strongest '1 shot action' damage skill, which can be useful in itself. I guess it *is* nice playing a pistol character that feels great about plasma pistols though!

Army of darkness - C tier master
- Considered a shotgun master trait. The chainsaw flavour is nice but very niche and usually best ignored. The bonuses to launchers is much less significant. Note that this trait becomes less dominant in the lategame, but it's remarkable for late Callisto and Europa.

Vampyre - A tier master
- Marine melee speciality. Vampyre leaches health when damage is done. The health leeched is high enough to be viable even for ranged characters, but the true home of this is melee, where it is perhaps the best melee trait in the game.

Survivor - S tier master
- Crazy-strong master trait! Gives the marine health regeneration, and also 'cheats death' when hitpoints are near the max of the regeneration range. Top-class master trait, on top of the best class 'foundation' (marine). Works brilliantly with many marine skills, items, and abilities, and even alone is just bonkers good for staying alive!
- Scout Skills (basic)
Skilled
- One of the most important 'skilled' traits. For the scout this increases max energy high enough for 2 activations. It also increases stealth duration in a very significant way (often making the difference between a retreat + crit, and having to pick one or the other). The second rank allows scouts to get 2 crits per stealth, which is probably even *more* of a boost than the first rank! The third rank feels a little like overkill, but can be significant for underpowered scouts that want to skip their way through Dante and reach the end!

Eagle eye
- Increases accuracy, and reduces cover at rank 3. While the rank 3 effect is *very* valuable, grinding through the first 2 is rarely worth it. Skillpoints are at a premium, and spending them on accuracy is usually unnecessary when mods, weapon perks, or just good gameplay fundamentals can usually make the eagle eye range bonuses unnecessary.

Dash
- A strong contender for the most important scout skill. This is what makes scouts *completely* outrun all enemies, escaping dangerous situations with little to no effort or injury. It's also top-notch for kiting not only melee enemies, but also those with weak ranged attacks (like elemental fiends and reavers). More than 1 point here is often unnecessary (especially considering that when you need to dash through danger, stealth is often available), but the first point is a must!

Hellrunner
- Another absolute staple skill. Hellrunner for a scout doesn't unlock an essential skill (the way it does for a marine), but since scouts get no cover master, this is often their main form of defence. A great place to put any points you can spare, somewhat high priority. Note that it works best with light and/or swift armour.

Son of a Gun
- The crit chance is much less valuable on a scout, where other sources of crit (including 100% from stealth) mean that '20% crit' turns out to be much less than +20% damage. That said, it's necessary for gunslinger! If the scout is making a crit build, there are usually better ways of getting crit, but this isn't a bad across-the-board method!

Juggler
- I rate this skill absolutely *terribly*. I've heard accounts from some players that think it's strong, but I just find it terrible! Shame, too... In DRL, juggler was my very favourite skill; but then in DRL you could carry as many weapons as you liked, a 1 point in juggler allowed instant switching. In JH, juggler needs 3 ranks to instantly switch, and for a scout that's usually an instant switch between only 2 weapons! You're usually better off just reloading, or modding your weapon to help. Maybe if the scout didn't have the ability to just stealth, fully reload, switch to whatever weapon they liked, and move to the ideal location, this might have some use. I say might, because the scout still has abilities like swashbuckler to swap for free! As it currently is, I think it's terrible. I'd advise you to never, ever spend a point here!

Executioner
- A *great* way to get a huge crit chance! Just a single point offers 50% crit, which is massive! While you might feel put off by the close-range requirement, you'll quickly find that most situations where you really need those crits are close-combat! Add to that the ability to stealth up and get close before (shotgun?) critting, and executioner becomes an amazing source of massive damage when needed.

Hacker
- The second rank of hacker allows a scout to purchase tracking data for free, seeing enemy movements. This combines very well with the scout's fast speed, and a long-range AOE weapon for safe, damageless combat after a terminal is found. It also allows hacking of bots and turrets for free, which works very well with the 'infiltrator' skill for what, ultimately (with skilled:2) feels a bit like a master trait for how it plays out! On respawning difficulties, hacker:1's map of the level grows massively in value, due to the danger of backtracking.

Swashbuckler
- A great source of huge damage, strictly only for a character that uses both melee and ranged attacks. The closer to 50/50 your split, the more value you'll get out of swashbuckler. It's something you often have to build your character around, but it makes for perhaps the strongest scout approach to melee combat, and when combined with executioner makes for a *very* easy way to get crits you can actually rely on (100%).

Hoarder
- Gives the scout an extra weapon slot... Then increases inventory. This is a really valuable scout skill, and I often find myself regretting missing it by the time I get to Io and want to start managing different weapons and ammo types. If you can spare the point, put it here, and make some effort to do so (but don't break your build if you don't feel you need it.)
- Scout skills (advanced and master)
Dodgemaster
- I think this sounds a lot better than it actually is! For a melee character it writes out crazy numbers that don't seem to actually work (you can have 140% dodge and still get hit!) It's still essential for melee, but for ranged scouts, it's not too significant, offering perhaps a small defensive bonus against threats that take more than 2 salvos to kill; and I mean small! I'm not sure the 'minimal dodge' from rank 2 and 3 are high enough to be worth spending traits either - especially when you can just invest in ways to access stealth or run away!

Gunslinger
- *Hugely* increases the damage output of a pistol-wielding character. A gunslinger puts out a frightening amount of damage, but sadly this tends to shoehorn a character into pistol speciality, which can feel like an inconvenience or wasted points when nice rifles, shotguns etc are encountered. A particular problem is that the plasma pistol (Io tech) is not really any stronger than the 7.62 sidearm (Europa tech), and this can lead to a somewhat weak late-game. As such, I consider gunslinging a kind of 'buy now, pay later' trait - it makes for a powerful early game, and can be a great way to cut into the later game if you struggle in Callisto and Europa.

Infiltrator
- A *great* counterpart to hacker and skilled. Infiltrator allows you to get 'free' stealth activations. When you can increase the duration or available attacks from that stealth, it gets incredibly valuable! Hacker 2 and infiltrator 1 can make coasting off Callisto robots an easy way through the moon. Increasing infiltrator to 2 helps find the terminal for your free tracking data. Infiltrator:3 gives perfect awareness on any level with a terminal, and also opens up an extra strategy - if you have more than max energy at the end of a level, activate stealth, then at the start of the next level remote-access the terminal to get the stealth cost back and 'carry' your extra energy from one level to another.

Scavenger
- The scout's ammo skill. This is a remarkable way of keeping weapons fed. It suffers from the major weakness of requiring 2 or 3 ranks to make advanced ammo types. Generally I find it too expensive for 7.62 or energy cell weapons, but for characters that find a great 9mm, .44, 40mmGrenade or shotgun weapon, a single point in scavenger is a very high priority, ideally sometime in mid-Europa.

Whizkid
- See whizkid sections of this guide. Note that scouts can really benefit from hacker by using infiltrator and skilled, allowing any scout to potentially go the whizkid route while still being very powerful without their awesome mods!

Energy Leech
- Increases energy gained. Don't worry about the particulars too much, just consider this skill 'extra energy'. I find that in most situations, my need for energy increases massively in Dante, and while this skill *can* help keep it topped up, opening chests is still important. Can be fairly good if you don't have many stimpacks to feed your Dante energy needs.

Deadly precision
- This is how a scout uses aim-assisted scoped rifles without coverMaster:2. It gives great crit bonuses, and at rank:3 effectively gives all weapons a scope! Beware, scoped rifles don't only have a scope - they also have 100% crit damage (instead of 50% like most weapons). As such, deadly precision:3 doesn't just turn any weapon into the powerhouse that is a scoped rifle. Given that the max crit is 100% from this, I find rank:2 a good middle ground, and rank:1 suffices if levels are scarce. Rank:3 is a bit deceptive, and usually unnecessary.

Sniper - B tier master
- Sniper *massively* increases damage dealt at range through a huge crit chance, and on further ranks, is one of the rare sources of increased crit damage, which not only further pushes sniper damage up, it also makes scoped rifles + aim assist, deadly precision, and stealth attacks hit a lot harder. This is perhaps the strongest ranged attack damage trait in the game. It offers nothing in defence, but attacks this powerful prevent much chance of a counterattack, and the scout always has stealth to get out of a tight situation. Sniper also scales well in the higher difficulties, and is my go-to scout master trait if I want to secure a win, but numerous other (excellent) players feel that ghost is stronger, which is why I only gave it a B here.

Gun Kata - C tier master
- Gun kata allows a scout wielding pistols to attack while moving, albeit with a dodge penalty. This ability is extremely powerful, but features some very significant drawbacks that prevent it from being as strong as it might sound. First of all, there is a large dodge penalty applied. Scouts tend to rely on dodge for defence, and due to the nature of the system in play dodge is quite sensitive to penalties. This penalty is enough to prevent even a hellrunner from getting a good dodge rating until the late game. Second, gunkata absolutely will not work with a single gun. This is worse than it sounds, because it prevents you from 'saving your rare ammo' to dual-wield against stronger opponents, unless you just turn your master trait off completely! Third, it taxes the player with huge ammo problems as the game draws on. All that aside, the good part of gunkata is very good - allowing damageless play against the strongest opponents with little effort - provided ammo lasts!

Gunrunner - D tier master (but great for new players/lower difficulties)
- One of the most permissive master traits, gunrunner works well with all weapon types. It allows you to perform very fast attacks in between moves. It also gives reloads for free while moving, and helps a little with accuracy and damage. When all is said and done, the need to keep moving prevents the character from really digging in to any targets with damage/second, and the ammunition spent on what are, ultimately, very mediocre attacks can cause some minor ammo problems. It's a very safe master though, provided you have the time to keep moving around. Sadly, some levels, and *all* higher difficulty games don't allow this, making for a master that ultimately ends up somewhat weaker than many, but allows any choice of weapons and tactics to thrive.

Assassinate - D tier master
- The scout's melee master - allows the scout to teleport and perform a melee attack. This is a good master trait, unmatched for mobility, but it puts the player in great danger, with only dodge chance to protect them. While dodge can be very good protection, it's ultimately a dice roll, and after enough dives into battle it will get you killed. This means assassinate is better used as a final attack, or as a repositioning tool. It's great for both of those, but suffers all the usual problems of melee (very weak early game, somewhat unsafe). This is a *ton* of fun, at least!

Ghost - A tier master
- Absolutely awesome skill, and really fun, too! Ghost allows *tons* of stealth. There are items like 'firecrown', fire fiend's rib, Toxic fiend's fang and Medusa's eye, that make ghost jump straight up to S-tier (or perhaps even 'I win' territory), but without them, ghost is a great master, allowing huge strategic versatility. Adaptable, unique, and fun!
(Note that I actually find ghost *weaker* than sniper while playing a scout, but I'm in a minority here! Some (excellent) players even consider ghost the best skill in the game in nightmare play!)
- Technician Skills (basic)
Skilled
- Not a great 'skilled' trait. The extra power granted isn't enough to allow 2 uses of smoke screen on high difficulties, and the increased smoke duration isn't often very useful. In fact it can often feel more of a hinderance than a help - default smoke lasts long enough to get well clear, or if you attack (shotgun?) enemies through smoke, they'll meet you outside the cloud before it dissipates. Rank 2 and the increased area is nice with toxicologist, but the small cloud is enough with some care, so it's still hard to justify spending points in tech's skilled. Obviously the main draw of this skill is getting extra modpacks out when dismantling, but I find dismantle for 1 is usually enough - the few items I have that feature more modpacks can just be dismantled at a station, which happens maybe once or twice per game, and let's face it, that's just 2-4 multitools. :)

Whizkid
- There's a section dedicated to whizkid in this guide. Technicians are notable for being able to pick whizkid without any prerequisites, making them the 'best' class at modding items (particularly with their dismantle ability.) It's also important to realise that a lot of the time, whizkid is the best skill for increasing a technician's damage.

Powerjack
- Gives the tech more power from various sources. This is quite a significant power increase, but the main reason for taking powerjack is usually going to be rank 1 for a toxicologist prerequisite. Rank 2 and 3 gives significant power bonuses, and are a good place to dump spare points if you have toxicologist and need more power for it.

Cover master
- Technicians can take cover master from the very start, and with no access to hellrunner, they somewhat rely on it to reduce damage. I've made a few mentions of cover master so far in this guide, for good reason. It's one of the most important skills in the game. The defence bonus from hunkering is huge, and cover master makes it pretty trivial to get a hunker bonus in a vast majority of firefights on non-respawning difficulties. While it's still great on nightmare and apocalypse, the time-critical nature of the respawning exalted enemies makes taking a good corner and waiting a much less viable strategy, which weakens cover master somewhat. Still, even on high difficulties, the extra defence just 1 rank in this affords the player is huge. The second rank is more specialised, offering *huge* value to players that use a scoped rifle for a main combat weapon. All 3 ranks also offer resistance to AOE attacks, which becomes more and more significant the further the character progresses. By the time a strong character is in Dante, AOE accounts for a good chunk of damage taken, and without cover master it's very hard to resist. Consider this a '1 point wonder' to carry you through the game, and invest extra points where circumstances demand.

Son of a gun
- The crit chance is a reasonable damage buff for a tech that uses rifles, but is somewhat unreliable. The increase to pistol range profiles is extremely situational, and the dame buff for pistols/shotguns/launchers is poor.. All things considered this is a very middle-of-the-road damage buff for a marine, but an essential prerequisite for pistol-specialist technicians.

Juggler
- While juggler is somewhat more useful for a technician than it is for a scout, I still consider it an incredibly poor way to spend trait points. Just mod your weapons, play more tactically, or smoke your way to safety! Read the explanation in the scout skills if you want to hear me bash juggler some more!

Sustained fire
- The fact that the bonuses are dropped when a player does anything other than fire really limits this skill. For such a huge tactical cost, the damage bonus would have to be significant. Rank 1 really isn't, rank 2 and 3 *would* be nice, if they didn't take such a huge amount of time to build up! The way the maths works out gives certain weapons more benefit than others with this skill. 9mm auto rifles are quite poor, Chainguns aren't bad, 7.62 assault rifles are good, hyperblasters and plasma rifles are great. Scoped rifles *would* be ok were it not for the clash with aiming (it resets this skill), same goes for any 1-shot weapons. It really says something about technician's lack of damage skills that this mess is their best source of non-master damage for most weapons!

Hacker
- The second rank of hacker allows a tech to purchase tracking data for free, seeing enemy movements. This is of different priority for a tech than it is for a scout - a tech gets less benefit from the 'long range/kiting' side due to slow speed, but the situational awareness can be more important because the tech lacks stealth to escape an ambush. It also allows hacking of bots and turrets for free, which makes it nice with 'remote hack', albeit not super-strong! On respawning difficulties, hacker:1's map of the level grows massively in value, due to the danger of backtracking.

Juggernaut
- Damage resistance from any targets you move towards: Consider this a melee trait - its use outside of melee builds is so limited as to be almost never worth the point. For melee, it's essential for reducing damage while the technician slowly lurches over to their foe.

Hoarder
- While the tech's hoarder offers an unprecedented *4* weapon slots, it's not terribly necessary, since 3 feels like enough much of the time. However, hoarder:1 is an important prerequisite to the very-good 'grenadier' skill, and further ranks in hoarder can be essential to expand inventory enough to *carry* said grenades. Besides, inventory space is always valuable in JH!

- Technician Skills (advanced and master)
Toxicologist
- A strong contender for the most important technician skill. Don't make the mistake of thinking this is only for wizards - *all* techs can benefit greatly from taking toxicologist; and not just because it makes their smoke cloud a much more effective 'panic button' either! One of the most important things about toxicologist is that, without any decent basic or advanced skills for increasing damage, technicians really struggle without an 'ace' to hurt tough opposition before it's upon them! Toxicologist does this job fantastically, and thus serves a double or triple-role in patching up the holes in the tech's gameplan!

Headshot
- Instead of carrying and firing 2 pistols like the other classes, a 'son of a gun' tech that wants to push further into pistols instead gets this super-strong ability. It does huge damage, similar to carrying 2 pistols, but wasting less ammo! Great for nightmare and apocalypse play for the gib chance, but generally a lot like gunslinger (strong earlygame, weaker lategame), with better ammo efficiency and less weapon slots taken up. A really solid skill if you're suffering in Calisto/Europa, and elevated into 'best' tier when sharpshooter became able to refresh it in 2022.

Remote hack
- Allows the tech to hack without being next to the target. 1 rank is pretty much necessary for hacking most robots without taking damage (although sentries can be somewhat safely hacked by half-killing them, then standing at the edge of their smoke and waiting for them to wander out next to you). Rank 2 makes it more effective, but is hard to justify spending trait points on for me. Rank 3 is probably worse that rank 2, since it doesn't allow you to 'mass' a group of bots and overpower enemies, instead getting your robot minions killed immediately. Plus on nightmare/apocalypse it can very well cause game over!

Scavenger
- The tech's ammo skill. This is a remarkable way of keeping weapons fed. It suffers from the major weakness of requiring 2 or 3 ranks to make advanced ammo types. Generally I find it too expensive for 7.62 or energy cell weapons, but for characters that find a great 9mm, .44, 40mmGrenade or shotgun weapon, a single point in scavenger is a very high priority, ideally sometime in mid-Europa.

Sysop
- Gives extra charges to stations. This can go from almost useless (taking it in dante:2) to really strong (taking it in Callisto, then going through the Europa Dig zone to tyre outpost!). Its rank:2 can also be important for showing up terminals if you have hacker, since getting map or tracking data as soon as possible on a level is valuable. Note that sysop can also be used to locate the manufacturing station in CRI experimental facilities, allowing a BFT without any red keycards.

Bladedancer
- The tech's advanced melee skill. Despite the huge damage output from 2 melee attacks, the more important part of this is actually the increased guard%. This is just about the only way of a tech getting high dodge (guard% is added to dodge for enemies at or below range:4), and 90% dodge is pretty important for melee combat. If you're melee, max this as soon as you have a guarded blade. If you're not melee, always avoid.

Grenadier
- A great way of putting some damage out, and a fun alternative to toxicologist when your tech's start feeling a little samey. You'll want at least 2 ranks, I find, for a good grenade supply, and you'll want to ranks in hoarder, too, when your inventory starts filling up! Try to get it early rather than late, for the sake of inventory management as well as finding more grenades in a full game. This skill is a remarkable way of lasting out ALL difficulties with a tech, and it can be surprising how long a grenadier can 'hang on' by throwing the grenades they find to get from one level to the next! It also has a strong synergy with juggler:2, although juggler is so mediocre, it's hard to justify it even with grenadier! (Note - ammo boxes are blue, general boxes are white.)

Entrenchment - C tier master
- A great bit of defence, and reduced ammo consumption per salvo after 'waiting' for a turn. This makes for a decent all-round master trait. At first glance, entrenchment seems designed specifically for spin-up weapons (chaingun/hyperblaster). In practice, though, those weapons are arguably stronger in the hands of a fireangel. Entrenchment has perhaps even more of a niche with weapons that require 2 or 3 ammo per shot, due to the ammo reduction. This can make the rail rifle strong (due to the way aimimg using a scope synergises with entrenchment's resistance while hunkering, while also getting an ammo use reduction). Moreover, it can make 3-shot weapons *incredibly* ammo-efficient, which includes not only 762 assault rifle and plasma rifle, but also, crucially, the jackhammer. Its BFT ammo use would have me put it in a much higher tier if it weren't so hard to actually get a BFT on nightmare/apocalypse difficulty, at least partly down to how slow this skill is at fighting through respawn levels. Consider entrenchment a D+ for nightmare/apocalypse, and B- for non-respawning difficulties.

Sharpshooter - A tier master
- Recently improved to work with non-pistols, and instead resets headshots to encourage pistols. A pretty solid damage increase to ranged weapons. Sharpshooters sometimes need a solid plan B for close-quarter combat, a jackhammer weapon or toxicologist skill were the obvious answers, but skilled use of grenade launcher, SMG, or autoloader shotgun can get you by. Son of a gun and headshot can work with a very fun scoped rifle + backup pistol approach now! While the ranged damage increase is great, this one comes too late to help top-difficulties in Callisto (where damage increases are so important), so character planning can become a little confusing.
I don't have enough experience to be very confident in the rating here, so it might change drastically over time!

Fireangel - B tier master
- A great master trait. Hugely increases damage potential, and confers AOE and fire immunity! Really nice stuff! While there can be a few problems with cauterizing bleeds and thawing frost effects, it's an all-round strong master with very nice damage especially when using multi-hit weapons.

Blademaster - F tier master
- Probably the worst melee master trait. That's not to say it's *miles* worse than the others, but it's probably worse, but like many melee builds it's tons of fun! Since melee is so hard to get off the ground, taking this will often mean a tricky Callisto, a *very* tricky Europa, and an Io thats perhaps as difficult as usual. Dante can be tackled well by a blademaster, but this is all par for the course with a melee build. Of particular note is that blastmasters will take (albeit reduced) damage approaching melee, have no way of getting that health back, and even when they finally break out their 'superhero' mode in Dante, blademasters are held back by the soulstealer being too large to dual-wield!

Wizard - S tier master
- Wizard + toxicologist technicians are incredibly strong characters! Spammable death-clouds to destroy enemies with little to no effort, and as if that's not enough, an army of robots to help with anything not willing to bathe itself to death in VX (which is a preference perhaps more rare than it ever should be!) Be warned - this turns the game into something completely different, and many would say less rewarding. You game plan is to puff out LOS-blocking gas, then let enemies walk into it. In recent versions the enemy AI has improved, weakening this skill slightly.
I was torn about putting it in 'S' tier here, given that I tried to rate most skills in terms of their power on the top difficulties, but I felt wizard was so unique and powerful on lower difficulties, that it would catch more attention in S. Just be warned that the time-critical nature of nightmare or apocalypse difficulty often leave no time to use toxicologist+wizard, making significantly weaker.
Weapons (overview)
Jupiter hell (unlike many roguelikes) severely restricts how many weapons a character can carry. This means that selecting weapons that complement one another is absolutely crucial.
Weapons have a number of important attributes - how much damage do they do? What ranges are they effective at? What ammo type do they use? How well do they penetrate armour? Do they have damage bonuses or penalties against mechanical enemies? How quickly can you draw them? etc

For a 'basic' weapon strategy, try to pick one or more 'main' attack methods that have sustainable ammo (so grenade launchers and rocket launchers are going to struggle, and .44 can be tricky).
Then you want your other weapons to fill in the deficits of these.
For example, one of the best weapons for long-range combat in Callisto (first moon) is the hunting rifle. The range profile is *extremely* important in Jupiter Hell. Interestingly, all weapons have 100% accuracy when they are used at their ideal range. The hunting rifle has an extremely long 'effective' and 'maximum' range, meaning it will hit 100% of its shots at long range against enemies not occupying cover. However, it also has a long minimum effective range, making it poor in close quarters.
Logically, you can supplement this with a short-range weapon! Your options for a short-range weapon vary from a knife (*very* quick to draw, but fairly weak), to a shotgun (slow to draw, but very powerful). A great compromise is a submachine gun or heavy pistol, which are quite fast to draw and very effective up-close.
If you don't have a hunting rifle (or if you lack the .44 ammo to feed it) then you can try an auto rifle, which has similar attributes, albeit slightly closer in ideal range.

If you haven't yet got the hang of this kind of strategy, try making a character and using a .44 hunting rifle paired with a 9mm SMG. You'll find your long-range attacks with the hunting rifle absolutely devastating, killing almost every target with a single shot, and firing at 100% accuracy, to boot! When an enemy manages to get in close, switch to your SMG. It only takes .5s (half a turn) to pull a SMG out since the gun is quite small, and the weapon itself does even more damage per turn than a hunting rifle (albeit completely ineffective at longer ranges).

(If you don't find a hunting rifle, you can try the same strategy with a 9mm auto rifle and a .44 pistol). However, combining a 9mm auto rifle with a 9mm SMG might run into ammo problems.
In this manner, the weapon selection of Jupiter hell can be quite involved even with basic weapons at the very start of the game.

If you're playing a character that can carry 3 weapons, I usually like to dedicate my third slot to AOE; weapons like shotguns or rocket launchers are not only great at taking out groups of enemies, they are also useful for attacking enemies that you can't see! Since these weapons have an area of effect, you don't actually need to see the target to attack them - you only need a rough idea of where they are, and a good knowledge of the area that your weapon damages.


- AV weapons.
- Ok, so you can get used to the above basic strategy, and it'll take you through Callisto pretty soundly, but you'll still bleed health here and there - it takes a great deal of understanding when to aim/hunker, which locations to bring a fight to, and how to alert the attention of (or even hurt to annoy) enemies; before you start managing to stockpile healing items.
However, there is one thing perhaps more instrumental than any of the above, and that's a keen eye for good 'AV' weaponry.
Modpacks allow a player to place certain traits on their items. There is always a limit though - out of about 30 perks, any particular weapon only has 15 potential mod perks (5 each from power, bulk, and agility). AV (advanced) weapons can get many more. Furthermore, even the perks that mods provide can often have far more effective versions through AV mods. For example, you might be able to mod a pistol with 'fresh mag:3' that gives 3 bonus damage if a magazine is full; but you can find an AV1 pistol with 'fresh mag:6', far more effective! both perks will take 1 'mod slot', but one is twice as strong as the other!
When you start to get a feel for which AV weapons are junk, and which are powerful, you can start to capitalise on what the RNG seed throws at you.

- Great weapons
before getting into every weapon, I feel it's prudent to cover some of the most important..

- 762 assault rifle
This weapon does a remarkable amount of damage. Enough to very often kill a target in a single salvo where the range and cover situations aren't resticting it. It works very well with many mods, and auto-calibrates very well.
- Jackhammer
Can be found in maybe half of all games, this thing absolutely massacres enemies in a good area. While it is costly in ammo, it is a devastating 'answer' to dangerous situations, not only killing all targets in a salvo or 2, but also ignoring pain penalties.
- Grenade launcher
Very strong, and surprisingly quick to swap to (ie great in a panic situation). Take note that a shot can be fires 2-squares away with 100% accuracy, which includes lobbing a shot over the head of a melee opponent for a safe answer to a point-blank threat (and yes, this is not what you'd expect from an AOE weapon)
- scoped rifles
Almost uniquely able to make it through most of callisto killing enemies with a single shot, scoped rifles also lends themselves fantastically to 'hunker/aim', due to their scope and massive critical damage bonus.

Honourable mentions go to SMGs, rail rifles, and I'd list more, but this is supposed to be a summary of the greatest weapons, those that are most significant in lifting a player 'above the curve' in a game. I think these 4 are the best to 'master' to really lift a new player's chance of success.
- Callisto Weapons
-= Individual weapon breakdown: =-
============================
I'm going to break weapons down into the common weapons used in each moon. I will undoubtedly leave some weapons out here, because I'm not trying to go into extensive details about every exotic and unique item in the game, but rather pan out a 'general' strategy that applies to each area. So the 'Callisto weapons' section should be a rough guide to how to pick the right weapons to get through Callisto, etc.

Callisto weapons:
9mm pistol
- This thing is almost never an ideal weapon. Trade it for something better at first opportunity. It can still make a passable backup if an enemy gets too close due to its fast switch time and great accuracy from point-blank to quite far, but in general it requires some *amazing* AV mods to be worth sticking with one.

.44 pistol
- This is a much stronger but shorter ranged version of the above pistol. It's *far* superior due to an ability to 1-hit-ko many Callisto enemies, but sadly uses a rather precious ammo type.

9mm SMG
- This one is so easy for new players to disregard before they properly understand the way range profiles work. Basically, it's so short-range it's almost melee! However, it does *devastating* damage. Up there with point-blank shotguns, but with full damage to armoured/mechanic enemies! Great as a switch for surprise close-range enemies, fiends that get too close, or sentry robots emerging from their smoke clouds a little too close to you! Added bonus for making use of the extremely common 9mm ammo type!

34 gauge shotgun
- This takes some finesse, but can be made to work really well. It's important to pay attention to the top-right display to see whether your shotgun will or will not kill the target in one shot, because reloading it during combat is just asking for injury! It can kill fiends in a single shot if you let them get close enough (pay attention to that top-right health bar), can destroy multiple targets, and can even be used to annoy people outside of your visual range! However, one of the most important niches that it can fulfil is killing former humans coming round a corner. This sounds really niche, but early in the game, there is a very common situation where you have been firing through a door using the doorframe's cover, and you need to back up a tile away from the door. From this new position, you can't see into the room you were previously attacking, and if you move forward to take a peek you are in danger of immediate return fire; but a shotgun can kill a healthy former-human coming through that door provided they aren't using armour. The shotgun never misses, but rather has its damage reduced with range. It also seems to take very few penalties for attacking an enemy in cover.

.44 hunting rifle
- Usually the best weapon for the early game. This has enough damage to kill anything but a fiend in 1 hit, up to about Callisto 5. It also has 100% accuracy at long ranges. This means that just keeping it equipped and exploring lets you instantly pop anyone that comes into max-range view without cover. You can sometimes clear entire levels without being hit at all just by firing a hunting rifle at everyone you see the moment you see them!

9mm auto rifle
- An awesome 'all-round' performer of a weapon. Take note that you often need to aim with this thing - an accuracy of 70% is a good shot for a .44 calibre weapon that only need to hit to kill, but the 9mm auto rifle needs *all 3* of its bullets to hit to kill most targets. This means that taking a turn to aim (remember you get your 50% defensive bonus for aiming in cover) will usually push the 9mm auto rifle from 'very likely not to kill' to 'guaranteed to kill'. Get a feel for when to aim, and this thing becomes a mainstay of many playthroughs.

9mm combat pistol
- Awesome range profile (great from point-blank to quite far), good ammo efficiency with the most plentiful ammo source in all Callisto.. The 9mm combat pistol sadly suffers from not being able to kill most targets in a single salvo. however, being a pistol, it *does* have the ability to gain significant damage from mods. In fact with only the 'fresh mag' power mod effect it becomes one of the mightiest weapons in the first moon! Modding this well can make a world of difference!

40mm grenade launcher
- Consider this thing 'absolutely broken'. It's all balanced based on a lack of available ammo, but basically it's the most powerful weapon, effective at all ranges from point-blank (remember to target a tile that won't hit you, and make sure it's highlighted green (not yellow) while targeting so that you can't miss and hurt yourself!), to max-range (although it will usually miss at this range, even a miss almost always kills your target due to the area of effect). It even has a really fast swap time (same as a pistol)!!! I really think it needs fixing, tbh, because at the moment this is basically the de facto backup weapon, outclassing all other 'emergency' weapon options like SMGs, shotguns, knives, pistols etc. It's the perfect switch.

Combat knife
- The knife has low damage, but guard (helping protect you) and a *very* fast swap speed. So fast, in fact, that it's usually a good idea to take out the knife before retreating even if you don't intend to use it! Pierce damage means you should usually treat this as a 'robot killer', and will want some melee traits to make it work well against flesh.

Pipe Wrench/Crowbar
- Decent slash damage, but no guard. This is the Callisto melee weapon for killing fleshy targets.

Chaingun
- Often the first 7.62 ammo weapon, and a really disappointing one at that! The chaingun does middling damage at a rather long range, with big close-range penalties. It also takes long to reload, swaps slowly, does a poor job of penetrating armour, and absolutely guzzles ammo! Its advantage is an increased damage during a prolonged firefight (the barrels 'spins up'), but make no mistake, this advantage in no way compensates for the huge weaknesses of the chaingun. You're going to need some great AV perks or character traits (basically a master that plays well with chainguns - onslaught, entrenchment, or fireangel) to make it worth using one of these!
(With that said, since publishing this guide, I've run into some extremely skilled players that swear that the chaingun is superior to the assault rifle, so as I give advice against it, bear in mind there are some very experienced players that disagree and feel the chaingun is a better weapon. It does well to respect their opinion and try it out! [edit: Since writing this, I can at least vouch for its power on apocalypse or inferno difficulties, where the second-turn damage is very important.] )
- Europa Weapons
Europa weapons:
-----------------------

7.62 assault rifle
- This thing is usually found late in Callisto. It's kindof more a Europa weapon, but since they are quite common you'll usually find one or two before you get to Europa. It's a definite upgrade to the 9mm assault rifle, but it's used in much the same way, including similar ranges and a frequent need to aim. However, it's a big upgrade in damage and armour penetration. In fact, it out-damages everything so far except the grenade launcher. Great for taking out any targets, but notable for how well it takes out robots (which grenades are weak against, and which hunting rifles usually require an extra turn of firing to take down).
Another important detail here is the fact that the 'auto calibration' modification adds 10% damage to any weapon, rounding up. Since this does 11 damage, auto-calibrating the 7.62 AR rounds it up to 13 damage per bullet! This makes for 39 damage per turn, which is getting close to *double* the damage of the 9mm auto or hunting rifle, and almost equal to the grenade launcher. Make no mistake, a calibrated 7.62 assault rifle is a weapon you can rely on for the majority of your adventure!

7.62 sniper rifle.
- By the time you're in Europa, if you're still interested in a scoped-rifle based strategy (44-hunting or 762-sniper) you'll want to consider the benefits of aiming. Scoped rifles get a crit chance from your aim bonus. Combining a scoped rifle with an 'aim assist' helmet (to double your aim bonus from a turn of aiming) is absolutely devastating, and a great alternative to spraying bullets, matching the damage, but vastly outperforming them on ammo efficiency and accuracy. To truly go sniper-style, though, you'll want a character trait that allows you to keep your aim bonus after shooting, to help deal with the tougher targets. Look for 'cover master' or 'deadly precision' in your skill lists at levelup.

7.62 SMG
- This thing is pretty disappointing. I'd generally recommend leaving it. If you manage to find a CRI riot SMG (which is somewhat rare), then that makes a great Europa SMG, but this one falls a little short.

Missile launcher
- Similar to the shotgun in that the area of effect of the missile launcher means that you can use it to hurt enemies even when you can't see them. It deals a huge amount of damage, and unlike the grenade launcher, it's effective against mechanical targets. Be warned, though - you need a direct hit to do respectable damage to a mechanical target (a direct hit deals impact damage, whereas the explosion ties surrounding ground-zero get slash damage, which robots halve and armour greatly reduces). The huge area can also be dangerous to the player, so carefully consider each shot. You'll often find yourself targeting walls or boxes instead of firing directly at enemies! finally, skills or abilities that let you track enemies can greatly expand the use of the rocket launcher. You'll never have the ammo to just spray and pray, but when you know enemy locations, you'll occasionally line up an incredible artillery-type shot at extreme ranges!

7.62 sidearm.
- Typical (great) pistol range profile and swap speed, but this one does a great deal more damage, while hugely benefiting from modpack upgrades (each bullet typically gets +3 from mods, as opposed to +1 on automatic weapons or +4 on one-shot rifles). With the right modpacks, this pistol can be a top-tier Europa weapon, but without them it requires heavy trait expenditure to be worthwhile.

Auto Shotgun
Slightly less powerful, slightly shorter ranged shotgun with 4 shots before reload instead of 1. While this *is* a good upgrade to a shotgun, there usually much better shotguns available.

Dual Shotgun
A very powerful shotgun that uses twice the ammo, for almost twice the damage. It has a shorter range than a standard shotgun, but is still usually the best 'nornal' shotgun prior to Io, albeit one completely outclassed by exotics (elephant gun, jackhammer).

Machete
- A good melee upgrade from Callisto close-combat weapons. 40 slash damage and a melee guard make this a great weapon against biological opponents.

Large Axe
- A very powerful melee weapon. Without the guard, it's not always a straight upgrade for the machete, but 9/10 times a melee character will prefer it.
- Io Weapons
Io weapons:
------------------------
Plasma rifle
- Basically a pumped-up version of the 7.62 assault rifle. The plasma rifle is an awesomely powerful weapon, calibrates quite nicely, and functions well for a wide range of characters. Once you pick it up (Io) ammo is plentiful for the rest of the game. Overall an awesome 'main weapon'.

Plasma pistol
- Perhaps a bit of an exception to the usual pattern of Io weaponry, in that it's not often better than the 7.62 sidearm that you found in Europa. In fact it's decidedly worse when it comes to perks / modpacks. That said, it has a lot of stopping power and functions very well against armour. Perhaps its biggest advantage, though, is that it uses energy cells to function, allowing pistol characters a way of using the plentiful Io ammunition types!

Plasma Shotgun
- A huge upgrade to the shotgun. This thing does close to double the damage of a normal shotgun, and trades the poor 'slash' damage type for the awesome 'plasma'. Sadly, its energy cell use competes with many other Io weapons, but by this time shotgun shells will have stopped dropping, making this the go-to shotgun for any characters wanting a powerful single-shot spread attack.

Hyperblaster
- Basically a much more powerful chaingun, that uses energy cells. The hyperblaster suffers the same ammo-guzzling problems that the chaingun does, making its rather strong damage somewhat limited. Most characters would prefer a plasma rifle, which features a stronger first-burst damage, and much better ammo efficiency. The hyperblaster is undoubtedly stronger in a drawn-out firefight from a stationary player, but after only a few such fights ammo is going to limit its use!

Plasma launcher
- Think of a rocket launcher with a smaller AOE, less damage, but more efficient ammo use. In truth, perhaps the biggest weak point of this weapon is simply that energy cells can be used elsewhere, and rockets are still somewhat plentiful. Those ammo-based facts alone make this weapon a worse choice than a rocket launcher for most characters.

Plasma SMG
Your typical SMG affair - very high damage, reasonably high ammo consumption, very short range. The plasma SMG is perhaps least like other SMG's via its lack of weakness to armour.

Rail rifle
- An awesome weapon, most common in CRI-based areas. The rail rifle does full damage even when it hits cover, making '30% hit chance' shots always hurt! It also has a scope and huge crit chance, working very well with sniper or critical hit strategies/builds and aim assist helmets. Pierce damage makes it really strong against mechanical targets... Finally it can penetrate targets to hurt more than one opponent when they are lined up correctly. Once of the best standard weapons in the game.

Katana
- A hugely damaging melee weapon, that also has melee guard. Outside of exotics and uniques, this is usually the best melee weapon a character can bet on finding in a run, given the relative rarity of the chainsaw. Its only significant drawback is slash damage, making it ineffective against mechanical targets.

Chainsaw
- Trades the fast draw speed and melee guard of the katana, for much more damage, and the 'pierce' damage type. A devastating, but rare, melee weapon.
- Modding weapons (whizkid)


Note - there is a 'modpacks' section, later in the inventory items section of guide, with further info about specific modpack types.


Whizkid:
After practice and experimentation, I've come to understand that, actually, whizkid:3 is a *huge* investment, and you can often get very close to the kind of power levels of a whizkidding master with only a single rank in the skill!

Level 1:
Allows a player an extra mod choice (pickind 3 instead of 2), and repeating the same mod type will offer up to 4. This means whizkid:1 can obtain 80% of perks, with notable instant access to 'acid shield', 'hunter', 'precise', and 'autoloader' (among others). Many more important mods require 2 mods of the same type for a whizkid:1 to access, but they include the very notable 'crit enhancer', and 'barbed'.

Level 2:
Can reach those awesome number 4 perks ( 'crit enhancer', and 'barbed') without spending a previous mod of the same type. Level 2 whizkids can also finally access the number 5 perks, the most important of which might be 'Auto-repair', 'Metabolic Boost', 'Molten', 'Efficient', 'Exalted bane', 'Second chamber', and 'surrounded'.

Level 3:
Allows even the number 5 perks to be applied to an item without other similar modpacks, which isn't much of an advantage, but whizkid:3 also increases the available modding slots on a weapon by 1, which is a *very* useful effect. This potentially makes all items a little stronger, as well as allowing certain 'special' cases, like medi-fibre armour with 'autorepair', a BFT with 'second chamber', and 'efficient' exotic (purple) weapons.

Bonus: Due to the nature of perk selection 'skipping over' perks already on the item, if you find an AV item with any of the effects of a particular modpack, a whizkid:1 will be able to access all perks from that modpack type!


(That might have been a bit much to explain, so I'll give an example):

When modifying rotary weapons with bulk mods, there are 5 effects available:
Swap Harness
Speed-loader
Extended Mag 6
Barbed 1
Efficient

Now, let's say we really want the 'efficient' perk - after all, rotary weapons absolutely devour ammunition, so doubling our ammo efficiency is invaluable!

Without any ranks in whizkid, a character can only pick from 2 (always the top 2) - swap harness, and speed-loader.
At the other end of the spectrum, a whizkid:3 character can pick any of these choices!
With whizkid:1, a player gets a choice of 3 (so also extended mag). However, they can apply 2 mods of the same type, and the system always tries to give a whizkid:1 3 choices, so a whizkid:1 could potentially use a bulk mod to add 'swap harness', and then when applying the second bulk mod, the 3 options will now be speed-loader, extended mag 6, and Barbed 1!

Ok, nice, but still no efficient, right? Not to worry, all a player has to do is find an AV chaingun with any of the bulk effects. You might find a chaingun with 'extended mag 12, for example.
This time, our whizkid 1 applies a bulk mod, and gets a choice of swapHarness, SpeedLoader, and Barbed. Let's say we take 'barbed'. Now, next time we apply a bulk mod, we get a choice that includes efficient, since the only 3 bulk effects that we don't already have are swapHarness, SpeedLoader, and efficient!
Voila! Our whizkid:1 character just got a top effect! This can be even more beneficial when you consider that the AV effect (in this case extended mag:12) can be re-rolled at a blue manufacturing station, so we can actually use the effect to get our efficient modpack perk, then re-roll it into something more useful. Hell, you can sometimes use this to get another level:5 effect!!!

Ok, so how do we mod weapons for best effect?
First of all, consider damage-over-time effects. These typically add the most damage to a weapon, but require time to do their damage. There is a choice of 2 - bleeding, and burning. Bleeding is easier to reach (requires only Whizkid:1, and with whizkid:2 can be reached without using an earlier bulk mod. Burning, on the other hand, requires Whizkid:2, and needs whizkid:3 to be added without 'wasting' an earlier mod.
Bleeding takes longer to deal its damage. This isn't necessarily a bad thing, though, since it makes it easier to generate stacks. Every time a damage-over-time effect 'ticks' its damage, it loses a stack, so a longer gap before that 'tick' means more stacks can be build up=more total damage. Since the damage dealt by DOT effects is a triangular number, it's in a players interest to add a lot of stacks *before* they have time to 'tick down' again.
(If you don't know what triangular numbers are, just know that they increase somewhat exponentially. The formula for the damage than 'n' stacks will deal in total is (n^2+n)/2. You can see the speed at which the pattern expands here:)
stacks damage 1 1 4 10 7 28 10 55 13 91 16 136 19 190
That being said, the fast speed of burning is usually better than the slow speed of bleed.
Additionally, though, these effects have further unique features - after dealing damage, a bleed will reduce enemy accuracy (similar to the 'pain' mechanic on the player). This accuracy penalty is significant, with -10% accuracy for every stack of bleeding. 10 stacks will pretty much knock an enemy out of the game, and 13 stacks will even disable most exalted enemies with 'accurate'.
Burning, on the other hand, spreads to nearby enemies every time it 'ticks' for damage. Enemies can apply this back and forth, leading to close-packed groups of enemies getting out of control fire problems! A burning shotgun blast applied to a group of enemies can be crazy!
Of these 2 effects, I tend to gravitate towards bleeding due to its easier whizkid requirements, but both are extremely desirable. Note, though, that the two cannot be effectively combined. Burning cauterises bleeding wounds, so it's often best to pick one and ignore the other.
Also note that bleeding removes enemy health regeneration. This only currently applies to exalted enemies with the 'regeneration' modifier, and warlock auras. Against those, though, bleeding really shines, and I consider it a good counter for warlocks.

On top of the damage-over-time effects, there are other ways of modding weapons for more damage.
Auto-calibration (availaboe from orange stations) is a very strong flat buff to damage. Since the damage increase is rounded up, this works best on weapons with 11-15 damage. It's pretty effective on 21-24 damage weapons too. The 7.62 assault rifle is a perfect candidate here.

Power mods can give a weapon 'fresh mag', increasing damage for every bullet in the first salvo. This is particularly effective with 2-shot pistols, like the combat pistol or the 7.62 sidearm.
Agility mods can offer critical hit chances, which are a huge advantage for many weapons, although crit-based characters will get much more benefit from putting that agility mod on a helmet and taking 'crit enhancer'.
Finally, 'precise' and 'scope' can work well in combination with 'aim assist' (accuracy mod on a helmet) for a large damage increase. 'Aim assist' is almost necessary for 'sniper' characters.
Another 'aim' effect - 'Precise', can be modded on to certain weapons, notably pistols, SMGs, and launchers.

A full list of mod effects is:

- Exotic Weapons/armour (WIP)
Recently, there was a significant patch that created a lot of early-game exotic weapons. Because of this, I'm going to split exotic weapons into 'callisto' and 'general' exotics.
Most Callisto exotic items were designed to boost a player's early-game power, but fall off later. This isn't any kind of hard rule though - there are often ways of playing around the limitations to make them work somewhat later, sometimes even all game. The most obvious are ammunition traits - army surplus for a marine, or scavenger for a scout/technician.

The important thing about exotics is that they only have a single modpack slot. While they're usually much more powerful than normal weapons, this limited modding capacity prevents them from being hugely powerful. Even so, they're usually better than all but the very best modded 'normal' weapons.


Callisto exotics:

Mag pistol : 30 pierce damage pistol, that slowly loses damage as it is used. Don't worry - an entire moon of use only drops the damage by about 4 for me - don't be afraid of using it. I like using this to make the first 2 moons easy, then ditching it.

Flintlock Pistol : a very powerful single-shot pistol. Not often worth committing to, but a speed loader mod can make this a pretty good sidearm. It has the 'concussion' effect to halve enemy damage.

Magrail Rifle : 50 pierce damage sniper rifle. This thing is remarkably powerful, but sadly can't be reloaded at all. Saving this for aimed shots against strong opponents can be effective.

Precision Rifle : The precision rifle fires a very powerful single shot when aimed. Not only is this a great weapon, it can be taken to dizzy heights with certain traits. In short, anything that gives an automatic weapon an extra bullet will make the precision shot extremely powerful.

Tactical Rifle : features both a scope, and a built-in 'aim assist' effect. Everything you need to make a great sniper, and a decent automatic rifle even when you aren't aiming, to boot! Fantastic weapon, viable even late in the game.

Toxin Rifle : a *terrible* equivalent to a sniper rifle. This is perhaps the worst exotic I've found. Be sure to message me if you manage to find a good use - for me it's just a sniper rifle that doesn't instantly kill in a single hit like a hunter rifle, instead featuring very slightly more damage over a long period. Compared to a hunting rifle, you'll find yourself riddled with bullets using this.

EGLS launcher : 20 powerful, large-AOE grenades in the clip, but unable to reload. A great way to carry 20 powered-up grenades off Callisto with you.

40mm Drum Launcher : Extremely overpowered. A 3-shot automatic grenade launcher. While it typically needs supporting traits to feed it ammunition (army surplus / scavenger) in order to use it past callisto, it is a remarkably strong weapon in the hands of any character able to load it!


Guardian armour: a decent suit of armour that saves the character once upon taking fatal damage. Always a nice find! Take note of the complete lack of dodge penalties, which often make this the best armour in the game for characters using dodge or melee guard.

Ablative armour: *huge* protection and durability (6 / 2000), but can't be repaired. A bulk mod for 'durable' will usually make this thing last all game despite lack of repair.


'Other' exotics

Pierce Rifle : this high-damage assault rifle absolutely slaughters robots, but is pleasingly effective against biological targets too. Usually a good replacement for a 7.62 assault rifle, especially for non-whizkids.

Frag shotgun : a shotgun that uses 9mm ammo. This weapon also bleeds enemies, and does more damage when more shots are applied. A great pre-Io shotgun.

Elephant gun : awesomely powerful shotgun, with a great debuff to reduce enemy damage instantly (usually far superior to the delayed effect of barbed.)

Jackhammer : a 3-shot automatic shotgun, the jackhammer is devastatingly powerful, and applies perk effects like 'barbed' 3 times, for remarkably utility. Often the ideal shotgun.

Super shotgun : a more focused double-barreled shotgun, really powerful!

Focused shotgun : impact damage shotgun with a very tight spread. A nice upgrade to a standard shotgun, but usually less devastating than other exotic shotguns.

BFT : The 'big gun' of the game. Holds 80 energy cells, and uses 40 per shot. Hits a target with a huge damage 3x3 blast, then jumps to the closest enemy for another go. BFT chains can shred many screens of enemies, and do huge damage, especially if an enemy is unfortunate enough to be in range of 2 or more blasts.

Medi-fibre armour : good protection and mobility, and this heals the player to 50% health at the cost of durability. Just adding a bulk mod, and taking care to remove it at times, is usually enough for a good healing solution right up until the lategame, saving tons of medkits. Or you can go more extreme, and get whizkid:3 to make it auto-repair for infinite healing. Be careful though - late in the game an auto-repair medi-fibre will typically be too damaged to protect you from instant KO attacks.

Duramesh scout armour : great protection, mobility, and indestructible. A fantastic piece of armour for all characters!

Blast helmet : good protection, and the only source of AOE protection for many characters. Often the most desirable exotic helmet.

Battle helmet : great protection and durability, with a slightly useful pain penalty reduction.
- Unique weapons (coming later)
Enemies : ordinary enemies
Since this guide is in its infancy, I will cover the most difficult enemies in the game here, and as time allows I'll expand into the simpler and more basic opponents.

- Former humans: These zombies are typically quite stupid, but all are equipped with ballistic weaponry. It can really pay to check which weapons they are carrying (press tab to cycle through visible targets). Shoot the more dangerous ones first! Note that former humans have terrible melee attacks, and spending a turn to get close is often the best way of fighting them! 'Corrupted', 'former CRI' and 'demonic' humans are stronger formers in later moons, but feature the same general pattern.

- Drones: Drones are flying security forces. They have a weak weapon and an extremely weak frame. This it notable because many weapons that are usually poor (like the 9mm pistol) can actually out-perform their counterparts when damage isn't important and accuracy becomes the 'top trait' for knocking drones out of the sky.

- Fiends: Fiends are impish, smaller, bipedal demons. Dangerous at close range
Variants include fire, ice, and toxic ranged attackers.

- Turrets: It's important to learn to fight against these auto-sentry turrets.
The basic turrets are armed with machine guns, and after locking-on (you'll hear a 'beep') to a player's location they will unload their entire clip in 3 bursts, before reloading and going back into standby. It's often not possible to kill them in a single ranged attack, and if so, it's important to get out of their sight range, wait for their clip to be exhausted firing at your last known location, then stepping in and taking a single free attack while they reload. After this, a player can back away and prepare to repeat this cycle.
- Rocket turrets, on the other hand, will lock on (beep!) then fire their clip in a single shot - a rocket! This can mean that even if a player dodges, the rocket may still hit a wall or other object. Either way, with good planning and positioning, they too can be killed while reloading before they are able to acquire a new target, similar to the machine gun turrets.

- Sentries: Sentries are roaming security robots. Upon seeing a hostile target, they stop moving and begin firing a chaingun. This weapon spins faster for each turn of sustained fire, so it can help to get out after the first exchange of ammo has occurred. Once they are heavily damaged, they release a smoke cloud as a distraction while they begin self-repairing. They can be killed while healing by firing into the smoke cloud. Alternatively, a player can wait it out, because sentries are only able to heal up to 50% of their health before they run out of healing resources. Finally, wily players can take advantage of this behaviour by walking _just_ outside of the smoke cloud, and waiting for the sentry to reactivate - when they do, they will often move towards the player into point-blank range, which can be a perfect opportunity to hack the newly-healed sentry!

- Bots: Bots are huge, hulking mechanical warriors. They often feature multiple weapons, including rockets and chainguns. Like all metal enemies, they are weak to piercing damage (including krak grenades) and EMP, but can also be reliably taken down with hard-hitting impact ranged attacks. Just be sure to engage them when they're in the open and not taking cover, and try to avoid using slash damage (shotgun/grenade launcher/most melee) against them.

- Ravagers: Ravagers are huge humanoid meat-sacks that love to attack with ranged weaponry. They take a long time to take down, and are often lower-priority targets in a firefight. Ravager variants include chaingun firing, high-hitpoint, rocket-wielding, and even siege-artillery variants.

- Reavers: Reavers are huge, bipedal demons that by default have a powerful melee attack that cuts through the player's dodge. There are variants that feature ranged attacks, although they use demonic energies to do so, and so can't be counted on for resupplying ammunition. Note that their ranged attacks usually have very short range profiles, like 2/6, making them terrible at fighting a long-range fight.

- Cerberos: These are very tough, giant, dog-like demons that often favour melee attacks. There are many variants of the cerberos, including bionic versions, and elemental-themed variants with ranged attacks.

- (former) CRI Humans: Upon reaching IO, you'll meet the crack forces of the CRI! These elite troops seem to be waging war against the same demons you are, but sadly that doesn't make them friendly. Perhaps they don't want you surviving as a witness to the experiments going on amid Jupiter's moons? Whatever reason, these extraordinarily well trained and armoured foes will engage you with high tech plasma weaponry. They can be deadly, but luckily don't have quite the constitution of demons and robots. In a multi-target firefight, this makes most CRI humans the highest priority targets to be dispatched. If you have any frag grenades left, 2 or more CRI soldiers are prime targets!

- CRI marines: CRI marines are *not* the same as other former human enemies. They have *huge* resilience from their power armour, and are able to use their lethal plasma rifles in close-combat, making them deadly even at melee range.

- Medusae: These monstrously difficult squid-like demons are quite vulnerable to gas grenades. Failing that, be prepared to face not only an extremely accurate ranged attack, but also a *permanently* damaging melee strike. When they bite you, you lose health forever, and can never fully heal the wounds. Due to the difficulty in avoiding damage from a medusa (it's possible, but very hard - check the 'advanced tactics' section of this guide to learn more), I just recommend using a gas grenade on medusa. It's usually the best use of this resource.

- ArchMedusae: I'm creating a separate entry for the archmedusa due to its completely different ranged attack. Archmedusa charge a beam attack after they see you. While charging, they take *hugely* reduced damage. Their beam attack always hits, but has its damage hugely reduced from your dodge, cover, and hunker. Also, even if you wait-out a medusa that is charging (by retreating I assume), that doesn't mean that it wont laser you when it sees you... After an archmedusa is finished charging, It's *charged*. Many players assume that when an archmedusa finishes charging, it 'resets' - nope, it's charged and deadly still! This all adds up to make the best strategy for firefighting with archmedusa: shoot it before it starts charging if you get a chance, then hunker behind cover until the archmedusa fires its laser. THEN take a shot (hopefully you've aimed in the previous turn). When it starts charging again, go back to hunkering. That being said, it's usually better to use a gas grenade to take the thing out without any of this worry!

- Warlocks: Warlocks are multi-armed walking demons that generate an aura that heals all nearby enemies (including the warlock themselves). This can heal all the way up to 200% hitpoints! The rate of healing is quite high, meaning that if a player has to face a warlock, they can suffer ammo issues or even an inability to kill the target at all if the player can't put out damage fast enough. Weapon reloads really put you behind, and grenades can be a significant advantage, but often the best strategy is to cut your losses rather than investing in a fight you can't win. Take special note that in the latest update (varia), frag grenades cause bleeding, which will prevent warlocks from healing. This can be used to effectively take them out where a character might otherwise struggle, but since they resist bleeding, the timing window I after throwing the grenade s tight!
- Enemies : (mini) bosses
- Exalteds: Exalted enemies are vastly more dangerous versions of 'normal' adversaries. Exalted enemies are most often found in 2 different ways:
The first way is 'exalted packs' - occasionally (perhaps once every other level) a player will run into a pack of 3. These packs are spawned pretty randomly (you can even meet 2 packs in the same level), and they drop health orbs, AMPs, or exotic weapons with a decent frequency. Interestingly, exalted packs found on nightmare or apocalypse do *not* have the tainted modifier.
The second way is through the 'tainted' modifier, which ordinary enemies on nightmare and apocalypse difficulties have. 'Tainted' means that when the enemy dies, a purple portal will appear next to their corpse. After 25+ turns outside of the player LOS, these portals have a chance of turning into an exalted version of the dead opponent, with one more modifier than he previously had (so 'tainted' might become 'tainted+accurate', which could then become 'tainted+resilient+accurate' etc...)
Exalted enemies typically have stronger stats than their ordinary counterparts, although they can occasionally be weaker, and feature a number of additional modifiers to improve them:
  • Heavy: Wields a heavy weapon
  • Accurate: +25% accuracy
  • Deadly: Double damage
  • Resilient: Gains overhealth (ie. double hitpoints)
  • Armoured: Gains extra armour (4 points in Callisto:1)
  • Regenerate: Regenerates 10%hp per turn
  • Fire: Gains a fire attack
  • Hellfire: Gains a powerful fire attack
  • Fast: *Much* faster than normal
  • Hunter: Has an extremely keen sense of smell to track the player
  • Unstable: Explodes on death (melee-attack range only)

- Swordmaster: To beat this guy using technician master melee, there is a specific strategy: From the moment you see him, go up-right-right, up-right-right - then run around the pillars counter-clockwise

- Harbinger: The health bar is confusing, and it's best to be very familiar with the actual stats of each of the harbinger's 3 forms, rather than relying on the confused display readout. Each time a harbinger changes forms, it is essentially indestructible until its transformation is complete, though this transformation often occurs fast enough that a player doesn't even get a turn to see it. It's quite possible to defeat a harbinger relatively quickly as long as you focus on attacking very mercilessly at the start, and keeping distance from its final stage.
- The first stage is 200hp (from 400/200 to 200/200) of 75% damage-resistance, well-armoured biological. This can be taken down in 3 hits with good melee crits. (The first stage can be quite capable of damaging itself with its AOE attacks)
- The second stage is 400hp with a damage gate of 80 (so at least 5 hits). 3 Krak grenades and a BFT (K-Bft-K-K-Bft) will destroy this form while controlling the spawning mobs around it. (The second stage takes a good while to take down, but it can help to end the battle at range, so that:)
- The third stage is 400hp of standard resilience, but is very fast and chases you. (Hit it with a gas or smoke grenade to blind it, then BFT or plasmaGrenade (double if you can) it!

Enemy sounds:
It's important that a player learns to identify enemy sounds, or at the very least, recognises the cry of the more dangerous enemies, and those that require different strategy.
Early in the game, recognising the hiss of fiends allows a player to wait on the spot, since fiends track by scent, and will often seek a player out.
Medusae are *really* important to identify. Their cry is a sort of mournful sound. My way of identifying it while still learning was to remember that it's the only enemy sample that could be written out as 'oh'. Other sounds are more screechy, mechanical, or raspy/reverberant. The medusa sounds like a haunted kind of mournful groan that could be written as as ghostly kind of 'oh'.
I'd advise you check the 'tips' video linked at the start of this guide, since it points out a medusa howl to help identify them.

- Bosses
There is a boss at the end of each moon.

Callisto has the Calsec Warden.
This robotic boss will initiate a mortar spam if you damage him too quickly (hit the damage gate), which can be very dangerous if you don't have a door to close/cower behind.

Europa has the Cryomancer.
This boss has a vulnerability to fire. A few napalm grenades are worth hanging onto if you find them. Burning weapons also help. Cold resistance, using the ice spike hazards, and melee combat can also help. Don't be afraid of burning a stack of healing items to win.

Io has the Ancient.
The ancient is best tackled from the side (I like to use the second pillar down from the top). The ancient has a damage gate, and is also often immune to damage...
Your first hit makes him start flickering in blue/white, after which you can shoot him again to hurt him. Once you do 100 damage, he will split into 3 clones. These are immediately destroyed upon damaging them, unless you hit the 'right' clone, in which case all other clones will disappear.
The best 'general' tactic I've found so far seems to be to damage him until he spawns clones, then VERY carefully study the battlefield - the clones will deal no damage, so you can often figure out which is the 'real' ancient based on the damage you take from incoming attacks. Hit the 'real; ancient, and all the clones disappear.
Reloading during the intense moments of the fight can be difficult, whereas using AOE attacks through smoke or gas can be very strong.
Inventory items
The player usually gets 10 item slots with which to fill their inventory. Choosing how to best use this space is crucial skill to learn, and believe me it takes a lot of time to get right.
First, let's go over many of the inventory items:

- Ammo
Ammo is one of the most important and obvious uses of inventory space. Perhaps the most important things to know about it from an inventory management perspective is that not all ammo types are equal when it comes to inventory space... 10 rockets don't tend to do as much damage as 100 7.62 bullets, and 50 shotgun shells carry *huge* total damage potential compared to most other ammo stacks. Importantly, though, the weapon being used is just as important here. A 7.62 sniper rifle only really needs a single stack of 7.62 ammo in the inventory to keep going all game, but a chaingun is going to need perhaps 3 stacks (and a backup weapon most likely!).
The other important thing about ammo is that different moons have different 'common ammo' types. You'll only find grenades, shells, a little 44, and 9mm bullets regularly in Callisto. 7.62 and rockets are common from Europa onwards. Energy cells are abundant in Io and Dante. Take note that the very start of Dante (moon 4) features a way to make lots of ammo, so if you have a great weapon that needs shells or 9m, it can still be worth hanging on to it at times.

- Medpacks
These things heal you. 40hp for a small medpack. Full heal for a large. Using medpacks also removes many status effects from the player, and this can be massively important... I generally tend to greatly prefer a stack of 3 small medpacks to a single large - while the large will fully heal the player in much less time than the 3 small ones would, the 3 small packs will purge bleeding, burning, and poison on 3 separate occasions. Just sitting in poison for 3 or 4 turns will result in perhaps 14 stacks of 'poison'. This is more than 100hp of damage in total! A single small medpack in such situations will heal a player for up to 145 hitpoints! This makes stacks of small medpacks a really valuable way of using inventory. That said, large medpacks and their 'full heal' can be extremely useful for characters that have their healing effects reduced (relics and frozen heart wishers, for example), since the medpacks 'full heal' is a full heal, even if you have -75% healing effects!

- Stimpacks
Stimpacks are really important items that are easy to miss out on. After some experience with them, you might end up like I did, and stop using red stations for increasing your maximum hitpoints, preferring a stimpack instead! First, stimpacks do everything a small medpack does... Healing you by 40hp, and removing negative effects like bleeding or burning. In addition to that, stimpacks will also reduce all further effects for the next 5 seconds. During that 'stimmed' 5 seconds, you will also act a little faster, which can really help in a difficult fight, or even assist a slow character in retreating! Finally, stimpacks restore some of your class resource (fury, energy, power). It's surprising how often this pushes a character over the threshold required for another use of the class skill, and that can be crucial!
When all is said and done, a stimpack is an awesome item, and I like to try to get 2 stacks of them by the time I reach Io, which generally requires quite a few red station charges!
Military stimpacks are far better versions of stimpacks. They usually heal fully (unless a player has healing reduction effects), and their stimmed effect lasts *much* longer, but they drop the player's max HP by 5 permanently on use. I find these an amazing item to hang on to, ready for the hardest fights in the game. If you haven't already used it by the end of the game, the military stim's added speed alone will make the end of the game much more manageable.

- Combat packs
These usually heal more than small medpacks, and can be 'gamed' with fast player actions to give a pretty much full heal (they last for 5 seconds, but heal 8hp each player action)

The large combat packs are much less desirable, and can only really be better than a large medpack in very niche situations (where a player is taking regular damage *after* the heal effect). Still, like military stim, this can be great in some fights, and can also be 'gamed' with fast actions for truly ridiculous amounts of health!

- Grenades
Grenades are extremely useful items. They are often the game's way of allowing a character to fight through a situation that's just too difficult for their skills and weaponry to deal with (and make no mistake - the game is very much going to confront you with challenges beyond your character's natural ability to defeat if you're pushing yourself with difficulty settings!) Each grenade has its own 'niche' of use: EMP grenades stun mechanical enemies for a few turns, or slow down mechanically-augmented biologicals. Smoke grenades help escape tricky situations, and smoke can also be used to great effect with AOE weaponry like shotguns to deal with huge threats (Don't underestimate smoke grenades - combined with a shotgun or some decent target location guesswork, they can be every bit as good as the damaging grenades.) Frag grenades have a large area of damage, and cause targets to bleed, dealing more damage, and preventing enemy healing, which is great against warlocks. Krak grenades do pierce damage, making them the most powerful grenade against robots or remarkably well-armoured enemies. Gas grenades block line of sight, and do absolutely devastating damage to biological enemies (even those resistant to poison!) i like to save gas grenades for killing medusae, but will occasionally use one 'early' when I have no other option. Finally, plasma grenades do an insane 200 damage - enough to kill most enemies instantly. I tend to try to save plasma grenades for Dante's 'you're dead' moments, and if I'm lucky enough not to see such a moment, they are good in Dante Altar too!
Despite the fact that these niches give all grenades a chance to shine, there is a general hierarchy of which grenades are most desirable. For me, it goes something like this:
  • Plasma >
  • Gas >
  • Smoke / frag / krak >
  • EMP

- CRI phase kit
This device teleports you to safety. Or it tries to! Most of the time it works just fine. The way it works (I believe) is selecting 8 random locations on the current map, then teleporting the player to the one that is further from enemies.
I tend to try to always carry 1 CRI phase kit, in preparation for a 'the hunt' event in Dante (which is a very common occurrence, happening in over half of my games). without the CRI phase kit, a hunt event in Dante can be unbeatable for many characters - depending on which enemies are created, where, and a player's resources.

- Red keycards
There are a few places that require these. I assume readers don't mind this being spoiled (kinda the point of a guide!!)... First up, a few random branch elevators can require them - the player is informed of these via terminal emails in the relevant moon. Second, Some Callisto special levels (Valhalla command, Calsec central, docking bay) require them. Third, much later in Io, the CRI facilities (black site or laboratories) require *3* red keycards to unlock the biggest CRI weapon technology (technically, you need 4, but 1 card is dropped inside the CRI special level itself.)

- Mod Packs
Bulk mods - For the reasons mentioned in 'whizkid', above, bulk mods are usually the most desirable standard mod packs. Even without any whizkid, adding a bulk pack to a short-range weapon (swap harness) gives a great 'panic button' when enemies close in. You can also greatly benefit from the 'durable' trait on armour, since it not only allows the armour/helmet to last twice as long, but in turn doubles the duration of any armour repair (multitools). On a helmet, 'tech monitor' is a great boost to armour repair, which will increase multitool healing to 37% (which, when using 'durable' (bulk-modded) armour, is an insane amount of repair (3 times the durability of normal repair) for 1 multitool!) That being said, the best *defensive* additions to armour tend to be those that afford resistances, and bulk mods can provide fire resistance, which is one of the most important!

Power mods - These are good for getting an extra inventory space out of armour, But if you want the best defence, try out 'meshed' or 'acid shield' to resist bleeding or acid, respectively. Power mods can provide some decent enough damage increases on weapons, especially multi-hit pistols (fresh mag is awesome here).

Accuracy mods - These are a good way of doubling your aim bonus with headgear (aim assist), and are also the best way to increase your damage via armour (rather than weaponry) through crit modifiers. The 'balanced' trait can also be very important to help remove the short-range penalties on weapons, or to use 'calibrated' to increase the ideal range on short-ranged weapons like SMGs and shotguns (although 'autocalibration' is much better than accuracy mod calibration, if you can stand the wait for autocailbration to finish). All things considered, accuracy mods are probably best suited to headgear, where 'aim assist' helps greatly with scoped rifles, adding max range can help greatly with shotguns, especially DOT shotguns (since bleed or burning applies full effects even at max range). The final notable effect of accuracy mods is their ability to increase movespeed when placed on armour, which would be invaluable if it didn't require high ranks in whizkid to access.


- Rare mods - Other, rarer modpacks in the game are:
- --------------------------------

Autocalibration pack: Pretty common. Autocalibrates the weapon, like the orange station effect (after 50 kills weapon gains +1 opt range and +10% dmg, rounded up.) This is much better on some weapons that others - for awesome results try it on 7.62 assault rifles.

Sustain mod: Weapon regenerates 1 salvo of ammo every time it kills. This can range from near-pointless, to obscenely strong. The rare whizkid that manages to put this on a BFT basically becomes god!

Cold mod: Weapon chills targets on hit. Not great, but somewhat desirable, especially vs bosses.

Vampiric mod: Weapon steals some health from enemies. A very desirable effect.

EMP mod: Disrupts (EMP stuns) mechanical and semi-mechanic units, similar to an EMP grenade.

- Non-existant mods. - mods that almost never spawn in the base game.
- ------------------

Nano mod: Makes item regenerate it's expendable resources. Great when you want free ammo!
Onyx mod: Makes armour indestructible.

Note that these *can* be found in normal games, but are insanely rare (2000 hours of play might find you one, if you're lucky).

Stations
There are various terminals and stations for a character to interact with throughout a run. I'll break them down per type:

Green terminals.
Green terminals feel like the 'standard' computer network access points in the Jovian settlements. they typically allow players to access information and control systems, in contrast to the manufacture/repair/aid offered by stations.
- The terminal 'security' menu allows players to disable or hack mechanical enemies. Note that the cost of disabling or hacking goes down the less turrets/drones/bots are on the current level. This means that eventually turrets will be free to disable. (Hackers get there faster than non-hackers.) This can be extremely valuable when a player is trying to take zero damage, but a problematically-placed turret is hard to approach
- Green terminals also have a 'recon' screen that display info of the current branches. This, in addition to the messages screen, is vital for plotting your best path through the current moon. The next section (locations) includes a rough guide to deciding on locations to take. The 'recon' screen also allows players to gain data of the current level layout, and even the real-time location of enemies (although these options cost multitools, with discounts for hackers (ultimately making the options free).)
- Green terminals also have 'special' options for opening vaults on the current level, or applying 'changes', whose effects can be discerned by reading emails, but can range from opening elevators, flooding the level with poison, releasing security sentries, or even spawning in demons through portals!
- Finally, 'messages' in green terminals can be used to read emails. These emails are essential for planning the best route through a moon. Note that emails can be clicked on (alternatively select them and press 'enter') to record the email to your (J)ournal, where they can be read in future.

Orange (technical) stations:
Orange terminals allow a player to repair armour, auto-calibrate weapons, and create modpacks. I usually find these the most useful places to spend my multitools.
- Repair armour at an orange terminal gives a full repair for only 1 multitool (or 'charge'), which is often a wonderful bargain if said armour/helmet are below 75% durability.
- Create modpack is perhaps the most important use of a technicial station. It does just that - creates one of the 3 'standard' modpack types for just 2 charges.
- Autocalibrate can range from bad to amazing depending on the weapon it's applied to. This is covered in the 'modpacks' section of this guide.
- Dismantling modified items can be a great effect if you have items with multiple modpacks, but it's actually quite rare that you get a good opportunity to take advantage of this. It should, then, be something you just remain ready to benefit from, despite rarely using it!

Red (medical) stations:
Red stations are medical stations. They have a few options for helping keep a player healthy. Take note that occasionally email messages will mention scripts to program medical stations - this is a *great* reason to visit the levels in question, since the effect is a *very* nice boost for characters programming then visiting said medical station.
- The 'healing' option is an incredible bargain, for only a single charge (or multitool) it gives a player a ton of hitpoints (about as much as a small medpack). This is pretty much the best use of a single multitool in the game! Well worth using multiple times in the same level if needed!
- 'create medpack' is a great use of 2 multitools. I typically want to have 5 stacks of healing items in my inventory when I reach Io, so I often buy some of these. In fact, perhaps the most common use of a red station in my playthroughs is one 'heal', and one small medpack.
- 'Create stimpack' is a great use of 3 charges, but I don't often use multitools for this. Stimpacks are much better than medpacks, particularly for scouts! A great choice for a healthy player!
- '+Max HP' costs 3 charges (or multitools) and increases max HP by 5. This is a really popular choice, but I actually consider is a terrible idea for most characters. I've seen players spend all their saved multitools just to hammer this option, but in reality it takes an absolutely colossal amount of large medkits to make this at all worth it! Something like 8 large medkits translate to 40hp - so if you are stupidly lucky enough to find 8 large medkits in your game, then you just spent 3 charges for 40hp... Or you could just spend 1 charge for 40hp healing... Or 2 charges for a 40hp small medpack!!!! Sure, there are other considerations (health orbs and exiting levels, and skills like the marine's angry mofo and survivor that sway the decision a little), but most of the time buying +maxHP from a red station is a 'noob trap', and really reduces your win chances on high difficulty levels if you're restricting other multitool purchases for it.

Blue (manufacture) stations:
Blue stations are perhaps the rarest in the game. They create items based on the location they are found in. They also have 3 'levels'... The level of the blue station affects the AV mods available from advanced items brought there. It also determines whether the station can be used to reroll AV mods on existing items (lvl:2), or even reroll AV3 'special' perks (lvl:3).
- Blue stations can create items. My favourite use of blue stations is probably getting access to items like 7.62 sniper rifle, 7.62 sidearm, or machete 'early' (in Callisto). I've seen many players skip over the 'create basic item' option, but this actually allows access to great items for a very cheap cost (1 charge) if you're happy to skip over the AV perks. It also allows creation of red keycards for 2 charges.
- Failing that, 'create armour' to make AV marine armour is often a nice choice in early Europa.
- Blue stations can also be used to dismantle items, like orange stations. Similar to orange stations, it's rare that this is useful, but when it is it's amazing!
- Rerolling AV perks can be *awesome*, but it's very rare that a beneficial opportunity presents itself to take advantage of this option. It's rare that I have a good AV3 item and a level:3 blue station to roll the dice, but when I do it can be gamebreaking if the RNG is on your side! More common is the opportunity to re-roll AV2 amps, especially when aiming for 'auto-precise' perks on auto AMPS, to combine with aim assist and other aim-based traits.
- Perhaps most often, I use blue stations to extract multitools and move on! I'd rather use those multitools at an orange station in most playthroughs.

Locations (callisto + europa)
level structure -

Each moon consists of multiple locations. A player can take a route through these locations to the exit, or sometimes just stay on the 'base' path. Every location within a moon has an optional special level. Think of it as a 'boss fight' that the player may skip.

Where a new location is accessed (from the starting location) determines whether or not it will spit the player out at level 6, or the last level.
The first, last, some 'midpoint' levels, and any special levels have set layouts. These are represented in the below diagram with letters, as opposed to numbers for randomly generated layouts.
(Although take note that the random level generation method is based on the current location - the cavelike, open Callisto mines are very different than the spaceStation-like corridors and rooms of the Mimir habitat.)

In the below diagram, Each column represents a different area. The layout is randomised, such that in any given playthrough, areas can be in different places (or even nowhere to be seen!). For example, in one game on the Callisto moon, the first column could represent Valhalla terminal. the second column is just the basic Callisto', the third could be Callisto mines, and the fourth might be the rift. Any level marked 'S' is skippable. These are the final levels of given locations, and in addition to set layouts (which often makes them easier than random levels), they tend to have far greater rewards, making skipping them, for the most part, unwise (though not unheard of!)
Take note of the fact some branches don't allow a player to visit level 6 upon completion (this can be important if an email tips you off to something of interest on 'level 6'.)


Start 1 __-2 1'‾ 3-_____ 2 M-_ ‾'1 3 5 ‾'1 2 S S 2 3/S 6 6 S S/6 \ | __/ / ‾‾‾-E-‾‾‾‾‾‾

Take note of the right-hand branch in that diagram - the branch from level 3 (the second branch) can vary in length... This very particular case depends on the branch -
If taken on level 3 (second branch):
Mimir, Valhalla, Asterius, Dig zone, will skip level 6.

All other level:3 branch exits will include level 6 in your run.

This is important information for players that spotted something interesting in an email, on a moon's level 6 ('callisto 6' etc).

Key:
M: 'Midpoint' level - this is a random level with a slightly more rigid structure than usual. The 'mid' levels are often smaller, and feature unique layouts, often focusing on vertical and horizontal symmetry. Think diamonds and squares for layouts!
S: A 'special' level. Think of this as a 'boss' for the current path.
Note that level:6 isn't always present. This can be important because many events feature level 6 of a moon... Such as 'pocket' levels (workshop, laboratory etc) and events like programmable medical stations.
The different locations have somewhat random, but partly fixed rewards. They also favour certain uniques, although the chances of getting the 'favoured' unique is so small, it should never determine your strategy.

Callisto
------
Generally speaking, Callisto routing strategy is about finding which special areas (workshops, labs, strongrooms etc) suit your playthrough.
- Base route: There are great rewards in the tricky military barracks, but the docking bay often has stimpacks, and is easier. Red keycards help.
- Valhalla/Mimir: Mimir tends to feature more robotic opponents than Valhalla, for better or worse. The Valhalla/Mimir route can offer a great weapon or two, with a *personalised* ideal weapon costing 1 red keycard. It also offers more XP if you pay the keycard and makes the next levels easier.
- Mines: The mines is probably easiest, great for players confident fighting against fiends, and who aren't too worried about ammo. It has a good chance of dropping a great weapon tailored to your character, but demands a gauntlet of tough acid-spitting barons. Beware ammo depletion though - not much ammo drops here!
- Rift: Think of the rift as the mines, but with less melee enemies, and an incredible stack of multitools instead of a large medkit for a reward. Go rift if you want a good melee weapon, and are confident in your ability to use cover to survive somewhat open firefights without losing too much health. Similarly to the mines, beware ammo depletion here.
╔═════════════════╦═══╦═══╦════╦═══╦══╦═══╦═════╦═══╦════╦═════╗ ║ Callisto ║ # ║Pis║Shtg║H2H║HP║Box║Armor║AMP║BEST║ Req.║ ╠═════════════════╬═══╬═══╬════╬═══╬══╬═══╬═════╬═══╬════╬═════╣ ║Military Barracks║ 8 ║ 2 ║ 2 ║ ║ ║ 4 ║ ║ ║ ║ ║ ║Docking Bay ║ 6 ║ 2 ║ 2 ║ ║ ║ 2 ║ ║ ║ ║2keys║ ║Mines/Anomaly ║ 5 ║ 1 ║ 1 ║ ║ 1║ ║ 1 ║ 1 ║ ║ ║ ║Valhalla Command ║ 5 ║ 1 ║ 1 ║ ║ 1║ ║ 1 ║ ║ 1 ║1key ║ ║Mimir/Calsec ║ 5 ║ 1 ║ 1 ║ ║ 1║ ║ 1 ║ ║ 1 ║1key ║ ║Rift ║ 6 ║ 1 ║ 1 ║ 1 ║ ║ 2 ║ 1 ║ ║ ║ ║ ╚═════════════════╩═══╩═══╩════╩═══╩══╩═══╩═════╩═══╩════╩═════╝
Europa -
---------
Europa is all about filling in your character deficiencies. It offers a great choice of rewards, but will be useless for a player that doesn't select carefully.
- Base route: Backpack. Pick a basic route if you have all you need, because the base route levels (refuelling base and the pit) offer the awesome CRI backpack for more inventory space. Often the best option if you have all your bases covered, and just want to get stronger later.
- Asterius: Armour. Pick Asterius if you like your current weapons, but need armour. The Asterius Habitat/Breach offer a dual-set of armour, manufacture station, and boxes.
- Conamara Chaos: AMP/shotgun. Pick Conamara chaos If you need everything except shotguns and AMPs - it gives a well-rounded spread of: unique ENV armour (protection against fire/cold/acid), a few ranged weapons, a red keycard, a health box, and a few other nice boxes. Use caution though - the containment area (biolabs special level) is one of the more dangerous special levels in the game. I wouldn't quite compare it to the refuelling base, but it can be nasty for characters without toxin/acid resistance.
- Dig Zone: Industry! Pick dig zone if you want to do some serious manufacturing on your existing gear. A sysop whizkid will get powered up hugely! It offers orange, blue, and red stations (technical, manufacture, and medical) as well as a few nice mid-tier but very random items.
- Ruins: Used for a wish later. Pick the ruins if you want an AV:3 amp, nice armour, and a wish later. It gives an awesome amp for your favourite weapon, a good suit of armour, and an artefact that allows you to wish in the dark cathedral later. Note that this is usually the weakest choice of path for episode 2 *and* 3.
╔═══════════════════╦═════════════════╦═══╦═══╦══════╦═══╦════╦══╦═══════╦════╗ ║ Europa ║Arm/Rifle/AMP/Pis║Arm║AMP║Backpk║Box║Ammo║HP║Station║Keys║ ╠═══════════════════╬═════════════╦═══╬═══╬═══╬══════╬═══╬════╬══╬═══════╬════╣ ║Refueling Base 6║-----1-------║ ║ 1 ║ 1 ║ 1 ║ 1 ║ 1 ║ ║ ║ ║ ║The Pit 5║---1-----║ ║ ║ 1 ║ 1 ║ 1 ║ ║ ║ 1║ ║ ║ ║Asterius/Breach 7║ ║ ║ ║ ║ 2 ║ 1 ║ ║ 3 ║ ║ ║ 1 ║ ║ ║Conamara/Contain 7║ ║ 1 ║ ║ 1 ║ 2 ║ ║ ║ 1 ║ ║ 1║ ║ 1 ║ ║Dig Zone/TyreOutp.6║ ║ ║ ║ ║---1---║ ║ 2 ║ ║ 2║ 2 ║ ║ ║Ruins/FrozenTemple2║ ║ ║ ║ ║ 1 ║*1*║ ║ ║ ║ ║ ║ ║ ╚═══════════════════╩═══╩═════╩═══╩═══╩═══╩═══╩══════╩═══╩════╩══╩═══════╩════╝
- Later locations (Io + )
Io -
----
Io navigation is primarily about whether you have the 3 red keycards and strength of character necessary to loot high-tech CRI weaponry. If you don't, then you are looking at navigating the dark (warehouse), poison (Mephitic mines) or playing with rare modpacks (Lock).
- Base route: The Io base routes are quite different. The infernal lock provides health, AV3 utility AMP, nice boxes, and a a rare modpack provided you SPOILER: can learn how to stop doors from closing. The warehouse, on the other hand, is a dingy treasure dungeon suited to players that can see in the dark.
- Mephitic mines: The mines are poison-filled caves that reward players with a great high-tech helmet that helps see in all conditions and resists most elements. They also house a good suit of armour, some healing, and a strong katana. The katana can help players beat the special melee level in the next chapter, but will be redundant after succeeding!
- Shadow Halls: The shadow halls route horribly starves a player of ammo, and will lead to the unholy cathedral - a level that offers decent high-tier weapons and armour, and a chance to make a cursed wish if the player collected the frozen heart earlier (dropping it on a certain pentagram). Generally, this is hard to make pay off compared to other routes.
- Black Site: One of the 2 areas housing the strongest CRI tech weaponry, the black site is the easier of the 2, featuring mostly biological enemies, turrets, and a great set of rewards including manufacturing stations and grenade shops, awesome for later! If the player has 3 red keycards, then can access the CRI vault and loot an incredibly powerful weapon.
- CRI labs: One of the most dangerous areas in the game. The CRI labs are full of extremely strong robotic warriors partnered with well-trained and well-armed CRI marines. Clearing it while taking in 3 red keycards, though, offers similar but significantly better rewards than even the black site. Notably, instead of a grenade shop, the CRI labs have a great chance of giving very powerful high-tier character-tailored weaponry, some health recovery, and on top of the height of CRI tech in weaponry, the labs also feature the very best in CRI-tech armour! Overall the best area to tackle *if* you feel confident fighting dangerous robots. EMP or krak grenades work wonders here.
╔═══════════════╦═══╦════╦═════════════════════╦═══╦════╦═══╦═══════════════╗ ║ Io ║Box║+Box║Hyper/LRifl/ShotG/Pis║Arm║Medi║AMP║Other ║ ╠═══════════════╬═══╬════╬═════╦═════╦═════╦═══╬═══╬════╬═══╬═══════════════╣ ║Warehouse 11║ 8 ║ 2 ║ 1 ║ ║ ║ ║ ║ ║ ║ ║ ║Inf.Lock 7║ 1 ║ 1 ║ ║ ║ ║ ║ 1 ║ 2 ║ 1 ║ RareModpack ║ ║Mephitic/NoxH 5║ ║ ║ 1 ║ ║ ║ ║ 2 ║ 1 ║ ║ Katana ║ ║ShadowHall/DC 6║ ║ ║-----------2---------║ 1 ║ 1 ║ 1*║ Wish ║ ║Black Site 7║ 2 ║ ║-----1-----║ 1 ║ ║ ║ ║ 1*║Man+ammoStation║ ║CRI Labs-Arm. 8║2x*Bwpn*║ 1 ║--------1+-----║ 1+║ 1 ║ 1*║ Man Station ║ ╚═══════════════╩═══╩════╩═════════════════════╩═══╩════╩═══╩═══════════════╝
Dante -
--------
After Io is Dante. I don't want to spoil to much, but I'll go as far as to say that Dante special levels work differently than other places...
- 'The shattered abyss' is accessed via a portal after an enemy is killed via melee in dante:1. It is a melee-focused level with a great melee weapon, but no weapons can be fired there.
- 'Inferno' is accessed after fully clearing a later Dante level. It is an entirely optional level. Consider it a 'win more' feature: basically a victory lap. You'd be amazed how many characters that could otherwise win the game with ease, go here and die! In short, don't visit inferno until you've won so many times, you're bored of standard victory! The level features 'islands' that the player teleports between, with lethal enemies. At the end, there is a huge pile of rewards
(Honestly though, despite amazing rewards, even incredibly inferno-able characters usually finish this level in a worse overall condition than they had going in.)
- Special branch locations
There are now many 'special' branch locations, with unique challenges and rewards. Each moon has a pool of 4 locations to 'pick from', out of which 3 will be chosen in a given run. I'll try to cover a 'general' approach to branches and their bonuses here

Callisto:
- Jovisec weapon perks (the 'not-special' branch perk) are good for Automatic/pistol characters, and not bad for snipers.

- Mimir Habitat offers the 'mimir defense force' weapon trait, common here, gives +1 optimal range. It's not too important on pistols, average on shotguns, strong on automatic rifles, and extremely strong on SMGs.
The branch mission allows a player to create exotic weapons and get AI robot followers, provided they hack MDF sentries on each level.

- Valhalla Terminal has Valsec, which increases damage against robots. Useful, but not hugely influential.
The branch mission allows a player to deactivate further callisto robots, or gain access to storage rooms: 1 with good consumable items, 1 with a most-used-type weapon, and one with combat armour.

- Mines: Jovisec weapons are nice for many pistol builds and scoped rifles.
Become attuned to demons by closing 2 demonic portals fast enough. Then bump the pillars to draw a pentagram in the anomaly, to reach purgatory, which allows you to pick uniques items, portals to other moons, and a boss fight+ending+new difficulty (bottom of the map). busy work for people who like to google, basically. :P
Einheijar posted a nice purgatory graphic on the JH wiki, showing the path to most uniques/areas. :
https://gtm.steamproxy.vip/ugc/1785135165616242336/64935C97E27A81BDD671CF7ADA04E1FE21320799/?imw=256&&ima=fit&impolicy=Letterbox&imcolor=%23000000&letterbox=false
If you want to get to the boss / unlock inferno difficulty, then the following path works: ↑←←↓→↑→→↑↑↑←↓←←↑
Alternatively, note down the runes in the dark cathedral to find a much shorter path which is specific to your personal Jupiter Hell installation.

- Rift: Jovisec weapons here too. The rift also gives access to very nice 'generic' rewards, as well as poison immunity if you open all the gas pipelines, then walk into the brighter gas cloud in the bottom-left of the level. Getting out on respawning difficulties can often be too taxing.


Europa:
- Asterius habitat weapons inflict chill (This is my favourite manufacturer perk, for how well it works with an autoloading rocket launcher). The branch mission is to hack Astertech sentires, allowing reward unlocks in Asterius breach.

- Conamara Chaos Biolabs weapons hurt biological targets more.
Essence pipelines spawn many demons, one of which will carry an essence to be colelcted. The can be handed in for 3 multitools at the end of the branch, for an immunity.

- Europa dig zone weapons have -75% swap time (great with shotguns, and can also be important with certain sniping characters. Generally useful elsewhere (melee, pistols etc), too.
The branch mission involves pipelines, which can be closed to remove the cold gas on the levels, but you will be punished for doing so by being denied branch rewards.

- Europa ruins items offer +25% damage after moving, which can be extremely important for certain characters, but useless to others.
The levels have a special cubby in each level which has a (ancient) item that can also be sacrificed in the shadow halls (blue pentagrams) in Io. The temple can offer 5 items, once of which is the frozen heart, which can also be sacrificed in the cathedral for a powerful faustian bargain.


Io:
- CRI black site weapons do 'wither', reducing enemy resistances by 20%.
The black site levels are often raided by CRI units, which will keep spawning in waves until the monsters are cleared. Help the CRI for a reward

- CRI lab weapons have the 'CRI' perk, which offers increased damage to demons +50%.
The labs get invaded regularly by demons, similar to how black site levels are raided by CRI. Making sure very few CRI die leads to special reward.

- Mephitic mines weapons have a reduced reload time -50%

- Shadow halls -
Leads to dark Cathedral. A unique item can be traded in here for another (only gives exosuit, death, void or apocalypse. )
Frozen heart can be sacrificed for a wish. All wishes are currently quite useful, but wealth perhaps requires a deeper understanding of the game's unique items, and how they might benefit your current character.
- Choosing your route (ie. reasons for taking braches)
Note - this section is out of date. While the advice about reading email messages, and hunting for programmable medbays or extra rooms is still sound, lots of the rewards for specific branches have slightly changed since this guide was written. If you disagree with something here, you're probably right and I'm probably wrong!

Some areas have significantly different rewards. I'll try to break down my approach here:

First of all, read the email messages. Something like a programmable medbay should strongly incline you to take a path. Ditto (albeit slightly less-so) for 'extra' rooms like strongrooms, workshops, and to a lesser extent storerooms and laboratories. Likewise, feel as put off by broken elevators or clearance access requirements as your current inventory demands!

Now, assuming email reports on special events are somewhat equal (which they hardly ever are):

In Callisto, you may want to take Valhalla/Mimir if your character is using autos, semi-autos, or launchers. This is because they feature a tailored weapon based on your highest weapon class kill count. It also offers nice XP from shutting down Calsec! They also have a nice chance for a purple shotgun, including the jackhammer, but it's no guarantee.
If you're after melee, the rift offers you a close-combat weapon. It also provides many multitools and charges, which is great for anyone with the space to carry them! For pistols or shotguns, the military base or docking bay offer 2 of each! Docking bay is easy and has quite a nice chance of finding stimpacks from vending machines, but the difficult military base will usually have better quality in those 2 pistols and shotguns. Finally, the mines offer an AMP to suit your most used weapon, and some high quality items / a good medpack, if you're happy to fight archreavers. My favourite is the rift. Try to avoid the military base though, it's the most dangerous path for me.

In Europa, the best reward is probably the backpack which you get from the pit or the refuelling base. However, the refuelling base is *lethal* and you usually want to avoid it.
If you feel you can do without the extra inventory space (maybe your main weaponry doesn't use much ammo? Maybe bad luck had you use all your medkits and grenades already?), you should pick based on what you need: Need armour? Conamara Chaos has the (awesome) one-off enviro armour (great for mephitic mines later as well), but Asterius has some armour, a relic, and additionally a manufacturing station to raid for future armour repair tools! Or maybe you need weapon mods/manufacturing? The dig leads to Tyre outpost which is a goldmine for multitool shopping (technician sysops have a field day here!) Finally, if you want a demonic wish later, take the frozen temple (it also features a mod based on your most used weapon class, and a piece of decent armour, but make no mistake, these rewards are paltry compared to all other Europa areas- for now!)

In Io, If you want to cash in your frozen heart go for the shadow halls (health is no longer the only good wish!) by dropping the frozen heart on the orange pentagram near the centre of the level. Otherwise, the CRI facilities are very likely to offer the best firepower in your game provided you're carrying plenty of red keycards. If you get the choice of both CRI facilities, the CRI labs are undoubtedly harder, but in addition to the best weapon, you also likely get the best armour! (The CRI black site is miles easier for most characters though, and thus probably wiser too.) Otherwise, you've got the mephitic mines if you're immune to poison, the warehouse if you just want an easy level and a piñata of random goodies, and finally the infernal lock if you want a rare modpack.
SPOILER!!!! If you want to open the infernal lock, and you don't mind being spoiled, then you've got to learn how to stop doors from closing :)

As for the other area - it should be self explanatory. Without wanting to spoil too much, melee specialists know which level they're focusing on, and players without a death wish will soon learn where to avoid!


- Hope that helps. Of course this is just my opinion, and I'm always happy to hear others!
Advanced tactics and game mechanics 1
-= Cover (and aim/hunker): =-
------
The numbers behind cover, aim, and hunker would probably surprise you - did you know that, if a fight would just go on forever between you (in cover) and an enemy, and you had no skills, weapon perks, or anything, firing with <65% accuracy, you almost break even using aim/hunkering before every shot, compared to just opening fire!!!

First, the numbers:
  • Cover: 70% protection (enemy hit chance reduced to 30%)
  • Hunker: 82% protection (enemy hit chance reduced to 18%)
  • Aim: Current tohit% increased by +50% (can be applied twice)
In reality, hunker/aim isn't completely dominant because a: it's not worth it without cover, and b: frontloading damage - if you can kill an enemy in 1 turn, they can't shoot back!
In general play, the most common situation where hunker/aim is great is when the player has a weapon that can kill the target *if* it hits with all of its bullets, but have less then (maybe) 70% hit chance. In this situation, hunkering will allow the player to take out the target in 1 salvo (next turn), instead of 2 salvos by firing twice. That means the enemy is dispatched in the same time whether the player hunkers or just fires, but using hunker the player will be much better protected during the turn in which the enemy returns fire (82% instead of 70%). As an added bonus, the player will use half the usual ammo.
Another good situation, easily missed, is when enemies haven't noticed you yet - enemies tend not to notice you as soon as you can see them. If you shoot them, they'll immediately respond, but you can very often 'aim' while still not being seen, to open a firefight with a more powerful attack.
More situations where hunkering is worth it usually involve the 'aim assist' helmet, scoped rifles, or the 'cover master' skill, but it's important to note that even without any traits or perks relating to hunker or aim, hunker still gives an extra 40% protection during the aiming turn, and an extra 20% protection the turn after that. This total of 60% protection means that you're effectively only using 40% of a turn to aim. Using 40% of a turn to get +50% damage is close to even! It's pretty negligible though, and thus the important part in deciding whether or not to aim/hunker is all about recognising situations where you can shave off a turn by aiming or not aiming.
Less negligible is using aim with an aim assist helmet, a scope, cover master, or precise, which make hunker awesome!
As a final note, I arrived at these numbers through testing, not code diving or word of god. This means they could well be a little out, but if I ever do tests that suggest otherwise, I'll update them!


-= Resisting enemy AOE attacks. =-
----------------------------
Note that this is a pretty advanced skill to get used to. Feel free to ignore this until you've mastered most of the rest of this guide, because these situations are far more rare than others, and only really necessary for a player trying to squeeze out every last bit of efficiency from their play!

Enemies with AOe attacks can be the bane of many players. In fact, loads of us value items like blast helmets, or skills like fireangel or cover master for their AOE damage reduction.
However, a character without these AOE-resisting options can still take out AOE opponents safely - the key is recognising situations in which a 'miss' (due to cover) will strike cover too in a way that protects the player from the blast.

My favourite such situation, due to how recognisable it is for me, is where an enemy is a knight's move from a piece of cover, and you are further back, at a diagonal to that cover:
.... ...m m..# .... ..## ..## ...@ .@#.
In the above situations, for example, the player (@) hunkering behind this piece of cover(#) will make the medusa (m) keep hitting the cover, while the player can fight back effectively.

Important Jupiter Hell notes (for advanced players)- medi-fibre armour healing is *not* increased with the 'health monitor' perk
- For the sake of weapon perks, an entire turn's burst of bullets is calculated against the target when the turn begins. This means perks like 'ripper' and 'finisher' will *not* kick in half-way through a burst. A healthy biological target will get hit with standard (un-boosted) damage from every bullet, even from a ripper weapon that hits every shot.
On the other hand, 'fresh mag' will apply to every bullet in the first salvo, so yes, a 7.62 sidearm can deal 30 damage on the first round with a simple power mod for the 'fresh mag' perk.
- 'Barbed' heavily reduces enemy accuracy, but the enemy will get a chance to fire at full-accuracy before the barbed effect 'kicks in' and ticks some damage. This means using barbed requires allowing time for the effect to 'settle'. When it does this, though, barbed is a remarkably powerful disabler.
- Medusae beam attacks (the ones that take a turn of 'charging') deal 60 damage. The always hit, but their damage is modified by accuracy penalties in the way that normal attacks suffer reduced chance to hit. Cover will reduce the damage relative to it's protection of 70%. Hunker further increases this to 82%. Dodge bonuses work multiplicatively with this cover bonus. It's usually best to find good cover and hunker when a medusae is charging its beam attack (running away will only delay the shot until the next time it sees you). Surprisingly, despite its accuracy penalties, bleed stacks do not reduce archmeduase damage.
- The infernal lock only has 2 'critical' doors to be kept open. The two directly to the left of the leftmost switch.
- Level 2 and above blue stations can re-roll basic and advanced perks. Some of the most important uses for this are trying to roll the 'auto-precise' perk on an auto AMP (especially for snipers), and re-rolling weapon mods. This is especially useful *after* using appropriate modpacks to get the traits you want.
(For example, without any whizkid, an AV1 chaingun with the 'ripper' perk can be modded with a P mod to add 'hunter'. After hunter is applied, the 'ripper' perk can be rerolled, and might even allow other interesting mod possibilities.)
Advanced tactics and game mechanics 2
'mastering dodging, in 3 easy steps' :

1) Moving increases your current dodge by your dodge stat (default:30) .

2) Mobile actions (moving or melee attacks) 'pass along' half of their dodge to your next turn.

3) Dodgemaster doubles dodge when meleeing, and makes stationary actions 'mobile'.


To hit, cover/hunker, and dodge/guard.
---------------------------------
This was a mystery that took a *ton* of experimentation to figure out! For a long time a number of players wondered whether aim bonuses combined with dodge/guard in an additive or multiplicative nature. Every time a set of data suggested one, something would appear that suggested the other.
Eventually, after literally thousands of points of data, I finally arrived at something that fit all the experiments:
Cover/Hunker give 70%/82%
dodge/guard are added, to a max of 90%

Now, the really confusing part - enemy base aim is multiplicative with the above, (enemy base aim appears at the top of the enemy info screen) so if you have 50% cover, and an enemy has 150% aim, then he will hit 75% of his shots...
HOWEVER, the *weapon* accuracy bonus is *additive* against the dodge/guard of the player. (weapon accuracy bonuses are found towards the bottom of the enemy info screen.)

For example, a player with 90% dodge/guard, going up against an enemy with a natural 120% accuracy, will be hit 12% of the time.
On the other hand, a player with 90% dodge/guard, fighting a reaver that has 100% accuracy (normal difficulty) attacking with his melee claw attack (+20% tohit), will be struck 30% of the time!

On the surface, you'd expect a 90% dodge player to take the same amount of hits from a 120% accurate enemy, and a 100% enemy with a +20% weapon accuracy, but in fact they are completely different!
This is most significant in the game with melee attacks, but there are also ranged weapons with accuracy bonuses, such as the medusa's explosive energy ball.

(I *really* hope this info is of use to readers of this guide, because it took an embarrassing amount of testing to figure out!)


Videos with other mechanics: Shotgun sniping: (17:15) https://youtu.be/GNsJyWa4BWw?t=1035
Rail rifle marine: (4:48:07) https://youtu.be/jZx5_iMQ-KQ?t=17287
Bleeding scout: (4:26:10) https://youtu.be/18YThLJa-J0?t=15968
RangedRockets: (3:58:19) https://youtu.be/18YThLJa-J0?t=14298

embedded video previews:
Shotgun sniping: (17:15) https://youtu.be/GNsJyWa4BWw?t=1035
Rail rifle marine: (4:48:07) https://youtu.be/jZx5_iMQ-KQ?t=17287
Bleeding scout: (4:26:10) https://youtu.be/18YThLJa-J0?t=15968
RangedRockets: (3:58:19) https://youtu.be/18YThLJa-J0?t=14298
- Supplementary links (videos, tips, nightmare playthroughs)
There is a great wealth of information and regular discussion available on the game's discord channel: https://discord.gg/JupiterHell
Additionally, be sure to check my youtube: https://m.youtube.com/user/xxxxSylphxxxx
or twitch: https://www.twitch.tv/sylph_h
channels for (somewhat) regular new gameplay videos. Twitch and youtube can both be a wealth of gameplay examples from tons of players, and I'd totally recommend checking them out, especially for live games!

I thought I'd finish this guide with a few videos that might help demonstrate some of these ideas to players... general tips and tricks: https://youtu.be/qzTWe5k-uTg Timestamped strategy examples: Shotgun sniping: (17:15) https://youtu.be/GNsJyWa4BWw?t=1035 Rail rifle marine: (4:48:07) https://youtu.be/jZx5_iMQ-KQ?t=17287 Bleeding scout: (4:26:10) https://youtu.be/18YThLJa-J0?t=15968 Rocket sniping: (3:58:19) https://youtu.be/18YThLJa-J0?t=14298 Nightmare Full game playthroughs: recent: Technician (entenchment) https://youtu.be/t4Kw_Tpl8rg Scout (sniper) https://youtu.be/RbgdmRlyxgU Marine (Vampyre): https://youtu.be/jz8u6-GidOo Part 2: https://youtu.be/hMsurQCUBtA scout (ghost) https://youtu.be/WyYSVg8yv0A part 2: https://youtu.be/G2z_rsQ9uUs Old: Tips and tricks: https://youtu.be/7eMT5nfIa-I Scout (sniper) https://youtu.be/EvDAD1ym8uo Technician (sharpshooter): https://youtu.be/znRlvucyQj8 (Note - don't let these videos trick you - It's far easier to win a nightmare game with a marine, or a hellrunning scout, or a wizard technicians. I love playing technician, and try to challenge myself to win without 'wizard'+'toxicologist'. Enjoy the videos, and soak up nightmare advice, but don't let them fool you into thinking that technicians are better off not picking wizard!!! Similarly, 'survivor' is way better than 'vampyre' for a nightmare marine!)

The youtube videos above are embedded below:


Nightmare Full game playthroughs:

recent:
Marine (vampyre): https://youtu.be/jz8u6-GidOo
Part 2: https://youtu.be/hMsurQCUBtA
Technician (entenchment) https://youtu.be/t4Kw_Tpl8rg
Scout (sniper) https://youtu.be/RbgdmRlyxgU
scout (ghost) https://youtu.be/WyYSVg8yv0A
part 2: https://youtu.be/G2z_rsQ9uUs
Old:
Scout (sniper) https://youtu.be/EvDAD1ym8uo
Technician (sharpshooter): https://youtu.be/znRlvucyQj8

general tips and tricks: https://youtu.be/qzTWe5k-uTg
Old tips and tricks: https://youtu.be/7eMT5nfIa-I

Timestamped strategy examples:
Shotgun sniping: (17:15) https://youtu.be/GNsJyWa4BWw?t=1035
Rail rifle marine: (4:48:07) https://youtu.be/jZx5_iMQ-KQ?t=17287
Bleeding scout: (4:26:10) https://youtu.be/18YThLJa-J0?t=15968
Rocket sniping: (3:58:19) https://youtu.be/18YThLJa-J0?t=14298

Other game modes - 'Angel of', 'Trials' etc
Other game modes.
When playing Jupiter Hell I have a preference for the standard game types. To me, the 'angel of' challenges basically feel like Jupiter Hell with a ton of missing content! I quite like the trial modes, but I very much see that as fun little sub-games, and don't really spend significant time on them compared to the main game. These habits probably stem from me loving the variety in the main game, and that is reflected on my playstyles too... I mostly play on Nightmare difficulty. I enjoy the odd apocalypse game, but the enemy health values clearly aren't designed to fit the weapons in the way that other difficulties are, which I felt led to less strategic variation/depth. [edit - after playing more, I've come to *love* the health values on Apocalypse/inferno. It gives a reason to aim scoped weapons, and a reason to use automatic weapons over hunter rifles, chainguns over assault rifles etc]

When I'm playing I love to react to what the game throws at me, and I get a ton of satisfaction from going into a game with no idea of what I'm going to build, reacting to the seed accordingly; not necessarily to be as powerful as possible, but rather to play around with a seed's unique possibilities (although the two are often the same!) That means it's rare that I play the angel of or trial modes, but after completing other parts of the guide I'll fill in some details about challenge modes here.

For now, I'll at least put together a basic list of builds or tricks that I've found successful for the various mods:

Angel of light travel - Scout(sniper) or melee builds
Angel of carnage - Tech(Sharpshooter)
Angel of mercy - Scout(ghost) - if you can ever get there!!!
Angel of doom - Scout(gunrunner)
Angel of New York reload - Tech(Entrenchment)

Arena - There are a few builds that seem much better than others for arena. I've done it with Vampyre, but other builds like grenadier(technician) and Army of Darkness(Marine) are totally viable. The most important strategy seems to be buying grenades with all (or almost all - a chainsaw can be a nice purchase) of your multitools. Gas grenades are pretty much necessary for the last waves (10-12), and krak grenades are important escaping bot problems. A frag (or 2, max) can help. The general strategy for me was the clear the first 6-9 levels with normal weapons, maybe a grenade or 2, and then just go mental with grenades. Plasma shotgun (to fire through gas) can also be important, especially for fighting warlocks.
Supplementary writing (more casual/detailed discussion of points covered)
I'm using this section to include any further explanation of points visited earlier in the guide that I felt were trivial or overly verbose.

Re: Difficulty settings and improving player skill:
So, with that being said... If a 'good' player is one that can identify danger and reduce the harm that danger causes (related: previous section of guide), how does someone get better at doing that?
I've seen too many new players pumping the difficulty up so high that not only are their success chances minimal, their chances of even realising what on earth they did wrong are minimal too! It's much easier to get better, in my opinion, when you're playing on a difficulty level where you get to occasionally survive nasty situations.

I know the age-old mantra that you learn most when you fail, and often it's very true, but in my experience, specifically in this game, I find that I learn most when I *nearly* fail, but then try out something crazy and it sometimes works!


I'd love to be able to explain why I think JH is something of an exception to the rule of 'lose lots=learn lots', so I'll give it my best try:
I think the most important ingredient to improve your JH gameplay is sharpening your understanding of the myriad of mechanics in the game. There's a *ton* of depth that comes from the game's core mechanics. As you play, you have a natural 'feeling' about how well cover protects you, how much aim improves your accuracy, whether staying on the move to keep your dodge bonus is better than using this firing position that 2 enemies can see etc. Now, as your understanding of these mechanics improves, so does your ability to find the best 'solutions' to dangerous situations, but these mechanics and resultant priorities are just so damn intertwined!

Now, there is certainly also a lot of value in learning the enemies and our equipment. It's important knowledge, but I feel that this knowledge comes somewhat automatically from just playing the game. When a ravager kills you with a big missile, you know that ravager missiles hurt automatically! The first time you pick up a plasma shotgun and fire it at a sentry, you immediately gain an understanding for how much better a plasma shotgun is against bots than a normal shotgun is! Obviously, as you play more, you get a better idea of exactly how much damage those ravager missiles do!

The crucial part of learning the game though, in my opinion, is this:
While the 'knowledge' of game entities (enemies, equipment, levels etc) comes automatically to the player, the knowledge of the game mechanics does not! The emergent depth in the game that comes from mechanics like action speed, cover, dodge, enemy behaviour, aim/hunker etc is only learned when a player actually uses or pays attention to them.
Of particular importance is that they all affect one another so much that, often, if you survive an encounter, you have no idea whether it was your dodge or your cover or your bleed or your action speed or your aim that was responsible without many more trials!

I personally feel that this is particularly important when it comes to selecting the difficulty level. On higher difficulties, you can't just correctly use these mechanics to survive an encounter. You often have to correctly use more than 1! This means that playing a high difficulty can kill you even if you got most of them right, and you'll have no way of knowing which one you got wrong, so you can't know what to change next time. In such situations, you're not getting better!

When the difficulty is reasonable, OTOH, you can master these skills individually, and identify when you're misplaying.

I've seen an incredible amount of players immediately lock themselves in to the harder difficulties, and it really makes me sad watching them, because even when they aren't painfully dying every 5 minutes, they still tend to be so overwhelmed, they don't even get to understand how they messed up! Sure, you can learn what I described above as 'entity knowledge' (enemy & gun statistics etc) this way, but you don't really get much of a chance of understanding the other type of JH knowledge (the way game mechanics intertwine and the priorities of player choices that result).

Just to be clear here - I'm not trying to bash players that lock in to hardest difficulty here *at all*, especially those that really enjoy dying in videogames. I have a ton of respect for that approach, People should absolutely play games in the way that's most fun to them!
The reason I'm covering this a lot here is because I, in fact, am one of those 'hardest only' players. I don't know about others, but the reason I tend to do it is that the 'fun' part of a videogame, for me, is improving. I like having a very clear 'measure' of my skill, then seeing it demonstrably get better. For me, that is where the satisfaction of playing a game lies. I don't get a reward from a 'you win' screen, I get a reward when I know I've honed my skill.
The reason this is important for JH players is because if, like me, they play on hard because they want to improve, I feel it's vitally important to realise that you're quite likely to improve your skills much faster by playing a less challenging difficulty level.
if you haven't done it yet, please just try getting a reliable win! Ideally, try finding a difficulty level where you have a reasonable chance of winning. Maybe something like 30% *?
If you pick a reasonably 'win-able' difficulty, and take your time thinking about each of your moves, I'm confident that you'll soon find yourself learning new skills and improving your understanding of the game at a much faster rate than playing high difficulties and dying lots.


(*: Many roguelikes tend to get much easier as the later levels are approached, where a player has all the gear, all the skills, all the items, ready for anything. JH had a few design features to prevent this. There was an intentional design focus on making the game maintain or even increase difficulty throughout a run *faster* than the player character gains strength. Due to this, while a 30% win ratio sounds really high, especially to roguelike veterans, it's actually a good ratio, because those 70% losses are likely to come after an hour or two of playtime, rather than in the first quarter/half of the game like many roguelikes!)


23 Comments
John Battman 29 Apr @ 4:15pm 
Oh and for what it's worth, the cover calculations will have helped at least 1 person. It always annoyed the hell out of me that I had no idea how effective hunkering ACTUALLY was, why sometimes it seemed great, other times almost useless - now I know, and it makes the game feel a lot more intentional rather than just "hope it works this time" which is important in a roguelike.
John Battman 29 Apr @ 4:14pm 
Incredible guide, thank you so much! I've always really liked JH but it never "stuck" for more than a few runs at a time because a lot of the mechanics were unclear / unreasonably difficult to figure out from experimentation. I recently found your guide and it's really breathed new life into the game for me, and now I can enjoy it more than ever before.
PhaseVampire 11 Aug, 2023 @ 5:06am 
I just discovered this game last week. I think not so many people know about it sadly. It's a great game, and your guide helps me a lot!! Always using it mid-game too for routes etc. I was able to clear normal mode yesterday including Dante Inferno!! ^^ My turning point was when I picked up the Shadowhunter weapon haha!! :)

I want to win 1-2 games more, before I move to the next difficulty.

Are you still playing/planning to play this game? I know it's a lot of work, but I would love to see an updated guide!! ^^

Thank you Sylph for your great guide!! :steamthumbsup:
sylph  [author] 24 Apr, 2023 @ 8:08pm 
@ Asriel - There's a section called "Special branch locations" that covers manufacturer perks and branch quests, but it's admittedly rather brief. You might have missed it, or maybe it just didn't cover enough detail? As you mentioned, it IS too old to cover the +crit effects.
This being said, I'll be covering the newer version of the game sometime, and I'm sure I'll have plenty of updating. (The new nightmare respawn prevention (high-damage and DOT effects / gibbing) is something I look forward to playing with). I'll confess that I'm a bit wary of some other areas though, particularly headshot and crit builds, but Kornel usually seems to get things just right!

@Raiseo Hitsu - I'm glad the content was some help! Hope you've got a lot of enjoyment out of the game. As for difficulty - it's surprising just how quickly hard and nightmare go from 'unfathomable' to 'reasonable' with a bit of play! I'll bet you're improving much faster than you realise!
Raiseo 19 Apr, 2023 @ 10:20am 
Thank you, Sylph, your video and guide helped me clear Medium today at 15 hours. :squirtyay:
Not sure I'll get to the difficulty you play, but it's a start.
Asriel 19 Apr, 2023 @ 4:28am 
Very nice guide, but seems a teeny bit outdated? I think.

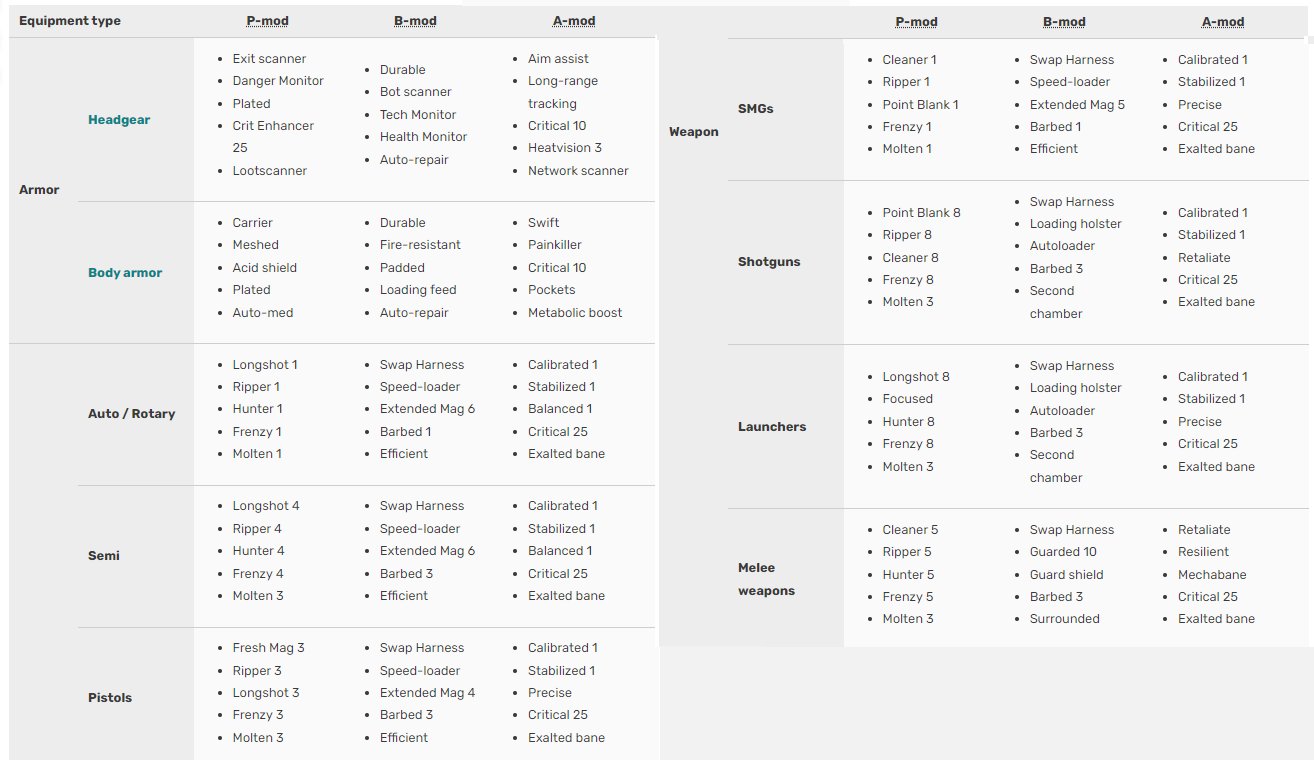
Also, is there a plan to include the new manufacturer perks in the guide? Myself basically almost only win games where I get a suit of Jovisec armor and helmet due to how nasty and hard to get 50% crit is.
brickey.8 21 Oct, 2022 @ 5:47pm 
Wow, this guide was super helpful! Well done!

I gotta disagree about Assasinate being weak though (at least on UV)--I found it one of the easiest builds. With a good melee weapon and points in executioner+swashbuckler (which are still useful when you use your gun and are less weak early-game than the other melee builds), you can one-shot even ravagers and medusas, and with energy leech you can spam it. Letting you clear levels losing minimal health and ammo. You do have to be careful not to use it until you know there's nothing dangerous behind them, but on non-respawning difficulty I didn't find that much of a problem. That said, finding an exotic sword makes a big difference.
sylph  [author] 19 Sep, 2022 @ 9:15am 
Haha! The first chapter was designed for that purpose! ("A very short Jupiter Hell guide")
(But the videos are probably a better learning tool there!)
Stargoat 19 Sep, 2022 @ 8:53am 
Is there an abridged version? Haha.

Great work!
Endy73 4 Sep, 2022 @ 3:36pm 
Great work. Thank you very much for your time and efforts.