Fight'N Rage

Fight'N Rage

43 ratings
Costume Mod Installation Guide : VERSION 2
By Aries
This guide has been as a bit of an "update" to my previous guide. This one will be made separately from the other because the methodology to mod is different, and requires an entirely new structure.

However this new method is much easier, cleaner, and practical in the long run.
5
   
Award
Favorite
Favorited
Unfavorite
Introduction
Well hello there! You must be interested in making/adding mods into this fine little beat-em-up game now don't you? Well, rest assured, I am here to help.

Before we begin, it is important that I do this in case somebody screws up.

I AM NOT RESPONSIBLE FOR ANY DAMAGES THAT MAY OR MAY NOT POTENTIALLY BE DONE TO YOUR GAME, COMPUTER, OR WHATEVER ELSE. YOU WILL ACKNOWLEDGE AND ACCEPT THAT YOU ARE MODDING FIGHT N RAGE AT YOUR OWN RISK. AGAIN, YOU WILL UNDERSTAND THAT I AM NOT RESPONSIBLE FOR ANYTHING YOU BREAK

With that out of the way, let's begin!

I recommend that you get your hands on some archiving software in order to get access to the files. You can use whatever you want, like Winrar, and some installations of Windows come with archiving software base, but I like to use this one right here....

https://www.7-zip.org/
Step 1: Creating the "mod" folder
Due to the new way you install mods, it is no longer necessary for you to unpack and repack assets like you might have before. Instead, all that's needed now is a "mods" folder in the root directory for Fight N Rage. Where is that? Simple!

Find Fight N Rage on your steam library page. Right click it, and select "Properties." Then select "Local Files." Then select "Browse Local Files"

Reference the images below for visual help.


And congratulations! We're here! All you need to do now is right click somewhere in the empty space in the window, select "Create New" and then "Folder."

Name this folder "mod" without the quotation marks.

Step 2: Creating the sub-folders & adding in mods
Now that you have created your mods folder, it is time to create the next folders for the game assets that you wish to mod over. This is where things can kind of get tricky, because there's a lot you can put here.

For most people, all you'll want to do is create a new folder named "characters" without the quotes. However, in the mods folder, you can also create folders named "sounds," "bg," and so on (documentation still needs to be done on this it'll take a while), each folder being the place where you will put the appropriate mods for.

But like I said, for most, you'll really only want to put in "characters" so go ahead and make a new folder in the mod folder and name it "characters" without the quotes.

Step 3: The Hard Part
Unfortunately, dear reader, you're not getting away from having to unpack the game assets. The difference is that all you need to now is ONLY unpack assets, and not pack them back in.

SO, without further ado, let us begin the "hard part."

In order to mod in the sprites that you wish to use in Fight N Rage, you need the appropriate .xml file. The .xml file is used by the game to make sense out of the sprite sheet, where things are placed, and what not. Where are the .xml files? Not too far away from the original source sprites. You will need to go back to the root folder for Fight N Rage and then to "data," where you will likely see something like this...


Below is a list of all the main playable character .dat files so you can find them fast without having to extract everything. Each are organized to include where you will find the image file and the corresponding .xml. You must extract the files from the .dat files by using archive software, like 7zip or Winrar. I suggest 7zip, because it's quick and easy. You do this by right clicking on a .dat file, and then opening it with your archive software, such as "open with 7zip." A new window will open up, and simply drag and drop the file inside the archive onto your desktop, or another open window (preferably an empty folder).

Character Sprite Locations & XML

Gal: Codename "girl"
Costume 1: 154.dat (image) 155.dat (xml)
Costume 10: 156.dat (image) 157.dat (xml)
Costume 11: 158.dat (image) 159.dat (xml)
Costume 12: 160.dat (image) 161.dat (xml)
Costume 13: 162.dat (image) 163.dat (xml)
Costume 14: 164.dat (image) 165.dat (xml)
Costume 15: 166.dat (image) 167.dat (xml)
Costume 16: 168.dat (image) 169.dat (xml)
Costume 17: 170.dat (image) 171.dat (xml)
Costume 18: 172.dat (image) 173.dat (xml)
Costume 19: 174.dat (image) 175.dat (xml)
Costume 2: 176.dat (image) 177.dat (xml)
Costume 3: 178.dat (image) 179.dat (xml)
Costume 4: 180.dat (image) 181.dat (xml)
Costume 5: 182.dat (image) 183.dat (xml)
Costume 6: 184.dat (image) 185.dat (xml)
Costume 7: 186.dat (image) 187.dat (xml)
Costume 8: 188.dat (image) 189.dat (xml)
Costume 9: 190.dat (image) 191.dat (xml)


F.Norris: Code name "master"
Cosutme 1: 224.dat (image) 225.dat (xml)
Costume 10: 226.dat (image) 227.dat (xml)
Costume 11: 228.dat (image) 229.dat (xml)
Costume 12: 230.dat (image) 231.dat (xml)
Costume 13: 232.dat (image) 233.dat (xml)
Costume 14: 234.dat (image) 235.dat (xml)
Costume 15: 236.dat (image) 237.dat (xml)
Costume 16: 238.dat (image) 239.dat (xml)
Costume 17: 240.dat (image) 241.dat (xml)
Costume 18: 242.dat (image) 243.dat (xml)
Costume 2: 244.dat (image) 245.dat (xml)
Costume 3: 246.dat (image) 247.dat (xml)
Costume 4: 248.dat (image) 249.dat (xml)
Costume 5: 250.dat (image) 251.dat (xml)
Costume 6: 252.dat (image) 253.dat (xml)
Costume 7: 254.dat (image) 255.dat (xml)
Costume 8: 256.dat (image) 257.dat (xml)
Costume 9: 258.dat (image) 259.dat (xml)

Ricardo: Code name "minotaur"
Costume 1: 260.dat (image) 261.dat (xml)
Costume 10: 262.dat (image) 263.dat (xml)
Costume 11: 264.dat (image) 265.dat (xml)
Costume 12: 266.dat (image) 267.dat (xml)
Costume 13: 268.dat (image) 269.dat (xml)
Costume 14: 270.dat (image) 271.dat (xml)
Costume 15: 272.dat (image) 273.dat (xml)
Costume 16: 274.dat (image) 275.dat (xml)
Costume 17: 276.dat (image) 277.dat (xml)
Costume 18: 278.dat (image) 279.dat (xml)
Costume 2: 280.dat (image) 281.dat (xml)
Costume 3: 282.dat (image) 283.dat (xml)
Costume 4: 284.dat (image) 285.dat (xml)
Costume 5: 286.dat (image) 287.dat (xml)
Costume 6: 288.dat (image) 289.dat (xml)
Costume 7: 290.dat (image) 291.dat (xml)
Costume 8: 292.dat (image) 293.dat (xml)
Costume 9: 294.dat (image) 295.dat (xml)
Step 4: The Tedious Part
Now that you have the assets out, you need to rename them appropriately. Let's use Gal's first costume, as a base line first and then you can do the rest on your own.

Gal's first costume is found in 154.dat, which you should have extracted to your desktop (or some other folder). You should now have a file named "154" that is blank, that isn't an image, or a text file. Rename this file, "154" to "girl.png"

Now the file is an actual viewable image, and depending on your OS's setup, you should see Gal's sprite sheet. You can then copy and paste this file into the "characters" folder you just made not too long ago.

But we're not done here. Just having the image file alone isn't enough. You need the XML.

Gal's xml for her first costume is located in 155.dat, which you should have extracted somewhere onto your computer. This file is floating right now as just "155" so rename it to "girl.xml"

You can now take this file, "girl.xml" and copy paste it into the "characters" folder.

This is basically all you need to do now for your mods to work. I know I just had you put Gal's normal costume in the mod folder, but it makes for a great example because this new system is fairly simple.

For this next example, we will do things a little differently. Go ahead and look for my "Shotgun Gal" custom skin, and download it (you can find it here in this guide, along with many other skins I have made. You don't have to use "Shotgun Gal," as you can really use any skin.)
https://gtm.steamproxy.vip/sharedfiles/filedetails/?id=2730545302

Let's say we want to put this skin over Gal's costume 11. SO, this is what we need to do...

1.) Find Costume 11's .xml file (the file named 159), and rename it to "girl_c11.xml"
2.) Rename the skin you just downloaded, "Shotgun Gal," to "girl_c11.png"
3.) Copy paste both of these files into the "characters" folder

Ta-Da! The next time you boot up Fight N Rage, Gal's costume 11 should look very different than normal.

If it doesn't work, then nothing will happen. The game will boot up normally. You need to go back and repeat the steps again.

You must repeat this process for any and all characters you wish to mod over.

Gal's code name is "girl"

For example: "girl_c2.png" and "girl_c2.xml"

F.Norris' code name is "master"

For example: "master_c5.png" and "master_c5.xml"

Ricardo's code name is "minotaur"

For example: "minotaur_c12.png" and "minotaur_c12.xml"

Note: Every character's first costume is just their code name.

For Gal, that would be "girl.png" and "girl.xml"
For F. Norris, that would be "master.png" and "master.xml"
For Ricardo, that would be "minotaur.png" and "minotaur.xml"

Only the first costumes use this pattern. The rest use the "character_c#" format.
Notes On Character Skins
You can't just put any skin over any costume number.

Trying to put a skin of Gal that has cat ears over a skin where Gal has the bow in her hair will have negative results. You must put a "cat ear" Gal skin over another "cat ear" Gal costume. You must put a "bow" Gal skin over a "bow" Gal costume, and a "bowless" Gal skin over a "bowless" Gal costume.

The same is true for F. Norris and Ricardo. You must put a "hooded" F. Norris skin over a "hooded" F. Norris costume, and you must put a "no hat" Ricardo skin over a "no hat" Ricardo costume.

This is fairly straight forward.
FINISH
AND THAT'S ABOUT IT!

The new method of installing mods makes it easier in the future for users to mod the game, it just takes time to set everything up for that to happen. Now that you have the game setup for easy modding, life should be easy.

I will likely fiddle with backgrounds, sounds and music at a later date, but I imagine it is a similar structure.

Anywho, this guide is finished. Have fun modding!
22 Comments
dafirus 10 Feb, 2024 @ 3:32am 
@Aries
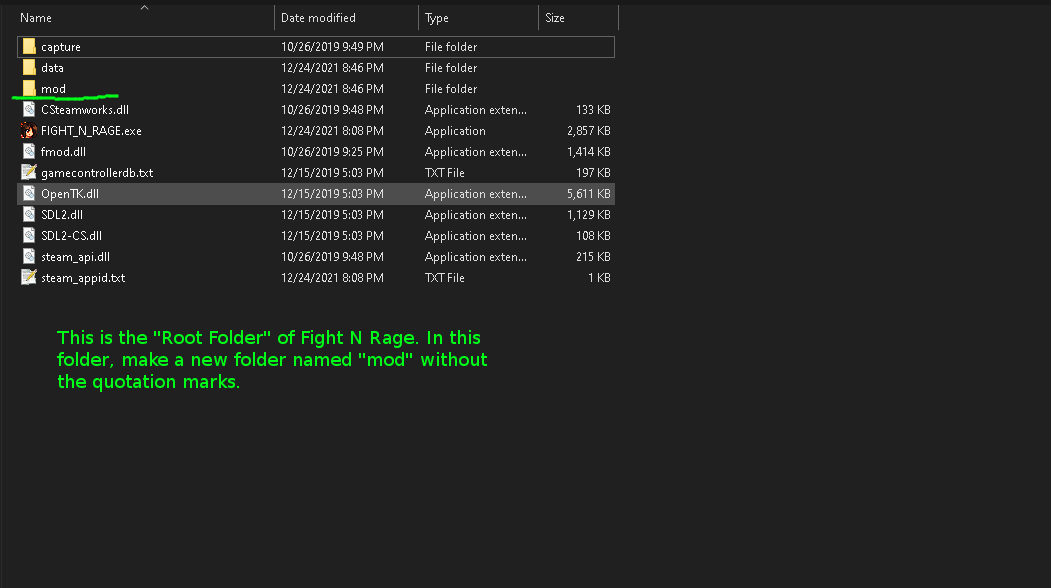
It was my inattention, I was putting it in the Data folder instead of the Root.
Thank you for your help
Aries  [author] 9 Feb, 2024 @ 3:50pm 
@dafirus
I am unsure of what your problem is. You may need to be a little more specific. I dont have a download for any mods folder, I just tell you how to make your own. If you are using one of my skins, you need to name it the same as the xml you paired it with. Reread the guide if you need to. They need to have the same name eg "master_c5.png" & "master_c5.xml" Double check the names of the folders you made; they should all be lowercase like how I put them in the guide. Also, if you are trying to follow my example using my skin, you can't mod it over the first costume, as that is a "bowless gal" skin, and gal's first costume has a bow. This is something I discuss at the end of the guide. Try to follow the example again but mod over the costume I say to mod over in the guide. And if you did it properly, you need to have unlocked costume 11 for gal to see any changes. I don't fully know your issue this is me just giving some quick tips.
dafirus 7 Feb, 2024 @ 2:01pm 
This isn't working for me. I already downloaded it with the Mod folder which has the characters folder and the two png and .xlm files with the names: girl, master and minotaur. I put it in the game's root folder and it's not changing the skin of the characters' first outfit.
icarusbird02 2 Nov, 2022 @ 9:10pm 
I made a hud_props mod forever ago that now no longer works with the new modding system. Can someone tell me how to get to the FNR discord so I can share it there and get it working again?
PBK 24 Sep, 2022 @ 9:19pm 
I see now thank you !
Aries  [author] 24 Sep, 2022 @ 10:09am 
okay let me be clear:
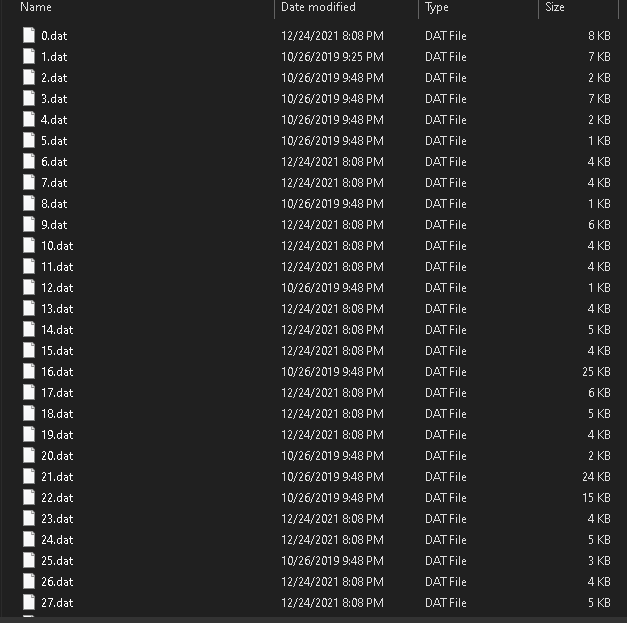
Unpack the assets you WANT TO UNPACK (such as character sprite sheets and their xmls, which I have provided for you). Ignore everything else (unless you are interested in making your own mods). Rename the xml and character skin(png) to their corresponding costume (girl_c11.xml & png) Place those files in the correct folder. DO NOT WORRY ABOUT THE ORIGINAL FILES. They should remain UNTOUCHED. You only extracted the contents. That does not modify, replace, or move them. They cannot be altered unless you deliberately do something that i have not taught you. IF, for whatever reason, they were altered incorrectly, the game will crash. Simply validate integrity of game files and follow this guide again.
PBK 23 Sep, 2022 @ 9:05pm 
you know what i realize i missed this and wasn't sure how to ask it, in the last part of the hard part and the beggining of the tedious part you say I have to unpack all the assests, Do i have to unpack ALL the assests or just the ones I have to alter? Or do I have to unpack each of the character assests, I'm willing to the work but may have stumbled on this steps.
PBK 23 Sep, 2022 @ 8:55pm 
yeah now i feel like I'm missing a step. so from scratch am I just grabbing lets say character 11 xml putting that in the mods folder then renaming that girl_c11.xml, grabbing the png then labeling that png girl_c11.png? what about the originals(the xml and the png?) might be a bit too hard to ask but can i get a screenshot of how it should look like in the mods folder? thanks for helping tho, feels great to be trying this.
Aries  [author] 23 Sep, 2022 @ 6:23pm 
@PBK

You place 159 (the xml) in the mods folder. Then, you take shotgun gal and rename it to 158, and place that file in the mods folder. The original 158 does not need to be there. As for why those things are still in the data folder, thats because the game simply loads your mod files over the original data. If you change the files in the data folder incorrectly, you will cause the game to crash on startup, hence why youre not changing/replacing files in the first place. You are only extracting the assets. Really, the only thing you needed to grab was the xml, download shotgun gal, and rename it, and drop it in the mods folder. I mention the original png files in case you want to make your own custom character skin with the original sprite sheet. Hope this helps.
PBK 21 Sep, 2022 @ 4:29pm 
so i downloaded the shotgun gal skin , from there i think things get iffy. so lets say i just downloaded the png, its on my desktop not its time to replace it into the 11th character slot. i make copies of both 158 and 159 into the mods file and also paste the png file(shotgun gal) i rename them accordingly except im not sue what im doing with the png file in this case(158) nor do i understand whats happening with the original files as they are still in the data folder. pls help