tModLoader

tModLoader

25 ratings
Calamity, Lunic Eye Only (Pre-Hardmode)
By Okami Tomato
So I've beaten Calamity in dumb ways before, but I wanted to try something more... interesting

The Lunic Eye is an item that interested me a lot but I never really used it, so I did the only rational thing and beat the game with it.

So here it is; Calamity but your only weapon is the Lunic Eye:
2
   
Award
Favorite
Favorited
Unfavorite
[The Rules]
So, of course, there are some rules for the run.

Your only weapon is the Lunic Eye
By far the most obvious point of the run, the player's only weapon they are allowed to use is the Lunic Eye. I will go into more details about its abilities later.


Alternative Damage Sources
In order to stop this becoming an easier version of the weaponless run or an impossible run Post-Moon Lord I had to decide on what damage sources are allowed for the run. Regular weapons are obviously banned but I also banned the following:
-Accessories that summon minions: It'd just be the weaponless run again as I'd just stock up on accessory minions. Accessories that provide damaging dashes, thorns, or things like the Nebulous Core are allowed since those aren't minions.
-Traps and Town NPC damage is also banned: This also includes lava, but anything that can be used to deal damage without player influence is banned

So, what is allowed?
-Lunic Eye: (Duh)
-Armour Set Bonuses: Actually a necessity Post-Moon Lord due to the Lunic's damage falling off immensely. These are mainly summoner armour bonuses, so only numbers are limited and they cannot be entirely relied upon like stacking accessory minions, so I allowed them.
-Non-Minion Accessories: Damaging dashes, thorns effects like Amidias' Spark, effects from things like the Nebulous Core, and the Abyssal Amulet are allowed. The effects of these are minimal in the grand scheme of things and banning all of these would be awkward, so I let them be.


Accessory Slots
This is a run I'd genuinely advise giving yourself more accessory slots for to give the Lunic Eye a tiny bit of extra damage and to compensate for being forced to use mostly-offensive accessories. I went with the following rule
+1 in Pre-Hardmode (Max of 6)
+2 in Hardmode (Max of 8 with the Demon Heart as well)
+3 Post-Moon Lord (Max of 10 with the Demon Heart and Celestial Onion)
This... doesn't actually make you overpowered by any means, trust me. Remember your main weapon has a whopping 9 base damage.


Also please bear in-mind this was a blind run with little to no prior planning, so there may be more optimal ways of doing things.
[The Lunic Eye Rundown]

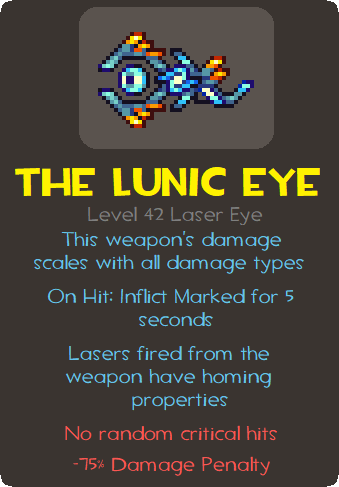
The Lunic Eye may be one of Calamity's most unique weapons, so I shall discuss all of its stats individually below:

Buffs:
Damage Scaling
All damage multipliers from things like buffs, accessories and armour apply to the Lunic Eye, regardless of class. Better yet, any 'universal' damage multipliers like the Avenger Emblem apply per-class, so with Melee, Ranger, Mage, Summoner and Rogue all of these universal buffs apply 5 times over
Note, however, that Thrower does not count according to some calculations I ran, so even though Calamity is still in 1.3 as of writing this it doesn't stack 6 times.

Marked Debuff
The Marked Debuff can cause one of two effects, depending on if the enemy being fought has damage reduction or not. If they have a Damage Reduction stat it is halved, but if not they simply lose 5 defence. This doesn't have too big of an impact, especially since most Calamity bosses are immune, but it's still a nice little extra buff where possible.

Homing Projectiles
The Lunic Eye's projectiles are fast, linger for a long time, and have a powerful homing property that lets them even keep up and hit mobile bosses.
The projectiles can also explode, but in practice this makes little difference in most fights since the explosion is so small.

Debuffs:
No Random Crits
The Lunic Eye cannot, under most circumstances, deal critical hits. This means that accessory upgrades like the Destroyer Emblem and the Lucky reforge are basically useless.

Low Damage
Not exactly 75%, but I put the stat there to summarise the fact that the Lunic Eye has pitiful base damage to offset its extremely powerful damage scaling buffs. Normally it only has 9 damage.
Pre-Boss
Very early-on the Lunic Eye is a decent weapon, but nothing game-breaking. Since you are so early in the game damage buffs are rare, so your base damage is generally going to be very low.

My main 2 recommendations, therefore, are to do two things:
-Fish in the Sulfurous Sea to obtain the Abyssal Amulet
-Activate the Goblin Army event to unlock the Tinkerer for damage-buffing reforges

The Abyssal Amulet can really help with the weapon's otherwise-low damage here and is always a useful accessory to have when doing challenges that involve low-damage items or effects. Anyone who read the weaponless guide will know that it's useful all the way to Moon Lord, though remember that after Moon Lord everything is immune to Crush Depth.

The Tinkerer allows the player to get Angry and Menacing reforges for items, which as explained prior give +15% and +20% damage respectively. Even though I much prefer Warding's increased endurance the damage is a must for this challenge
Desert Scourge

Summary:
Desert Scourge actually doesn't change during this challenge. While the Lunic Eye's projectiles explode to create an AoE which sounds cool, in practice it makes negligible damage even against multi-segmented bosses.

Desert Scourge, however, is still a fairly-simple fight and feels similar to a normal Scourge fight with normal weapons.


Difficulty Increase:


Aftermath:
-If the player doesn't already have the Abyssal Amulet they can use Scourge's fishing drops to increase their fishing power to make it easier.
-The Aero Stone's +3% damage actually makes a difference here, since it becomes +15% for the Lunic Eye
King Slime

Summary:
King Slime, as before, doesn't change all that much in this challenge. The Lunic's explosions, high fire rate and homing can deal with both King Slime and its minions fairly easily.


Difficulty Increase:


Aftermath:
-The Slimy Saddle is the main thing to gather from this fight, since it is a mount that grants fast-fall
-The Solidifier can be used to craft Shiny Red Balloons to make the Bundle of Balloons easier to get thanks to Calamity adding a recipe for them


Notes:
-The Ninja Armour does not seem to affect the Lunic Eye's damage. Whether this is just purely the lack of damage increases or because Throwing buffs don't apply to the Lunic Eye has yet to be properly tested
Eye of Cthulhu

Summary:
The Lunic Eye is actually perfect for this fight. Its high fire rate and homing capabilities make it so that EoC's Servants are killed almost instantly as the Lunic projectiles are faster than them, and due to their low health even the Lunic's base damage is plenty good enough to defeat them.

Phase 2's chain dashes also aren't a problem, as the homing capabilities of the projectiles combined with their speed allow them to still consistently hit the EoC even when its health begins getting lower.


Difficulty Increase:


Aftermath:
-The Shield of Cthulhu is an amazing mobility tool and potential alternate damage source not banned by the initial rule listings, so it is recommended the player picks it up after defeating EoC.
Crabulon

Summary:
Crabulon is the first boss in the challenge to have an actual mild difficulty increase as opposed to being roughly the same or easier than normal. The Lunic Eye's projectiles cannot pass through blocks and so if they miss Crabulon they will like try to turn, hit the ground, and despawn and thus the player must actually aim here.

Most problematically, though, is Crabulon's ability to summon minions through the fight with its spores. While the Lunic Eye can deal with them decently the homing effect means that it may begin targeting spores and not Crabulon itself, especially when more spores are present.


Difficulty Increase:
★★


Aftermath:
-Crabulon does not gatekeep anything important during this challenge specifically, aside from a Revengeance buff.
-The Fungal Clump is banned due to the rules stated before about accessory minions, and thus both it and the Amalgam later are banned from use. Crabulon's other drops are weapons so those aren't useful either.
Eater of Worlds

Summary:
The Eater is potentially the champion of disappointment in this challenge; displaying most of the Lunic's unique abilities but also showing them all in awkward or disappointing ways.

The Lunic projectiles' explosion has the ability to hit EoW 2-3 times with a well-placed shot. Normally with regular projectiles for normal-damage weapons this would be alright, but the Lunic Eye's low damage and the Eater's defence mean that these explosions still deal pitiful damage.

The Lunic's homing properties are also more of a detriment here as they will wildly target whatever segment they feel like sometimes, making it harder to keep the worm whole and easier to manage.

It was, however, after this point, that I realised the Abyssal Amulet existed and then equipped it. The Abyssal Amulet shreds the Eater in a display I can only call disappointingly stupid, so take this as a lesson to always remember to keep the Abyssal Amulet on-hand.


Difficulty Increase:
★★★ (No Amulet)
★ (With Amulet)


Aftermath:
-The player can now craft the Nightmare Pickaxe and can use this to immediately skip to Molten Armour and tools; with the armour granting a decent 17% damage buff
-The Worm Scarf's damage reduction effect is pretty nice to have, especially since the player's defence is likely going to be low through much of the challenge
Brain of Cthulhu

Summary:
The first hypothetical fight of the run, since I did the initial run on a Corruption world. Thus, you must take a fair amount of this with a pinch of salt.

In theory the Creepers' ability to overlap should make the Lunic's explosions actually helpful for this fight, since multiple Creepers can be damaged per shot. However there is a risk of being awkward to aim as usual since it will randomly target Creepers sometimes due to its homing properties.

Phase 2, however, should be alright since the Lunic Eye will constantly home-in on the actual Brain; giving away its position and allowing more hits to land even if the player wasn't aiming at the right Brain.


Difficulty Increase:


Aftermath:
-As with the Eater, killing the Brain grants access to new tiers of ores and allows the player to skip straight to Molten gear.
Hive Mind

Summary:
Hive Mind is... an alright fight in this challenge. There are points both for and against this fight, though my memory of it isn't quite as vivid as the others so I can only assume it went decently well.

On one hand, the Hive Mind's 2nd phase teleports around often, which the Lunic Eye's projectiles should be able to pursue due to their speed and powerful homing capabilities.

However, its constant minion spawning does mean that the Hive Mind can take quite a while, depending on how often it decides to spawn minions.


Difficulty Increase:
★★


Aftermath:
-Aerialite Armour can be obtained here which, since it is a universal armour set with varying helmet types, should have a general damage buff on either the breastplate or leggings for the Lunic to use. However, I was an idiot and forgot to get it.
-The Rotten Brain actually has the potential to be useful here. Due to it providing +10% damage under 75% life this becomes a +50% buff due to it being a universal damage buff.
Perforators

Summary:
The Perforators are the other theoretical boss for the challenge, since once again I did this on a corruption world when I initially tried this.

Unlike the Brain, however, the Perforators seem like they would be an annoying fight. Its worms have high defence and thus damage dealt is limited, and even the Abyssal Amulet isn't an instant-win due to the quantity of worms, their high health, and the Lunic's preference to target their heads to limit how many segments can be attacked and debuffed.

The fight should, however, still be manageable should the player remember the Abyssal Amulet exists


Difficulty Increase:
★★★ (No Amulet)
★★ (With Amulet)


Aftermath:
-The aftermath of this fight is basically the same as before, but instead of a Rotten Brain you get an item that provides +5% Damage and +5% Damage Resistance, which is honestly outclassed by the Worm Scarf
Queen Bee

Summary:
The Queen Bee is a highly-mobile boss and one of the first that can actually, in some capacity, outrun the Lunic Eye projectiles. However, since the Queen Bee will follow the player, the projectiles can all be lured back to the Lunic Eye in a large group to deal a massive chunk of damage.

Queen Bee's bee spawns are mildly annoying, since the Lunic projectiles will often focus on them and not Queen Bee herself, but this is entirely manageable

Finally, the Queen Bee's scaling defence in Expert means that the Lunic itself gradually loses damage throughout the fight, making the Abyssal Amulet a must-have. Fortunately this time I remembered to bring it with me.


Difficulty Increase:
★★


Aftermath:
-Nothing Queen Bee drops is particularly useful for the challenge
Skeletron

Summary:
Skeletron as a fight does not change too much, once again having a small blessing and a small curse due to the Lunic's abilities.

The main thing to note is that the Lunic projectiles cannot keep up with Skeletron when it is moving at high speeds, but like Queen Bee Skeletron can be lured back into a large group of them fairly easily.

Another thing to note is that the Lunic Eye will still home-in on Skeletron's even while its hands are still active in Expert Mode. However, the Abyssal Amulet makes it so it isn't an entire waste as Crush Depth still does some damage, even if it's a lot less than it would've been.


Difficulty Increase:
★★


Aftermath:
-Defeating Skeletron grants access to the Dungeon. The main thing the player wants here is the Cobalt Shield so they can upgrade it later. Its knockback immunity is also helpful should the player have a fairly-free accessory slot.
Slime God

Summary:
Slime God is another fight that doesn't change all too much from a normal run. The Lunic's homing can make focusing specific slimes down tricky, since it will typically shoot whatever is closest to the player, but the Slime God has only a limited amount of minions and a vulnerability to Crush Depth to exploit

Slime God's core is noticeably faster than the Lunic projectiles, but it does mean that a large cluster can hit it at once when it turns around, especially if it's doubling-back to catch a player moving in the opposite direction it was


Difficulty Increase:


Aftermath:
-Defeating the Slime God grants access to Statigel Armour; the best armour set in Pre-Hardmode for this challenge both for its damage buffs and for its extra mobility.
-The Slime God also provides another Revengeance item, should the player be trying to take on this challenge on higher difficulties.
Wall of Flesh

Summary:
The Wall of Flesh is, without a doubt, the hardest Pre-Hardmode boss in the challenge; even outclassing Slime God by a large margin in this challenge due to one specific thing; Lunic's homing.

The Wall of Flesh spawns Hungries constantly, which the Lunic Eye will target as they are in-front of the Wall itself. This means the fight will take significantly longer which, considering it gets faster as it loses health, is a serious issue.

On the initial attempt a 2000-block bridge wasn't quite sufficient for the fight as the Hungries kept spawning and distracting the Lunic Eye, however, getting closer to the wall (as unwise as that is) may allow for easier hits. Do not do this when it is at low health, however, since it soon starts outrunning Lightning Boots.


Difficulty Increase:
★★★★


Aftermath:
-The player will now enter Hardmode, granting another 2 accessory slots in this challenge; one from the Demon Heart and the other as a bonus from the ruleset in-place.
-The Emblems the Wall drops can be useful, granting a +15% buff outright and also being upgraded later into the Avenger Emblem
[Final Notes]
Yes, I know I only recently uploaded the Weaponless challenge and, yes, I know I also only recently beat Double Trouble mode but I just started playing a lot of Calamity recently and all of them have been dumb challenge runs, so I am also starting this one

Bear in-mind this is pre-Draedon so if the Draedon update comes out before I'm finished there's a chance things will be different compared to my old notes. This is to be expected with any updates, honestly, especially those tweaking existing weapons, accessories or mechanics.


Also thanks for checking out the page and enduring my ramblings for ages. I know that literally nobody is going to attempt this as well so I appreciate people still checking out these pages to know if it's possible or not and how it's done since it's a weird question and whatnot.

Next page will be out... probably some time soon. The challenge run is over itself so it's mostly just documenting my findings in a way that's at least a little cohesive, so see you then :)
16 Comments
Okami Tomato  [author] 16 Mar, 2022 @ 2:45am 
Most of the fights were tedious and long when actually playing, specifically in the latter half, so it probably wouldn't be a very interesting watch unless heavily edited down

Plus my PC can't handle recording software rn and basically just throws a fit and freezes
colegmr 15 Mar, 2022 @ 11:08pm 
With all the effort you put into this
why not make a youtube video?
this sounds like it would be a fun watch
not that it wasnt a fun read
cool story:steamthumbsup:
Cotija 1 Dec, 2021 @ 5:54pm 
Almost past pre-hardmode hooray
bigzthegreat 20 Nov, 2021 @ 2:44am 
dope
Okami Tomato  [author] 18 Nov, 2021 @ 1:12am 
Thanks :)
Warlock 17 Nov, 2021 @ 5:55pm 
i like the: tf2 weapon stats bit
Okami Tomato  [author] 29 Oct, 2021 @ 10:11am 
If I had to suggest a challenge it wouldn't be this one trust me Post-Moon Lord is awful :D
hitori 29 Oct, 2021 @ 6:10am 
very nice, might try this later
Zmooth 19 Oct, 2021 @ 7:05am 
Absolute mad lad
WhoEvenKnows 18 Oct, 2021 @ 5:09pm 
yeah meme guides