cyberpunkdreams

cyberpunkdreams

38 ratings
General Tips and Tricks
By Cptwad
A WIP that I am working on as I play the game
5
   
Award
Favorite
Favorited
Unfavorite
Before we start
If you read the rather simple tutorial and have no idea what the hell is going on here's a few notes to take in:
First: The game opens up when you complete the tutorial. Several features like accessing your inventory are locked until you complete this. You complete the tutorial roughly once you are set up in Cinci Slums.
Second: I am intentionally being vague in order not to spoil very much. The game is dense and being specific will ruin some of the fun.
From here I am going to explain the items on the screen again for clarity


Yellow:Action spot. Tells you your character info, actions and credits. Mostly meta information.

Green: Your tabs. Affects the middle column. Story is the screen shown and is where you spend most of your time. Weapons are for equipping weapons, outfit is for managing your clothes, Equipment is for important items, usually key items for story stuff (Binoculars help in certain situations for example). Inventory is the second most important tab in the game, you use it to manage all your junk. Many items are usable from here, see the inventory tab below for more information. Character. Your character information, here you can take account of your moods (used for managing threats and hazards along with buffs and debuffs along with other misc character info. People. Information on who you know and how they feel about you. Progress. Main quest info, side quest info (number represents what stage you are at if you are on a stage) and general character progress. World. Organization info (such as gangs) on what you know, who you know and how hostile they are to you. Also has information on what you know about a location such as the path to places, how familiar you are and how reputable you are.

Orange: Deck Generators. On the left you have decks which use a turn and generate 3 random events from that deck or from common events. You always have a deck for your location and for your life/survival. Remember you can dismiss most events you don't want or need although some events (usually the ones that pop up once you use your deck) cant be skipped.
Location decks generally involve the area you are in and are a way to generate information on your surroundings, going to places in your surroundings and generally getting involved with the location.
Life/Survival decks are good for managing your needs and relationships. As you meet people you can talk to them through this deck without finding them randomly. You also are able to manage buffs and debuffs though this.

Blue: Buffs and debuffs. Generally temporary effects. The ones at the top are more important while the stat up and down cards represent your core stat effects. Max of 10.

Purple: Status. First, health and well-being represent your daily needs. Pain which is straightforward and is removed with drink or painkillers. There is sustenance which you can eat to cure, Alertness which just requires sleeping, preferably at a home. Need is your social needs, talking to people and the sorts. Injuries represent how banged up your body is. Generally you have some healing cuts and bruises always in the beginning but if it gets worse you may have to seek medical treatment sooner.
Threats and hazards are direct effects on your body or mental health. Black shakes are taken care of more easily as you gain more of it (usually through time) and you have a quest line that helps you sort it out. Hardship is the more abstract feeling of slum life dread. Injury is straightforward. Heal yourself at a hospital or doctor, use a first aid kit and it should go away. Don't leave them unattended for too long. Psychosis is your mental state, goes hand and hand with hardship but you use other methods to rid yourself of it.
City tab tells you the day and temperature information.
State of dress is used for calculating what people see when they look at you.

Red: Locations and actions. Here we have Mission info which tells you how your mission is going, destinations, which is basically another tab of locations to go to (or just generally exploring too) Hospitals which heal for a price or sell you medical gear. Bars which allow you to drink your psychosis away and generally get cozy with the locals. Stores where you buy goods. Training locations where you can train skills. Locations of interest which usually have a character you talk to and manage. Homes and hideaways which allow you to sleep or store things. Getting around which allows you to travel to other hubs and change what event cards you pull from the location tab. Phone which is really useful and lets you contact specific people easily. Notes which tell you what you need to do for your side quests in case you forgot. Content wall which is a nice way of telling you which sidequests or content is dead ends.
Managing Moods (WIP)
There are several moods to take note of and managing them is key to not suffering.
In general many events that handle moods are in the life deck. Use that.
Some positive moods can be built up (Roughly 10) which then can be converted to special moods that can be equipped for massive bonuses. The same can be said of negative moods. These are lost occasionally when you sleep so use it or lose it.
The moods: (WIP)
-Buzz.
To have: Good
To get: Coming down from Adrenaline highs,
To lose: Many events, spending on buffs or actions requiring the mood
-Calm
To have: Good
To get: Tea. Rare events.
To lose: spending on buffs or actions requiring the mood
-Caution
To have: Good
To get: Random events in the city deck usually.
To lose: Trade in for personal security.
-Discomfort
To have: Bad
To get: Adrenaline comedown. Bad physical events.
To lose:
-Distraction
To have: Bad
To get: Failing events.
To lose:
-Distrust
To have: Situational
To get: Failing tasks involving others.
To lose: Trade in for personal security.
-Enthusiasm
To have: Good
To get: Succeeding in events.
To lose: Enthusiasm event for buffs.
-Fatigue
To have: Bad
To get: Failing Laborious tasks. Not managing Alertness.
To lose: Use Buzz
-Frustration
To have: Bad
To get: Failing talking to people.
To lose:
-Guilt
To have: Bad
To get: Failing tasks for others. Doing horrible things.
To lose: Turn in for a charisma debuff.
-Inspiration
To have: Good
To get: Succeeding in events.
To lose: Inspiration events. Can be used to trade for losing psychosis or buffs
-Irritation
To have: Bad
To get: Specific events. Result of backlash on other moods as well.
To lose: comforts
-Relaxation
To have: Good
To get: "Relaxation" events.
To lose: spending on buffs or actions requiring the mood
-Satisfaction
To have: Good
To get: Succeeding in events. Eating good food.
To lose: spending on buffs or actions requiring the mood
-Thrill
To have: Good
To get: Coming down from Adrenaline highs,
To lose: spending on buffs or actions requiring the mood
Managing Information
Opening up more of the game literally requires you to learn more about your surroundings. You are new in town and you need to manage information to learn more about the city.
As you explore a city you earn rumors, Hard facts and Familiarity. You can "Use" these pieces of information to trade them for other types of information.
-Rumors are common but in high demand as you come along.
-Hard facts are useful and I recommend saving some up if you can, you have various events which will consume hard facts. Don't trade these in if you can.
-Familiarity is static. You slowly build this up as you explore the city. An event in the location deck will allow you to trade in rumors for familiarity. Save up for this event. if you need some spare cash you can use this event to raid local areas for supplies and cash but otherwise save up rumors when possible. As you increase familiarity many events become easier and finding places in the city where you are already familiar makes exploring less of a chore.
Other general information isn't location specific. That's Mysteries, Patterns and Detailed Plans.
-Patterns: Keep 5-6 patterns on you for some rare events but otherwise you can turn patterns into rumors at a low rate.
-Mysteries: Involve rare events. You cant use these but they help unlock various side quests.
-Detailed Plan: Events and quests use these but otherwise you can use them to handle certain activities or organizations. Also used for consuming skewed ideas.
-Flexible closure: Helps with information and rumor events. Can be made from rare insights.
General Tips
-Go drinking. Alcoholism is good for clearing out some Psychosis and picking up rumors. You can also meet people while in a bar. Some bars allow you to enter if you have a Tale to Tell which can be earned by talking to (specific and unnamed) people.
-A new day clears out all buffs, debuffs and some effects. If you are going to debuff yourself to hell do it before going to bed and sleeping it off
-Not all skills are visible from the get go. There are MANY skills.
-Outfits are expensive but help more than you think. Your desert duster will get you through the early game but wearing it in town will give a negative event that pesters you while wearing it.
-There is a tab in your inventory called Sortables. Sort through them if you have some time to figure out what it all is. The doctor in the outskirts will help you identify the pills.
-Keep your electronic components. Keep some 10 junk and spare parts. Some events require these items but selling them can be a good money maker.
-Keep around 20-40 dollars on you at all times. If you have a lot of money buy items that look important. Some are quest specific (they tend to stick out) others are used in some events such as binoculars. Barring items that look important (ive bought a few and yet to find their use, or didn't need to use them) clothes are another good investment. A pair of city clothes will help you survive cinci.
-You can join a work gain in the outskirts or the Slums for cash, builds up skills so that as you fail you are more likely to succeed. Good money but limited so you cant grind it all day. After work go to the worker bar and get sloshed (opens after work is over).
- After using the kitchen, always clean up after. It provides many buffs and gets rid of things like hardship and
- Clothes make the man. Pay attention to what you are wearing. The seasons change with the game so wear seasonal clothes or suffer the consequences. Styles is a rabbit hole of possibilities to learn up on as well.
(WIP) I will add more as I go along.
15 Comments
Panam 28 Dec, 2021 @ 7:45pm 
You can lose discomfort by cleaning up after making meals in your kitchen.
jutetrea 11 Jul, 2021 @ 9:36am 
Good stuff - even in the comments:steamhappy:, thanks to you both.
Vulgar Calluna 24 Jun, 2021 @ 9:07am 
Not at all. Just make sure to correct them if it turns out I'm wrong about any of these.

Also, the in-game tips can be brought up again by using your phone, just in case you skipped through them.
Cptwad  [author] 23 Jun, 2021 @ 9:32pm 
Mind if I yoink your tips my guy?
Vulgar Calluna 22 Jun, 2021 @ 9:11pm 
Oh, and another thing before I forget - certain items can block certain slots. For instance, if you're wearing gloves that cover the fingers, you won't be able to wear rings. If you put on a mask that covers the entire face, you can't wear eyewear, etc.
Vulgar Calluna 22 Jun, 2021 @ 9:09pm 
Styles is... another can of worms entirely. Suffice it to say - some items provide boosts to certain fashion styles, some providing a core style. If you wear a lot of items that provide a boost to the same style (say, a bunch of military gear for Military Chic), you can boost your dressed to impress, which I think helps social checks (I'm afraid I haven't done enough testing to confirm this). However, wearing items that don't fit with the desired style can hurt this fashion score, so don't try to mix styles unless you're not interested in dressing to impress.
Vulgar Calluna 22 Jun, 2021 @ 9:09pm 
Another thing to note about clothing is that most articles of clothing can't be changed while you're out and about. If you want to, say, put on a jacket or change the shoes you're wearing, you need to find and use a changing room (either at your home or in Facilities that are in certain areas). The only clothing items that can be changed outside a changing room are accessories, gloves, rings, concealed items, hats, eyewear, and masks.

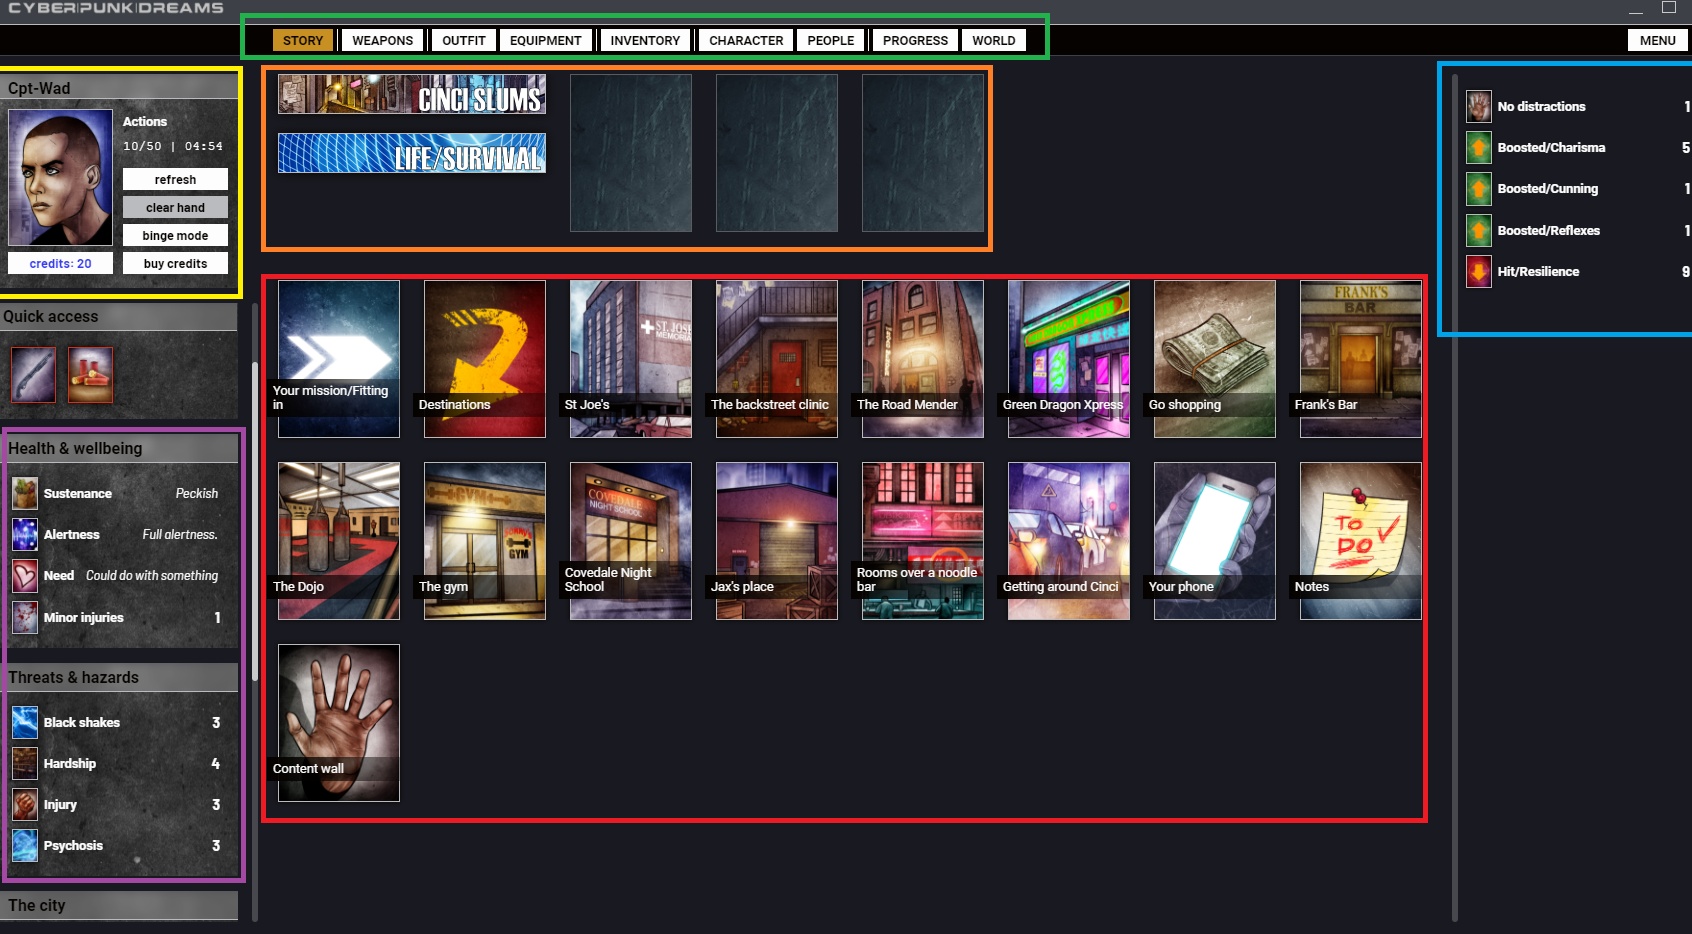
This also means that, if you need to unlock an option or get better odds at a skill check, one can click the outfit tab and change these items in order to improve one's odds of success.
Vulgar Calluna 22 Jun, 2021 @ 9:09pm 
Maybe add a section on Fashion and clothing?

What one wears in Cinci is important. Some items, like masks, help the player conceal their identity and may provide protection from certain things, but may also reduce certain stats. Depending on where you go, you may need to dress for the city, the wild, work, the gym, or to party. If you don't, you may have a hard time of things.

You also need to worry about temperature. As of the time of this writing, it's summer in Cinci, which means that you'll want to find ways to dress cool, cool yourself down somehow, or suffer the consequences. I'd imagine that once it hits winter, you'll instead want to bundle up in jackets and coats and whatnot.
Vulgar Calluna 22 Jun, 2021 @ 9:09pm 
Continuing due to character limit.
Another thing that these special moods do is protect against special negative moods (like with special positive moods, special negative moods are acquired if negative moods climb too high). If you have a special positive and a special negative would be created, you lose the positive and the special negative disappears.

These special moods seem to disappear slowly as you sleep (one of each special mood per day), so while it is possible to stockpile them, it's largely use it or lose it.

Flexible Closure is an important stat for making the most of rumors and other information-related items. If one has a rare insight, they can use that to gain Flexible Closure by choosing to work on one's mind (The bottom option, I believe). This is temporary, so make the most of it while it lasts.
Vulgar Calluna 22 Jun, 2021 @ 9:09pm 
Like what you've got so far. I've got something to add to the guide:

If you have enough of a certain positive mood (very close to 10 or above), you can turn it into a special mood that can be equipped in the Equipment tab. These special moods often boost base stats, reduce menaces, and increase skills temporarily. There are two ways to create special moods - draw the appropriate card once you have enough, or gain so much of that positive mood that you go over.