Nioh 2 – The Complete Edition

Nioh 2 – The Complete Edition

435 ratings
Everything you need to know about Nioh 2 (2023)
By Tiny Timmy Tokyo
All the details and obscure information I could find for Nioh 2: Complete Edition, gathered from multiple sources online and from my personal experiences for your convenience and mine.
10
8
33
7
2
4
2
3
2
2
   
Award
Favorite
Favorited
Unfavorite
Introduction
USE THE GUIDE INDEX ON THE RIGHT TO NAVIGATE
PRESS CTRL+F TO SEARCH THE PAGE

2/15/2023
Added information on blocking and breaking, added some tables to rank how good weapon categories are at blocking and breaking.

This guide is currently under construction, I have less free time now than I did when the original Nioh was released due, I will contribute to the guide whenever I am able to. It is also extremely possible that the information posted here is erroneous, so please take it with a grain of salt. While I am the author of this guide I did not write all of the text here and instead found the information online, I am simply compiling it all into one guide for ease of access. Some of it will be in my own words and others will be straight copied from wiki or reddit, I will provide the link when I have done so. Assuming I remembered to do so.

This guide is a compilation of information gathered from various sources online and will be updated as necessary. The purpose of this guide is to provide the community with a one-stop source of information where most common questions can be answered.

This is for reference only, Nioh 2 DLC names:
DLC 1: The Tengu's Disciple
DLC 2: Darkness in the Capital
DLC 3: The First Samurai
Multiplayer
Does PvP exist in Nioh 2?
No.

Is there friendly fire?
You can push each other slightly, but otherwise no, there is no friendly fire except for Burning Oil Jars.
Beware of bored griefers when you summon strangers.

Can a random player join my game?
Not without manually offering an Ochoko Cup at a Shrine.

Can I kick a player?
Yes, but you have to use an item called Sacred Salt. Otherwise there is no easy way to kick them other than shutting the game down.

Are there checkpoints in co-op?
Now there is checkpoints, but you only retain half of the co-op blue bar back when you fail the mission and you incur penalties to Glory rewards. This is only for Expedition, if you summon someone through the shrine and you both die, you go back to the checkpoint and they leave the match.

What is the Co-op blue bar?
This is your "lives" in co-op. If a player dies, the bar will deplete. If it reaches zero, you both fail and then are asked to continue from the last checkpoint with less rewards and half a blue bar or return to the lobby to try again from the start.


Player death and resurrection
If a player dies, the blue bar will slowly deplete until another player walks up to them and resurrects them. Thus preserving some of the bar for more available deaths. You cannot recover your lost Amrita when you both die and return to the checkpoint.

Random Encounters vs Expeditions
Random encounters are designed for solo players who wish to receive(host) or provide(visitor) help. When a visitor joins a game and they die, they go back to the map and leave the game with zero reward; while the host of the game continues uninterrupted. If the host dies, the visitor also leaves the match as he failed in his mission to help the host. This is similar to how Dark Souls handles co-op. Expeditions on the other hand are the exact same game mode, but designed to share lives with the Co-op blue bar so that you don't get kicked if you die once or twice. Expeditions are meant to be a cooperative effort, while Random Encounters are meant to be about receiving help if you are the host or providing help if you are the visitor. The benefit to random encounters is that if a visitor shows up and he sucks really bad at the game, then you are not penalized for their mistakes. You do lose the Ochoko Cup offered however.

Where's the Starting Point?
On the world map, outside of a mission. Only quit a mission if you wish to start an expedition with a friend, otherwise they can still join you by heading to a shrine mid mission. To quit a mission you need to go to your inventory and find an item called Divine Branch Fragment, which makes you lose all acquired Amrita in exchange for quitting. To keep all your Amrita, you need a Divine Branch which can be found randomly as you play the game or from mission rewards.


Quick Steps: Co-op How to play with friends

How to host a game lobby to play with friends:
  • Starting Point (Outside of a mission)
  • Torii Gate
  • Expedition
  • Custom Match
  • Create Room
  • Without Conditions
  • Set private slots if you do not wish for strangers to join
  • Private Slot Conditions: Secret Word (aka the Lobby Password)
  • Set your Secret Word if you don't have any public slots and share it with your friend
  • Wait for your friend to join before starting the mission
  • Select: Preparations complete to ready up

How to join a game lobby to play with friends:
  • Starting Point (Outside of a mission)
  • Torii Gate
  • Expedition
  • Custom Match
  • Search
  • Without Conditions
  • Special Matching Conditions: Friends
  • Click SEARCH FOR A FRIEND
  • If their lobby settings are correct, their name will appear on the list
  • Enter Secret Word (aka Lobby Password) if there is one
  • Select: Preparations complete to ready up

How to join a friend that's already in a mission:
  • Starting Point (Outside of a mission)
  • Torii Gate
  • Random Encounters
  • Without Condition
  • Friends

How to summon a friend while on a mission:
  • Head to a Shrine
  • Summon Visitor
  • Change Settings
  • Friends or Secret Word (aka Password for private)
  • Offer Ochoko Cup (1 per player you wish to join)
  • When they join a message will appear in the top right.

Quick Steps: Co-op how to play with strangers

How to make your game public while in a mission:
  • Head to a Shrine
  • Summon Visitor
  • Change Settings
  • No (no restrictions, aka public)
  • Offer Ochoko Cup (1 per player you wish to join)
  • When they join a message will appear in the top right.

How to join a public game(Quickmatch):
  • Starting Point (Outside of a mission)
  • Torii Gate
  • Random Encounters
  • Without Condition

How to join a public Expedition game(Quickmatch):
  • Starting Point (Outside of a mission)
  • Torii Gate
  • Expeditions
  • Without Condition
Public Expeditions are the least picked option for solo players as they do not like to depend on strangers for the success of the mission. I recommend that you instead offer Ochoko Cups at a shrine if you wish to receive aid from a stranger or join a Random Encounter match if you wish to provide help for a reward.


Bloody Graves
Bloody Graves or Red Graves, can be found scattered throughout the game where players have died and you can interact with them to summon the Revenant of the player that died. Once summoned, they will attack you and chase you down if you run, so be prepared for a fight. Revenants provide loot, experience and Ochoko Cups when killed, which can be used to interact with Benevolent Graves.


Benevolent Graves
Benevolent Graves or Blue Graves are a mechanic similar to summoning other players and NPCs to help in Dark Souls. However, instead of summoning the actual players coming to your aid, you summon their characters controlled by the AI. To summon help, press and hold the button displayed. The character will appear after a bit. The Ochoko Cup requirement will scale based on how much stronger the character is in relation to yours.


Righteous Jasper Graves
These cyan colored graves are Benevolent Graves you placed. You can place up to three Benevolent Graves with the Righteous Jasper item. You get these from completing certain missions, or by crafting. You'll get special rewards of Ochoko Cups and Glory proportionate to the number of times other people have used that particular grave. When you place more than three, you'll be asked which one you wish to replace.
Stats and Level Caps
  • Dream of the Strong Level Cap: 300
  • Dream of the Demon Level Cap: 400
  • Dream of the Wise Level Cap: 600
  • Dream of the Nioh Level Cap: 750
  • Max Level: 750
  • Respec: Yes
  • Total Amrita Needed: 1,485,204,076,450 Trillion

  • Max Focus Level: 1000
  • Respec: No
  • Total Amrita Needed: 3,000,000,000,000 Trillion


Stats Cap: 99
PENDING IMAGE

Dream of the Wise Stats Cap: 200
PENDING IMAGE

Soul Core Cap: 200
PENDING IMAGE

The table below indicates what is earned from improving each statistic, but for more detailed information regarding leveling up, please visit this page: Nioh 2 wiki stats[nioh2.wiki.fextralife.com]
Statistic
Description
CONSTITUTION
Increases max Life and resistance to Poison and Paralysis. Armor requirement.
HEART
Increases max Ki and resistance to fire.
COURAGE
Raises Ki recovery speed and resistance to Lightning. Slightly improves Onmyo Power.
STAMINA
Increases max Life and max equipment weight.
STRENGTH
Medium and Heavy armor requirement, improves Ki Pulse. Slightly improves equipment weight.
SKILL
Light armor requirement, improves Ki Pulse. Slightly improves Ninjutsu Power.
DEXTERITY
Determines the power and capacity of Ninjutsu, provides Ninjutsu skill points.
MAGIC
Determines the power and capacity of Onmyo Magic, provides Onmyo skill points.

Weapons always have three statistics they base their damage on, and the rating varies from weapon to weapon. This table only shows the best base rating for that weapon category. So you would either choose a weapon based on the statistic you chose to increase or inversely choose which statistic to increase based on the weapon you wish to become proficient in.
Statistic
Rating
Weapon
CONSTITUTION
B+
SPEAR
HEART
B+
SWORD
BOW
COURAGE
B+
TONFA
STAMINA
B+
AXE
HAMMER
HAND CANNON
STRENGTH
B+
ODACHI
FISTS
SKILL
B+
DUAL SWORDS
HATCHETS
RIFLE
DEXTERITY
B+
KUSARIGAMA
MAGIC
B+
SPLITSTAFF
SWITCHGLAIVE
Equipment Level Caps

When certain Patronage bonuses are in effect, items can be forged with a + Level. When an item has a + Level, it has essentially 10 item levels worth of stats compared to a similar item that does not have one. Example: a Level 170 Tonfa will have roughly similar stats to a Level 160 + 1 Tonfa. Items can also be found with + Levels. Soul Matching an item with a greater + Level to another item will raise that item's + Level by 1 if it is a Divine Item. Note that additional + Levels on the Soul Matching item will not increase the amount of + Levels gained, it can only ever increase by 1 per Soul Matching action. Thus, if the player wants to increase the + Level on an item that has +2 already and they have a +3 and +4 item to use for Soul Matching, the +3 should be used first. If, however, an Ethereal Item is used, the + level will increase by multiple, depending on the difference in levels between the two items.Nioh 2 wiki item level cap[nioh2.wiki.fextralife.com]

Difficulty
Level Cap
Plus Cap
Samurai
150
+10
Strong
160
+10
Demon
170
+20
Wise
180
+50
Nioh
200
+120
Underworld
???
???
Yokai Shift & Soul Cores


In the meantime, watch this video for a full breakdown of how this works.
Nioh 2 Guide to Guardian Spirits

or visit the wiki page:
Nioh 2 wiki Guardian Spirits[nioh2.wiki.fextralife.com]

Soul Cores
Another new feature of Nioh 2 is Soul Cores. These can drop from each enemy in the game, even Bosses, and can be equipped by the player to give them special attacks that also use Anima. Additionally, and equally important is that fact that these Soul Cores provide passive bonuses to your character when equipped, which can help make you stronger. These are not only listed under Special Effects, but there are also Attack and Armor values at the top that are added directly to your Attack and Defense. This makes some Soul Cores defensive and some Offensive, so be sure to pick the ones that have the Skills that you want, AND give you the bonuses that are most applicable to you.

Soul Cores also have Ranks and can increase in power via Soul Fusion at any Shrine. During Soul Fusion you are combining two of the same Soul Cores to make one more powerful at the cost of the other. This is a great way to “power up” your Soul Cores so that they are even more effective, as this will increase the bonuses these Soul Cores give. If you have extra Soul Cores and you haven’t maxed out the rank of your primary 2 Soul Cores then you’ll want to do that before you start using Resting Rites and destroying them for Shifting Skill Points.Nioh 2 Wiki New Player Help[nioh2.wiki.fextralife.com]

More Soul Core information here: Nioh 2 Wiki Soul Cores[nioh2.wiki.fextralife.com]
Prestige Points
Prestige Points are earned by acquiring titles. There is two sections: Agyo and Ungyo. Titles earned are specific to one of the two categories, so if you're trying to earn a specific one, then keep an eye on your title list to see the requirements. The details on how to acquire a title will remain hidden until you've performed it once.

Each category can have up to 30 points placed into them. (Pending confirmation, but that's how it worked in Nioh 1)

Ungyo
Increase
Cap
Gold Earned
0.5%
15%
Life
10
300
Ki
5
150
Ki Recovery Speed
0.5%
15%
Ninjutsu Power
2
60
Onmyo Power
2
60
Equipment Drop Rate
0.5%
15%
Elixir Efficacy
0.5%
15%

Agyo
Increase
Cap
Amrita Earned
0.5%
15%
Anima
0.1
3
Anima Charge
0.5%
15%
Elemental Damage Taken
-0.5%
-15%
Yokai Ability Damage (All)
0.5%
15%
Extended Yokai Shift
1%
30%
Soul Core Drop Rate
0.5%
15%
Other Realm Resistance
0.5
15

Where do I put my points into then?
You can max out 6 abilities if you don't spread out the points and if you play for a very long time, but when you start the game all you have to do is decide 3 abilities you definitely don't care for, and simply upgrade the other 5. So when you first go into this screen, just upgrade the ones you've already decided you like, eventually you'll only have to upgrade a single slot because it just cycles through all the ones you do like. There is no wrong ones to choose, this is all personal preference, simply choose your 3 least favorites per section and go for the rest. If you continue playing this game for a long long time you'll eventually be able to max out 6 sections on both Agyo and Ungyo.

Prestige recommendations
Ungyo
Recommended?
Why?
Gold Earned
NO
Money is never an issue unless you messed up.
Life
MAYBE
Only Specific builds make use of 300 HP.
Ki
YES
It's not a lot, but every bit helps.
Ki Recovery Speed
YES
15% is a lot of Ki recovery.
Ninjutsu Power
MAYBE
Only really useful for Ninjutsu builds.
Onmyo Power
MAYBE
Only really useful for Onmyo builds.
Equipment Drop Rate
MAYBE
This is very useful in Way of the Nioh, useless early on.
Elixir Efficacy
NO
Useful early game, absolutely worthless later on.

Agyo
Recommended?
Why?
Amrita Earned
YES
You have 750 levels to get through and then focus levels. This will help a lot in the long run.
Anima
MAYBE
Useful if you have an Anima build, not so much otherwise.
Anima Charge
YES
Useful even if you don't have an Anima build.
Elemental Damage Taken
YES
Stack with items, armor and guardians to emote in the fire while laughing at bosses.
Yokai Ability Damage (All)
YES
Everyone should have at least ONE damaging Yokai ability, this will help it a lot.
Extended Yokai Shift
MAYBE
Required for Yokai Shift builds. Worthless to everyone else.
Soul Core Drop Rate
MAYBE
Useful in Way of the Nioh once you're trying to build your perfect Soul Core setup.
Other Realm Resistance
MAYBE
It's hard to really gauge how useful this is. Needs testing.


Can I reset these points?
Yes, you can purchase a Zen Manual from the Hidden Tea House, mission rewards or boss drops.
Focus Levels
PENDING IMAGE
What are Focus Levels?
Once you reach level 750, the game provides its die-hard fans with an extra 1000 levels. These level up points cannot be respecced however as they are minuscule increases and serve only as a way to provide a long term goal for players that enjoy the game long after they have completed all tasks and wish to conquer the Underworld. The average player will not max this out as it requires around 1200 hours of gameplay.

You can choose to distribute 1000 levels in any of the four categories, however you can only max out one single stat.
It is recommended to invest into a single statistic. The most recommended choices are Attack and Ki Recovery Speed, however choosing Ki Recovery Speed on a Courage build is not recommended since you will hit a soft cap and will suffer from diminishing returns, making your 100 Ki Recovery points feel lackluster.

Statistic
Increase
Cap
Life
0.5
500
Attack
0.2
200
Ki Rec Speed
0.1
100
Luck
0.1
100
  • You gain 1 HP point every 2 levels = 500 HP for 1000 levels
  • You gain 1 Attack point every 5 levels = 200 Attack for 1000 levels
  • You gain 1 Ki Recovery Speed point every 10 levels = 100 Ki Recovery Speed for 1000 levels
  • You gain 1 Luck point every 10 levels = 100 Luck for 1000 levels


Luck
Luck increases the probability of rare items dropping. Useful mid-game, but considered useless if you've been playing for hundreds of hours and have close to your best gear possible. I personally would never recommend dumping Focus points into Luck.
Region Map, Kodama and Secrets
Region Map / World Map
PENDING IMAGE
UNDER CONSTRUCTION
Order
Region Name
DLC
1
Awakening
2
Soaring
3
Shadow
4
Dawn
5
Twilight
6
Dream
7
Afterglow
8
Tengu's Disciple
DLC 1
9
Darkness In The Capital
DLC 2
10
The First Samurai
DLC 3

Copied from the first Nioh guide, should still apply:
Originally posted by Nioh 1 Steam Guide:
The regions are unlocked from top to bottom. The first six regions are the main campaign and the last three are DLC, from top to bottom: DLC 1, DLC 2 and DLC 3 as they were released.

Kodama
Kodama Locations
Kodama are special NPCs in Nioh 2. Find and interact with these small spirits to guide then back to the nearby Shrine, and they will reward you by making Kodama Blessing available for the area. Guiding all of the Kodama can also unlock trophies and achievements.

Nioh 2 Kodama locations: Kodama Base Game[www.powerpyx.com]
DLC 1 Kodama locations: Kodama DLC 1[selphie1999gaming.com]
DLC 2 Kodama locations: Kodama DLC 2[www.gamerevolution.com]
DLC 3 Kodama locations: Kodama DLC 3[www.gamerevolution.com]


Kodama Blessings
These are enhancements for the current mission you are in. Finding all of the kodama will provide you with a bonus to whatever blessing you choose. Amrita bonus is recommended when you are starting out as having more levels is beneficial to improving the quality of the items that drop.


Sudama (aka Purple Kodama)
Drop an item from your inventory to receive a reward in exchange. The better quality it is, the better the reward will be, it is random however. Certain skill trees will increase the chances at better items you can receive from Sudama, such as the Shiftling skill tree.

Secrets
Hidden items on the world map
There are hidden items on the world map when you click seemingly empty areas. When you manually move the cursor over an area it will turn from blue to red, press the interact button to claim a reward. These rewards seem to unlock as you progress on the region, so at the beginning you might only find one or two, but more will appear as you unlock missions.

Hidden items locations: Nioh 2 wiki Secrets[nioh2.wiki.fextralife.com]
Familiarity
This statistic indicates how much you have used an item. The higher your familiarity, the more Amrita you will obtain when you offer the item at a Shrine. Every item has a level at which their familiarity is maxed out.

Familiarity Increases the base stats of the equipment piece as shown in the pictures below.

Some weapons come with the attribute of Familiarity Damage Bonus. This increases your weapon's damage, please check the section Damage Boosts for more detailed information.

Familiarity Bonus on the other hand, does not increase your damage. It increases the rate at which the Familiarity bar is filled. This attribute is found in armor and accesories and is considered useless unless you do very specific builds where you spend your familiarity bar to get a large bonus in damage for a short time with Onmyo Magic.

How do I increase Familiarity without fighting?


Whetstones for weapons, 150+ familiarity to ALL equipped weapons.


Glue for armor, 150+ familiarity to ALL equipped armor.

Do not use these items willy nilly as they are expensive and hard to come by in the beginning. These items affect ALL equipped items, so make sure you equip all the items you intend to max first before using them.
Proficiency & Skill Trees
Proficiency levels up best when you deal lots of damage, which is why melee weapons always go up at a steady pace compared to Ninjutsu and Onmyo, keep that in mind so that you can cast spells against enemies that are weak to it and capitalize more on bigger damage while also getting more proficiency. Leveling up weapons at much higher difficulties will expedite the level up process, so if you want to level up other weapons it's best to wait until NG++ and higher.

Weapons
The best ways to improve proficiency are to currently hold the weapon you wish to increase while doing the following:
  • Deal damage with the weapon or skill.
  • Deal damage while transformed into Yokai Shift.
  • Deal damage in any type of mission, including Dojo missions, excluding the training mission.

Onmyo & Ninjutsu
Use one elemental talisman from the Onmyo skill tree, and one of the broths from the ninja skill tree, swap between these for easy proficiency. You can also use talismans, bombs and shuriken from the inventory and they will count towards their respective skill tree. Credit: .Zallion(bot)

Skill Trees

Each weapon has its own unique abilities. Increasing your proficiency will allow you to learn new skills that can be used in a particular battle stance. You cannot unlock every single node in a tree, so keep in mind the abilities you don't care about and reset your skill tree once you've figured out what works best for you. Resetting a skill tree can be done so in the dojo for a bit of gold, the cost increases the more you do it.

Samurai Skills
This skill tree is mainly focused on using your Ki Pulse as well as the efficiency of ranged weapons. Please refer to the Ki Pulse section to learn how to use this mechanic as it will greatly improve your performance in combat. You can also unlock Active Skill modifiers in this tree, which you can assign to your Active Skills under the "Skill Customization" of your main menu. These can greately enhance an active skill for an increased cost in Ki or sometimes damage dealt.

Ninja Skills
Unlocks various types of bombs and throwing weapons, poison and paralysis status application, utility skills and elemental jutsus that deal massive damage against opponents without Ki.

Onmyo Magic Skills
Magic employs the use of various talismans. By using them you can apply different elements to your weapon, buffs for self and party, debuffs for enemies, healing spells and offensive spells.

Shiftling Skills
Focuses more on progressing the potency and capabilities of using the Guardian Spirit and Yokai Shift. There are some great passives on this tree, so make sure you look for them.
Ki, Agility & Weight
The Basics
  • Attacking, evading, guarding and taking damage consumes Ki.
  • A depleted Ki gauge will exhaust you, leaving you open to finishers.
  • High Stance rolls to evade, Medium and Low stance dash to evade.
  • Agility Rating affects the distance and speed of your dash and roll.
  • Agility Rating affects your Ki recovery speed.
  • Some equipment comes with Damage Bonus (Agility), this provides a rough estimate of 15% damage increase at A Agility and 10% for B Agility.
  • D Agility Rating provides the worst ki regeneration, ki consumption, slowest movement speed, evasion, and makes it unbearable to control.
  • Ki consumption and regeneration is primarily affected by your Agility Rating.

AGILITY
WEIGHT
ARMOR
AA
0% ~ 20%
Ultimate Stamina
A
0% ~ 30%
Light
B
30.1% ~ 70%
Medium
C
70.1% ~ 100%
Heavy
D
100.1%+
Encumbered

Ultimate Stamina
This skill does two things: it provides AA Agility to light armor builds and AA Toughness to heavy armor builds. AA Agility rating is only available with Ultimate Stamina equipped, this minimizes your Ki consumption and maximizes Ki Recovery Speed as well as dodge distance. Ultimate Stamina is only found on Scrolls. It requires 150 Stamina to take effect, requires 20% or less weight ratio For the AA Agility Rating. AA Toughness requires 350 toughness to activate which can only be attained by wearing heavy equipment.

Recommended Weight
Under no circumstances do I recommend settling for C agility, it destroys your mobility, ki regeneration, ki consumption and total output damage. Also, there are debuffs in the game that can cripple you by increasing the weight of your equipped items, this knocks you up an entire letter grade; this means that a C would become a D and you may as well ALT+F4 at that point.

Reduced Weight Effect
It looks like this equipment ability was removed in Nioh 2. However, some armor may come with a special effect called "increase max weight +1.4" for example, and this is functionally the same or better than what it used to be in Nioh 1, with the exception that you can't temper it anymore and it has to be found on equipment as is.
Toughness, Ki Damage, Break & More
Toughness
  • Reduces Ki Damage taken.
  • Reduces Ki Damage taken on Guard.
  • Increases Stagger resistance.
  • Allows you to continue attacking when receiving damage.
  • Beyond 300+: Diminishing returns hit and hard-caps at 400 or 500 according to some sources. Basically it's not worth investing points beyond 300.

Toughness affects how much Ki is used up when guarding or if you become staggered in the middle of attacking. At 200 Toughness you gain the ability to prevent most staggers from taking damage, meaning you can continue attacking while taking damage even if it kills you. However, there are attacks that will always knock you down, usually heavy telegraphed attacks from bosses or grapples the enemies perform. You want at the very least 100 Toughness at all times unless you're doing a very particular "no damage" build.

Toughness is NOT incremental (for stagger resistance)
This means that having less than 100 Toughness does nothing for you. Having 199 Toughness does not make you any tougher than 100. Toughness breakpoints are only granted once the tiers are reached: 100,200. If you can't reach the next tier then that extra toughness is worthless, keep that in mind. You do get some Ki damage resistance, but it's still not worth to sacrifice weight tiers if you don't have to, so keep that in mind.

Ki Damage
Similar but different from Break. Ki Damage only affects enemies that are not guarding, you will deplete their ki faster when your attacks successfully land. In Nioh 1 the general consensus was that stacking this ability is not as good as it should have been, nor does it affect Yokai. This may have changed in Nioh 2, but try to not put all your eggs into one basket with this ability until you know more.

Break
How much Ki damage you do to a guarding opponent. If their Ki is depleted while guarding, they will be exhausted and left open to finishers, marked by a red reticle.

Guard Ki Consumption
This affects how much Ki you lose when guarding attacks and can be found as a special effect in weapons and armor. In Nioh 1 this was called Guard Ki Reduction.

Block
How effective your blocking is. Lowers Ki consumption when blocking attacks while holding the block button. Similar to Guard Ki Consumption, but Block is the first line of defense when these stats are calculated (as far as I know).

Weapon Block Average Rating
Every weapon has different block values even within their own category, but they all vary greatly from one weapon type to another, this table should give you a decent idea of how good a weapon category is at blocking.
Weapon
Block
TONFA
A
FISTS
A-
HATCHETS
B
DUAL SWORDS
B-
SPEAR
C+
SPLITSTAFF
C
SWITCHGLAIVE
C-
SWORD
D
KUSARIGAMA
D
ODACHI
E
AXE
F

Weapon Break Average Rating
Every weapon has different break values even within their own category, but they all vary greatly from one weapon type to another, this table should give you a decent idea of how good a weapon category is at breaking.
Weapon
Break
AXE
S
ODACHI
A+
SWITCHGLAIVE
A
SPLITSTAFF
B+
SPEAR
B-
TONFA
C+
FISTS
C
SWORD
C-
HATCHETS
D
DUAL SWORDS
E
KUSARIGAMA
F
Ki Pulse & Burst Counter

Ki Pulse
This is the bread and butter of Nioh. You have to learn to use this early on in the game if you wish to progress further into the game.

Ki Pulse does three very important things:
  • Recovers Ki Spent
  • Cleanses Yokai Realm
  • Buffs your Ki Recovery

How to Ki Pulse
On a controller you hit the right shoulder button (R1/RB) to Ki Pulse after a combo, this is visualized by a blue glow effect that appears on your character. Timing it perfectly will recover the stamina you spent on your combo. Press the button when the blue lights culminate on your character.

Yokai Realm
Yokai Realm is the black and white circle area that Yokai leave behind. Standing inside of a Yokai Realm pool will lower your Ki Regeneration. Performing a Ki Pulse will immmediately cleanse the area.

There’s also the Dark Realm, an often Yokai-infested area which will turn your screen grey, impeding your vision once you enter it. The Dark Realm is built to damage your Ki gauge and will impede recovery until you free the realm of its tormentor, the offending Yokai. Once you’ve defeated all of the Yokai in the Dark Realm you should see the world return back to normal and gain access to special chests and shrines. This can also happen in boss battles where the enemy will flip on the Dark Realm to impede your Ki recovery mid-battle. Consider holding out until this phase passes and using Ki recovery items like Sacred Water to offset the stamina deficit - there’s not much you can do about it here. gamesradar[www.gamesradar.com]

Advanced Ki Pulse Techniques
As you unlock abilities in skill trees, you will gain access to different methods of performing Ki Pulses after a combo. Blocking, Switching Stances and Evading are examples of upgrades you can select to ki pulse after a combo. Please refer to the video below if you wish to see a full tutorial on how to master Ki Pulse.
YouTube Link: Nioh 2: Ki pulse & perfect ki pulse

Burst Counter
The other tactic that is mandatory for success in the game is the Burst Counter. As you achieve successful hits on enemies, you’ll build up what’s known as your Anima gauge. This is the purple gauge underneath your Ki Gauge. Often times, enemies will use attacks that sprout a red burst of light. This is to let you know the following attack that’s coming can be countered (or interrupted) with a Burst Counter.

The timing on each enemy’s attack when it must be initiated is different (some have a delay between the flash of light and attack that must be learned with consecutive fights). A successful Burst Counter will severely impact an enemy’s stamina, often resulting in a moment in which you can Grapple the enemy with your Heavy Attack for massive damage. IGN: Nioh 2 Tips and Tricks Guide


Phantom Burst Counter
This one doubles as a Guard and has a small active window. Activate it just before the moment the enemy's attack connects with you to counter.


Feral Burst Counter
This one acts as a dodge, however it can only counter enemies when you dash forward with it. Feral leaves two images behind as indicated by the image above, and as long as one of the images makes contact with the attacking enemy, they will be countered. The timing is slightly easier than the Phantom's BC.


Brute Burst Counter
This one is not a counter, despite the name and mechanic of the other two, it is more of an interrupt. You cannot negate damage, but you are uninterruptible to most attacks (except grabs and such) while it is active. The brute is especially great at disabling red attacks when they are slow, but it is absolutely impossible to counter an instant red attack from the enemy as it takes half a second to activate unless you predict it. Use the Brute's BC as soon as you see the red flash on the enemy, sometimes it's safer to dodge first and then BC them or if you're feeling good about trading damage then you can stand your ground and take the hit.

The Brute's BC can also be used in the middle of combos to add some extra damage and sometimes finish off enemies since it does not cost any Ki at all. Using it often will also benefit you in mastering its usage.

What's the best Yokai Shift Burst Counter?
Feral. After playing around with all three, I really like them all but if I had to pick just one then Feral is the best choice for aggressive and defensive play. You can use Feral BC to get out of any sticky situation even if the enemy is not attacking with a burst attack. Simply dodge left or right and you can avoid a lot of grabs, this is simply not an option for the other two Yokai shifts. Brute is strictly offensive and preventive, while Phantom is strictly defensive.

Watch this video for a full breakdown with examples and tips on how to master Burst Counters:
Blacksmith
Everything at the Blacksmith can be extremely expensive if you don't know what you're doing. Especially if you don't know what the attributes do, sometimes they're self explanatory and sometimes they are as obscure as they are useless.

How to unlock Blacksmith
Complete the second main story mission.

How to unlock Muramasa
Region: Dream (6th Region)
Mission: The Roaming Artisan
Pre-requisite Missions: The Mausoleum of Evil, Calling of the Fire God


TEMPERING
Tempering is how you min-max your equipment and customize the way you play. This is where 90% of your money will go into.

Instructions
Select an attribute you want to change and look at the list on the right for an ability you want.

These attributes can appear anywhere on the list, they could require cheaper Umbracite or they could require more expensive ones. They tend to be completely random. Be careful to not spend a more expensive Umbracite on a lower tier attribute. Even higher tier attributes can appear at the top of the list for cheaper umbracite, so make sure you always check every entry of your weapon.

Min-Maxing
Once you have tempered most of the abilities you want, it gets more difficult to find the last ability on the last slot. So how can you cycle the list of abilities? Here's what you do: spend a regular Umbracite on a crappy ability and then check the temper list again, you will usually notice different abilities. Keep doing this until you find what you're looking for, this can be expensive but it's a sure-fire way of guaranteeing you get the exact build you want.

Some abilities are from the same category, this is important if you're trying to understand what's the best way to forge a weapon since you cannot put two abilities from the same category into the same weapon. Here are some examples of abilities that are in the same category:

Elemental & Status Pool
  • Fire
  • Water
  • Lightning
  • Poison
  • Paralysis

You can only choose one of those to use on your weapon, the same goes for other abilities such as Familiarity Damage Bonus, Agility Damage Bonus, Ninjutsu Damage Bonus, Onmyo Damage Bonus, etc. For a full table of attributes that share the same category pool, please visit the page below:
Nioh 2 Tempering Attribute List for weapons and armor spreadsheet[docs.google.com]
========================================================


UMBRACITE
Where do I get Umbracite?
Four different ways:

1. Twilight Missions (2 missions per difficulty)
Twilight Missions are limited per day but they can reward Umbracite for completing them.

2. First time rewards
Some missions will give different quality Umbracite as a first time reward depending on the difficulty you are playing. So keep an eye on the rewards if you're hurting for Umbracite.

3. Disassembling gear at the blacksmith
You can get umbracite fragments from unwanted gear and then forge a single piece from 10 fragments.

4. Helping Others (preferred method)
  • Select Torii Gate.
  • Select Random Encounters.
  • Search without conditions.
  • Kill strong Yokai and finish the mission.
You are guaranteed at the very least one Umbracite as a reward. Sometimes you can end up with higher quality Umbracite as well as several of the regular ones. Drops are affected by luck and Kodama Hunter Blessing that increases Materials Drop by 25%.

========================================================

SOUL MATCHING
The idea of soul matching is to take a low level item and to increase it's level by sacrificing a higher level item. The following list is going to be a quick reference guide so you understand Soul Matching a little easier at first glance.
For more in-depth information visit: Nioh Wiki Soul Match[nioh.wiki.fextralife.com]
  • Costs Gold or Patronage.
  • Multiple melds will increase the cost of that item.
  • The cost also increases as the item level increases.

Matching Cost Increase
Every time you match an item and increase its base level, the cost will increase if you try to soul match the same item. The number of times you match something does not appear anywhere, but matching something more than two times is not recommended as the cost becomes astronomical.


Inheritable Skills
This icon indicates that this skill can be inherited by another weapon. In order to do this, you must max the familiarity of the weapon that currently has the skill you want to move, then use it as a material for a Soul Matching meld. The levels of the items do not matter, all that matters is the familiarity, if it remains at anything less than max then you will not be able to transfer the skill.

You also need the base weapon or armor to have an inheritable slot you can overwrite or the skill will not transfer. You can transfer an inheritable skill as long as you max familiarity.
Furthermore, you cannot bring an ability that is of the same type as another ability that already exists on an item, for example you can't bring an attack ability into a piece of equipment that has "damage" increase of some type somewhere on the item.


Transferable Skills
Unlike inheritable skills, you don't need another inheritable skill on the base item in order to transfer this skill. Requires Max Familiarity on the item with this ability and that the destination item does not already have an ability that is of the same type.


Soul Matching Plus Gear
Matching plus gear does not increase the cost of melding as long as the base item level remains the same. So if you match a +2 with a +2 and get a +3 and continue to match items all the way to +10, the price will remain the same based on the original formula of the item level, item type and item name.

Soul Matching Cost Reduction
This ability can be found randomly on weapons and gear as well as forged items, but you cannot temper it. Any soul matching that this item is involved in will be discounted by the percentage shown, whether it's used as a base or a material. Be aware that the cost will still increase based on how many soul matches you have completed with the base weapon.

REFASHION
In order to unlock the look for a certain armor or weapon piece you must first obtain the actual item, rarity is not important. The only catch is that it cannot be unlocked by obtaining the equipment through a revenant or even dismantling it afterwards.

  • Obtain the item by defeating an enemy that drops it
  • Forge the item from a smithing text you obtained
Patronage

Patronage points can be earned by spending money at the blacksmith by purchasing, forging, and tempering items or gear. Patronage points can be spent to upgrade various aspects of the blacksmith options and capabilities. Accessed via the dialogue menu at the blacksmith. As you progress through the game, the upgrading limit of the patronage options will be increased one time.

Don't worry about buying things or forging countless worthless items, you will earn most patronage points simply by tempering when you are constantly trying to cycle through abilities on your items with cheap Umbracite.

Which Patronage do I upgrade first?
From most important to least important:
  • Muramasa - 20/20 Tempering Cost Discount
  • Muramasa - 20/20 Soul Matching Cost Discount
  • Muramasa - 29/29 Disassemble to Obtain Rare Materials
  • Muramasa - 5/5 Upper Level Limit for Forged Items
  • Muramasa - 5/5 Lower Level Limit for Forged Items
  • Toyo - 15/15 Forging Cost Discount

Anything after that doesn't matter.
Smithing Texts & Weapon Skills
Under Construction

Click this:
Google docs spreadsheet for all smithing texts and weapon skills here.[docs.google.com]
Damage Boosts
Because this section is way too large to compile together, I will simply offer the link here. It is a google document spreadsheet that shows in very fine detail what the increase in damage is, please review it to min-max your output. Remember that some bonuses are lower than others because they also affect ranged weapon damage.

Nioh 2 Damage Boost Spreadsheet[docs.google.com]
Onmyo & Ninjutsu

Onmyo
Let's GO! Onmyouji! Onmyo magic has a seen a few slight nerfs overall from the first game to the debuffs you can apply to enemies, but it's still a strong choice overall. Even if you're not going to be a pure spell caster (let's be honest, nobody really is in the end) you'll still be using a wide arrange of Onmyo spells to win the day, whether it's healing, imbuing your weapon with elements, casting elemental spells, debuffing the enemy, buffing yourself and your friends, the list goes on.

Starting the game as a Mage
When you start the game, it's recommended to pick the lightning Spirit Guardian (the yellow bird) because it gives you a passive to +20% lightning bonus. This will greatly help your early mage build when you invest into the lightning skill tree, don't worry about having the perfect build since you can always respec at a later time once you have a good grasp of what works best for you.

Ninjutsu
Dattebayo or something! Ninjutsu is a lot stronger this time around and you can totally make a full ninjutsu build that works, you can decide to go specifically for passives, utility, elemental or status jutsus, and depending on the situation these can absolutely melt anything in the process.

Starting the game as a Ninja
It's not easy and it is very weak, but you want to focus on using broths and dealing as much damage as you can. You can get the bombs and use them on enemies that are weak to fire, such as slimes. You can use the paralysis broth on Enki (Yokai Monkey with spear), since they are weak to paralysis.

Recommended Jutsus:
It goes without saying that just about every spell and skill has its use even if it's not immediately apparent at the start. Some require better statistics while others require specific situations to really utilize them to the fullest. With that knowledge in mind, here's a top tier list for good all around Onmyo spells and Ninjutsu skills.

Recommended Onmyo
Fire/Water/Lightning/Purification Talismans
These are great - If and when - used against the correct enemy type, you'll still see numbers coming up which is extra damage and it doesn't hurt, but using them against the correct enemy adds so much more value to your hits. Make a mental note of who gets hurt the most when you use them and you'll level Onmyo much faster because of it on top of dealing more damage. Purification talismans are the exception here, they only work on Yokai or Yokai corrupted humans, purification exhausts their Ki so you won't see any numbers coming up. This is a difficult one to judge the value on, but after using it for a while I can say that it's worth it as long as you capitalize on finishing blows. You cannot have two elements at once, killing Oni-B(flying yokai heads) will overwrite whatever element you had imbued on your weapon.

Life Leech/Oasis/Rejuvenation Talismans
These healing talismans are better than many give them credit for, personally I've never needed them, but my buddy uses them all the time and he can heal us both at the same time which saves elixirs if you're getting chumped over and over in a particular stage in the early game. You can also heal Benevolent Grave NPCs you summon with these, which helps them stay alive longer since they suck at that. These become completely obsolete if you are running a Life on Amrita Absorb build, so keep that in mind.

Steel and Barrier Talismans
Steel is invaluable when you're fighting enemies you've never fought before, these significantly reduce the physical damage you take by 20%. Might not sound like a lot, but it is. Barrier Talismans are amazing, they increase your Ki Recovery Speed and they automatically dispel Yokai Realm Pools as soon as you touch them. There is no better hyper aggressive buff that I can think of. Steel does not stack with Defense Up buff from any source. Barrier gets overwritten and does not stack with any Ki Recovery Speed increase buff from any source.

Sloth and Weakness
Sloth slows enemies speed and Weakness makes enemies take 20% more physical damage. Both of these are invaluable (on your first run) (if you get them), but if you become dependent on them then you'll start hurting later on, because the harder the game gets, the less duration they stick to the enemy. Yep, debuffs at max difficulty will sometimes last 5 seconds, if you're lucky. Don't get me wrong, they're still good... but I don't really recommend them later on unless you have a very solid strategy on how to maximize its potential in that short window of opportunity. Most tough enemies are extremely resistant to Sloth and Weakness, so it's not recommended after NG+. Lightning Status is a better alternative against most enemies that you wish to slow, unless they are resistant to Lightning as well.


Recommended Ninjutsu
Poison and Paralysis Broths
These are your bread and butter at the start when it comes to leveling up Ninjutsu proficiency. There are specific enemies that are very weak against poison or paralysis, so keep an eye out for who gets wrecked. You can also affix your gear with "melee damage vs poisoned/paralyzed enemy", I don't recommend the paralyze one unless you are strictly playing solo, the strategy is to paralyze them then charge up a really strong attack to break them out of paralyze, doing max damage. In co-op they'll just break out of paralyze instantly from all the constant damage.

Shuriken and Bombs
These start out extremely weak, they will feel worthless. But if you keep investing points into Dexterity, get gear with Ninjutsu power and use them at the right time against the right enemies, you'll see insane numbers. Enhanced Shrapnel Bomb is a really strong jutsu btw.

Shadow Arts: Fire/Water/Lightning
These elemental jutsu are a bit different from their Onmyo counterparts, these deal worthless damage to enemies with full Ki and inversely deal ridiculous damage to enemies with zero Ki. As soon as you exhaust a boss or a strong enemy, use these to nuke them. These obviously scale from Ninjutsu Power, which most comes from Dexterity.

Quick-change and Utility
Probably the most invaluable skill in the entire game is Quick-change, it prevents death once, until it expires. It's an expensive skill to slot, but later in the game everyone has this, and everyone uses it. As for the rest of the utility skills for Ninjutsu, it varies greatly. I'd recommend levitate if you want to avoid ground effects like fire and poison, but the rest of the utility jutsu vary wildly in proper usage, and their value can only be gauged by the player.
Hidden Teahouse & Clan Battles
The Hidden Teahouse is where the game's Clans battle for online supremacy via Clan Battles. Within the Hidden Teahouse, you can use Glory, earned from killing Revenants, to trade with the merchant for Items, unknown rare Weapons, and Armor. Transform yourself into another Nioh 2 character using skins, or acquire new Gestures. You can also appraise tea utensils for your hut here. Appraise tea utensils for 50 times and you can get Tea Connoisseur trophy.

How to unlock
The Teahouse is unlocked when you defeat the owl boss in the 7th main mission: A Way Out.

Clan Bonuses
Nioh 2 wiki Clan bonuses[nioh2.wiki.fextralife.com]


Clan Battles
Clan Battles are a unique Online event in which players join clans that are randomly grouped into two sides and compete for the total amount of Glory obtained from clearing stages and item donations. Players can spend Glory points at the Hidden Teahouse Trade section. The clans are accessed through the Hidden Teahouse.

More information as well as a purchase list of items can be found in the link below.
Nioh 2 wiki Hidden Teahouse[nioh2.wiki.fextralife.com]
Items you should know about

Summoner's Candle
Allows you to retrieve your Amrita and Guardian Spirit without having to find your grave after you died.


Divine Branch
Allows you to quit a mission and return to the map without losing any Amrita. Later in the game you receive so many of these that it's impossible to run out, assuming you're not using them all the time.


Divine Branch Fragment
This is what you use at the start of the game to quit out of missions, but once you start getting Divine Branches, then forget about these because they make you forfeit all Amrita. (Using it in certain missions and the tutorial will not cost you Amrita)


Sacred Salt
Sends visitors away. Just in case you ever summon a griefer or a cheater, this is how you get rid of them.


Amulet of Camaraderie
Do you play with a friend? do they constantly run off on their own and die who-knows-where? this is the item for you! now you can resurrect them from anywhere in the map. These items are found and crafted. Also tell your friend to stop sucking or git gud.


Visitor Amulet
Did your visitor get lost? maybe they ran off killing everything on sight? this is how you summon them back. Also, you don't have to wait for someone to get to you in order to fight the boss of the mission, they will be automatically transported. Not sure if this item works on Expedition mode, pending confirmation.


Book of Reincarnation
Resets your level and skills, cannot be used during a mission. Found as a reward and sold from the blacksmith for 10,000 gold. Can be obtained from the Hidden Teahouse, rewards and drops.


Zen Manual
Resets all prestige titles (Agyo/Ungyo), cannot be used during a mission. Can be obtained from the Hidden Teahouse, rewards and drops.
New Game Plus (NG+) No Spoilers
How do I get to NG+?
Complete the final story mission "In the Eye of the Beholder" in the "Afterglow" region. The same goes for every new difficulty.

Do I lose anything?
No.

Do I have to unlock all the regions again?
Yes, but only for the new difficulty. Also, unlocking regions and missions is different. You unlock regions in sets, the only requirement is that you complete a set number of missions, in no particular order or specificity.

What's the point?
Better loot, better items, level cap increase, etc.

For a full and exhausting detailed look on what unlocks, please visit the link below.
Nioh 2 Wiki New Game Plus[nioh2.wiki.fextralife.com]
Credits
Information gathered and filtered from my Nioh 1 guide, the Nioh 2 Wiki, Reddit, Gamefaqs and various forums. A lot of information has been copy-pasted, but edited for clarity and transparency.

Nioh 2 Wiki[nioh2.wiki.fextralife.com]
20 Comments
Veniamin_kHz 16 Jan @ 8:01pm 
You can respec focus points, actially. But yout need extra Amrita available.
JDMunited 12 Mar, 2022 @ 9:39am 
hello. sorry to disturbing your pepoles but want to ask i have a problem with nioh 2 the game crashes every time when i want to start a main story mission. i have tried yet many solutions to try to fix this problem but nothing have worked yet. i try now to reinstall the gale to try to fix on this problem. if it need for information the main story mission who crahes my game erevy time in in the dream world the 3th main story mission who have the name sealed fate
Tiny Timmy Tokyo  [author] 25 Jun, 2021 @ 4:34pm 
To be honest, that's the first I've heard of it. But it really doesn't make too much of a difference if you've decided you're going to wear one type or another. Generally I choose what set bonuses I want to focus on, and then I find out what armor type it is, and then I build my character around that. If there is a hidden damage reduction stat, it's probably built in just to make you feel the difference between armor weights. I personally never wear light, and there's not a huge difference between medium defense and heavy defense, most of the defenses that are usually noticeable come from set bonuses in my opinion.

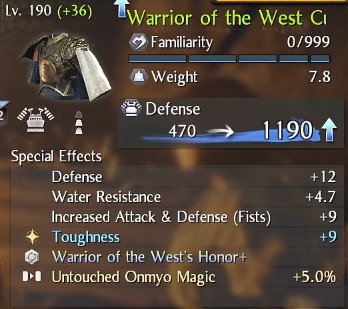
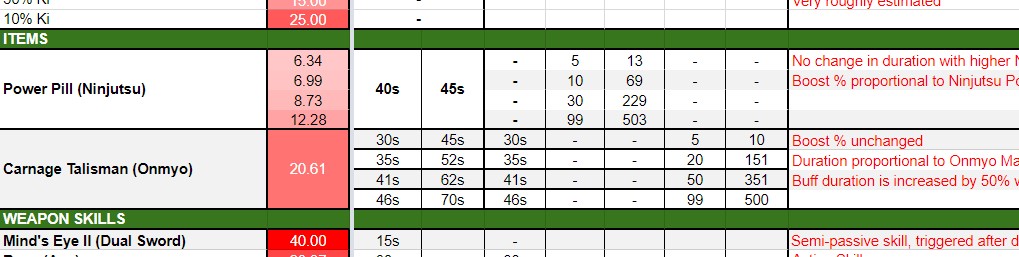
Nioh 2 definitely facilitated tanky builds in contrast to the first game, so it's a lot easier to feel invincible this time around.
{5LINE}Cows with Guns 25 Jun, 2021 @ 2:40pm 
Found an old thread on reddit for Nioh 1 about armor - do you know if the damage reduction for Light/Medium/Heavy still applies?

https://www.reddit.com/r/Nioh/comments/8tr3oh/light_v_medium_v_heavy_armor/

Light: 8% DR (11% with familiarity)
Medium: 15% (18% with familiarity)
Heavy: 25%(!) (30% with familiarity)
Tiny Timmy Tokyo  [author] 23 Jun, 2021 @ 2:35pm 
I don't think there's a simple answer to it. There's a lot of factors involved when it comes to staggering, I believe that after a certain difficulty level they become unable to be staggered during certain attacks. And yes, your stats are very important in that regard, but I don't think the weapon type matters(maybe?), however the move you execute does matter. It's been a while though, I hope I'm not mixing my games up.
{5LINE}Cows with Guns 23 Jun, 2021 @ 1:00pm 
A few question about weapons and staggering enemies.

Do weapon types have an effect on staggering HUMAN enemies (I don't think yokais stagger unless they are out of ki or you break their horns).

My assumptions have always been Odachi and Axe/Hammers being the staggering type (but having fought tsukahara on dotn, i am not so sure... then again, anything at dotw and beyond is mostly dealing with BS).

That being said, does character levels have influence staggering? (After 300+ hours and completing the dojo missions, I am convinced that it does, but I have not seen any details about it...).
Tiny Timmy Tokyo  [author] 21 Jun, 2021 @ 4:45pm 
Expeditions are the only ones that increase the health of enemies as far as I know. But summoning friends or AI to help you does not.
Hardcorefux 21 Jun, 2021 @ 2:06pm 
does summond players, player controled or from ai, increas the difficulty against enemies by increasing there stats or lowering the loot/amrita or have any other negativ benefit?
Tiny Timmy Tokyo  [author] 25 May, 2021 @ 2:50pm 
It could also be argued that it doesn't matter that much in the end, I never ran into money issues, but one thing I was always doing was tempering, the higher level equipment you sell, the more value it gives, but even though I didn't do the sell value increase, I still didn't have money issues.

It's whatever in the end, it's just a suggestion, everyone is always free to do what they think is best. I'm glad the rest of the guide helped you though, it's not 100% accurate, but hopefully it helps people find the answer they were looking for.
Cephara 25 May, 2021 @ 11:27am 
I just spent ~100 hours being a fresh experience, and I have to say your "patronage" recommendation is just wrong:

1) Sell Value
2) Temper or Soul Match
3) Soul Match or Temper
4) Who the f*uck cares

Your guide was helpful for my first play-through nonetheless, but is bad advice when you want patronage points. When you sell your junk gear, you're going to get more patronage points out of the ability to spend more gold on tempering and soul matching. To other new players... dismantle everything until you actually start needing gold or you start crafting. The only thing I actually crafted (in strong [don't worry about grace until Nioh difficulty]) was my weapon that got me to "Wise" where you can't craft that rarity.