Deep Sky Derelicts

Deep Sky Derelicts

32 ratings
Stealth team - Guide
By lecoqaveugle
  • Tired of enemies always dealing damage to you?
  • Tired of endless failed tries to beat the 'Hardcore' game mode?
  • Tired of battle rounds taking ages to finish?

If you answered Yes to the questions above then, my friend, you are in a deep need of some stealth action.

3
2
   
Award
Favorite
Favorited
Unfavorite
Introduction
Welcome to the Full stealth team guide.

After having countless battles and mixing different types of heroes, there came a vision of a one, that would fully utilize the stealth mechanic DSD is offering. It doesn't matter how many enemies are being thrown at you - you are a quick, non-reachable merciless killer 🗣️


The team performs excellently at the 'Hardcore' diffuculty, so if you fancy a challenge then gear up and dive to the sections below.

Trackers - why them?
Who would have thought, that one of the best teams, that DSD has to offer would be a composition of x3 Trackers. Why trackers, though? It's fairly simple.


Advantages
  • The team utilizes 2 native to Tracker's stealth systems (the 'Stealth Strike' and 'Emergency Cloak').

    When a hero is being in stealth mode - the enemies cannot hit him with direct hits, except AOE skills. Those skills though are rare, the enemies that use them - rare as well, so for the most part of your early game you won't have to worry about them.

  • Very high damage ceiling. The more damage you deal - the faster you end the battles and the less damage you take. Basically you increase your credits income that way. Faster battles = you can farm more enemies per hour, while less damage = no credits spent on healing heroes.

  • Very high initiative. You start your turn early - you kill enemies eraly. Simple as that.

  • The skill 'Mark Target', which turns those difficult to deal with enemies (high evasion or big damage resistance) in puppy fights.

  • Evasion. Trackers have one of the highest evasion by itself in the game. Just take a look at my guys below, with their superior 99% evasion (laughs at evading).

Disadvantages
But what about disadvantages? Surely there must have been some, and indeed there are:
  • Traps. Have you ever wondered what was this "beep-beep-beep" sound that you hear when walking through a direlect? It's the sound of a trap and unless you have some 'Scavenging Kits', your team will lack any skills to disable them.

    Luckily, the damage you take from them is minismal and once you farm some credits to buy 'Scavenging Kits', you can forget about traps almost forever.

  • Quest related skills. Some quests have you go through technical skill challenges and we lack those, but those quests do not interfere with our game progression, so we can easily ignore them.

  • Rinse & repeat. The repetitiveness is the worst (and arguably the only) big disadvantage of this team. Every fight would look pretty identical to the previous one, that is speaking in terms of skills/cards usage. This can get you bored really quickly.

Team creation
So, we have selected all three Trackers, that we would need. 2 of them would get the passive bonus of 'Skittish' (+5% evasion). It may not seem to much at the beginning, but once you reach the mid-late game - it becomes a game changer (especially, when you reach those sweet 50%-60% or even 90% of evasion).

Those 2 will be our primary DD (damage dealers) throughout the whole game.

The Tracker that we left untouched takes 'Neurotic' (+2 initiative), so he would always go first and give buffs/debuffs to our team or the enemies. This last tracker would eventially become a support for our team, but keep in mind, his damage would still be high enough.

Starting level 1
Important notice
The less cards you have at your disposal in every fight, the better. Stability is core to playing (and winning) this game, and stability in card games comes always at controlling your deck (predicting your next cards, knowing your cards and so on).

Thus the very first thing we are doing is thinning our deck size. You unequip from all of your heros their blade weapons and their weapon tools - this leaves you with a deck size of 4 cards, which always guarantees you all of your cards in your early levels & fights. Each round.

The cards we basically got rid of do little in those early stages, but they cripple your stable ability to inflict damage or heal your shields. Thus our deck is composed of: x2 attacking cards and x2 defensive cards.


We also unpick from everyone the 'Mark Target' skill. This is something a lot of people don't know - you can actually control how many cards you wish to add to your deck from the skills you pick.

Right now we want this card number to be at - 0, so we just click on the little icon near the skill name (highlighted by red rectangle), which signifies the cards number and make it blank, thus adding 0 cards.


Fights
The fights are pretty easy and straightforward. Every round, each of your Trackers pick the card with the most damage they have. Since they have high damage and [/b]initiative[/b] - you can easily kill 1 or 2 enemies before their round even starts. The remaining enemies rarely pass through your shield before dying as well.

Usually, each fight takes around 2-3 rounds. This is the tactic that we are going to follow until we hit level 4.

Equipment
Weapons - until we hit level 4, we stay with a ranged weapon of our choice, that gives us high damage output and gives us less cards, than the weapon we currently use.

Weapon modifications - if we are lucky and loot mods, that give 0 cards, then we immideately equip them. Otherwise, consider taking a minute or two to think about equiping that mod. It may have good stats, but it gives us 2-3 extra cards. This would probably mess with our constant DPS, since we would get more useless cards per turn, so we should just sell this mod.

Shields - consider upgrading the shield module as freaquently as you can. Change it to the one that gives the most shield points and less cards. A shield mod with 1 card is the one that we always want to strike for.

Tools - the one that benefits us the most is the 'Scavenger tool' since it can give us the 'Craft Supply' card. This card instead of adding extra cards to our deck, stabilizes it instead by letting us pick a card of our choice from our deck and immediately playing it (comes in really handy when you don't have a card).

Scaner/Energy upgrades
I leave this to your choice. Upgrade the ones, that you think would benefit you right now (usually energy updates first and inventory second), since by the mid-game you would have so much money, that you can easily upgrade them all.
Team level 2
Once we reach level 2 our heroes take the next skills:

DD's - 3 points in 'Tools of the Trade'
Support - 2 points in 'Agile'

We start to specialize our guys to their respective roles. Our support takes some [evasion], that he is lacking, while the DD's increase their damage even more.
Team level 3
The level 3 is very simple as well:

DD's - 1 point in 'Agile'
Support - no points spent. We will use them later on.
Team level 4
Hooray! We got to the level 4 and here is where the fun begins.

Skillpoints
DD's - 3 points in 'Stealth Strike'
Support - 3 points in 'Stealth Strike'

Stealth Strike
This skill is our bread and butter skill and the one that we will mostly utilize until the end of the game. Since this skills is melee only we should have saved 3 energly blades for our heroes by level 4 - otherwise we won't be able to use this skill at all.

If we use this skill from a normal state (not in stealth), then it does 110% damage, otherwise if we use this skill from stealth mode then it goes up to 170% damage and reveals a hero from his stealth mode (as any other card would do).

So we sell our ranged weapons and play only with our melee ones.

Specialisation (Sub-classes)
Damage dealers - take the specialisation of 'Chemist'. You can use 'Quartermaster' instead, since he is better at lower levels, but the final bonus of this sub-class is minismal compared to the Chemist's, that is why this build will use only the Chemist sub-class.

Support - takes the specialisation of 'Surgeon'. Immediately we spend 2 skill points in the skill 'Purify' and add 1 card to our deck. For now this will suffice.


Fights
The fights now will always go this way:

1. We go first because of our high initiative and play 'Stealth Strike' (make sure to hit an enemy with low or 0 evasion), so we can enter our stealth mode and become invisible (untouchable).

2. We click on the 'PASS' button and pass our next turn. This will apply a buff to ourselves - energize, which makes us play one more card next turn & gives us one more card to play to our hand size.

3. We strike with our first card using 'Stealth Strike' dealing 170% damage and we use the same card again (otherwise use something else) to re-enter the stealth mode. Practically, this makes us invinsible.

4. Rinse and repeat until the end of the fight.

This way all of our heroes are ALWAYS invisible and untouchable for our enemies ALL THE TIME. We can practically end fights in 2-3 rounds, sometimes in 4 rounds.

One problem we can encounter is those pesky enemies that use AOE attacks - they can even hit us, when we are in stealth mode, but this happens rarely.

To deal with those annoying enemies, that apply a buff to themselves (like block + counter-attack), we use the Surgeon's skill - 'Purify'. It will de-stealth us as well (for the time being, until we hit higher levels), but at least we can hit those enemies again.

Skillpoint view
This is how your skills should like at level 4. The left is for Damage Dealers, while the right is for the Support.

Team level 5
At this level ALL of our heroes take the skill - 'Emergency Cloaking'.

This is the skill, that will save us countless times. Essentially, once we take hefty amount of damage from our enemies (10 damage), we will enter stealth mode automatically and immediately. This passive skill has recharge of 4 turns though, so we won't be able to exploit it every turn.

Team level 6
At level 6 we continue with the skills below:

DD's - 2 points in 'Agile'
Support - 2 points in 'Mark Target'

At this stage of the game a lot of our enemies have either:

a) high base evasion;
b) skills, that increase evasion.

To counter this we use 'Mark Target' cards, that nulify any evasion of the enemies. A few of these cards should suffice for now (2 cards until we reach higher levels).
Team level 7
We dive deeper into the skills and at this level we have:

DD's - 3 skill points in 'Critical Aim'
Support - 1 skill point in 'Agile' and the 2 remaining skill points we can apply to one of these skills:
  • Self-cleansing system - a very good passive skills, since it purges from our support each turn any negative effects he could have. Really handy against enemies, that like to apply 'Fear' or 'Stun' - since our support will always go first (high initiative), he would have a good chance (up to 95% when maxed out) to get rid of any negative effects.

  • Purist - up to 60% chance (when maxed out) to resist any negative effects. The effect is similar to the self-cleansing system above, just works differently.

  • Critical Aim - our support is Tracker first of all and then support, so he deals hefty damage as well. We could help him to deal even more.

I, myself, chose the Self-cleansing system since I like to play safely on my support heroes and limit any source of infections from nipple-twisters 🤣

Team level 8
Nothing ineteresting here:

DD's - 2 skill points in 'Symbiosis'. It's kind of useless right now, but it will shine when we reach level 10.
Support - we max out one of the passives, that we chose at level 7.
Team level 9
This section will fly-by as well.

DD's - 1 skill point in 'Symbiosis' and we save the rest.
Support - 2 skill points in 'Superior Purging'.

Now, whenever we use the 'Purify' card to get our enemies rid-off of any +evasion/block/counter-attack buffs they apply to themselves, we won't get rid any positive effects from our heroes. A fairytail indeed.
Final level 10
Final level! Hooray! Now it's showtime.

Skills
DD's - 2 skill points in 'Assassinate' and 2 skill points in 'Power Injection'
Support - we max out any passive we left of our choice

And now...it begins.


Fights
Power Injection - gives our ally +2 cards, +2 actions, buffs his damage by 70% and gives +10 to initiative for 1 turn. It can be stacked indefinetly.

Remeber the usless 'Symbiosis', that we picked earlier? Well, with this skill we have 35% chance of applying the same effects to ourselves as well (each of the bonuses gets it's own 35% chance).

So, the fights now go something like this:

1. Everyone goes stealth by standard method we learned earlier.

2. The first DD plays 'Power Injection' on the second DD. If the 35% applied, and we have another 'Power Inejction' in our hand or the 'Supply Craft' card - we can buff the second DD once more (or our support).

3. The second DD, repsectfully, buffs the previous DD with 'Power Injection' and since he has more actions, he can buff the first DD even more.

4. By the end of round 3 we have fully buffed our DD's and our Support. We are ready to unleash hell on those enemies any way you wish.


Tips & tricks
Assassinate - this skill is kinda bugged right now, so it will always 'Miss' whenever used from stealth. Use it only when you are de-stealthed.

Items - the best 'non-Illustrious' (legendary, marked by yellow text) items are the ones you can craft by yourself. Usually craft items at level 4, then level 7 and level 10. You don't need to craft new items with each new level.

Credits - you can farm money by covering a direlict entirely in 'Power Generators', in order to make most of the tiles visible and, thus, requiring 0 energy to walk onto. Enemies do respawn and they drop items, which you can sell for more credits.

Hazards - always have a few of 'Hazard Protection' boxes, since some fights, especially those on those planets with weather effect tiles (where the weather effect deals ~6 damage per turn in fight/or walking around), are really tough without any hazard protection.

Conclusion


This is a really versatile team able to deal with everything that the game throws at you. A fun way to play at the 'Hardcore' game-mode and get that sweet achievement, as well as exclusive skins as shown below (skin is unlcoked when completing the campaign with a hero).


Feel free to ask any questions in the comment sections below 🙃

You can always check out another one of my guides on 'Arena' and how to beat it.


This guide is a translation of a russian stealth guide for us English users.
26 Comments
lecoqaveugle  [author] 7 Feb, 2022 @ 1:30am 
@kschang77 Indeed the stealth team makes the game on 'Hardcore' difficulty a piece of cake once you manage to survive the early game until the stealth mechanic (which is easy as well).

The final level is just a joke. The only enemies that give me a sort of headache (mostly by prolonging the fight) are the big Brutus bots with their enormous armor. It's just tedious.
kschang77 3 Feb, 2022 @ 11:21pm 
Watching some of the other folks play the mothership level on YT makes me appreciate how powerful the stealth team setup is. :D Our initiative is so high (esp. the support at like 33 initiative) she will go first, no matter what. Only Cobra assassin came close at hitting 20-25. She has auto-clean/purge so she can't be affected by debuffs and stuns and with a good draw she can purify the rest of the team. Occasionally a wurm can shriek enough to cause fear, but that last one turn at most with shield damage, mainly by causing my guy to break cloak, but with evasion at 99/100/101 they rarely if ever take damage. I've taken on the Red Hoods and the Death Wardens for fun and they are really no match to me.
lecoqaveugle  [author] 3 Feb, 2022 @ 11:11pm 
@jamesthesecond Unfortunately the game didn't become a hit. It really didn't have any sort of marketing and the developers abandoned it a few years ago.

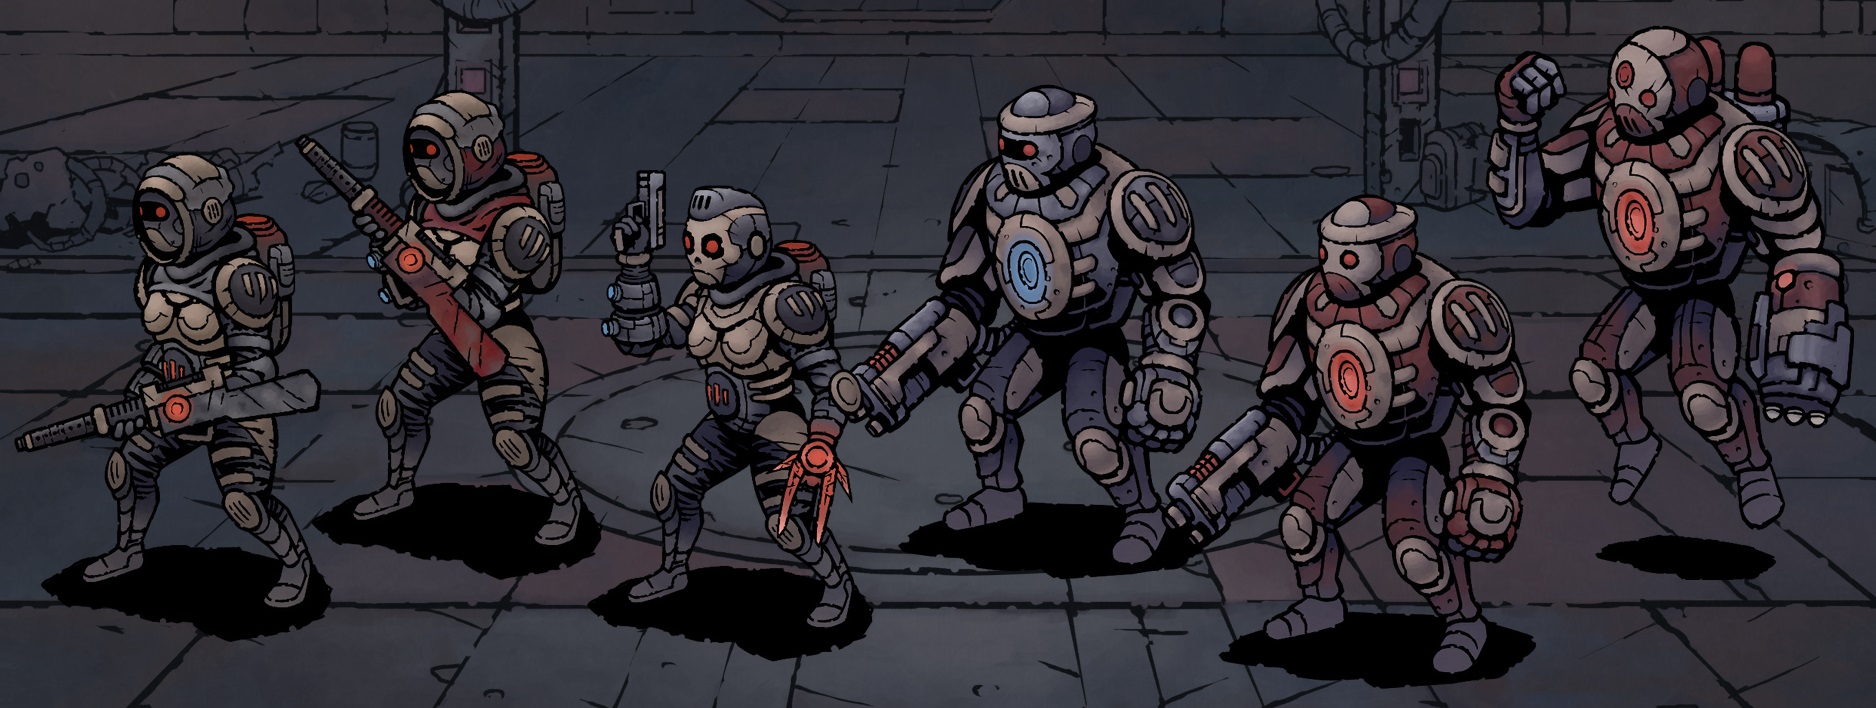
It didn't help that a lot of people compared it to Darkest Dungeon, when in reality this artstyle is a legacy from end of-80's early 90's.
kschang77 3 Feb, 2022 @ 1:42pm 
Not team combat though, but Fight in Tight Spaces is kinda close?

And maybe WH40K Space Wolves? That has teams.
jamesthesecond 3 Feb, 2022 @ 11:40am 
Would like to see a sequel. You do now any games like this?
kschang77 3 Feb, 2022 @ 11:17am 
Not even stealth mode helps. But I get hit so seldomly (evasion 98+!) it almost doesn't matter. By this time my shields are up to 60+ so HP deficit is not a MAJOR concern, even during battle.
lecoqaveugle  [author] 3 Feb, 2022 @ 10:14am 
@kschang77 Yeah, the trap detection works kinda wanky in this game, gotta admit that. Even fully updated I still cannot 100% find those traps when the sound appears.
kschang77 3 Feb, 2022 @ 9:52am 
Have to get lucky on the energy blade having a 12-15% evasion though. Those are almost impossible to roll for.

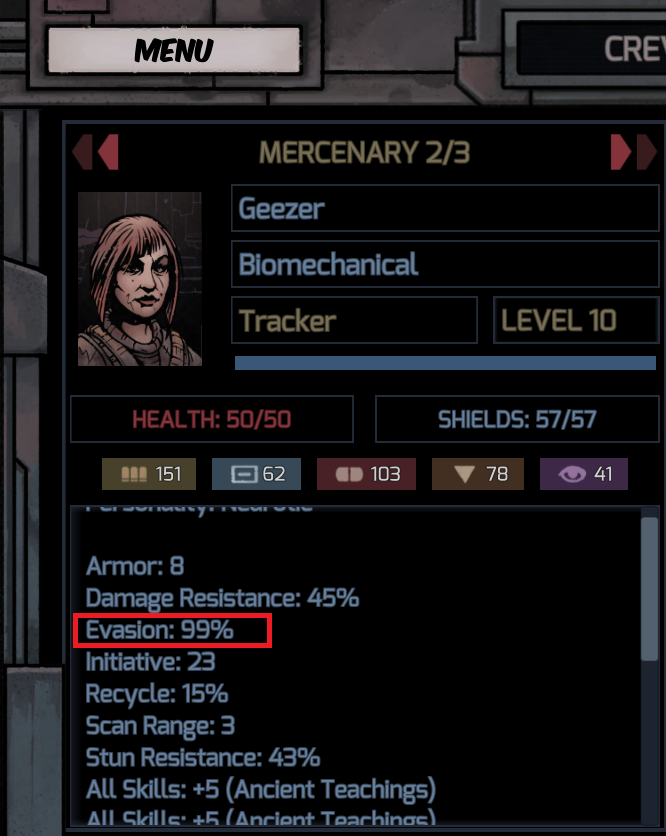
Just got a guy up to 101% evasion. Decided no point going any further. I'm about half way through derelict Level 9. The limit of exploration is actually amount of salvage kits availableand my luck (or lack thereof) in trigger trap squares forcing me to go back for a heal.
jamesthesecond 3 Feb, 2022 @ 8:22am 
Nice!
kschang77 3 Feb, 2022 @ 7:35am 
FWIW, I got a guy's evasion up to 100%. Took a bit of crafting the stuff with the highest possible evasion (and with no card or 1 card), and lots of re-rolls, but it can be done.