Valdis Story: Abyssal City

Valdis Story: Abyssal City

348 ratings
A Completionist's Guide
By TKhaos and 2 collaborators
A checklist/guide that will help you keep track of Crew members and Chests you've found. Using this checklist can allow you to potentially earn up to 63 of the 77 achievements available.
5
   
Award
Favorite
Favorited
Unfavorite
Primer
UPDATE: As of 7/21/2015 the guide is considered complete from an information standpoint. If there is anything you feel was not clear or should be added, within reason, please post it in the comments and I will add it in. On my end however, there is nothing really left for me to do aside from spruce up some of the visuals. It's been a pleasure folks.

-TK
____________________________________________________________________________

The list will give you a general idea as to where everything is and what order you can get it in. Some items can be saved for when you return to the area for a second time, but the reason I listed them as early as I did is because they make certain sections easier. For example, you can wait till end game to get the Wanderer's Raiment and Paladin Armor as you'll be going through there again, it'll save time but the armors can come in handy much sooner. Specifically the Paladin armor granting stat points and immunity to 3 status conditions.

Instances that require Arctic Javelin/Hellish Descent can also be done by Reina's beam attack, and she gets Arctic Javelin too. So everything Wyatt can get, Reina can too. Alternatively you can come back later to get it with the Double Jump upgrade but this list is made with the intention of reducing how much you have to backtrack.

If you'd like to get everything you need as soon as possible then I recommend going with a Full Luck build to start. That way you can obtain the gems and spirits you need a lot more easily and save yourself some time you'd otherwise spend grinding. Once you've reached end game and obtained every item/upgrade you need, collect 2 Demon Ruby, 2 Angel Sapphire and 5 Polished Stone. Take them to Mesmer in Tagrum and purchase Forget Training. That will reset you stats and let you go into whatever build suits you most.

The order in which the items are obtained is laid out so that you can optimize your route and get pretty much every achievement related to completion in one playthrough.
General Information
S-Ranking Bosses:

The ranking system in Valdis Story is based on three things.

1. Time: How fast you beat the boss. There is now a timer next to the boss' health bar that indicates how much time is left to achieve a certain time rank for the fight.

2. Style: How well you performed combos and how often you were hit during the fight. Getting hit reduces your style rank while constantly hitting the boss with a long string of attacks will increase your style rank.

3. Potion: If you lose all your health during a boss fight, you use up a red potion. When this happens your potion ranking immediately drops, making it impossible to get an overall S-rank on the boss fight. Blue potions do not count toward this rank.

A few things to take into consideration when trying to S-Rank the bosses would be:

1. Take as few hits as possible during the fight.
2. Deal as much damage as possible as quickly as possible, time is of the essence.
3. Short combos won't get you anywhere, try to land as many consecutive hits as you can and utilize magic as well as your focus gauge.
4. If you're going for an overall S-Rank or a perfect run, you should reload the save file rather than retry. The boss rooms aren't far away in most cases and retrying is counted against you in the final ranks.
5. If you manage to avoid taking any hits, you're guaranteed a style S-Rank.

____________________________________________________________________________

Retries:

Due to a the way the system works, after 5 retries your retry rank will drop from an S and in turn will drop your overall combat rank down to an A. In order to avoid this you must get through the game without retrying more than 5 times. The only way to avoid having any retries is to just reload from your last save file in order to keep the counter at 0. You can retry as many times as you like in order to get the achievement and it won't affect your final rank so long as you just reload the save file and beat the boss without retrying.

Note: To have an overall rank of S in the final tally, you need to have an S-rank in each of the categories. This means both combat and adventure. So not only do you need to S-rank your retires and the bosses, you also need to find all the crew, items, save the civilians and go to every single room in the game.

Retry Chart:

S: 0-5
A: 6-10
B: 11-20
C: 21-30
D: 31-40
F: 41+

The chart in this section was provided by Myrh2
Frequently Asked Questions
Q: Is there a New Game+?
A: Not exactly. What you can do during a playthrough of the game is unlock each of the character's additional weapons. Wyatt and Vladyn have 3 unlockable weapons while Reina and Gilda have 4. Once you defeat the final boss while having these weapons unlocked, they will become available for use during a new game file. Aside from that, nothing else carries over.

Q: How do I get skill cancel as Vladyn when I start the game as him?
A: Level up once, put a skill point into the middle skill of his Sentry skill tree. It is literally called skill and gives you a skill cancel.

Q: How many skill cancels can each character have?
Q: There are 3 Master Scrolls that each character can obtain. The Judicator's Raiment grants 1 more Skill Cancel. Vladyn gain an additional Skill Cancel from his Sentry skill tree, and another from his Golden Weapon. So for Wyatt, Reina and Gilda, 4. For Vladyn? 6.

Q: How do I get the Golden Weapon you mentioned?
A: There is a new area to the game called the Halls of the Fallen. In that area is a super boss known as Leilodin. Defeating the boss gives you access to a new merchant. This merchant sells 2 items. The Golden Weapon and the Goibniu Warrior Marking. The Golden Weapon is different for each character and scales in stat bonuses with each of them where as the Goibniu Warrior Marking can be used to increase your level past the maximum of 20 to up to 25. Once you have obtained it, simply beat the final boss. The weapon will now be available from the start anytime you start a new game with the respective character. The same applies to all alternate weapons you craft.

Q: Where can I get more Arch Demon Sprits?
A: There are only 2 in the game. One you obtain from Shu Gohth, and one you can obtain from Azudor in the mines. However, if you want access to the Armor of the Grey Knight, as well if you want to get an overall S-Rank at the end, you'll need to forgo one Arch Angel Spirit and one Arch Demon Spirit for the Twisted Spirit. The choice is yours which you would rather have.

Q: What do the Hats do?
A: Consult the Le'Roy Hat Bonuses segment of the guide for more information on the hats.

Q: What happened to the Bolt Jump ability?
A: It was replaced with the Bolt Shackle, which I think is significantly more useful. The double jump is now a passive upgrade you can obtain by rescuing Daemahn, a member of your crew, from The Hallows. Once rescued you may purchase it from him in the library.

Q: I missed an item somewhere, but I followed your guide to the letter! What do?
A: The most commonly missed items are generally the Gem of Purity in the Sewers above Bolverk, the ancient coins, the Spirit Crystal in the Tainted Laboratory, and pretty much any of the pieces of the Grey Knight armor. If you've missed anything else, then I'm sorry to say I'm not sure what it could be. Your best bet, is to switch to a full luck or agility build, grab the Jester's Watch if you go full luck, switch your alignment to dark and run around with the speed boost doublechecking with the list below.

Chests, Crew & Maps

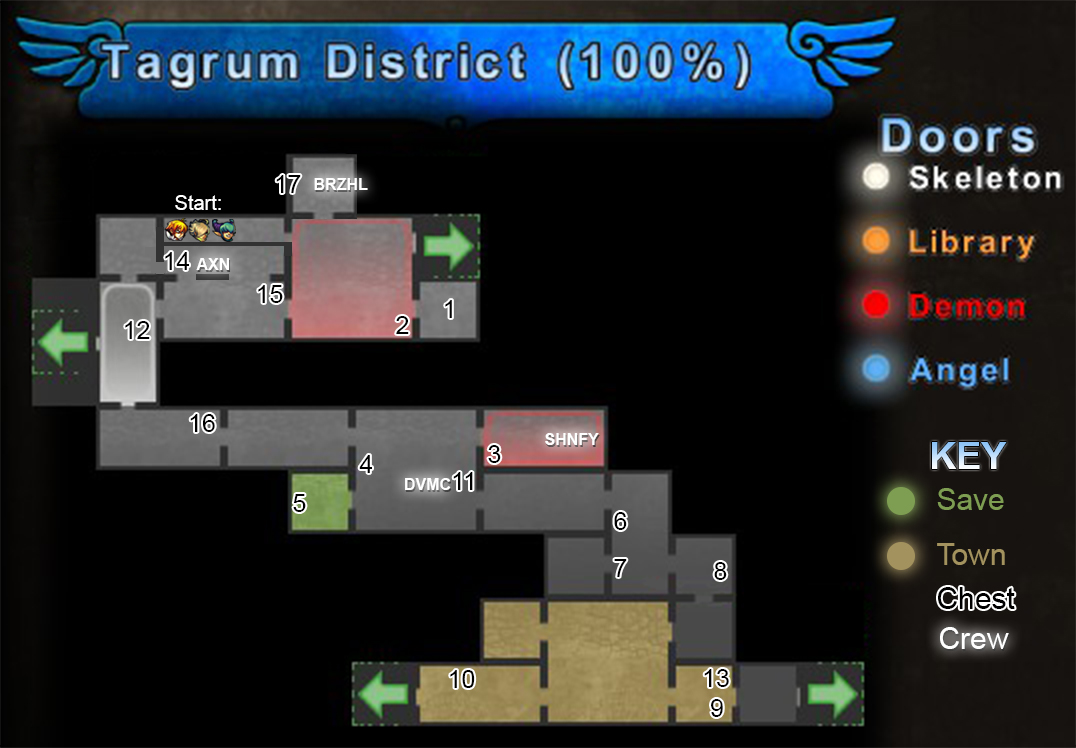
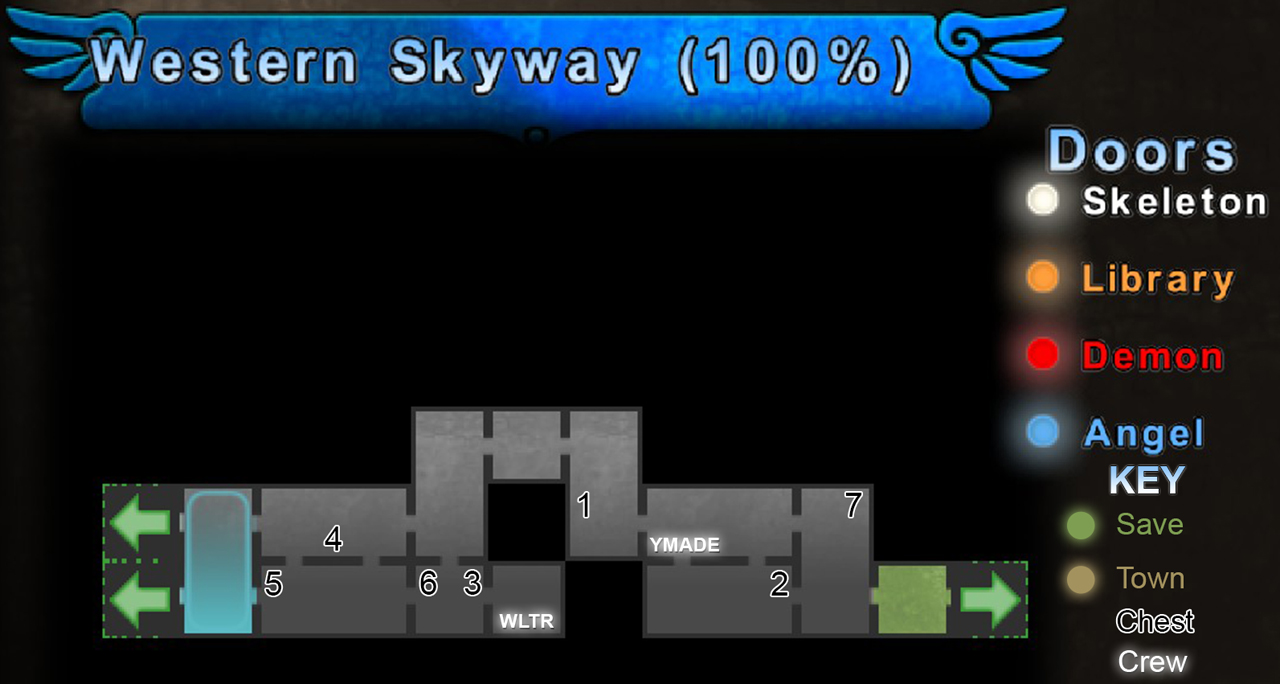
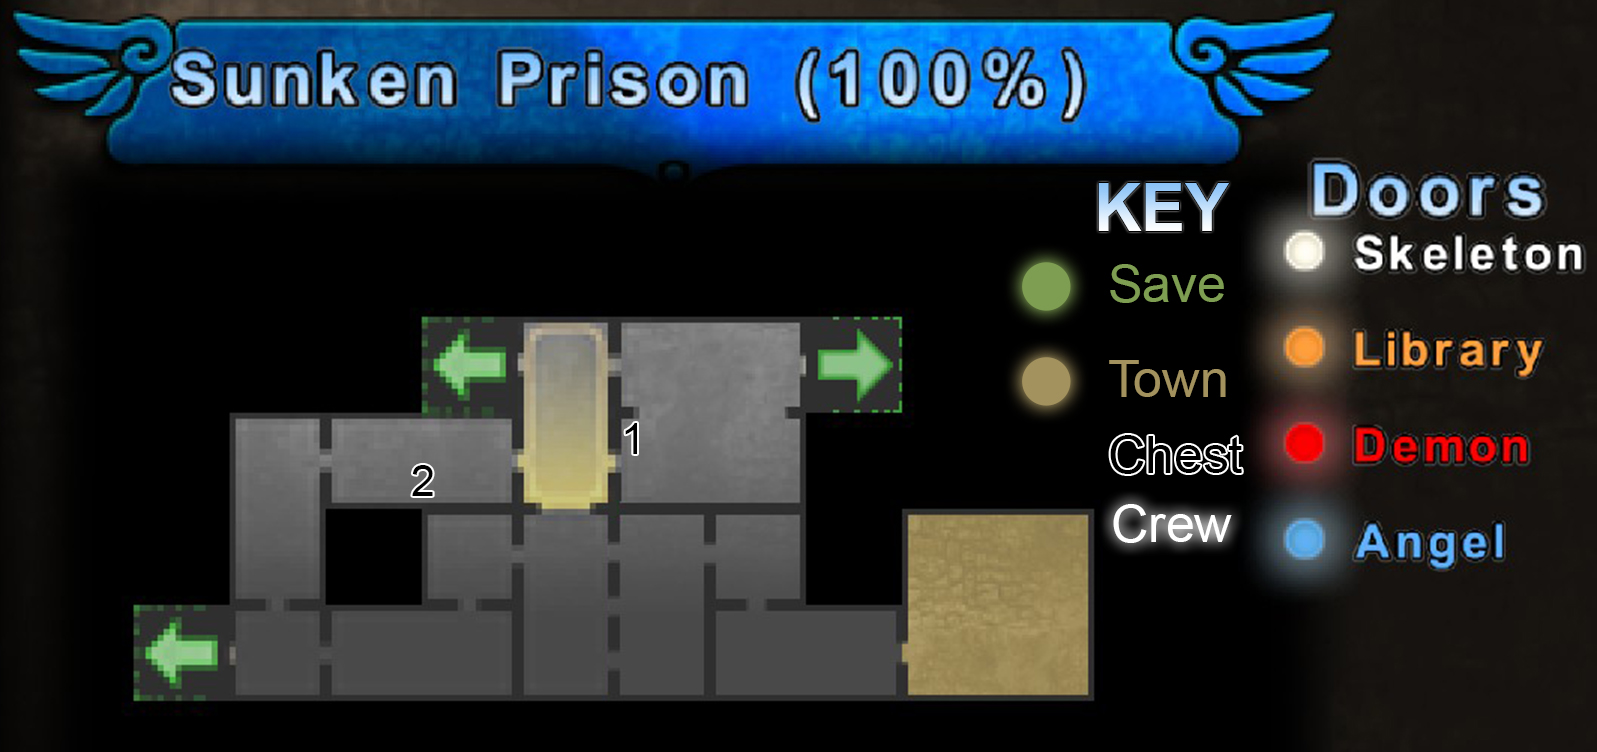
1. Life Potion
2. Iron
3. Master's Scroll
4. Iron
5. Rogue's Cowl
6. Demon Ruby
7. Spirit Shard
8. Demon Ruby
9. Spare Parts
10. Steel
11. Steel
12. Murderous Raiment
13. Grand Agate
14. Silken Cloth
15. Tamahagane
16. Grey Metal Plate
17. Ancient Coin
____________________________________________________________________________


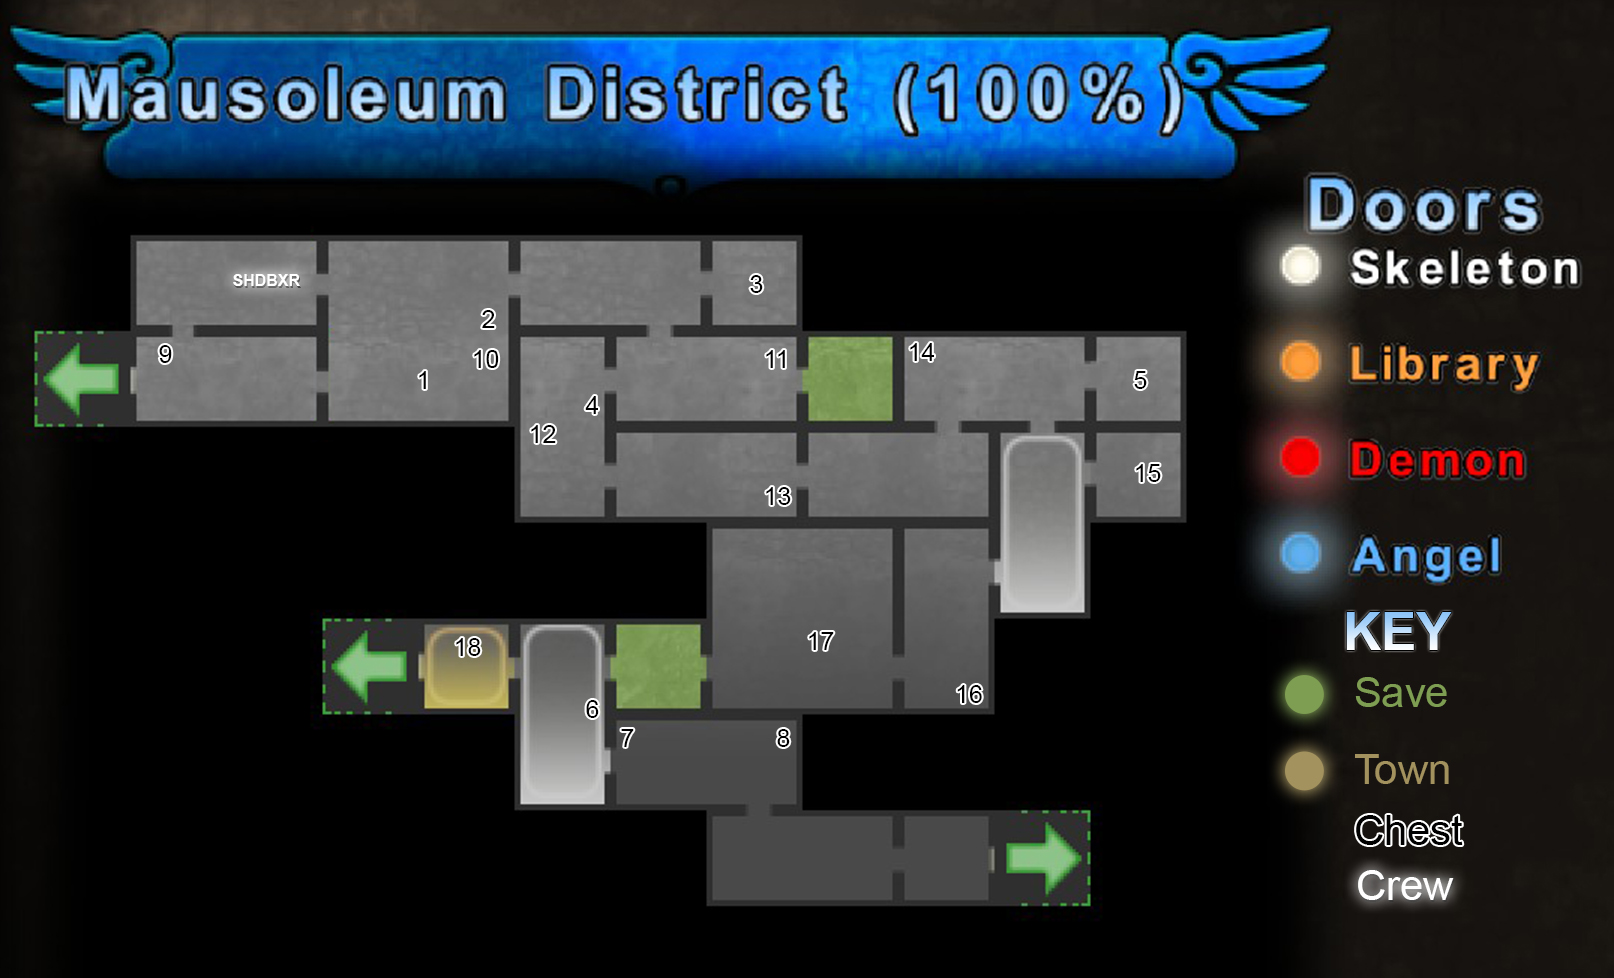
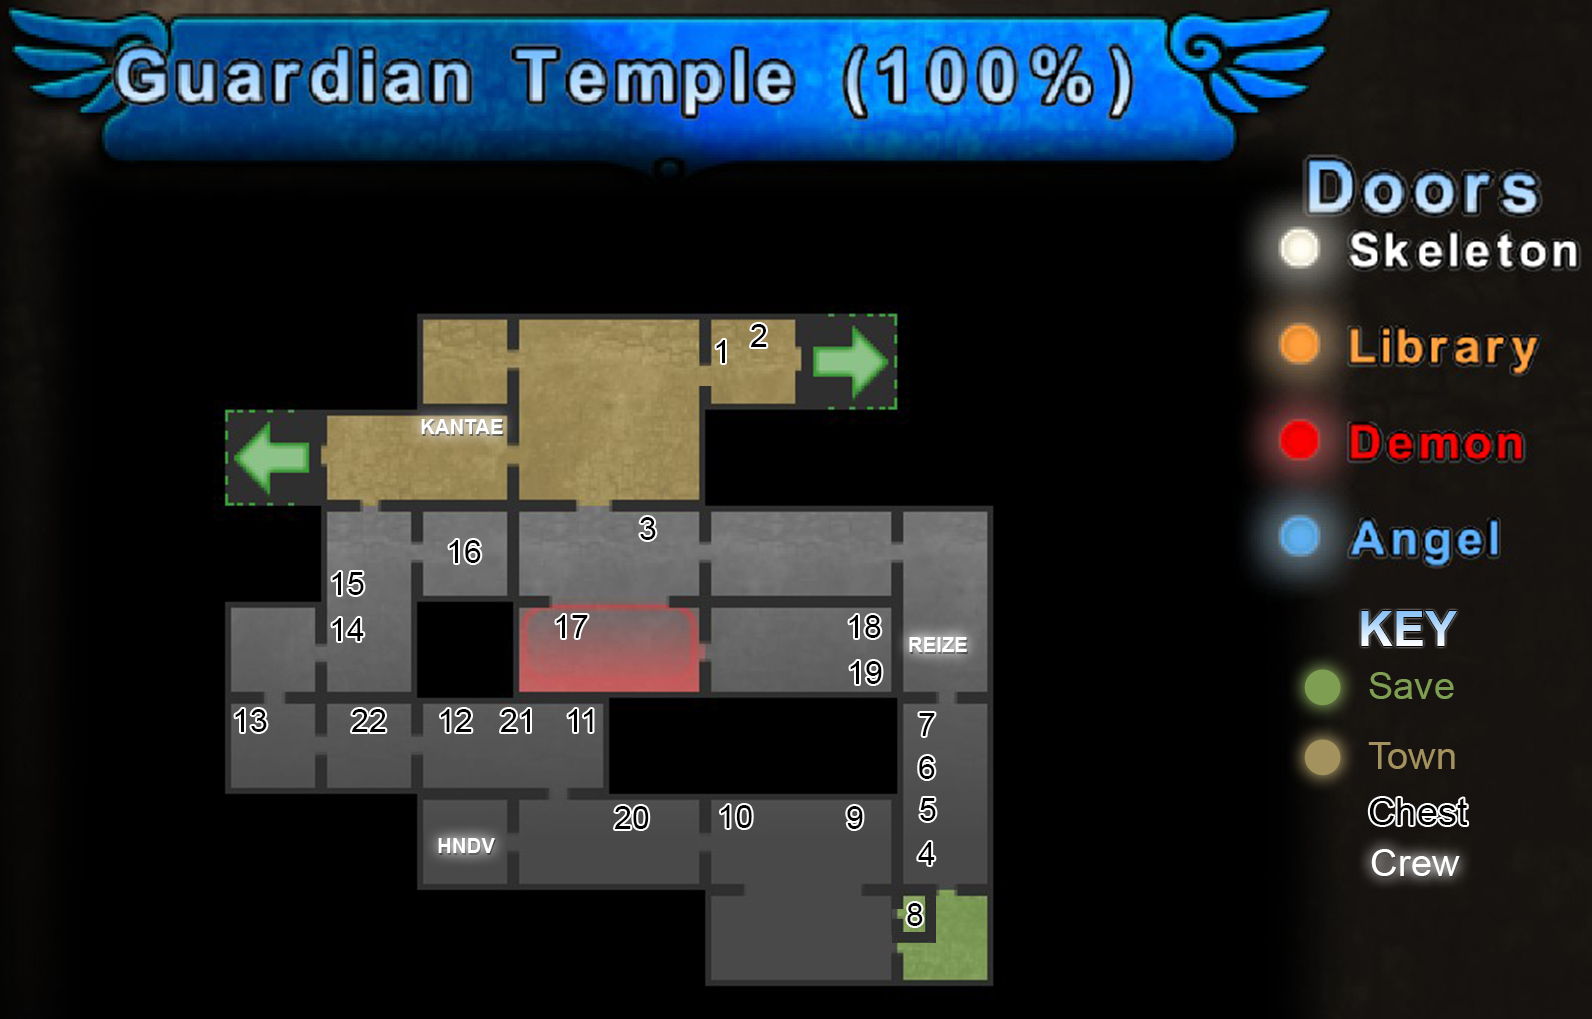
1. Angel Sapphire
2. Angel Sapphire
3. Spirit Potion
4. Iron
5. Mana Key Stone
6. Spirit Crystal
7. Iron
8. Warrior's Plate
9. Spell Lantern
10. Tamahagane
11. Paladin Armor
12. Grey Metal Helm
13. Mana Charm
14. Ancient Coin
15. Life Potion
16. Grand Agate
17. Wanderer Raiment
18. Teachings of Life Blade
____________________________________________________________________________


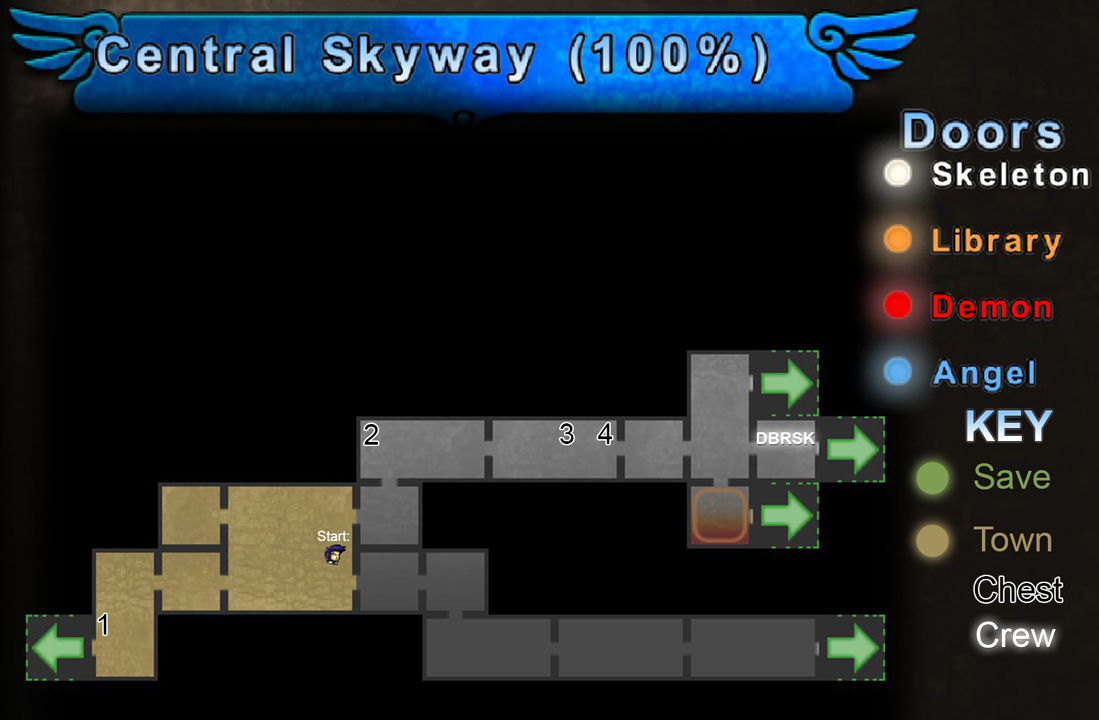
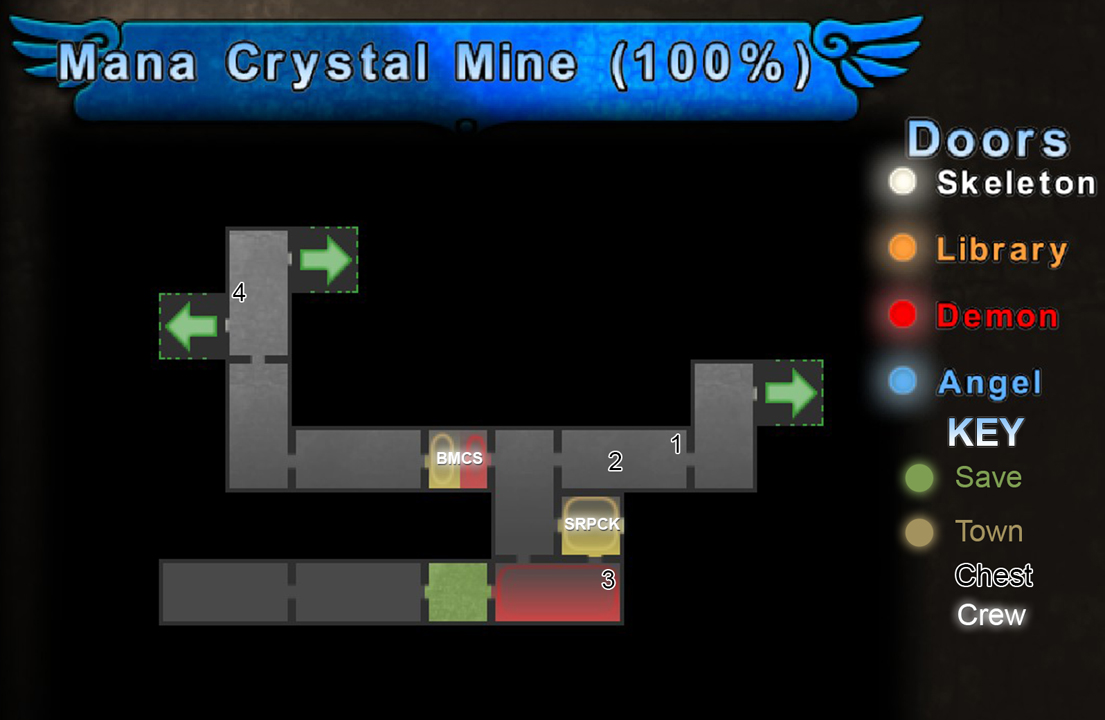
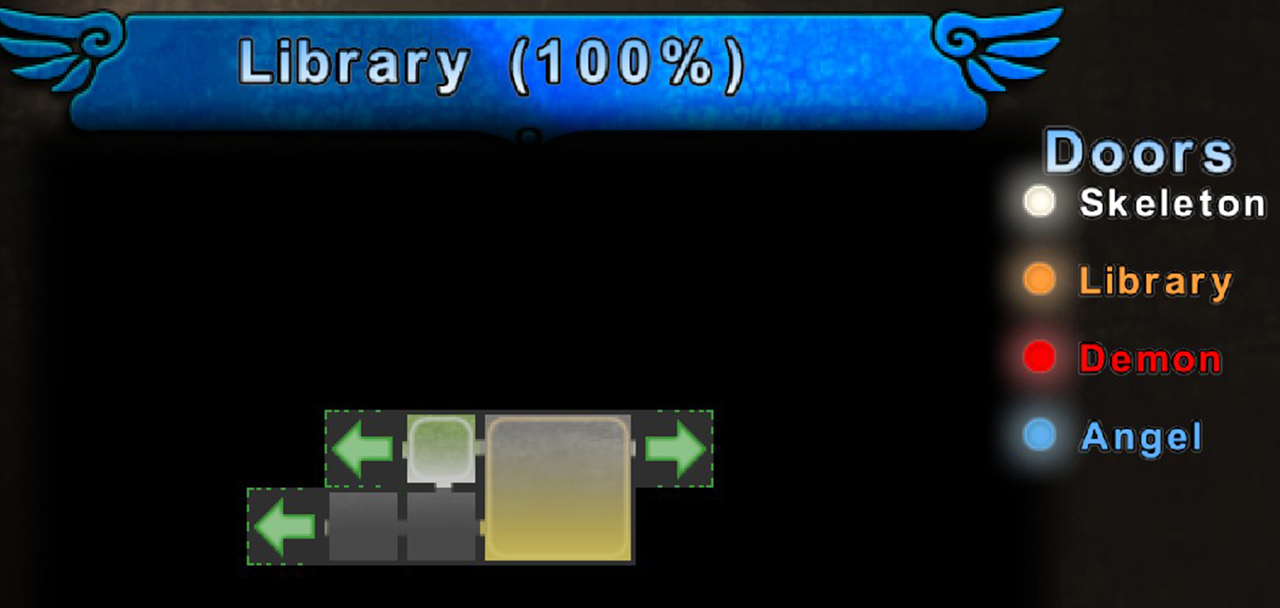
1. Steel
2. Silken Cloth
3. Soft Cloth
4. Magister Vestments
____________________________________________________________________________


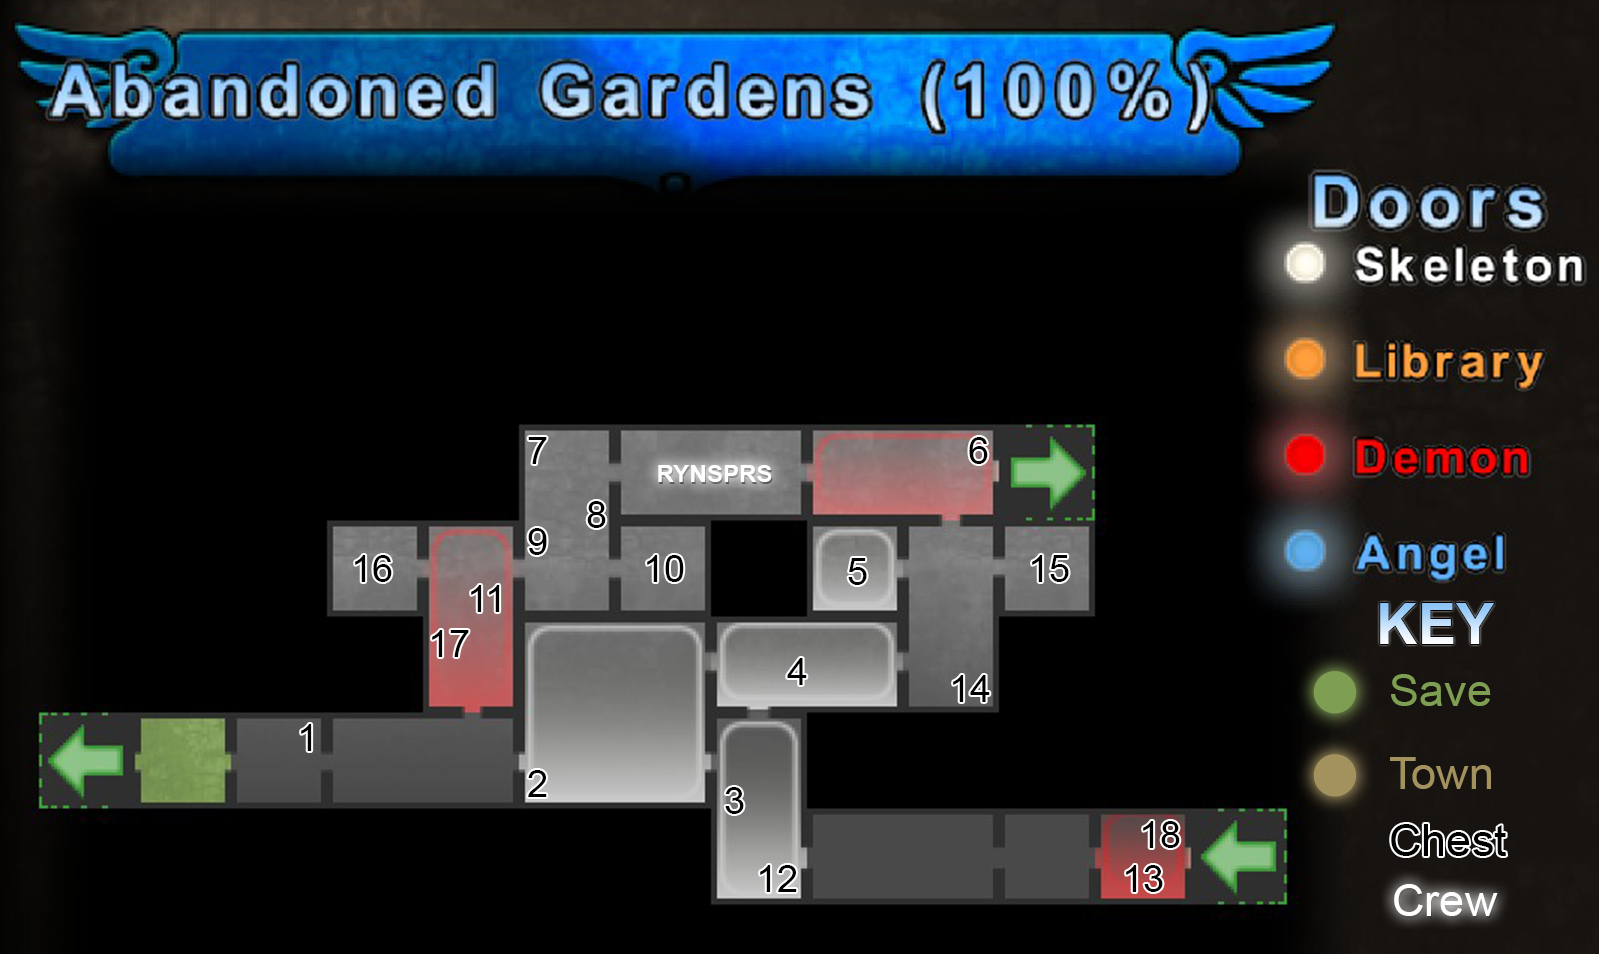
1. Grand Agate
2. Tamahagane
3. Steel
4. Warlock Vestments
5. Skeleton Key
6. Spirit Shard
7. Demon Ruby
8. Spirit Stone
9. Gladiator Vest
10. Life Potion
11. Soft Cloth
12. Magician's Cape
13. Lordless Tear
14. Black Heart Stone
15. Spirit Potion
16. Grey Metal Gloves
17. Steel
18. Grand Agate
____________________________________________________________________________


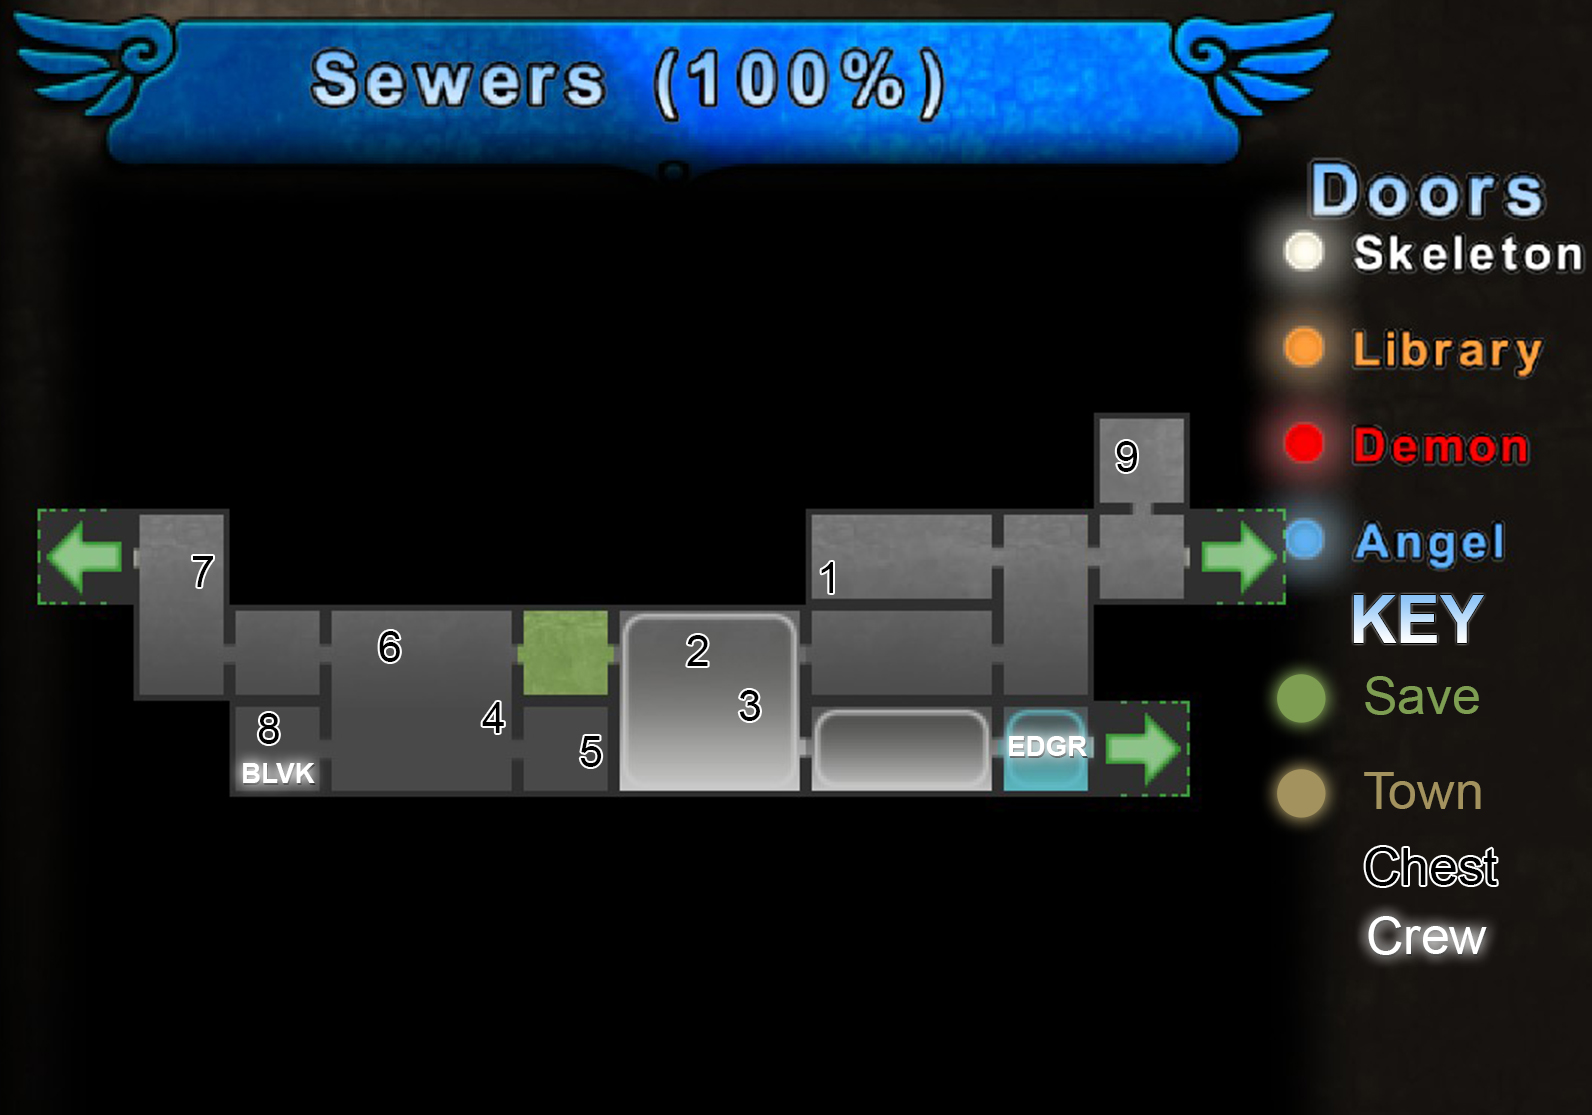
1. Cleric Vestments
2. Steel
3. Angel Sapphire
4. Book of the Old Gods
5. Saint's Opal
6. Gem of Purity
7. Tamahagane
____________________________________________________________________________


1. Steel
2. Tamahagane
3. Book of the Old Gods
4. Spell Lantern
5. Tamahagane
6. Black Heart Stone
7. Goibniu Armor
8. Grey Metal Greaves
9. Magician's Cape
10. Monk's Robes
11. Spirit Stone
12. Steel
13. Sezzi's Hammer
14. Warrior's Plate
15. Spirit Potion
16. Master's Scroll
17. Silken Cloth
18. Tamahagane
19. Silen Cloth
20. Gambler's Rags
21. Ancient Coin
22. Health Charm
____________________________________________________________________________


1. Angel Key
2. Spirit Stone
3. Judicator Raiment
4. Grand Agate
5. Book of the Old Gods
6. Mana Charm
7. Spell Lantern
8. Gem of Purity
9. Strange Glasses
____________________________________________________________________________


1. Spirit Crystal
2. Silken Cloth
3. Dreadnaut Armor
4. Rogue's Cowl
____________________________________________________________________________


1. Deadman's Fury
2. Health Charm
3. Tamahagane
4. Spell Lantern
____________________________________________________________________________


1. Book of The Old Gods
2. Grand Agate
3. Spirit Stone
4. Divine Dust
____________________________________________________________________________


1. Mana Charm
____________________________________________________________________________


1. Spirit Crystal
2. Tamahagane
____________________________________________________________________________


1. Tamahagane
1. Silken Cloth
____________________________________________________________________________

Civilians
Prevent Execution of Prisoners
-Before entering Ishk, defeat the Yeti.

Prevent Tagrum Massacre
-Clear the Guardian Temple
-Return the Hammer to Sezzi
-Return to the Chief in Tagrum.

Repairing Mana Heater Core:
-Clear the Mana Crystal Mines
-Before getting the Divine Key*, talk to Schultze in Ishk.
-Then take the tram and talk to Claudia in Hrukk.
-Defeat Treu in Engineer's Palace
-Cast Thunder Struck (Down-Lightning)
-Return to Schultze in Ishk.

*NOTE: ONCE YOU GET DIVINE KEY, YOU MUST IMMEDIATELY SPEAK WITH SCHULTZE TO RETURN THE CORE, GETTING THE DIVINE KEY IS THE CUT OFF POINT FOR THE QUEST, IF YOU LEAVE ONCE YOU HAVE IT, ISHK WILL BE EMPTY.
Resource Information
In the game there are certain items that are limited in how many you can have. While a lot of the items are drops from various enemies, some are exclusively found in chests and/or bought from various Merchants who have limited supplies. Keep these numbers in mind when crafting/upgrading your equipment.
  • 4 Rogue's Cowl
  • 4 Warrior's Plate
  • 4 Magician's Cape
  • 10 Tamahagane
  • 6 Grand Agate
  • 6 Spell Lantern
  • 2 Arch Demon Spirit*
  • 5 Arch Angel Spirit*
  • 3 Arch Feral Spirit
*There is one less of each of these if you choose to allow Dhistahn to live before fighting Azudor in the mines. Doing so changes the boss fight and causes you to obtain an item called the Twisted Spirit instead.
______________________________________________________________________________
There are two endgame items purchasable from the merchant in the Hall of the Fallen, these are each character's golden weapon, and the Goibniu Mark. The weapon, which carries over to the new games once you beat the final boss while having it in your inventory, will cost you all your Arch Feral Spirits and all 10 Tamahagane as well as a few other items which aren't limited in amount. The Goibniu Warrior Marking will cost you 2 Tamahagane for each one you purchase for a maximum of 5 marks in total.
Le'Roy Hat Bonuses
Red Berry Beret
Passive: Stronger health regeneration while outside of combat.
Active: Grants access to 3 additional health charms

1. in Tagrum, Jamie Starr NPC (at the entrance from Tagrum's Derelicts)
2. in Ishk, Alex Never (on the way to the Mines)
3. in Execution Hall, Joey Coco (first guard inside the room)
________________________________________________________

Laurel Crown
Passive: Doubles the rank based rewards received from bosses.
________________________________________________________

Cowboy Hat
Passive: Halves the regeneration time of Skill Cancels, initial delay remains. Attack speed is increased by 30%.
________________________________________________________

Captain's Tricorn
Passive: Halves the cool down of Assists. Increases Assist power by 20%.

Information in this section was provided by Myrh2
Optional Bosses
Note: The following are bosses that optional in regards to simply beating the game, but to get 100% completion, they are required.

Yeti: If not defeated before entering Ishk, the Yeti will be in the Execution Hall and will have killed everyone there.

Raven: If not defeated in the Central Skyway by obtaining the Broken Doll, the Raven will be in the Lost Gardens. If fought in the Lost Gardens, there are two Feral Sirens in the room and you do not receive the "Never More" achievement.

Magus: In the Western Skyway, must be defeated before defeating Treu, otherwise she'll go away/be killed by Feral Manawar.

Dhistahn: Optional to beat, he's on the way to Ishk through the sewers. I recommend beating him after you get Laurel Crown, and if you're doing a 100% run, be sure to spare him after defeating him in the sewers.

Soul Rage Azudor: If you let Dhisthan live, he will join in on the fight with Azudor in the Mana Crystal Mines. If you defeat Dhistahn during the first phase, Azudor will enter Soul Rage.

Possessed Dhisthan: Same as the above boss however you must defeat Azudor in the first phase for him to possess Dhisthan. Due to the fact that this boss fight is three phases long, I recommend fighting Possessed Dhisthan instead of Soul Rage Azudor. Azudor locks you out from damaging him several times and wastes your time spawning clones of himself you have to kill before you can damage him again. Possessed Dhisthan thankfully does no such thing.

Abomination: After defeating either of the above two bosses, a third phase of the fight will start. The Abomination. He has an attack, a small, near invisible bubble that he spawns when at low health that can potentially instant kill. If you're going to hit him, hit him fast and hard. Defeating this boss will drop a Twisted Spirit. My recommendation for this fight is to use ranged attacks, such as Wyatt's Raven Quil heavy. It essentially neuters the Abominations damage output as its attacks are only strong due to the fact they can easily blindside you from up close.

Feral Manawar: In the same place as you fought Magus. Appears after defeating Treu.

Abbigail: An optional boss fight in The Hallow which accessible both through the Frozen Crypt and the Sewers. I recommend going to her through the Frozen Crypt after you've obtained the Divine Key, that way you'll have everything you need to get all the items in the area. She is required if you wish to unlock the Golden Weapon for the character you are playing as.

Eye of Alagath: Located two rooms past Abbigail via the bottom left door. The boss in an area where you constantly take damage from cold, so keep that in mind.

Raganao: The boss the Tainted Laboratory, you get there by going through the Abandoned Gardens, one entrance is in the room with the Lordess Tear, and the other is just above the area in which you get the Skeleton Key. The latter is the recommended path as it allows you to obtain all the items. To reach the boss, you must destroy all the poison mist generators in the dungeon before the doors open. There is also one located inside the boss room itself, be sure to destroy it to make your life easier. He is a required if you wish to unlock the Golden Weapon for the character you are playing as.

Eye of Myrgato: Located in the pit. Get there by taking the bottom exit from Ishk and going down instead of to the right. Requires Black Hole. From there follow the path until you find a Divine Door.

Hermit Crab: Located in the lower sky way, in the room with the two Feral Puffers with green auras. Occasionally when you enter the room there won't be an puffer but an NPC called Fisherman Gully. 10 Fish will jump out of the water, kill all of them to spawn the Hermit Crab. If you miss even one, you'll have to exit and try to get Fisherman Gully to respawn. Be sure to save before attempting this.

Siren Queen: In the Frozen Crypt room with the Wanderer's Raiment, there are 3 unlit torches scattered throughout. Light these three and follow the path of the Wanderer's Raiment puzzle back to the center of the room. The Siren Queen will have spawned there. You only get one try at this as the torches never become unlit once she has spawned, so be sure to save before doing if you're not confident in your ability to kill it.
Boss Rewards
This section will contain information on the S-Rank rewards for each boss, this is to help maximize the effect of the Laurel hat that can be obtained from Le'Roy once you have access to the Soul of the Purifier.

Azudor: 1 STR
Tagu: 5 Armor
Shu Gohth: 1 Stat Point
Ruckjahl: 1 INT
Jahzracht: Affliction +15
Yeti: 1 Skill Point
Raven: 1 Skill Point
Dhistahn: 1 Skill Point
Magus: 5 Spell Ruin
Lozzo: 15 HP
Abbigail: Mana Cost -10%
Azudor [Mines]: 10 HP
Abomination: 24 HP
Gernot: 2 STR/2 LUK
Treu: 2 INT/2 AGI
Raganao: 3 LUK
Feral Manawar: 3 INT
Leilodin: 3 Stat Points
Eye of Alagath: Crit/Armor Ruin/Attack +8
Eye of Myrgato: Affliction/Spell Ruin/Magic +8
Anemone: 40 HP
Item Drops
Demon Ruby: Dropped by Demon Assassins, Archers, Ogres, Bats and Burning Skulls.

Black Heart Stone: Dropped by Void Warlock and Demon Widow

Devil's Onyx: Dropped by Demon Mistress

Greater Demon Spirit: Dropped by Demon Ogre, Mistress, Warlock and Widow.

Angel Sapphire: Dropped by Angel Soldier, Zealot, and Priestess

Greater Angel Spirit: Dropped by Angel Templar, Archon, Soul Ranger, and Shepherd

Saint's Opal: Angel Templar, Archon, Soul Ranger, and Shepherd

Gem of Purity: Dropped by Angel Priestess and Shepherd

Spirit Shard: Dropped by Demon Bat, Burning Skull, Feral Hermit, Siren, and Reaper

Spirit Stone: Dropped by Angel Soul Ranger, Shepherd, and Feral Siren

Spirit Crystal: Dropped by Demon Warlock, Angel Shepherd, Feral Siren (Poison) and Feral Puffer

Greater Feral Spirit: Dropped by Feral Siren, Reaper, and Puffer

Large Emerald: Dropped by Feral Reaper and Puffer.
Item Farming Locations
Demon Mistress: located in the room with Rinn Speras [Abandoned Gardens]
Demon Warlock: right outside the save room [Guardian Temple]
Angel Soul Ranger: Room with 2 Angel Soldier's and lasers [Sewers]
Feral Reaper (Poison): right outside Execution Hall [Sunken Prison]
Feral Siren (Poison): right outside Execution Hall [Sunken Prison]
Feral Puffer: 2 spawn in the Lower Central Skyway, just before the Sewers
Addtional Advice/Recommendations
I recommend waiting till after the Guardian Temple to fight Dhistahn, that way you can grab the Laurel Crown and gain the additional Skill Point from him. This does mean you'll have to fight Magus but if you're playing as anyone but Reina, dark magic ruins her easily. If you are playing as Reina then I recommend avoiding the full luck build, as without dark magic, Magus is significantly harder to kill. Full Agility is the best alternative in my experience. My advice would be to grind out the Demon Ruby/Angel Sapphire to reset your stats with Mesmer, taking advantage of the luck build in the mean time so you'll have all the items you'll need for later.

Also If you're feeling up to it, as Vladyn, save Ruckjahl for after the Guardian Temple as well to get the extra point in INT. Save the Eyes, Leilodin and Feral Manawar for as close to the endgame as possible. You'll likely be at a high enough level by then that you'll wipe the floor with them. Though do keep in mind that the Eyes gain more defense the more of their respective enemy type you kill.

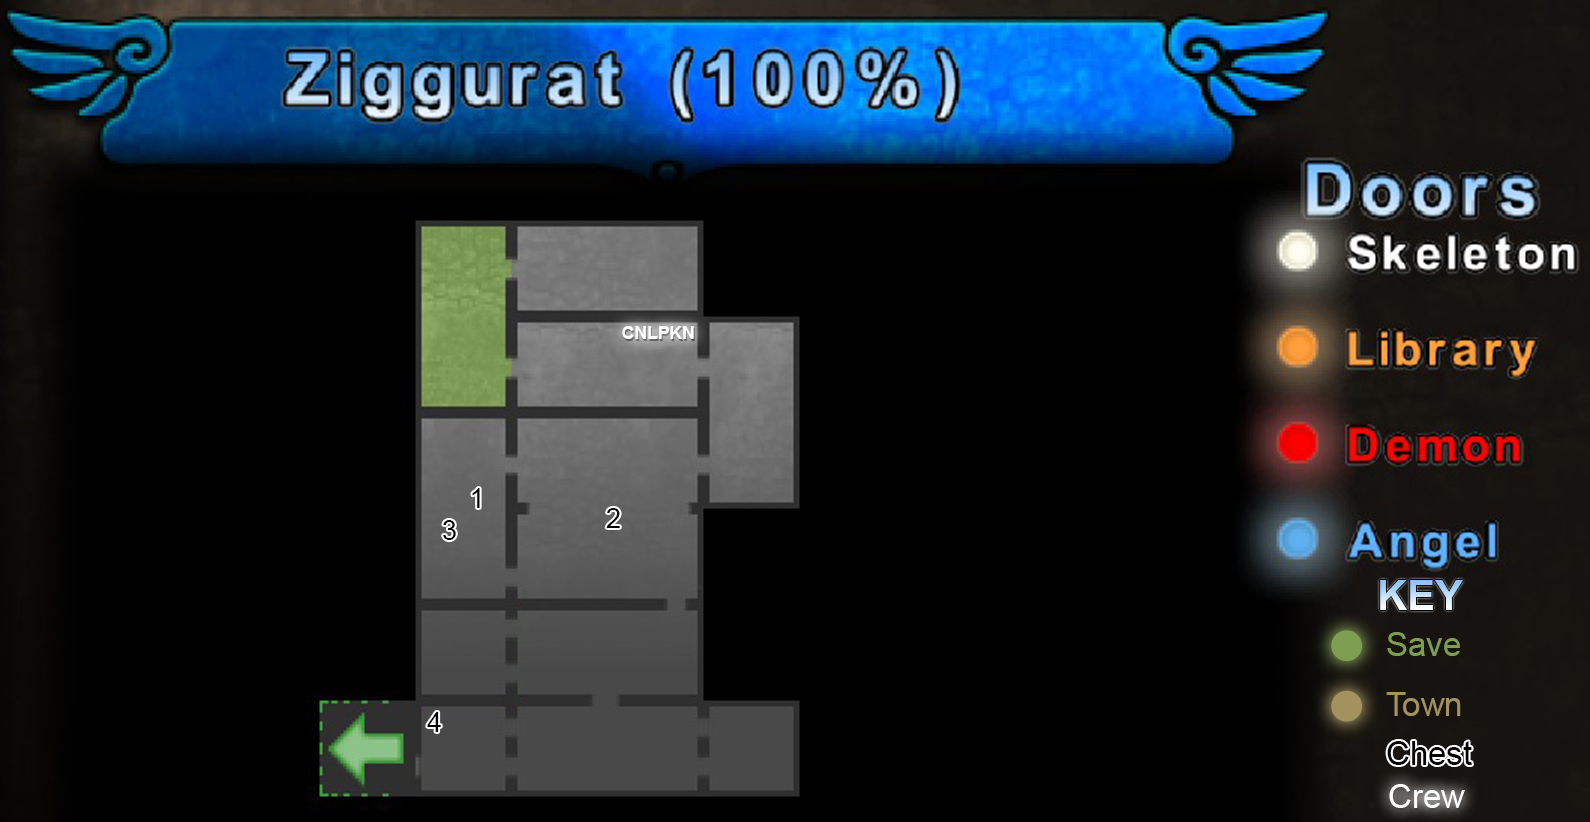
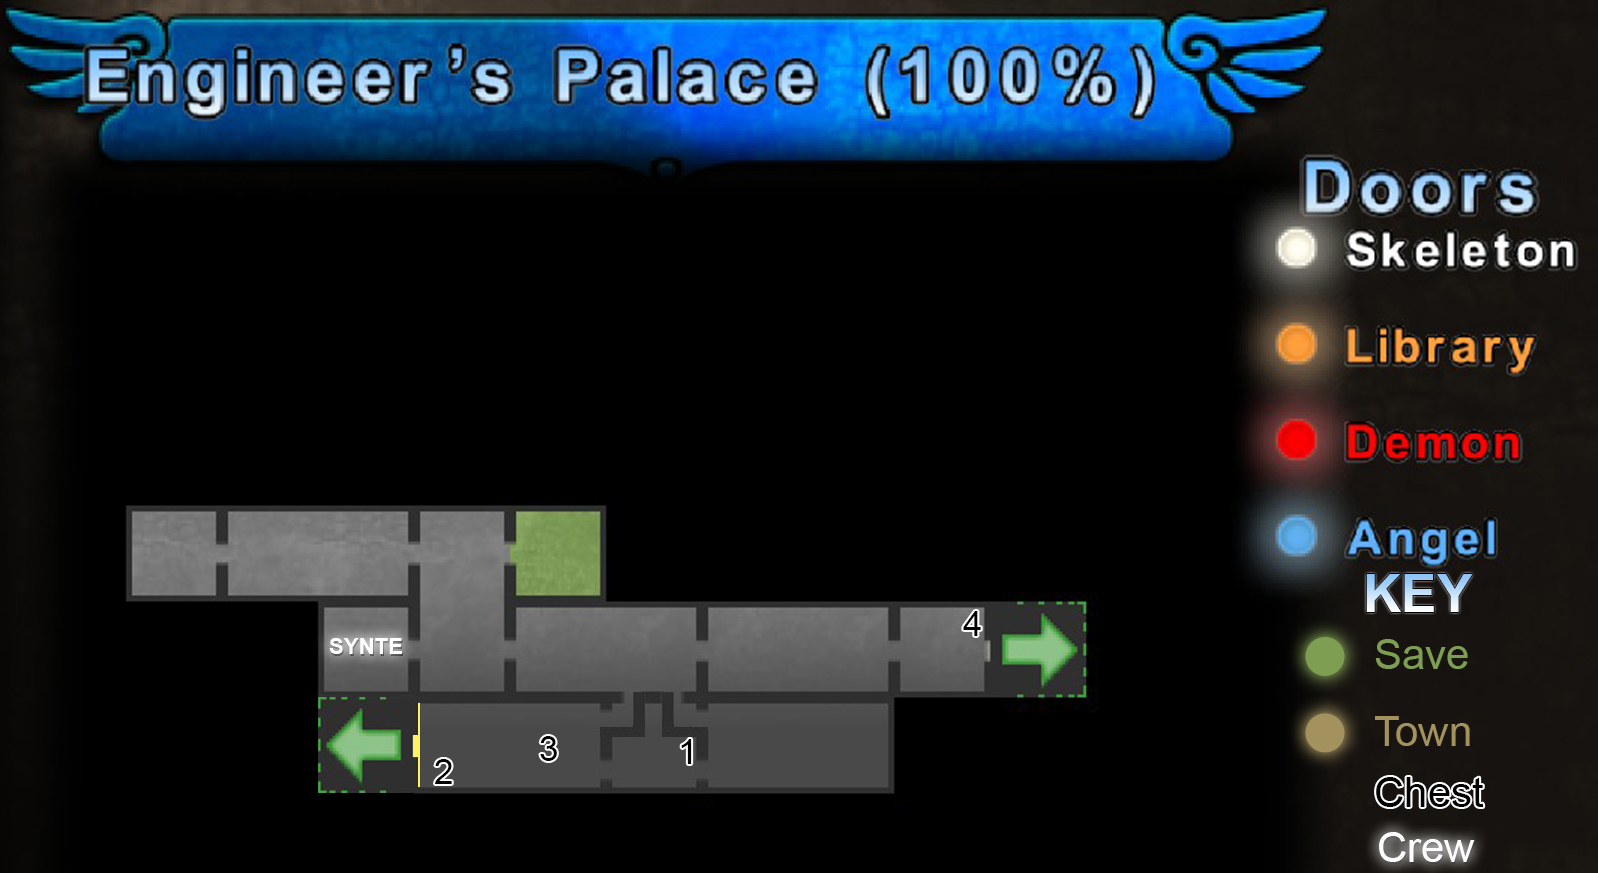
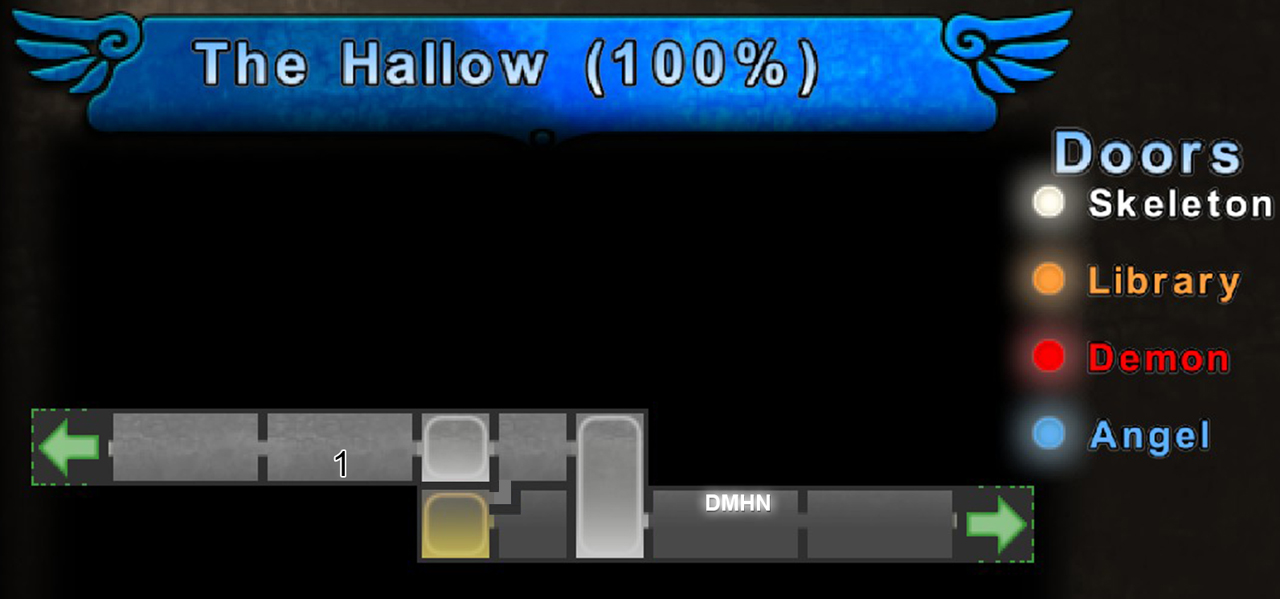
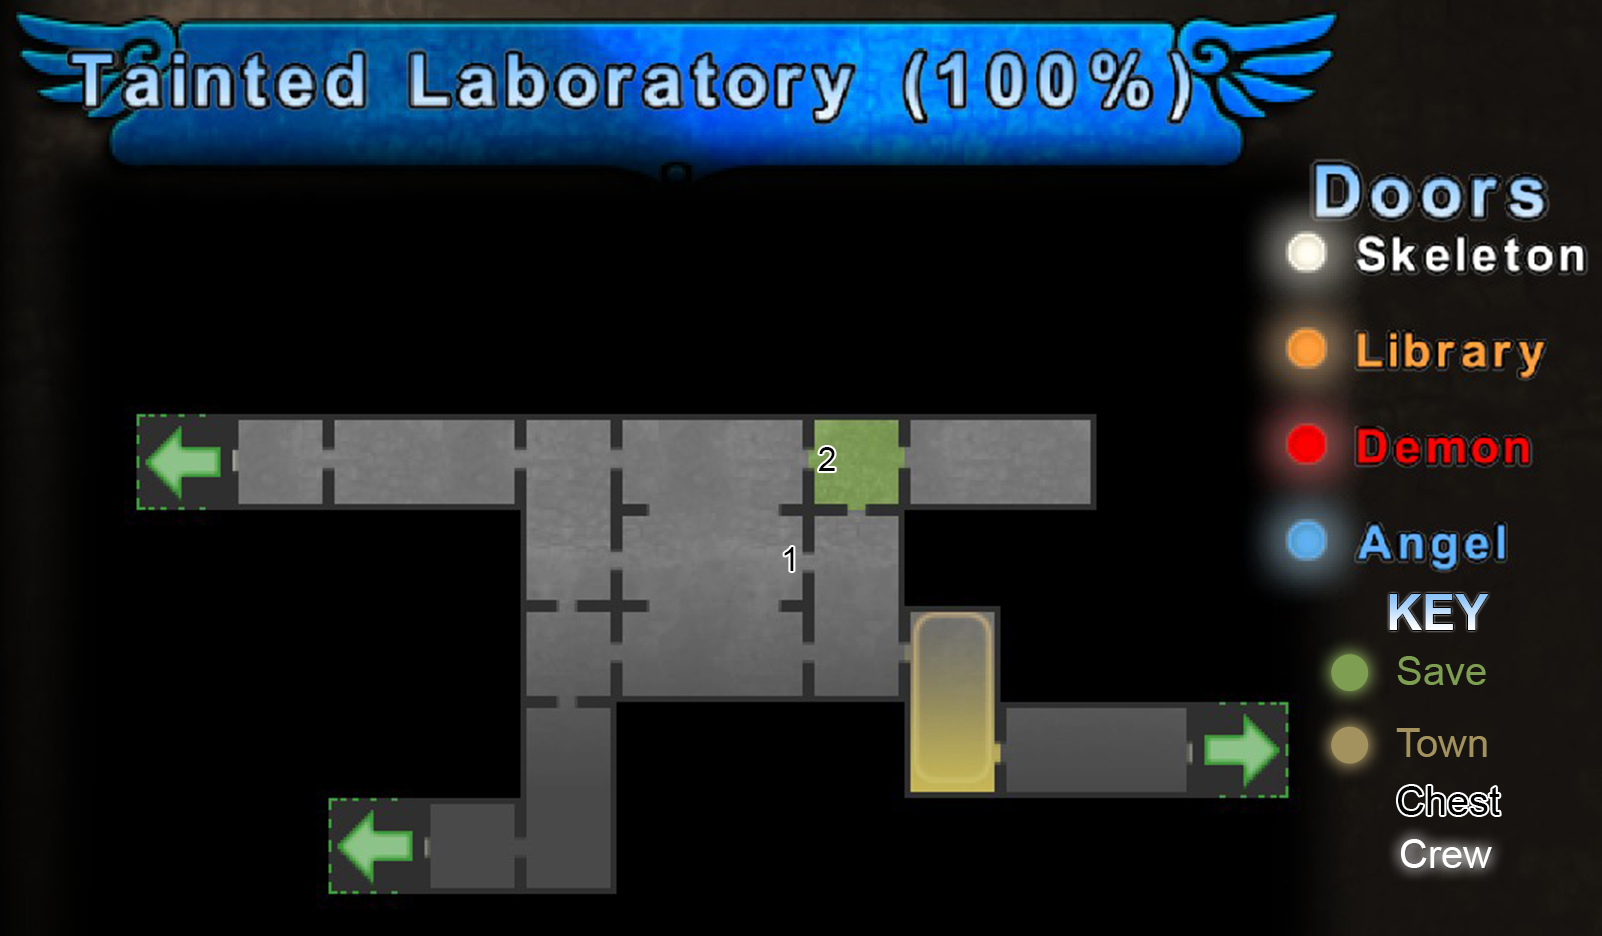
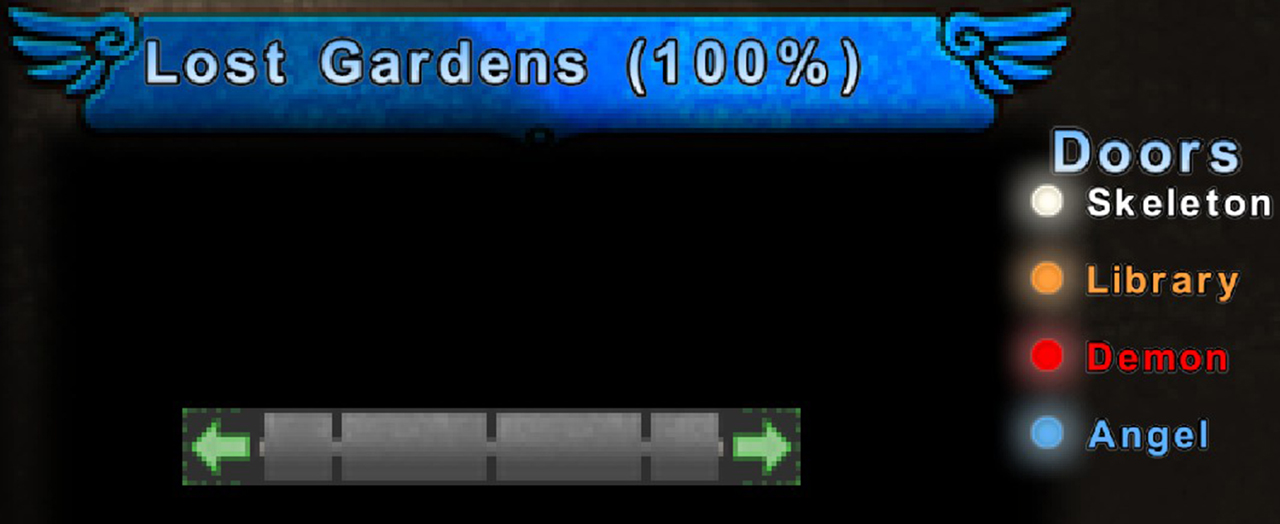
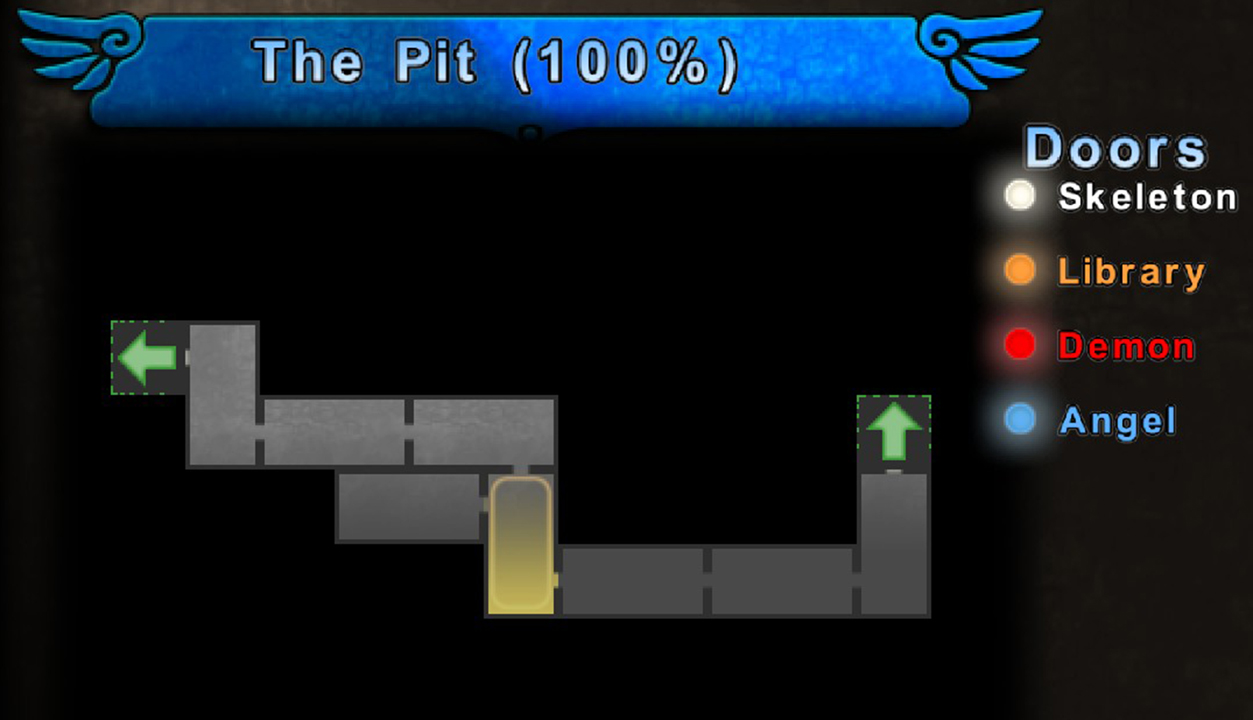
The locations are very vague, however Sprsclr was awesome enough to actually make a map which served as a basis for the finalized maps, so you can look at those if you need to. That said after you've done this a few times the locations more or less get ingrained in your mind.
Video Walkthrough
The following section contains a fairly edit heavy walkthrough with backtracking through certain areas cut out to reduce run time. All chests, map areas, crew members and civilian rescues as well as boss fights are available at full length and only redundant trips were removed.

Playlist

Final Notes
By following this guide you can obtain approximately 63 of the currently available 77 achievements in one run of the game. The remaining ones being:

Unlock all weapons for every character
Beat the other version of the second phase boss in the Mana Crystal Mines**
Beat the game as the other characters
Beat the game as the other characters on God Slayer difficulty or higher
Beat the game on Goibniu mode
Get to floor 30 of Heaven or Hell arena
Beat the game in 3 hours or less*
Beat the game without saving*
Beat the game without upgrading/changing equipment*
Retry 40 times***

If you decide to play the game on Goibniu mode and manage to somehow beat the game without upgrading your equipment, you can also get the achievements marked by the *. Do I recommend it? No. Is it possible? Certainly. Just remember, you can't play Goibniu mode until you've beaten the game at least once. Which means you will be able to get every other achievement, but you'll already have the one for beating the game.

**Both the achievements for the second phase of the Mana Crystal Mines boss can be obtained if you reload the save file after beating the third phase.

***You can obtain this achievement as well. It requires that you retry but don't save. The counter for the achievement will keep going up but it won't be counted against your final progress.
Credits
Sprsclr: Creating the maps under the maps section prior to version 1.0.0.23, seriously big thanks to him for that since it gave me a good idea for how to handle them when I went to make the updated ones.

Myhr2: General help with various sections of the guide after the major updates. Without him the guide wouldn't be as refined as it has become.

Herablacious: The tip on how to get Axen earlier. Location for farming Feral Reaper & Feral Siren. Confirmation on Yeti & Raven locations if not fought earlier.

Super Nintendan: Confirmation on event that causes Magus to disappear/Manawar to take over.

Cifer: Correction on various aspects of the guide.

Lupus Albus: Correction about some achievements.
83 Comments
Ad Massive 23 Aug, 2024 @ 1:22pm 
Thanks again. I guess I'll have to do some luck grinding at some point.
TKhaos  [author] 23 Aug, 2024 @ 1:17pm 
You can skip it, you'd only be missing out on a Heart Charm from the gravestone in the cold area to the left of Tagrum iirc
Ad Massive 23 Aug, 2024 @ 1:14pm 
Also thank you for the unbelievably swift reply. After this much time I thought I was gonna whiffing air.
Ad Massive 23 Aug, 2024 @ 1:13pm 
Is the pretty flower important or can I skip it? I'm only worried about it, if it triggers an event or is necessary.
TKhaos  [author] 23 Aug, 2024 @ 1:11pm 
@Ad Massive

Yeah that's partly a result of the video guide being made to work in tandem with the text guide. I opted for a full luck build, which results in a substantial increase in drop rate of Ancient Coins from regular enemies.I did cut what I thought was redundant footage so it's possible I got the Ancient Coin from an enemy and didn't show it, though there are 3 that can be found from chests in the game.
Ad Massive 23 Aug, 2024 @ 12:54pm 
Was following the video guide to avoid missing saving people, and despite not actually getting one in the video you suddenly have an ancient coin when you visit the Hat dude in video 7. Now I'm a bit lost and confused.
Crack Open A Cold-One 17 Nov, 2023 @ 10:45am 
How do i get the grand Agate from Elder Trair's? I see the green shield from the necklace indicate there's something there but I don't see a thing.
KelpTheGreat 4 Oct, 2022 @ 10:12pm 
Geez... I knew this game was complicated from my first playthrough, where I didn't consult any walkthroughs and just did the best I could... but seriously, there is a buttload of stuff in this game. Missable stuff, alternate paths, mutually exclusive items/bosses/stuff... wow.
residentleever 22 Aug, 2021 @ 5:17am 
Thanks, yeah it's the Hrukk shop.
TKhaos  [author] 21 Aug, 2021 @ 4:52pm 
@residentleever I believe one of them has to be bought from the shop in Hrukk. The map and list only talks about items from chests.