RESIDENT EVIL RESISTANCE

RESIDENT EVIL RESISTANCE

32 ratings
A Jan guide! (January Van Sant)
By Jin Sime 金飞嵩 and 1 collaborators
This girl found out how to unable mastermind action in [insert your city name here]! All masterminds hate her!
Want to learn more? Click here! hahahaha
Welcome to my guide!
I plan to share with you my experience as a Jan main, also give some tips about playing with her and about her skills, so you can better understand her role and be a better Jan!
I will also cover some general tips that every player can use, so come with me!
2
2
   
Award
Favorite
Favorited
Unfavorite
Introduction
First of all, let's learn who's the badass society hating girl we're playing with.
Jan is classified in the game as Damage, Hacking. This is really interesting, because some people seem to believe that she is designed to charge and kill stuff, when that's not her role at all.
The point we wanna focus here are her hacking skills. That means she can do massive damage, but only to cameras: our main enemy here will literaly be the mastermind, directly. She mainly plays a preventive role in the game, incapacitating the mastermind of his actions and obstructing his plans. So it's fair to say she's more like a support character.
Basically, Jan is never useless in a match, cause sooner or later, even a zombie possessing demon as Daniel will need to get on camera to unleash his creatures, traps and bioweapon. If you're fast enough, you can at least delay his actions. And if the mastermind really takes too long to give up his zombie or always possess it from unreachable areas, you can adapt her role to a more offensive one.
Anyway, as I always say: a good Jan is a Jan that will never go unnoticed by the mastermind. But that doesn't mean he HAS to see you. We wanna play in "stealth" as much as we can. The goal is to make him see as many black screens as he is allowed to while wondering "where did this shot come from?".
And that's where I want to lead you, the best I can.

So... let's start talking about her skills, so you get a general idea.
Fever and Personal Skills
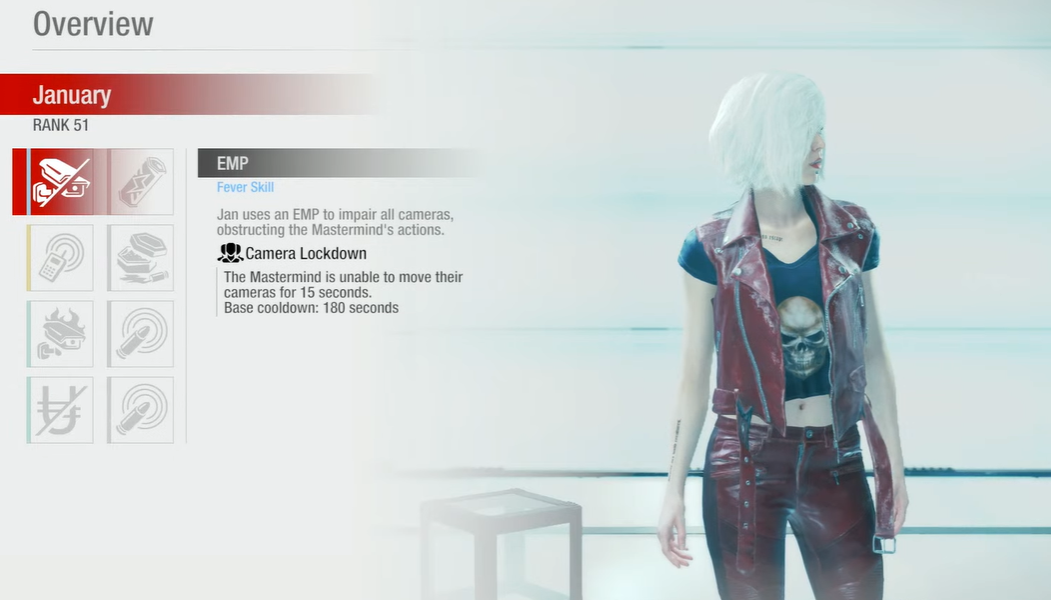
EMP


Jan's fever skill is the EMP. It affects all cameras in the area for 15 seconds. This skill has 2 variants:

- Interference: This is the initial one you get. This skill makes every card owned by the mastermind to cost 3 points more, for 15 seconds. It's an interesting skill that mostly prevents them from spamming creatures or traps. It's very effective against Annette, Daniel and Alex and a nice moment to use it is at the start of the stage, since you can buy you some time to do some shopping or exploring without many concerns. But BEWARE: if you know the mastermind is the kind that likes to preset creatures at the beginning of the area and/or possessing zombies right away, it might be not wise to do so, since it won't affect gameplay outside of the camera and they can easily pass these 15 seconds away from it. So don't just spam the fever skill right away. Maybe then it's better for you to use it when you know he is not in a nearby camera, trying to spam enemies elsewhere you need to go.
This skill is not so effective against Spencer. Spencer's speciality is time stalling, so he can easily get discounts on cards or gain energy by interacting with the scenario. So, he'll just have to turn some more lights on and close some more doors to get extra energy and probably won't care so much about the prices of the cards, specially if it's a gun Spencer deck. If you're dealing with a creature Spencer he maybe will hesitate a little more, but it probably won't stop him from spamming things anyway.

- Camera Lockdown: This is the second version, you unlock at level 23. It basically freezes camera rotation for 15 seconds. While Interference messes mostly with creatures and traps, this skill messes up with guns. The mastermind can't shoot you if the camera is still, so you can take the time to do your objecitves (specially against gun Spencer, when there's 2 cameras around). But besides that, if they can't use guns, they can't buff creatures. It's true that if the camera is frozen at a good position, the mastermind may be able to set creatures where he can buff them, but it will have to be in a single spot (easier to kill with grenades). Besides, there are some cameras that have a wide field of view. And if it's too far on one side, he can't set things at your side, making it easier to deal with anything that may be set there. Also, there are places with 2 or more cameras, but they point at completely different angles, and that way you can prevent him from even aiming at you. It's like unabling an additional camera!

THIS SKILL DOESN'T AFFECT CAMERAS UNDER SHIELDS, SO WAIT THE SHIELD TO FADE AWAY PRIOR TO ACTIVATING IT.

Also, don't pick one randomly! Which one you're gonna choose depends on the game you wanna play. When we get to the passive skills, we're gonna talk more about these variants.

OVERLOAD


Jan's personal skill is overload. With this you can deactivate any camera that's currently without a shield and it comes in these 2 variations:

- INSTANT: This is the first one you get. It disables a camera in about 2 seconds after you start holding the button. It's really fast and if you fail to disable the camera, you don't have to worry because it won't be wasted: cooldown only starts after a successful attempt. It works just like shooting the camera, but faster and no resource consuming. But the cooldown takes a whole minute, so you'll probably be shooting more cameras than using this skill. It's important to keep in mind that you can use this skill after shooting a camera down, to reset it's recovery cooldown, earning you some extra time with it deactivated . This way you can get the most out of it (if you have enough ammo to do so. Always keep in mind your resources).

- LOCKDOWN: Unlocked at level 11. Takes about 2 seconds to start its effects, but it doesn't deactivate the camera immediately. Instead, it heavily damages the camera while you keep holding the button, up to 15 seconds (you can subtract 2-3 seconds here to deactivate the camera if the mastermind doesn't have any protection equipment and you're running HIGH CALIBER (see below), but if he does it can take up to more 5 seconds prior to deactivation. If you're running ENERGY DISRUPTION it takes a real long time to deactivate, but the effects of the disruption will take place until the end).
If the mastermind use a shield after the 2 seconds of the skill activation, you'll have to wait the 30 seconds cooldown to use it once again, but if successful, after the camera is down, it will stay like this way longer (as long as you keep holding that button).
It can also (and SHOULD if you can) be used after you shoot the camera down, but you have to start it really fast, because in the first seconds it takes to start its effects the mastermind CAN recover the camera (if he has the perks to reduce camera recovery to 3 seconds), and you don't want that. If you time it right, using it after the camera's been shot down, you can get around 20 seconds of mastermind-free quality time in a room on a regular deck, or 15-16 if the mastermind has all perks to recover the camera faster and is hitting his button as if his life depended on it (it's important to know that he can smash buttons to speed up recovery and fight against Jan in this matter. Also, after the camera recovers, it will be shielded for 5 seconds, giving the mastermind the opportunity he needs to smash your team).
The first thing to point about this skill is that while Jan is executing it, she's locked under animation, making her an easy target for the mastermind, so you have to take caution about your location before using it, specially the lockdown version (I'll give some tips about this part later on).
In that matter, it seems that instant is a more popular choice. And I hear over and over again people saying it fits the fast pace of the game. But here's the thing: although instant deactivates cameras fast (making you less vulnerable), it also lets them reactivate fast. And it's true that the game is in overall rushing for the goals, but sometimes you need to take your time. Simple examples are the area 2 security devices, area 3 biocores and the countdown before the final door opens for your escape. In these moments, or whenever you need to perform tasks like reviving a fallen teammate, kiling the supply zombie or a horde, you want some privacy, and the instant version will poorly give you that.
No only that, the effect of lockdown is directly linked with the passive you choose, granting you more possibilities (see next section), as the mastermind will also be energy locked if you use it with energy disruption.
So I usually stick with the lockdown version: it fits most purposes greatly and has a quick cooldown. Besides, if I want a fast paced camera deactivation, I'll just use my gun. And, about that, let's proceed to the passive skills.
Passive Skill - Disruptor Rounds - HIGH CALIBER


Now, this passive is real cool. This is really where Jan makes a difference among a whole team organized to shoot cameras down!

- HIGH CALIBER: The initial one. This increases damage to cameras around 50%. So you'll be shooting them down real fast, in comparison with any other teammate. If you combine this with the EMP rounds I and II (that only costs 2 e 3 points, respectively), you can shoot down a camera with 6 rounds using the MUP or 7 if you're with Matilda (if the mm doesn't have any perks to make his camera stronger).
About that, I highly advise you to choose Matilda. It has an ammo capacity of 24 rounds, a nice paced 3-burst shot and is more steady, what makes it perfect for camera shooting. The Quick Draw Army will also do the job, but it's designed for killing creatures. If you miss a shot, the time it takes to reload will be everything the mastermind needs to take you down. If you don't have Matilda as a choice at area 1, you can negotiate with a teammate who has it to buy it for you in exchange for supplies (we'll get into that soon). But if this isn't an option, you'd better stick with the MUP for the time being and get the Matilda right away at area 2.
If you still feel that you wanna buy the quickdraw for the first area anyway, here's a tip: shoot the 6 rounds and then switch to MUP to finish the job. This way you'll be less exposed. But, sincerely, I'd wait for the next area. Resources are precious in this game, and you don't wanna buy anything to throw it away later.
Passive Skill - Disruptor Rounds - ENERGY DISRUPTION
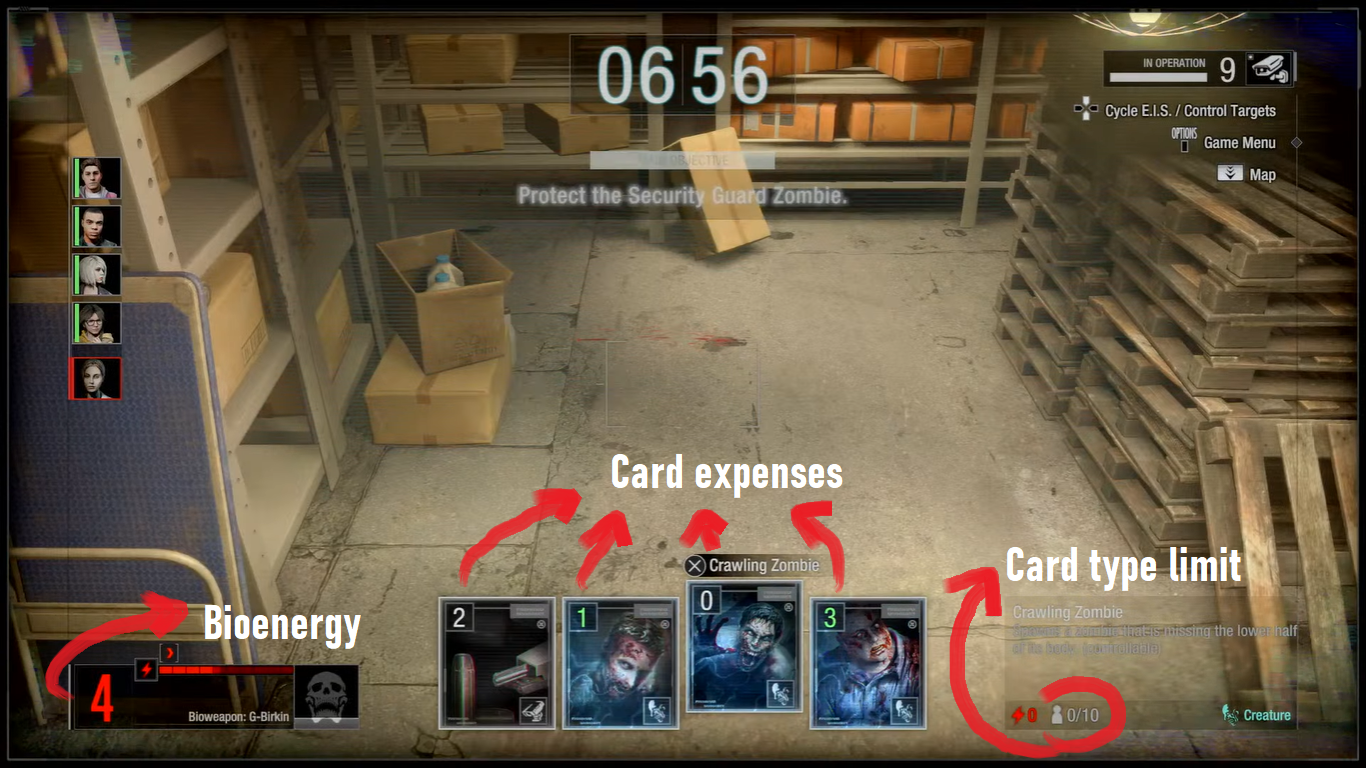
- ENERGY DISRUPTION: This little piece of magic is unlocked at level 5. With this, each time you shoot at an active camera (you know it's active because its leds are red, blue doesn't count), the mastermind bioenergy recharge freezes for 1 second. By the way, if you're not familarized with how the mastermind works, here's a sweet screenshot I took for you:


See that red gauge in the left corner, with a big 4? That's the bioenergy gauge. By default, it fills automatically with time, at a rate of 1 bar per 5 seconds (the mastermind can speed this up, but I'll cover this below). Each bar is equal 1 point, to the max of 10. To summon creatures, traps or guns, the mastermind needs to expend these points he gathered. In this image you can see all the cards have a different cost. The "better" the card is, the more expensive. The number in white in the card is its original cost. When the mastermind gets a discount, it turns to green, representing the decrease of the cost. In this example I was running Annette, whom has by default a 1 point discount for all creature cards. So, basically, they pay their cards with time. A tough zombie (the fat one) usually costs 4 points (20 seconds), but since Annette has a discount, she can pay 3 (15 seconds). As she levels up, she can reduce it to 2 and, then, even 1. And that's what you, as a survivor, don't want, since it can also be done to lickers, as example.
Also, when you activate the final door, the bioenergy recharge rate increases to 1 bar per second, to give the mastermind that last chance to destroy you, so you don't really wanna stick around for long after you activated the door (if you can, make sure all your teammates are next to the escape area).
Besides time, the mastermind can collect bioenergy by 4 other means:

- THE ENERGY LEECH CARD, which is unlocked for everyone when your Spencer reaches level 13. You can identify it's being used in a creature when you see that blue orb in its mouth. And it only generates energy if the creature grabs you. Keep that in mind. 1 bioenergy per successful grab (this can escalate really fast if you're not careful).

- THE CONCENTRATED ENHANCER CARD, Annette only, which she unlocks at level 19. This an exclusive card, and - for me - her greatest. It's a sum of infection, berserk, energy leech and regen, all at a cost of 2. She can only use it in area 3, though.

- MOD RECYCLER CARD, Spencer only, which he unlocks at level 9. He gets it at area 2. With this card, Spencer converts the mod cards in his hand in bioenergy, acquiring 1 bioenergy per mod card discarded. As of today, a level 19+ will probably be equipping just one of these 4 mods: Generator Mod - Small, Effeciency Mod - Creatures/Guns, Shuffle Mod - Partial. Maybe he'll have 2 of them, but that's not very likely. So he won't earn much energy from this card and when he use it, he'll temporarily lose bionergy gain or discount at cards, so it doesn't make a great difference.

- INTERACTING WITH THE E. I. S., Spencer only. E. I. S. stands for Enviroment Interaction System. It's the ability that lets the mastermind lock doors, turn off lights, control zombies, activate lifts, brigdes, traps and that jackpot in the Casino. So... if Spencer is using his Recharge passive skill, each time he does any of those things (except for the zombie control and trap activation), he receives 1 bioenergy point. That's why the lights are always off when you're against him. In maps like the Abandoned Park, where there are lots of light switches, Spencer can max up his bionergy in matter of seconds.

The energy disruption ONLY AFFECTS TIME EARNED BIONERGY. Let's keep that in mind.
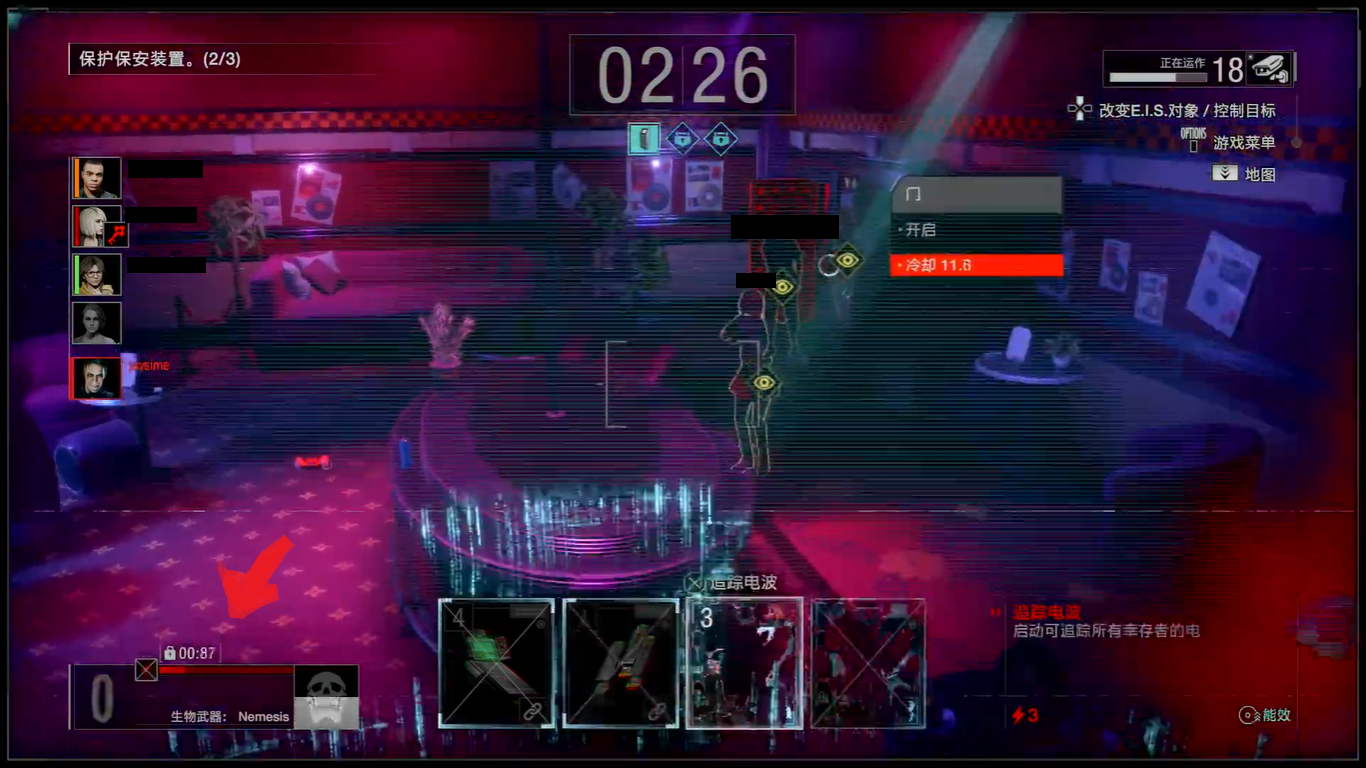
Pay attention to this screenshot:

Whenever you shoot the camera, a countdown of 1 second will start, in which the recharge will be frozen. Shooting again resets that timer, it doesn't add up. So you shouldn't shoot fast: it's useless, a waste of this skill. THIS TECHNIQUE REQUIRES YOU TO KEEP SHOOTING AT THE CAMERA AT A 1 SECOND RATE, WITHOUT DISABLING IT. As long as you keep shooting, the mastermind CANNOT USE NEW CARDS (granted he consumed all his energy). In this example, I had no bionergy at the moment, and kept like that until Jan disabled my camera (which unfortunately she did very fast). Unless the mastermind has other means of acquiring it, you basically let him unarmed. And once the camera is finally down, you can use your personal skill to keep it down.
Does this mean this skill is useless against Spencer? The answer is: YES and NO. Spencer's Recharge skill buffs him through areas 1 and 2, where there are a significant number of things to interact with, specially lights. But once you arrive at area 3, there are no more lights. So all he can do is lock doors, activate lifts and the jackpot. The thing is: while light switches have their activation cooldown counted per room, the doors and lifts share the same cooldown period. What I mean is, if I close a door, I can only close another one in 15 seconds. If I activated a lift, I can only do so again in 30 seconds and only then earn 1 more bioenergy. So by area 3, Spencer can start to feel the menace of freezing his bioenergy recharge (specially because normally Spencer use high cost cards). Spencer can even get a way around this issue with the right deck, but he'll need to use cards that are just not worth it, so you don't even have to worry: area 3 will be Spencer's weakest.
Besides time, the only other way he'll have to recharge is the Mod Recycler. If he's running a creature deck, sacrificing the creature mod will make it harder for him to spam them (because he's probably greedy and will have all the most expensive ones). And if it's a gun Spencer, the same with the gun mod. So at the first 2 areas it may not help much, but at area 3 things get more interesting. Then it's the time to shoot at every active camera on the way of your team (REMEMBER IT HAS TO BE SLOW AND PAINFUL FOR HIM).

HIGH CALIBER and ENERGY DISRUPTION are totally different strategies. In the first Jan "doesn't like being watched" and disable everything fast. But in the second the catch is "ok, you can see me, but you can't touch": you want those cameras on! (remember bioweapons and special skill cards can still be used). As result, the mastermind probably will "run from you" and you're going for a mastermind hunt. But also remember: eventually he'll have energy to attack you, specially at the start of each area, so always take caution in your actions.

I strongly advise you to use EMP rounds if you're sticking with HIGH CALIBER. On the other hand, you don't want them with ENERGY DISRUPTION. Either way you SHOULD use Matilda since with the 1 second rate shooting it takes at least 10 rounds to shut cameras down, and it's still fast with HIGH CALIBER.

I DON'T RECOMMEND USING ENERGY DISRUPTION WITH RANDOMS! I TESTED IT, IT DOESN'T WORK. Your team needs minimal coordination for this. That means they shouldn't shoot active cameras with you, but should take down those turrets for you, while you focus on the mastermind.
THIS TECHNIQUE ALSO DOESN'T REALLY WORK WITH DANIEL (or Daniel wannabes), but I'll explain why later.
This passive goes well together with the INTERFERENCE version of your fever skill, since you'll be taking even more bioenergy off the hands of the mastermind.
With HIGH CALIBER I advise you to choose the fever skill thinking on what you fear the most: stick with INTERFERENCE if you want to prevent creatures and traps or CAMERA LOCKDOWN if you're afraid of guns.
Please don't choose ENERGY DISRUPTION if you're just gonna shoot those cameras down.

Now... whatever is your option, if we're going to shoot those cameras, we demand resources. So how do we keep up? That's when Jan's other passive skill enters in action!
Passive Skill - Cyber Monday


Jan's last skill is Cyber Monday (my friends and I call it black market) and is all about negotiation! Let's check out its variations:

- BARGIN BIN: This is the initial one. You get 30% off every non firearm. But you still have limits on buying herbs and grenades (also, I always have the impression Jan gets the least amount of grenades of all characters), so there's no use relying in these to negotiate (at first, as least). So what do we want this for exactly? Melee weapons and ammo, of course: they're unlimited.
The thing about Jan is that the game isn't really made for her to buy firearms (at least the regular ones): she's there to negotiate them, what I think is amazing, since it fits her personality well enough.
As I said earlier, your weapon of choice is Matilda, but supposing you can get it yourself in area 1, you still have to pay $ 220 for it. Are you willing to expend that much? I'm sure not (unless I have no other option).
Now let's suppose we have a Sam or Tyrone in our team and they have access to Matilda right at area 1. You can buy them a torch ($ 84) and 2 repair kits ($ 56 each) for a total of $ 196. In return, they give you Matilda. It's a win for both sides, since they'd have to pay $ 280 for these itens, but they'll be expeding only $ 220 for your Matilda. And you get to save $ 24 too.
If you don't have the torch at first, it still works out only with the repair kits (specially with Sam, whom needs lots of them) or with the bat, if they're willing for it. It might work with Martin too, since he has this passive that gives his melee weapons more durability when repaired.
At round 1 it doesn't really work well with Becca or other player who's relying on ammo, since you can't buy the 50 pack yet and the 10 pack is not worth it for its price, so don't negotiate with them yet. You can work your way around from area 2 on (if no melee weapon user had the Matilda at area 1, as example). Then, you can exchange 100 rounds (also for $ 196) for your Matilda. From area 2 on, you'd better have some money to buy some rounds for you too, since you're probably gonna be shooting many cameras and we don't wanna be short on them.
After you bought your weapon, you can still negotiate with other goods, like grenades and molotovs (since Jan doesn't really get many of them, though she has the discount), specially with Valerie. If you have money to spare and don't feel like you'll be needing the grenades, be sure to hand resources to your teammates anyway (buy them some repair kits and 50 ammo): they'll need it. I always leave some bullets at the safe room of area 3 for my teammates. There's no use being selfish.
By doing this, you're gonna get a more powerful team and make the most out of your resources.

- ARSENAL: Tired of killing supply zombies for special weapons? Have you ever wished you could get special weapons right away? Well, now your problems are solved! Jan presents you the Arsenal version of cyber monday. You unlock it at level 17. It's pretty straightforward: at each area you're given a random special weapon choice at the armory. And it's not necessarily a different special weapon. That means you can get access to the same special weapon 3 times if you're out of luck (and it can be the spark shot, if it's a really rainy day... what will I do with 3 spark shots? aaaaaaa). But you can get 3 different types too. Here are the weapons you can get:

- SPARK SHOT, for $ 250 (pretty expensive).

- ATM-4 (ROCKET LAUNCHER), for $ 200.

- GM-79 (ACID ROUNDS GRENADE LAUNCHER), for $ 200.

- MINIGUN, for $ 200.

I'm gonna be honest: if you don't have a Becca in your team, you shouldn't stick around with this version. Not only you lose your discount on resources (letting you short on ammo for your camera shooting), the special weapons ARE NOT THAT SPECIAL. I mean... the supply zombie appears about every 2 minutes and can hand them over for you for free. Besides, the special weapons deplete VERY FAST.
If you're not dealing with a crusher mastermind that is greatly overpowering your team from the start, you can try to kill the supply zombie at some point, specially in area 1 (and if you're dealing with that, I have bad news for you...).
If Becca is there, on the other hand, this can really come in hand. But it's also a great risk. The negotiation game isn't over when you choose this variant. If you can talk to Becca, you should exchange the special weapon for your Matilda, so both of you are good on resources (here it doesn't matter if it's area 1 or 2, you can negatiate right away). It will still pay off, since every good special weapon costs $ 200. If you can't talk to Becca but still wanna choose this option, then try to play it safe. Many times it's not worth it at area 1, but if you get an ATM-4 right away and you're dealing with Annette/Daniel/Alex, maybe it can work?
The thing about this variant is you're gonna be relying more on your teammates, in comparison with bargin bin. Keep that in mind.

And that's it for her skills, let's talk about gameplay then!
General Tips: Camera shooting and "stealth play"
The first I wanna point out is JAN SHOULDN'T TAKE THE SECURITY CARD at area 2. Try to avoid this, since you're playing a support role.
Now let's start with your MAIN role: camera shooting. And I say main because that doesn't mean you can't or shouldn't cooperate with other goals, if your way is clear.
Once you decided what skills you wanna try, let's learn some things:

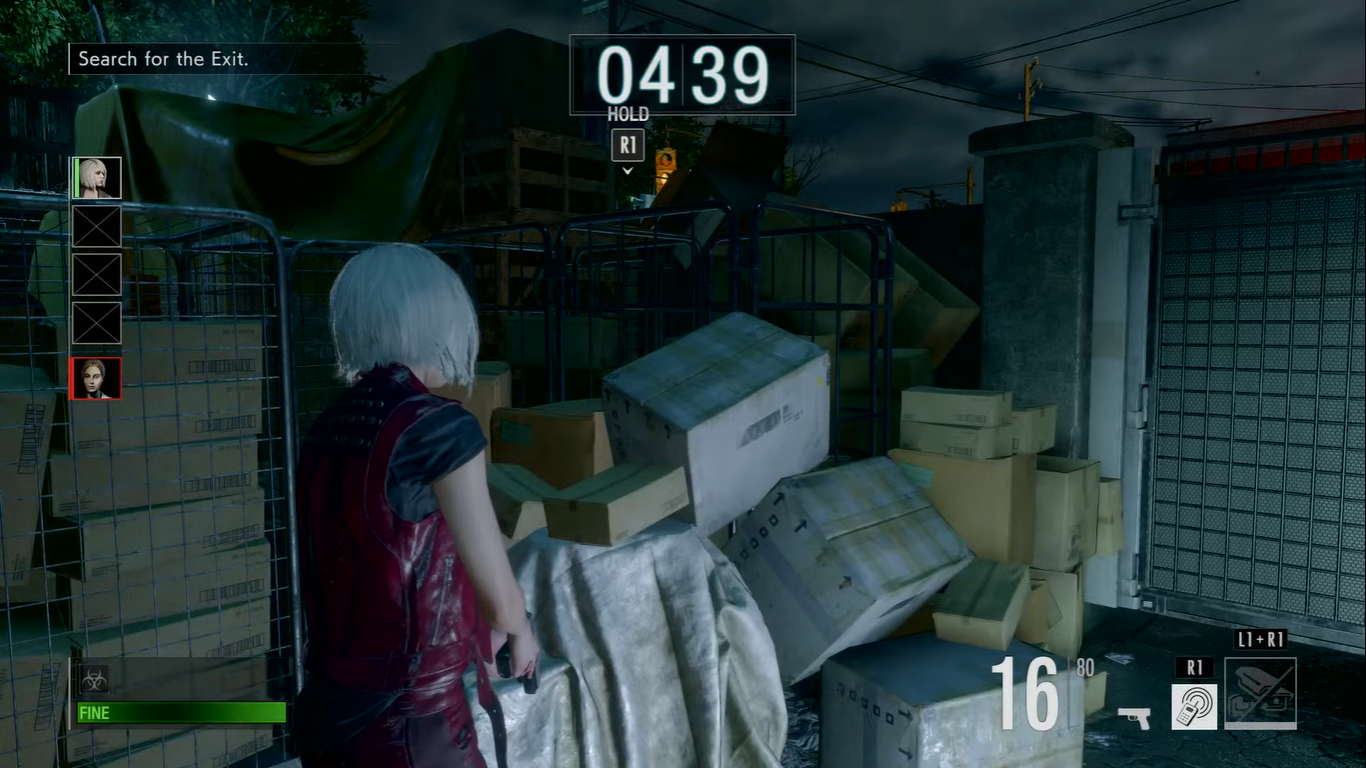
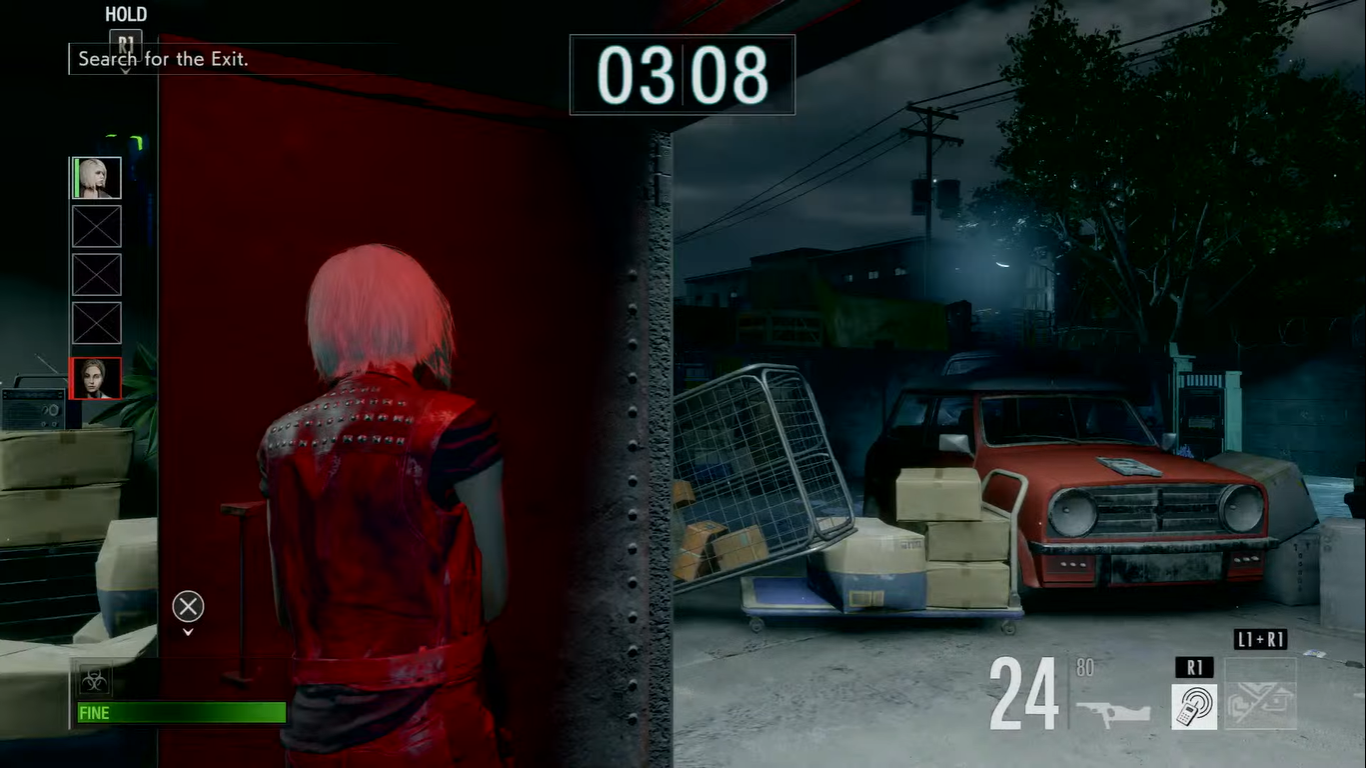
- Please don't deactivate cameras right in front of them. This is a HUGE Mistake. Jan's ability lets her deactivate cameras within view, even if you can't shoot at them (sometimes it's just hard to shoot, not impossible, but with your personal skill it goes switfly). As long as they're not blocked by a wall, you can deactivated them without exposing yourself. As example, the first camera in the downtown map can be deactivated right away from inside the spawn room (and the mastermind can't strike back from there). Take a look:


As long as any camera is not blocked by a wall, within jamming range and can be fully be seen on your frame, you can deactivate it! Also, once you start using your skill, even if the mastermind close the door of the room or activate a lift to put the camera out of your view, you will still shut it down. You just need that first contact to send the signal and make it work. There are many cameras you can deactivate without having direct exposure.

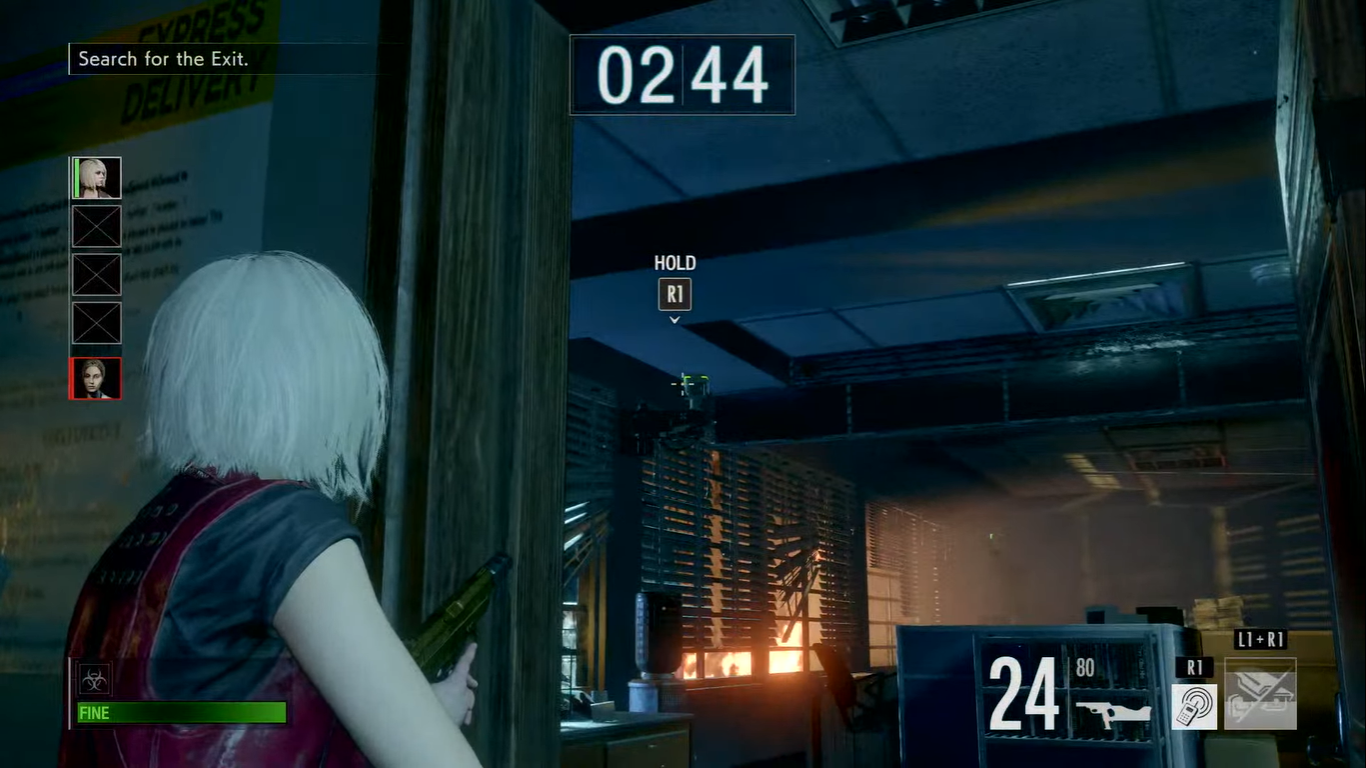
- NEVER EXPOSE YOUR BACK TO CAMERAS! There are rooms like the second one in Downtown area 1, where the camera is right behind you. USE DOORS AND WALLS AS PROTECTION FROM THEM. Besides, you can also deactivate them without even have to show your face, as long as the camera is in your frame. Look at this:


Take note, though, that while you're hiding behind those open doors, you're exposed to the camera in the previous room, so I advise you to look directly at the camera outside after you start deactivation, just to be sure you won't be attacked. If so, close the door and proceed to shoot the camera inside (the time the mastermind took to switch cameras will be enough to deactivate the one inside), then keep up to the next room.

In open areas, AFTER PASSING AN INACTIVE CAMERA (green leds), if there's no creature to take care, proceed looking at it until you're out of its range or until you're in the range of the one ahead (then you'll check both). Masterminds usually wait for you to expose your back before acting and you have to be always ready for the engage. If there are creatures ahead, shoot them before passing the camera, so you're not trapped with attacks on the front and the rear.

- If you notice the mastermind is in the camera ahead, deactivate it ASAP and be ready to get the one behind: that's usually where they go next.

- IF YOU DON'T PLAN ON RETURNING TO A ROOM, CLOSE ITS DOORS. The doors act like a shield from guns. Lickers and dogs can't open them, so you might as well just keep them trapped in an already explored room. But PLEASE don't trap your teammates with them.

- If you're down, crawl to a safe spot!

- If you have teammates with you, except Valerie or Becca (they're the healer and the sniper, so shouldn't be so exposed, if possible), let them open the doors so you can deactivate the camera inside. While doing so, always protect yourself by staying as out of view as you can. Look at this example:


Like this, it's harder for the mastermind to hit you and you can shoot the camera with less risks.

- Don't simply rush through areas and always keep a safe distance of your teammates. This way you can't all be defeated at once. Also take care of mines being set under your feet while deactivating the cameras.

- As long as you're not trapping a teammate, always close the doors when running from bioweapons: it takes some time for them to open them and it breaks their attacks.

- If you're gonna run for you life, cure your infection first, cause it WILL cost you. You always cough in the worst time, believe me.

- Just like Valerie and Martin, Jan can't outrun turret shots. And they WILL hit you, if you run in a straight line. So don't do that. Always find cover to deactivate the camera.

- TURRETS ARE DUMB. Actually, AI IN GENERAL IS DUMB AND GREATLY MANIPULABLE. Use this in your favor. The mastermind can't really control 2 things at once. The turrets will aim at the closest target and if someone run in circles it just will never catch up. If you can stand under the camera with the turret is even better, because it will stay there looking down doing nothing until its time is up. So your priority isn't deactivating the turrets, but the active camera (red) while someone distracts the gun (if you have defense buffs and it's not a high caliber rifle, you can even take the shots). That way you can keep the holder of the security card safe to do his job.

- Creatures are also designed to attack the nearest survivor. But normally they pursue anyone who headshot them (if not dead right after). Sometimes they even ignore nearby survivors to take their revenge (you may have noticed it before). You can do this to draw creatures away from teammates who need help and win extra time for them (AI is dumb). But please don't trap yourself.

- DON'T KILL ANY CREATURE YOU DON'T HAVE TO. SAME WITH TRAPS: DON'T DESTROY THEM UNLESS YOU HAVE TO.
Remember this? The mastermind have limits on traps and creatures he can set. It increases by area. If he is spamming creatures or traps, the older one will be automatically destroyed when he places the new one, and if you were damaging it, you've just wasted your resources. We DON'T want that.
By area, limit for creatures is 8, 10 and 12 respectively. Traps have a limit of 20 anywhere. That means if the mastermind don't pay attention to what he does (and some really don't), he can replace a licker for a crawling zombie. Also, if he horded a room and went to horde another, the first horde just dissapears! POOF! Try to fool him with this. Oh, Ivy also counts on the said creature limit.
There are no limits for turrets, but they have a lifespam of 1 minute, unless the mastermind has equipment to extend that time. So if the mastermind places one too soon, exploit that and do other objectives first (or fool him to do so).

- Remember a good mastermind will attempt to attack from both front and rear, so ALWAYS deactivate the camera outside before the one inside if there's a security device in there. If you're in a group, ask for one of them to take care of the outside one using the trick below while you deal with the one inside.

- Don't shoot inactive cameras unless they're strategical and YOU KNOW the mastermind will pop up in there. Also, if you're ahead of the mastermind in a room you know it's the next target, SHOOT THE CAMERA, BUT KEEP THAT 1 BULLET AWAY FROM DEACTIVATING IT. Shoot again if the camera start recovering. You'll only give the final shot when the mastermind reaches it, earning you 10 sec and more time with it down.

- Some masterminds are not willing to give you those 10 sec, so they'll switch cameras as soon as you start shooting or deactivating them. But they'll soon come back to check on it (they'll wait elsewhere for the camera to be down, just to recover it fast and earn a shield, trapping you). If so, do the trick above if shooting, to catch them off guard. If you're using INSTANT, just restart the skill and keep restarting until he shows up and the camera is deactivated with him there or proceed to the shooting trick (if the cameras are not super resistant). Remember shooting is better because you can use INSTANT after, to buy some more time. If you're using LOCKDOWN, the skill will probably already be consumed, so just keep that camera down.
General Tips: Equipment
When it comes to equipment, HIGH CALIBER demands EMP ROUNDS II. EMP ROUNDS I just makes a difference if the camera is reinforced by the mastermind, what is very unlikely, so don't worry equipping it with Jan.
If you're going with ENERGY DISRUPTION, STAY AWAY FROM THE EMP ROUNDS. You don't really wanna destroy any camera with that. The only case you won't be able to use the energy disruption technique is when against Daniel (or a wannabe). But in this case, shooting active cameras down isn't really effective either. You'll be working more in destroying them before the "Daniel" arrives in the room - specially making use of your personal skill -, so that he can't really have a single second to possess his zombie in there. And when you can't prevent that zombie from coming, you'll be better doing other stuff, so it's also better to have more useful equipment.
I personally like to use ENERGY DRINK III and BOOK OF WISDOM to reduce my personal cooldown, but if you notice you just don't use the personal so often that you really need them, aim for something that makes Jan more versatile, like raising critical chance or knockback, increased resources, quick teammate reviving or anything that's off her original role. But remember she is not a very good fighter. So don't pretend she is Tyrone or Samuel and go ahead killing stuff: keep more caution. Against a good Daniel (or Daniel wannabes), Jan will just have to adapt to other duties, because there won't be many cameras to take down. These times even melee weapons are welcome (at least they're cheap for you), but always be ready to take your role back as soon as those camera leds turn red! You don't wanna let your teammates down, right?
It doesn't matter if you're a survivor or mastermind, versatility is key in this game. And, for that, you'll have to know your ground. So, let's talk about the maps and its cameras locations! You'll need to know them more than anyone (actually, everyone should know them).
MAP: Downtown
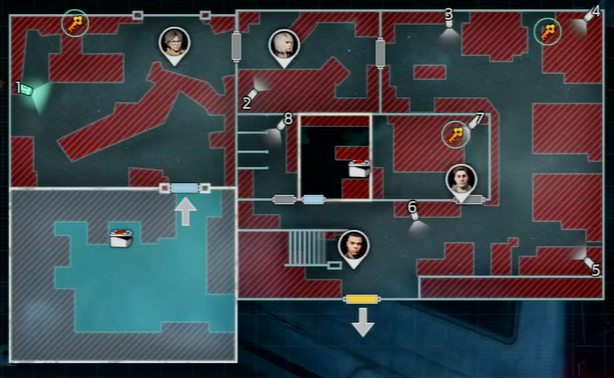
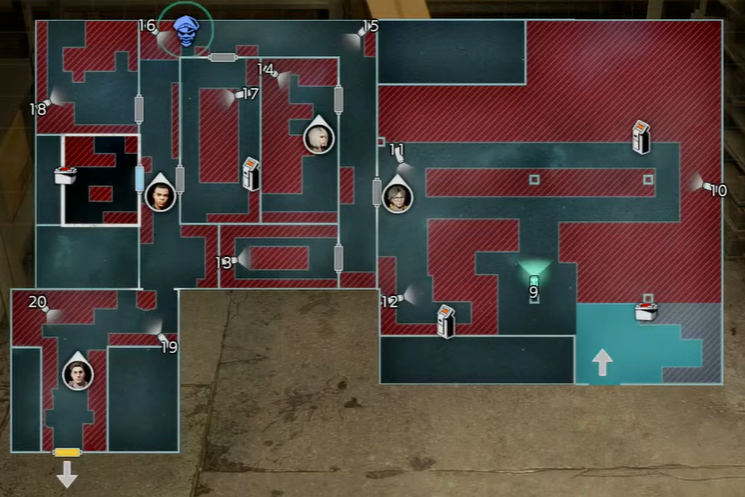
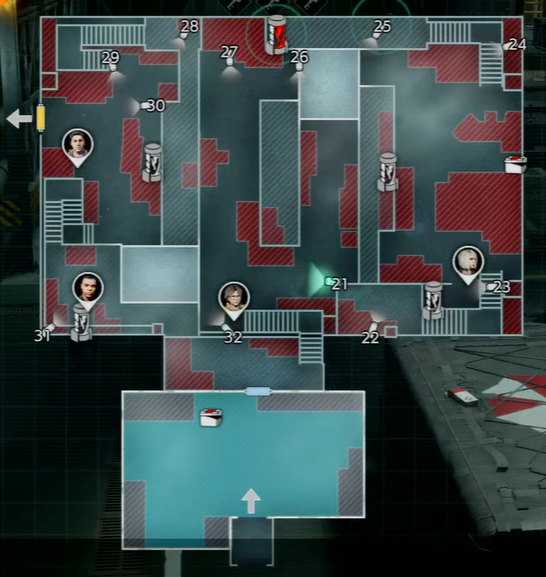
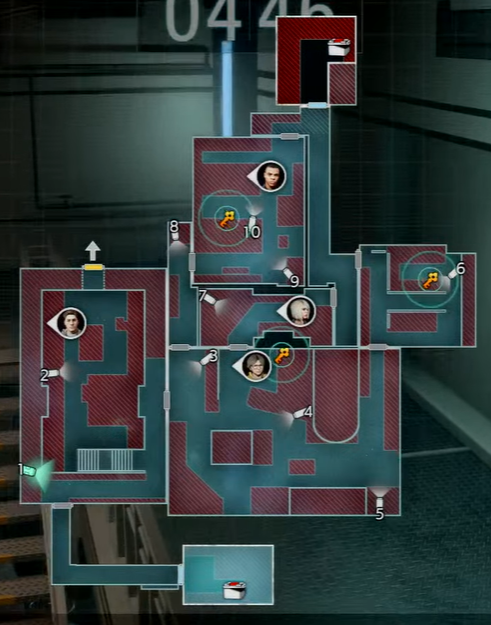
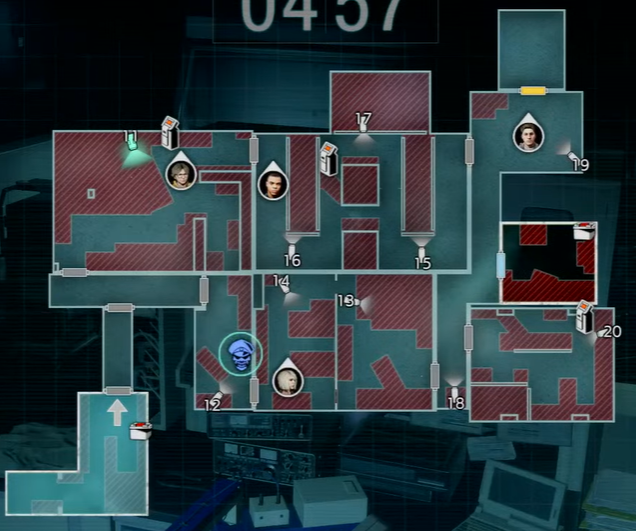
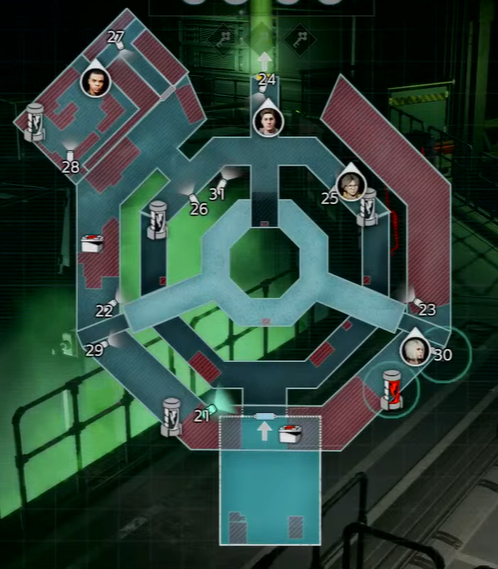
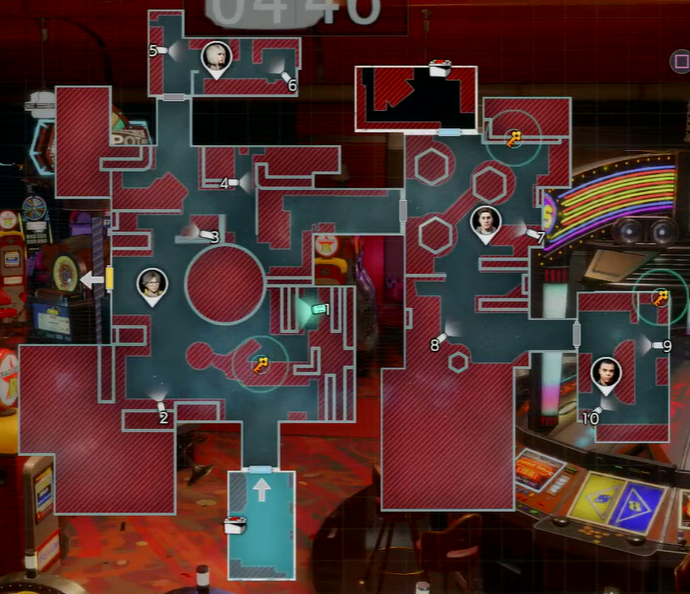
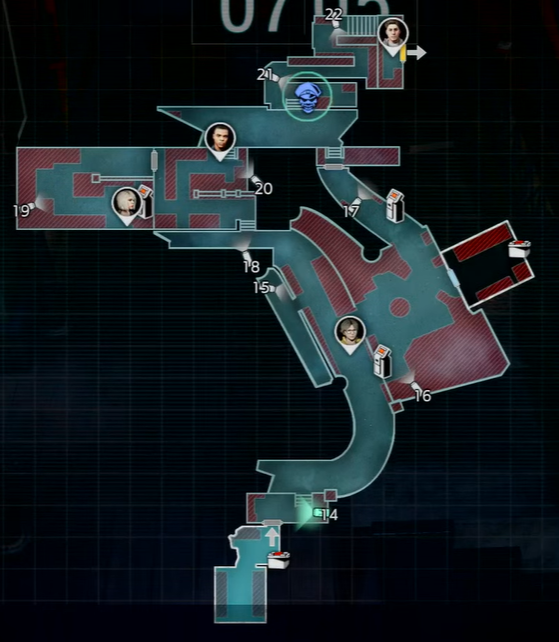
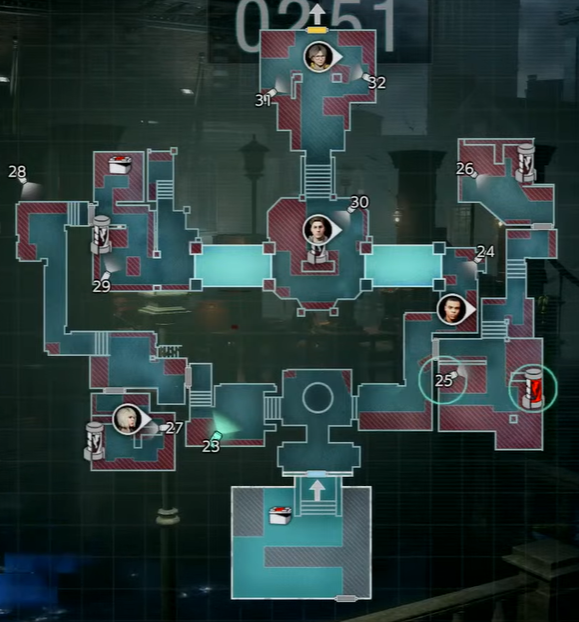
This is my favorite map. It's the first one and it's a real nice one for Jan! I took screenshots from the mastermind map of each area and I'm gonna give some hints about them and discuss the cameras there. You can see each camera in the map has a number besides it. That's its identification and I'm gonna refer to them by the number assigned. The green areas are the ones you can explore. The red ones, you can't. When a camera is in a green area, you can hide from shots under it. So keep that in mind.


Camera 1 can be shot and deactivated both from inside the spawn. If you see a turret in there, don't even bother going outside to take it down. It's safer in the spawn. And if the mastermind is in there waiting for you, you can tell him hello by starting your personal (specially if they're the kind that like to invade the spawn with creatures). Sometimes that scares them away. Anyway, it's your way of saying "the game is on". If this camera is inactive, proceed by looking for traps in the ground and checking if the mastermind doesn't come back to attack you from behind. Use the doors before camera 2 as shield if necessary, but don't stand too close, because immobilizing rounds and the air cannon WILL hit you. Other than that, there's nothing really special in area 1.


I really like the spawn room in area 2. Cameras 9, 10 and 12 can all be deactivated without risks (I actually don't understand why someone would put a turret in camera 9, but ok). If you stand just behind the pillar where camera 9 is and look carefully, you can see camera 12 in a little square in the block. You can't shoot it, but you can deactivate it from there using your personal. Also, right in the end of the ramp of the spawn you can see camera 10, which you can shoot and deactivate safely if needed. Those corridors in the left and right of camera 9 turn into blind spots for the mastermind if you deactivated camera 10, so you want to stay there if needed (revive a teammate, as example). Camera 11 has its blind spot by the corridor in the left, the lower one. You can use the open double doors in the camera 15 corridor as a barrier. Also, there's a curtain there which provides you cover. When your teammates are headed for the room where camera 18 is, let them go ahead and stay in right corridor to ensure camera 16 and 17 are both under your control (also, taking caution of camera 15). Also, if the mastermind spawned creatures in that corridor (before the room of 18), you can safely kill them by shooting by standing at the edge of the right corridor (where Yorick is in the map).
Cameras 19 and 20 can be a problem if you're dealing with a gun mastermind, but remember the turrets weakness: let it aim someone to distract it and destroy the active one, so the holder of the keycard keeps safe (that means the holder shouldn't be the first to arrive).


Area 3 here is my favorite. You can safely deactivate any turrets that were poorly set in camera 32 as soon as you get out of the spawn. This area is fun because you can deactivate all cameras but 24 and 31 by just staying in the central area (that circle where cameras 21, 26, 27 and 32 are). From there, activating the lifts if necessary is quite easy and I usually play my role from there, since basically every camera is of easy access. That way you're mostly away from the mastermind grasp and can be a major pain (since he'll have to choose between attacking you, whom is deactivating/shooting every camera you can from the distance, or your teammates whom are focused at the biocores).
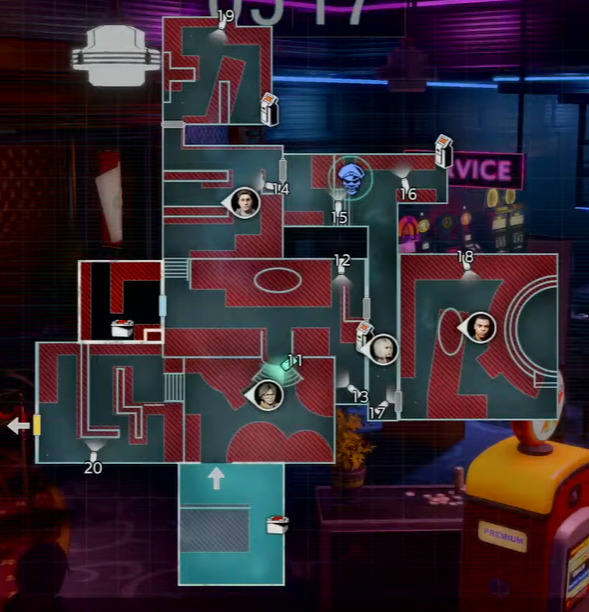
MAP: Research Facility


If the room is too quiet, beware of camera 1. My advice is to open the door, go back and then check on the camera. Usually the opening of door is the moment masterminds want to attack, since you're locked in animation. Turrets normally are set on cameras 4, 6 and 9. If you're dealing with creatures, they'll be set before camera 3 or at the laboratory, where are cameras 9 and 10. This is a good level to split up, but, if you can, stay in groups of 2. If you wanna quick explore, you can go for camera 7 and then to the room with camera 6 to help the teammate who went there. But always pay attention to their healths and the timer to go help ASAP if needed. Also remember that team work doesn't mean staying all the time together, but coordination.
The best entrance for the lab is from the west, also where you're the most vulnerable. From the north entrance you can't shoot camera 9, where the mastermind will be.


This area is loopable and there is a chance Yorick will be hidden in the spawn room, right at the end, if everyone follow the same direction to explore. The good news is: this area isn't really fit for turrets, and there's no double camera where the deactivation devices are. So, if you play carefully it can go smoothly. But remember everywhere in this area is narrow, so turrets and creatures will make your doom if you don't play it safe. If you're dealing with Annette, Daniel or Nicholai, the bioweapon will likely be unleashed in cameras 15 or 18, right after deactivating 17 or 20. Remember to keep 18 deactivated while dealing with 20, to prevent surprise attacks. Yateveo is likely to be set before cameras 11, 19 and 20.


Normally people like to release the horde right outside of the safe room here. Your safest bet, besides using a yellow herb (I guess I didn't mention so far yellow herb decreases damage, did I?) or having Tyrone buffing the group, is to have someone throw a grenade by the door right after someone with a stun goes out. That way you prevent grabs of the first one to head out and the person outside can open way for everyone to come out as safely as can be. Turrets in this area are only a real problem at the exit, because there are 4 cameras there (24, 25, 26 and 31). But if people space out a bit, it will be ok.
This section is so narrow in overall that hordes becomes a problem. Don't give Annette that much time to build one up. Besides use the lift in your favor, locking the hordes away from you. Normally the mastermind horde up the section where the biocore is, but you can shoot every biocore except the one inside the room from a quite safe distance to avoid those zombies and buy some time. Remember you can shoot the biocore in the lower section from the one directly above too, if necessary.
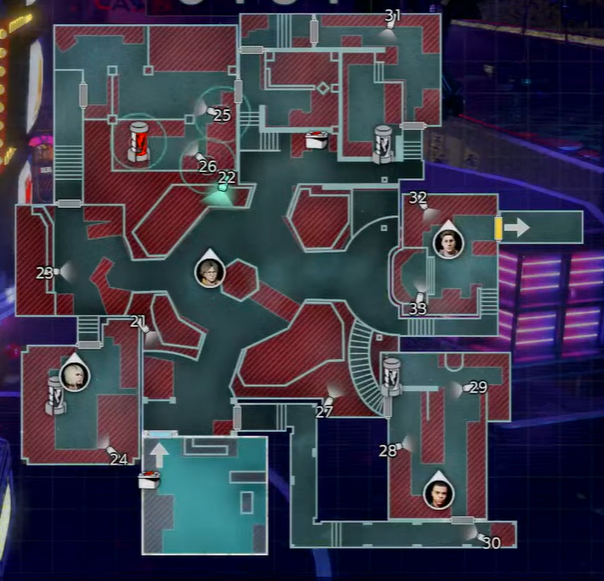
MAP: Casino


The Casino is a specially dangerous area. Most of its rooms are designed for ambushes, so you need to be real careful here. I didn't say this before, but here it's essential: keep always a clear escape route for your team. The rooms where cameras 5, 6, 9 and 10 are not important at first. They are designed to ambush you. I would advise you to first explore the east side, because it's further away from the exit. If you're dealing with Annette or Creature Spencer, you wanna make sure cameras 4, 7 and 8 are all under control, and you have to be fast. Remember Annette is the creature Spammer and so can be Spencer, so you don't wanna waste time with them and keep those escape routes clear. If you hear those creature buffs coming from 5 or 6, you can fool the mastermind to put more things there and then head to 9 and 10. Remember the mastermind can only set 8 creatures in this area, so if he start spamming there, the ones in 5 or 6 will be cleared and someone can explore there in safer conditions. And if he insists in staying at 5, let it to be the last thing you'll do, since you can throw a grenade for traps and creatures and a stun for the rest. Be quick and get the hell out of there. For turrets, you can use the pillars and the whole casino structure as shields. Camera 3 and 4 can both be taken down from behind, but beware one can see the other. When you enter room with camera 5, the mastermind will likely go to camera 3, so beware. The same with camera 9. Probably the mastermind will pop up in camera 8. Camera 1 has a HUGE field of view, so always keep track of it when passing in the central area.
If you're dealing with Daniel, he sometimes possess a zombie in room 5 and waits for you to open that door. You can take that time to fool him and let them team explore the rest of the area, just like Annette.


Turrets are likely to be set on cameras 12 and 13. And they're both hard to reach, but also somewhat easy to evade. Bioweapons area likely to be set from cameras 14 and 17, so you know what to do. 15 and 16 are the only double cameras on deactivation devices, but the procedure is the same. You can stand under many cameras here too. Beware of camera 11 when heading for the exit: don't expose your back.


This area is very interesting. It can easily turn into a death trap if you're not careful. Keep in mind that there's a jackpot in the middle that will give resources away, amongst them even special weapons. But the mastermind can also use it to summon creatures for free, even lickers. So always activate it when you can.
Also remember that EVERY ROOM EXCEPT 24 HAVE 2 DIFFERENT ENTRANCES. And you, specially, wanna enter from behind, cause that's probably where the mastermind isn't looking. And then deal with those cameras. If there are hordes, you can use those different ways to lure the creatures away and lock them: there are just too many doors here. Turrets are more likely in the central area and cameras 25 and 26. In the other rooms it's not so hard to deal with them. Before exiting, use the stair at the DJ station as cover from any turrets and deactivate them from there.

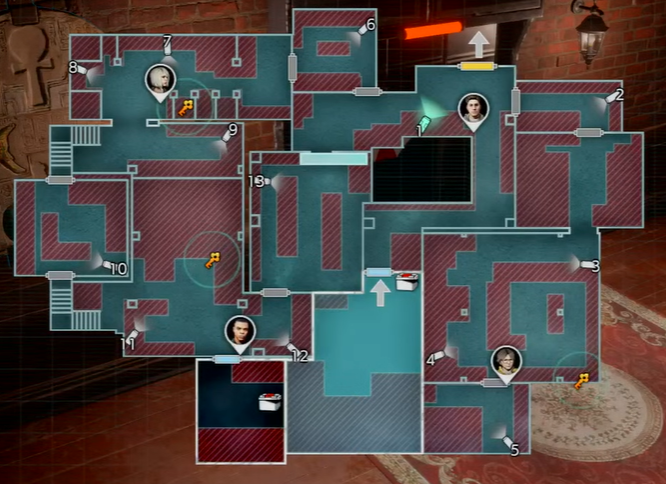
MAP: Abandoned Park


Always beware of camera 1 for turrets (they're not dangerous, though: they're the easier ones to deal with). If you're dealing with a creature mastermind, it's a good idea to split in groups of 2 and explores the different areas. Most likely 2 keys will be on the east side, since it's the best place to trap you. If it's too quiet, take whatever you find fast and go to the other side assist your teammates. If you're teammates are way too ahead of you, always check for camera 13 from the edge of the initial area, where the exit is. If the mastermind is there you can deactivate it from there. Also, if you're new to the game, see that light blue block right next to camera 13? It's a secret passage that lead you back to the start of the area. Just activate it on the right side of the northern wall. Actually, if you're not dealing with a gun mastermind, I advise you to open that door first and they take anything (even they key) from this room. If the mastermind down you after you initiated the animation, it WILL open anyway, giving your teammates a chance to revive you. Or if they can't at least they can take the key right away and get the hell out of there. So that's your priority. You can shoot creatures in front of cameras 9 and 13 from the western side of the initial area. You can attract them to these walls and shoot them to help your teammates on the other side if needed (considered you splited up and you went to the right side). There are pillars through most of the rooms here, that will help you get around guns. Be caferul of places with 2 of them (3 and 4, 7 and 8, 11 and 12).
If you look carefully to the right after leaving the the spawn room after the turn, you can see a cracked window that shows camera 4 (see the Sam on the map, just walk him to the wall in the lower side and there's the window). You can deactivate turrets from there if needed. Camera 10 can be deactivated by looking up from that edge of the next room.


This area is a problem with hordes, since there's just one place you can lock of them up. Proceed carefully for camera 16, staying on the left, out of the sight of camera 15. If you destroyed camera 19, the bioweapon will probably come from 18 or 20. So beware. Don't give your back to camera 21 and I guess there's nothing so special for this area. Always look for places where you can deactivate cameras away from its grasps.


This third area isn't good for turrets also, because there are not so many cameras. Only in the central area and at the exit. On the other hand, this is place is made to trap you with creatures and... traps. So beware. Always keep a safe distance from your teammates. If the biocore is in the middle, you can use the bridges as a safe spot (but also be trapped in it) and you can shoot from the exit room too. I guess I don't have much to say about this area.
Mastermind: Annette
This is the last section of my guide. Here I wanna explain a little bit about each mastermind and how they play. It's important to know their games so that you can get the most out of yours.
Just like you, the masterminds earn skills and cards as they rank up. So, depending on their level, you can tell what they can do and what they can't, and so adapt your style to deal with them. Besides, by the cards they have you can also tell how experienced they are, since there are cards that are shared among them as they rank up.

Please don't fight a bioweapon unless you're Tyrone/Sam and are strategically doing so to buy time for your teammates with the required caution and experience. But since it's a Jan guide, I believe that's not the case. So don't.

The first mastermind is Annette. She is envolved in the creation of the G-Virus and, from trying to protect this creation, the T-virus was unleashed in Raccoon City. And so she is "cursed" with the horde of zombies that came right after. Her gameplay reflects that. She is all about calling as many creatures as there can be in record time and buffing them. Her bioweapon is William.


William is slow, but his attacks are powerful and well ranged. He can enrage, temporarily gaining speed by opening his monster eye. When this happens he gets his weakness exposed and you can even kill it. He can grab you and instakill from quite a distance, so don't stay close to him. Until level 24, he'll be using FURY. With this ability, the less Annette uses him, the more times she can summon him. Normally, Annettes using this skill will call on William, do some damage or scare you away to buy her time to horde a room and make him leave, all in seconds. And in the next minute or so he'll be back to say hi again. So stay away from him, but not that far away, so that you can quickly go to the key room and stop Annette's plan.
By level 24 he unlocks BLOODTHRIST, which will give him extra time each time he successfully instakill. Oh, and I have to say that whichever the skill she's using, William's time on screen pauses when he is executing his kill attack. An Annette using this WILL try for any grab she can have, and if you let her kill your teammates you can easily have William's company for 2 whole minutes. So remember to stay away.
Annette also uses his instakill as a way to force you to use grenades and be defenseless against her horde of zombies. So ignoring him whenever possible is a smart way to save resources you'll be needing later.


Her first passive skill is GENETIC MUTATION. The first variant (you won't be really seeing this) is RECOVER. It recover creatures' health by 1000, whenever she buffs them.
About buffs, there are a 4:

- BERSERK: The red one. Makes creatures faster, more violent and improves their AI.
- INFECTION: The purple one. Makes creature infectious.
- REGEN: The green one. Grant creatures regenerative abilities (unlocks as Daniel, rank 13).
- ENERGY LEECH: The light blue one. Whenever a creature successfully grabs you, give the mastermind 1 extra bionergy (unlocks as Spencer, rank 13).

You can tell what's being buffed by the color of the smoke on screen. The second variant is BUFFS and is unlocked at level 4. It makes her buffs 30% stronger. That means her infection fills your infection gauge 30% faster, her zombies recover more health with regen and also grant more bionergy for her. This is where things get nasty. Specially because of regen, you'll have to kill creatures FAST to save resources.


Her second passive is ZOMBIE APOCALYPSE and is what makes possible the swarms she calls.
The first variant is CREATURE EFFICIENCY, which lowers any creature card cost by 1. By level 19 she unlocks a mod with the same name, which she can stack to get a discount of 2. So she'll be using LOTS of them.
The second variant is ENHANCEMENT, which increases all of her creatures HP and she can choose from level 14 on. It works just like the 7 cost equipment "Resilient Skin III".
So basically, if her creatures are not stronger than the others, they're more numerous (Spencer can be closely as numerous, but never as strong).


Her exclusive cards for area 2 and on are:
a) the 3 dogs or;
b) a berserk tough zombie (unlocked at rank 9) that makes every creature passing next to it also berserk.
And both at the cost of 4, which can be reduced to 2, if she is using the discount abilites. The zombie is the most interesting, because with it she can simply not hold the berserk card and use the zombie for buffing her other creatures.


For last, at area 3 she gets either the 2 detonators at once or the deadly card CONCENTRATED ENHANCER (unlock at rank 19). This enhancer grants the creatures all the 4 buffs for the cheap price of 2 and it looks like fireworks when used... the fireworks of your doom haha.

For areas 1 and 2, if you can, explore the creature limit she has. Fool her into swarming one single room, if possible. Don't go killing things you don't have to and save grenades for area 3 if you can, because that's when the game really begins. At area 3, besides being fast, try to reach the biocores from away to avoid the swarm or use BOTH of the entrances to the biocore room (if there are) to make them split up. You can use doors and brigdes to trap them. When there's no choice but confrontation, clean the room quickly with grenades and other strong weapons you have. Resources are extremely important with her.
If you find a mastermind that wants to be Annette (let's call them Annetters), the procedure is the same. The good thing is they'll never be her, and their creatures as not as strong or numerous, so it's way easier to deal with them.
As Jan, you'll ALWAYS want to keep a safe escape route for your teammates, taking care of the key cameras in central areas. At area 2, go along the keycard holder to protect him. If you use the energy disruption technique, Annette will most likely go Daniel, possessing a zombie after you. The good part of this is: while she is doing so there are no more swarms and her zombie isn't unstoppable. But she can also escape to another camera and wait for her bioenergy to collect and swarm up again, but that buys time for your team to do the objectives. And as long as you keep her from collecting energy where you are, she won't be swarming that room with you, but expect to at least see 2 or 3 zombies or a licker and a zombie when she comes back. Here is important to watch the camera outside, so that she's not swarming your escape route. If she randomly decides to swarm another room, the creature limit can even work in your favor.
Once again: don't use energy disruption if you don't feel like you can depend on the team to take care of the creatures by themselves, because you'll need to keep that camera distracted and it will take most of your attention.

The cards she unlocks for everyone are:

- DETONATOR ZOMBIE, level 7.
- LICKER, level 13.
- EFFECIENCY MOD: CREATURES, level 19 (grants discount of 1 to any creature card while in hand.
- ENERGY BOOSTER: CREATURES, level 25 (decrease the cost of all creature cards held in hand prior to it's activation by 2).
Mastermind: Daniel
Daniel is the guy whom gets his hands dirty for Umbrella. That means he won't stand there watching what you're doing: he'll enter in action and stop you himself. His bioweapon is the Tyrant, Mr. X.


His first ability is BRUTALITY, which makes Tyrant's punches faster and stronger. This is not a real problem as long as you're not cornered by him. Just stay away and you'll be fine. Mr. X needs to be close to do anything to you. Doors are his worst enemy, so keep them closed and also keep a safe distance from them, not to get hit if he decides to punch you from the other side with the doors open.
Mr. X also has an ability called Bull Rush, in which he runs through open areas and damages anyone he touches, finishing with a punch in the end. At rank 24 he unlocks WINDUP, which makes this punch deadly if you're not careful. But any CLOSED door interrupts this attack. So that's why you wanna keep them closed and stay at a safe distance. If the next door is too far away just wait close by to go back where you came from if he decides to enter. Also, don't have all of your teammates together so he can easily kill everyone.
Keep in mind that at level 25 he gets a trap that locks all doors and he can use the doors to corner you, so be extra careful.


His first passive is BLOODLUST. The first variant, VAMPIRE, makes zombies regen each time they hit you. They'll blink green when this happens so you can tell he is using it. Combine this with the regen buff and let it keep hiting you and the zombie will just feel like Immortal Sam. So you really wanna keep extra caution with Daniel's zombies.
At level 4 Daniel unlocks REND, that will make the zombie's bite deadly. Equipped right, it can down Martin in one grab and other players in two. So whatever is the option Daniel makes, you don't wanna be too close from these zombies.


The second passive is even worst than the first: PUPPETEER. This differs from the first passive because IT ONLY WORKS WHEN HE IS CONTROLLING THE ZOMBIE. The first variant is SADIST and it makes controlled zombie's attacks stronger. I think right now is a good time to remind you that CONTROLLED ZOMBIES TAKE LESS DAMAGE FROM YOU. So when controlling a zombie, Daniel can regen each time he attacks you (or down you right away), and he'll take less damage and will be giving more.
But the horror really comes with level 14. Then he unlocks ENDURANCE, the second variant. This makes impossible to knock back the zombie he controls. That means YOU CAN'T STOP A GRAB OR ANY ATTACK HE IS EXECUTING, unless you use stun abilities or weapons (like Martin's shock mine or flash baton, Tyrone's kick, rocket launchers, the spark shot or flash and regular grenades). And a grab may kill you. Each scratch can regen him. And Daniel's default zombie is the partially armored one, which is already hard to damage by default.
So Daniel's passive turns his zombies into bioweapons and you'll have to play accordingly.


At area 2, his exclusive cards are the regenerating Dealer (the female zombie that steals your money) or the Berserk Detonator (unlocked at level 9), both at the cost of 3. The dealer is weak even with regen, so it shouldn't be a major problem granted he is not possessing her. About the detonator, just keep in mind that it WILL explode before dying, so always keep your distance.


At area 3 he can get a full armored zombie, that can only be harmed with shots from his back. He can choose the equilibrium mod at level 19, but it's unlikely he'll use it, since it doesn't really fits his gameplay. This mod makes bioenergy rechard faster, according to the cost of the cards you have in
your hand. The more expensive they are, the faster you get.

I, personally, hate Daniel. Maybe because I'm a Jan main and Daniel is a bionergy waster. He doesn't really care about bioenergy or cameras (I don't really think he cares about anything, actually haha). He WILL spend a good time away from the cameras to hunt you with his controlled zombie. And while this happens, his bioenergy will be recharging and there's nothing you can do. He most of the time will come back to a full recharged camera and just proceed with his hunt. And he is also the only mastermind that's really strong outside of cameras.
If the area you are in have more than 1 route to explore, don't go for the one he's hunting. If possible, fool him away from your teammates (with caution). Remember: his zombie is like a bioweapon. You don't wanna be close, you don't wanna be hit. Just get away from it, you can't defeat it either.
If you have a strong character like Tyrone or Sam in your team, they can entertain that zombie while the rest of the team gets things done. They just can't be cornered. Carry supplies to stun him, in case you know you can't escape. PLEASE DON'T GIVE THAT CONTROLLED ZOMBIE ATTENTION (I need a sign for that). That's all he needs to kill you. If he's dancing to mock you, let him be and go away, it's time he's wasting.
You'd better just do your objective right away and leave and keep some distance from other teammates so that everyone won't be killed together.
When you get tired of that zombie, the Tyrant will appear. And that's most likely how the match will play the whole time.
You can kill the zombies he's not possessing, just be careful.
He can try to horde a little, to make things more interesting, but if he does so he gets vulnerable to you in his camera.
There are masterminds that seem to only know how to play as Daniel (I call them wannabes), so they'll try to act like him. But the catch is: their zombies are not that strong and CAN BE DEFEATED. That doesn't mean you really have to fight them, specially if you're dealing with tough or partially armored zombies. You CAN, but it doesn't mean you SHOULD. Weaker zombies like the regular one, jester or the dealer are ok to kill, since they'll be down fast and you'll keep the mastermind on his place. The stronger ones you can just knockback and proceed.
When using energy disruption, one of the reactions of the mastermind (if he has zombies in his deck) is to start a Daniel strategy. This can become a huge advantage if it's not Annette, because the zombies WILL BE WEAKER and it will be easier to deal with.
Unless there's someone in the room with stun abilities or you have stun grenades and can revive your teammate fast enough, it's better not even risk reviving. Daniel will protect that body just like a dog and kill the whole team if trying to help.
NEVER PLAY THE MASTERMIND GAME. Make him play yours. Sometimes is just better to lose those 30 seconds and proceed. Also, as a teammate, understand the situation you're under, if you're down.
The cardkey holder should be well protected, so keep that in mind. Besides, destroy those biocores fast.
Just because we can't get enough of it: Please don't give Daniel attention. That's all he needs to defeat you.

The cards he unlocks for everyone are:

- DEALER ZOMBIE, level 7.
- BUFF - REGEN, level 13.
- JESTER ZOMBIE, level 19 (the clown that paralyses you).
- LOCKDOWN TRAP, level 25 (lock all doors in the area when activated or increase lock's level by 1 if already locked, to the limit of 3).
Mastermind: Alex
Alex is the mastermind whom is sneaky. She'll drag you in situations to favor her and attack when your guard is down (even if she has to take it down on her own), leaving no chance for a escape. She's a trap master and that's what the game gives you. Her bioweapon is Yateveo.


All gameplay around Alex involves traps. And Yateveo is the ultimate trap: a weapon that blocks the escape route, can hold survivors in place with it's slime, attacks from the ground with vines, devour those who dare get close enough and - as a good trap - explodes.
She can get in and out Yateveo to complement her trap with guns, creatures and regular traps. When she's out, Yateveo get's invisible. But beware: she can get in control of it anytime and devour you if you get too close when this happens.
Her first skill is VERDANT. It increases Yateveo's health and makes the slime harder to escape from. That will probably what you'll see when against her, because Yateveo by default isn't really that hard to kill. At level 24 she unlocks EXPLOSIVE. The second version lets her explode Yateveo anytime (normally she can only do so after devouring a survivor).
Yateveo's explosion works just like a regular mine. She needs to activate it first for about 3 seconds and then BOOM. But there's no warning for survivors, so it's easier to catch them off guard.
If you're used to the maps, Yateveo's placement are somewhat predictable. It can't be placed in narrow corridors, cause it needs space. Its movements are also slow, so it's not hard to dodge its attacks if you're fast enough. As long as you can keep in movement, you should be ok.
But that's what a good Alex won't let you do. She'll slow you down first.
And then comes her first passive:


BIOHAZARD is the passive that makes her the infectious mastermind. Infection has 3 levels and it increases each time you cough. When you cough you lose 5 seconds and a bit of health, besides being unable to act for about 2 seconds, forced to move slowly: this can be deadly.
At level 1 you'll eventually cough, but from level 2 on you'll have frequent cough and be constantly pausing your actions. When it reaches level 3 (maximum) you'll easily get to danger status and cough all the time. A blue herb resets infection to 0.
The first variant is AMPLIFY. It works like the 6 cost equipment Viral Canister, which can be stacked for that instant level 3 infection when you fall on a virus mine or is attacked by any infectious creature.
At level 4 she unlocks EPIDEMIC. This second variant makes that purple smoke creatures leave behind when walking (or that passes under doors) last longer. When you get in contact with it, you get infected. Also, with this variant, any creature in contact with the smoke also turns infections. Alex gets both the infectious zombies and she can use this variant to buff every creature she spawn without using the buff weapon, just by placing them close. It's harder to see this variant tough, since her creatures are weak and people don't seem to like using this kind of technique with her.


Her second passive skill is RESIDENCE OF EVIL. The first variant is TRAP EFFICIENCY, that lowers all trap cards cost by 1. At level 19 she unlocks a mod with the same name which can be stacked for a discount of 2. The only trap card that costs 4 (Nicholai's reinforced leg trap is exclusive, so I won't take that in consideration) is the High Explosive Mine, so all other cards can cost 1 on a leveled up Alex, since they all cost 3 and below.
The second variant is MECHANIC, unlocked at level 14. This one makes traps harder to destroy with weapons and makes Martin waste a whole lot of time if he tries to disarm them (a great opportunity to down him under the disarming animation, so he'd better not do it when Alex is around). It also reduces the time needed for the trap to activate, allowing them to turn into instant bombs on the ground if you get too close.


The exclusive card she get from area 2 are:

a) Virus Mine, which creates a purple virus smoke field that engulfs anyone around it.
b) 3 aligned landmines (unlocks at level 9), that will stack their damage.

Both costs 3 and you can see both of them quite regularly.


Area 3 cards for Alex are sad. Until level 19 she is stuck with the Efficiency Mod: Infection, which reduces the costs of Virus Mine, Zombie - Infectious and Tough Zombie - Infectious by 1. It's unlikely she'll be running all those cards. And if so, she can't equip more useful mods, because her hand will be quite full of mods. Also, this mod costs 10 to recycle, so it usually just gets in her way (there are just not enough infection cards to make this worth it).
At level 19 she unlocks Jester - Camouflaged. It's a regular Jester, but it's invisible until it attacks. It's actually pretty good if placed in sneaky areas, where survivors don't see him clearly. So you should beware, higher level Alex will probably be using this.

Her gameplay is around traps and infection. Actually infection is an element to help her make traps work better. She will be sneaky and can set traps on your feet, specially when you're deactivating her cameras, so take caution. At level 13 she gets the immobilizing rounds which will hold you in place to set her traps. It's not wise go against her alone and ALWAYS keep some distance from your teammates, because those traps explode easily and you don't want your whole team down because of a misstep.
If she's running a cheap cost trap deck, it will be harder to use the energy disruption technique, but not impossible (it will still make her life harder and she will leave the camera often, but unlike Annette that will come back with 2-3 creatures, she can come back way faster with 2-3 mines that will easily hit you). If you notice that's the case, specially if running fast activation trap, just deactivate that camera.
Remember she wants you to stand in one place, so try to keep some movement here and there even when shooting her camera. Using your personal can be as dangerous as Martin's, because both of them locks the survivor under animation. So BE EXTRA CAREFUL.
Also, when moving, LOOK WHERE YOU STEP. There are gonna be traps all over the place and you don't wanna rush so much you get caught in all of them.
If you're too slow, you're gonna give her time to trap you, but if you're too fast you'll fall on avoidable mines. So you'll need to set up a pace to proceed.
When using energy disruption it's likely that she'll go Daniel, but again, she's not strong. On the other hand, those zombies are probably very infectious and you don't wanna be hit by them anyway, so the advice is still the same as ever.
If she tries to play Annette, Daniel or Nicholai she'll be particularly weak, but a good Alex will use guns, creatures and possession along her traps to force you on doing what she wants. Just keep that in mind.
Bring some molotvs and grenades to destroy stacked traps on your way and PLEASE bring a torch to save anyone being devoured.

The cards she unlocks for everyone are:

- TOUGH ZOMBIE - INFECTIOUS, level 7.
- IMMOBILIZING ROUNDS, level 13.
- EFFICIENCY MOD: TRAPS, level 19.
- ENERGY BOOSTER: TRAPS, level 25.
Mastermind: Spencer
One of the founders of Umbrella, Spencer seeks a way of turning into a deity. He's afraid of his own mortality and so he wants time, he needs time, and that's the way his gameplay develops. Spencer is a time staller mastermind: he makes things slower for you and faster for him.
I think the best way to describe him, when it comes to cards, is mediocrity. He can spam creatures as Annette, but never as strong. He can spam many traps as Alex, but they're also not as resistant or fast. And he can use as many weapons as Nicholai, but not so diverse and powerful.
But the key in his gameplay it's not the power of his cards, but the quantity he can use in a short ammount of time and how he delays all of your actions. He will not overpower you in strength, but in the ammount of hazards. That's actually what makes him - besides Nicholai - the only mastermind fitted to a weapon deck.
This old rich man can spend so much he doesn't really care about the prices and he IS greedy, so he'll have some real high cost cards in his deck. He's also the only mastermind that doesn't really ever gets out of camera: he'll be there watching you. His bioweapon is the desintegration field (D. Field if you're nasty), a laser wall that will inflict 400 damage each time even a single hair touches it. It also absorbs bullets, so don't even bother shooting whatever is behind it.
The desintegration field works both as a trap and as a way to buy time for spencer, protecting whatever creatures, traps or devices that are behind it. It stays around for 10 seconds once he releases it, and take around 1-2 seconds to completely be set on screen, that is the time you have to run away from it if he's placing it right over you. Yellow herbs and Tyrone's buff reduce its damage, so you can risk passing through if low on time. But only if you're really low on time and remember you HAVE to cross it. If you get stuck in it for whatever reason, you WILL fall. So just don't go recklessly.


Spencer first skill, GENERATOR, decreases the cooldown for the D. Field each time he uses a skill card. If he spams things right, you can see that wall every 2 minutes. Spencer likes to use this wall when you're under animation, deactivating cameras, or if Martin is desarming traps. So beware. Those leg traps and immobilizing rounds are perfect for that too. He can also set it when you're reviving a teammate out of a safe area and with the cameras on (you're playing with Jan, the cameras must be off before reviving a teammate).
At level 24 he unlocks CLONE. This lets him unleash 2 walls at once at double duration (20 seconds). But that's it and you'll see it twice if you're fast, or 3 times at most.


Spencer's first passive is UMBRELLA TECH. This one is meant to slow you down.
The first variant, DEFENSE SYSTEM, messes with the key elements of each area. At area 1 many false keys will appear to confuse the survivors, specially newcomers. At area 2, the security devices will take doubled time to deactivate. And at area 3 those biocore will have way more health. I don't know if it doubles the health, but I know it will make it super resistant.
The second variant, DEADBOLT (unlocked at level 4), makes doors instantly locked at max level whenever you lock them or when a survivor fall on a lockdown trap. And, oh boy, those level 3 locked doors are frustrating. Also, whenever a card is used, the cooldown for everything E. I. S. is reduced by 1 second. So Spencer will be able to activate bridges, lifts, lock doors and everything more often. He'll use the environment to slow you down.


Next passive is BIOACTIVATION and this one is meant to speed Spencer up.
The first variation is RECHARGE: the one everybody knows and basically the only one everybody seem to care about. Whenever Spencer interacts with the environment, by closing a door or turning a light off, he gets 1 bioenergy point. I already explained how this works when discussed energy disruption, so you're probably familiar with it by now.
The second variation is SYMBIOSIS (unlocked at level 14). This one grants a discount of 1 whenever you use a card that is a different type from the previous one. This can be used to stack discounts and make everything cheaper for Spencer. A Licker can cost 5 with this and creature mod, but it gets worse, since the Licker can even cost 2 with his exclusive card (and mostly everything else cost 1).
The first variant makes Spencer powerful in areas 1 and 2, because he depends on the environment to earn energy. The second variant will power him up in area 3, when he can't produce energy, because it relies on discounts.


For area 2 his exclusives are:
a) Advanced OS Mod, which decreases E. I. S. cooldown as long as he holds more than 6 in bionergy;
b) Mod Recycler, which turns mod cards into energy (costs 1).
They're not really special, to say the truth.


For area 3 his exclusives are:

a) Hypercharge, which reduces all card costs in the activated camera by 3 for 15 seconds, by the cost of 2.
b) Overcharg Mod, which speeds up bioenergy recharge if he already has more than 6.

Spencer will be annoying because he will be able to use lots of cards, but you can never tell what kind of cards he'll use. Since he won't get off camera for long, he's the perfect victim for you. I'd say to proceed with caution specially in area 2, when you'll need to protect the cardkey holder and the devices will take forever to deactivate.

The cards he unlocks for everyone are:

- GENERATOR - SMALL, at level 7;
- BUFF - ENERGY LEECH, at level 13;
- HIGH CALIBER RIFLE, at level 19;
- SHUFFLE MOD - PARTIAL, at level 25.
Mastermind: Nicholai
And the last section is here. I think Nicholai's strategy is pretty straightforward: he is a mercenary and will pursue you with his guns. He is the REAL gun mastermind and those shots can be deadly. He's being paid for this job and I wish we could buy him back using those Umbrella credits (here, take them all, just let me go hahaha). His bioweapon is Nemesis.
Nemesis can be deadly with those punches. Unlike Mr. X., there's almost no run for escaping his punches. He's also the fastest thing in this game. If he wants you, he WILL get to you. He can also attack you with his tentacles, every 10 seconds or so, but you're ok as long as you're not standing still. You don't wanna be hit by that rocker launcher. It will kill everyone in full health but Tyrone and Samuel. I don't remember if I said this earlier, but if your teammates are not close to the exit door when Nemesis arrives, you don't wanna be there too, since you're gonna be an easy target and probably killed in seconds. The bright side is: Nemesis is easily stunned with molotovs, stun grenades, Sam's punches, Tyrone's kick, Jill or Becca's rocket launcher, Martin's flame mine or flash baton (more possibilites than Yateveo). But he can also stun you when he shrieks. Also, his stuns are of short term.
When he's using his rocket launcher, he's unable to move, so you can get behind him for protection, as long as you're in an open area. If not, the rocker will hit you anyway.


For his skills, he can be RELENTLESS, in which Nemesis' appearance gets closer and closer each time you're tracked or down. Also, when you're tracked, you take 20% more damage. It's like the reverse of Valerie's survival instinct. Besides, enemies will favor tracked survivors to attack. At level 24 he unlocks S. T. A. R. S., in which everyone get tracked while Nemesis is around. Besides, Nemesis is able to super run almost all the time. But that's it.


The first passive is PREDATOR. It's all about tracking.
The first variant are the TRACKING ROUNDS. Whenever you take a shot, you're tracked. Then you know the next one is even deadlier and Nemesis can be one moment closer to arrive.
The second variant is BLOOD TRAIL (unlocked at level 4). As long as you're in caution status or below, you're tracked. So with this it doesn't matter the source of the damage: as long as you're hurt, you're gonna take even more damage and may call for Nemesis even faster. There's nothing much to say about this passive, I think it's pretty simple.


The second passive is FIREARMS SPECIALIST. Just like Annette and Alex work, the first passive is FIREARMS EFFICIENCY, which grants a discount of 1 to every firearm card in the deck. At level 19 he unlocks a mod of the same name, which can be used to stack a discount of 2.
At level 14 Nicholai gets MAG EXPANSION. This increases ammo and the duration the firearms can be used (and they're already deadly in his hands). If equipped with Extended Magazine or Enhanced Frame, he can double the rounds of every firearm he has, even the immobilizing rounds and the air cannon.
With this a single turret rifle can hold up to 12 rounds and high caliber can hold 8. I don't think he would equip both the Ext. Mag. and Enhanced Frame, since the camera probably won't be there to give all those shots and he needs other equipments, specially to protect the camera, if he wanna keep on shooting.


For area 2, his exclusives are:

a) RADAR PULSE, that just tracks everyone without other consequences (besides Nemmy coming faster);
b) TURRET - HIGH CALIBER RIFLE, for the cost of 6, unlocked at level 9.
If Nicholai is really just relying on guns, the turrets will be deadly. On the other hand, having everyone always tracked open way to diverse strategies.


For area 3, his exclusives are:

a) REINFORCED LEG TRAP, for the cost of 4. It's a problem if you fall on it, but if you're careful it's not a major problem at all;
b) TURRET - MACHINE GUN, costing 6, unlocked at level 19.

The machine gun isn't as menacing as the high caliber rifle, because the shots are not so strong. Since it's only at area 3 and most of them don't really have a layout so favorable to turrets, they can mostly be taken down without further ado in camera decks. They are more deadly when combined with creatures, so you should proceed with caution in these cases.
As Jan, guns shouldn't be a big problem for you. With some help of your teammates you should be doing fine.
For Nicholai my advice is just to follow what's been said so far.

The cards he unlocks for everyone are:

- RED QUEEN MOD, at level 7 (which doubles E. I. S. activation speed);
- AIR CANNON, at level 13;
- EFFICIENCY MOD - FIREARMS, at level 19;
- ENERGY BOOSTER - FIREARMS, at level 25.

I wish you the best in your games. Hope I helped you figuring your Jan out and remember to try your builds in the practice mode prior to matches, just to check it out.
There's no perfect formula for winning. You will need teamwork, besides carefully managing your resources. Try to be versatile, because you never know what's coming ahead.
And thank you for reading!
2 Comments
Viewbob 26 May, 2020 @ 2:04pm 
now we just need a sam guide, alex guide and perhaps a rank 1 mastermind guide
DJ 26 May, 2020 @ 3:03am 
I play mostly Jan and I gotta say this is a very well done guide! A lot of the stuff you say about Jan are stuff I can relate too as well and some things I didn't even know (like EMP does nothing to camera with a shield on).

I'm not even done reading but you really have a vast knowledge of Jan's capabilities. I can't imagine how long this took to organize but its very top notch!