Forgotton Anne

Forgotton Anne

31 ratings
Forgotton Anne - Tarot Card Guide
By Kelrycor
You want to be a true Master or a true Caretaker? Or you want all 4 tarot cards and still missing some particular cards?
Then this guide is absolutely what you are looking for! It will walk you through all the decisions in the game step by step.
3
   
Award
Favorite
Favorited
Unfavorite
Preamble
You can earn 4 different tarot cards according to the choices you make during your walkthrough. You can do so by playing through the game less than 3 times with the same game file after you unlocked the (Ether) Bridge with your first playthrough.

There is no special reward in collecting all of them in one game save file beside that all tarot cards will be displayed in the Bridge. That is why it is only interesting for completionists like me who just love to collect for even cosmetic reasons, or to see some different and interesting story developments on your journey based on new decisions and surviving characters. The finale and the endings however are not differing in any way.

But since some people are confused how to earn the different tarot cards, I decided to write this little guide to make things clear and show them how to get them for sure.

                                BE AWARE THAT THIS GUIDE WILL SPOIL YOU IN A SERIOUS WAY.                                      

I recommend to play the first time on your own and let you heart decide to see which outcome you personally would have gotten if you were Anne.

Though I will mention a lot about achievements, this is neither a complete walkthrough, nor a complete guide for achievements. It is focused on getting the tarot cards and the in-game decisions leading to them.

If you find any mistakes, or you have a constructive addition, please let me know.

Thank you.
The Four Tarot Cards

Caretaker (extremely good karma)

The Caretaker strives to treat everyone equally and peacefully. Rarely seeking to influence the world, the Caretaker observes life as it unfolds.


.


Rebel (predominant good karma)

The Rebel is idealistic and committed, force is never a solution. The Rebel acts in order to further understanding.


Enforcer (predominant bad karma)

The Enforcer is strong-willed and relentless. Keeping up the stated law, the Enforcer carries out almost any order without question.


Master (extremely bad karma)

The Master is clever and powerful. A natural leader, the Master has the courage not only to dream but also to carry out the dream, no matter the costs.


The tarot cards will be placed from left to right in chronological order you achieved them in the Bridge. The one earned first will always be displayed in the big frame.


Notice that we do not know how exactly the formula works with which the game judges over you at the end, but the developers confirmed that it is based on your general kindness to forgotlings, whether you rescued forgotlings or just distilled them recklessly, and of course which of the both endings you have chosen.

It seems there is a simple, yet hidden scoring system in the background which will determine which cards you will get by choosing one of the endings. Let’s just call it your "karma" then. Be aware, if you are too cruel or too good, you can end up earning only the "Master" or "Caretaker" tarot card with both endings. Also, it is possible to just earn "Rebel" and "Enforcer" tarot card if you played very irresolute. It is technically not possible to do a run in which you earn "Master" and "Caretaker" in the same run without going back a long way to the beginning over the chapter select in the Bridge.

You may vary some answers or decisions as some are obviously meaningless and don’t affect the karma at all or too much. But if you stick to my guide I can garantuee you the tarot cards you are aiming for as promised.

Don't feel bad about missing an achievement or memento. Remember that you can jump chapters after beating the game once, so collecting missed mementos and achievements afterwards is an easy thing to do. If you want a little help with that, I can recommend Kyzer’s guide
The Bridge Game Mechanics
The Bridge is an area you unlock once you beat the game. There you can watch all your collectibles, listen to the game music, and - most important - you get a chapter select by using the Ether Bridge portal.


If you're doing a whole re-run though, this Ether Bridge can be tricky. So a friendly reminder:

DO NOT use the portal if you currently do a whole re-run for a tarot cards on an existing game file. Always use the CONTINUE function in the main menu! Else you will reset not only your progress but also the choices you made on the whole re-run. This is because using the portal always generates a temporary timeline based on your very first playthrough. This is how game mechanics and the Bridge portal is working (see the manual next to the Bridge for details).

This is also the reason why the minimum to get all 4 tarot cards are 3 runs. 2 cards you can get on your first run because you can actually use the portal to directly re-choose the ending and obtain (hopefully) another card. Then you have to do a new run or go back a long way using the portal. If you now conclude this temporary timeline with your third tarot card, your game progress will automatically be reset during the credits to the former timeline - there is nothing you can do about it as you want the new tarot card to be saved to the file. So you are unfortunately not able to vary your temporary timeline in any way.

You can make actually backups of your progression. Either to prevent playing from the very beginning if you done a big mistake, or to temporarily need to „jump back“ via the portal to a chapter to quickly redo a missed Steam achievement. For the latter, make sure not to forget to restore your backup afterwards before you continue via the main menu again:
<Steam-folder>\userdata\<user-id>\542050\remote\forgottonanne-save.json

Still, I suggest not to mess around with the portal at all during a whole game replay.
Fast Way to the 4 Cards
The fastest way to collect all 4 tarot cards are doing about 2.2 playthroughs using the Ether Bridge three times.

1. I suggest to start off with the Caretaker tarot card and choose the good ending.

2. Use the Ether Bridge to jump back to the finale (or even to Tink and distill her) and choose the bad ending to get a minor bad karma hit for the Rebel tarot card (*)

3. Use the Ether Bridge again to jump back to the chapter with Tiphany, distill her and Tink and choose the bad ending to get a major bad karma hit for the Enforcer tarot card (*)

4. Use the Ether Bridge go back to chapter 1-1 and do the Master tarot card run by being extremely bossy and distill or leave behind any forgotling. Enjoy being the bad guy.

(*) Depending on how effective you were at your Cartetaker run, it might be necessary to get a little bit more back and do more bad things for step 2 and 3 to make sure you get a more heftier hit on your good karma to get the other cards.
(Good) Guide “Caretaker“ and “Rebel“
The basic idea for this tarot card is to be as kind to any forgotling as possible, neither you will distill anyone nor you leave any forgotling behind by instilling them (see hint for details). The Caretaker’s Realm is more important than anything else and you side with the rebel’s point of view. You most of the time will pick the choices on the right side of the dialogues.


You will get the tarot card “Caretaker“ (Cornerstone) or “Rebel“ (Ether Bridge) by choosing one of the two endings at the end.

Hint: With this “Caretaker“ playthrough you are able to unlock the Steam achievement “Pacifist“. Be aware that you will ruin the achievement as soon as you distilled any forgotling (except Fig during the story event) or you forgot to instill (revive) any forgotling on the way (except the walkie-talkie later on, instilling him will make things worse and it will count to your karma). If you play with a temporary timeline via the Bridge, I suggest you begin from chapter 1-1 to make sure you have an absolute clean start.
(Good) Chapter 1-1
Story event: Speaking with Master Bonku at the first mirror.
  • What should I do?

Story event: Dealing with Dilly (the red scarf).
    Hint: Anne gets judged by Bulb for this action, so I recommend to do it exactly this way.
  • What do you want?
  • Your story doesn’t make sense.
  • Action: Walk towards Dilly twice until he escapes (DO NOT distill him as the game proposes)

Optional event: Speaking with Pavil outside of the house on the right side.
  • That’s pointless work.
  • The rebels attacked.
(Good) Chapter 1-2
Story event: Speaking with Tiphany (the lamp) about the attack.
  • Don’t blame yourself.

Story event: Speaking with Master Bonku before getting the wings.
  • Tiphany did her best.
(Good) Chapter 1-3
Story event: Speaking with Wade (the shoe).
  • It’s beyond repair.
  • I can tell you.

Story event: Speaking with Struct (the teddy bear) about the workshop.
  • Sounds like a bad morning.
  • Action: Load the dispenser
  • Will you help me out?
  • Action: Fetch his CCU from the tower watch. It is back in the building where you got your wings on a desk (you will get the “Reluctant Helper” achievement)
  • Action: Speak with Struct a second time and give him the CCU.
  • Thank you.
(Good) Chapter 1-4
Story event: Speak with Secti (the spotlight) and Pax twice (the clock)
    Hint: Anne gets judged by Bulb and Tink for this action, so I recommend to do it exactly this way.
  • You’re lying.
  • Action: Begin to distill Pax but stop when the Arca tank is 3/4 full. He will confess to be the mole. DO NOT distill him completely. (you will get the “Plot Thickens“ achievement).
(Good) Chapter 1-5
Optional event: Speak with Sull (the trunk).
  • Please open, sir.
  • Why not?

Optional event: Follow Quill (the pinfeather).
  • Why did you run?
  • Consider this a warning!

Story event: Speak with Melewe in front of the emergency brakes
  • I’ll handle this.
(Good) Chapter 1-6
Story event: Speak with Deputy Amp.
  • What’s the situation?

Optional event: Speak with Inspector Magnum first in the wagon.
  • Yes, I’m here.
  • Too many to count.

Story event: Speak with Inspector Magnum after finding the wig.
  • That‘s not important.

Story event: Speaking to Master Bonku on the mirror.
  • Any means?

Story event: Interrogate Heeltoe.
    Hint: Anne gets judged by Bulb for this action, so I recommend to do it exactly this way.
  • Let’s just talk.
  • Why are you doing this?
  • I know about Fig.
  • We also found a wig.
  • Fig is the leader!
  • You can confide in me.
  • How did you find the rebels?
  • I know this is hard for you.
  • Thank you.
(Good) Chapter 1-7
Optional event: Speak with Ed (the bookstall).
  • Is that a problem?

Optional event: Speak with Mrs. Hue (the camera) in the house far to the left at the top floor flat
  • Sorry for not visiting.
  • I’m sorry.
  • Action: Make a portrait. Reposition yourself 3 times until she makes the photo.
  • Action: Do speak to Mrs. Hue again before leaving.
Optional event: Speak with the Hound (the singing barrel) hidden in the canal.
  • Be careful.

Story event: Fight between Mop and Right (a shoe which has to install a mirror).
    Hint: Anne gets judged by Bulb and Tink for this action, so I recommend to do it exactly this way.
  • Shoe, no pointing fingers.
  • Take that Mirror down!
  • Action: Deplete the dispenser of the Mirror to shut it down for good.

Optional event: Speak to Carmellia (the rocking horse) in front of the haunted house (with the lights on the windows) by using the lever to form a path.
  • Action: Show “magic“. Turn off the lights with your Arca completely (Carmellia will react).
  • Action: Turn on just the right lamp (Carmellia will react also).
  • Action: Now, show her using your wings by jumping to the right balcony (she will react).
(Good) Chapter 1-8
Story event: Speaking with Stan Haw (the radio) in the theater.
  • No.
  • I want to see… (doesn’t matter which choice you make)
  • I feel free.

Reaching the telephone boot, you have to solve a small riddle. I can give you hints for those in need:
  • Hint 1: The code is the plays name – look in your diary.
  • Hint 2: It is “Othello“. Translate to numbers (simple way, not like on old cell phones).
  • Solution: The code is 6843556.

Story event: Speaking with Malone (the refrigerator and bartender).
  • Don’t worry.

Important advice before roam around in the bar:
    There are two solutions here, one non-violent sneaky way and the other to start a barfight. Since Anne gets judged by Bulb for this action later on, I recommend to NOT start a barfight. For this we will leave Sonny and Pam (the two televisions) alone and focus on Sidereus (the telescope) and the cinema area. DO NOT shut off the projector in the cinema.

Optional event: Earl, Pot, Willy and Shackle playing card with illegal anima on the left side of the bar.
  • Action: DO NOT drain the anima from the dispenser. Else they get into a fight. Just leave them alone. They won’t speak with you either way.

Story event: Sidereus (the telescope) on the right side of the bar.
  • Who?
  • Action: Go to the bartender Malone.
  • He makes you think.
  • Give yourself a chance.
  • Action: Speak with Sidereus again and get your information.
  • Action: Go to the far left to the cinema, wing-jump to the ladder to sneak in.
(Good) Chapter 2-1
Story event: Speaking to Fig (the rebel leader) after the chase on the roofs.
  • Stop calling me that!

    Hint: Shortly after Fig is asking you how many lives you have claimed to reach here, Anne should answer “Not a single one! Not one!“ if you followed this guide. This is a good check being on the right path to the “Caretaker“ tarot card and the “Pacifist“ achievement.
(Good) Chapter 2-3
Story event: After Bulb and the rebels caught you they will judge you based on your former actions.
  • What are you doing?
  • You don’t know what you are doing!
  • Stop talking!

Optional event: Speak to Joust (the helmet), he is the doorman to the left.
  • Never mind.

Story event: Speak to Jinx (the doll) while on you way to the crystal room on the right.
  • I’m fine, don’t worry.
  • Spoken like a rebel.

Story event: Speak with Quill in the storage room on the left bottom side.
  • Bulb will know it’s me.
  • (Nod) Yes.
  • (Shake) No.
  • (Wave) Get attention.
  • (Nod) Yes.

Story event: Keeping Bulb busy while Fig is stealing the Arca.
    Although I am quite sure that the answers do not affect your karma but stick to the basic idea give Bulb correct answers regarding their plans and the Arca.
  • (Nod) Yes.
  • (Shake) No.
  • (Nod) Yes.
  • (Nod) Yes.
  • (Nod) Yes.
  • (Nod) Yes.
  • (Nod) Yes.
  • Action: Go upstairs and wave, after that do the same on the left side of the lower level to lure Bulb as far away as possible from the Arca and Fig.

Story event: Speak to Joust (the helmet) to the left while trying to escape.
  • (Nod) Yes.
  • (Wave) Get attention.
  • (Wave) Urge attention.
(Good) Chapter 2-4
Story event: After Fig return the Arca to you.
  • Where were you?

Story event: Report back to Master Bonku over the mirror.
    This one is difficult. But just try to lie to Bonku.
  • I’ve almost caught Fig!
  • I’m not hiding anything.

Story event: Speak with Fig about the power shortage.
  • You’re right, I’m sorry.
  • Let’s just get going.
  • Action: Ride the service car (you can get the “Rythmic” achievement here)
  • I’m a forgotling.
(Good) Chapter 2-5
Story event: Speaking with Rini (the stethoscope).
  • Is that the truth, Fig?

Story event: Speak with Master Bonku in front of the furnace.
    In this conversation Anne will also confirm she didn’t distilled anyone if you done everything according to the guide until now.
  • How could you?
  • It’s too late!
  • Action: DO NOT trigger the button at the right side which activates the depleter. Hitting accidentally a container will be bad for the karma and will void the “Pacifist“ achievement. Directly use the elevators (left and right side) to reach the other levels and shut down the machine from there.
(Good) Chapter 2-6
Story event: Speaking to the Caretaker in the forest.
    It doesn’t really matter which choices you make in this conversation. Choose as you wish.
  • Where am I?
  • I don’t understand.

Story event: After finding out about your past.
  • Sorrow
  • I want to me my mother.
(Good) Chapter 2-8
    Special hint: In this chapter you have to instill EVERY single forgotling. There are 8 in total (excluding Fig). Make sure you don't forget anyone before leaving the area forgood. Instilling all will also unlock the “Alma Mater“ achievement.

Story event: Speaking with Fig after reviving him.
  • I found a cave…
  • Let’s do it.
  • Action: Instill Third (a pioneer’s assistant) outside, right on top of the stairs.
  • Action: Instill Vinyl (a gramophone) on the lower levels where you came from.
  • Action: Instill Umbre (an umbrella) on the lower levels further on.
  • Action: Instill Jinx (the doll) on the lowest level near the boat.

Story event: On your way to the left sewer side, conversation with Fig.
  • Of course.
  • Tell me more.
  • Action: Instill Pinhit (bowling ball) inside of Bulb‘s house.
  • Action: Instill Playful (clothespin) in front of the crystal near Joust.
  • Action: Instill Joust (the helmet) to the left.
  • Action: Instill Broom downstairs in front of the room where you got disguised.

Story event: Conversation with Fig and Bulb about the plans if you go past Joust (the helmet).
  • Crate Boxton can’t be trusted.

Story event: Before sleeping, speak with blanket.
  • Tell me about the Ether.
  • (To Fig) No.
(Good) Chapter 3-1
Story event: After getting caged in and Norman distilled the Walkie-Talkie.
  • I could revive him…
  • I won’t revive him, then.
  • Action: And DO NOT instill the walkie-talkie (if you do he will kill Norman instead resulting in bad karma and voiding the chance to get the "Pacifist" achievement).
(Good) Chapter 3-2
Story event: Distilling Fig for the act for Inspector Magnum.
    I am quite sure it doesn’t matter how you choose here. Feel free to take whatever you like. Just don’t miss the achievement.
  • I finally have you, Mr. Fig!
  • Yes, I was indeed undercover!
  • Be quiet now!
  • Wait: At the end of Fig’s monologue you get the “Hidden Thespian“ achievement.
  • Action: Distill Fig finally (this one will not affect the karma nor the achievement)
(Good) Chapter 3-3
Story event: Speaking with Magnum on the observation deck and acting the rebel attack.
  • It was a team effort.
  • Action: Blow the lights with the Arca in the middle of the wagon.
  • You, Magnum.
  • Action: Trap Amp and Magnum, then instill Fig.
  • (To Fig) I‘m so sorry, Fig.
  • (To Magnum) I saw no rebels.
(Good) Chapter 3-4
Story event: After arriving at the station and meeting Secti (again).
    Though it doesn’t matter who you turn in, still the best for the rebels is to get rid of Magnum.
  • Magnum wants the Arca!
(Good) Chapter 3-5
Story event: Speaking with Tiphany behind the locked gate.
    Hint: Anne gets judged by Tink for this action, so I recommend to do it exactly this way.
  • I’m on your side.
  • I’m sorry, Tiphany.
  • Action: Drain anima from the dispensers next to the lever before you leave.

Special hint: Looking for Pavil on the scaffolding to the far right will confirm that he quit his job for good after your advice.
(Good) Chapter 3-7
Story event: Speaking with Tink (“the thing“ in the tower, your former alarm clock).
    If you match your answers with your previous actions on your journey (I marked the answers), you are able to avoid distilling Tink. At the time being, if you followed my decisions closely, we are so deep into the “Caretaker“ tarot card‘s karma points that we will end up getting this card regardless of the ending we will choose. That is why we have to distill Tink to get the choice of either to obtain the “Caretaker“ or “Rebel“ tarot card at the end - but you’ll miss two achievements. I suggest you first rescue Tink, and as soon as the achievements unlocks, you leave directly mid-sequence to the main menu and continue from the last checkpoint. Redo and distill Tink this time.
  • What have you become?
  • (Match) Never give up on anyone.
  • The truth always triumphs.
  • (Match) No, there must be another way.
  • I am Anne the rebel.
  • I want to understand you.
  • (Match) I help those in need.
  • No.
    First time, if you need the achievements, do:
  • (Rescue Tink) Yes, I would. (wait for “Pacifist“ and “Empathic“ achievements to pop up, leave immediately to the menu and continue from last checkpoint)
    Second time, recommended for being able to get also the “Rebel“ tarot card, play on with this option:
  • (Distill Tink). No, never.
  • Action: Distill Tink after you opened her cover.
(Good) Chapter 3-8 Showdown
Story event: Decide whether to use the Ether Bridge to return home or complete the Cornerstone to rescue the Realm.
  • Action: Go to the Ether Bridge and activate it.
  • (“Rebel“ tarot card) I want to go home!
    or
  • Action: Go to the Cornerstone and complete it with the Arca stones.
  • (“Caretaker“ tarot card) I’m ready.
(Bad) Guide “Master“ and “Enforcer“
The basic idea for this tarot card is to be as ignorant and bossy to any forgotling as possible. You are the Enforcer, and everyone has to obey. You will distill any forgotling who poses a threat to your cause and you won’t instill (revive) forgotlings at all (except Fig). You will fulfill Bonku’s will by any means necessary and will fight the rebels wherever possible in the first half of the game (the second half is a bit more complicated). You will most of the time pick the choices on the left side of the dialogues.


You will get the tarot card “Master“ (Ether Bridge) or “Enforcer“ (Cornerstone) by choosing one of the two endings at the end.
(Bad) Chapter 1-1
Story event: Speaking with Master Bonku at the first mirror.
  • I’ll defend us.

Story event: Dealing with Dilly (the red scarf).
    Hint: Anne gets judged by Bulb for this action, so I recommend to do it exactly this way.
  • You’re lying.
  • Do you think I’m stupid?
  • Action: Distill Dilly

Optional event: Speaking with Pavil outside of the house on the right side.
  • Keep it up.
  • None of your business.
(Bad) Chapter 1-2
Story event: Speaking with Tiphany (the lamp) about the attack.
  • Be more responsible.

Story event: Speaking with Master Bonku before getting the wings.
  • Tiphany let them in.
(Bad) Chapter 1-3
Story event: Speaking with Wade (the shoe).
  • Kicking it won’t help.
  • I don’t have time for this!

Story event: Speaking with Struct (the teddy bear) about the workshop.
  • Focus on what’s relevant!
  • Action: Load the dispenser
  • I don’t have time for this.
  • Action: Speak with Struct a second time
  • Action: DO NOT fetch his CCU from the tower watch (you will miss the “Reluctant Helper” achievement)
(Bad) Chapter 1-4
Story event: Speak with Secti (the spotlight) and Pax (the clock).
    Hint: Anne gets judged by Bulb and Tink for this action, so I recommend to do it exactly this way. You also will be able to enjoy a scene in which Magnum fights Pax later on.
  • Action: Distill the innocent Secti (you will miss the “Plot Thickens” achievement)
(Bad) Chapter 1-5
Optional event: Speak with Sull (the trunk).
  • Open up, now!
  • What?

Optional event: Follow Quill (the pinfeather).
  • Show me your papers.
  • You’re going to the plant.

Story event: Speak with Melewe in front of the emergency brakes.
  • Useless forgotling!
(Bad) Chapter 1-6
Story event: Speak with Deputy Amp.
  • Where is the rebel train?

Optional event: Speak with Inspector Magnum first in the wagon.
  • What’s the status?
  • Status report, now!

Story event: Speak with Inspector Magnum after finding the wig.
  • Yes, the deputy missed it.

Story event: Speaking to Master Bonku on the mirror.
  • I understand.

Story event: Interrogate Heeltoe.
    Hint: Anne gets judged by Bulb for this action, so I recommend to do it exactly this way.
  • You should!
  • If you don’t talk…
  • I know about Fig.
  • We also found a wig.
  • Fig is the leader!
  • I can protect you.
  • You’ve been there, liar!
  • Action: Go out and speak to Inspector Magnum, tell him “yes“ and he will shoot Heeltoe (this will earn you the “Good Cop, Bad Cop” achievement as well)
(Bad) Chapter 1-7
Optional event: Speak with Ed (the bookstall).
  • As he should.

Optional event: Speak with Mrs. Hue (the camera) in the house far to the left at the top floor flat.
  • It’s because of the rebels.
  • It happens.
  • Action: Don’t make a portrait, just leave Mrs. Hue alone.

Optional event: Speak the Hound (the singing barrel) hidden in the canal.
  • You’re ill?

Optional event: Carmellia (the rocking horse) you can find to the upper left of Hound.
  • Action: DO NOT interact with anything near her as she likes to see you “use magic“! The “haunted house“ in the background is reachable by going around through the security checkpoint to the right. So just let her be.

Story event: Fight between Mop and Right (a shoe which has to install a mirror).
    Hint: Anne gets judged by Bulb and Tink for this action, so I recommend to do it exactly this way.
  • Mop, stop talking!
  • Yes, we need this right now.
  • Action: Distill Mop.
(Bad) Chapter 1-8
Story event: Speaking with Stan Haw (the radio) in the theater.
  • Yes.
  • I want to see… (doesn’t matter which choice you make)
  • I exude power.

Reaching the telephone boot, you have to solve a small riddle. I can give you hints for those in need:
  • Hint 1: The code is the plays name – look at your diary.
  • Hint 2: It is “Othello“. Translate to numbers (simple way, not like on a mobile).
  • Solution: The code is 6843556.

Story event: Speaking with Malone (the refrigerator and bartender).
  • I have the Arca.

Important advice before you roam around in the bar:
    There are two solutions here, one non-violent sneaky way and the other to start a barfight. Since Anne gets judged by Bulb for this action later on, I recommend to ACTUALLY start a barfight this time. For this we will use Sonny and Pam (the televisions) and leave the cinema area alone.

Optional event: Earl, Pot, Willy and Shackle playing card with illegal anima on the left side of the bar.
  • Action: Speak to them twice.
  • Action: Empty your Arca, drain the illegal anima from the dispenser on the skateboard.
  • Action: Take the memento.

Optional event: Sidereus (the telescope) on the right side of the bar.
  • Where is Fig?
  • Action: Go to the bartender Malone.
  • I understand.
  • Stick to what you know.
  • Action: Speak with Sidereus again and get your information.

Story event: Speak to Sonny and Pam (the televisions on the bottom floor).
    Hint: Anne gets judged by Bulb for this action, so I recommend to do it exactly this way.
  • Action: Activate the lever once.
  • Action: Go up to the cinema room and divert the anima flow. Leave the cinema shut off.
  • Action: Go to Sonny and Pam (now on the same level) and use your Arca three times on the anima bong to start a barfight.
(Bad) Chapter 2-1
Story event: Speaking to Fig (the rebel leader) after the chase on the roofs.
  • I’ll catch you!
(Bad) Chapter 2-3
Story event: After Bulb and the rebels caught you they will judge you based on your former actions.
  • I’ll speak for myself!
  • Everyone wants to go home.
  • He broke into my home!
  • I had to!
  • I am not a victim!

Optional event: Speak to Joust (the helmet), he is the doorman to the left.
  • The Enforcer.

Story event: Speak to Jinx (the doll) while on you way to the crystal room on the right.
  • You’re right, I am not fine.
  • Labels help organize.

Story event: Speak with Quill in the storage room on the left bottom side.
  • The plan is stupid!
  • (Nod) Yes.
  • (Shake) No.
  • (Wave) Get attention.
  • (Nod) Yes.

Story event: Keeping Bulb busy while Fig is stealing the Arca.
    Although I am quite sure that the answers do not affect your karma, still stick to the basic idea to give false information to Bulb to force him to give up the plan and is misled regarding the Arca.
  • (Shake) No.
  • (Nod) Yes.
  • (Nod) Yes.
  • (Shake) No.
  • (Nod) Yes.
  • (Shake) No.
  • Action: Go upstairs and wave, after that do the same on the left side of the lower level to lure Bulb as far away as possible from the Arca and Fig.

Story event: Speak to Joust (the helmet) to the left while trying to escape.
  • (Shake) No.
  • (Nod) Yes.
  • (Nod) (Yes.
  • (Nod) Yes.
(Bad) Chapter 2-4
Story event: After Fig return the Arca to you.
  • I should distill you!

Story event: Report back to Master Bonku over the mirror.
  • This one is difficult. But just don’t lie to Bonku.
  • I can’t come home now.
  • I can’t tell you.
  • I’ll come home.

Story event: Speak with Fig about the power shortage.
  • That’s hard to believe!
  • I’m not buying that.
  • Action: Ride the service car (you can get the “Rythmic” achievement here)
  • What do you mean?
(Bad) Chapter 2-5
Story event: Speaking with Rini (the stethoscope).
  • Fig, what else are you hiding?

Story event: Speak with Master Bonku in front of the furnace.
  • I don’t understand.
  • I miss you too.
  • Action: Do at least distill 4 containers of forgotlings with the machine before you continue to shut it off.
(Bad) Chapter 2-6
Story event: Speaking to the Caretaker in the forest.
  • It doesn’t really matter which choices you make in this conversation. Choose as you wish.
  • Who are you?
  • Where are you?

Story event: After finding out about your past.
  • Anger
  • Bonku is my family.
(Bad) Chapter 2-8
Story event: After reviving Fig.
  • Long story short…
  • Get lost!
  • Action: DO NOT instill any of the other dead forgotlings in this chapter!

Story event: On your way to the left sewer side, conversation with Fig.
  • Not right now.

Story event: Conversation with Fig and Bulb about the plans.
  • I was Crate Boxton.

Story event: Before sleeping, speak with blanket.
  • Never mind.
  • (To Fig) Yes.
(Bad) Chapter 3-1
Story event: After getting caged in and Norman distilled the Walkie-Talkie.
  • Action: Distill Norman to get free. DO NOT instill any forgotling in this chapter.
(Bad) Chapter 3-2
Story event: Distilling Fig for the act for Inspector Magnum.
    I am quite sure it doesn’t matter how you choose here. Feel free to take whatever you like. Just don’t miss the achievement.
  • Mr. Fig, prepare to be distilled!
  • This is the end for you, Mr. Fig!
  • Indeed, you have!
  • Wait: At the end of Fig’s monologue you get the “Hidden Thespian“ achievement.
  • Action: Distill Fig finally.
(Bad) Chapter 3-3
Story event: Speaking with Magnum on the observation deck and acting the rebel attack.
  • Yes, I am cunning.
  • Action: Blow the light with the Arca in the middle of the wagon.
  • Let Amp do it.
  • Action: Trap Amp and Magnum, then instill Fig.
  • (To Fig) I can distill you again.
  • (To Magnum) I saw no rebels.
(Bad) Chapter 3-4
Story event: Meeting the station master Pax.
  • Yes.
  • Be very careful, Pax…
  • Stand down, Magnum!
(Bad) Chapter 3-5
Story event: Speaking with Tiphany behind the locked gate.
    Hint: Anne gets judged by Tink for this action, so I recommend to do it exactly this way.
  • I’m on the rebel’s side.
  • Action: Distill Tiphany. DO NOT instill her afterwards.

Optional event: Speaking with Pavil on the scaffolding again.
  • Keep up the good work.

Story event: Finding Dilly (the red scarf).
  • Action: DO NOT instill him.
(Bad) Chapter 3-7
Story event: Speaking with Tink (“the thing“ in the tower, your former alarm clock).
    If you match your answers with your previous actions on your journey (I marked the answers), you are able to avoid distilling Tink. At the time being, if you followed my decisions closely, we are so deep into the “Master“ tarot card‘s karma points that we will end up getting this card regardless of the ending we will choose. That is why we have to be a little bit nicer from this point on and save Tink to have the full option whether to obtain the “Master“ or “Enforcer“ tarot card at the end.
  • What have you become?
  • (Match) Right, don’t trust anyone.
  • The truth always triumphs.
  • (Match) Yes, I have to speak with Bonku!
  • I am Anne the rebel.
  • I want to understand you.
  • (Match) I haven’t been exemplary.
  • Yes.
  • (Rescue Tink) Yes, I would. (You should get the “Empathic“ achievement by now)
(Bad) Chapter 3-8 Showdown
Story event: Decide whether to use the Ether Bridge to return home or complete the Cornerstone to rescue the Realm.
  • Action: Go to the Ether Bridge and activate it.
  • (“Master“ tarot card) I want to go home!

    or
  • Action: Go to the Cornerstone and complete it with the Arca stones.
  • (“Enforcer“ tarot card) I’m ready.
17 Comments
Scone 9 Nov, 2022 @ 6:22pm 
It's pretty funny that taking the Ether Bridge can ever result in the 'Rebel' tarot card. Haha
Kelrycor  [author] 8 Jul, 2021 @ 5:02am 
You may do at least one mistake like distilling Dilly in the run. Though you ruined the Pacifist achievement for sure. But this had nothing to do that you instilled him later on. It does not make it up.

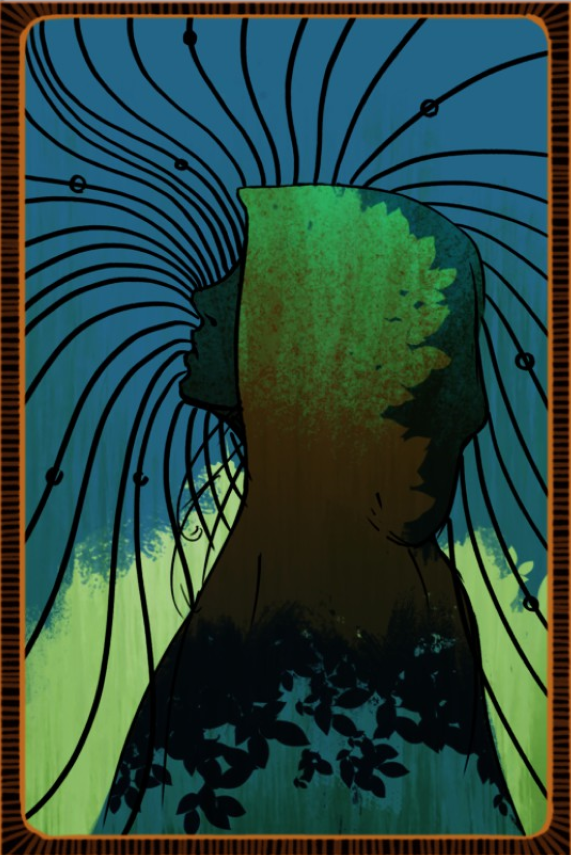
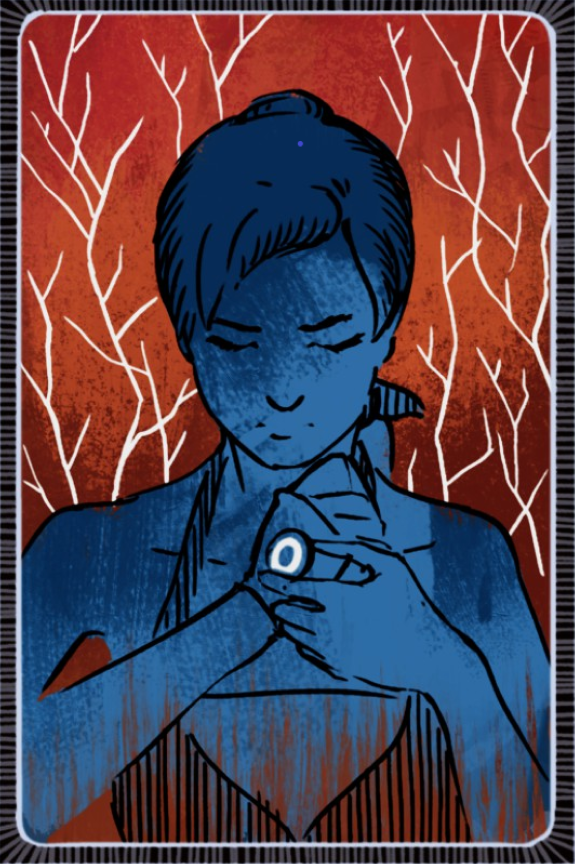
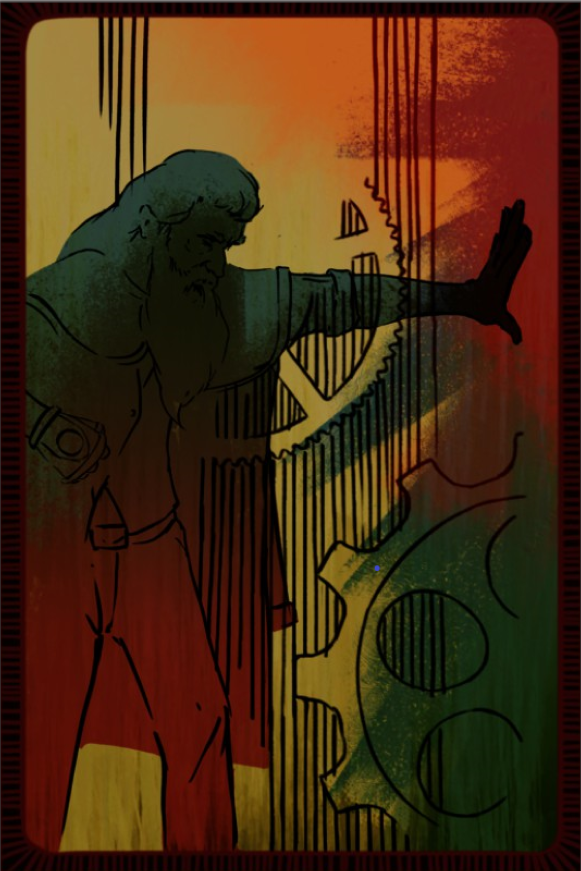
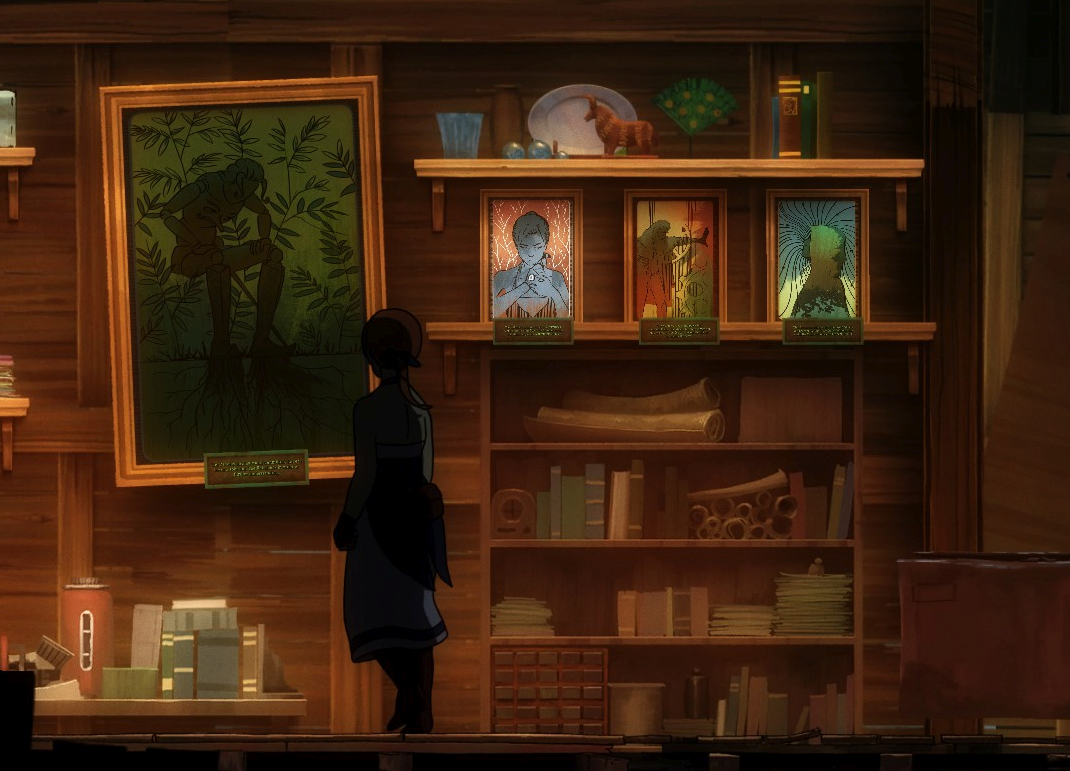
If you follow my guide you will gather so much good karma that you have to destill Tink in chapter 3-7 (like I suggested) to be possible to choose from both tarot cards in chapter 3-8. Else you would always get the Caretaker card.

Means you probably have to distill two forgottlings to void your chance to get the Caretaker card completely.
metro2mars 7 Jul, 2021 @ 4:52pm 
on my first run i distilled dilly but brought him back to life later on in the story and i still got caregiver hopefully this helps someone
Kelrycor  [author] 7 Jan, 2021 @ 10:05am 
I will try this out if this is suffient to reduce your karma down to Enforcer. Thanks for the heads up.
Aeri 6 Jan, 2021 @ 5:19pm 
i'm late but i guess a few things changed.

it's possible to get 3 cards from one run.

if you complete a perfect caretaker route you can use the ether bridge to jump to the time you return to the tower and meet tiphany. distill tiphany (i also told pavil to keep on scrubbing. not sure if this made a difference). next: distill tink. go through the bridge and enjoy your enforcer card.

next the rebel card: jump to the time you have to deal with tink. distill her and go through the bridge again. only difference here is that you let tiphany live. rebel card earned.

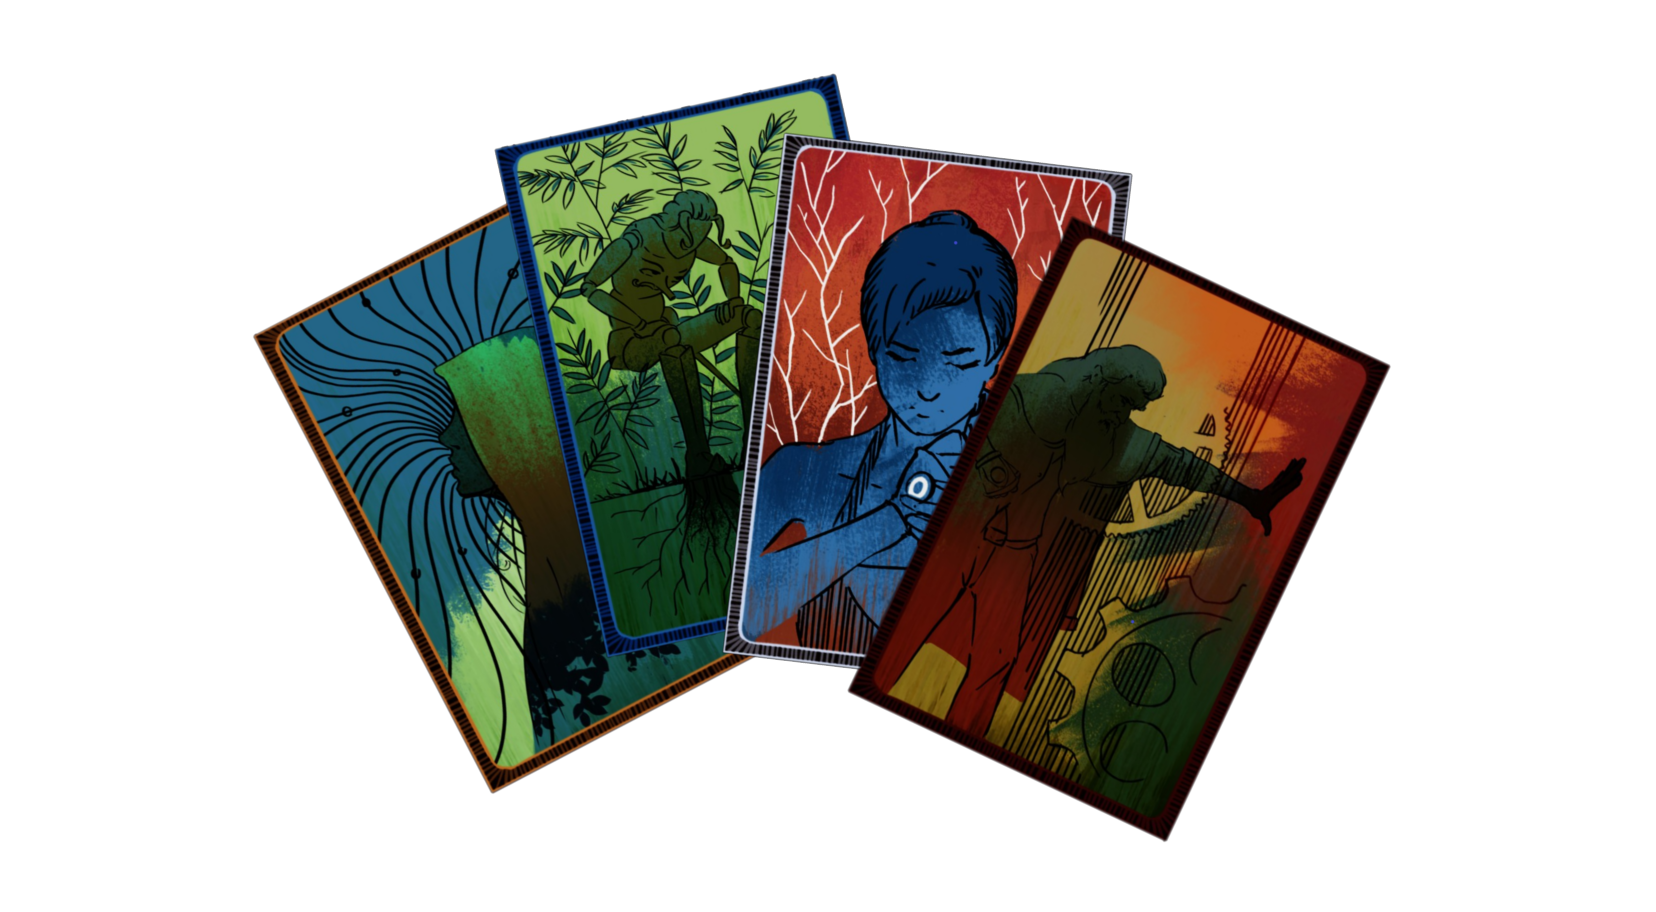
i guess the "master" card is self explanatory. just be the biggest douchebag.
Cubic John 21 Sep, 2020 @ 11:01am 
I see; it still seems strange to me, but I guess the 1-7 Grab was probably just there to foreshadow the importance of collecting as many mementos as possible. Thanks a lot for checking and letting me know!
Kelrycor  [author] 28 Aug, 2020 @ 6:11pm 
Never knew that there is a covered area to the right.

But yes, it is the very same for me. The Bridge Grab is reacting properly to your collection, the ingame Grab says that I seem not to be into collecting. I have all 4 tarot cards, mementos and diary entries (even the letter of my mother and the coin for the jukebox).

If you ask me, it is just broken. But I doubt you will gain anything special from him. He seems to be just an early version Grab before they placed the properly functional Grab into the Bridge.

Especially I don't see a point why you would get a fifth tarot card like a "collector" tarot card. I mean, the tarot cards are symbols of your reputation and attitude depending on your playstyle and behaviour towards the Forgottlings - a collector version does not really fit in into this mechanic. Plus there is no empty frame for another tarot card, and the developers never made a mystery out of it that they're there. So if you ask me, there is none.
Cubic John 28 Aug, 2020 @ 1:33pm 
He's to the right of the first communications mirror broadcasting the radio station, just before the area where you can meet The Hound. This is the only other place he appears besides The Bridge, to my knowledge. I should mention that I played the Switch version, though; so I suppose there's a chance that that's something they changed for that version, although I don't see why they would have. He asks to look at your collection, but for me he still says something like "Hm, maybe you're not really that much into collecting? Come back and see me when you've collected more stuff!", even though I've collected all mementos and his version in The Bridge is impressed by my collection.
Kelrycor  [author] 19 Aug, 2020 @ 12:17pm 
I could check it fo you, but I don't understand whee you have found Grab in chapter 1-7. You have to give me some hints to this where to look.
Cubic John 18 Aug, 2020 @ 8:08pm 
Has anyone tried talking to Grab in chapter 1-7 after collecting all Tarot Cards to see if he has any special reaction? I find it strange that his dialogue there is no different even after you've collected all mementos (unlike for his counterpart in The Bridge), and he's standing by a conspicuous empty picture frame that looks much like the ones in The Bridge, which makes me suspect there could be one final secret bonus tarot card for only the most obsessive of completionists. But I've only got three of the tarot cards, and I really don't feel like re-playing the whole game a third time just to collect the last one and check for myself. It's conceivable that you might also need to have collected all possible diary entries to get Grab's secret (if there is one); the easiest ones to miss might be the different variations for your return to the Tower station in chapter 3-4 based on who's in charge and what you do to them (I know there are two for Secti).