Dead by Daylight

Dead by Daylight

101 ratings
Balancing Ideas
By ShittyM1Killer
Throughout my experiences of Dead by Daylight, I've played Survivor and Killer equally. As of right now, Killers are in a worse predicament than Survivors. It seems that Killers can't win without "foul play" at high ranks or against survivors with "crutch perks". I've made this guide to give some ideas on how to balance this game; where killers are equally strong to survivors.

Killer perks would need to be changed (nerfed for the most part) if these buffs hypothetically happen. I have not addressed this issue in this guide since there's way too much to conclude.

I do not mind criticism at all. I don't care if you agree with 0% of this guide. I will not respond to trolls, sarcastic remarks, or other brain-dead people. The first thing you bring to a debate is evidence and if you can't provide enough to insult me then you're words are worth nothing. The more hatred I get, the more attention I get. Your words will die in the comments here and will never be heard, but mine are.
   
Award
Favorite
Favorited
Unfavorite
Objectives
Generators:
Generators are essential in deciding whether or not you escape. If you get cocky as survivors and don't do any objectives and just bully the killer, you're not going to escape if you're not doing the generators. If the killer plays exceptional in chases, but can't 'pressure' enough generators then all generators will be completed against an optimal team.

Generator Completion Rate:
1 Survivor - 80 seconds
2 Survivors - 44 seconds
3 Survivors - 35 seconds
4 Survivors - 28 seconds

There are many prerequisites that determine how long a chase would take. However, picture a basic loop with one pallet and you do not have Hex: Ruin. Each loop would take about 3 seconds per loop. Exceptional or experienced (optimal) survivors tend to run a killer around a basic loop until the Killer injures them. It would take a 115 (4.6 m/s) speed killer 15 seconds to gain Bloodlust. It would take an additional loop, an extra 3 seconds, to get the hit. This is 18 seconds on one loop alone. Suppose the survivor decides not to leave the loop. A very similar pattern will happen and about another 18 seconds later, the survivor goes down (that's if they don't get greedy or you don't respect the pallet which creates more time wasted). That's 36 seconds on one chase. That would mean if 3 survivors work on one generator than there are only 4 generators remaining. This means, 1/16th of your Objective is complete whereas 1/5th is completed for the survivors. If you're not good at math, that means:
Survivor Objective: 20% Complete
Killer Objective: 6% Complete

At this rate, there's no way of playing Killer without 'foul play' (i.e. slugging, camping, proxying, tunneling) which is almost necessary in high ranks.

The Inconsistency of Hex: Ruin:
If you are unaware, Hex: Ruin is a teachable Hag Perk.

Hex: Ruin Description[deadbydaylight.gamepedia.com]

This perk might be extremely reliable for lower ranks since they're less competent on hitting Great Skill Checks, but once you get to high ranks, optimal survivors can easily hit them (not EVERY time since we're humans and therefore not perfect). However, optimal survivors are consistent enough to hit Great Skill Checks (GSCs) more consistently.

I have taken the average of Hex: Ruin being active in my Killer matches, Survivor matches, my friend's matches (both as Killer and Survivor), and about 15 different streamers (both as Killer and Survivor). On average, it takes about 58 seconds for Hex: Ruin to be cleansed, 1-out-of-11 matches where I spawn within 20 meters of the totem, and 1-out-of-18 games where Hex: Ruin stands all game.

*This next is all theoretical:
If you stand still as Killer and if Hex: Ruin is cleansed within 58 seconds then if two survivors do one generator each then 3 generators will remain in the first 44 seconds and you'll only have 14 seconds left of Hex: Ruin.

I occasionally run Hex: Ruin on my killers, but not as much anymore due to the unfortunate results I've made.

How I'd Balance Generators:
At the 90 seconds of the game, survivors have a -15% penalty to doing generators. After the 90 seconds are over, survivors can work without the penalty.

Generator Completion Rate:
1 Survivor - ~90 seconds (approx.)
2 Survivors - 51 seconds
3 Survivors - 40 seconds
4 Survivors - 32 seconds

This 90 seconds is a very small portion of time of the match. On average, games last about 14 minutes which is 840 seconds. 90 seconds of 840 is only 10% of the match being under the effect of this penalty. The other 90% is normal generator speed.

If you go back to the previous scenario with the Survivor looping the Killer, where 3 survivors are on one generator then you have a 5-second gap to get a hit and create more pressure throughout the board. Whereas before, survivors are 5 seconds ahead of you. If survivors move at 3.8 m/s then if those survivors ran in a straight line then they are 19 meters away. Now with the 5-second gap, they might commit to the generator, but you'll at least get a free hit and chase them down. The other survivors will go heal the slug and now all survivors are accounted for and immobilized.
Maps
The BHVR Developers have announced that they're planning on fixing older maps to be more balanced. On November 25, 2019, the BHVR Devs have made a list of maps which Survivors had the highest chance of winning in and losing in:

November 2019 Statistics[forum.deadbydaylight.com]

Haddonfield:
In other words, this shows that Survivors have a 56.73% of escaping in Haddonfield meaning half die, whereas the other two escape or that Killers have a 56.73% of losing on Haddonfield. This map is easily abused with Balanced Landing and Lithe.

The map design is appealing to the eye, but disgusting when playing Killer. The only bright side for Killer on this map is the basement location which has several openings anyway.

I personally have not absurd troubles with the loops on this map, but the generator locations. This map has generator locations in weird spots, on platforms, on roofs where survivors can use Balanced Landing and escape. There's not much of a way of protecting generators efficiently unless if you're Freddy Krueger with Thrilling Tremors and Pop Goes The Weasel.

Fractured Cowshed:
I'm very surprised that Killers have a difficult time with winning on this match. There's only one infinite loop at the Barn and 4 'unmindgameable' pallets.

I'm surprised how other maps such as Blood Lodge or Thompson House have higher success rates as Killer than this map.

Rotten Fields:
This map is disgusting for smaller killers such as Freddy, Hag, or Legion. This is also a nightmare for Myers and Ghostface. Due to this map's immense size and far generator placement, killers struggle. Even killers with high mobility such as Freddy, Demogorgon, Nurse, and Hillbilly suffer on this map. This map consists of multiple Jungle Gyms into Killer Shack and you can't protect generators easily.

In my opinion, this is the worst map for killers.

How I'd Balance Maps:
There's a reason to why Hawkin's National Laboratory, The Game, and Lery's Treatment Theatre are have the highest success rates for killer.
Q. Why is that?
A. Because they're small.

These maps can have absurd loops and busted windows, but it doesn't matter since they're small. It's easy for killers to create pressure on generators since there's enough time to get to each one.

To make the maps balanced for survivors, increase the amount of loops and pallets.
To make the maps balanced for killers, decrease the size of the map.

Hawkin's National Laboratory has absurd loops yet killers have almost a 70% chance of winning on that map.

A good size for a balanced map would be:
Map ≤ 100sqT
or
Map ≤ 6,500m²

If the Devs want to make the games balanced for killers, a good start would be the map size.
Survive With Friends
Survive With Friends (SWF) is a way to play Dead by Daylight with your friends. SWF can have 2-4 people in a single group. It wouldn't make any sense playing with your friends without talking on Discord or some other platform so therefore this going to allow survivors to be on 'coms'. SWF on coms creates a highly organized and optimal team that is nearly impossible to win against even as Killers such as Spirit or Freddy with their best addons and best perks.

For the newer players, below I have listed several types of SWF groups. Each from worst-to-best.

SWF I "Boosted SWF Group": Unorganized survivors that barely understand the mechanics of the game. New players.
SWF II "Toxic SWF Group": Cocky survivors that are genuinely terrible that use perks and items to carry them. Understand Survivor only and extremely biased towards the Survivor side.
SWF III "Silent SWF Group": Semi-organized survivors that aren't using coms.
SWF IV "Casual SWF Group": Organized survivors that aren't playing to win, but are just playing to mess around and hopefully win.
SWF V "Optimal SWF Group": Extremely organized survivors that utilize every perk they have efficiently with other survivors. Understand both Killer and Survivor sides equally.
SWF VI "Tournament Level SWF Group": Arguably the best survivors in the world that understand every move you'll make. They rarely make mistakes and capitalize off of every mistake you make as Killer. Most Killers will very rarely go against these types of survivors.

Since SWF is extremely powerful against even the best killers, there should be a penalty to repair speeds, healing speeds, and sabotaging speeds. These penalties should be applied to the SWF players only and not to solo players or "randoms".

Values:
SWF Group (2 Survivors): -4% decrease to repair speeds, healing speeds, and sabotaging speeds.
SWF Group (3 Survivors): -6% decrease to repair speeds, healing speeds, and sabotaging speeds.
SWF Group (4 Survivors): -8% decrease to repair speeds, healing speeds, and sabotaging speeds.

In order for the game to understand whether or not the survivors are SWF, there should be UI showing the Killer post-game which survivors were in a SWF group. An easy way of adding this type of UI would be color-coding each survivor name.

There should be two colors: Red and Blue.
For example:
Detective Tapp, Quentin, Claudette, and Laurie all queue in the same lobby.
None of them are SWF; all of their names will remain White.

Kate, Jeff, Meg, and Bill all queue in the same lobby.
Kate and Meg are in a SWF; they will be Red Team.
Jeff and Bill are in another SWF; they will be Blue Team.
In the post-game the Killer will see which two survivors are Red and which two are Blue.

or

Steve, Feng, Adam, and Dwight all queue in the same lobby.
Feng, Steve, and Dwight are in a SWF; they will be Red Team.
Steve is a solo survivor; he'll get no color code.
In the post-game the Killer will see which three survivors are Red and which is the "random".

or

Nancy, Jane, Jake, and David all queue in the same lobby.
They are all SWF; they will be Red Team.
All survivors will have Red names.

This allows Killers to see if they went against a SWF Group or not and understand why they lost or how they managed to win against a weak SWF Group or an optimal one. This also allows the Developers to see how well SWF Groups perform against every Killer. This will provide sufficient data for making stronger Killers rather than nerfing every Killer before release.
Killers
Killers have always been in a worse predicament than survivors. The BHVR Devs will not nerf survivors since they mostly consist of the player base. I do not believe Survivors need any further nerfs (besides Keys), but rather Killers should be equally as strong as Survivors.

As of right now, some Killers are genuinely terrible whereas others excel. Some killers are extremely addon dependent such as Trapper, Ghostface, and Doctor. Other killers are extremely perk dependent such as Leatherface (Play With Your Food), Clown (Brutal Strength), and Myers (Hex: Ruin). Very few killers such as Freddy, Spirit, and Hillbilly can win without addons or even perks for that matter.

All the changes that I've made are to help each Killer and make them strong without any addons. If they nerf any addons to compensate for the strength, I really wouldn't care. I don't use addons and frankly, I believe the worst killers are addon dependent. If they can win without addons, that's all I'd be thankful to see.

Addon 'Numbers':
The BHVR Devs like using certain words for most addons. For the most part, Brown addons are Slightly, Yellow addons are Moderately, Green/Purple addons are Considerably, and Purple/Pink addons are Tremendously when judging the power of a Killer's addons. These numbers are very inconsistent and different killers have different numbers. It would be best if the Devs gave a specific value for each addon. I have proposed several numbers for each category.

'New' Addon Values:
Slightly Increase: +10%
Slightly Decrease: -10%
Moderately Increase: +20%
Moderately Decrease: -20%
Considerably Increase: +30%
Considerably Decrease: -30%
Tremendously Increase: +40%
Tremendously Decrease: -40%

Some addons will become "overpowered" for some Killers. In order to prevent Killers from using absurd amounts of strength, each addon could have certain numbers instead of the values I've proposed.

Also, the higher the rarity of addons, the harder it should take to find them in a Bloodweb. If addons are becoming stronger with the killer there should be a lower chance of getting Ultra Rare addons for Killers.
Chances of Ultra Rares:
Level-50: 50% Chance
Prestige I Level-50: 65% Chance
Prestige II Level-50: 80% Chance (Additional 5% Chance of getting two)
Prestige III Level-50: 100% Chance (Additional 15% Chance of getting two total, Additional 5% Chance of getting three total)

This gives an incentive to Prestige Killers rather than just the cosmetics.

Author's Note:
In my list of changes to Killers within their designated areas, I have given each addon a certain categorization. The addons will either receive (N/A) meaning no change, an asterisk ( * ) which are addons which I've changed to my ideas, two asterisks ( ** ) which are addons which have changed from one rarity to another (i.e. Brown/Yellow/Green/Purple/Pink).
The Trapper
Power:
Bear Trap


As of right now, it takes The Trapper 2.5 seconds to set a trap and Survivors 3.5 seconds to disarm one. The Bear Trap's "setting time" is divided into 3 phases: putting the trap down (0.5s), setting the trap (1.5s), and standing back up (0.5s).

A Survivor's chance of freeing themselves from a Trap is 25% and each attempt takes 1.5 seconds.

Buffs:
- Already starts off the match with 4 traps.
- 4 additional Bear Traps are placed within 36 meters of your spawn location.
- Sabotaged Bear Traps will respawn in 90 seconds.
- Second phase, setting the trap, will take 1 second.
- Survivors can disarm a trap in 4 seconds.
- 10% chance of escaping from a Bear Trap.
- 2 seconds per each attempt of escaping.
- Allow for more hidden blind spots for The Trapper to Trap.

Addons:
Trapper Sack - N/A
Trapper Gloves - N/A
Strong Coil Spring - N/A
* Padded Jaws - Bear Traps do not inflict damage on trapped survivors. Applies the Hindered effect for 60 seconds. Increase the Deviousness Score by 300%.

Trapper Bag - N/A
Trap Setters - N/A
Serrated Jaws - N/A
Logwood Dye - N/A
4-Coil Spring Kit - N/A

Wax Brick - N/A
Tar Bottle - N/A
Setting Tools - N/A
Secondary Coil - N/A
* Rusted Jaws - Survivors suffer considerably from the Mangled effect.

Stitched Bag - N/A
Oily Coil - N/A
Honing Stone - N/A
Fastening Tools - N/A

* Iridescent Stone - Every 60 seconds, all closed Bear Traps become set. Does not grant 5 additional traps within your spawn location.
* Bloody Coil - When a Trap is sabotaged or disarmed by a Healthy Survivor, the bloody coils exact their price and that Survivor becomes Injured. Slightly increases the Bear Trap sabotage time.
Slightly increases the Bear Trap disarm time. Slightly increases the chances of freeing oneself from a Bear Trap. Decreases the setting speed of a Bear Trap (old setting speed with animation from the Beta).

I've played Trapper without any perks or addons recently. I've managed to gain an 8 game win-streak as such and throughout those exhausting games, the biggest problem I've faced was setting up the Bear Traps at the start of the game. Pressuring generators and chases weren't difficult, but his power became almost useless. As of right now, you'll never see a Trapper without addons. I've made these changes to hopefully change that and make players lose that incentive.
Further Trapper Information[deadbydaylight.gamepedia.com]
The Wraith
Wraith:
Power: Wailing Bell


It takes 3 seconds to uncloak and 1.5 seconds to cloak. The Wailing Bell can be heard up to 24 meters. The 'Whoosh' sound can be heard up to 40 meters. Survivors will collide with Wraith while cloaked.

Buffs:
- Grants total invisibility when further than 16 meters.
- Movement speed increased to 5.4 m/s when cloaked.
- Surprise Attacks (or lunges after uncloaking) will increase to 0.6 seconds (Evil Within III's lunge)
- Can no longer be burned by a flashlight (only blinded like every other killer).
- 2.25 seconds to uncloak.
- Wailing Bell can no be heard from a distance of 16 meters.
- The 'Whoosh' sound can now be heard up to 32 meters.
- Terror Radius decreased to 24 meters.
- Increased vaulting speed while cloaked to 1.275 seconds (Evil Within II's vaulting speed).

Addons:
"The Serpent" - Soot - N/A
"The Hound" - Soot - N/A
* "The Ghost" - Soot - After uncloaking, The Wraith will gain the Undetectable effect for 6 seconds.
* "The Beast" - Soot - The Wraith's Terror Radius is no suppressed while Cloaked. Increases The Wraith's Terror Radius to 32 meters. Increases Deviousness Score by 300%.

Bone Clapper - N/A
"Blink" - Mud - N/A
"Windstorm" - Mud - N/A
"Swift Hunt" - Mud - N/A
"Blind Warrior" - Mud - N/A

"Windstorm" - White - N/A
"Swift Hunt" - White - N/A
"Shadow Dance" - White - N/A
"Blink" - White - N/A
* "Blind Warrior" - White - Surprise Attacks afflict Survivors with the Blindness and Oblivious effects for 60 seconds.

"Windstorm" - Blood - N/A
"Swift Hunt" - Blood - N/A
"Shadow Dance" - Blood - N/A
** "All Seeing" - Blood - While cloaked, the repair progress of generators can be determined by the intensity of their Auras. Decreases The Wraith's movement speed to 4.4 m/s.

Coxcombed Clapper - N/A
** "All Seeing" - Spirit - While cloaked, the Auras of Survivors within 24 meters are revealed to you. Removes 5.4 m/s movement speed while cloaked. Decreases The Wraith's movement speed to 4.2 m/s. Decreases The Wraith's lunge after uncloaking to 0.5 seconds (normal lunge).

No matter how long you've been playing The Wraith, we can all agree that 'burning' The Wraith is completely ridiculous. He's still weak regardless of what perks he has and he gets completely dominated by optimal survivors.
Further Wraith Information[deadbydaylight.gamepedia.com]
The Hillbilly
Power:
The Chainsaw


Running into an any obstacle during a Chainsaw Sprint will stun and immobilize The Hillbilly for 2 seconds.

Letting go of the Power Button will stop the Chainsaw Sprint and put The Hillbilly into a cooldown state for 2 seconds.

You can use the Chainsaw to instantly break Pallets.

Buffs:
- N/A

I personally do not believe this killer needs any further buffs to help him. If you are good at curving, you're good at curving. If you're not then either you'll get better with practice or he's not for you.

Addons:
- N/A

Any increases to his overall power would make him way too strong. I think The Hillbilly is a strong Killer with or without addons.
Further Hillbilly Information[deadbydaylight.gamepedia.com]
The Nurse
(Warning: My thoughts are going to get heated.)

Power:
Spencer's Last Breath


Holding alternate attack (default: M2) will charge up a Blink. The longer a Blink is charged, the farther she can blink. The maximum range is reached when The Nurse clenches her fist and exhales. The number of glowing orbs floating in her hand indicate the remaining amount of Blinks. The actual blinking distance depends on where The Nurse's gaze falls. Looking at the horizon or slightly above will allow her to blink the maximum distance, which depends on how long she charged the Blink for. Looking below the horizon will shorten the distance independently of the charge. Looking at The Nurse's feet will let her blink in place. If the Nurse blinks inside a multi-story building, she can change the floor by looking up or down during the Blink.

After blinking, there is a short window of opportunity, called the "Chain Blink Window", during which The Nurse can choose to charge a Chain Blink (if she has any Blinks remaining that is) or to initiate a Lunge attack. The imminent closure of the Chain Blink Window is indicated by a smoke effect surrounding her vision, after which she will go into the fatigue cool-down. Charging the Chain Blink beyond the window closure will cancel the Blink and instead trigger the fatigue cool-down. This can be used to forgo a Chain Blink if one decides against it mid-charge.

By default, The Nurse has 1 Chain Blink. The fatigue will stun The Nurse and prevent her from interacting until she leaves the fatigue. The stun duration scales with the number of Blinks used. Also, the stun will be longer if she misses or successfully lands the post-blink attack.

Akin to The Wraith, The Nurse is vulnerable to Flashlights triggering the Lightburn mechanic, thanks to her ability to interact with the Spirit World.


Buffs:
- Revert all changes done to The Nurse prior to Patch 3.3.0 and undo all the nerfs.

As of right now, The Nurse has the lowest kill ratio and is doing below average. On November 25, 2019, the BHVR Devs released a graph showing the kill ratio and pick rate amongst all Killers. The Nurse is not only very unpopular now, but she's doing awful.

November 2019 Stats[forum.deadbydaylight.com]

Addons:
Keep the addons how they are right now; stupid and pointless for the most part. Although some addons might need to be tweaked due to the new Blink Cooldown.

The only reason why The Nurse was over-performing was due to mediocre Nurse mains using Ataxic Respiration and Catatonic Boy's Treasure, formerly known as the infamous "Omega Blink Nurse". Her old addons used to give her additional Blinks (up to 5 extra). People used to use these busted addons every game since they were atrocious as The Nurse's base. Addons are the sole reason why The Nurse and most Killers over-perform. Survivors endlessly disconnect due to the insane power that is granted to each Killer with addons and quite frankly, I don't blame them. Addons shouldn't be used in order to make Killers strong or viable. I'm glad they slaughtered The Nurse's addons because addons don't make you a better Killer, only worse. However, there was never a need to gut her base kit.

Author's Note:
Everyone says it requires skill now to play The Nurse, but an old Nurse would get lacerated by optimal Survivors since they knew to break line of sight unlike the inexperienced players. Every Nurse that I used to go against prior to Patch 3.3.0 would get dominated unless they had addons, therefore being carried by crutches. Every Nurse that I go against now gets dominated with or without addons.

I know several friends of mine who used to play The Nurse with Omega Blink only. Now they're garbage with the new Nurse. That's a good thing to see. They shouldn't use addons to act as crutches for the skill they don't have. That goes to all the old Nurse mains that used Omega Blink only. Survivors argued that The Nurse's base was unfair since she can brainlessly spam blinks, but also is t-bagging on the hatch with a stupid SWF group with a Skeleton Key and Object of Obsession. If you want to argue that about The Nurse, give me another stupid argument first.
Further Nurse Information[deadbydaylight.gamepedia.com]
The Shape
Power:
Evil Within


Each Tier of Evil Within requires The Shape' to gain 5 points from draining evil from the Survivors.

The amount of total evil available in a Trial (40.4 points) is independent to how many Survivors load into the Trial, the evil is always evenly distributed across them at the start of the Trial. If all 4 Survivors load into the Trial, each Survivor carries enough evil to be equivalent to 10.1 points.

The Shape can stalk Survivors within a range of 2.5 to 39.85 metres. The stalk's efficiency depends on The Shape's distance to the stalked Survivor, ranging from 100 % at closest range to 1 % at farthest range. With a stalk rate efficiency of 100 %, it takes The Shape 6 seconds to fill his stalk meter.

The Shape's movement speed is moderately reduced (set to 60 % of his base Movement speed) while stalking passively (no Survivor in his FOV) and tremendously reduced (set to 20 % of his base movement speed) while stalking actively (Survivor in his FOV).

Upon reaching Evil Within II, The Shape can never fall back to Evil Within I.

The colour of a Survivor's outline while being stalked determines how much Evil is left in them, ranging from white (full) to red (empty).

Buffs:
- Immune to Spine Chill and Premonition at Evil Within Tier I.
- Total amount of "Evil" available is decreased to 39.5 points. Therefore, each survivor carries an equivalent of 9.875 points.
- Increases the stalk range to 2.5 - 42 meters.
- Can stalk through the walls of the Killer Shack (similar to The Oni absorbing Blood Orbs through walls).

Addons:
Author's Note:
Only two addons should be changed:
* Tombstone Piece - Kill healthy or injured Survivors with Evil Within III. Disables the ability to stalk with Evil Within III. Considerably drains the Power Gauge after killing a Survivor. Considerably increases the amount of Evil required to reach Evil Within III. Decreases the lunge of Evil Within III to 0.5 seconds (normal lunge).

* Judith's Tombstone - Kill healthy or injured Survivors with Evil Within III. Disables the ability to stalk with Evil Within III. Tremendously increases the amount of Evil required to reach Evil Within III (+75% increase instead of my proposed +40%). Moderately reduces The Shape's Movement speed to 4.4 m/s. Decreases The Shape's lunge to 0.2 seconds (Evil Within I's lunge).

When a player uses these addons for The Shape, one of two things will happen. The survivors will destroy The Shape or vice-versa. Since I have increased the base kit for Myers, there should be no need to use these addons every match. I've also decreased the lunge of The Shape with Judith's Tombstone since many Killers use it to get the Steam Achievement - "Evil Incarnate". Sometimes a Killer might accidentally lunge instead of insta-kill. This is more of a nerf for this addon since it forces The Shape to be really close to survivors in order to insta-kill.
Further Shape Information[deadbydaylight.gamepedia.com]
The Hag
Power:
Blackened Catalyst


It takes The Hag 2 seconds to set down a Phantasm Trap. That time is divided into 3 phases: opening (bending down, 0.5 seconds), setting (drawing the Trap, 1 second), exiting (standing back up, 0.5 seconds). Only the setting phase is affected by Add-ons that affect the setting speed.

A tripped Phantasm Trap lasts for 5.5 seconds.

Buffs:
- Phantasm Traps are no longer affected by flashlights.
- Teleportation Range is increased to 48 meters.
- The second phase of setting traps is decreased to 0.75 seconds.
- Tripped Phantasm Duration will last for 6.5 seconds.
- The Oblivious effect will be applied to Survivors who triggered the Phantasm Trap for 7.5 seconds.

Addons:
Rope Necklet - N/A
Powdered Eggshell - N/A
Dead Fly Mud - N/A
Bog Water - N/A

*Puѕѕy Willow Catkins - Reveals the Survivor's aura for 4 seconds when triggering a Phantasm Trap.
Half Eggshell - N/A
Dragonfly Wings - N/A
Cypress Necklet - N/A
Bloodied Water - N/A

*Willow Wreath - Reveals all Surivors' aura for 4 seconds when triggering a Phantasm Trap.
Swamp Orchid Necklet - N/A
Dried Cicada - N/A
Cracked Turtle Egg - N/A
Bloodied Mud - N/A

*Scarred Hand - Triggered Phantasm Traps have collision. The Hag can only teleport to Triggered Phantasm Traps within 16 meters. Decreases the Phantasm Trap's duration to 3 seconds. Increases The Hag's lunge to 1.7 meters (Tier III Myers). Trumps all other addons.
Rusty Shackles - N/A
*Grandma's Heart - The Hag gains the Undetectable effect for the duration of the Triggered Phantasm Trap.
*Disfigured Ear - Survivors who trigger the Phantasm Trap will be defeaned and will yell and reveal their current location for 6 seconds.

Waterlogged Shoe - N/A
*Mint Rag - The Hag can teleport to any Phantasm Trap in the level. The Hag now has an indicator to which Phantasm Trap she chooses (similar to Freddy and Demogorgon), but has a cooldown of 30 seconds.

The Hag has the most situational awareness in the game at any given point. If you teleport to your Phantasm Traps, you hit and create more pressure and rotate. The only struggle that Hag faces are the generator speeds since she is a 4.4 m/s killer. Her power becomes useless when a survivor uses the perk Object of Obsession and if survivors bring a flashlight.
Further Hag Information[deadbydaylight.gamepedia.com]
The Doctor
Power:
Carter's Spark


The Shock Therapy Attack has a default range of 9 metres.

The Shock Therapy Attack has a default charge time of 1 second.

Switching stances takes 1 second.

The Doctor is slowed by 25 % while using the Shock Therapy Attack.

The Shock Therapy Attack has a default delay of 1 second in-between spawning the visual effects and affecting the Survivors.

After a successful Shock Therapy Attack, there is a cool-down of 2 seconds in which the Static Field does not impose any Madness effects and during which the Shock Therapy Attack is on cool-down.

Madness does not start to decline outside of the Static Field for 5 seconds and decreases at a rate of 1 Insanity Point per second.

Buff:
- Complete Rework

As of right now, The Doctor is useless. There are two ways of playing The Doctor. The first way is to run perks that expose survivors and go into Treatment Mode in order to find these survivors. The second way and the more ideal way is to use Treatment Mode to prevent survivors from vaulting a window or a pallet since it locks survivors in the screaming animation. Both of these methods are extremely inconsistent and terrible. They barely work and will cause you to waste time at pointless loops when you can just mind game pallets or bring 'anti-loop' perks.

Strong Killers don't get dominated easily unless if the player or Killer is tilted, having a bad day, upset, etc. Mid-Tier Killers get dominated by any optimal survivors or optimal SWF group. Low-Tier Killers get dominated by decent survivors or casual SWF groups. The Doctor gets dominated by any survivor that isn't Rank 20.

Addons:
- N/A

Since I'd prefer to see a complete rework to this Killer, I have no ideas in mind on how his addons will be.

Even with addons, The Doctor is still garbage. He's far from viable and his power will still be inconsistent. He needs Moldy Electrode and Iridescent King in order to be the second worst killer in the game.

Author's Note:

I have made a guide on how to play The Doctor. This guide was rushed and I did not put much effort into. However, there was a video I added titled: How To Use Doctor At Killer Shack. You will see the Adam unable to vault the window which is what his power is allegedly supposed to do. Capturing that footage took over an hour. It'll probably be more likely to find a zebra in front of your house than reenacting this footage in-game consistently.

My "The Doctor" Guide

I will reiterate. I am not too proud of this guide since it was rushed due to the insane amount of time it took to capture the Killer Shack footage.

I'm hoping that this Killer will receive a complete redux to his power (similar to Freddy). My greatest hopes would be for The Doctor regressing generator progression. Besides that, I have no further thoughts on how to rework The Doctor.
Further Doctor Information[deadbydaylight.gamepedia.com]
The Huntress
Power:
Hunting Hatchets


Buffs:
- Decrease The Huntresses' Terror Radius to 16 meters.
- Decrease The Huntresses' humming to 32-16 meters.

These changes are very minimal and wouldn't make The Huntress a "busted killer" at all. These changes would be more similar to that of 'quality-of-life 'changes.

Addons:
Coarse Stone - N/A
Berus Toxin - N/A
Bandaged Haft - N/A
* Amanita Toxin - Hit target suffers from the Oblivious effect for 30 seconds. Does not stack.

Yew Seed Brew - N/A
Shiny Pin - N/A
Oak Haft - N/A
Manna Grass Braid - N/A
Leather Loop - N/A
Fine Stone - N/A
Deerskin Gloves - N/A

Yew Seed Concoction - N/A
Venomous Concoction - N/A
* Rusty Head - Hit target suffers considerably from the Mangled effect and Hemorrhage for 120 seconds.
* Pungent Phial - Lockers' Auras are shown to you when within 36 metres of range. Considerably decreases Hatchet's reload time at a Locker.

Infantry Belt - N/A
Glowing Concoction - N/A
* Begrimed Head - Slightly decreases Hatchets wind-up time. Hit targets become deafened for 6 seconds. Hit targets suffer from the Hindered effect for 30 seconds. Moderately decreases the repair speed of Survivors injured by the Hatchet. Decreases the amount of Hatchets by 1.

** Flower Babushka - Allows The Huntress to see where Hatchets will land up to 16 meters (similar to The Nurse's Plaid Flannel addon), anything beyond that range will not show. Tremendously increases the Hatchet's wind-up time. Slightly increases cool-down time between Hatchet throws. Decreases the amount of Hatchets by 2. Trumps all other addons.
* Iridescent Head - Inflicts Dying upon the victim. Reduces maximum carried Hatchet amount by 3. Trumps all other addons.

Some of these addon changes might be a bit strong which therefore I have previously mentioned on decreasing the chances of finding high rarity addons in the Bloodweb. Iridescent Head was a nerf. Rogue Huntress players would use Iridescent Head with Infantry Belt which is absurd. I have added "Trumps all other addons" to the new Flower Babushka and Iridescent Head to balance these addons for the Survivors since Infantry Belt and Iridescent Head was almost unstoppable; impossible if The Huntress was genuinely good.
Further Huntress Information[deadbydaylight.gamepedia.com]
The Cannibal
Power:
Bubba's Chainsaw


The Chainsaw has a default charge time of 2.1 seconds.

The Cannibal's Tantrum has a default duration of 5 seconds.

Buffs:
- Complete Rework

The Cannibal's Chainsaw, as of right now, is near useless. Bubba's Chainsaw is extremely underwhelming and its not even close to reliable.

The Cannibal is an addon dependent Killer and relies on perks such as Play With Your Food (PWYF). Running utility perks instead of generator protection perks such as Discordance, Hex: Ruin, Thrilling Tremors, or Pop Goes The Weasel will definitely hurt The Cannibal. PWYF does make The Cannibal decent albeit with his useless chainsaw.

Addons:
- N/A

The Cannibal in my opinion is not the worst Killer in Dead by Daylight since he has insta-downs and he can instantly break pallets. He punishes mistakes, but since his movement speed is reduced when revving the Chainsaw for some reason, you won't be able to capitalize on any mistakes too easily.

If BHVR does decide to rework The Cannibal, this Killer either needs to be very strong in chases or have high mobility. These will definitely help The Cannibal. There is no reason in buying this DLC except for his perks which are underrated and very powerful; you can still purchase these in the Shrine of Secrets every Tuesday (in North America) anyway.
Further Cannibal Information[deadbydaylight.gamepedia.com]
The Nightmare
Power:
Dream Demon


The glimpses of The Nightmare awake Survivors see last for 2 seconds, then go on "cool-down" for 2 seconds. This process will repeat over and over.

Awake Survivors will passively gain 1 sleepiness point per second. Once they reach 60 sleepiness points, they will fall asleep.

The Nightmare can place Dream Snares on the ground by holding M2 for 0.75 seconds.

Dream Snares will become active about 1.75 seconds after they've been placed.

Dream Snares slow Survivors down by 15%.

Canceling the Dream Projection will incur a 10 second cool-down to it.

Buff:
- N/A

The Nightmare's Dream Demon has greatly improved since his rework. I congratulate BHVR for making a very strong Killer that has easy counter-play by looping him, but still has a chance against the "crème de la crème" Survivors with his semi-reliable anti-loop kit and high mobility generator kit.

Addons:
- N/A

As of 12/12/2019, The Nightmare's addons have been nerfed. I do not disagree with this nerf at all. The Nightmare's addons were annoying to go against and made games go tedious as hell. Most games averaging around 20 to 25 minutes with Swing Chains, Jump Rope, etc. Now these addons are much more balanced and still fun for both sides.

The Nightmare is a perfect example of what 'my' ideal Killer. He's a viable Killer that can win against any team (depending on your play-style). His base-kit is strong and his addons are only 'quality of life'. This is how I believe Killers should be; strong base-kit, weak addons, and decent addons.

Author's Note:
Freddy is my favorite Killer. I utilize his high mobility very well and use perks to assist my Dream Channeling such as Discordance and Thrilling Tremors.

I don't care about the addon nerf since I don't use Freddy's addons; he's strong enough without them. I've managed to get to Rank 1 with Freddy without Hex: Ruin or addons several times. I've once had a 38 game win-streak (4K with Merciless Killer) without Hex: Ruin or addons and an 8 game win-streak without perks or addons.

I genuinely believe this Killer is in a perfect spot right now. He doesn't need addons to win and quite frankly, I don't believe Killers should need addons to win. Their base-kits need to be stronger.
Further Nightmare Information[deadbydaylight.gamepedia.com]
The Pig
Power:
Jigsaw's Baptism


Survivors take 12 seconds by default to search a Jigsaw Box.

Reverse Bear Trap timers expire in 150 seconds or 2 minutes and 30 seconds by default.

The crouching animation or "transition" takes 1.3 seconds.

It takes 3.3 seconds by default to put a Reverse Bear Trap onto a Survivor's head.

The Dash lets her cover a distance of 16 metres in 2.5 seconds.

Upon crouching, her Terror Radius and Red Stain fade to 0 metres over the time of 4 seconds, and vice versa when standing back up.

The exception to this is an Ambush Attack, which will increase the Terror Radius to its default range immediately after procuring the loud roar.

Buff:
- Reverse Bear Trap Timers activate when in the Injured or Healthy state (timer doesn't progress while in a chase).
- Increases the Trigger Time of the Reverse Bear Traps to 240 seconds (4 minutes).
- Increases the time for survivors to search a Jigsaw Box to 15 seconds.
- The crouching animation or "transition" takes 1 second.
- Now takes 3 seconds by default to put a Reverse Bear Trap onto a Survivor's head.
- The loud roar will no longer activate at the same time while charging the Ambush Attack, but will now activate once the Ambush Attack has been completely activated. (Once the Pig already begins to Ambush will you hear the loud roar, rather than simultaneously.)
- Survivors whose Reverse Bear Traps have been attached after all generators have been completed can not escape until the Reverse Bear Trap has been removed. (Escaping through Hatch is still an option as well.)

Addons:
* Rules Set No.2 - Considerably increases Jigsaw Box Skill Check Trigger odds. Triggered Skill Checks' success zones are reduced by 25% (much weaker Unnerving Presence).

This is the only addon that I feel needs a change. As of right now, this Ultra Rare Addon is almost entirely useless.

The Pig should not be a weak 'M1 Killer' unlike her other Killer counterparts. The Pig was once semi-decent, but now she's extremely unreliable. There are other stealth Killers such as The Wraith, The Ghost Face, or The Nightmare (with "pseudo-stealth" due to the lullaby) that can keep better control and slow down the game better.

The Pig is a licensed Killer and should therefore be strong in order to get more sales which would be more profitable for BHVR. This is should be quite obvious.

For example, after the Freddy rework, the positive-negative review ratios for the Nightmare on Elm Street DLC have been leaning more positive.

Further Pig Information[deadbydaylight.gamepedia.com]
The Clown
Power:
The Afterpiece Tonic


The slowdown after leaving a gas cloud lasts for 2.5 seconds.

The impaired vision after leaving a gas cloud lasts for approximately 4 seconds.

The blurred vision has a "wearing-off period" where it is less strong.

Afterpiece Tonic Clouds linger for approximately 8-9 seconds.

If Survivors who ran out of the cloud go back to it, they'll be intoxicated for an extra duration.

The Clown can reload his bottles by holding the Secondary Power Button (Default:L Control) for 5 seconds.

After tossing a bottle, The Clown enters a cool-down period for 1 second, during which he is unable to perform any interaction.

Being directly hit by a bottle will cancel Survivors' channeled interactions such as healing, repairing Generators, sabotaging, unhooking, opening an Exit Gate, etc.

Buff:
- Remove the slow-down penalty after tossing a Tonic Bottle.
- Survivors will cough while Intoxicated for 3 seconds.
- The Clown now gains a 3.25 second cooldown after using a Tonic Bottle.
- After all Tonic Bottles have been used, Tonic Bottles will now replenish over time (3.25 seconds per bottle).
- The slowdown after leaving a gas cloud lasts for 3 seconds.
- Afterpiece Tonic Clouds linger for approximately 12 seconds.
- Removes 'Grunt' when vaulting a window.
- Rework for Secondary Power Button (LCTRL).

My Idea for a LCTRL Rework:
Secondary Power: Toxic Chloroform
The Clown's Secondary Power will have an 80 second cooldown. The Clown holds the Secondary Power Button for 10 seconds to pour Chloroform onto a generator. The generator will now regress by -1% (tick per second) instead of -0.25% (ticks per second). The next Survivor(s) who work on this generator will be met will 3 consecutive tremendously difficult Skill Checks. If any Skill Checks were unsuccessful, the generator will spew out Chloroform and applies the Blindness and Exposure effects for 60 seconds. Additionally, the Survivor(s) will gain Blurred Vision for 30 seconds. If all Skill Checks were successful then the generator will give The Clown an alert and the generator will glow Yellow for 16 seconds.

Animation: The Clown shakes the Chloroform Bottle (reload animation) for 5 seconds. Next, The Clown grunts (window vault) and pours Chloroform all over the generator which takes and additional 5 seconds. The next Survivor(s) to work on the generator whom which have missed at least one Skill Check will be spewed with Chloroform. (Chloroform spewing could look similar to the blood that spews when missing a Skill Check in the Dream World when asleep hitherto facing The Nightmare. Instead of maroon blood, pink Chloroform.

UI: The Clown's Power Button starts of with a tint of grey. After 80 seconds, The Afterpiece Tonic will become its normal color and will make an 'indication' sound when its available to use.

- The LCTRL cannot be synchronized with Pop Goes The Weasel or Overcharge.
- Cannot use the LCTRL on regressing generators.
- Cannot use the LCTRL on sealed generators.

Addons:
* Smelly Inner Soles - Slightly decreases the cooldown of the Toxic Chloroform.
Robin Feather - N/A
* Fingerless Parade Gloves - Slightly decreases the intoxication time when using the Toxic Chloroform on a generator.
Ether 5 Vol% - N/A

* Thick Cork Stopper - Moderately decreases the intoxication time when using the Toxic Chloroform on a generator.
Sticky Soda Bottle - N/A
Starling Feather - N/A
* Solvent Jug - Intoxicated target, from The Afterpiece Tonic, suffers from the Exhausted effect for 30 seconds.
* Kerosene Can - Intoxicated target, from The Afterpiece Tonic, suffers from the Blindness effect for 30 seconds.

* VHS Porn - Moderately decreases the cooldown of the Toxic Chloroform.
* Sulphuric Acid Vial - Intoxicated target, from The Afterpiece Tonic, suffers from a tremendous Mangled effect for 120 seconds.
* Flask of Bleach - Intoxicated target, from The Afterpiece Tonic, suffers moderately from an extra Hindered penalty.
Ether 10 Vol% - N/A
Bottle Of Chloroform - N/A

Garish Make-up Kit - N/A
Ether 15 Vol% - N/A
Cigar Box - N/A
Cheap Gin Bottle - N/A

* Tattoo's Middle Finger - The Auras of Intoxicated Survivors, from The Afterpiece Tonic, are revealed to you for 8 seconds.
* Redhead's Pinky Finger - Survivors hit directly by a Bottle suffer from the Exposed effect for 15 seconds. Slows down The Clown's movement speed when tossing a Tonic Bottle for 1 second. Trumps all other addons.

As of today, The Clown is a very underwhelming Killer. He's not horrible, but boring to go against. He's also very weak and his power hurts him and gives him unnecessary movement speed penalties. He cannot win without addons or against the best Survivors with his best perks.

His play-style requires the player to be flawless in-game and their is no room for you to make mistakes when playing The Clown. Every Killer can capitalize off of the Survivors' mistakes in a chase except The Clown. The Clown also has no mobility or other power to help him perform. He normally does awful and can barely get 2 or 3 kills.

I play The Clown occasionally and I do okay. However, if I make one small mistake, I'm screwed. This isn't the case for Killers like The Hillbilly, The Cannibal, or The Wraith. They can all recover, but The Clown can't. Unless if the Survivors are "memeing" around in the basement or "swarming hooks", there's no way to recover from the slightest mistakes.

Author's Note:
I've also made a guide for The Clown.

My "The Clown" Guide

I do believe that my Clown guide does help and it does show improvement for Clown players. Unfortunately, when The Clown goes against above average Survivors, it'll become a 'bullying simulator'; no matter how good you are.
Further Clown Information[deadbydaylight.gamepedia.com]
The Spirit
Power:
Yamaoka's Haunting


Yamaoka's Haunting is a Charged-based Power which has 5 Charges at default, consumes 1 Charge/second, and recharges at a rate of 0.333 Charges/second.

Default Phase Walk duration is 5 seconds.

Default Power recovery is 15 seconds.

Default Power activation time is 1.5 seconds.

The post-Phase-Walk speed boost is maintained for 0.5 seconds.

The Spirit's Lunge range is also increased during that time.

Survivors within the Terror Radius of the Husk will not hear the phasing sound. Survivors outside of that range will hear the sound, but will be unable to determine its direction.

Survivors will not hear The Spirit's breathing sound during a phase-walk.

The Spirit can still hear any sounds the Survivors produce, be that from interactions with Props or sounds in general.

The Spirit can see the invisible Survivors' effects on the environment, such as grass or corn moving.

The Spirit cannot see Auras while in her ethereal form. However, she still receives loud noise notifications.

Buffs:
- N/A

Addons:
- N/A

This Killer is still strong. I do not believe this Killer needs any buffs or addon changes. Even after The Spirit got nerfed, she still does very well against optimal Survivors and is not addon dependent like The Nurse. I'm glad that her base-kit didn't get gutted like The Nurse's since the only problem to begin with were the addons.
Further Spirit Information[deadbydaylight.gamepedia.com]
The Legion
Power:
Feral Frenzy


Default Frenzy lasts for 10 seconds.

Default post-Frenzy cool-down lasts for 4 seconds.

Default Frenzy Charge time takes 20 seconds.

Default Mending takes Survivors 12 seconds by themselves or 8 seconds when done by other Survivors.

Pallet and Window vaulting takes 0.9 seconds.

Buff:
- Complete Rework

Addon:
- N/A

Author's Note:
For all intents and purposes, I will refer to Frank as The Legion since all other members are only reskins.

When this Killer first came out, The Legion was busted. Every game, no matter how inexperienced you were, you would get an Iridescent Chaser Emblem for using the Feral Frenzy. This would allow inexperienced players to rank up easily against any survivors. This Killer at one point was arguably an SS Tier Killer.

Tier List (Patch 2.5.0):

(This is not my opinion. This is a general viewpoint of each Killer during Patch 2.5.0 based on MOST of the community's perspective.)

After The Legion got gutted in Patch 2.7.0, he is a small remnant of what he once was. He keeps getting nerfed along with his addons. I do believe he needed to get obliterated in Patch 2.7.0, but after several nerfs, he's arguably the worst Killer in the game.

The BHVR Devs have promised a complete rework of this Killer, but they've never delivered. They keep using 'band-aid fixes' to help him out, but it doesn't do much or give significantly better results. This Killer should get reworked like BHVR has promised. This rework shouldn't be rushed, but it should definitely be a slight priority.
Futher Legion Information[deadbydaylight.gamepedia.com]
The Plague
Power:
Vile Purge


Vile Purge has a maximum range of approximately 13 meters.

Vile Purge takes 1.6 seconds to charge and sprays for 2 seconds.

Corrupt Purge lasts for 60 seconds.

It takes The Plague 1.4 seconds to ingest Corrupt Purge.

It takes Survivors 6 seconds to cure themselves of the Sickness at a Pool of Devotion.

Environmental objects stay infected for 35 seconds.

Survivor infection does not reset upon being hooked.

Buff:
- Decreases repairing, sabotaging, and healing speeds when infected by -10%.
- Vile Purge now takes 2.5 seconds to charge and sprays for 2 seconds.
- No movement speed penalty when holding Vile Purge (will not be the same for Corrupt Purge).
- Takes Survivors 4 seconds to cure themselves of the Sickness at a Pool of Devotion.

Nerf:
- Survivors with Iron Will will not cough loudly when infected.

Addons:
Prayer Tablet Fragment - N/A
Olibanum Incense - N/A
Limestone Seal - N/A
Healing Salve - N/A

Prophylactic Amulet - N/A
Potent Tincture - N/A
Haematite Seal - N/A
Emetic Potion - N/A

Blessed Apple - N/A
Rubbing Oil - N/A
* Infected Emetic - Slightly increases effectiveness of Vile Purge.
Incensed Ointment - N/A
Exorcism Amulet - N/A
Ashen Apple - N/A

Worship Tablet - N/A
* Vile Emetic - Moderately increases effectiveness of Vile Purge. Decreases repairing, sabotaging, and healing speeds by -2% when sick.
Severed Toe - N/A
Devotee's Amulet - N/A

* Iridescent Seal - Vile Purge becomes Corrupt Purge every time a Generator is completed. Considerably reduces the duration of Corrupt Purge. Moderately decreases Movement speed while holding Corrupt Purge. Slightly decreases effectiveness of Vile Purge.
* Black Incense - After ingesting Corrupt Purge, Survivors auras are revealed to you for 10 seconds.

The Plague has two separate powers one of which might not even be obtainable in a match. She could infect everyone and Survivors will still 'gen rush' and no one will cleanse.

I have given a slight penalty which is essentially a built in Thanatophobia. This forces Survivors to cleanse and give The Plague her other power: Corrupt Purge.

Many people want The Plague nerfed for that one issue I've addressed: Iron Will. Therefore, I've made it so when using Iron Will, you will not cough. Besides that one issue, there's no other problem with The Plague.

Many lower Rank Survivors complain about how The Plague can just spew out vomit on them. Since lower Rank Survivors don't understand the 'looping' concept of the game, they'll easily go down and become infected. The additional time to charge Vile Purge should allow lower Ranks to get to a pallet and stun her or get to a window and break line of sight. The removal of the speed penalty when holding Vile Purge is the same as how The Plague was in the PTB when she first made her debut. By allowing The Plague to 'get greedy' at loops with her Vile Purge now, she'll be much more easier to loop. This'll be good for lower and higher Rank Survivors. Unless if The Plague just rotates to another Survivor, there will be no looping involved and you'll just be infected and will eventually become completely sick.

The Plague's Ultra Rare addons are extremely powerful. I've given Iridescent Seal a slight change by decreasing the effectiveness of Vile Purge. This'll force The Plague to move on to other Survivors since you won't be able to make Survivors completely sick when chasing them unless if you get extremely greedy. This will eventually lead to multiple generators being completed, decreasing your chances of winning. Do remember: this game is a 4v1, not a 1v1. The Plague's Iridescent Seal is broken. There's no way Survivors can win against this unless if the player of The Plague is genuinely bad or inexperienced. By showing Survivors' auras for 10 seconds will be like a built in Bitter Murmur. She'll know where to use her Corrupt Purge and apply more pressure. However, this addon change cannot be done unless if there's an incentive to cleanse first. Most Survivors won't heal against a Plague anyway so applying my changes on this addon would be useless unless if there's an incentive. Otherwise, you might as well make Iridescent Seal a Brown Common addon.
Further Plague Information[deadbydaylight.gamepedia.com]
The Ghost Face
Power:
Night Shroud


Marked Survivors are Exposed for 45 seconds.

The Ghost Face can be revealed by Survivors within a 32 meter range of him by default.

Survivors need to see at least 20 % of Ghost Face's body to start revealing him.

The Ghost Face is able to stalk Survivors from a distance of up to 40 meters, with the same efficiency across the entire distance (20 Stalk point per second).

While leaning around a corner, the Stalk rate is doubled.

There is a delay of 2 seconds before stalking will commence.

Survivors become Marked after Ghost Face has depleted 100 Stalk points from a Survivor.

Buff:
- Decreases Terror Radius to 16 meters.
- The Ghost Face can stalk already Marked Survivors, but will only gain 10 Stalk point per second.
- When within 8 meters of a Survivor, Stalk rate is increased to 25 Stalk point per second (not against Marked Survivors).

Nerf:
- Decreases the Stalk Range to 36 meters.
- Any M1 Attack will no longer count Basic Attack when in Night Shroud. (Therefore, Sloppy Butcher nor Save The Best For Last will not affect Survivors when in Night Shroud.)

I personally do not believe this Killer needs any changes. However, many people are annoyed how people are playing The Ghost Face 'hit-and-run' style. I do not mind playing as or against a Ghost Face that plays like this. People want The Ghost Face to use his somewhat ineffective ability instead.

The Ghost Face's Stalk is nowhere close to as strong as The Shape's. The Ghost Face's Stalk requires you to 'tunnel' for 45 seconds until that Survivor is eventually no longer Marked. This will cause you to lose a generator if a two Survivors are working on one. If you do want to end this 'hit-and-run' play-style for The Ghost Face then you need to add more incentives for Stalking mid chase. By allowing The Ghost Face for stalking mid-chase, he'll be able to very slowly recover some Stalk rate lost which creates more tunneling so there really shouldn't be any changes to this Killer. Although I do believe a nerf is inevitable for stupid reasons, whining, and complaining. The only nerf I've given The Ghost Face is the Basic Attack change which will make it so that way Sloppy Butcher will no longer work in the 'hit-and-run' build. Then Ghost Faces will begin to run Pop Goes The Weasel and that's even worse for Survivors anyway.

Addons:
* Chewed Pen - Considerably reduces Night Shroud Recovery time. Does not stack.

That's it.

I may have made The Ghost Face's base-kit stronger, but that's what I prefer. Make the base-kits viable, nerf the addons.

I do believe that this Killer is balanced and needs no changes. If you find any severe issues with this Killer, I don't know what the hell you're doing.
Further Ghost Face Information[deadbydaylight.gamepedia.com]
The Demogorgon
Power:
Of The Abyss


Buffs:
- Increases the radius in which Survivors can be detected by Of the Abyss to 1.5 meters.
- When Survivor(s) is/are within the radius of an active Portal, The Demogorgon gets a Killer Instinct notification only when within 16 meters of that Portal.

Normally you can only detect Survivors near your Portals when charging your Shred Attack. Now you'll get the notification without having to do so. This way you'll be able to protect your portals and will not become an "M1 Killer".

Addons:
- N/A

The Demogorgon is a very underrated Killer. He performs very well against the 'crème-de-la-crème' Survivors since he can cancel his Shred at a loop and get a free hit at every pallet. He has a built in Spirit Fury, Brutal Strength, and Bamboozle. He also has high mobility and can teleport across the map with ease. This Killer does not need any sort of nerf and any of these buffs I've given wouldn't even be necessary, but 'quality of life' changes. Likewise, this Killer does not need any addon changes since they're fairly balanced.
Further Demogorgon Information[deadbydaylight.gamepedia.com]
The Oni
Power:
Yamaoka's Wrath


Buffs:
- Re-add the 'Flick' when The Oni uses Demon Bash.

Addons:
- N/A

I have no idea why this new Killer where people spent $6-$7 on got nerfed to begin with. Give the Killer a chance ♥♥♥♥♥♥♥♥♥♥! Killers keep getting nerfed before Survivors can understand the counterplay. This Killer could do little to nothing at a jungle gym before. Now he can't do anything at all. This Killer got gutted right after release. Might as well not have developed this Killer in the first place if this were the intention.

Author's Note:
I have no further ideas on this Killer since I have not purchased the DLC. I've only versed him as a Survivor; the OPPOSING side. I am not planning on purchasing this DLC either. From what I've heard from friends and other content creators, The Oni is now an unreliable "M1 Killer".

As of 12/14/19, I've only lost 3 times against The Oni as a Survivor. Every time I go against an Oni or any Killer, I never heal and I 'gen rush'.

For example:
One time I was on Wrecker's Yard as a Nea Karlsson. All of my teammates were going down very quickly and I was on 'death hook' at 4 generators left. I then stayed injured for the rest of the match and 'gen rushed' The Oni. After a short chase with him, I got my Adrenaline. Two other Survivors and I escaped that match. The other Claudette died due to Endgame Collapse.
Further Oni Information[deadbydaylight.gamepedia.com]
Other Issues
The Hatch:
Ever since Endgame Collapse, the Hatch will now spawn when there's one Survivor left regardless of how many generators have been completed. For the Killers who play to Rank up and play competitively, this will be your demise.

If you manage to dominate a team, they all kill themselves on hook, 5 generators left, and the Claudette didn't do anything but open a chest all game, she can escape. She'll escape and your domination will be for nothing since you won't rank up or pip. It's not your fault Survivors killed themselves on first hook.

The Hatch mechanic should be available at 3 generators when there's only 1 Survivor left.

A new meta has sprung about all because of this problem with the Hatch and Engame Collapse. Competitive players will "slug for their 4K" in order to pip, get to higher Ranks, or get all 4 kills. Many Survivors complain about this and find it boring staying 'slugged' on the ground when there's only their one teammate left at 5 generators. The Killer should be able to hook that 'slug' and find the other Survivor to prove his Merciless Killer victory and allow the other Survivors to move on to another game. KIllers find this boring as well. Most of the time Killers 'slug' a Survivor then they search the map and the 'slug' is up. They find the 'slug' again and down them. Then the 'slug' gets picked up and now the Killer finds the other Survivor. Now they have to 'slug' that Survivor to find the other one. This is a waste of time and this is where the boring side of Dead by Daylight comes into reality.

Ever since Endgame collapse, Survivors can no longer be grabbed from the Hatch. I don't see why that is. If a Survivor is 't-bagging' the Killer on top of the Hatch and opens it in front of the Killer's face, there's nothing he can do to stop that Survivor. The shouldn't be. If a Survivor finds the Hatch, then they should be able to escape, but if the Killer is right behind them then the Killer can just close the Hatch and get the last kill. The game shouldn't punish a Killer for playing good or reward Survivors for playing bad.

Keys:
Keys are a huge issue in Dead by Daylight. As a Killer, you could've had a rough start, but you managed to pull your act together and kill a Survivor at 2 generators left. Now another generator is completed. The Claudette finds a Feng Min and a Jeff. They all run around to find another generator, but since Feng Min has a key, all three escape. Now as Killer, you get Entity Displeased. Keys allow the Survivors to less work then they already have to do.

How to Fix Keys:
Nerfs:

Broken Key - N/A

* Dull Key - The Survivor inserts the Key into the Hatch. After inserting the Key, the Killer gets a notification and can see the Hatch's aura when being tampered with. A Survivor is met with tremendously difficult Skill Checks. Missing any Skill Checks will regress the Hatch's opening progress by a small percentage. Opening the Hatch will take 15-25 seconds. The Hatch will only stay open for 1 Survivor.

* Skeleton Key - The Survivor inserts the Key into the Hatch. After inserting the Key, the Killer gets a notification and can see the Hatch's aura when being tampered with. The Survivor is met with 3 tremendously difficult Skill Checks in the Madness State. Missing any Skill Checks will reset the Hatch's progression and will slightly decrease the charges of the Key. Opening the Hatch will be instantaneous after hitting the 3 Skill Checks. The Hatch will only stay open for 1 Survivor.

Addons:
{Ultra Rare Addon} - After successfully opening the Hatch, the Hatch will stay open for 10 seconds.
{Ultra Rare Addon} - When the Hatch is being tampered with, the Hatch's aura will be revealed to all Survivors within 32 meters of the Hatch's location.

The Killer will also be able to grab a Survivor in the tampering animation when trying to open the Hatch with a Key.

Ebony Memento Moris:
Once upon a time, Ebony Memento Moris (EMMs) used to be completely broken and Survivors had no chance of winning against this. EMMs used to be able to insta-kill Survivors who were in the Dying State without having to hook them. Technically, it wasn't TOO unbalanced for the time since this was when Old Decisive Strike used to exist along with ACTUAL infinites, 2.5 second Killer vault, insta-blind Flashlights, etc., etc., etc. However now, EMMs do not fit the meta anymore and they're completely unbalanced. I guarantee everyone had at least one game where they've gone against a terrible player and got tunneled off of the hook because the Killer had an EMM.

Nerfs:
Start off the game with one Obsession. After sacrificing the Obsession, the Entity grants you the ability to kill other survivors after being hooked. (The Obsession cannot be killed by your hands or bleed out. You Obsession must be sacrificed in order for the Ebony Memento Mori to activate.)

This allows for all other Survivors to play normal and try their best to keep the Obsession alive. This gives the Survivors a fair chance of winning and also a very suspenseful and stressful match.

I do not believe that EMMs should only be for cosmetic purposes for killing Survivors on death hook since this offering is an Ultra Rare after all. The only cosmetic Mori is the Cypress Memento Mori.

in order to fix the usages of EMMs, allow Ivory Memento Moris (IMMs) to appear more frequently in Bloodwebs. From my experience, I've seen 5 Bloodwebs in a row with EMMs, but not one with any IMMs.
78 Comments
Mitzi 28 Aug, 2020 @ 5:10am 
Im a survivor main btw.
Mitzi 28 Aug, 2020 @ 5:10am 
Keys NEED To take three years, cuz right know if the survivor is healthy, there is literally NOTHING the killer can do if they are infront of the hatch and with a key, like litearlly, you cant grab, and you probably cant instadown.
Gene 10 Jul, 2020 @ 12:55pm 
Some things about Other Issues:
Keys make no sense. Since when does it take like 3 years to use a key? Also Where Did They Go!? would be hard as fuck without the pink addon(s). Also also, don't bring Doctor's Madness into this. That's exclusive to him. Also also also, it looks much, MUCH harder to open the hatch with Skeleton Key than Dull Key.

Ebony Moris just encourage tunneling and/or camping the Obsession, similar to the old Dying Light.
Hopper 30 Dec, 2019 @ 12:44am 
I just want to respond some things and provide my own ideas
-Slowing generators is not the way to do balance, generators are already tedious as it is to do and are incredibly boring due to the loop of holding m1 and hitting skillchecks. If we want to address game time, the best way to do it is with an exciting secondary objective that isn't holding m1.
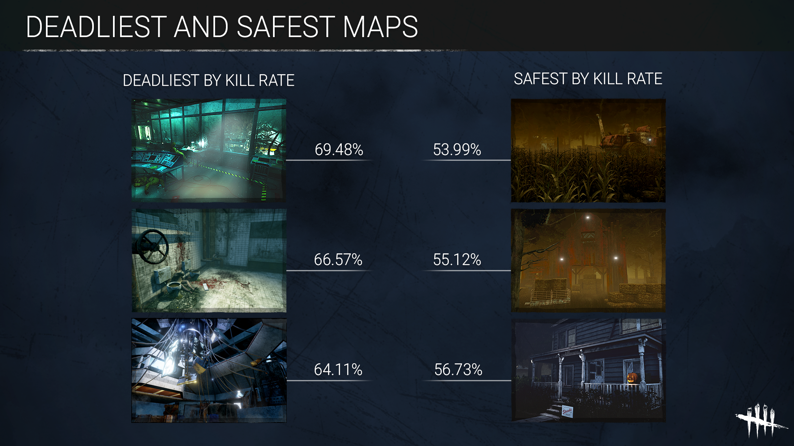
-Maps are a big problem in this game, I'll address some maps specifically but in general maps that are large and have strong structures are harder to win on. Haddonfield is better after the BL change but they still need to fix fences and some of the basement (not killer basement) house configs. People have trouble on cowshed due to the long pallets. The map is lined with them and they are completely safe. Rotten fields is too big and the corn can make it hard to catch survivors. Now for what you said are the strongest maps, it is definitely not all because of size.
Hopper 30 Dec, 2019 @ 12:43am 
While Hawkins does have good loop spots, a large majority of the pallets are not safe. The Game has a very good amount of safe pallets but that is all it has, there are very few windows. This is even more detrimental when combined with the last thing these maps have in common which makes them super strong. This is the fact that they are what I call maze-like. As a survivor there is no way to know which tile you are running to do the map not being open. As a survivor you have to pick where to run and hope you find a good pallet or window. Compare this to other maps where structures predictable spawn. When I play Thompson House, I know where each and every structure spawns so I can map out a path for myself. You can't do that with any of those due to the unpredictable structure spawns.
Hopper 30 Dec, 2019 @ 12:42am 
-SWF needs to be addressed in some fashion but I don't think SWF penalties are the way to do them. Personally, I want solos to be given the information that SWF provides (See when someone is in chase, see others, etc). From there killer's can be buffed to this new level of power.
-Trapper: give him all of his traps off start, it wastes too much time to not only have to set them but also have to hunt them down when you need more only to go to where you actually wanted to set it
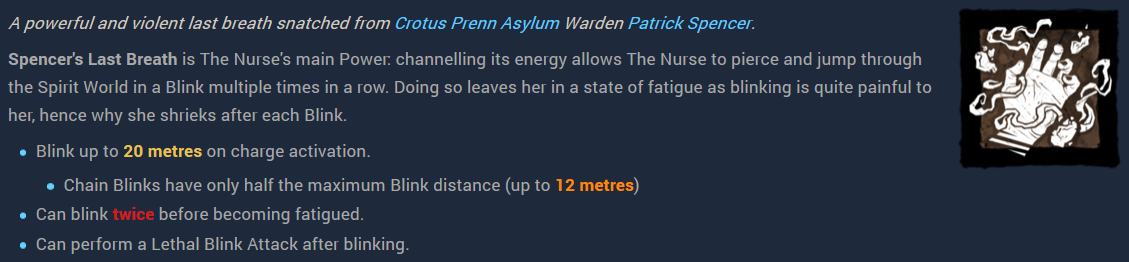
-Nurse: I still play Nurse and she is undeniably still the most powerful in the game. I don't get how people suddenly think she was dumpstered. While her add-ons were dumpstered, her base kit was only changed in a way that punishes bad Nurses. I actually like the changes, it makes her less forgiving to play. This is completely fair to be the case when she is the top killer. The way I see it is this, the stronger the killer is, the harder they should be to use.
Hopper 30 Dec, 2019 @ 12:42am 
-Huntress: I am fine with Huntress the way she is now. The only thing that should be changed is maps so that they aren't a pain in the ass. Remove stupid twigs that hang off trees that can suck up a hatchet. Any see-through loops should be lowered so that she can throw over them (give enough space so survivors can safely crouch though).
-Oni: Old flick was too much but new flick is too little. Old flick allowed him to hit way past where he should be able to but new flick means he can't hit anything that isn't right in front of him. They should adjust the max flick to 90 degrees. This way he can still hit survivors around objects but he can't swing way around something.
Hopper 30 Dec, 2019 @ 12:41am 
-Hatch: honestly think it should be removed and replaced with something more skill based and exciting, maybe a countdown to open the doors while the survivor is revealed to the killer, they have to survive the timer and then make it to a door. RNG mechanics just aren't fun so they shouldn't be in the game. (This applies to Trapper's struggle, and pig boxes, they should be a set thing not hope you get lucky). Also the reason killer's can't grab out of hatch is so that they can't camp hatch with no penalty. If they could grab out, they could camp hatch and wait until the survivor comes, if they see them, close hatch and chase. If they slip through, grab out of hatch. The whole point of end-game was to end the dumb stand-offs that happened at the end of games. It was not meant to be a balancing mechanic.
Hopper 30 Dec, 2019 @ 12:41am 
-Keys: let them keep their aura reading but I honestly think they should just be removed from the game, they aren't fun
-Moris: same thing as keys, change current offerings to be usable after struggle state and remove them from bloodwebs. Cypress mori should become base kit though, if the last survivor is down the killer can wait out any trick the survivor has so make it base to avoid the senseless waiting (DS, Sabo'd hooks, etc). Your suggestion doesn't work as it just promotes tunneling and camping. It is the same reason Dying Light was changed.
ShittyM1Killer  [author] 25 Dec, 2019 @ 6:17pm 
Thx for all the insults, stupidity, and/or support, and criticism. Haven't read the comments since the guide's debut, but Merry Christmas to all. Let's have one day where more important things (basically everything else) is put first. Have a Merry Christmas.