Unity of Command II

Unity of Command II

Not enough ratings
Modding guide
By J-manByte
How to create mods and upload them to the Steam Workshop.
   
Award
Favorite
Favorited
Unfavorite
Introduction
This guide is a work in progress, sections describing different types of mods will be added over time.

First and foremost, locate the game's Steam install folder.
In it, you'll find the prep.exe script. This is the main modding tool, and is used to build and upload mods.

Secondly, locate the game's AppData folder at %localappdata%/.uoc2/.
The _packages directory located here is where all your mods will be stored locally.


The game consumes mods in the form of packages. A package is a directory containing some assets. In the game's installation folder is the base package (_packages/base).
This package contains all of the assets that the game ships with.
Mods are packages that share the directory structure of the base, but change some files in it.

Each section of this guide describes how to create a specific type of mod.

Enjoy personalizing your Unity of Command II experience!
Editing the game's configuration files
Creating a mod

Unity of Command II uses YAML configuration files for almost everything.
These files define things like the camera, AI behavior, game rules and much more!
Most of them can be found in the base package at _packages/base/config.

Let's create a new camera mod! First, create a new package in AppData _packages. I'm calling mine camera_mod.


Now, create constants.patch.yml in the camera_mod folder with the same directory structure as in the base package.


constants.yml contains a lot of data, but we can modify only some of it.
For example in the camera mod, I've only edited some of the zoom values.
The camera mod we've crated allows for some pretty epic zoom outs!

Localization mods

To create a localization mod, follow these steps:
  • Create a new package
  • In the package directory, create localization/{language_code}/strings.yml
  • language_code should be from the ISO 639-2 standard[en.wikipedia.org]
  • The original texts can be found in the Steam installation folder {path_to_steam}\steamapps\common\Unity of Command 2\_packages\base\localization\eng
  • Copy-paste the data from a yaml file into strings.yml and translate the text

Uploading to Steam Workshop

To upload the mod, run the steam_ws_upload command with the prep script in the game's install directory.

./prep.exe steam_ws_upload {package_name} --title "Item title" --description "The item's description" --visibility 0

The {package_name} is the name of the mod's package directory. So it would be camera_mod for the above example.
The --visibility kwarg can be 0 (public), 1 (friends only) or 2 (private).
Adding a thumb.jpg to the mod's package directory will set it as the mod's thumbnail.
When updating the mod the --title, --description and --visibility kwargs aren't required.

Happy modding!
Modding 3D assets
The list of moddable 3D assets can be found in _packages\base\assets\models.
Here I'll be using us_inf_42_mesh.npz (US infantry model) to explain the process, but any other can be used.

In the game's Steam directory, create assets_in/unit_models.
In assets_in/unit_models, create a directory with the name of the model your mod will replace.
Model name is everything before the _mesh.npz suffix. E.g. in case of us_inf_42_mesh.npz, the model name is us_inf_42.

In assets_in/unit_models/us_inf_42 create a .yml with the same name as the model.

us_inf_42.yml:
materials: map_Kd: Default_Base_Color_us.tga map_Ks: us_inf_42_specular.tga map_bump: us_inf_42_normal.tga Kd: [1, 1, 1] Ks: [1, 1, 1] shininess: 4.0 mesh_file: us_inf_42.obj properties: scale: 0.84 offset: [0, 0, 0] variations: shooting: us_inf_42_shooting.fbx

Let's explain each section of the yml:
  • materials - material specification tag
    • map_Kd - name of the diffuse map that's located in the same directory as the .yml. No alpha channel.
    • map_Ks - name of the specular map that's located in the same directory as the .yml. Grayscale.
    • map_bump - name of the normal map that's located in the same directory as the .yml. No alpha channel.
    • shininess - shininess factor
    • Kd - diffuse factor
    • Ks - specular factor
  • mesh_file - name of the mesh file that's located in the same directory as the .yml. Can be .obj or .fbx
  • properties - mesh properties
    • scale - mesh scale
    • offset - object space mesh offset
  • variations - mesh variations
    • shooting - name of the mesh file that's located in the same directory as the .yml. Shooting pose for infantry units. Not needed for non infantry units. Can be .obj or .fbx

Once the .yml has been setup, run the following command to build it into the .npz file that the game can understand:
./prep models us_inf_42 --package={your_package_name}
32 Comments
hjf98 22 Nov, 2024 @ 12:21am 
Hello, after the update of DLC in Berlin, the mod for modifying experts has completely become invalid (downloaded directly from the Workshop), but the mod under \AppData\Local\.uoc2\_packages(Local Mod) is still valid. Can you check if there are any issues?
durgerburglar 1 Mar, 2021 @ 11:12pm 
I wonder if it would be possible to mod in the supply numbers when you hit the supply view hotkey, i.e. the distance your supply covers on the terrain. Add it under/over the supply disruption bars. I think this would really speed things up, as now I have to click on the supply hub button and manually click on each hub to see it's range. Don't know why this isn't there by default like it was in the first game, perhaps because it's more complicated with various custom supply depots. But would make planning and movement a lot faster.
Nathan 21 Nov, 2020 @ 4:29am 
Hello,
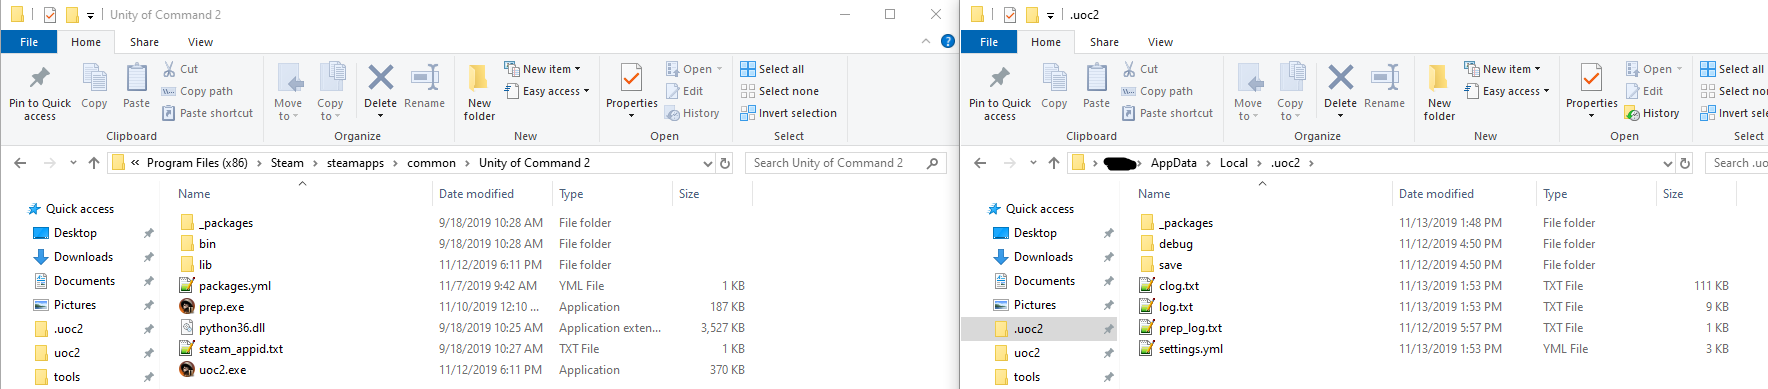
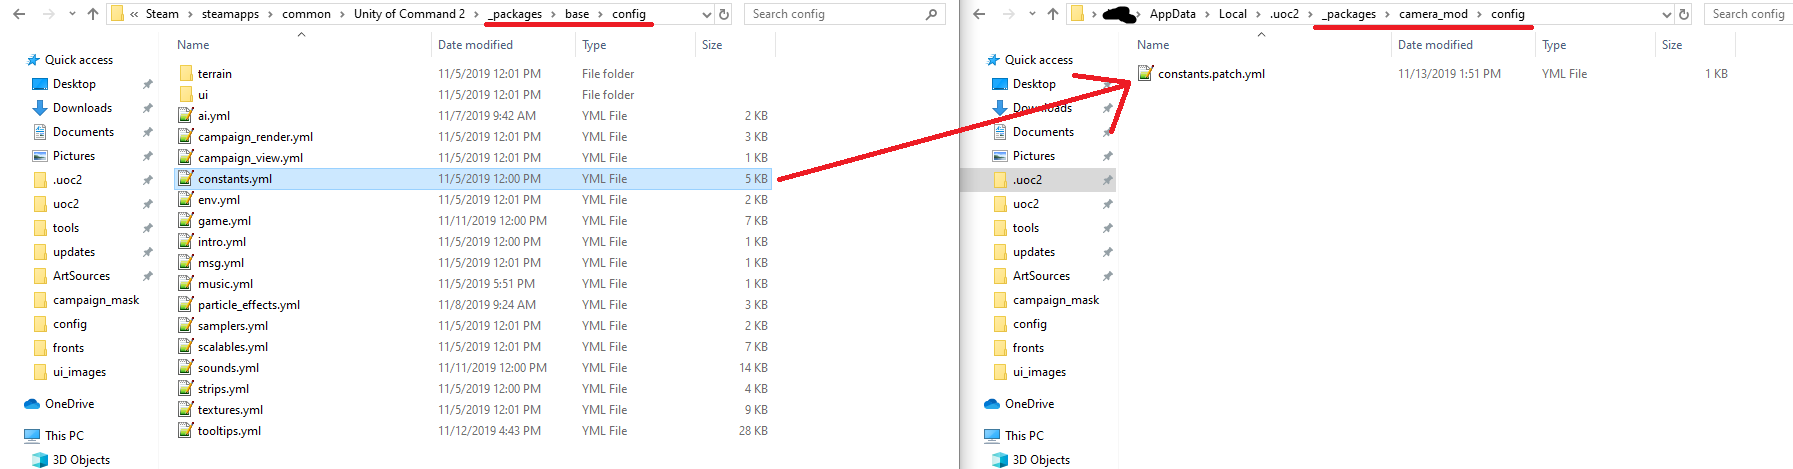
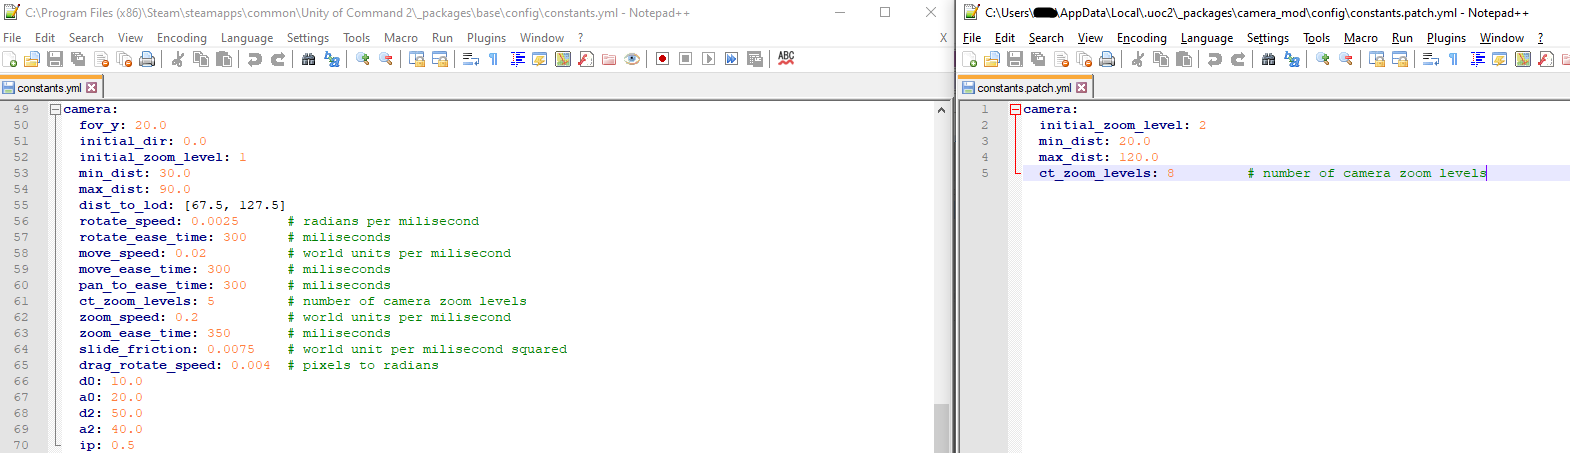
thanks for the modding 3d asset infos,
but could you provide a little more
information? I'm trying to replace a tank model,
but I miss a lot of information, for example for the turret.
what is needed in the yml file for a vehicle ?
as well as for the type of mesh that I have to use, can I use sub-mesh or the model must be composed of only one mesh? could you provide an sample model for infantry and vehicles?
Steevodeevo 3 Feb, 2020 @ 1:34am 
Ok thanks for that. I hope it is included at some stage as I can imagine some amazing mini-campaigns being created using just one zoomed in map and it provides space to make movement on the maps quite strategic.
J-manByte  [author] 3 Feb, 2020 @ 12:40am 
@Steevodeevo Ah, I misunderstood. What you want is to change the hex scale, which is currently 15km per hex. This isn't supported currently, but it might be once the map editor is released.
Steevodeevo 3 Feb, 2020 @ 12:34am 
Sorry I explained that really badly. What I mean is if I wanted a Map to be on a bigger scale - in other words the map would still have the same towns, starting and ending locations, BUT is it possible to make the distances between these locations greater: by adding in more hexes between towns and victory locations, in effect zooming in and increasing the scale of an existing map within its existing boundaries.

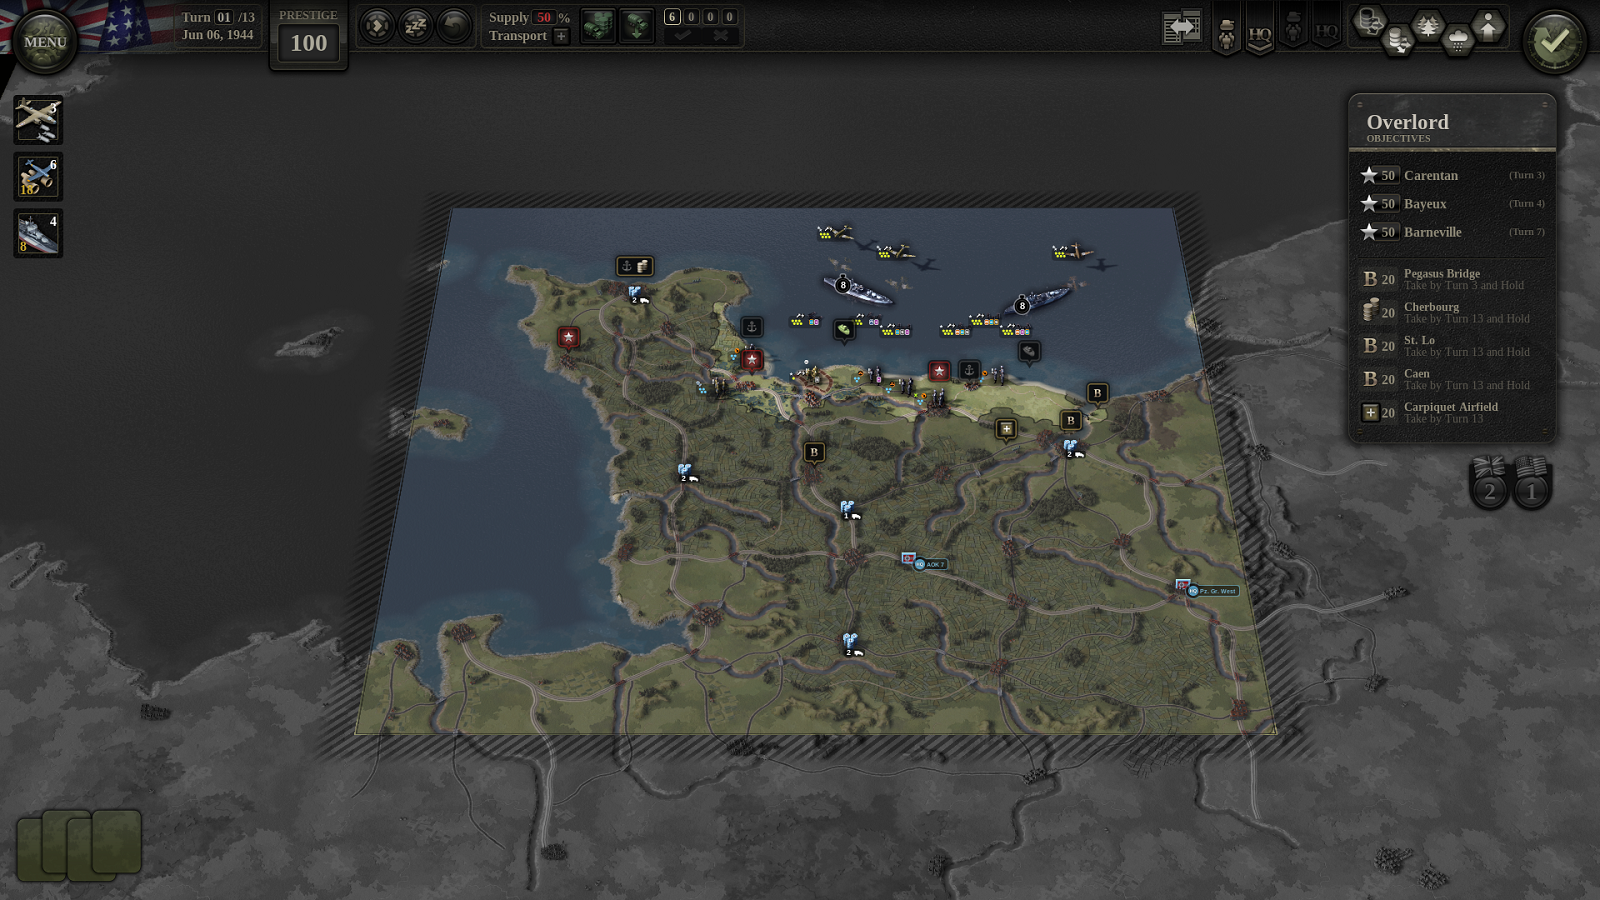
So instead of Town A having 5 hexes to town B, could I modify it so that town A and B were, lets say, 10 hexes distant from each other?
J-manByte  [author] 3 Feb, 2020 @ 12:27am 
@Steevodeevo The engine loads a specific number of hexes around the playable area. So what you can do is enlarge the playable area, save, exit the editor and when you load the scenario again a larger part of the map will be loaded.
Steevodeevo 2 Feb, 2020 @ 6:26am 
Thanks for that. Is the playable area only based on the existing map(s) scale?
So for example, if I want to create a scenario on a different scale so there were more hexes per map is this not currently possible?
J-manByte  [author] 2 Feb, 2020 @ 3:56am 
@Steevodeevo

You exit the scenario editor with CTRL+Q.

You can copy campaign scenarios as standalone in the scenario editor menu. When a scenario is loaded, you can edit the playable area with the "Set Playable Area" tool.
The guide for it can be found here: https://gtm.steamproxy.vip/sharedfiles/filedetails/?id=1971010989
Steevodeevo 2 Feb, 2020 @ 1:39am 
Hi hope this is in the right place, sorry if not.

New to modding so 2 dumb questions...

1. How on earth do I exit the scenario editor? I loaded a map as a new template had a look at iot and wanted to leave and there is no exit button and Esc doesn't work..

2. Is there a way to load a pre-existing map and change its size.. so retain its locations and proportions but 'blow it up' to twice or 3 time s the size / number of hexes..

Thanks

Steve