Terraria

Terraria

25 ratings
Terraria Boss Ideas 7 [Bosses 31-45]
By Okami Tomato
I have even more of these bosses, though a few more than usual are actually requests from the Boss Ideas Discord page that I have received as opposed to me just brainstorming on my own as I often used to do.

As usual this isn't a guide, just some ideas for bosses that don't exist already. Please stop commenting that this isn't a guide. I know, I'm sorry.

Anyways, to those who want to see more bosses; enjoy!
   
Award
Favorite
Favorited
Unfavorite
New Stuff:
"Any new info that might be important for these pages, whether in-game or just in general"

1. 'Heavy-Hits'
The 'Heavy-Hits' system is mainly an aesthetic detail being added to certain bosses' stronger attacks. It is a large red 'slash' or 'strike' that lingers in-place if the player is hit by certain attacks. The strike itself does nothing and is purely visual, but can act as a more immediate warning that the player has just been hit by a strong move and, thus, has just lost a lot of health without looking at the top-right of the screen.
Attacks with this effect should now be labelled with a '!' next to the attack's damage in the stats.

2. Discord
Discord is now the place you probably want to be to submit boss ideas (though doing so in the comments still also works too if you don't want to join the Discord, just that the Discord is divided up nicer). Link will probably be in the final section, as usual.

3. Uni
The biggest change is that I have actually gone to University now, and will be for the next 3 or 4 years or so. Therefore, there is a chance that these will be slowing down even more than previously anticipated as I juggle it with my studies and a few other things, though I will not be abandoning these by any stretch; just delaying them slightly.

Anyways, with that out of the way, enjoy some more bosses :)
[Debuff Almanac: Vol. III]
Burning Light
Tooltip - "The light burns deep"
Effect - Deals 10 damage per second. Being hit by an attack that can inflict the debuff whilst inflicted with it will cause the player to receive the Light Blaze debuff

Chaotic Ember
Tooltip - "Unstable energies consume you"
Effect - Deals 50 damage per second

Crimson Embers
Tooltip - "Bright red flames burn around you"
Effect - Deals 15 damage per second

Heavy Gravity
Tooltip - "Gravity feels stronger"
Effect - Flight time reduced by 30% and flight speed and acceleration reduced by 50%

Hypersensitivity
Tooltip - "Your senses have been heightened drastically"
Effect - Weakened hunter potion effect, though also reduces player's attack by 5% and being hit inflicts the Stunned debuff

Ichorian Spark
Tooltip - "The Ichor is burning..."
Effect - Deals 8 damage per second and reduces the player's defence by 30

Lethal Venom
Tooltip - "Better find that antidote"
Effect - Deals 6 damage per second for 10 seconds, then increases by 1 damage per second every 8 seconds. Lasts until it is either cured or the player dies.
Extra - Can be cured by the Nurse or the Antivenom Vial

Light Blaze
Tooltip - "Light consumes you..."
Effect - Deals 18 damage per second, reduces the player's defence by 20, and causes the player to take 1.2x damage

Lovestruck
Tooltip - "You've been blinded by love"
Effect - The player cannot attack, but can still use non-damaging items. Movement speed also reduced by 15%

Nature's Fury
Tooltip - "The power of nature directed at you"
Effect - Reduces player defence by 20 and deals 10 damage per second.

Stunned
Tooltip - "You have frozen up..."
Effect - Player cannot use items, loses 10 defence, and movement, jump and flight speed reduced by 60%

Unstable Energy
Tooltip - "The energies absorbed are too strong to handle"
Effect - Deals 20 damage per second, reduces player's defence by 20, and removes any additional damage reduction effects outside of the player's defence stat.
31 - Nebula Hive
Request by UltraCraftGames (via Discord)

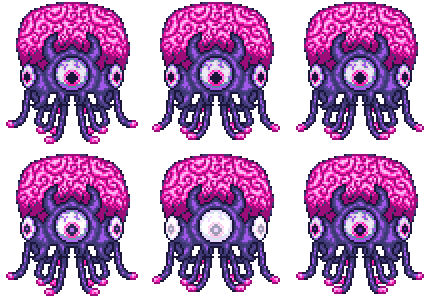
Appearance: A massive, 3-eyed Nebula Floater. Its brain makes up around half of its total body size, with the rest being dedicated to a mixture of a solid purple body and numerous tendrils squirming wildly below the body. Its eyes occasionally begin to glow before dimming down again shortly after.

Summon: Use the Nebula Breaker at night. The background will switch to that of the Nebula Pillar/Monolith and the fight will begin. The fight doesn't actually end at daytime, only upon getting too far away from the boss or upon dying, like the majority of bosses.

Fought: Post-Moon Lord
Specification: Post-Moon Lord
Special?: No
Progression?: Yes, Later Bosses

Stats:
Health: 145,000 (200,000)
Attack:
-115 (200) (Melee)
-120 (210) ! (Teleportation)
-100 (175) (Lasers)
-105 (183) (Holo-Eye)
Defence: 50

Attacks:
Phase 1:
The Nebula Hive will mostly float towards the player or float around near to the player, usually based at least in-part on what its current attack is. It has various attacks at its disposal:
-It may summon up to 3 Nebula Floaters, signalled by it becoming stationary and its eye glowing. The Floaters are spawned in random positions near the boss and only become active after around half a second.
-The Hive may charge at the player, slowing to a stop at the end of the charge.
-It may fire a short barrage of lasers at the player from its central eye, remaining stationary until the lasers are all fired
-It may summon up to 7 Energy Rings; up to 3 from the main eye and up to 2 from each of the smaller eyes, which accelerate as they travel. Upon hitting a solid block they have a 25% chance to spawn an Evolution Beast before despawning.
Once down to 85,000 (145,000) health it will let out a shriek and transition into its 2nd phase, gaining new attacks.
-It now has access to a teleport ability. It will go invisible and will signal its teleportation location via the glow of its eyes being visible just before it re-appears there. It can also 'fake-out' the player numerous times by its eye glow appearing in places and then disappearing again.
-It may release massive clusters of Brain Sucklers from its within its tendrils whilst stationary, beginning to move again after a few seconds have passed.
-Finally, it may summon numerous eye-shaped projectiles in random places nearby. After a second of inactivity they will all suddenly accelerate towards the player's location. This attack can happen up to 3 times in succession.
(Once down to only 25,000 health it transitions to its 3rd and final phase. In this phase it continuously uses its teleport attack, with only the occasional swarm of Brain Sucklers being spawned between every few charges.)

Defeat: It stops moving, its eyes begin to glow white, and it then bursts into both a pulse of pink light and a lot of gibs.

Drops: Large amounts of Nebula Fragments, a small amount of Luminite Ore, and also Mindful Fragments which are used mainly to make Mind-Bender Armour; a more offence-based mage armour that doesn't provide the same wisps as the Nebula Armour itself does. Also drops a tome and a magic staff. In Expert Mode it drops the Concentrated Nebula, used to enhance the Nebula Monolith so that it provides a small damage boost to mages when nearby, as well as the Nebula Pillar Fragment that provides some mild buffs to mages (like magic damage and crit chance, reduced mana usage, etc.).

Hints:
-Dealing with the enemies it spawns first is recommended as they can provide problems later on in the fight if not dealt with.
-Once it gains access to its teleport any sort of 'burst speed' like a dash is recommended as its teleports are quite fast and the signal provides only short notice before it re-emerges.
-Farming this boss as a mage could be a good idea as the enhanced Nebula Monoliths that can be made in Expert Mode provide a damage boost to mages over quite a large area, and thus having a few scattered across your arena can give you a mostly-free damage buff during boss fights and events.

Extra Info:
-The Nebula Hive, due to it being mostly a brain, is indeed a 'Hive Mind'
-The Nebula Hive was the first boss idea requested via the Discord server as opposed to the Steam comments
[Added: 29/9/19]
32 - Solar Champion
Request by UltraCraftGames (via Discord)

Appearance: 'Solareon The Great' is a Drakanian donning what appears to be a slightly modified set of Solar Flare Armour, though the heat of the armour appears to be so intense that the armour is releasing small cinders constantly.
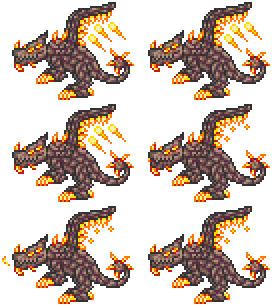
Appearance: The Arch Drakomire, the Solar Champion's mount, is a large Drakomire-like enemy. The main difference visible is its large set of crystal-lined wings, kept airborne not by flapping its wings but, instead, by releasing jets of flame periodically.

Summon: Use the Solar Beacon at night. The background becomes that of the Solar Pillar/Monolith's background and the boss will spawn by slowly flying in from above and raising a blade into the air whilst on the back of his Drakomire, becoming vulnerable only after his 'taunt'. The boss only despawns if the player gets too far away or dies, like most other bosses.

Summon: Post-Moon Lord
Specification: Post-Moon Lord
Special?: No
Progression?: Yes, Later Bosses

Stats:
-45,000 (67,000) (Drakomire + Champion)
-50,000 (85,000) (Drakomire)
-35,000 (55,000) (Rider)
Attack:
-130 (245) ! (Drakomire Melee)
-120 (232) (Champion Melee, Champion Weapons, Drakomire Firestorm)
-100 (200) (Drakomire Fireball, Champion Fireball)
Defence:
-78 (Drakomire + Champion, Drakomire
--780 +99% DR (Phase 2 Drakomire (Champion still active))
-105 (Champion)

Attacks:
Phase 1:
The Champion will ride the Drakomire throughout this phase, with both the Drakomire and the Champion using separate attacks despite acting as 1 entity.
-The Drakomire may charge at the player up to 3 times, with each subsequent charge gaining distance and speed
-The Drakomire may launch a flurry of fireballs from its mouth that explode on contact with players or solid blocks.
-The Champion may throw up to 5 fiery daggers at the player in rapid succession. These stick onto blocks after being thrown and persist for a while, dealing damage if the player hits them even when they are stuck in a block.
-The Champion may throw a large Daybreak-like spear at the player. As it travels it arcs through the air and releases fireballs that accelerate towards the player's location, exploding on contact with a solid block or player.
Once it reaches 0 health the Champion dismounts the Drakomire and the two begin attacking independently with their own separate health bars.
Phase 2:
The two have their own attacks from the previous phase, plus 2 more attacks each. The Drakomire itself has increased defence until the Champion is defeated, so defeating the Champion first is recommended.
-The Drakomire can now launch a special fireball that explodes when close to the player or upon hitting a block. Upon exploding it summons a damaging tornado of fire at its location that continuously releases arcing fireballs similar to the Solar Pillar's, though faster, more numerous, and unable to be destroyed by weapons.
-The Drakomire may charge, releasing fireballs as it travels that accelerate towards the player
-The Champion may pull out a Solar Eruption, swing it backwards quickly, and then launch the flail forwards, acting like the Solar Eruption does normally. It remains immobile during the whole attack.
-The Champion may draw 2 large blades and jump at the player whilst spinning, able to deflect projectiles. It stops spinning once it reaches the player's location at the beginning of the jump, simply falling down afterwards.
Once the Champion runs out of health it falls to the ground and becomes inactive whilst the Drakomire becomes increasingly agile and aggressive.
Once the Drakomire is defeated it, too, falls to the floor. (In Expert Mode the Champion goes over to it, raising a blade to 'put it out of its misery' before the Drakomire lunges forward and eats the Champion, beginning its 3rd phase.)
Phase 3:
The Drakomire heals all of its health back and takes to the sky again. It gains new attacks and becomes even more aggressive than before.
-It may release fireballs randomly in all directions for a few seconds whilst remaining stationary. Afterwards it will charge at the player once.
-It may slowly fly towards the player, releasing a massive cluster of fireballs at the player. After a few seconds it will fly upwards rapidly and stop launching fireballs.

Defeat:
-Defeating the Champion and Drakomire in the second phase will cause them to simply fall to the ground exhausted, both disappearing into fireballs in Normal Mode
-In Expert Mode the Drakomire begins to explode and falls out of the sky, passing through blocks as it falls. It releases embers as it falls, though they deal no damage to the player and are purely aesthetic.

Drops:
Solar Fragments and Luminite Ore, plus Drako Plating which is used to make Drake Armour; a tankier version of the Solar Flare Armour that has less damage output but a lot more defence. Also drops a sword and throwing knives that deal melee damage. In Expert Mode it drops the Concentrated Solar, used to enhance the Solar Monolith so that it provides a small damage boost to warriors when nearby, as well as the Solar Pillar Fragment that provides some mild buffs to warriors (like melee damage and crit chance, increased melee speed, etc.).

Hints:
-As the fight gets a lot more dangerous as it progresses, taking a bit of time to naturally regenerate health or waiting for potion cooldowns before triggering the 2nd phase is recommended, as the 2nd phase is a lot more hectic.
-In the 2nd Phase keep an eye on what the Champion is doing. He has an attack where he may deflect projectiles back at the player which, at this point in the game, can deal around 300 damage with some of the stronger projectiles.
-Taking some time to health during the phase 3 transition animation in Expert Mode may also be recommended as the 3rd phase doesn't have any particularly calm periods once it begins.

Extra Info:
-The phase 3 transition is a Dark Souls reference, though flipped on its head in execution
-The Arch Drakonian's design was partially based on the fire dragon seen in the opening sequence of Thor: Ragnarok, mainly being its flame-jet wings.
-The only weapon used by the Champion not seen elsewhere in the game are the fire throwing knives used across both phases 1 and 2; as the other weapons are either those used by the Selenians or ones the player themselves can craft.
-The Champion's full title is actually: Arch Drakonian Rider, Champion of the Sun; Solareon the Great
--The 'Champion of the Sun' also being a subtle joke about 'Dayman' from It's Always Sunny In Philadelphia
[Added: 29/9/19]
33 - Vortex Queen
Request by UltraCraftGames (via Discord)

Appearance: The Storm General is a tall, heavily armoured Storm Diver-like enemy. It has a jetpack and a large Vortex Beater-esque gun it carries at all times.
Appearance: The Vortex Queen on the other hand... oh no

Summon: Use the Vortex Larva at night. The background will turn to that of the Vortex Pillar/Monolith's and the Storm General will spawn. The boss only despawns if the player either gets too far away or dies, not despawning due to time of day despite the nighttime specification.

Fought: Post-Moon Lord
Specification: Post-Moon Lord
Special?: No
Progression?: Yes, Later Bosses

Stats:
Health:
-65,000 (102,000) (General)
-100,000 (165,000) (Queen)
Attack:
-100 (180) (General Melee, General Ram Finisher, Queen Lightning)
-1 (1) (General Ram) (Ignores Immunity Frames)
-105 (192) (General Laser Bullets)
-130 (230) ! (General Gravity Grenade)
-120 (216) (Queen Melee)
-0 (0) (Queen Warp)
Defence:
-122 (General)
-85 (Queen)

Attacks:
Phase 1:
The Storm General appears and begins his assault. He mainly spends the fight flying horizontally to the player, bombarding them with attacks.
-It may fire an inaccurate burst of laser bullets at the player. They are fast-moving laser-like projectiles that, like most lasers, don't pass through blocks.
-It may fire a rapid barrage of laser bullets similar to Retanazer's Phase 2 laser barrages, but more damaging.
-It may lower its head, line up with the player, slink back and then, after less than half a second, dash horizontally at the player. If it misses the attack ends after a second but if it connects the General will 'ram' into the player and continue moving. The player will be forcefully moved with the General if caught, taking 1 damage ticks for a few seconds before the General frees the player from the grasp and deals an extra hit. The attack ends if the General hits a wall or travels through the air for more than 2.5 seconds, ending both types on an additional burst of damage against the player.
-Finally, it may launch a Vortex Grenade. The grenade is affected by gravity but, with every bounce, will always reach the player's vertical height. After 5 bounces it will explode if it hasn't already exploded upon contact with the player.
After taking the General's health to 0 it will explode in a large green explosion, dealing the General's melee damage if the player is caught in it. A few seconds later, a glow of many eyes appear near the player and the Queen begins to come into view, though partially transparent around the edges.
Phase 2:
The Queen will appear somewhere, use an attack, and then disappear in a similar manner to how she appeared, only to then appear elsewhere.
-Vortex Lightning, as used by the Vortex Pillar, will continuously spawn whilst the queen is active, regardless of her current actions.
-The Queen may 'attack' by summoning 3 Alien Queens to fly in from off-screen.
-The Queen may 'attack' by summoning 5 Storm Divers to fly in from off-screen.
-The Queen may 'attack' by releasing a roar, dealing no damage but inflicting the Warped debuff on the player for a few seconds.
-The Queen's only real attack is signalled by her roaring, similar to when she goes to inflict the Warped debuff, but instead of inflicting the debuff she instead opens 3-5 portals above the player that release Vortex Lightning after around a second.
Once down to 10,000 (22,000) health the Queen transitions to her final phase.
Phase 3:
The Queen now teleports more frequently and ditches all but 2 attacks, both signalled by roars in this phase. Vortex Lightning still continues to appear.
-The Queen may use her own 'Vortex Lightning' attack seen in the 2nd phase
-The Queen may roar and summon 3-6 portals nearby. Instead of lightning, as expected, she will instead summon a random Vortex Pillar enemy from each of the portals before closing them again.

Defeat:
-The Queen lets out another giant roar alongside a pulse of green energy before beginning to shake violently in-place. As she does this, she begins to slowly fade away again. Once she becomes invisible, the background goes back to normal and the boss is considered 'won'.

Drops:
Vortex Fragments, Luminite Ore, and Storm Queen Vertebrae; used to make a tankier version of the Vortex Armour set for Rangers. Also drops a vortex flamethrower or a vortex rocket launcher. In Expert Mode it drops the Concentrated Vortex, used to enhance the Vortex Monolith so that it provides a small damage boost to rangers when nearby, as well as the Vortex Pillar Fragment that provides some mild buffs to rangers (like ranged damage and crit chance, ammo conservation, etc.).

Hints:
-The Vortex Queen's appearance isn't something made explicitly clear during the boss fight itself until she actually appears, though the General's relatively low health may hint that there is more to this boss than meets the eye.
-The Vortex Queen's attacks are somewhat easy to deal with overall, though the constant bombardment of lightning and enemy projectiles, combined with probably being somewhat worn-down by the General, still make the 2nd phase hard to combat.
-The General should be dealt with A.S.A.P. as he is virtually the toughest part of the fight as a whole due to his high damage output, fast movement speed, and continuous aggression putting constant pressure on the player.

Extra Info:
-The Vortex Queen's design was actually something I was originally going to use for a boss called the 'Copper Guardian'. However, being unable to design a good-looking Guardian, the design idea went unused until now.
-The Vortex Queen's face simply looks like a much, much larger version of the Alien Queen enemies.
[Added: 29/9/19]
34 - Stardust Magus
Appearance: The Stardust Magus, re-made again using another re-design. The most obvious difference is the stardust energy that both flows around her and also gives her dress an impossible moving design.
Appearance: The Grand Stardust dragon is essentially a larger, more intimidating version of the Stardust Dragon the player can summon. There are differences in its design, most notably the helmet's additional spike and 'teeth'.

Summon: Use the Stardust Cookie at night. The boss only despawns if the player is killed or gets too far away and is unaffected by the time of day despite it being a spawn condition. The background changes to that of the Stardust Pillar/Monolith's during the fight. The fight also begins with some small dialogue from the Magus, with the Magus passive until the dialogue ends.
"A cookie? Well that's awfully n-"
"Wait! I know you!"
"I had a feeling that the cookie offering wasn't all that was up"
"Well, unlike last time, I have a bit of help this time around!"
"Get a load of this!"

Fought: Post-Moon Lord
Specification: Post-Moon Lord
Special?: No
Progression?: Yes, Later Bosses

Stats:
Health:
-450,000 (650,000) (Dragon)
-1 (1) (Distressed Magus)
-(50,000) (Magus)
Attack:
-20 (35) (Magus Melee)
-105 (200) (Stardust Blast)
-200 (350) ! (Dragon Head Melee)
-140 (275) (Dragon Body Melee)
Defence:
-75 (Dragon Head)
-100 +70% DR (Dragon Body)
-50 (Magus)

[Piercing attacks lose 50% damage for each segment of the Stardust Dragon they pass through]

Attacks:
As the battle begins, the Grand Stardust Dragon will spawn in, attacking independently of the Magus.
The Magus' attacks are simple, but her 'pet' makes them hard to deal with regardless. She floats around seemingly randomly, but can also teleport to relocate herself.
-The Magus may spawn in between 3-4 Star Cells around herself that become active after a second
-The Magus may summon up to 3 random enemies from the Stardust Pillar above herself in a similar manner to how the Stardust Pillar does
-The Magus may launch up to 3 arcs of Stardust Blasts at the player. These arcs are made up of 4-7 Blasts each and are fired directly at the player, though move slowly. The spacing in-between each is roughly 2/3 of a second and she re-adjusts her aim for each subsequent shot.
The Dragon has its own attacking cycle separate of what the Magus is doing. It switches between its passive and aggressive modes;
-In Passive Mode it will fly around above the player, not going out of its way to target them unless they are too far from the ground. When the player is too far from the ground, however, it rapidly accelerates towards them in order to deal melee damage; only going back to its more passive behaviour once the player is grounded again. It may also occasionally fire barrages of Stardust Blasts at the player, each barrage lasting about 4 seconds and consisting of a flurry of inaccurate individual shots that accelerate slowly as they travel.
-Its aggressive behaviour has it act more akin to a Wyvern; continuously swooping around to ram the player. It drops its passive behaviours and its Stardust Blast attacks in aggressive mode until it switches back to passive again.
Upon defeating the Grand Stardust Dragon the Magus will perform one of two things, based on difficulty:
-In Normal Mode she will go straight to her 'Distressed' mode
-In Expert Mode she enters her 2nd phase
Phase 2: [Expert-Only]
In this Phase the Magus becomes a lot faster and more aggressive, teleporting very frequently and launching attacks continuously at the player. She can also summon enemies alongside an attack occasionally.
After this phase is defeated she will also go into her 'Distressed' mode

Defeat:
In her 'Distressed' mode she will simply panic in-place, doing nothing until attacked by the player. Once attacked, she will be launched upwards at an extreme pace (though is faster with a higher-knockback attack). After a few seconds she can also be seen as a small spec in the background, eventually disappearing into the sky with a 'sparkle'.

Drops:
Stardust Fragments and Luminite Ore, as well as Star-Patterned Cells; items used to make a more defensively-oriented summoner armour called the Star-Cell Armour. Also drops a summoner staff and a tome that deals summoner damage. In Expert Mode it drops the Concentrated Stardust, used to enhance the Stardust Monolith so that it provides a small damage boost to summoners when nearby, as well as the Stardust Pillar Fragment that provides some mild buffs to summoners (like summoner damage and knockback, max. minions, etc.). Very rarely drops the Never-Ending Star Cookie; used to summon a mini Magus pet.

Hints:
-The main threat in this fight is definitely the Grand Stardust Dragon. The Magus' summons may be annoying and her projectiles are slow and linger for some time, but the Dragon's high speed, damage, and aggression make it the biggest threat by far.
-Despite the fact that piercing weapons deal less damage for every segment that they pass through, piercing weapons are still good for at least some extra damage.
-When the Dragon is in Passive mode, stay close to the ground. Flying is a good way to take a hit from its head; the hardest-hitting segment it has
-In Aggressive Mode move based on the direction it is currently moving. Dash past it once it gets close and keep moving in that direction to distance yourself from the Dragon.

Extra Info:
-It is the only one of the 4 Lunar bosses seen in this page that actually has any dialogue, as well as being the only one to have a secret drop and also be the only one who has appeared in a previous Boss Ideas page.
--The Magus is also the only one not designed by UltraCraftGames from the Discord server, while the other 3 had been his idea.
-The Never-Ending Star Cookie is a reference to Willy Wonka's 'Never-Ending Gobstopper'
--Also, her line 'Get a load of this!' is a line taken from a boss fight against Dr. Eggman
[Added: 29/9/19]
35 - Blizzard King
Idea by TheWeirdHat (via Discord)

Appearance: A humanoid ice creature. It is mounted upon a large chunk of ice; sculpted with a snowflake-like adornment on the front and sword-like sculptures behind the King itself. The King has a large underbiting jaw and a crown atop its head, with two barely-visible eyes beneath the crown.

Summon: Use the Mysterious Ice Cube in a snow biome during a Blizzard. The Blizzard will persist until the boss despawns as opposed to ending naturally like usual, with the boss despawning if the player leaves the biome for too long, dies, or simply gets too far away to target.

Fought: Hardmode
Specification: Post-Golem
Special?: No
Progression?: No

Stats:
Health: 42,000 (64,000)
Attack:
-62 (100) / 87 (143) (Melee) (Inflicts Frostburn - 100%, Inflicts Chilled - 100%)
-56 (90) / 71 (118) (Laser) (Inflicts Frostburn - 100%, Inflicts Chilled - 50 (100)%)
-68 (113) / 93 (160) (Icicles) (Inflicts Chilled - 50 (100)%)
-52 (85) / 70 (116) (Smaller Icicles) (Inflicts Chilled - 20 (50)%)
-200 (350) (Self-Destruct) (Inflicts Frostburn - 100%, Inflicts Frozen - 100%)
Defence: 18 / 50

[Type 1: Normal Stats, Type 2: Half-Health Enraged Stats]

Attacks:
The Blizzard King will follow a simple patter; charging at the player up to 3 times in succession before using one of three attacks:
-He may remain in-place and call upon 3-6 Flockos, who appear from off-screen shortly after
-He may fire a barrage of icy lasers inaccurately at the player, then more to a new location and do it again. After doing this up to 4 times the attack ends.
-Finally, he may fly horizontally in the sky above the player, dropping sharp Icicles from above. Some of the icicles will be a slightly brighter blue and will drop slower-falling smaller icicles as they fall.
Phase 2:
At half health, the Blizzard King will become enraged; coating itself in similar effects to the Frostburn debuff, and gaining additional attack and defence. Its attacks don't change, but the King attacks faster than before and continues gaining speed as it takes more and more damage.

Defeat: Begins to shake, then begins its self-destruct sequence. During the self-destruct sequence it will launch icicles that are affected by gravity in random directions and continuously calls in Flockos. After a few seconds it will stop and explode in a large violent explosion; with the explosion dealing heavy damage if the player is caught in it. Explodes into gibs.

Drops:
Can drop the Icicle Blade, a projectile-firing sword, a Freeze-Ray that can immobilise non-boss enemies, the Ice Piercer which is a gun with a high firing speed and the Snowflake Staff is a summoner weapon that summons a small Flocko. All of its weapon drops inflict Frostburn on hit. Finally, it drops Frost Cores and its own unique 'Cryo-King's Cores'; materials for a few items, and in Expert Mode the Frost Crown which creates a burst of ice around the player upon taking damage.

Hints:
-Ending the 2nd phase as quickly as possible is recommended due to its ever-increasing attacking speed becoming problematic, especially for less defensively-built classes.
-Piercing weapons can be good for dealing with the Flockos it spawns, which is helpful as they can overwhelm the player quite easily if left unchecked or get in the way of players' dodges.
-Keep away from the boss once it is defeated. Keeping a distance means that neither the icicles nor the explosion will hit you and thus you won't have to worry about its last-ditch attack.

Extra Info:
-Originally, the Blizzard King was going to have a design somewhat like an enlarged Flocko. However, this was later changed.
--There was also some plans to allow it to spawn Ice Golems during the fight, but this was scrapped as well.
[Added: 30/9/19]
36 - Fragile Soul
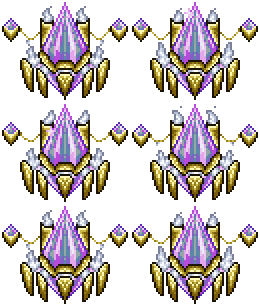
Appearance: A spherical gemstone held within the confines of a purple stand. Two crystals float nearby; one either side of the stand, and 4 large wings levitate beside it.

Summon: Use the Imprisoned Soul at night. The boss will despawn when it reaches daytime, the player gets too far away to target, or the player dies. A reddish-violet glow radiates upwards from below the background throughout the fight.

Fought: Chaos Mode
Progression: ???
Special?: No
Progression?: Yes, Arena

Stats:
Health: 500 (875)
Attack:
-400 (684) (Melee)
-420 (720) (Violet Ember)
-450 (802) (Violet Blast)
-500 (875) (Crystal Bomb)
-1000 (2000) (Violet Nuke)
Defence:
-Invulnerable (Phase 1)
-999,999 +99% DR (Phase 2)

Attacks:
Phase 1:
In Phase 1 the Fragile Soul only moves with either charges or teleports and cannot move freely on its own. However, while it would seem that that would make it an easy target, it is actually completely invulnerable in this phase.
-It may summon horizontally-moving and vertically-moving Violet Ember projectiles in their own bullet-hells. More projectiles will be spawned as the fight progresses and also in Expert Mode.
-It may launch numerous 'bursts' of violet ember projectiles outwards in organised patterns. With each subsequent burst the projectiles will be rotated slightly from their previous position, creating a 'spiral'. The amount of projectiles, the firing speed, and the amount of bursts per attack increase as the fight progresses and in Expert Mode.
-It may release 'bursts' of projectiles, similar to the last attack, though with fewer projectiles and slightly decreased speed for when each subsequent 'burst' is launched. It also launches Violet Blasts; pseudo-homing projectiles that, after a while, explode into 10-14 violet embers each which travel outwards in random directions.
-It may charge at the player up to 3 times, releasing Violet Blasts whilst charging and a final 3 at the end of the final charge. The charge speed increases as the fight progresses.
Throughout the fight certain aspects will change, with some being more intense attacks and other being additional aspects to the fight
-After 30 (25) seconds pass, a violet blast will periodically spawn every 10 seconds, independent of the Soul's actions
-After 45 (38) seconds pass, a second violet blast will be spawned alongside the first, though from a different angle. Both only spawn every 8 (6) seconds now instead
-After 60 (50) seconds pass a Crystal Bomb will spawn every 10 seconds randomly near the player. Crystal Bombs are passive for a few seconds and don't move but, after a few seconds, they trigger a timer and detonate after roughly 2 seconds. Violet blasts now spawn every 6 (5) seconds.
-After 90 (75) seconds a second Crystal Bomb is spawned along with the first, both spawning in different places but performing the same functions. Bombs spawn every 10 (8) seconds and violet blasts every 5 (4)
After 120 (150) seconds pass the boss will attempt its last-ditch attack. The bombs and blasts still spawn, but the boss itself only uses one attack:
-It will teleport near the player and, after only around 1-1.5 seconds, will release a devastatingly powerful explosion. It then disappears and repeats the cycle. On the 3rd (5th) use of this ability, instead of simply teleporting away, the Fragile Soul's orb will crack and the boss will descend slowly towards the floor, not doing anything else until it hits the ground.
Phase 2:
Bombs and blasts stop spawning and the boss remains stationary on the ground throughout the whole phase. It becomes vulnerable now, but only takes 1 damage per attack and is immune to debuffs.
-Its only attack is the 'burst' attack [seen as its 2nd attack in its 1st phase] which releases the violet embers outwards in random directions per burst. As the boss takes damage, the speed each burst is released at increases, making the fight progressively more hectic.

Defeat: The boss makes a 'cracking' sound before being engulfed in light; leaving only a silhouette of itself. The boss lets out a distressed cry before the silhouette appears to disintegrate, and upon disappearing completely the light also fades as well and the background returns to normal.

Drops: Drops Fragments if Imprisonment and Violet Fragments; both materials for a lot of powerful items. Can drop a sword that also gains some magic-exclusive benefits, 3 tomes, a magic staff, and a summoner staff that summons a small orb minion to attack foes. In Expert Mode it drops the Shattered Reflection which may reduce an attack's damage to 1, with the chance increasing the lower the attack's damage was originally.

Hints:
-Bringing a defensive setup for the boss is recommended, as the player cannot damage the boss' 1st phase and the 2nd phase only ever takes 1 damage.
-Using a high fire rate weapon on the 2nd phase can reduce the time taken to defeat it. Lingering projectiles can also help defeat it quicker
-The fight's difficulty scaling is not based on the player's actions, so the changes will be consistent across repeated runs

Extra Info:
-The boss actually has an alternate form seen only in the Post-Game Arena, which is said to be its true form before being sealed within the orb
-Despite apparently having its power sealed, it still seems quite powerful being invulnerable, and still having access to extremely powerful projectile attacks even when bound.
-The boss actually makes itself vulnerable, meaning its own recklessness is the only reason you could defeat it ultimately.
[Added: 1/10/19]
37 - Grand Amber
Sprite commissioned by GoodPro712 (via Discord)

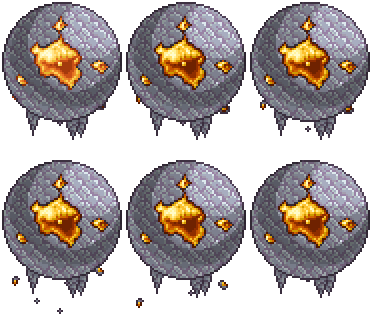
Appearance: The Grand Amber is found trapped within a nearly perfectly spherical stone, with a few cracks and holes revealing the massive amber within. The amber occasionally lets off a quick glow, with small fragments of the rock crumbling away as it does so.

Summon: Use the Suspicious-Looking Amber in the underground or cavern layers. The boss can be taken anywhere once summoned, and instead of despawning when the player goes too far away or dies it will go into a 'neutral state'
In the neutral state it will become immobile, fall to the ground, and begin rapidly regenerating health back. If left undisturbed for too long, however, it will still eventually despawn. If it is attacked whilst in the neutral state it will become aggressive again.

Fought: Pre-Hardmode
Specification: Post-Skeletron
Special?: Unusual passive behaviour
Progression?: No

Stats:
Health:
-6,000 (7,250) (Amber)
-200 (300) (Amberlings)
Attack:
-40 (75) (Amber Melee)
-20 (50) (Amberling Melee)
-15 (40) (Amber Energy)
Defence:
-18 (25) (Amber)
-10 (Amberling)

Attacks:
The Grand Amber solely attacks the player itself using melee attacks. It lacks any proper projectiles outside of a single weak homing projectile attack.
-The Grand Amber may charge at the player up to 4 times in succession
-It may fly above the player directly for a few seconds, and then stop moving entirely. After a second of not moving it will drop out of the sky [like a rock] and slam down into the ground, attempting to crush the player.
-It may fire up to 3 Amber Energy projectiles at the player. They are slow-moving, but are homing projectiles and they persist for a long time
-It may spawn up to 3 Amberlings by dropping small amber-like chunks from its body. These chunks grow rapidly into Amberlings; enemies that look like Giant Ambers, though still partially encased in stone, that float after the player in a manner similar to Wraiths. Up to 5 Amberlings may be alive at once and, once 5 are reached, it stops spawning them until the total amount falls again.

Defeat: Explodes into gibs. Any Amberlings or Amber Energy projectiles alive when it dies remain active until they despawn naturally or get destroyed.

Drops:
An Amber Sword, Amber Tome, Amber Bow and a throwing Amber Disc. Also drops lots of Amber, and potentially an Amber Hook, Giant Amber or very rarely an Amber Mosquito. In Expert Mode it will drop the Amber Shield which may deflect back weak projectiles, but this effect is uncommon and has a cooldown.

Hints:
-Simply walking in a single direction can actually deal with both the drop-down and homing projectile attacks, despite how simple of a strategy it seems.
-As the Amberlings act like Wraiths you can fight the boss over a semi-solid platform and cause them all to fall to a lower level, effectively removing its minions from the fight.
-Higher-damage weapons are recommended as opposed to just fast-firing ones due to the boss' defence (which is increased even further in Expert Mode)

Extra Info:
-The boss' sprite was commissioned by GoodPro712 for a mod that he himself was currently making. This fight is simply my take on such a concept, with his one likely being different. He is allowed to use the sprite, so don't worry :)
-The boss' melee damage is actually quite high, comparable to King Slime's, but much like King Slime its lumbering movements and limited attacking capability means it, too, is easy to deal with overall.
[Added: 1/10/19]
38 - Volcanic Leviathan
Idea by Masokitsune and Froggy (via Turquoise's Discord)

Appearance: A massive, ocean-dwelling, fiery serpent coated in a thick layer of obsidian. Its eyes, fangs, and numerous spines that aren't coated in obsidian glow intensely. Its tail, the only part not almost entirely covered over, is feathered out and acts as its only vulnerable point.

Summon: Use the Hydrothermal Power Cell in the Ocean, or have it potentially spawn naturally when submerged in water whilst at the very outskirts of the world. The boss can be taken out of the ocean biome once spawned without a problem, luckily.

Fought: Post-Moon Lord
Specification: Post-Chorus
Special?: Can summon itself
Progression?: No

Stats:
Health:
-450,000 (677,500) (Leviathan)
-300,000 (423,000) (Young Leviathans)
Attack:
-500 (750) (Head Melee)
-320 (470) (Body Melee)
-300 (437) (Young Leviathan Melee, Firestorm, Explosive Fireball)
Defence:
-[Invincible] (Leviathan Head, Leviathan Body)
-25 (Leviathan Tail)
-150 (Young Leviathan)

Attacks:
The Leviathan will switch between its aggressive and passive modes every 20-30 seconds, much like the Grand Stardust Dragon seen previously.
-In Passive Mode it flies above the player and will only attempt to melee the player if they become airborne. It continuously barrages the player in this mode, launching small fiery wisps that burst into fiery pillars after a few seconds of falling, and obsidian-coated fireballs that explode on contact with the player or a solid block, releasing a damaging explosion.
-In Aggressive Mode it still spawns 'firestorms', though less commonly, but its new main attacking method is to ram into the player. It is 'grounded' in this phase as opposed to flying.
Throughout the fight it will spawn Young Leviathans; flying worm enemies that try to simply ram into the player. Unlike the main boss all of their segments are vulnerable and there is no 'piercing penalty', but the main Leviathan will spawn them indefinitely to ensure that there are always exactly 2 (3) active at any given time.
The Leviathan will speed up its movements and fire more explosive fireball projectiles as its health gets lower, though little else changes.

Defeat: The Leviathan explodes into fiery gibs and obsidian plating, though the Young Leviathans it spawns persist until killed or despawned themselves.

Drops:
A sword, a tome, a magic staff, a bow and a summoner staff. Also drops Obsidian Plating; a material used in some armours and accessories. In Expert Mode it drops the Volcanic Emblem; which increases damage, the effects of fire-based debuffs used on enemies, and releases a fiery explosion when the player takes damage.

Hints:
-Keep an eye on it and watch when it changes from passive to aggressive. When it is passive stay close to the ground, though when it is aggressive you might want to consider becoming airborne.
-Only target its tail. All of its other segments are completely invulnerable and cannot be harmed by the player's attacks. The same cannot be said, however, for its minions.
-There isn't much point targeting the boss' minions as they will be replaced almost immediately after the previous ones have been destroyed.

Extra Info:
-Despite having a server specifically for boss ideas, this one actually instead came from Turquoise's discord instead: Maso requested a Crawltipede-like boss and Froggy an ocean boss, and thus the two were combined.
-Due to it being based on a Crawltipede, it shares three aspects with them; the use of fire, the vulnerable tail, and the aggression towards airborne players (in its passive phase only).
[Added: 2/10/19]
39 - Permafrost Mage
Appearance: A tall, humanoid ice mage, balanced atop a platform of ice. Her outfit appears to be partially made out of ice, though remains opaque. Her appearance is actually somewhat reminiscent of the Lightseeker...

Summon: Use the Frost Spark in the snow biome. The boss can be taken anywhere but the underworld once summoned without despawning, and only despawns if taken to the underworld, the player gets too far away to target, or the player dies.

Fought: Pre-Hardmode
Specification: Post-Skeletron
Special?: No
Progression?: No

Stats:
Health: 5,000 (9,200)
Attack:
-30 (55) (Melee) (Inflicts Chilled - 50 (100)%)
-35 (64) (Icicles) (Inflicts Chilled - 25 (40)%)
-25 (40) (Snowball) (Inflicts Chilled - 25 (40)%)
Defence: 8 (8-30)

Attacks:
The Mage mainly just floats around near the player, moving to either close the gap between her and the player, or to outright use an attack.
-May charge at the player up to twice in succession, with little time between charges
-May fly overhead, summoning ice clusters that eventually form into icicles and fall out of the sky
-May float around the player, summoning and launching large snowballs at the player whilst doing so
-May summon a massive row of icicles above her head, causing them all to fall down shortly after. The one directly above her falls first, then the next 2 out after a miniscule delay, and continuing until all of them have fallen.
The Mage's attacks speed up progressive as she takes damage. (Also, in Expert Mode, her defence will also increase similarly to the Queen Bee's)

Defeat: Explodes into a massive cluster of snow, which slowly falls down as particles.

Drops:
Drops a magic weapon, a throwing spear, and a sentry staff, as well as a few Frost Clusters; used to make a pre-hardmode armour set and some additional weapons. She has a small chance to drop an item that summons an Ice Slime-like pet and, in Expert Mode, will also drop a Frost Shuriken; a rapid-use throwing weapon that is non-consumable despite the name.

Hints:
-In Expert Mode, much like with Queen Bee, the player may want to switch to weapons with a higher base damage as the fight progresses, as her defence will increase significantly as the fight progresses.
-The player can force her to move by simply moving far enough away from her, as for some reason the boss is quite happy to just sit there half the time and get hit constantly as long as the player remains close-by and she isn't using an attack that requires movement.

Extra Info:
-Originally, this boss was going to go unused due to being mostly made as practice. However, the boss later got used.
-While some connection to the Lightseeker Aurora is hinted, the connection is never made explicitly clear.
-To an extent, she can be seen as a counterpart to the Queen Bee; both are bosses of their own large respective biomes but can be taken anywhere once spawned, both have a high chance to inflict their own debuffs, and both reject having a second phase to instead just progressively gain speed during the fight (and, in Expert Mode, defence). Also, drop-wise they both drop a few weapons and materials used to make class-specific armour sets.
[Added: 3/10/19]
40 - Blacklight
New sprite submitted by Darkpuppey (via Discord)

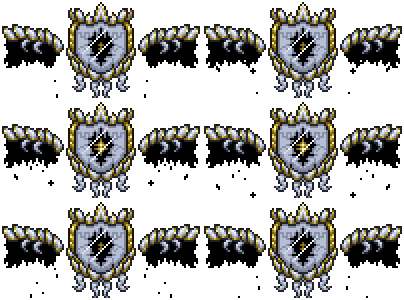
Appearance: A strange, silvery mirror in a gold frame. Gold-rimmed marble plates are seen around the frame, as well as supporting two wing-like structures either side of the mirror itself that continuously leak strange globules of a black substance. Something seems to be looking on from beyond the mirror...

Summon: Use the Broken Mirror at night. The boss will despawn if it reaches daytime, the player dies, or the player gets too far away; like with most bosses. A 140x140 arena made of unbreakable* blocks is formed around the player during the fight.

Fought: Post-Moon Lord
Specification: Post-Chorus
Special?: No
Progression?: No

Stats:
Health:
-500,000 (702,500) (Blacklight)
-5,000 (7,025) (Clones)
Attack:
-285 (425) (Melee) (Inflicts Burning Light - 100 (100)%)
-250 (370) (Burning Light) (Inflicts Burning Light - 50 (100)%)
-268 (402) (Shadow Wraith)
-275 (411) (Light Disc) (Inflicts Burning Light - 33 (50)%)
Defence:
-100 (100-500) (Blacklight, Clones)
-99,999 (Outside Arena)

Attacks:
Will only move via teleporting, attacking in-between teleports. Its attacks are usually not connected to the boss directly, but it still summons them.
-It may summon numerous wisps of light in random places around the arena in rapid succession; summoning around 50 in only 1.5 seconds. After one has existed for 2 seconds, it will explode into a brilliant white explosion, dealing damage if the player was nearby. The whole attack, therefore, lasts about 5 seconds, though the explosion timer is reduced slightly when the boss' health gets lower.
-It may create a clone of itself. This is done whilst teleporting so that, when the boss re-appears, it appears at the same time as the clone and thus cannot be told apart, outside of its health bar. Clones cannot use their own attacks most of the time, but will copy Blacklight when he uses the Shadow Wraith attack. Up to 5 can be active at once and, at lower health, up to 3 can be summoned at a time.
-It may launch up to 8 'bursts' of Shadow Wraith projectiles from itself, with each 'burst' being made of 4-7 projectiles launched in random directions. Any clones active will also use the attack. The projectiles move faster when Blacklight's health lowers.
-At certain intervals of health, Blacklight will summon large white rings that spin rapidly and ricochet off of solid blocks, moving at a slow but constant speed. They are always spawned within the arena, usually from Blacklight's location, and persist until the fight ends. They are spawned at 75%, 45%, and 15% (80%, 55%, 30%, and 15%) health.

Defeat: Blacklight's mirror will shatter, with the strange golden glow dwindling shortly after. The boss then explodes into gibs of its plates, with a few fragments of the mirror left behind as well.

Drops:
A sword that uses mana, a gun that uses mana, a bow that uses mana, a tome, and a rare summoner staff that, when used, doesn't actually do anything. Always drops Mirror Shards; materials for a few different items. In Expert Mode it will drop the Mirror Shield, which may occasionally deflect projectiles and make them damaging to enemies when reflected (though the chance is based on the projectile's damage).

Hints:
-As the fight progressively gets harder as it continues, spending a little extra time in the earlier part may be recommended so you can get used to the boss' attacks
-The majority of the boss' attacks change so little over time that the player might not even notice the differences until they become more apparent
-Defeating the clones it spawns is a good idea, as otherwise they could also use it's Shadow Wraith attack alongside the main boss and cause additional problems for the player.

Extra Info:
-The boss' design was actually based off of something made in the Discord, but had the design adjusted heavily due to the original concept being a partial recolour from Ancients Awakened
-The use of an un-shaded matt black suggests some sort of connection to the Chaotic Entities (Terminus, Chorus, Blackrune, etc.) or directly to the Chaos Doppelganger itself.
--In fact, an almost identical silvery colour is seen making up Chorus' mask and - while it isn't quite the same gold - gold is seen on both of Terminus' cloaks as well.
- Originally, the boss' design looked a little different, though thanks to Darkpuppey (probably more well-known for being one of the devs for the Ancients Awakened mod) helped remake the sprite to look a lot better
[Added: 4/10/19]
41 - Null
Appearance: Another Chaos Entity, much like Terminus and Chorus, though instead of wearing a cloak like those two it instead wears a set of red armour with copper highlights. It appears to have a scar over its left eye, though this may not be a scar due to its form only being partially physical and constantly shifting.

Summon: Use the Crimson Banner at night. The boss won't despawn during the day, despite the summoning requirement. The boss only despawns if the player gets too far away or dies. He opens with the message "You think you stand much of a chance?" which appears just before his first attack.

Fought: Post-Moon Lord
Specification: Post-Chorus
Special?: No
Progression: No

Stats:
Health:
-1,200,000 (2,000,000) (Null)
-24,000 (33,500) (Pawns)
Attack:
-300 (465) (Melee) (Inflicts Bleeding - 100%, Crimson Embers - 33 (67)%)
-318 (500) (Copper Chakram, Red Chakram) (Inflicts Bleeding - 100%)
-330 (527) (Buzzsaw) (Inflicts Bleeding - 100%, Crimson Embers - 33 (67)%)
-250 (380) (Pawn Melee)
Defence:
-400 (Null)
-150 (Pawn)

Attacks:
Null spends most of the fight appearing near the player, charging at them, and then disappearing again a little time after the charge ends. He has numerous attacks he uses in-between charges, usually appearing somewhere else, using the other attack, and then disappearing again and resuming his charges.
-He may throw a large, orange-brown spinning ring that ricochets off of blocks. If it detects it is going too far away from the player it can also ricochet off of nothing at all to go back in the right direction again. After around 10-15 seconds it despawns.
-He may raise a curved blade to the sky and then point it left or right based on the player's direction, letting out a laugh as he does so. Numerous Chaotic Entities, unarmoured and visibly shorter than Null, will run in from off-screen, mainly just running and jumping at the player until defeated.
-He may raised his curved blade up to the sky but, instead of pointing it at the player, he will throw it. Once thrown it moves in a similar tear-drop shape to a Boomerang, but at a much higher speed, as the blade rapidly spins (buzzsaw). He remains stationary until the blade returns to his hand
-His final attack is the 'Red Chakram', in which he throws a red version of the spinning ring from before, though they all act differently and persist until the boss is defeated.
--The first one, launched at 75% (80%) health acts like the Copper Chakram did, simply bouncing off of blocks, but moving slower. This is also signalled by Null saying "Plead for your life now, and I might spare you."
--The second one, launched at 50% (65%) health will continuously move towards the player at a moderate pace, moving through blocks where necessary. This, too, is signalled by Null speaking; saying "You've made a fatal mistake in continuing your pointless endeavour"
--The third, and final, one is launched at 25% (40%) health and simply follows the player's path, moving based on where the player had been and simply following that path as opposed to heading directly at the player. It will only move off-course if the player teleports, where it will move to the location the player teleported to directly and continue following the player's movement path again afterwards. This is signalled by him saying "I'll Crush You!"

Defeat: Null lets out a shout and disintegrates over a period of only a few seconds, with his armour burning up as he does so. Any projectiles active upon reaching 0 health are destroyed, though the Pawns continue to attack the player until despawned or defeated manually. He leaves no gibs behind.

Drops:
A fast-use melee weapon, his curved blade that can be thrown like the Buzzsaw attack, 2-4 of the chakrams that stack up to 10 and bounce off of blocks when thrown, and a summoner staff that summons Null's Pawns. Also drops Hate Shards; a material for mostly Chaos Mode stuff. In Expert Mode he also drops Rage Fuel; a consumable item that reduces the player's defence to 0 but excessively increases their damage.

Hints:
-Dashing and teleportation is, as ever, very useful for dodging his attacks due to their short notice and unpredictability
-Fighting Null far from the ground can limit the effectiveness of the Pawns he summons

Extra Info:
-Despite being the 'edgy' boss, with his red and black colouration, scar, numerous bladed weapons, bleeding and fire debuffs, and his threats; he is only slightly stronger than an evil mirror statistically.
-Despite the fact that his body isn't entirely physical (a common occurrence for chaotic entities), he somehow appears to have a scar. It may be the case that, for whatever reason, this part of his body is mostly solid, or that the scar isn't even a real scar.
-Despite having similarities to the Crimson (lots of use of red, bleeding being a common debuff, etc.) his summoner has no Crimson-specific materials, meaning he can still be fought on a Corruption world
[Added: 5/10/19]
42 - Mimi
Appearance: A Chaotic Entity, much like Terminus, Chorus and Null, wearing a pink summer dress. She twirls a pink parasol within gloved hands, with a strange look of glee in her eyes.
Appearance: The Guardian is a strange, barely-formed creature with a large mouth that makes up a large portion of its body. It has small tendrils thrashing from its back.
Appearance: Grimflies are partially-formed flying enemies with spider-like legs. Their bodies are hollow and eyes slanted due to not being formed properly.

Summon: Use the Molten Amalgam at night. The time will be stuck at midnight for the rest of the fight. The boss only despawns if the player dies or gets too far away. Mimi and her Guardian only appear after their dialogue:
"Oh? Someone wants to see us?"
"My, my, now look at you!"
"Do you also want me to help you?"
"...Like I did the others?"

Fought: Post-Moon Lord
Specification: Post-Chorus
Special?: Unlisted Craft
Progression?: No

Stats:
Health:
-675,000 (1,000,000) (Mimi)
-105,000 (200,000) (Guardian) (Respawns)
-10,000 (17,450) (Grimfly)
Attack:
-250 (388) (Mimi Melee, Guardian Melee)
-320 (500) (Angered Guardian Melee)
-300 (470) (Grimfly Melee, Heart)
-400 (650) ! (Heartbreaker)
Defence:
-202 (Mimi)
-375 (Guardian)
-150 (Grimfly)

Attacks:
Mimi herself will mainly float in-place, but can either teleport of float around during attacks or for relocating herself to get nearer to or further from the player.
-Mimi may create a ring of 8 heart-shaped projectiles around herself and then launch it at the player. The ring splits into 2 smaller rings of 4 upon reaching the place where the player was when the attack was launched; with one ring remaining in-place and the other continuing to move. The stationary ring despawns after a length time period passes.
-Mimi may create numerous heart-shaped projectiles from off-screen and cause them all to begin moving in random-ish directions. The only rule for their movement is that they cannot move away from the player; only staying the same distance away or getting closer.
-Mimi may disappear and have pink petals fall from the sky near the player. If any are touched they don't deal immediate damage, but Mimi will giggle before the player is hit with an unavoidable 'strike' that deals heavy damage. Mimi appears again after the attack ends. (Heartbreaker)
-Mimi may raise her parasol, only for large swarms of Grimflies to fly in from above. They act much like bats; clumsily bouncing off of blocks while chasing the player.
The Guardian will remain close to Mimi and the player, remaining passive until Mimi is attacked. Every time Mimi takes damage the Guardian will become aggressive; lunging at and ramming into the player for roughly 2 seconds before calming down again.
If the Guardian is defeated, it will remain immobile in a crumpled heap for a few seconds before reviving itself.
At 75 (80)% health her attacks will speed up, with her saying "You put up a lot of resistance, don't be shy, now"
At 45 (60)% health her attacks speed up again and she begins using the Heartbreak attack. She says "Don't fret; I don't bite... but my friend here probably will, so lets not make him angry, now"
At 20 (30)% health the Heartbreak becomes more common and she speeds up again. She says "Oh, now, so immature."

Defeat:
-Mimi will let out a distressed cry before disappearing, leaving behind her parasol that slowly floats to the ground. Her Guardian and any Grimflies left despawn as she does.
-When the Guardian is defeated whilst Mimi is active, it will drop to the ground and melt into a puddle. After a few seconds, it will reform itself.
-Grimflies, upon defeat, simply explode into gibs without anything fancy occuring

Drops:
Can drop the Parasol, which acts as a melee weapon like a sword, a bow, a tome, and a summoning staff that summons Grimfly minions. May also drop an alternate version of her parasol that acts like a better version of the Umbrella item by reducing fall speed which can also be changed with the up and down keys, her dress as a vanity set, and a mount similar in appearance to her Guardian that boosts melee damage if hit you take damage. In Expert Mode she also drops the Amalgam Soul which provides stat boosts based on its prefix.

Hints:
-Unlike most grounded enemies, her Guardian cannot be removed from the fight using a semi-solid platform and a pit. Its jumping abilities and nature of being 'tied' to Mimi mean it will jump the entire map if needs be.
-Attacking Mimi with any sort of weapon will enrage the Guardian, even with town NPCs and traps. Therefore, slower-firing weapons with higher overall damage may prove beneficial for providing windows where the Guardian is calmer.
-The petals from the Heartbreak attack fall awkwardly. Teleport out of their falling area if you want to avoid them easier.

Extra Info:
-Mimi's dialogue, unlike most, is actually rather strange. She never seems to really get angry or flustered and remains worryingly calm even at low health.
--Some of her dialogue, mainly the 'like I did the others' line, suggest that the Grimflies and maybe her own Guardian were once also people as well, that she has somehow transformed. This fact alone turns her character from 'strangely mellow' to 'outright dangerous' real fast
[Added: 7/10/19]
43 - Being of Order
Base concept by UltraCraftGames (via Discord)

Appearance: A large pink crystal placed within a golden frame. Two smaller crystals float at its sides, attached to the main section by golden chains. Strange white fire burns from two large pillars either side of the main crystal, as well as from in-between some of the joints on its base's 'legs'.

Summon: Use the Eternal Crystal anywhere in the world. The boss only despawns once the player either gets too far away or dies, as with most bosses. An arena of solid blocks is created around the player, with the player at the centre. The boss enters with dialogue:
"You have brought too much disorder to this world... and so you must be ELIMINATED!"

Fought: Chaos Mode
Specification: ???
Special?: No
Progression?: No

Stats:
Health: 5,500,000 (8,000,000)
Attack:
-350 (585) (Melee, Explosive Light, Crystal Detonation) (Inflicts Burning Light - 75 (100)%)
-385 (630) (Cleansing Deathray, Eviscerator) (Inflicts Burning Light - 100%)
-300 (505) (Light Bullet Alpha, Light Bullet Beta) (Inflicts Burning Light - 25 (40)%)
Defence: 350

Attacks:
The Being of Order will usually only move by teleporting, often in-between or even sometimes during attacks. Its frequent teleports mean, despite its rather large hitbox and overall immobility outside of said teleports, that it may prove tricky to attack.
As the fight progresses, the Being of Order will both begin attacking faster and implementing new moves into its attack pool.
-It may launch a massive barrage of 'Alpha' light bullets at the player. These small and rather thin projectiles have no special properties to them, but the amount fired and the pseudo-randomness of their starting angles mean that a 'cone' of them is formed. Throughout the 5 seconds the attack is launched the Being of Order will re-adjust its aim so the player always remains near the centre of the 'cone'.
-It may summon small glowing balls of light that eventually explode, much like Blacklight's attack. However, they are summoned randomly across the arena over 5 seconds and, instead of simply creating a somewhat round explosion, their explosions are more 'oval-shaped', as telegraphed by the shape of the light balls prior to exploding. After the 5 seconds of summoning the attack ends, with all the light balls having exploded by 7 seconds.
-It may launch a single arc of 'Beta' light bullets at the player, consisting of 5-9 individual bullets. Unlike the Alphas, which have no special properties, Betas home-in on the player and chase them down with rapid short-ranged charges before eventually despawning. Attack is used when under 85 (88)% health.
-It may appear at the centre of the arena and summon a large Deathray, like the Moon Lord's, but rotates it a whole 360 (540) degrees around the whole arena. This attack is only used when under 65 (72)% health.
-It may summon up to 3 stationary crystals randomly around the arena. After a few seconds they all explode simultaneously, creating a total of 3 vertical pillars of damaging light that linger for a long time, often part-way into the upcoming attack. This is only used when under 50 (58)% health.
-It may teleport near the player and, after a few seconds, release a pulse of light called the 'Eviscerator', disappearing again after doing so. The 'ring' left by the pulse lingers for 5 seconds. This attack is often used up to 4 times in succession before switching to a new attack. This is only used when under 30 (42)% health.

Defeat: Explodes into gibs whilst releasing a powerful flash of light. The only gibs shown are of the crystal itself.

Drops:
2 Tomes, a summoner staff, a sentry staff, a spear, and a gun. May also drop a very high-tier pickaxe and an infinitely-flying mount. Drops Shards of Order; used to craft a few very powerful items once in the late-game. In Expert Mode it also drops the Mirror of Reflection, a powerful item that 'reflects' damage back at enemies; multiplying any damage they deal by 2 and storing it and any other damage the player takes. Upon use it releases a single 'blast' that deals the stored damage to enemies, but resets the mirror's damage counter.

Hints:
-Dashes and teleports, as ever, are very useful in this fight. However, when it comes to the alpha light bullets and the pillars of light, dashing can potentially be risky as you may just end up dashing into another projectile.
-Practice the earlier stages of the fight until you get confident, then deal enough damage to give it a new attack. This gives time to learn its attacks and the best methods for avoiding them without throwing the player into the deep-end when they discover a new attack they didn't see prior near the end of the fight, where the boss is at its hardest.
-Don't take it outside of the arena it spawns; it takes no damage.

Extra Info:
-The Being of Order seems to be a sort of parallel to the Chaotic Beings. While the Chaotic Beings take on black, vaguely-humanoid forms and have large numbers of individuals, the Being of Order takes on a solid shining crystal for its form and seems to be unique.
-The Being of Order's quick judgement of the player as being responsible is both true and false. It is true from outside the 4th wall, where the player installed the mod, whereas within the confines of the game itself Terminus was the one responsible for Chaos Mode, not the player.
--If anything, the Being of Order's instantly aggressive and judgemental tone makes it seem overall more antagonistic than the Chaotic Beings.
[Added: 7/10/19]
44 - Aether
Appearance: A large, silver and gold serpentine creature. Its body seems very thin and unusually flat; very different from the vast majority of bosses in general.

Summon: Can either be summoned manually using the Silver Edge anywhere in the world, or by finding it partially-buried a total of 3 times randomly in the world once the world is Post-Moon Lord. If found in the world attacking it will cause it to run away the first 2 times, but on the 3rd encounter attacking it will begin the fight. The boss only despawns once the player dies, and will rapidly chase the player across the world.

Fought: Post-Moon Lord
Specification: Post-Moon Lord
Special?: Can be found without a summoning item
Progression?: No

Stats:
Health:
-12,500 (19,000) (Phase 1 Body Segments)
-350,000 (500,000) (Phase 2)
Attack:
-465 (700) (Head Melee)
-300 (465) (Body Melee)
-275 (420) (Rings)
-100 (175) (Fragments)
Defence:
-200 +40% Damage Resistance (Phase 1 Body Segments)
-200 (Phase 2)

[The damage dealt by piercing projectiles is reduced by 40% for each segment it passes through]

Attacks:
The boss burrows, much like most worm bosses, but is extremely fast and can accelerate rapidly. While it is grounded, it is allowed to 'fly' if the player is deemed too high to reach; much like the Destroyer. In the first phase each of its segments has its own separate health bar and each has a ranged attack it can use independently of what the other segments are currently doing: If any segments' reflective shine shifts it will launch a projectile after roughly half a second.
-It may launch a silver-coloured ring projectile which decelerates after roughly a second. It lingers in-place for a long time after stopping, dealing contact damage on-hit.
-It may launch a gold-coloured ring projectile that moves at high speeds and ricochets off solid blocks.
-It may launch a ring that is half silver and half gold. This one, unlike the others, has pseudo-homing projectiles. It moves at high speeds but, due to its homing properties, will still sometimes slow down in order to re-adjust its path towards the player again. It despawns after a short time has passed
Upon defeating any individual segment of its body they will 'shatter' with a sound akin to glass breaking. That segment will then also release a large cluster of small fragments that deal minor contact damage, though after this point those segments no longer release any projectiles.
For each segment destroyed the other segments will have slight decreases to their attack cooldowns to compensate, though little else changes until all of its body segments have been broken.
Upon breaking all of its vulnerable segments it transitions to its 2nd phase.
Aether lets out a 'roar' at both its head and tail segments break apart, with the head revealing what appears to be an eye from within its thin body. Aether will now begin acting more like a Wyvern; now having free aerial mobility.
Its attacks are the same as before, but now all of its segments are free to attack again and will remain as such until the fight ends. All of its segments are vulnerable and, as they take damage, it will continue to speed up.
The only oddity with its actions at this point is that, if the player manages to deal enough critical hits to its head, it will let out a similar 'roar' to its phase 2 transition and will fall out of the sky, recuperating after a couple of seconds and returning to its original attack pattern. This only happens up to 4 times per fight, however, and so characters with a high critical chance don't get too much of an advantage overall.

Defeat: Completely freezes for a couple of seconds, before beginning to shudder. After a couple of seconds it will release another 'roar' before shattering completely. Bear in-mind, however, that these fragments it drops as gibs still deal damage to the player.

Drops:
Drops a large quantity of Silver Shards; used to either make a fairly decent quantity of weapons, a set of armour, and also to later help upgrade a few of Blacklight's drops. It also has the chance to drop the Shard Gun; a weapon with a similar appearance to Ribbon's Crystal Gun from Kirby 64, and in Expert Mode will drop the Gold Shard; used to upgrade a large variety of weapons and also to make an accessory that provides the player with special buffs once a meter is filled by either taking or dealing damage.

Hints:
-In the first phase, attempting to fly far above it to stay out of its reach, or trying to simply out-run it, are both very bad ideas due to its speed and pseudo-flight abilities.
-Fighting it in an open area is recommended, as it means the gold rings won't be as much of a hassle and an open area also provides more room to evade both the other ring types and Aether itself
-In Phase 2 its more Wyvern-like properties can be difficult to deal with due to its speed. Dashing once it stops targeting the player or teleporting behind it can help evade its massive contact damage.
-Piercing weapons, while not as effective as they might be, are still helpful for this fight for dealing extra points of damage.
-Being hit by the fragments it drops isn't that bad. Don't accidentally get hit by its more deadly attacks whilst trying to avoid them.
-If encountered naturally, it is recommended not to attack it unless you already feel prepared for the fight, even on its 1st and 2nd encounters, just in-case you end up encountering it again and damaging it on accident.

Extra Info:
-Originally, this spot was going to be taken by a boss called Talon. Talon was a mechanical dragon whose segments all used laser attacks based on the colours their lights shone. However, due to the sprite looking 'off' even after several re-attempts, it was scrapped.


-Aether seems to be somehow related to Blacklight. It uses the same colour scheme, seems to also be made at least partially of glass (or something akin to glass), and has drops that can be combined with some of Blacklight's as well.
[Added: 14/10/19]
45 - #3
Appearance: A Chaotic Entity, definitely, but with a few oddities. Firstly, and most notably, it lacks a face; with a large white '3' in its place. It also seems to be missing one of its arms, though this may be due to prior incidents before the player encounters it (but this is never answered). Its clawed fingers and head twitch frequently.

Summon: Break the Sealed Keystone. The Keystone itself can only be found in the Void Tower in Chaos Mode and it can only be broken by throwing it into the void beneath the tower. After 30 seconds the boss will spawn, though remains passive until attacked by the player, where the fight begins. Unlike other Chaotic Entities, it doesn't have any dialogue outside of an ominous '...' every now-and-then when passive.

Fought: Chaos Mode
Specification: ???
Special?: Uncraftable Summon, Unusual Summoning Method
Progression?: Yes, Arena

Stats:
Health:
-50,000 (62,750) (Phase 1)
-350,000 (495,500) (Phase 2)
-8,500,000 (13,650,000) (Phase 3)
Attack:
-580 (950) (Melee, Sword Strikes)
-600 (988) (Brutal Swing)
-550 (900) (Shadow Chains, Shadow Swords)
Defence:
-100 +99.5% Damage Resistance (Phase 1)
-200 +85% Damage Resistance (Phase 2)
-300 (Phase 3)

Attacks:
Phase 1:
Simply follows a pattern of attacking, teleporting, and attacking again. It only has a few of its attacks at this point and low overall health, but it deals high damage and has extreme defences that reduce some attacks to only around 10 damage a hit.
-It may appear near the player and then charge at them with a broken, but still usable, sword. It disappears again at the end of the charge
-It may launch an arc of 5-7 Shadow Sword projectiles at the player from its arm. These pass through blocks and leave damaging trails that disappear shortly after being made, but are otherwise fairly basic
-It may appear over the player's head before slamming its sword downwards, trying to hit the player. It moves a lot faster than its charges once the downward motion begins, and only stops after either hitting the floor or after a little under a second of travelling.
Once reduced to 0 heath, it will begin to shake wildly before being enveloped by shadows. After a few seconds pass, it re-emerges with a slightly-enhanced form.
Phase 2:
Attacks similar to before, but may now sometimes attack twice before teleporting. Uses its previous attacks, but with some additions and alterations.
-It may now sometimes charge at the player twice in succession before disappearing again as opposed to just once.
-Its first new attack has it appear very close to the player, sword already drawn back, before swinging it in a large arc. The swing leaves a heavily-damaging 'streak' of black that lingers in-place for a short time after the swing, dealing massive damage on contact.
-It may now appear on the ground, slamming its sword down. After about a second numerous chains emerge from the ground in large upright columns before disappearing again about a second later. This attack is used only when the player is near the ground.
Once reduced to 0 health again a similar animation to its Phase 1 transition occurs, with it soon emerging in its 3rd and most powerful form.
Phase 3:
Acts the same as before, but is faster and has access to a few new attacks as well. Its larger hitbox means it is easier to hit, but also has an easier time hitting the player with its high contact damage.
-It may appear near the player, clutch its chest, float up by 1 or 2 blocks, and then release numerous 'bursts' of shadowy swords in rapid succession. Each burst has between 10 and 16 swords all released in random directions, and up to 20 individual bursts are performed over only around 5 seconds.
-It may use an attack similar to the Phase 2 chain attack, but instead of summoning them vertically from the ground they can now be summoned at any angle between two portals. It is slightly slower than the Phase 2 variant due to the portals being summoned, but the lack of reliance on being grounded makes it much harder to predict.
-It may appear vertically to the player and lunge at them with its sword, disappearing after the lunge ends. It isn't quite as fast as the vertical strike, but is still faster than its regular charges.

Defeat: It falls to the ground, then collapses; eventually disintegrating over a period of about 2 or 3 minutes. Once gone it will leave a single puddle of a strange, black water behind. This water inflicts Chaotic Ember as long as the player stands in it, doesn't mix with other water nor lava, and cannot be picked up with a bucket or absorbed by the underworld or with a sponge; meaning the only real way to remove it is to simply bury it or drain it into the bottom of the world or void.

Drops:
Will always drop the Dark Spark regardless of difficulty; which can either be 'used' to create a powerful explosion that deals colossal damage to all players and all NPCs in its vicinity, or can be used as a crafting material. In Expert Mode it drops the Madness Mask which, when equipped as a helmet, grants any set bonuses as if it were the correct helmet, but also randomly applies buffs and debuffs to the player at irregular intervals (though debuffs are more common).

Hints:
-Use the time between the Phase 1 and Phase 2 transitions to heal and recuperate, as the boss only gets harder as it progresses and otherwise provides almost no downtime at all.
-Fast-firing weapons are best for the first phase as its defence already reduces most attacks to double digits at best, in order to compensate for its lower health.
-Teleports, as always, are a great help. Dashes are best saved for dodging attacks like the Brutal Swing and the downward strike attacks, as they are both fast and deal high damage.

Extra Info:
-Originally, #3 was planned to be a sort-of Superboss fought after the Doppelganger fight seen prior, but this was later changed.
-To an extent, #3 can be seen as a sort-of reverse to Hollow Knight's titular boss. Instead of weakening as the fight progresses and losing attacks it just seems to continuously grow stronger as it gets wounded and only continues to incorporate new attacks into its arsenal. It also has a few attacks similar to his, or to the Hollow Knight's stronger counterpart.
-While its design is humanoid, making it comparable to characters like Terminus, Chorus, Mimi and Null, #3 seems to be lacking a few aspects that the others share. It doesn't have any dialogue, which is strange as all the others have at least a few lines to represent their characters, it lacks an actual face, with a large '3' where its face should otherwise be, and it lacks any sort of outfit, whereas the others are either wearing clothing or armour.
--Blackrune, a former boss reduced to mini-boss status in Boss Ideas 7, is the best comparison to #3 amongst the Chaotic Entities: It also has no dialogue and doesn't really wear an outfit outside of its scarf. It was revealed that Blackrune's mind was not properly formed due to being formed by the Doppelganger's wounds, so this could perhaps also apply to #3 as well.
-Despite its twitching, missing arm, and apparent instability; it still ends up being the overall most powerful Chaotic Entity the player canonically faces (outside of the Doppelganger itself).
[Added: 14/10/19]
[Final Notes]
Thanks for coming to take a look at another few boss ideas. A lot more stuff from the community this time around, which is great to see.

While I may now have to slow down a little due to University now being a factor, I will keep making these pages for as long as new and interesting ideas continue to appear, so I'm not quite done yet :)

Discord:
https://discord.gg/URhX8GU
It's still a relatively small server at the time of writing this, with a little less than 20 members, so feel free to stop on by!


[This page receives the Tomato Trending award for somehow, within less than 2 days, reaching the most popular guide position]

As usual, feel free to post ideas in the comments below or over on the Discord server. Both are viable but the Discord means you're likely to see my comments quicker and may even see some glimpses into the boss' creation.

Anyways, see ya!
31 Comments
Queennoobi101 9 Jan, 2020 @ 8:11pm 
#3. is that a reference to how the # and the 3 are the same key on a keyboard? Maybe it's creator was using a keyboard and it's name was supposed to be censored but slipped off the shift key?
Lich_King042 2 Nov, 2019 @ 10:12pm 
hey Okami i just updated the mod forum and updated lich king, the forum is much more cleaner
and more easy to read and the lich king battle is much harder also hes moved to post moon lord.
finally hes going to provoke some fan fiction too. 2 things to note i made a snapshot thing so people dont have to look around for it in the comments and i removed the npc and item counter because i dont think i will ever update it T_T.
(TKG) Lord Kirbo 22 Oct, 2019 @ 4:49pm 
yay
Skrat Keeper 19 Oct, 2019 @ 10:05pm 
sounds good
GerryScary 18 Oct, 2019 @ 5:24pm 
This is cool
Flow 18 Oct, 2019 @ 8:56am 
u should do a mod about this
Gate Minecraft from Minecraft 16 Oct, 2019 @ 2:43pm 
#3 seems creepy and i like creepy
Okami Tomato  [author] 16 Oct, 2019 @ 2:38pm 
:)
Gate Minecraft from Minecraft 16 Oct, 2019 @ 12:25pm 
AWESOME BOSSES
Lich_King042 15 Oct, 2019 @ 4:18pm 
ok thanks