Insurgency: Sandstorm

Insurgency: Sandstorm

Not enough ratings
Sandstorm Admin Wrapper Install - Linux - Ubuntu Server 18.04
By Robomikel
This is a guide to install Sandstorm Admin Wrapper on Ubuntu Server 18.04.

9-1 Updated - Added Service config for Auto startup after reboots.
9-2 Updated - CTE Install
9-11 added enable for daemon
9-19-20 added Steam Query [Issue] section
2
   
Award
Favorite
Favorited
Unfavorite
Prerequisites
Requirements
Ubuntu Server 18.04
4GB of RAM can be run with 2GB if you reboot 2-3 times a day.
2 vCPU can be run on 1 vCPU
50GB or More Storage


You should have your Ubuntu Server 18.04 up and running. I recommend a VPS or VM. Shoot grab an old computer with 4GB of RAM that you have in closet and put it to use.

NOTE: If you are running this on a VM at home. Will have to do some Port Forwarding for other players to connect. I recommend not forwarding the dashboard Port 51422 so it will only be accessible on our Network.

Applications: I recommend
Text editors
- Visual Studio Code https://code.visualstudio.com/download
- NotePad++ https://notepad-plus-plus.org/download/

Bitvise SSH client with SFTP built in. When you connect it will create a SFTP connection as well. Kinda of nice when you are moving files to and from the server.
- Btivise https://www.bitvise.com/ssh-client
or
Putty (SSH) and FileZilla (SFTP/FTP) if you are old school.


Connect via SSH and Log in.
An update command before we get started this will reboot the server as well.

root@Inssserver:~# sudo apt-get update && sudo apt-get upgrade -y && sudo apt-get dist-upgrade -y && sudo reboot

Click yes if it ask for permission to restart services.


After the reboot log in and since we are root. We will install some tools to compile code.
NOTE: Bitvise will reconnect after reboot. Right Click the small icon on the task bar to open another Terminal Window.

root@Inssserver:~# sudo apt-get install build-essential -y

Some Dependencies for Ruby 2.6.3

root@Inssserver:~# sudo apt-get install -y libssl-dev libreadline-dev zlib1g-dev -y

Dependency for Steam
root@Inssserver:~# sudo apt-get install lib32gcc1 -y


UFW - Setup Firewall
I recommend copying and paste into Root Terminal Window. This is using SAW Default Ports. Change x.x.x.x to your Public IP


ufw default deny incoming ufw default allow outgoing ufw allow from x.x.x.x/32 to any port 22 comment 'SSH for My Public IP' ufw allow from x.x.x.x/32 to any port 51422 comment 'webmin for My Public IP' ufw allow from any to any port 7777 comment 'Game Port for ANY' ufw allow from any to any port 27131 comment 'Query Port for ANY' ufw allow from any to any port 27015 comment 'RCON Port for ANY' echo y | ufw enable

you may want to add changes these lines if you have a Dynamic Public IP
Use SSH keys and Strong passwords.
ufw allow from x.x.x.x/32 to any port 22 comment 'SSH for My Public IP'
ufw allow from x.x.x.x/32 to any port 51422 comment 'webmin for My Public IP'
to
ufw allow from any to any port 22 comment 'SSH for any'
ufw allow from any to any port 51422 comment 'webmin for any'
Create Inssserver user
I try not running gaming servers as root of course. Ruby can be installed without Root. So lets create a user account to finish installing Ruby and run the web server on.

This will create a user account called inssserver
root@Inssserver:~# sudo adduser inssserver

afterwards will ask for the password twice
create a strong password
Name section can be the same as inssserver
For the rest, click enter a few times to leave blank and confirm


Installing Ruby with rbenv
You can start another SSH session and connect with the user account you just created
Installing Ruby with rbenv
inssserver@Inssserver:~$ git clone https://github.com/rbenv/rbenv.git ~/.rbenv
***IF you don't have git installed run as root in other terminal window*** You probably have it already**
root@Inssserver:~# sudo apt-get install git

set up rbenv

inssserver@Inssserver:~$ echo 'export PATH="$HOME/.rbenv/bin:$PATH"' >> ~/.bashrc
inssserver@Inssserver:~$ echo 'eval "$(rbenv init -)"' >> ~/.bashrc
inssserver@Inssserver:~$ exec $SHELL


Download the ruby-build plugin into the plugins folder of rbenv
inssserver@Inssserver:~$ git clone https://github.com/rbenv/ruby-build.git "$(rbenv root)"/plugins/ruby-build

Install Ruby
it may look like its idle for a bit, this is normal. Give it a few minutes.
inssserver@Inssserver:~$ rbenv install 3.1.2
When it finishes run this command
inssserver@Inssserver:~$ rbenv global 3.1.2

Verify Install
inssserver@Inssserver:~$ ruby -v
Should output something like this
ruby 2.6.3p62 (2019-04-16 revision 67580) [x86_64-linux]

Install bundler with gem
inssserver@Inssserver:~$ gem install bundler

Afterward run
inssserver@Inssserver:~$ rbenv rehash


Install Sandstorm Admin Wrapper
Download a copy of sandstorm-admin-wrapper as a zip from
https://github.com/Joe-Klauza/sandstorm-admin-wrapper

Then Unzip and copy Contents to the SFTP window for the inssserver user. You should be in the Home folder if not sure then run command
inssserver@Inssserver:~$ cd ~

I copy the contents to save a change directory command when reconnecting and starting the server.


To avoid a permission issue run
inssserver@Inssserver:~$ chown -R inssserver:inssserver *

Make the start up script executable
inssserver@Inssserver:~$ chmod +x linux_start.sh


Now lets do a trial run
inssserver@Inssserver:~$ ./linux_start.sh

if successful should see something like
2019-08-30 03:48:17 +0000 | INFO | Webserver initialized! Visit: https://127.0.0.1:51422

Press CTL + C to stop the server. We are not done yet :)
Since we do not have a browser on the VPS. We cannot connect 127.0.0.1. Lets change the config to Listen on all interfaces so we can connect to the public IP of the server.

In the SFTP window for the inssserver go to this path to edit config.toml
/home/inssserver/config/

I changed my Bitvise Client to use Visual Studio Code as the default text editor. We can just use notepad for the sake of the guide.

Right click config.toml and edit.

Find the line with
admin_interface_bind_ip = "127.0.0.1"
and change to
admin_interface_bind_ip = "0.0.0.0"

Save and close

restart the server in the inssserver terminal window with
inssserver@Inssserver:~$ ./linux_start.sh

Now we can use a browser on your computer.
Go To the public IP of server with the Sandstorm Admin Wrapper default Port
https://x.x.x.x:51422

NOTE: I suggest using the VPS provider Firewall to only allow your public IP to connect to TCP Port 51422 or Private IP if its on your LAN

You should see the Dashboard for Sandstorm Admin Wrapper log in with username: admin and password: password.


Install SteamCMD
Download SteamCMD tar ball for Linux
https://steamcdn-a.akamaihd.net/client/installer/steamcmd_linux.tar.gz

Copy tar ball to
/home/inssserver/steamcmd/installation


change directory
inssserver@Inssserver:~$ cd /home/inssserver/steamcmd/installation/

Run Command to decompress tarball
You will have to stop the server. CTL+C if running
inssserver@inssserver:~/steamcmd/installation$ tar -zxvf *.tar.gz

change permissions for steam install
inssserver@inssserver:~/steamcmd/installation$ chown -R inssserver:inssserver *

make steam script executable
inssserver@inssserver:~/steamcmd/installation$ chmod +x steamcmd.sh

change directory
inssserver@inssserver:~/steamcmd/installation$cd ~

Start server
inssserver@Inssserver:~$./linux_start.sh

In the Dashboard should be able to click the install button under Server Setup. It will install Sandstorm.

CTE Install
Using the SAW SteamCMD tool change launch Param to
+app_update 581330 -beta cte_public validate

This is how I got it to work. If there is another way let me know.

for GSLT I used App ID 887860
Auto Start up
To have the SAW server start up after reboot.

We are going to create a service and setup a Cron Job to start the service after reboot. As Root.
Stop the server if running.
There is an example in
/home/inssserver/extras/systemd/sandstorm-admin-wrapper.service

find and edit
sandstorm-admin-wrapper.service

I have already updated this example to work with this guide. Copy and paste replacing all text in file with below. save and close. You will have to update the User and WorkingDirectory VARs to work with your server, if not following this guide.
[Install] WantedBy=multi-user.target [Unit] Description=Sandstorm Admin Wrapper [Service] User=inssserver Type=simple WorkingDirectory=/home/inssserver/admin-interface/ ExecStartPre=/home/inssserver/.rbenv/bin/rbenv exec bundle install ExecStart=/home/inssserver/.rbenv/bin/rbenv exec bundle exec ruby lib/webapp.rb Restart=always

Then Copy the service to systemd and start the service by running this command as Root. .
root@Inssserver:~# sudo cp /home/inssserver/extras/systemd/sandstorm-admin-wrapper.service /etc/systemd/system && sudo systemctl start sandstorm-admin-wrapper.service

Lets enable the service for Auto start up
root@Inssserver:~# sudo systemctl enable sandstorm-admin-wrapper.service


-------------------------------------Start SAW and Sandstorm Server-----------------------------------------------
To start SAW and the Sandstorm Server after reboot. Once you have created a Sandstorm Server config.
Update sandstorm-admin-wrapper.service and Replace 'My Server' with your Server Name in the config.
[Install] WantedBy=multi-user.target [Unit] Description=Sandstorm Admin Wrapper [Service] User=inssserver Type=simple WorkingDirectory=/home/inssserver/admin-interface/ ExecStartPre=/home/inssserver/.rbenv/bin/rbenv exec bundle install ExecStart=/home/inssserver/.rbenv/bin/rbenv exec bundle exec ruby lib/webapp.rb -s 'My Server' Restart=always

Then Copy the service to systemd and start the service by running this command as Root. .
root@Inssserver:~# sudo cp /home/inssserver/extras/systemd/sandstorm-admin-wrapper.service /etc/systemd/system && sudo systemctl start sandstorm-admin-wrapper.service

Using Screen
This would be good for if you want to manually start and stop SAW with out the Service Config. I am using Screen to run the SSH session and be able to close the terminal without fear of the Application closing.

When you are all finished installing and testing.
Stop the SAW with CTL + C
Type Command Screen to launch a Virtual screen
inssserver@Inssserver:~$ screen

Then press Space Bar. It will launch the Screen.
Start Server.

inssserver@Inssserver:~$./linux_start.sh

After it is running.
Press CTL + A and D to Detach from Screen.
Then it will be safe to close the Terminal Window.

To check/list for screens that are running.
inssserver@Inssserver:~$ screen -ls

It will list the current screens with output like
inssserver@inssserver:~$ screen -ls
There is a screen on:
28370.pts-1.inssserver2 (08/31/2019 03:15:28 AM) (Detached)
1 Socket in /run/screen/S-inssserver.

You can reattach with the PID/number like so
inssserver@Inssserver:~$ screen -r
or
inssserver@Inssserver:~$ screen -r 28370

Kill a Screen session use CTL + A and K It will prompt y/n to confirm on the bottom of the terminal window.
More Info
Enabling stats
Requirements:
1. Steam GSLT
2. Must not have a password on the server
3. Cannot use with cheats enabled

In SAW config dashboard find the line with
Game Server Login Token (GSLT) [ ]
Add add token
save config and restart


Demo
[issue] with steam query port
If there is an issue with the steam query port
got around to testing it a symbolic link.

1. make sure the SAW server is not running and check to see if you have this folder sdk64 in this location /home/inssserver/steamcmd/.steam/
1a. if the sdk64 folder is not there create it
mkdir /home/inssserver/steamcmd/.steam/sdk64

2. as Root run this to create symbolic link.
sudo ln -s /home/inssserver/steamcmd/installation/linux64/steamclient.so /home/inssserver/steamcmd/.steam/sdk64/steamclient.so


3. Start the server

4. watch the server console log output.
4a. make sure you DO NOT see these lines
dlopen failed trying to load: steamclient.so with error: steamclient.so: cannot open shared object file: No such file or directory dlopen failed trying to load: /home/inssserver/steamcmd/.steam/sdk64/steamclient.so with error: /home/inssserver/steamcmd/.steam/sdk64/steamclient.so: cannot open shared object file: No such file or directory [S_API] SteamAPI_Init(): Sys_LoadModule failed to load: /home/inssserver/steamcmd/.steam/sdk64/steamclient.so
32 Comments
Robomikel  [author] 6 Apr @ 3:31pm 
@NOMY-6l - its looks like you can add them to the same line like -s 'My Server 1' -s 'My Server 2' etc.. See the https://github.com/Joe-Klauza/sandstorm-admin-wrapper page in command line parameters.
[BG]N0MY-6l 6 Apr @ 8:10am 
how would i add multiple servers to the start up line lib/webapp.rb -s 'My Server'
[GY6]GotYurSix 7 Jan, 2023 @ 11:35am 
If you want the new version of Ruby as noted here:
Install Ruby 2.6.3
it may look like its idle for a bit, this is normal. Give it a few minutes.
inssserver@Inssserver:~$ rbenv install 2.6.3 <------------- change this to 3.1.2 or whatever the new version is.
Thrasher 27 Oct, 2020 @ 9:43pm 
Thanks for the help! Official instructions from the developers that it was difficult to find. For older versions only.
Robomikel  [author] 27 Oct, 2020 @ 9:20pm 
I also added the updated link for the sandstorm guide as well
Robomikel  [author] 27 Oct, 2020 @ 9:15pm 
I posted the sections for enabling stats.
Robomikel  [author] 27 Oct, 2020 @ 9:10pm 
okay, sounds like you did everything right. if steamcmd is not getting the newest version or updating. I would just wait some time and keep checking. I have seen an issues with steamcmd not seeing the update for up to 24 hours. I would assume some kind of load balancing on their end but I am not sure why it does this.
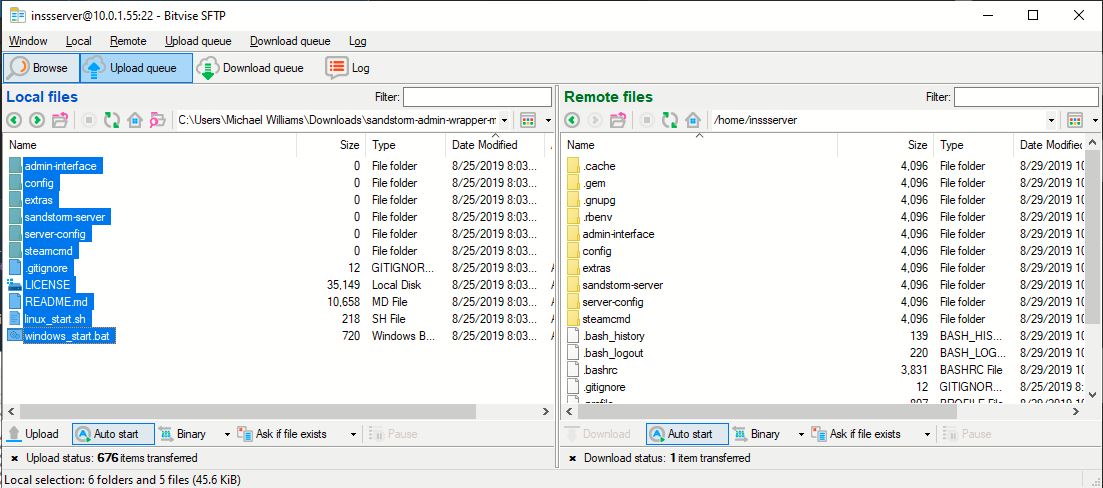
You can try renaming this file extension /home/inssserver/sandstorm-server/steamapps/appmanifest_581330.acf to appmanifest_581330.acf.bak
then trying to update again. but in the end just might have to give it some time.

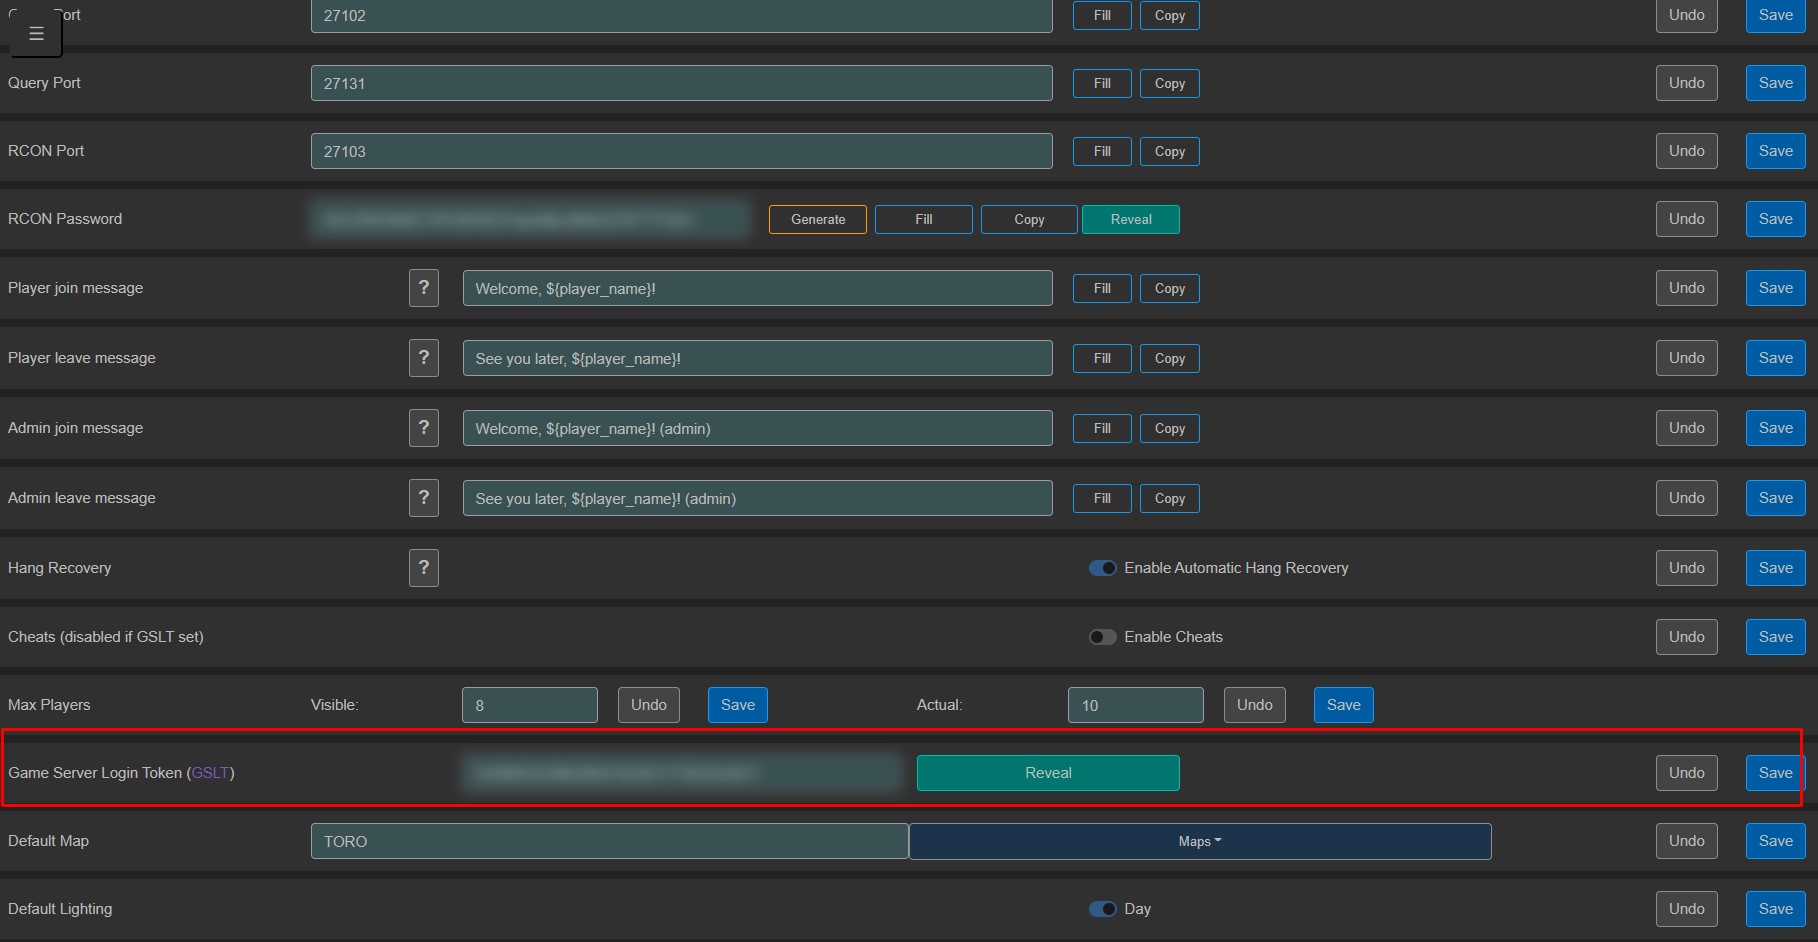
I will add the instructions for the token in a few minutes.
Thrasher 27 Oct, 2020 @ 8:44pm 
Another question is how to make the server experience gain? When starting the server of the sad storm, the -Gamestats parameter is written through the bat file and the accrual of experience works, but through the saw server, I did not find where to register this parameter. Accordingly, the accrual of experience does not work. I tested the saws on the server on Windows OS.
Thrasher 27 Oct, 2020 @ 8:35pm 
Happened. When setting up for the first time, when installing the server, steam swore that he could not access the files "inssserver @ inssserver: ~ / steamcmd / installation / linux32 $" I manually, through the file manager mc, gave full rights to the files (namely crashhandler .so, libstdc ++. so.6, steamcmd, steamerrorreporter) in that folder. But apparently something went wrong and the sandstorm server installed the old version and could not update to the new one. What I've done:
1. Cleaned up the folder "/ home / inssserver / sandstorm-server #"
2. Cleaned up the folder "/ home / inssserver / steamcmd / installation #"
3. Copied the files from steamcmd to "/ home / inssserver / steamcmd / installation #" again, executed the commands "chown -R inssserver: inssserver *", "chmod + x steamcmd.sh" and issued the rights via mc to "installation / linux32 ". Started up the saw server and installed the sandstorm server.
Robomikel  [author] 27 Oct, 2020 @ 6:17pm 
I still had the instance from this guide since the last time. I started it and it updated and seemed ok. If you still need a hand let me know.