Terraria

Terraria

Not enough ratings
Terraria Boss Ideas 7 [Bosses 16-30]
By Okami Tomato
Well, I don't really know what to say anymore
Other than, maybe, here's more bosses

Disclaimer: Not a guide, but most of the returning viewers already expected that :P

Anyways, enjoy!
   
Award
Favorite
Favorited
Unfavorite
[Prior Info]
To be honest, there isn't much to talk about that I haven't already mentioned in the first part of Boss Ideas 7, outside of one small addition to the Debuff Almanac

1. Almanac Changes
-All new additions to the Almanac will have an 'extra' section that adds additional detail about the debuff that isn't already clear
-Older additions, which at the moment only consists of Part 1's, will not have this extra info in order to save space. Extra info can be found in the previous guides for those who really care about the additional specifications of a debuff. :P

Anyways, with that out of the way, enjoy :)
[Debuff Almanac Vol. II]
Any of the debuffs seen in this page or ones potentially brought over from previous pages. Some have been changed a little if brought over, however.

Burning Light
Tooltip - "The light burns deep"
Effect - Deals 10 damage per second. Being hit by an attack that can inflict the debuff whilst inflicted with it will cause the player to receive the Light Blaze debuff
Extra - Being inflicted with Light Blaze by being hit will remove this debuff

Chaotic Ember
Tooltip - "Unstable energies consume you"
Effect - Deals 50 damage per second
Extra - All Chaos Mode enemies inflict this debuff.

Crimson Embers
Tooltip - "Bright red flames burn around you"
Effect - Deals 15 damage per second

Heavy Gravity
Tooltip - "Gravity feels stronger"
Effect - Flight time reduced by 30% and flight speed and acceleration reduced by 50%

Hypersensitivity
Tooltip - "Your senses have been heightened drastically"
Effect - Weakened hunter potion effect, though also reduces player's attack by 5% and being hit inflicts the Stunned debuff

Ichorian Spark
Tooltip - "The Ichor is burning..."
Effect - Deals 8 damage per second and reduces the player's defence by 30

Lethal Venom
Tooltip - "Better find that antidote"
Effect - Deals 6 damage per second for 10 seconds, then increases by 1 damage per second every 8 seconds. Lasts until it is either cured or the player dies.
Extra - Can be cured by the Nurse or the Antivenom Vial

Light Blaze
Tooltip - "Light consumes you..."
Effect - Deals 18 damage per second, reduces the player's defence by 20, and causes the player to take 1.2x damage
Extra - Usually only inflicted due to the Burning Light debuff

Lovestruck
Tooltip - "You've been blinded by love"
Effect - The player cannot attack, but can still use non-damaging items. Movement speed also reduced by 15%

Nature's Fury
Tooltip - "The power of nature directed at you"
Effect - Reduces player defence by 20 and deals 10 damage per second.

Stunned
Tooltip - "You have frozen up..."
Effect - Player cannot use items, loses 10 defence, and movement, jump and flight speed reduced by 60%

Unstable Energy
Tooltip - "The energies absorbed are too strong to handle"
Effect - Deals 20 damage per second, reduces player's defence by 20, and removes any additional damage reduction effects outside of the player's defence stat.
16 - Absorption Slime
Appearance: A colossal pink slime. While it seems simple enough, it is far more dangerous than it appears.

Summon: Use the Clinging Gel anywhere in the world. The Boss only despawns if the player gets too far away or dies; unaffected by biomes. The Clinging Gel is made in the Arcane Fabricator using Pink Gel and a Slime Crown.

Fought: Hardmode
Specification: Pre-Mechanicals
Special?: Arcane Fabricator (Unseen Summon)
Progression?: No

Stats:
Health: 30,000 (47,850)
Attack:
-60 (100) (Melee)
-1x (1.2x) (Deflect)
Defence: 18

Attacks:
Movement-wise it acts like the King Slime; performing 3 hops followed by a 4th larger leap, but also able to teleport to close distance with the player or reach them through blocks. However, unlike the King Slime, it jumps higher and faster and teleports more frequently; being unable to go even 8 hops without teleporting.
It will absorb any projectiles that hit it; causing them to get stuck within its body and lose any piercing properties. They do not deal additional damage whilst stuck in its body.
Every time it teleports, it will 'deflect' these stored-up projectiles back outwards at the directions they were launched from originally. They travel at only 50 (70)% of their original speed, but deal their original damage (120% in Expert).
As its health wanes, it will speed up and teleport more often. It doesn't spawn slimes like King Slime does.

Defeat: Explodes into gibs, releasing any projectiles caught within it.

Drops: An upgrade to the slime staff, a Slime Gun capable of dealing damage, lots of Pink Gel, and an upgraded Slime Hook. In Expert Mode it drops an item that reduces movement speed, but increases jump height and negates falling damage.

Hints:
-It teleports often, so don't continuously run in the same direction or you'll risk running into it
-Using projectiles like Flails, or not using projectiles at all (Swords) can stop it being able to deflect projectiles
-Grenades and Rocket Launcher rockets get stuck in its body without exploding, meaning they cannot damage the boss unless it releases them only to teleport near to where they explode. Detonate them near to the boss, not directly on the boss
-Fast-firing but low-damage projectiles, like with the Megashark, can make the deflected projectiles far less dangerous to deal with.

Extra Info:
-This boss was overall somewhat a bit of a joke, but its gimmick ended up being an interesting one.
-It was at one point planned to be a Pre-Hardmode boss but, due to there already being a vanilla Pre-Hardmode boss and the Molten Slime from the first part, plus the more limited amount of projectiles, it was moved to an early Hardmode Boss.
-It is one of the only Hardmode bosses who could still be considered a threat even in the Post-Moon Lord game due to the damage of the deflected projectiles being based on your own damage output.
-Some projectiles, like the Boomerang and Lunar Flare projectiles, may get confused due to having unusual properties to them. They may still be deflected, but not always as they should.
[Added: 18/8/19]
17 - Ascended Lightseeker, Aurora
Appearance: The Lightseeker, empowered with a strange ancient energy. Her hair seems longer, now down to her ankles, and her uniform has changed from dark grey to a reflective blue. 4 wings float beside her; with energy pouring from where the joints connecting them should be.

Summon: Use the Key of Brilliance in the Hallow. The boss will follow the player out of the Hallow once summoned, but gains increased defence. The day-night cycle affects the boss; with night increasing defence and day increasing attack, and for both to drop different items based on it either being day or night. The Key won't work if the Lightseeker hasn't been defeated yet.

Fought: Post-Moon Lord
Specification: ???
Special?: Uncraftable Summon
Progression?: Yes, later bosses

Stats:
Health:
-8,500,000 (12,875,000) (Aurora)
-45,000 (70,000) (Vision)
Attack:
-300 (460) (Melee)
-305 (468) (Light Blast)
-290 (447) (Vision Melee)
-330 (520) (Ancient Blade, Ancient Light)
Defence:
-145 (Aurora)
--300 +15% Damage Reduction (Aurora, outside Hallow)
-30 (Vision)

[All of this boss' attacks can inflict Burning Light - 25 (40)%]
[During the day this boss' attacks deal 10% more damage]
[During the night this boss gains 10% damage reduction]

Attacks:
Aurora will float in-place, use a few attacks, and teleport again. The teleports are accompanied by bright flashes of light, and the teleports themselves often bring Aurora relatively close to the player.
She has a large amount of attacks to make use of, sometimes even overlapping certain attacks with each other:
-She may release up to 8 bursts of light blasts from herself. They are all evenly-distanced and launched in rapid succession, but each subsequent 'burst' will be rotated slightly compared to the previous one; making a large spiral. The projectiles accelerate as they travel and pass through blocks.
-She may summon horizontally-travelling 'bullet-hells' of light blasts. They move at a fixed pace, but are summoned randomly. They pass through blocks and the attack is used for up to 10 seconds before ending.
-She may launch 2 arcs of light blasts at the player. The first wave consists of 7 and the second wave, launched almost immediately after, of 8. The projectiles accelerate as they travel and also pass through blocks
-She may summon a Vision; an enemy that appears to be a glowing, winged sphere. These follow a simple cycle of firing 6 light blasts at the player before charging 4 times in succession and repeating the cycle again. Their charges cover a lot of ground and are quite fast.
-She may summon Ancient Blades; large silvery lance-like projectiles, to travel horizontally or vertically from off-screen. They are always in-like with each other, move at a fixed pace, and pass through blocks. Up to 5 waves of ancient blades can be summoned in succession before a new attack is used.
Once at 50% health she will enter her second phase, though this isn't really signalled outside of the attacking shift.
Phase 2:
Upon Phase 2 being activated she will summon 3 Visions near to herself that become aggressive after a couple of seconds have passed, and she also gains the ability to sometimes overlap attacks 15 (25)% of the time. She teleports more often and uses more projectiles in many of her attacks, but only when not overlapping attacks.
-She may summon up to 5 portals near herself or near the player. The portals themselves don't deal damage, but they do frequently release light blasts in random directions. Once 8 light blasts are summoned from one, the portal will fade.
-She may summon small 'ancient lights' around the arena. They deal no damage at first, but they will eventually be triggered to detonate; where they deal high damage in a small area. Up to 4 waves of ancient lights can be summoned per individual 'attack'. The explosions are not random; with the 1st wave always exploding from top-left to bottom-right, the second from right to left, the third from bottom-left to top-right, and only the 4th being somewhat randomised.

Defeat: Aurora herself flinches, the wings behind her shudder and begin to drop small feathers, and a few seconds later she disappears into a bright light. By the time the light fades Aurora is gone, as well as any Vision active at the time of her defeat.

Drops: Always drops Brilliant Feathers and Burning Light Shards; materials used to make a large amount of items in the Post-Moon Lord and Chaos Mode game. Can drop a sword, mage staff, summoning staff or bow. If defeated during the day she will additionally drop the Light Wing; a powerful set of wings, or if defeated at night she will drop the Ascension Shield; a defensive accessory that provides a large assortment of defence-oriented buffs. Finally, in Expert Mode, she drops the Light Core; an accessory that provides stat boosts, releases an explosion when damaged, and also an even larger explosion upon death.
17 - Ascended Lightseeker, Aurora (Continued)
Hints:
-If aware of her second phase, it is suggested that the player gets used to her attacks before taking her down to half health. After that point, the fight becomes significantly harder as attacks become faster, projectiles become more numerous, and some attacks begin to purposely overlap.
-The Rod of Discord, as always, is amazing here. 'Nuff said.
-Dealing with the Visions as they spawn is always a good idea, especially in the second phase, as their aggressive nature means they can very easily get in the way of Aurora's other attacks.
-If the player gets hit, they should play on the defensive more for a short time in order to try and make the debuff expire. If hit a second time, the player is given an even more detrimental debuff in-place of the old one
--Also, if hit a 3rd time, the player can end up with both, and a 4th time just resets the timer for the more deadly debuff

Extra Info:
-Much like with Terminus, this fight seems to actually be a later rematch with the original Lightseeker after some sort of power boost.
-The fight, in general, appears to be a counterpart to Terminus' fight. Both are fought around the same time, are rematches of previous battles, and both require the player to face their previous fight before facing their updated versions.
-Up to this point, she is the only boss able to inflict Burning Light, meaning it might come as quite the surprise to find out that getting hit by her again after being inflicted actually brings about an even worse debuff.
[Added: 25/8/19]
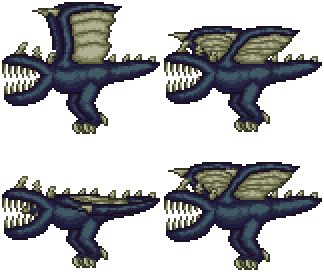
18 - Mawdragon
Appearance: A large, draconic creature. Its body appears to be very smooth and bulky, not scaly like most other dragon-like entities. The most notable feature of the Mawdragon's body is its face: it lacks any facial features outside of a massive, gaping mouth full of large but slender teeth.

Summon: Use the Meat Chunk underground. The boss can be taken anywhere once summoned without consequence; unaffected by biome changes or day-night cycles. While the Meat Chunk is mainly made out of ingredients like Rotten Chunks or Vertebrae, it also contains Souls of Might for some reason.

Fought: Hardmode
Specification: Post-Destroyer
Special?: No
Progression?: No

Stats:
Health: 35,000 (52,450)
Attack: 120 (200)
Defence: 15

Attacks:
The Mawdragon actually lacks any projectile attacks, instead solely utilising charges and contact damage to defeat the player.
-The Mawdragon may begin to rapidly chase down the player at high speed. This is one of his most common attacks
-The Mawdragon may begin to chase down the player even faster than before. However, solely in this attack, the Mawdragon will take on unusual properties. For starters, he becomes ever so slightly vulnerable to knockback; just enough that he can be slowed down to stop him reaching the player. The other is that, if he collides with a large enough wall, he will actually 'crash' into it; causing him to destroy a few blocks* and also ending the chase prematurely and dealing 500 damage to him.
-The Mawdragon may charge at the player 3 times in succession. Each charge covers a lot of ground very fast
-He may fly horizontally to the player and charge horizontally at the player. The Mawdragon only has very, very mild vertical control whilst charging.
-He may fly somewhere slightly above the player, before performing a long, arcing 'swoop' towards the player. It is very fast and will turn in the direction of the player as he travels

Defeat: The Mawdragon actually has 2 defeat animations; a standard one and one for if he is defeated by his own recoil damage.
-The normal defeat has him simply explode into gibs, like most other enemies
-The recoil defeat has the Mawdragon shatter most of its teeth, before it lets out a screeching roar as it flies away.

Drops: Drops Wyvern Hide and Mawdragon Fangs; both materials used for crafting purposes (but the Fangs are overall more commonly-used). May also rarely drop 'rusty' weapons like a sword, spear, flail, and throwing knives. In Expert Mode it also drops the Maw Bulwark; a shield-like accessory that grants a dash and has a Thorns Potion effect.
-If defeated by its own recoil, however, the drops change slightly. It drops far less Hide, only about 1-2 pieces, but drops even more Fangs. Still drops its other items normally, but also gains a new drop, the Mawdragon Egg, which summons a pet Mawdragon.

Hints:
-While the fight may seem easier due to the boss' significant lack of projectiles, the player should still be extremely cautious of its massive damage output that is only rivalled by bosses like Fishron, the Moon Lord, and beyond.
-Dashes, like with the Shield of Cthulhu, are very useful for dodging its many charges
-When performing the faster variant of the chase-down, the best strategy is simply to move away from it whilst unloading ammo and magic into its face. The knockback, though only mild, can actually slow the Mawdragon down significantly
--Another idea is to have small, player-sized gaps in the arena walls to cause the Mawdragon to crash into them and take damage.
-Get some fast wings for this fight. Everything up to the Leaf and Flame wings are available as the Destroyer must be defeated by this point. Lower-tiered wings are a bad idea due to the boss' aggression.

Extra Info:
-Strangely enough, the Mawdragon's design has actually had minimal changes since its conception. The only real difference was that its body was smooth instead of scaly; which in all honesty was a mistake anyways.
-Mawdragon had been planned since Arterion, but wasn't used there because of it not fitting the theming as well and lost its place in Boss Ideas 7's 1st page due to lack of overall importance and an unfinished sprite
-Mawdragon's entire attacking roster was actually just based on the most ideas I could come up with for usable melee-based attacks, as Mawdragon was never planned to use projectiles.
-Sadly, a small problem came up with animating the Mawdragon's wings, so their animation is less smooth than anticipated. However, most of the sprite has otherwise gone to plan.
[Added: 25/8/19]
19 - Discordian Magus Illuma
Appearance: Humanoid mage, though things like the purple skin, beady eyes, lack of a nose and sparkles are strong signs that she isn't actually a human. She wears a large pink and purple robe and holds a blue tome in her hand.

Summon: Use the Discordian's Banner in the Hallow. The boss can be taken anywhere once summoned without consequence, but will still despawn if the player flees too far during the fight.

Fought: Hardmode
Specification: Post-Golem
Special?: No
Progression?: No

Stats:
Health:
-5 (7) (Illuma)
-1000 (1150) (Light Barrier)
Attack:
-60 (100) (Melee)
-55 (93) (Light Shard)
-65 (107) (Illuminous Sphere)
Defence:
-Infinite* (Illuma)
-35 (Light Barrier)

[Piercing projectiles that pass through the Light Barriers lose 33% damage]

Attacks:
Illuma herself is completely immune to damage dealt by the player, which makes her otherwise pathetic health stat more intimidating. Light Barriers that orbit Illuma must be defeated in order for her to take actual 'damage'.
-Light Barriers simple fire a Light Shard at the player occasionally, increasing with frequency when their health is lower.
Illuma herself attacks in a way more reminiscent of Tim or the Rune Wizard, teleporting somewhere, attacking a few times, and then teleporting elsewhere. Each teleport is accompanied by a flash of white and all the Light Barriers are teleported with her.
-She may launch an inaccurate flurry of Light Shards at the player. These move in a straight line and even pass through blocks, but decelerate as they travel until they stop. Once they have stopped they will despawn.
-She may launch 3 arcs of Light Shards in succession, the first and third consisting of 3 shards and the second 4. The trajectory of each arc is calculated separately, so all 3 will be aimed at the player regardless of position.
-She may summon a Luminous Sphere; a large pink-coloured projectile that chases the player slowly while it is active, slowly accelerating the longer it is active until it eventually despawns. This attack is only used once at 4 (6) health
-She may summon up to 4 Luminous Spheres all around her, but instead of starting off with a fair amount of speed they start out immobile and accelerate from there. This attack is only used one at 2 (4) health.
The barriers are always summoned in specific groups and, once all of them are defeated, Illuma will take 1 damage and the next set will be summoned
-5 (7) health's is 2 that orbit Illuma closely
-4 (6) health's is 3 that orbit Illuma closely
-3 (5) health's is 4 that orbit Illuma closely
-2 (4) health's is 4; with 2 orbiting closely and 2 more orbiting further outward orbiting in the opposite direction
-1 (3) health's is 5; with 3 orbiting closely and 2 more orbiting further out
-(2 health's has 6; with 4 orbiting closely and 2 more orbiting further out)
-(1 health's has 8; with 5 orbiting closely and 3 more orbiting further out)

Defeat: Illuma gets visibly angry, throws her book at the player, and teleports away. The book does 1 damage on-hit and is virtually unavoidable due to its sheer speed; but is mainly there for comedic effect.

Drops: Always drops (or, rather, 'throws') an Enchanted Tome; a material used to make a large variety of magic items or to provide projectiles to swords. Drops Luminous Powder; another material, and Souls of Light in large quantities. Also provides a chance to drop the Rod of Discord. In Expert Mode she drops the Shiny Beacon; which summons a light wisp to provide light, may drop the Cracked Discordian Staff (which randomly teleports the player to a location nearby, but isn't controllable), and also has a rare chance to drop the Discord Stick, which summons a chibi Illuma who follows the player, floating on a miniature Rod of Discord.

Hints:
-Piercing and AoE weapons are still extremely useful for this boss, as the targets are predictable and stay packed together
-Circling the boss works well, as it stops the Light Shards from the Barriers and the Illuminous Spheres from being able to hit the player. However, the shard barrages and arcs from Illuma herself may still be problematic.
-Be wary, as if you are moving when she goes to teleport you may risk being teleported into if unlucky. Slowing down after she has finished attacking and re-gaining speed post-teleport may reduce the changes of this happening.

Extra Info:
-'Discordians', according to a small collection of unseen lore, are apparently a race rather than an individual, with pink skin and hair and an overall mastery of most magic types.
-Most of Illuma's colour scheme is based, even if only in-part, on the Rod of Discord's colour
-Illuma's health is more of a 'heads-up' to the amount of waves of Barriers there are, rather than fight progression. This is because the amount of Barriers always seems to be increasing within every single new wave (or, at least, staying the same if not increasing).
-Illuma's Barriers have a total of 18,000 health in Normal Mode, and 36,800 health in Expert
--This actually means that Illuma gains over double her original health in Expert, but only by technicality
[Added: 22/8/19]
20 - Chorus
Appearance: A 'Being of Chaos', much like Terminus. However, unlike Terminus, Chorus has 'selected a few more feminine qualities', in her own words. She wears a purple silk robe with silvery white pauldrons on only her right shoulder, and half of a similarly-white mask over the left of her face that contrasts heavily with her otherwise-black form.

Summon: Use the Symphony Emblem at night. The boss will despawn if it reaches daytime, but has no other specifications for its fight.

Fought: Post-Moon Lord
Specification: ???
Special?: No
Progression?: Yes, later bosses

Stats:
Health: 400,000 (650,000)
Attack:
-105 (185) (Melee) (Inflicts Lovestruck - 0 (20)%)
-100 (178) (Chaotic Sphere)
-90 (165) (Symphony) (Inflicts Lovestruck - 10 (50)%)
Defence: 100

Attacks:
Chorus usually follows a pattern of attacking with melee attacks with teleports in-between, with a Symphony or Chaotic Sphere attack being used under certain specifications.
-Chorus may appear near the player, dash at them, and then stop once reaching the player's original location. Roughly only half a second later she will dash in the player's direction again, disappearing at the end of the second dash.
-Chorus may appear either above or to the side of the player and dash either vertically or horizontally at them at high speed. Her movement is extremely fast and has minimal delay, with her disappearing again once the attack ends.
-Chorus may teleport near the player and dash at them.
--There is also an alternate version of this attack where Chorus uses a fake-out version of this attack where she appears, and then teleports again instead of dashing. She will teleport near the player and dash the second time around instead.
-After around 3 charges Chorus will use the Symphony attack where she stays in place and a reddish pinkish light appears beneath her. Large dark-magenta music notes begin to be spawned from her that disperse outwards in random directions, accelerating as they travel.
-Every 50,000 health lost will cause her to summon in 2 or 3 Chaotic Spheres. These simply hang in-place when summoned but, if the player gets too far away from them, they can re-appear near the player; indicated by black particles appearing where they are about to spawn.

Defeat: Chorus' mask cracks and the pauldrons on her shoulder shatter, with Chorus herself disappearing afterwards.
-Two new NPCs can spawn in; Chorus and Chibi Chorus
--Chorus will sell the player certain items, including a few used to locate a few 'secret bosses' in the world. She will also sell more items after certain bosses are defeated.
--Chibi Chorus can be given money in exchange for either a random teleport to somewhere in the world, or money in exchange for being given 5 'buffs'. These 5 buffs are almost completely random, last for an hour, cannot be cancelled, and can either be buffs or debuffs. (Certain buffs like Shadow Dodge and most highly-damaging Damage-Over-Time effects cannot be given).

Hints:
-Dashes and teleports are very useful for this fight, as Chorus' attacks are a mixture of fast-paced dashes or large quantities of projectiles.
-Staying in a relatively confined space, like an arena, can stop the Chaotic Spheres from relocating themselves suddenly; making them easier to keep track of.
-Chorus is most vulnerable during the Symphony attack, where she stays relatively immobile. During her dashes she can be damaged, but her fast movements and large amounts of time invisible make it less reliable to hit her.
--Despite this, the Lovestruck debuff is more commonly inflicted by the notes, meaning that it is rather easy to miss out on a lot of damage by being hit and ending up unlucky.
-Remember roughly where the Chaotic Spheres are. Lots are spawned in by the end and they may hinder the player's movements

Extra Info:
-Chorus, despite being another Chaotic Being like Blackrune and Terminus, doesn't appear to share their villainous tendencies due to her becoming an NPC once defeated.
--Overall, she appears more 'lawful neutral' as opposed to the original Doppelganger's 'chaotic evil', Terminus' 'lawful evil' or Blackrune's 'chaotic neutral'
-Originally, Chorus' fight was supposed to have a 'damage threshold' where dealing more DPS than expected would cause her to enrage. This was removed later, however.
-Chorus' NPCs seem to have very different personalities; with Chorus being a lot more serious while Chibi Chorus is more cynical or comedic in their dialogue.
--Chorus' dialogue is usually talking about other bosses, enemies and biomes (Like Terminus and the Void)
--Chibi Chorus' dialogue involves a mixture of cynical and sarcastic text about the player, and about Chorus herself. For example, the quotes include her calling Chorus a 'weeb' for no particular reason before realising that she is also Chorus and getting disgruntled about it.
-Chorus' NPCs, unlike with bosses like Skye (Boss Ideas 5), do not despawn when she is re-summoned; even temporarily.
[Added: 23/8/19]
Biome: The Rift
"Not a biome, but an enigmatic space created by a temporal instability. Biomes lost in time are added to the Rift; with their more powerful entities left to exist within..."

Appearance: Appears like normal Dirt and Stone blocks, but without any colour. Ores and other blocks simply turn to stone and trees become grey as well and lose their leaves.

Type: Small biome
Spawn: Post-Moon Lord, anywhere, surface and underground
Special: Most enemies are freely allowed to spawn here, outside of naturally-spawning bosses

Bosses:
Post-Moon Lord:
Ikari Doragon - A massive undead serpentine dragon, trapped in the Rift after destroying his own realm.

Enemies:
Post-Moon Lord:
-Rift Seeker, Rift Wanderer, Cosmonaut, Watcher

Items:
Post-Moon Lord:
-Rift Bark (Trees), Rift Essence (Enemies)

Extra Info:
-Most enemies in the game are allowed to spawn within the Rift, regardless of the biomes they are supposed to spawn in normally. Only a few enemies are banned from spawning; being boss minions and bosses themselves.
-The Rift is actually a very small biome; and is unable to spread or be overrun by other biomes.
-Most bosses can actually be summoned within the biome, but due to its limited room fighting them there is often very difficult (so probably best to face them in their own respective biomes).
[Added: 18/8/19]
21 - Ikari Doragon, Empire Usurper
Appearance: A large, red serpentine dragon. It has large, orange whiskers and fur around its neck, plus more orange spines trailing down its back. Its underbelly, as well as its tail, are a golden yellowy colour.

Summon: Use the Red Royal Scale in the Rift Biome. The boss can be taken anywhere once summoned without consequences, but it is probably best to face it on the surface. Summoning Ikari will cause the message "You must have a death wish..." to appear in yellow letters.

Fought: Post-Moon Lord
Specification: ???
Special?: No
Progression?: No

Stats:
Health:
-1,200,000 (2,000,000) (Ikari the Usurper)
-850,000 (1,250,000) (Ikari the Vengeful)
-400,000 (650,000) (Ikari the Undying)
Attack:
-250 (420) (Head Melee)
-285 (480) (Fury Head Melee)
-185 (300) (Body Melee)
-160 (270) (Flaming Meteor, Detonator)
-150 (257) (Fireballs, Flame Breath)
-100 (160) (Embers)
Defence:
-100 (Head)
-400 +40% Damage Reduction (Body)
-999,999 (Vengeful)
-Immortal (Undying Body)

[Piercing projectiles lose 60 (70)% damage for every segment they pass through]
[All of this boss' attacks inflict both Oiled and On Fire! for an extended time]

Attacks:
Phase 1:
Ikari acts mostly like a Wyvern; attempting to ram into the player. It is faster than a Wyvern and targets the player for longer with each charge.
-As it attacks, flaming meteor-like fireballs occasionally fall from the sky; with their positions shown beforehand by faint orange lines. The meteors fall quickly and explode violently upon contact with a solid block.
-Ikari may spew flames from his mouth as he travels. These also drop small damaging embers that linger on the ground for a few seconds before disappearing. The flames themselves roughly have the same length as the Flamethrower and are always launched directly in front of Ikari.
-Ikari may launch 3-4 Detonators. These usually hang in the air, but can be knocked away by attacking them. They explode on contact with solid blocks, after lingering for too long, or after making contact with the player or Ikari himself.
--If used to damage Ikari, he will take 500 damage and lose the additional Damage Reduction from its body segments briefly.
Upon killing Ikari Doragon, the boss music will continue. Around 5 seconds later Ikari Doragon, the Vengeful will appear.
Phase 2:
"Do you think that's all it takes to stop me!?"
Ikari gains massive defence in this phase, and begins releasing detonators more frequently and retains both his flame breath and meteor attacks. He continues to charge at the player, releasing detonators when nearby.
However, once a Detonator is knocked into him (head only), numerous things happen:
-He will slow down significantly
-His defence will drop to 140 across all of his segments (though the piercing damage reduction still applies)
-He will begin releasing fireballs outwards in all directions randomly from his head
After a few seconds he will regain composure and go back to normal.
Once defeated again, the music continues. 8 seconds later Ikari Dragon, the Undying will spawn.
Phase 3:
"Fool! I refuse to die to a mere mortal!"
His body is now skeletal, but his head remains the same. Fire is visible within his skeleton, causing all of his body segments to drop embers occasionally. He loses access to the meteor and detonator attacks, but retains the flame breath and fireball attacks from phases 1 & 2.
All of his body segments are now immune to damage, leaving only his head vulnerable. He is highly aggressive and tries to ram into the player at high speeds.

Defeat:
-The Usurper form (Phase 1) explodes into flames
-The Vengeful form (Phase 2) explodes into gibs of his body, but not his head
-The Undying form (Phase 3) explodes into skeletal gibs, plus a few for its head
Each form has its own set of gibs, separate for that phase of the fight, meaning that it actually has 2 fake-out deaths.

Drops: Drops a sword, a spear, a throwing chakram-like weapon, a magic staff, summoner staff, a bow and a gun. Also drops an accessory that boosts melee stats and magic stats at the cost of defence. In Expert Mode it drops the Flame Saddle; which summons a mount that is basically Ikari with only its head and tail segments with the description "He's alright, but his dignity is gone."

Hints:
-Due to the boss' high speed and Wyvern-like behaviour, any sorts of 'burst movement' (like dashes and teleports) can be good for dodging his charges
-The Rod of Discord can be very useful, especially during the meteor attack where horizontal movement options become more limited.
-In Phase 2 waiting for Ikari to approach before launching a Detonator at him makes it easier to aim, plus it means that upon being weakened he is already within close proximity to the player.
--In Expert Mode, where only hitting the head counts as weakening him, this is even more useful
-Piercing weapons, even though they lose power drastically, are still decent to use as they can provide additional damage with every attack; even if mild.
-Most of the fight should really consist of the player aiming for the head; made easier by this being the segment aiming directly for the player and also being the largest and 'flashiest' segment.

Extra Info:
-Originally, Ikari Doragon was called Shin Doragon, then a misspelling went to Shi, then eventually to Ikari.
--Shin Doragon is the reason as to why he has a resurrection ability in the first place; as it meant 'Heart Dragon' (and thus was related to life by name, even if a bit of a stretch)
---However, 'Anger Dragon' fit better to his violent and traitorous temperament
-Ikari's design was inspired heavily by the Mythical Wyvern enemies; Wyvern-like enemies left unimplemented on the mobile version of the game
-Outside of the actual movements of the individual segments, Ikari's 'beard whiskers' are the only animated part of his body
-Due to his title of Usurper in both name and his 1st phase, it is likely that from Ikari's own world he had at some point had some sort of position of power, perhaps even having been royalty.
--Specific use of 'Empire' in the boss' title also suggests that he may have actually usurped the former Emperor of his homeland before its destruction
[Added: 18/8/19]
22 - The Shredder
Appearance: The Shredder: a massive mechanical worm seen previously in Boss Ideas 2; though given a newly updated design. It has more spikes and a more heavily-armoured body, and a set of rotating spikes that spin rapidly around its central eye.

Summon: Found randomly in the underground or caverns near the right of the world once in Hardmode, but requires a specific location to be reached (a small temple-like building coated in damaging spikes and Chlorophyte brick). Found easier using the Bladed Compass brought from Chorus, which shows the direction of the temple. Entering will cause the Shredder to spawn immediately, and it will not despawn unless there are no active players remaining.

Fought: Post-Moon Lord (Technically Hardmode)
Specification: Post-Chorus*
Special?: Uncraftable summon, 'Compass Boss'
Progression?: No

[The boss isn't actually Post-Chorus or Post-Moon Lord. However, the Compass used to find the temple easier IS Post-Chorus and the boss' stats are based around the time you'd face Chorus]

Stats:
Health: 95,000 (135,000)
Attack:
-15 (18) (Head Melee)
-10 (12) (Body Melee, Sawblade)
Defence: 99,999 +99.99% Damage Reduction

[All of this boss' attacks ignore defence, damage reduction, and immunity frames]

Attacks:
Burrows through the ground most of the time, but is able to fly temporarily if the player is considered to be too far away to reach for a long time.
-He may summon sawblade projectiles that slowly move horizontally or vertically when spawned. They move slowly, but their number and large size mean they are rather dangerous hazards.
Making contact with either the boss or its projectiles will actually ignore the player's defence, damage reduction, and immunity frames (to an extent). The player can be hit up to 20 times per second making contact with the boss or the sawblades.

Defeat: Explodes into gibs of chunks of metal and green flames. The boss cannot be resummoned once defeated by re-entering the temple, but now the Bladed Compass is consumable and can summon the boss anywhere at any time.

Drops: The Bladed Key; an item that unlocks the chest in the Shredder's temple (but can only be used once Plantera has been defeated). Also drops Spiked Plating; a material used to upgrade a few Post-Moon Lord armour sets and to make a couple of accessories. In Expert Mode it drops The Shred Shell; an item that allows the player to deal contact damage every tick to enemies and increases the invulnerability period provided to the player by taking damage.

Hints:
-All attacks against this boss will ultimately only end up dealing 1 damage. Therefore, lingering projectiles, piercing projectiles and AoE effects are best against it.
--The boss is immune to virtually every debuff in the game, so Damage-Over-Time strategies prove fruitless, and defence-reducing weapons still have to contend with its steep damage reduction and still therefore ultimately end up only dealing a single point of damage.
-The player should avoid the boss and its attacks as best as possible, utilising teleportation effects mainly. Trying to abuse immunity frames proves pointless, and even items like the Cross Necklace end up not helping at all.
-Items that boost defence, damage reduction, defence, and immunity frames are all relatively useless in this fight, and thorns effects only deal 1 damage for every hit from the boss (meaning only a maximum of 20 per second).
-Fast-firing weapons, like the Megashark, prove useful even without special effects simply due to their high speed

Extra Info:
-The Shredder is the first of the 'Compass Bosses'; a sub-group of secret bosses that are only found by locating their special temples scattered around the world. Most of these are bosses from the past; re-sprited and given new fights to make them overall more interesting.
-The Shredder is able to kill the player in only a few seconds, as it can deal ~200 damage per second in Normal if the player makes contact with its mere body segments or projectiles.
--360 DPS is the most it can accomplish; with contact with its head in Expert Mode. This is the highest DPS of any boss that can be fought in Hardmode
[Added: 23/8/19]
23 - Forest Guardian
Appearance: A large brightly-coloured bird. Most of its fluffy body is orange, with a yellow underbelly and tail and some additional green on its feathers at the tip of its tail.

Summon: Use the Exotic Bird Seed in the jungle. The Bird Seed itself cannot be crafted, and instead must be brought from Chorus' NPC. The boss can be taken anywhere once summoned, but despawns if there are no players nearby.

Fought: Post-Moon Lord
Specification: Post-Chorus
Special?: Uncraftable Summon, 'Compass Boss'
Progression?: No

Stats:
Health: 0*
Attack:
-150 (260) (Melee)
-135 (230) (Feathers)
-145 (244) (Wind Blade)
-175 (300) (Wind Trap)
Defence: 0*

Attacks:
The Guardian cannot be damaged by the player, forcing the player to simply endure its onslaught. It mainly attacks by flying at the player continuously, using various attacks at random intervals.
-It may fly horizontally to the player before charging at them. It has mild vertical control whilst charging, but it is very limited
-It may launch a massive cluster of feathers towards the player. They move at the same speed, but at varying angles
-It may release 2 bursts of feathers outwards in all directions in succession. The first is made of 10 feathers and the second has 15 feathers and is launched almost immediately after. The feathers pass through blocks.
-It may launch an arc of 3 white crescent-shaped projectiles towards the player. They move very fast and are quite large, making them hard to dodge.
-It may stay still and rapidly flap its wings, summoning numerous Wind Blades that travel horizontally from off-screen. They move at varying speeds and heights, but all travel directly horizontally
-It may stay still and rapidly flap its wings, summoning very small spirals of wind that hang in numerous places in the air. The spirals themselves are harmless, but either when the player makes contact or they expire they will release powerful blasts of heavily-damaging wind around them in a miniature tornado
As time passes, it will begin to attack faster and faster until 3 minutes have passed, where the fight will end

Defeat: The Guardian, visibly tired, roosts on the ground for a few seconds. After some time passes it tweets and flies away.

Drops: Drops large amounts of Vibrant Feathers; used as materials for accessories and upgrades for a few other items like wings. Also drops the Feather Flayer; a feather-launching sword that can be upgraded a few times later-on. In Expert Mode it will drop 'Birb Wings'; a set of slow-acceleration wings that can fly for an exceptionally long time.

Hints:
-Defensive and mobility accessories should be chosen for this fight, as offence-based accessories are useless against this boss: Its fluffy body is impervious to attack.
-It has a lot of attacks that use either horizontal movements or horizontally-travelling projectiles. Teleports and fast-acceleration wings are good for dodging these
-The Rod of Discord might as well by your selected item throughout the entire fight as you won't need weapons

Extra Info:
-Originally, the fight was supposed to consist of a human and the bird. The human would have ridden the bird in the first phase, and then jumped off and acted separately after being taken down to lower health. The human was removed both due to not having a very good sprite, but also because of the amount of human or humanoid bosses released recently
-The decision to make it invulnerable, now its main gimmick, was only added because I felt bad for attacking it/forcing people to attack it
-It took a bit of inspiration from Calamity's Bumblebirb; with its fluffy body and charge attacks, but also accidentally ended up with a colour scheme akin to Yharon
-Technically speaking, the fight will always take the same amount of time for any players, as it will always last for 3 minutes before the Guardian tires
[Added: 24/8/19]
24 - Black Hole Sun
Appearance: A large, alien entity. Its limbs are all disconnected from each other and simply float near the main body. It has 4 wings, all of similar size, and a head with red eyes floating above the body. Its body appears to be a red sphere of some kind with a hole through it and small red particles being sucked into the body, with some of them escaping through the other side.

Summon: Find the Black Hole Shrine; a tiny floating island near the very top of the world with a small, red and black temple on it. Going inside this temple in Hardmode will summon the boss. Using the Star-Bound Compass, an item sold by Chorus' NPC, can help locate it easier.

Fought: Hardmode (Technically Post-Moon Lord)
Specification: Post-Chorus*
Special: Uncraftable Summon, 'Compass Boss'
Progression?: No

[*Only be difficulty. Can be accessed as soon as you are in Hardmode]

Stats:
Health: 525,000 (780,000)
Attack:
-160 (274) (Melee, Homing Fireball) (Inflicts Crimson Embers - 67 (100)%)
-150 (260) (Red Fireball) (Inflicts Crimson Embers - 25 (33)%)
-200 (340) (Chaotic Explosion) (Inflicts Crimson Embers - 100%)
-140 (248) (Small Fireball) (Inflicts Crimson Embers - 33 (50)%)
Defence: 200

Attacks:
The Black Hole Sun flies around above the player, usually in an elongated sideways figure-of-eight motion. It will occasionally go completely invisible and become both immune to damage and unable to deal contact damage. It attacks with red fireballs and explosions:
-It may go invisible and fly near to the player before become visible again, and then finally charge at the player.
-It may release up to 5 fireballs in succession from its core; launching them all towards the player. Once they hit a solid object, or after getting too far away from the player, it will detonate into between 7 and 8 smaller fireballs. The smaller fireballs are released outwards in all directions randomly and pass through blocks.
-It may summon fireballs from the sky that accelerate. Once they hit a solid block they explode into between 5 and 6 fireballs. The smaller fireballs and released outwards randomly and pass through blocks.
Once at half health it will gain a few new attacks, signalled by a roar and a non-damaging pulse of red energy from its core.
-It may launch 3-4 homing fireballs at the player. As their name implies, these will chase the player until they expire, which at that point they explode into 4-5 smaller fireballs which are launched randomly outwards and pass through blocks.
-It may disappear, re-appearing near the player shortly after. Once visible again it will charge up energy and, roughly a second later, release a massive explosion around itself. It does this up to 3 times in succession before ending the attack; with the final explosion being followed up by the Black Hole Sun resting briefly.

Defeat: The core begins to build up energy, so the Black Hole Sun launches its core at the player; with its wings and head being dropped as gibs. The Black Hole Sun's core chases the player quickly for a few seconds before exploding, ending the fight.
-The Shrine no longer summons the Black Hole Sun once entered, and instead the Star-Bound Compass will directly summon the boss anywhere.

Drops: The Black Hole Key; an item that unlocks the chest within the Black Hole Sun's shrine (but can only be used once Plantera has been defeated). Also drops Cosmic Fragments; used to make a few Post-Moon Lord items. In Expert Mode it also drops the Black Hole Staff; which summons a large, damaging Black Hole at the cursor's positon.

Hints:
-Dashes, in general, are quite useful in this fight as they can be used to dodge its charges, explosions, homing fireballs, and also its last-ditch attack
-The last-ditch attack is uses may be quite unexpected, so keep on your toes even after the boss appears to have been defeated.
-Unlike the Forest Guardian and Shredder; bosses that can potentially be beaten with basic Hardmode items, facing the Black Hole Sun is a very bad idea until you are properly into the Post-Moon Lord game.

Extra Info:
-The boss' design is purposely reminiscent of the Eclipser; a large moth-like boss seen in Boss Ideas 4.
-The boss' name is a reference to Soundgarden's song of the same name.
--The song's music video, which actually contained the titular 'Black Hole Sun', was also the inspiration for the boss' core
---Also, the relatively unsettling nature of the music video was the rather accidental inspiration for the heartbeat-like pulsing of the Black Hole Sun's core.
-The Black Hole Sun is, technically speaking, the deadliest of the 'Compass Bosses' at the beginning of hardmode because its gimmick isn't strictly defensively-based like the others, so it isn't just a case of high DPS or evasion like the other two.
[Added: 26/8/19]
25 - Terra Defender, Allium
Appearance: Allium herself is a Dryad, with an appearance very similar to the NPC, though taller and with a different hairstyle.

Summon: Use the Tome of the Earth during the day. There aren't actually any consequences for taking the boss to different biomes, nor even making the fight persist until nighttime. Allium will actually leave a message as she spawns, usually saying "You cannot fight nature..."

Fought: Post-Moon Lord
Specification: ???
Special?: No
Progression: Later Bosses

Stats:
Health:
-6,000,000 (9,150,000) (Allium)
-6,500,000 (10,000,000) (Geoforce)
Attack:
-315 (475) (Allium Melee)
-320 (482) (Allium Teleport, Terra Sphere, Nettle Bursts)
-300 (453) (Leaf Barrage)
-400 (600) (Geoforce Head)
-335 (500) (Geoforce Body)
Defence:
-250 (Allium)
-400 +50% Damage Resistance (Geoforce)

[All attacks have a chance to inflict Nature's Wrath - 33 (50)%]

Attacks:
Allium follows a mostly simple pattern; attacking with teleports in-between. When not attacking she floats in the player's direction, most of her attacks have her stay still, and finally her teleports have her actually turn into 2-3 balls of glowing green energy that disperse before all converging on a single point, where Allium reforms. Allium mostly uses nature-based attacks, as expected:
-She may summon numerous 'Terra Sphere' projectiles which she releases from herself. They travel upwards, arc around in the air, and then eventually come back to travel horizontally in miniature bullet-hells. Some will also fall down from above as well, but this is uncommon.
-She may throw seeds into the air that are affected by gravity. After random intervals the seeds explode explode: The explosions do no damage, but they do release 'Nettle Burst' vines that, as expected, work like the Nettle Bursts' projectiles, but longer and hazardous to the player. Up to 2 separate vines are summoned from each seed, but each seed releases them at varying times.
-She may release a large burst of leaves in the player's general direction, but at random angles. She will teleport directly afterwards, effectively hiding her teleportation 'spheres' from the player. She reforms around the same time that the leaves all despawn.
-She may summon large quantities of leaves that fall diagonally from the sky. They cannot pass through blocks and are quite slow, but their sheer number makes them threatening regardless.
-She can also launch a barrage of 3 Terra Spheres, pause for a second, and then fire 3 more. These spheres have mild homing properties to them as well.
Once down to 60 (65)% health Allium will summon two minions to assist her: Two colossal stone worms called 'Geoforce'. She also says "Alright, then I'll have to call upon some help; you seem to refuse to stay down"
Geoforce worms don't actually have any special properties to them, simply burrowing through the ground, but their size and speed, combined with some of Allium's own attacks forcing players to remain near the ground, make them a threat nonetheless.

Defeat: Allium flinches, turns into 3 spheres like during her teleports, and all 3 of the spheres fly away and despawn. Both Geoforce worms remain active, however, and she usually leaves with the message "You haven't seen the last of me!"
The Geoforce worms, when defeated, explode into gibs, releasing large quantities of green particles from all of their segments.

Drops: Always drops Earthern Shards; a material for a few Post-Moon Lord and Chaos Mode items. Drops a sword, spear, tome, magic staff, summoning staff, a bow or a gun; all with roughly the same drop chances. Also drops one of 5 equipable tomes; each providing different stat boosts (melee, magic, ranged, summoner, throwing). In Expert Mode she also drops the Earthern Aegis; an upgrade for the Paladin's Shield that provides a large assortment of defensive buffs. A rare Expert-exclusive drop is the Blooming Seed; which summons a chibified version of Allium as a pet.

Hints:
-Many of her attacks are overall more dangerous for players ascending or far from the ground. For example, both of the bullet-hell-esque attacks have projectiles either being launched into or falling down from the air, the homing attack cannot be blocked with solid objects if far away from any solid blocks, and things like the seeds are also thrown upwards and thus are more immediately dangerous for players flying nearby.
--However, once the Geoforce worms enter, the ground arguably becomes deadlier. Therefore, dealing with the worms is probably a good idea; with piercing attacks as usual being the most effective against them.
-Allura cannot be harmed whilst teleporting, so this time could be used for repositioning to either get out of the way of her last attack, or to deal decent damage when she reforms before she can attack again.
-The worms appear almost instantly after Allium speaks the second time, so their summon should be judged on her health and not her dialogue.

Extra Info:
-Allium accidentally ended up being a 'reverse' of the Vile Worm fight from Boss Ideas 5: instead of a worm assisted by 2 dryads, here a dryad is assisted by 2 worms.
-Allium actually has a few other bits of dialogue, but they are only used under certain conditions
--"Oh, it's you again" (Used if fought twice, less than a day cycle apart)
--"I didn't mean I would definitely see you again, you know" (Fought 3 times in 2 days)
--"I'll get you next time, [Player], next time!" (Defeating her 3 times without dying)
---A reference to Dr. Claw from Inspector Gadget
--"Stop it!" (Defeating her 4+ times without dying)
--"This is getting real old real fast" (Having a fight last more than a whole day cycle)
-Her normal defeat dialogue was partially a reference to Ganon from the CDI Zelda games, who has similar dialogue once defeated
[Added: 25/8/19]
26 - Disillusion
Appearance: Disillusion is a strange spherical grey entity, made mostly of shifting rings and shapes of different shades of greys. The two centre points where the 'ripples' both appear and disappear almost appear to substitute as eyes.

Summon: Use the Rune of Disillusion at night. The sky will darken and become strangely grey. The boss slowly fades in near where the item was used as opposed to appearing instantaneously like most bosses. The boss will teleport to chase players too far away from it. The boss only despawns if there are no active players in a world and is unaffected by biome and depth and the time remains at 12:00 throughout the fight so it cannot reach daytime again.

Fought: Post-Moon Lord, Chaos Mode
Specification: ???
Special?: No
Progression?: No

Stats:
Health: 2,000,000 (2,876,450) / 8,500,000 (13,885,000)
Attack:
-340 (550) / 550 (800) (Melee)
-320 (512) / 512 (725) (Illusional Orbiter/ False Delusions)
-300 (480) / 480 (670) (Illusion Projectile)
Defence: 400 / 400 +10% Damage Resistance

Attacks:
Disillusion mainly floats around akin to the Brain of Cthulhu's first phase, using a variety of attacks often featuring large amounts of projectiles. It teleports after every few seconds to a new location and both speeds up its movements and increases the frequency and likelihood of its teleports.
-It may summon projectiles that travel both horizontally and vertically, coming in from off-screen. They accelerate slightly when close to the player, though the changes aren't very noticeable until within only 4 blocks from the player. The 'bullet-hells' last a few seconds before switching to a new attack.
-Disillusion releases numerous bursts of projectiles out from itself while moving slowly towards the player. Each 'burst' consists of 10 projectiles and up to 15 total bursts can be fired in succession before the attack ends; with Disillusion teleporting as soon as the attack ends.
-It may summon 'orbiters' around itself which are projectiles that orbit part of it for roughly a second, teleport to another location around Disillusion, and orbit for a further second; continuing this cycle until the attack ends. Disillusion teleports near to the player continuously throughout this attack, but doesn't move outside of the teleports until the attack ends.
-Disillusion may summon clones of itself near to itself. After roughly half a second they all charge at the player, the real Disillusion included in the charges. They all begin their charges at different times, but the differences are just milliseconds. It teleports at the end of the charge.
Its attack actually speed up under 3 different main circumstances. Firstly, as it takes damage, its attack speed increases mildly. Secondly, in Expert Mode, it starts out with a naturally-faster attacking speed. Finally, in the Chaos Mode rematch with Disillusion, it also has an increased attack speed on top of both of the other things.

Defeat: Disillusion's continuous shifting slows to a standstill, and it begins to crack. A few seconds later it explodes into a flash of white and releases small gibs upon its destruction.

Drops: Normally drops up to 3 accessories that provide situational buffs that either come into play upon taking damage, dealing enough damage, or after set amounts of time have passed while a boss is active. The buffs are usually to damage and defence, but have a chance to also provide buffs towards damage reduction or additional damage rarely. In Expert Mode it drops a throwing knife that divides into additional homing knives as it moves or once it deals damage. All 3 main accessories are dropped at the same time in Chaos Mode without having to chance their drops.

Hints:
-Disillusion teleports rather frequently, so avoid moving too fast or too far away from him as he might end up teleporting directly into the player's path
--Also, staying relatively close allows the player to see what attacks it is using on top of the benefit of already reducing the likelihood of him teleporting again
-Avoid getting close to the projectiles in some of its attacks as their ability to accelerate when close to the player can easily throw the player off and cause them to take unnecessary damage

Extra Info:
-Technically speaking, Disillusion was the first boss to actually receive fan art... even if it's just an MS Paint drawing in the Discord
--Also technically speaking the artwork predates the boss' official release by roughly 15 hours... make of that what you will
-Disillusion's design came partially from a illusion created by certain types of mirror
-Disillusion actually lacks any proper shading details like most other bosses. Lore-wise this is because of the lack of light present in its fight anyways due to the night and due to its otherworldly nature, but the design reason was because it became far harder to animate when it also had additional shading.
[Added: 4/9/19]
27 - The Creeper
Appearance: A plant with a body similar in appearance to the Snatchers and Man Eaters of the jungle. It uses 4 thorny vines as legs; using them to drag its bulky body around relatively freely. The body itself has thorns on the sides and in its centre something sharing the same colour as the thorns revealed to be a seed pod during the fight.

Summon: Use the Plant Food in the jungle. The boss can be taken anywhere once spawned without consequence, however. The boss only despawns if there are no nearby targets; either due to all players dying or moving too far away from it.

Fought: Pre-Hardmode
Specification: Post-EoW/BoC
Special?: No
Progression?: No

Stats:
Health: 4,500 (8,000)
Attack:
-40 (80) (Melee)
-30 (60) (Seed Pods, Explosions)
Defence: 9

Attacks:
The Creeper follows a simple pattern, like with most Pre-Hardmode bosses. It begins by slowly walking towards the player, continuously launching seeds from its body upwards that are affected by gravity; falling down in an arcing motion after being launched. The seeds, upon contact with a solid object, explode into small explosions. It may pass through blocks when walking if considered necessary, like with the Everscream.
After a few seconds it will stop firing seeds and jump 3 times at the player. Each consecutive jump is higher than the previous and they all cover roughly the same distance. After the 3 jumps it goes back to its normal pattern. The jumps can pass through blocks.
Once under 40 (60)% health it gains one new attack where it performs a single jump at the player. Upon landing it will shake and release a massive cluster of seeds that don't travel very high,only 2 blocks compared to almost 30 like normally, with all the seeds landing and exploding near to the Creeper itself.

Defeat: Uses the attack it gained at roughly half health; jumping into the air before releasing a cluster of seeds. The seeds, as normal, land around the Creeper; but instead of the usual case where the Creeper itself is unaffected it actually ends up blowing itself up with its own last-ditch attack: bursting into gibs.

Drops: It may drop a weaker version of the Seedler or Leaf Gun, a slightly improved Vilethorn, or a bow that shoots thorns that can inflict Poisoned. May also drop a piece of the Halloween Creeper costume set. In Expert Mode it drops the Thorn Badge that releases mildly-damaging thorns upon taking damage or, very rarely, the Creeper Badge that releases an explosion when the player is hit that deals massive damage.

Hints:
-While a platform out of the reach of its jumps may seem a good idea, the trajectories of the seeds it spits continuously may actually be even more problematic that it's often worth
--However, making a solid platform 2 blocks thick will stop it being able to reach you, and means the seeds nor their explosions can damage you. However, attacking it back may also prove tricky and there's always a risk it will despawn.
-Keep a distance from the boss. It has high contact damage and its frequent jumps and its half-health seed barrages make staying closeby an unnecessary gamble

Extra Info:
-While its physical design was more inspired by the Man Eater in Vanilla Terraria and the Corpse Bloom from the Thorium mod, the name and its explosive seeds were actually based off of Minecraft's signature Creeper enemy.
--This is evidenced by its ability to both drop parts of the Creeper Costume set, and the Creeper Badge it rarely gives in Expert Mode
---Additionally, Game Theory's theory of a Creeper actually being a type of moss also played into this, since the boss itself is a plant
-The Creeper Badge is actually very overpowered in Pre-Hardmode and proves effective against a lot of Hardmode foes as well, especially those with numerous vulnerable segments like the Destroyer and Bloom Worm
[Added: 4/9/19]
28 - Primal Allium
Appearance: To an extent a simple rematch with the Grand Dryad Allium, though her appearance has changed. The flower on her head seems to have grown more, she has gained a red 'scarf' that uses the same reds as the flower, so it might actually just be petals. Her eyes have also taken on an unusual glow...
The Primal Geoforce is mostly similar to the original, but the stone formerly making up its body is replaced with jade, the thorns have grown more jagged and threatening, and it has increased in overall size.

Summon: Use the Primal Earth Crystal anywhere in the world and at any time. The boss only despawns if all players in the world die; chasing the player across the map if needs be. She can only be fought once the previous Allura fight has been defeated at least once.

Fought: Chaos Mode
Specification: ???
Special?: No
Progression?: Yes, Later Bosses

Stats:
Health:
-7,000,000 (11,800,000) (Primal Allium)
-6,500,000 (10,000,000) (Geoforce)
-8,000,000 (14,000,000) (Primal Geoforce)
Attack:
-515 (775) (Allium Melee, Geoforce Dust)
-520 (782) (Allium Teleport, Terra Sphere, Nettle Bursts)
-500 (753) (Leaf Barrage)
-600 (900) (Geoforce Head)
-535 (800) (Geoforce Body)
Defence:
-250 (Allium)
-400 +50% Damage Resistance (Geoforce)
-500 +70% Damage Resistance (Primal Geoforce)

[All attacks have a chance to inflict Nature's Wrath - 50 (67)%]

Attacks:
"I went easy on you last time. Don't count yourself so lucky this time around!"
Both Allium and the Geoforce's movements remain the same as in their original fights, though faster and more aggressive. The Primal Geoforce also acts similar to the Geoforce does, though also leaves a damaging trail as it moves.
Phase 1:
Allium and the normal Geoforce are active in this phase, however Allium herself is immune to damage; forcing the player to target the lone Geoforce worm burrowing around.
While the Geoforce just follows burrowing AI and lacks any projectiles, Allium has upgraded versions of all of her old attacks; given more projectiles, damage, and effects.
-Her teleport now consists of 4 energy orbs being summoned at a time instead of the original three. They are also faster now than before and release a small damaging burst upon reforming.
-The Terra Sphere projectiles of her old attack are larger and take less time to circle around again before moving horizontally across the screen. Some of the projectiles will also be brighter. The brighter projectiles, when travelling horizontally, rapidly accelerate.
-The seed-throwing attack no longer aims upwards; instead being aimed all around her randomly. They all burst at varying times and still turn into the Nettle Burst thorny vines once they burst open; though the vines are larger and longer and remain active for an extended time as well
-The leaf barrage has more projectiles, attacks faster, and still teleports as soon as the attack ends. The leaves also now pass through blocks.
-The diagonal leaf fall attack is mostly the same, but there are more leaves and they now pass through blocks
-The Terra Sphere attack launched 5, then 4 in the second barrage. She now teleports after the 2nd barrage as well; hiding amongst the projectiles.
Upon defeating the Geoforce worm Primal Allura herself will become vulnerable.
Phase 2:
"You made a poor decision in trying to anger me, human."
Allura fights by herself in this phase, using attacks from her first phase alongside some new attacks
-She may launch a massive barrage of Terra Spheres at the player. They have mild homing abilities, like before, and Allura teleports after finishing the attack; blending in with the projectiles to an extent.
-She may summon a box of Nettle Burst thorns around the player and summon leaves that fall diagonally to the left. After a few seconds new leaves stop being summoned and, a second later, the whole box fades away
-She may summon a 'snake' of thorns: Nettle Burst thorns are continuously summoned at the player's previous locations, making what is essentially a long vine that chases the player as it is summoned. After a few seconds, the snake will fade entirely. Whilst using this attack Allura will launch Terra Spheres at the player infrequently for added difficulty.
Once down to 50% health she will summon two Primal Geoforce worms to assist her, signalled by her exclaiming "I'll show you this world's TRUE POWER!". Once both are summoned her attacks will slow down ever so slightly, but her attacks speed up again as she takes damage and if the Primal Geoforce worms are defeated.
At 20% health she exclaims "Terraria depends on me!" and her projectiles will speed up very slightly
At 15% health she exclaims "I cannot afford to lose!" and some of her attacks will gain a few more projectiles
At 10% health she exclaims "This isn't over until I say it's over!" and she teleports slightly more frequently. Any Primal Geoforce worms still active health 10% of their health back as well.
At 5% health she exclaims "I can't..." and actually begins to slow down with her attacks. Some projectiles also lose speed, though only very mildly.
At 2% health she doesn't actually speak, with the dialogue just saying "...". Her attack speed, projectiles, and even the frequency of her teleports decreases significantly.

Defeat: Transforms into the 4 orbs as when she teleports, though they are all rather shaky. One will float away slowly, occasionally dropping slightly or 'staggering' the movements, while the others remain in-place before slowly fading away.

Drops: Only drops 5-8 Terra Souls. Terra Souls, however, are used for a multitude of things including upgrading a colossal roster of weapons, making late-game armours, upgrading some accessories, and even making two late-game boss summoners. In Expert Mode it drops between 7-10 Terra Hearts instead and also drops the Memento Shard; a material that simply states:
"Staring into the shard brings a feeling of familiar, but nonetheless powerful fear"

Hints:
-Strategies that worked in the previous fight against Allium's Post-Moon Lord counterpart will also likely work here, though to a weaker extent due to the more aggressive and fast-paced fight.
-Having an infinite flight mount or fighting near platforms is recommended for Phase 2 to avoid having a thorn box summoned around the player at an inconvenient time (like, say, when your wings run out)
-Piercing weapons, as ever, work wonders on the Geoforce worms. Defeating the first one is crucial but defeating the Primal ones, although not necessary, is recommended to reduce Primal Allium's already prominent area-denial attacks
-While the recommendation of waiting out the Nature's Wrath debuff once inflicted still somewhat stands, by this point mild defence reduction is mostly negligible since your defence should be in the hundreds and Allium's attacks in general reach high hundreds as well
28 - Primal Allium (Continued)
Extra Info:
-Allium, unlike in her original fight, doesn't have any special dialogue procks for rematches or losses. Her dialogue is always the same, no matter how many times you fight her.
--In fact her dialogue in general seems more serious than before, perhaps due to being near to the final boss of the mod...
-Her attacks all deal 200 more damage than their Post-Moon Lord counterparts, but in Expert they deal 300 more. These specific attack increases are strange to say the least...
-The Memento Shard is a reference to a certain character from Boss Ideas 4 & 5 who, unlike the others, hasn't canonically either died or moved to new lands. The familiarity and fear quotes mean it's a returning boss, and a powerful one at that
-Allium's actual animations have changed from before, when when excluding her now-glowing eyes and petal scarf. It isn't just some cobbled-together rematch as it may seem from first impressions :>
-As 'Allium' is actually a classification of onion then the boss' title is actually pretty much 'Basic Onion'... not the most intimidating
[Added: 5/9/19]
29 - Grand Conflict
Appearance: Terminus, Aurora and Allium; all locked within some sort of conflict. Each of them uses their designs from their strongest fights (Void Terminus, Ascended Lightseeker and Primal Allium), though size-wise are scaled to all be around the same height.
The only real major difference is their new addition of weapons not seen within their old fights; Terminus has a pair of large, curved knives, Aurora has a thin, katana-like sword, and Allium has a large green sword.

Summon: Use the Journey's End anywhere in the world. The fight begins with all 3 being summoned at once on the ground near the player, passive at first, before all drawing their weapons. Terminus bows before pulling the blades out from under his cloak, Aurora summons her sword in a flash of light, and Allium's sword forms from the ground beside her before she pulls it up and takes a combat stance. The boss only despawns if no players are left active in the world and is unaffected by time, depth, distance and biome.
All 3 have lines of dialogue at the beginning of the fight; signalled by their respective text colours of purple, blue and green.
Terminus - "I promise you that, before this day closes, I Shall Plunge This World Into Chaos!"
Aurora - "To bring peace to these lands, I must best the both of you!"
Allium - "I shall not allow either of you to destroy the natural order of this world!"
The player is also inflicted with Heavy Gravity throughout the entire fight; significantly limiting vertical movement

Fought: Chaos Mode
Specification: Post-Void Terminus, Post-Aurora, Post-Primal Allium
Special?: Normal Mode Finale
Progression?: ...?

Stats:
Health:
-8,000,000 (11,450,000) (Terminus)
-7,000,000 (10,000,000) (Aurora)
-7,500,000 (10,725,000) (Allium)
Attack:
-800 (1100) (Melee, Energy Blasts)
-820 (1150) (Sword Clashes, Bullet-Hell Detonations)
-810 (1125) (Geoforce Barrage, Seeker Bombardment Explosions)
-9999 (99999) (Finishing Move)
Defence: 500

[Terminus' attacks may inflict Shadowflame - 33 (50)% / Crimson Embers - 33 (50)%]
[Aurora's attacks may inflict Unstable Energy - 20 (33)%]
[Allium's attacks may inflict Nature's Wrath - 50 (66)%]

Attacks:
All 3 of them will actually fight each other as opposed to fighting the player directly, though the player ends up caught within the middle of the conflict. While they spend a lot of time invisible, they appear then they are attacking and are vulnerable until they disappear again; with characters appearing based on the attacks being used.
Attacks are used based on both which ones are still active at any given time, though they won't always attack until only one is left [so, say, if all 3 are active, they can still use attacks only using 1 or 2 of them].
[Terminus and Aurora]
-Terminus and Aurora will appear apart from each other, usually with the player in the middle. Aurora will begin to release a barrage of light energy projectiles at Terminus somewhat inaccurately; with Terminus mirroring her attacks with Crimson Seekers in order to destroy all of her projectiles mid-flight. The explosions deal slightly more damage than the projectiles themselves do.
-Terminus and Aurora may clash blades. The first clash with release 2 massive shockwaves of energy horizontally and the second clash, caused by Terminus' 2nd knife, releasing 2 smaller diagonal shockwaves at random angles.
-Terminus and Aurora will clash blades, like with their previous attack, though Terminus uses both knives at the same time to catch Aurora's sword. Having caught the sword, he forces it downward and then suddenly swings his leg up and suddenly kicks Aurora downward. She teleports just before he hits the floor or after travelling too far.
[Aurora and Allium]
-Allium may summon a Primal Geoforce to attack Aurora. Aurora, in response, summons her Vision minions. The Geoforce will lunge out of the ground and be bombarded by Visions; which causes 2 of its 8 segments to break. It will lunge at the player again only to have 3 segments destroyed in another Vision barrage. Finally, it lunges a 3rd time, where it is finished off by a 3rd and final barrage of Visions that this time destroy it mid-jump. It doesn't actually burrow, however; simply vanishing at the end of each individual lunge
-Aurora may attempt to strike Allium with her sword, but Allium will block and create shockwaves with the clash; like before. 3 shockwaves are summoned; 2 diagonally and 1 horizontally. After this Aurora will distance herself as Allium responds by swinging her sword and summoning an arc of 7 energy blasts.
-Aurora and Allium may cause the sword clash and shockwaves of before, but instead of backing away Aurora will summon a Vision below Allium that hits her and launches her skyward rapidly.
[Allium and Terminus]
-Allium and Terminus will begin summoning their respective energy sphere projectiles from off-screen. They are summoned both horizontally and vertically; with Allium's coming from the left and above and Terminus' coming from the right and below. The projectiles in this 'bullet hell' aren't purposely aligned but if any projectiles have head-on collisions with each other the two projectiles will create a violent explosion and despawn.
-Their 'blade clash' attack has Terminus lunge at Allium with one of his knives, which gets blocked by her sword; releasing a horizontal shockwave. Terminus then attempts to get in a hit with his other knife, though Allium tilts her sword upward as to just barely block it. A diagonal shockwave is released with the second hit.
-Events similar to their blade clash occur; with Terminus' first hit being blocked by her sword. However, as it gets blocked Allium will swing her sword around herself in a large arc and slams it into Terminus; launching him horizontally at high speed.
[Individual Attacks]
All 3 have similar individual attacks either used randomly or once 2 of the 3 enemies have been defeated. While all 3 have functionally identical individual attacks, they all use their own respective projectiles and attacks to do so.
-All 3 have the ability to summon horizontal bullet-hells; though the attack lasts longer when only 1 boss is currently active.
-All 3 may launch arcs of 10 fast-moving projectiles at the player before disappearing quickly
-All 3 have dash attacks where they appear near the player before charging at them suddenly with their weapons drawn; disappearing after the charge
[!!!]
Once 2 of them are defeated and only 1 is left active, that one will begin a countdown sequence. They will continue using their solo attacks while the timer ticks down, but upon the timer reaching 0 they use their respective Finishing Moves: (The timer is significantly shorter in Expert Mode)
-Terminus will summon black tendrils that rapidly climb the player's screen; killing the player on contact and remaining there until the player respawns. The tendrils, unlike other attacks, are actually based on the player's screen position and therefore cannot be dodged.
-Aurora will create an ever-intensifying flash of light which damages the player only once it becomes impossible to see. The attack only fades once the player respawns.
-Allium's attack has her create green pulses of energy. The sky flashes green with each pulse and, after the 3rd pulse, the green sky-filling energy itself becomes dangerous and continue to be released until the player respawns; the attack unavoidable as it fills the sky.
29 - Grand Conflict (Continued)
Defeat: All 3 of them have separate defeat animations, plus another one that is used once all 3 are defeated.
-Terminus hunches over, clutches at his face, then looks back up again; letting out an angered, echoing cry before falling backwards and out of the sky.
-Aurora will flinch and then disappears into a flash of light
-Allium will guard herself using her arms, then divides into the green energy orbs she normally does in her own fight.
At the end of the fight all 3 will appear near to the player, lowering their weapons, before all quietly leaving again; leaving with additional dialogue:
Terminus - "I Yield!... for now..."
Aurora - "It seems, due to my recklessness, you have done my job for me... apologies, and thanks"
Allium - "Gah! I can't keep this up with you ruining my chances! I'll be back, I promise!"

Drops: The drops are distributed as they disappear post-defeat; with each one dropping their own respective items.
-Terminus may drop 2 tomes, a small sword, a throwing knife, or an accessory that turns the player into a Chaos Entity; boosting offensive capabilities significantly and slightly reducing the damage from Chaotic Ember
-Aurora may drop a bow, sword, summoning staff, or a magic staff, or possibly a pair of wings that float near the player like her own that have high flight speed and time, a hover effect like the Hoverboard by holding down, and increased vertical speed by holding up.
-Allium drops a sword, summoning staff, sentry staff and a gun, as well as the chance for an accessory that turns the player into a dryad; increasing defensive capabilities and providing additional defence and regeneration when inflicted with a damage-over-time debuff.
-In Expert Mode Terminus may also drop the Final Piece; an accessory that can be unified with other drops to create the final summoning item in the game.

Hints:
-Fast movement is recommended for this fight; especially through things like dashes and teleports via the Rod of Discord. High-powered wings can also help offput the Heavy Gravity debuff as well, allowing for some vertical movement.
-Rod of Discord, or some sort of upgrade, no explanation necessary.
-It is strongly recommended that you keep their health pools relatively similar. This allows the player to basically skip the second part of the fight with the timer. An alternative is to just defeat one and then keep the remaining two similar in health as to reduce the amount of enemies to deal with (even if all it does is just take away some attacks).
--Defeating a single one of them removes 6 whole attacks from the fight
-This boss deals COLOSSAL amounts of damage. Practice may be necessary so don't just rush in in Hardcore or Expert Mode without prior knowledge.

Extra Info:
-This fight was actually designed both before Allium had her design finalised, and also before Aurora actually had her Ascended Lightseeker fight.
--Cadmar, a frequent contributor to Boss Ideas, was also partially the reasoning for this boss' existence
-Much like with Arterion Prime in Project: Arterion, this boss is intended to be Normal Mode's final boss. However, also like Prime, Expert Mode has one last additional boss that can be accessed through materials gathered from other parts of the game including bosses; like this very boss
-While Aurora and Allium have defeat animations similar to their original ones, Terminus no longer disappears upon his defeat and instead just falls down and off-screen. However, this may be because his original defeat animation suggested his death
-Despite all of them having animations that suggest they successfully manage to hit each other, they don't actually take any damage from these attacks
[Added: 6/9/19]
30 - ???
Appearance: Looks like the Chaos Doppelganger, seen in Boss Ideas 4 & 5, but not given a name. Its smiling face appears to be melting, much like with the Doppelganger's later fights, as well as sections where it will 'freak out' as well. The face seems to be dripping, despite it not having a proper physical form to see outside of its face.

Summon: Use the '???'; an item made in Expert Mode only using the Arcane Fabricator that combines numerous items from Expert Mode, Chaos Mode and the Post-Moon Lord game. As it uses the Arcane Fabricator its recipe cannot be seen and will either have to be looked-up or found via deduction of messages on its materials. Upon attempting to craft it rain will begin falling until the player takes it out of the Fabricator, where thunder is audible.
Upon using the item an arena is formed around the player of impenetrable blocks and the boss spawns. The background turns completely black, time freezes, it begins to rain, and NPCs cannot be interacted with. The boss is unaffected by the time it is summoned, the depth or the biome. Taking the boss out of the arena will cause it to become invulnerable and has its attack increase gradually, though it resets once the player re-enters the arena.

Fought: Chaos Mode
Specification: Post-Grand Conflict
Special?: Expert-Exclusive, Expert Finale, Arcane Fabricator Summon
Progression?: ---

Stats:
Health:
-25,000,000 (Chaos Phase 1)
-30,000 (Chaos Phase 2)
-30,000,000 (Chaos Phase 3)
-10,000,000 (Hands of Chaos)
-3,500,000 (Observer)
-12,000,000 (Terminus' Image, Chorus' Image)
Attack:
-1320 (Melee, Spheres of Dark & Light, Hands Melee)
-1170 (Explosive, Observer Melee, Homing Seekers, Boss Detonations)
-1000 (Chaos Rain, Chaos Sphere, Chaos Spears)
-1200 (Terminus Image Melee, Terminus Image Projectile) (Inflicts Crimson Ember - 100%)
-1150 (Chorus Image Melee, Chorus Image Projectile) (Inflicts Lovestruck - 100%)
-1400 (Chaotic Deathray, Elemental Trinity)
-1850 (Black Hole)
-Varying (Chaos Burst) (Leaves player on 1 health whilst in effect)
Defence:
-350 (Chaos Doppelganger, Hands)
-500,000 +99.9% Damage Resistance (Chaos Phase 2)
-400 (Images, Seekers)

[This boss' stats are the same in both Normal and Expert mode due to normally being an Expert-exclusive boss]
[This boss has a minimum damage output of 250. Any attacks that deal less damage will be rounded up to 250]

Attacks:
Phase 1:
The Doppelganger's movements are strange. It may either slowly move in the direction of the player, it may teleport to random locations around the arena, or it may begin moving and accelerating in random directions. It most often stays still when attacking, however.
-It may charge at the player up to 3 times, leaving behind immobile projectiles that detonate shortly after being spawned. It teleports in-between each charge instead of just charging from where it left off.
--It may perform a similar attack, but only charges up to 2 times and instead of leaving detonators drops Homing Seeker projectiles that chase the player before they explode.
-It may release a large cluster of projectiles from its mouth of varying colours (Purple, Violet, Red, Green, Lime, Blue, and Black) upwards which all fall down from above a few seconds after. They fall at slight angles as opposed to directly downwards and all inflict their own debuffs (Venom, Shadowflame, Crimson Ember, Cursed Inferno, Nature's Fury, Overloaded Energy and Oiled, respectively).
-It may split into two large spherical projectiles; one white and one black, before both disappear. For the next few seconds portals will open near the player with these two projectiles appearing from them and charging at the player before disappearing through another portal. The attack ends with both purposely colliding above the player and reforming the Doppelganger.
-It may create 'bullet-hells' of horizontally and vertically-moving Chaos Spheres. The 'bullet-hell' itself lasts for about 10 seconds, with the Doppelganger free to move throughout.
-It may open its mouth widely and begin releasing 'bursts' of slow-moving Chaos Sphere projectiles. Up to 8 are summoned with each burst, and roughly 2 bursts are released per second. The doppelganger moves throughout the attack and can even teleport, making the projectiles less predictable to dodge.
Once its whole health bar has been drained to 0, the Doppelganger will fake-out its death with a powerful flash of white. Upon the flash fading the player will notice that the fight's layout of the black background, frozen time, and the arena are still there. The player may also notice their health has been reduced to a maximum of 1.

After a short delay the Chaos Doppelganger will appear again and continue attacking the now-weakened player:

Phase '1.5':
A sub-phase where the Doppelganger uses specific attacks. The player has to be very careful, however, as their health is reduced to 1 for this sub-phase. The Chaos Doppelganger is also completely invulnerable.
-It begins with a bullet-hell attack from Phase 1. The Doppelganger remains stationary just above the centre of the arena.
-Secondly, an attack similar to the 'burst' attack from Phase 1 is used, though the Doppelganger isn't free to move as before so the attack is easier to predict.
-Finally, the Doppelganger uses a new attack. It will release a strange projectile with red and purple smaller projectiles orbiting it. The projectile comes to rest a little below the Doppelganger in the centre of the arena. After a second or two the projectile will explode, releasing 4 streams of Chaos Sphere projectiles in a '+' shape. After around a second the 4 streams will begin rotating anti-clockwise 270 degrees, forcing the player to keep moving to avoid getting hit.
After the 3rd attack the player's health is returned to normal and they are healed back to 50% health as compensation for the health loss from the phase. Afterwards the Doppelganger will teleport and begin the next phase.

Phase 2:
The Doppelganger goes back to their usual movements seen in Phase 1. They retain all of their previous attacks, plus the phase 1.5 'bomb' attack though it can now be used anywhere in the arena as opposed to just the middle and the Doppelganger is free to move whilst the bomb releases its projectile streams. It gains new attacks in this phase, plus a massive amount of defence that makes it only take 1 damage from attacks:
-It may release numerous homing seeker projectiles around itself that chase the player before exploding
-It may use a strange, almost reversed variation of its 'burst' attack from Phase 1. The main difference is, as opposed to summoning the projectiles from its mouth that travel outwards, the projectiles spawn just outside of the arena and travel back into its mouth.
-It may summon numerous projectiles around the arena borders in rapid succession that fly in the player's direction. They cannot turn once moving but they do accelerate quite rapidly once in-motion.
-It may summon a variety of bosses fought elsewhere in the game. The bosses have no stat boosts, but they do still fall under the minimum damage cap and thus can still deal moderate damage. While most bosses can be spawned, the only exemptions are Chorus, The Forest Guardian, The Lightseeker, Ascended Lightseeker, Terminus, Void Terminus, Allium, or any Chaos Mode bosses. If the bosses are not destroyed in a certain amount of time they will explode (different timers based on boss' difficulty), with the explosions being immensely large and dealing high damage. Bosses do not drop hearts nor items and the Doppelganger stops his assault while these summoned bosses are in-play.
-It may summon an Observer; a large Dribbler-like enemy that follows the player, increasing in speed when near the player
Upon reducing this phase to 0 health, the Doppelganger proceeds to disappear with a flash of light. Shortly after, the next phase will begin:
30 - ??? (Continued)
"Phase 2 1/3":
A monochromatic version of Chorus will be spawned. While it has the same actions as with its own fight, it has statistical differences that make it significantly stronger. She has majorly increased health, follows the minimum damage cap as seen elsewhere in the fight, and she now has a 100% chance to inflict Lovestruck with every attack.
Upon defeating the 'Chorus Image', it will explode. Any projectiles she spawned will disappear with her. A few seconds later, the fight progresses further.

"Phase 2 2/3":
Void Terminus will appear, though will be called 'Terminus Image' and will wear grey and silver instead of Purple and Gold like before. He has increased health, but retains its already-high damage for this part of the fight. All of its attacks inflict Crimson Ember, even if they didn't before.
Upon defeating it, it will act like how Chorus Image's fight ended; with the Image disappearing and any projectiles associated with them also disappearing as the boss does.

Phase 3:
The Chaos Doppelganger appears again, lets out an echoing roar, and begins fighting by itself again. It retains all of its attacks seen in the prior phases, though also gains new ones:
-It may use the Black Hole attack seen in the original Chaos Doppelganger fight: It summons a black hole from itself and begins moving it towards the player, occasionally teleporting to quickly reposition itself. After a few seconds the Black Hole will be closed.
-It may release a large deathray from its mouth similar to the Moon Lord's, though faster and with a larger arc and a shorter wind-up time. The Doppelganger teleports instantly after the attack ends.
-It may summon numerous explosive projectiles from its mouth, dropping them downwards. They all fall through portals summoned just below the Doppelganger and, after a few seconds pass, portals begin appearing in the area above the player; dropping the bombs down through them. The bombs explode on contact with the player or a solid block.
-It may release a barrage of small laser-like projectiles at the player, though instead of them despawning a portal collects them all. A second later two portals open up near the player, facing each other, with the laser barrage travelling from one portal to the other with the player in-between. This happens up to 3 times before the lasers despawn.
Once taken down to 50% health the Doppelganger will gain large amounts of defence and summon two large silhouettes of clawed hands. The Doppelganger's defence is the same as in Phase 2; reducing damage taken to 1.
Phase 4:
The Doppelganger continues his attack, but slightly slower, while the hands attack independently of both the Doppelganger and each other
-The hands may open and rapidly charge at the player, stopping either after travelling too far or upon hitting the arena walls, which they create small non-damaging shockwaves against.
-They may release bursts of projectiles from them. Some of these projectiles are homing seeker projectiles, but most are simple Chaos Spheres.
-They may hover above the player, dropping down bombs that explode on contact with either the player or a solid block.
Upon both hands being destroyed, the Doppelganger enters the final phase.
Phase 5:
The Doppelganger regenerates its health bar back to full and lets out another angered echoing roar before beginning to attack the player. It uses all of its previous attacks, but also gains one (technically 3) new attack(s) that is used more frequently than the others:
-It may summon an 'Elemental Trinity' around itself; three large spheres representing fire, lightning and ice. It will then grab one of them (using a hand it summons from the darkness that looks like its Phase 4 hands) and then uses an attack based on whatever one was chosen:
--If Ice is chosen there will be a 2.5-second delay before a massive blast of icy energy is released all around the Doppelganger, covering a massive area of the arena, before some icicles fall from the ceiling randomly and create large ice spikes once they hit a solid block. After a while these ice spikes despawn.
--If Lightning is chosen there is a 1-second delay before a massive lightning bolt will be dropped vertically at the Doppelganger's horizontal position. Afterwards, another bolt is dropped in the centre of the arena, another half-second passes before 2 more drop somewhere roughly between the arena's borders and centre, and another half-second later another final 2 bolts are dropped at the sides of the arena.
--If Fire is chosen there is a 1.5-second delay before two large pillars of fire are summoned at the sides of the arena. After they disappear a large fireball in the shape of a dragon will travel horizontally across the arena based on the player's position, followed by another around half a second later coming from the other direction. Finally, another second passes before the two fire pillars appear again and two dragon-shaped fireballs cross the arena from opposite sides; one across the arena roof and one across the arena floor.

Defeat:
Upon dealing the finishing blow the Doppelganger will remain motionless, with the face frozen in the standard smile; not moving or melting like usual. After a few seconds it begins to shake, growing steadily in movement. After this is disappears. Once a few seconds pass it will appear above the player, let out a rather ear-piercing screech, and begin melting away; with its smile slowly shifting into a frown as its face melts. After a few seconds the screen fades to white and, a few seconds later, the screen fades back in. The time is 7:30 AM, the arena borders are gone, the sky is back to normal, and the only thing remaining of the Doppelganger being its treasure bag.

Drops:
It will drop weapons themed around the Doppelganger; one of every class and sub-class, plus Daybreak shards which are used to create endgame-tier armour. Can also drop wings, an accessory used to fuse numerous accessories into a single super-accessory, and even 1 of 4 pets; mini-versions of either Aurora, Allium, Terminus, or the Chaos Doppelganger itself. In Expert Mode it also has a very rare chance to either drop the Familiar Spear, Familiar Red Scythe, or Familiar Ice Scythe, which are melee, throwing and summoning items respectively based on weapons used by other characters. Finally, it has a 100% chance to drop the Eternity and a 100% chance to drop the Nevermore; with the former permanently opening up a new difficulty setting and the latter acting as a summoning item for the Arena.

Hints:
-Rod. Of. Discord.
--Also, dashing items.
-Don't try to use an AFK farm or anything to sneakily gain invulnerability frames like a slime farm. The minimum damage trough means that you can end up killed by a Blue Slime rather embarrassingly in the final boss fight.
-In Phase 1.5 don't try to damage the Doppelganger as it cannot take damage, instead play on the defensive as the player dies in a single hit in this phase.
-If the Doppelganger summons bosses, don't try to use that as a rest period to regain health as the bosses will explode after some time passes and deal heavy damage in a large area.
--Also, summoning the Doppelganger at night means that both Skeletron and Skeletron Prime won't become Guardians as soon as they are spawned.
-The Doppelganger deals a TON of damage, so retries are almost certainly going to happen
-While fighting the boss in Normal Mode is possible by taking the item to a Normal-Mode world, it doesn't actually help at all as the fight is exactly the same in Normal Mode.
30 - ??? (Continued Further)
Extra Info:
-Originally, the boss' sprite was going to use transparency in some areas (like the droplets), though due to a small technical bug the transparent areas ended up becoming solid again.
-A return of the Chaos Doppelganger with a new movepool, while potentially nice to see, does have worrying effects on the lore built up over Boss Ideas 4 & 5, where they had already believed that the Doppelganger had been defeated.
-The three 'familiar' weapons dropped rarely are rather blatant references to Storm, Ember and Frost, a 'trio' of bosses seen in Boss Ideas 4.
--Same can also be said for the 'Elemental Trinity' attack seen in the Doppelganger's final phase, which uses their respective magic types of lightning, fire and ice.
-The Eternity item dropped 100% of the time actually adds a universal difficulty boost when used; boosting enemy health by 30%, damage by 20%, defence by 25%, and also making money drop more abundantly and rare drops more common. It is provided to all new players made once the Doppelganger is defeated at least once as well.
-The Nevermore, the boss rush item granted by defeating the boss, is considered 'Not canon' to the lore built up as it features strange variations of all of the boss fights seen up to this point, including a few special additions.
--The item's name is based off of The Raven by Edgar Allan Poe, the same source as some of Terminus' quotes from his Pre-Hardmode NPC's dialogue.
-The Doppelganger, despite being a secret boss, is considered the final Chaos Mode boss before reaching the Post-Game bosses, all of whom are also secret bosses as well.
-Due to how the Doppelganger was sprited, it has no background like its original sprites; therefore previews of the sprite's file showed nothing until being imported to the guide.
[Added: 15/9/19]
Final Notes
Thanks for taking a look at another lot of Boss Ideas. As you may be able to see a few more 'larger bosses' were added and animated; not the best but practice is practice, eh?

Hopefully, in the future, larger animated bosses will actually look better and come with smoother animation. Maybe even to the point where I might actually be able to make a decent sprite for Garagon on my 400,000th attempt :P

Oh! One more thing!

https://discord.gg/URhX8GU

There's a Discord now!
I mean, it's still relatively work-in-progress and not many people are on there yet, but once the server begins filling up a bit I might start posting more frequently there, including some potential boss spoilers for future boss designs if people are interested :P

Anyways, see ya!


[This Page also receives Tomato Trending for managing to reach #1 in the Steam Guides section]
27 Comments
BurritoBandito 12 Oct, 2019 @ 8:21am 
Oh.


:steamsad:
Okami Tomato  [author] 24 Sep, 2019 @ 2:25am 
Not yet, sadly

Hopefully it will be some day and, if-and-when it does arrive I'll try to remember to announce it :)
BurritoBandito 23 Sep, 2019 @ 5:07pm 
Is it a mod now Okami Tomato?
Okami Tomato  [author] 23 Sep, 2019 @ 6:03am 
Thanks guys :)

(Sorry it took so long to respond have been busy recently)
Liynbug 22 Sep, 2019 @ 4:18pm 
cool
:steamhappy:
cosmos 21 Sep, 2019 @ 12:13pm 
guide whatever
cosmos 21 Sep, 2019 @ 12:13pm 
thing
cosmos 21 Sep, 2019 @ 12:12pm 
nice mod
dre4ml1ght 16 Sep, 2019 @ 6:47am 
Okami mod, sounds great
dre4ml1ght 16 Sep, 2019 @ 6:47am 
Guy, make a mod, it's will be coolest mod