Void Bastards

Void Bastards

122 ratings
Enemies Guide
By musizlover2008
A guide on how to survive against the enemies or "Citizens" of the Sargasso Nebula. This is my first guide and feedback is welcome.
2
3
   
Award
Favorite
Favorited
Unfavorite
Introduction
The citizens of the Sargasso Nebula are the main opposing force you will be pitted against when salvaging the derelicts in the nebula. These unfortunate foul-mouthed souls were somehow mutated in the nebula's glowing mists and have gained paranormal abilities that can be a real pain in the *** when encountering them. If that's not bad enough you will also run into automated defences, rogue machines, vicious pirates, space whales and so on. Hopefully this guide will help you survive those encounters cause if you pick the wrong gun to use you might end up dead in space. It is hopefully completed now and the information is based on my experience so some feedback is appreciated. If you felt the need to contribute any info i might have missed, feel free to write it down on the comments section and i'll see if the information can be applied. If any DLC comes with new enemies i will try to make some time in seeing what they are capable of and adding the new info into this guide.
The Janitor
"Hello?"


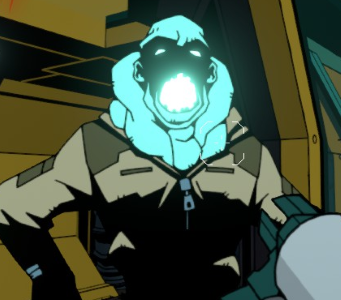
The Janitor is one of the first low tier opponents you will encounter in the nebula. When idle, it walks around the rooms or corridors waiting for the next cleanup job, but once it sees you, its face begins glowing and it starts hovering in the air. Then it begins shooting bolts of energy at you dealing a fair amount of damage while chasing you down. Its main weakness is the head so aim at it to deal extra damage. Any direct weapon is recommended when facing one but its better to make efficient use of your ammo and use the Regulator since the Janitor is very weak. Bushwackers and Bangers can easily dispatch large groups of them and poison spikes can slowly kill it without being alerted by you.

Veteran Janitor
This first class custodian is first encountered in the third depth level of the nebula and is much stronger than its weaker cousin. It is also capable of shooting a volley of two shots in each attack. Its best to use more damaging weapons like the Stapler or the Roaster to off it in one shot and always have some explosives like the Bushwacker at hand when there are too many of them to pick off one at a time. Spikers can also poison it to death but an upgraded Spiker can do it faster. The Whackuum is useful in destroying many of them at the same time.
The Juve
"I can see ya, ****ward!"
These extremely rude guys are the second weakest enemies in the nebula. Although they are small, they are fast on their feet and can employ hit and run tactics where they will shoot you once before running off causing you to potentially waste ammo when attacking them. They make "Tap Tap" noises when walking around idle and like all enemies start hovering when attacking. They are also one of the only enemies small enough to use the open crawl spaces between rooms, making the tactic of locking them in rooms more challenging. The best weapon to use is the Regulator since it can kill them in one headshot. Bushwackers are useful with setting up traps to cover your rear and the Clusterflak will clear sheadloads of them. The Spiker or RadSpiker are very effective because the poison will kill them quick and if they run away they will still die. The Whackuum works best against Juvies who are weak enough to die from its life draining suction.

Hardened Juve
These are stronger versions of the regular Juve with three times more health and damage, meaning that it will take more than one Regulator headshot to kill them. Their attacks are also capable of inflicting knockback, throwing off your aim and you in the air. Either switch to the Stapler or the Spiker to deal with them but the best weapon is the Whackuum which can drain the health of mulitple Juvies at the same time. Any explosive weapon is recommended when dealing with large numbers of them.
The Tourist
"MY HAT!!"
These glowing blobs are hard to miss with their sloshing noises, pitifully weak health and tacky hats but this masks their true threatening quality, as living bombs. If they see you (somehow), they will move towards you at a slow pace but once in range they began to glow and shake violently for a second or two before exploding in a large area dealing heavy damage to everything around it. Like the Juve, they are also small enough to move through open crawl space. They can be triggered to explode with one shot from a pistol which is useful in destroying any enemies near the Tourist like Gunpoints or other Tourists. If you want to save ammo you can walk up to them to start their self-detonation sequence and run like **** before they explode, just remember to steer clear of the blast zone since being near it can cause minor damage. There is also a special trait called "Tour Guide" that makes them and all their variants mostly harmless to you, if you're lucky enough to find it.

Glowtrotter
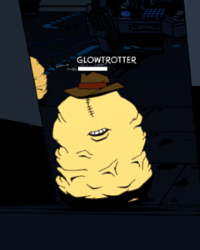
These jaundiced relatives of the Tourists are less explosive than their bluer variants but they move a bit faster and have a habit of leaving an irradiated spot on the ground that persists forever from where they exploded. If encountered it is important that they don't block your path because if you finish them too quickly they can leave narrow corridors impassable unless you think you can handle the radiation poisoning. Your best options are to either lure them towards larger rooms where you can safely disposed of them, seal the rooms with the rifts that spawns them, use a Rifter to manually move them away from narrow passages, or find a HAB room on a ship and purchase hazard immunity from the contaminants remover.

Friendly Tourist
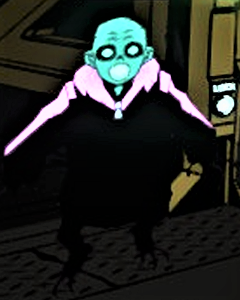
Don't let its name fool you for this pink coloured tourist is by far the the most damaging creature in the Nebula. Once it sees you, it will start to glow signifying that it is priming itself for detonation while moving slowly towards you. Once it gets to arms length it will immediately explode in a large radius doing enormous damage to everything around it. Your only safe option is to kill it at long range. A fully upgraded Regulator needs 3 shots to detonate kill it but the Toaster can do the trick in one shot. Any indirect weapon is recommended, especially the Clusterflak which can clear an entire room of them and with the Bomb Hunter upgrade you can replenish your ammo. The Bouncer can block its devastating blast even at point blank and the Unstable Kitty can be a suitable substitute if you can't use the Clusterflak.
The Screw
"Come on out..."

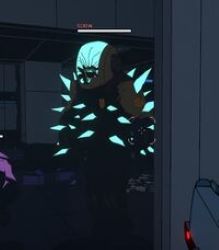
This is one enemy you do not want to be caught with in the same room. It's tough, mean, slow, and takes a lot of pepper to bring it down. When attacking, it sends out a burst of energy bolts from its body towards you and they are capable of bouncing off walls and hard surfaces making it difficult at avoiding getting damaged. If you're planning on fighting it with just a Regulator you'll just be wasting precious oxygen and ammo so try to avoid doing that. The Zapper is highly recommended if you're in derelicts that have more than a few Screws in them, and also seal off any room containing a Screw in order to effectively trap it. The Stapler and Zapper combo is an efficient method of dispatching them in just 4 headshots at point blank but do only so if you have plenty of ammo to spare. The Rifter is very helpful because it allows you to not just neutralise it, but you can either release it in a locked room to trap it or place it in the center of a drier found in WCG stations to get it swiftly disintegrated for a decent bio reward. It can become a useful damage sponge with the help of the Scrambler. Another useful tactic is stunning the Screw and quickly draining its vast endurance with the Whackuum, allowing you to survive better on a derelict filled with tough citizens.

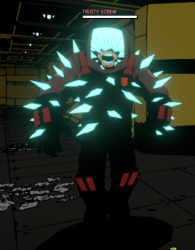
Trusty Screw
This is the big brother of the Screws that is only found in the deepest parts of the Nebula. Its thrice more stronger and tougher than the average Screw and can go toe-to-toe with the WarBot and win. Facing a Trusty Screw head-on without a plan is not recommended cause if you do you're screwed, pun intended so you really, really, really, REALLY have to avoid this hulking beast by all means, it's just not worth it. The Zapper may be your best chance at survival if encountering it is unavoidable. The Scrambler can turn the odds in your favour with the Trusty Screw as an ally, the Rifter can remove it from standing in your way and the upgraded Whackuum is one of the only weapons capable of rapidly draining the Trusty Screw's enormous health. The driers found in WCG stations are capable of killing the Trusty Screw very quickly, but this works best with the Rifter equipped.
The Scribe
"Is that my 5 o'clock?!"

This mutated office worker is a low tier enemy and is first encountered in the 2nd depth level of the nebula. The Scribe is constantly hovering and can see you from a distance but won't attack unless you get close within its range. When it starts attacking it takes a couple of seconds for it to bloat and unleash a volley of 3 bolts at you. After it attacks it will run off and hide before attacking again from a distance. Those first few seconds are its main weakness where it can be killed before it starts attacking. A Regulator can kill it in 2-3 headshots before it can attack you. Shooting it with a Spiker will ensure its demise when it runs off. Stunning it with the Zapper is recommended to prevent their hit and run tactics.

Senior Scribe
Basically, a stronger version of the Scribe not in terms of damage but in health. It does however has a longer range and once it sees you it will attack you from a distance before running off. Stun it with the Zapper to keep it from escaping and causing more damage later on. The Spiker and Stapler are recommended.

Veteran Scribe
Probably the most aggravating enemy to encounter in the 5th depth of the Nebula. It is the strongest of all the Scribes with four times more damage and health plus the volley of bolts it fires are capable of homing in on you, even while you're in cover they will snake their way behind the walls towards you. It is also capable of deploying explosive poop. Yes, glow in the dark poop that explodes like trip mines and those "mines" will become obstacles that bar your way. If a group of Veteran Scribes are attacking you they will create a minefield in seconds. You can turn those mines against it with a well placed shot at the right time but don't forget it will still attack you with its homing shots. The Herd-Zapper is helpful in stunning a group of them if you feel overwhelmed and Kittybots can draw their fire away. Overall, kill the Veteran Scribe fast before it becomes a growing problem. If there is too many and you can't kill them quick enough, use the Scrambler to make them fight each other.
The Spook
"I know you..."

The Spook is a mostly annoying opponent in the mid regions of the nebula. It usually found floating around aimlessly but when it sees you it immediately fades away like a ghost and reappears usually from behind you or another room where it will open its coat to reveal its core and starts shooting at you if it has a clear line of sight. If you look at it after it fires, it will fade away again and repeats its assault. The core is its weakness and you must attack it once it's exposed or it will cover the core and take reduced damage from bullets. The Stapler can kill it in one shot once its core is exposed so always bring the Stapler when encountering a Spook. Explosives like the Banger and the Bushwacker are pretty much useless against the Spook because of its teleportation. The Spiker or RadSpiker are very useful against a Spook because once poisoned, the poison aura will give away its position when it's invisible giving you time to prepare to kill it when it reappears, or you could let the poison kill it instead. Stunning it with the Zapper can also help expose its core.

Shifty Spook
This citizen is an enhanced version of the Spook with three times more health. It can fade away, reappear and shoot bolts at twice the speed and they can hit twice more harder. It can be dispatched with the same methods as the regular Spook, although a fully upgraded Spiker can kill it quicker.
The Patient
"Is that you, doc?"

These are a swarm of floating heads that on their own can cause little damage to you but in large numbers you will find yourself overwhelmed. Once they start attacking, they will quickly move towards you at close range and rapidly shoot small bolts at you. Each head has a separate hitbox and are constantly moving around in circles that makes aiming difficult and will lead to wasting ammo. The Bushwacker, Radspiker and the Riveter are highly effective against them. The Stapler however is not effective because it takes up to 4 shots to take out a Patient swarm which will waste ammo so using weapons with splash damage is a wise choice. The Rifter can capture a single swarm of patients and they can either be disposed of with hazards or locked in a room. The best weapon against patients is the Whackuum since it can wipe out swarms of patients with the added bonus of healing you.

Impatient
These heads are faster, stronger and they attack more rapidly than the minor Patients, but they still have poor health. Same tactics can apply.
The Zec
"Get back to work!"

This is one of the most dangerous enemies you will encounter deep in the 4th depth of the nebula. What makes it special is that it constantly has an unbreakable shield in front of it that blocks any projectile or weapon you throw at it, and also it shoot explosive bolts at you that can tear through chunks of your health so absolute caution is necessary when dealing with a Zec. It's only weaknesses are that it is quite weak for a high tier enemy and that the shield only protects the front, not its back and sides, so equiping the Nebulator is a must have, if not possible then your second best option is to use the Radspiker. The Nebulator will only work if you shoot at the floor, ceiling or walls so that the blast zone hits the Zec from behind its shield. The Radspiker is also a best choice because even though you hit the shield, it will not stop the spike from releasing radiation that will cook the Zec to death. You can even leave a spike near a spawn point to kill any fresh Zecs from making your day worse. If needing protection, use a Bouncer to reflect the explosive bolts back at it while you make a retreat. The Scrambler is also useful but it must make direct contact with the Zec itself instead of the shield. The Toaster can kill the Zec in one body shot but you will have to attack from behind its shield when it unaware of you to damage it, I recommend using the Spiker to poison it silently. Another viable tactic is to use the Rifter to capture it and place it in a locked room where it can't bother you, or place it on top of hazards when given the chance. My advice, just try to avoid derelicts with too many Zecs in them.
The Peeper
The Peeper is just your average everyday security camera that keeps a look out for intruders, mainly you. Once it spots you it will send out an alarm that after a few seconds will trigger the ship's security system to send out it's security robots to terminate you. This can be avoided by destroying the camera before it can finish reporting you. A single shot from a pistol or a zapper is sufficient enough to destroy it.

Watcher
This red coloured security camera is twice more sturdier that the Peeper and can alert twice as fast. That means you should destroy it twice more quickly because if it finishes reporting you, the room where the Watcher is installed will go into lockdown slowing you down and allowing the SecBot to find you.
The Gunpoint
This mechanical turret protects the corridors and rooms from invaders such as yourself. Once it has a clear line of sight at you, it takes a second to deploy and unleash deadly bullets at you. It is important to remember to keep out of its sight if possible. As a mechanical enemy, it is immune to poisoning, radiation and scrambling but the Zapper is highly effective at stunning it for a long time. Once stunned you may either destroy it with explosives and bullets or override it with some merits to turn it on your side. Important note, override is only possible once unlocked at the workbench. Kittybots can also draw its line of fire away from you. The Rifter can also work in moving a Gunpoint away from a position which you think will hinder your progress and put it in a lock room or if you subvert it, place it in the line of sight of a rift so it can shoot any citizen that spawns. The Whackuum can damage the Gunpoint as well as any other mechanical enemy, but instead of health it produces scrap that can be recycled into slag.

Boompoint
This turret is more well built than the gunpoint and instead of bullets, it shoots guided rockets with splash damage that can shave a lot of health if you're not careful. The Zapper or Bouncer are recommended. Rifter tactics can apply.

Radpoint
This turret is similar to the Boompoint but has twice more health than it and is only found in derelicts located in the deepest pits of the Sargasso Nebula. It can also shoots rockets but additionally they can cause radiation poisoning. Can be dealt with the same strategy as the Gunpoints.
The SecBot
This is a walking wall of impending doom that can eliminate any inexperienced scavenger once activated. In the beginning it is inactive in its port that is usually found in the NAV room or the SEC room but relies on the Peepers or Watchers to alert it of any intruders. You can tell if it is nearby by the sound of a loud siren. It is also one of the only enemies capable of opening locked doors except security doors which can be used to trap it, for a price. Like any mechanical enemy, it is extremely weak against the Zapper which can stun it long enough to slip past it or to override it. Remember, override is only possible once unlocked at the workbench. The Secbot is fortunately single minded at hunting you that it is blind to anything else it treads upon like electrical hazards or traps like a cluster of three Bushwackers in front of a door where you believe the SecBot will come through. Another method to disable the SecBot is to find the SEC room and either reset the security system or spend merits to shut it down. The SecBot can also be a good source of slag when you use the Whackuum against it while its inactive.

WarBot
This is a more powerful version of the SecBot that is only found at depth level 4 and higher. What makes the WarBot a superior model is that it has more health, stronger guns, red painted highlights, and more importantly it can auto-repair itself, meaning that trying to destroy it will only end up wasting ammo. While this makes it quite a dangerous threat to you, overriding it makes it your most powerful ally against mutated citizens or unwanted pirates. The Bouncer can reflect its shots that eventually it will be destroyed by its own weapons.
The Pirate
This fearless female cutthroat is only seen when a pirate ship has encountered your ship and follows you into a derelict. She is heavily armoured, packs some serious heat, moves fast and will actively hunt you down until you're dead. Not even locked doors can slow her down since she knows how to bypass locks. The best way to prevent pirates from encountering you is to either avoid any space route that has a risk of encountering them, or at least have a torpedo in store which will be spent in destroying their ship if encountered thus saving you the trouble of being hunted by them. If you don't have any torpedoes and you can't avoid them, you will need your best and strongest weapons like the Nebulator and the Roaster to deal significant damage to them. Upgraded tools like the Herd-Zapper, the Bouncer or the Scrambler are highly recommended. The Rifter is also useful but unfortunately meaningless since pirates tend to come in pairs and one is more than enough to ruin your day. It is also suggested that using the zapper to stun it together with Bushwackers can be a very effective combo in dealing with pirates.

Pirate Mate
Unknown, never encounter one before.
The Void Whale
While you feel confidant at shooting away deranged, mutated citizens, the Void Whale is far above their league and encountering it will spell instant death to your scavenging client. Thankfully it's only present in space and should you hear its majestic singing, avoid it by all means possible but if not, waste it with a torpedo if you have one. Its corpse can offer a decent bio reward.
The Outpatient
This citizen is by far one of the most grotesque to ever float in the Sargasso Nebula. It is basically a large floating head made up of multiple patient heads fused together and is often found early in the 1st depth level. This amalgamate has a lot more health than a janitor and can spit explosive blobs that explode when you get hit or can stick to any surface before exploding. It would take up to 9 Regulator bullets to kill an Outpatient but it would put you at risk of its attacks. It is best to bring along a Zapper to stun it before emptying a clip to its face, or faces. Despite being a giant floating head, it has no critical hit box so bear that in mind before attempting to kill it. Any direct and Indirect weapon are recommended.

Toxic Outpatient
This creature is hardly any different than its lesser version in terms of health. It does however, spits more explosive blobs that can also cause disorientation and hallucinations in the same manner as the toxic mushrooms hazards you find in the deeper pits of the Nebula. Same tactics can apply.
The Tydybot (DLC)
This rogue robotic custodian is found roaming the nebula in space vans where it searches for anything to clean. You can tell it's close by hearing the creepy tune of "Rock-A-Bye Baby" being played. Armed with only a powerful vacuum cleaner, it is a total neat freak, collecting any junk, ammo, fuel cans or sandwiches lying around and storing it for later disposal. Its only dangerous quality is that it will rob you of your oxygen with its vacuum cleaner. In the early stages of the Nebula, losing a few seconds will not be an issue, but in the deepest depths where oxygen is scarce, this will be quite the opposite. You can reclaim the oxygen by running towards the trail of bubbles being pulled by the robot. Destroying it quickly will be your best option, but its easier said than done since as a robot it is quite sturdy and you will need to use more powerful weapons to break it quickly. If destroyed, any junk it collected will be yours for the taking. As a machine, it carries the strengths and weakness of all mechanical enemies, such as immunity to poisons, weakness to electricity, and easily subverted with merits once you obtain the upgrade.

Tydierbot
This deluxe model cleaning bot is designed to take on even the toughest stains so its built like a tank, capable of taking up to 4 Nebulator shots before blowing up. Even its vacuum can drain your oxygen at double the rate of the Tydybot, making it one of the most dangerous machines to run into in the deeper parts of the Sargasso Nebula where Oxygen is scarce. The Zapper is highly recommended to prevent it from sucking away your precious oxygen while you hammer at it with your best weapons. A Rifter can temporary put it out of commission where later you can lock it in a room or place it on hazards to dispose of it.
26 Comments
piripi_tok 23 Nov, 2023 @ 1:03pm 
great guide - great tipps in the comments.
@Shad I also use the method of shooting my bushwackers against turrets to one shot them
heavy butt traffic 12 Nov, 2023 @ 9:12pm 
i was surprised how effective the stapler is against boompoints.
Aymerhic 17 Oct, 2023 @ 1:48am 
I'm surprised there's no mention of using a whacker agaisnt a zec, placing those behind a door when they're looking for you often kills them
Azer Draco 6 Sep, 2021 @ 2:41pm 
A few Tips for dealing with the REALLY annoying enemies:

1) Spooks can teleport out of a locked room if they see you through a window.

2) Juves are small enough to enter the ventilation ducts. A locked compartment with an open vent isn't gonna hold them.

3) A bunch of Tourists going pop all at once can kill ANYTHING.

4) When using the rifter, you don't need to see the destination where you want to send the enemy. That means you can lock a door and then "release" the citizen behind that door after it closes.
Zacnate 11 Aug, 2021 @ 1:41am 
People really should not sleep on the grenades in this game, The base grenade is very handy at removing most base enemies up to nebula 3 with relative ease and allows you to do so very safely, when upgraded those grenades take out warbots in 2 grenades and tydierbots in 2-3. It is a very handy weapon to have when fighting zecs since you can arc the throw or bounce it around a corner to get it behind the zec, and its explosion radius makes it very versatile for groups or high level single targets you want to remove without them seeing you right away. If there was a weapon that i took with me for most of my playthrough it was those nades. I just finished a hard campaign getting every upgrade and without dying and without those suckers id probably have a much harder time doing it.
Shad 17 May, 2021 @ 11:17pm 
For Gunpoints I like to stay at a corner and throw a bushwhacker as close as I can get it while it's still in my line of sight and shoot it with whatever primary I have. With screws I like to use the rifter, bring them to a nearby room with only one door that I've already cleared, start to lock the door then drop them in to trap them. Not worth the waste of bullets and effectively gets them out of the way! Overall no matter the enemy I stay away from the Riveter because I find every other weapon and tool more effective. Also as a piece of general advice that works on every enemy, run! If you are set on materials and only need one item from a ship sprint through and use your zapper if anything gets in your way. In and out no problem! :cryptothink:
Palandus 17 Jan, 2021 @ 12:50pm 
The save scum method also works on Pirates, Scrap Squids and wandering DNA, if they decide to enter your square.
Palandus 17 Jan, 2021 @ 12:49pm 
The Void Whale = Cheapest way to die. Torpedoes or avoid. Doesn't matter how many Heart Starters you have, you will die. But if you do have Torpedoes, it is 5 free food. If you can't avoid them and don't have torpedoes, you can "save scum". If the void whale eats you, just quit to main menu, and the game will reload right before you moved. Just keep save scumming until the void whale takes a different path.

The Out Patient = Single shot of roaster usually does the trick. Or spike them.

The Tydybot = Zap them and then shoot them. They ignore Kittybots. But a field of grenades, clusterflak or bushwackers can do them in, but they do have a lot of HP.
Palandus 17 Jan, 2021 @ 12:45pm 
The Gunpoint = Zap them and shoot them. Or bounce grenades / clusterflaks around corners. Usually not worth the merits to buy, unless the citizens are weak enemies.

The SecBot = Same overall strategy as the Gunpoint. Warbots do regenerate, so you'll likely want to use something other than the regulator on them. Two upgraded bushwackers can usually kill a Warbot. The Warbot can be worth merits but the issue is you have to get a peeper to see you first, as the hack button is on the behind of the Warbot, which isn't accessible when it is in the recharge booth.

The Pirate = Scrambler is best strategy. Rifter can be useful if you are on a ship with a buzz droid airlock. Rift them inside the airlock and vent them into space. If a pirate doesn't see you, you can Spike them to death. Frontal Assaults usually result in death, so unless you have a zapper and a nebulator I wouldn't attempt it.
Palandus 17 Jan, 2021 @ 12:40pm 
The Patient = Very bad advice for this swarm of little guys. Best way to deal with them is Rad Spiker, Whackem, or Explosives. Riveter may have high rate of fire, but you'll expend a lot of rivets trying to pop all the heads. Nebulator also works, but its a bit of a waste of ammo.

The Zec = Grenades bounced off ceilings or walls makes short work of them. Tricking them into walking into fire or getting shot from behind by a fellow Zec. Or rifting them into a fire. Or rifting them on the other side of a locked door.

The Peeper = Zap them and then shoot them. Or just shoot them. It should be noted that if you have an allied Security Bot, with no Peepers, it doesn't go to specific areas to attack enemies there.