Bleed
35 ratings
Invisible's Tips n' Tricks
By Xantic_
Here lies a humble guide to the secrets of "Bleed."
   
Award
Favorite
Favorited
Unfavorite
Introduction
I hope you enjoy reading this, and I hope that it is helpful to you. Before we begin, please know that I am not perfect, nor is my guide. This is only a rough sketch of what to expect in bleed, and you should not expect this guide to give you every secret or a way to beat arcade mode on very hard. Even I haven't yet beaten it on normal (although I plan to soon). Without further adieu, let's begin.
Weapons
Bleed offers a variety of weapons, with two to start. You may choose any two you've unlocked at any time ingame.


Dual Pistols
With high fire rate and minimal spread, this is the main weapon I recommend for everywhere except bosses (more on that in a bit). It is definitely the most balanced weapon in the game, and is wonderful for starters.

Rocket Launcher
The rocket launcher is the second weapon available to you at the start of the game. It fires slowly, but deals area of effect damage, which makes it great for clumps and crowds. It also damages through walls, so it is great for killing enemies that pop up from the floor or are otherwise inaccessible.

Laser Rifle
One of the six purchased weapons from the shop and costs 1500 points. While the one-shot kills are great, it is difficult to use (especially on moving targets) and is not recommended for general use. The laser rifle is extremely effective against one boss (more on that later), but not recommended for the others.

Remote Mines
One of the six purchased weapons from the shop and costs 1200 points. It's a great tool to use when faced with an enemy that might not be visible all the time, or is inaccessible otherwise. The remote mines also feature an area of effect attack, like the rocket launcher. It is not recommended for normal use, but for specific situations when called for.

Revolver
One of the six purchased weapons from the shop and costs 600 points. The revolver has medium attack speed and features ricocheting bullets, with its damage increasing with each bounce. The power increases twice and dissolves after the third. The colors to define the damage done.
  • Yellow: No bounce, low damage
  • Blue: One bounce, medium damage
  • Pink: Two bounces, high damage
While useful to pick off that guy hidden behind the corner, this weapon is difficult to use when compared to the dual pistols.

Flamethrower
One of the six purchased weapons from the shop and costs 900 points. This weapon has an extremely fast rate of fire, but a limited range, coupled with a low damage. The damage pierces enemies which makes it a good way to deal with clumps of enemies. It is not recommended for bosses, except perhaps to increase your style rating. More on the style bar later.

Shotgun
One of the six purchased weapons from the shop and costs 300 points. This weapon has some spread to its bullets and a short effective range. It can be used to deal with clumps of enemies like the flamethrower (and is probably better at doing so). The main use of a shotgun for me is to increase the style meter insane amounts. While I will use it on occasion, it isn't when doing a serious playthrough.

Katana
One of the six purchased weapons from the shop and costs 1800 points. This weapon is by far (in my opinion) the most fun to use because it reflects projectiles. Note that it will NOT reflect rockets, and other projectiles that can be destroyed by other means (aka shooting it). While this weapon can be used to slice through enemies, it is impractical to do so and so should be used primarily to reflect projectiles you're unable to dodge. This weapon is used well the the dual pistols.

Homing Missiles
Unlocked via completing the game on easy. It has the same damage stats as the rocket launcher but doesn't have area of effect and seeks out the nearest enemy. It is useless, in my opinion, except to "run and gun," which basically means you're not aiming. That technique isn't good practice anyway. The missiles are slower than the rocket launcher's, additionally.

Akimbo Pistols
Unlocked via completing the game on normal. This weapon is the same as the dual pistols except it shoots at the direction you're aiming and the exact opposite direction. Great when surrounded by enemies, but not so much otherwise.

Chainsaw
Unlocked via completing the game on hard. The chainsaw is an "automatic" melee weapon which causes it to do somewhat large amounts of damage. This weapon is wholely not recommended for almost all scenarios, as it is far too easy to take damage while using it.

White
Unlocked via completing this game on very hard. This weapon deals massive amounts of damage if you use it properly. Its damage scales as your style meter increases, incrementally, by rank. It deals almost zero damage when you don't have a rank, low damage when at "D," high when at "A," and extreme damage when at "S." This is the ultimate tool for bringing down bosses, but be careful not to get hit. Style will be explained in one of the following sections. Note that this weapon's range increases drastically when upgraded.
Characters

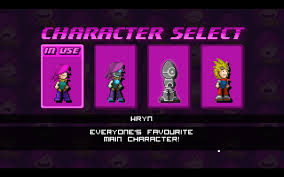
There are four unlockable characters in Bleed, all with their own perks and downsides.

Wryn
Your basic run-of-the-mill character. This is the recommended character for all starting players, and even for the better players.

Robo-Wryn
This character is unlocked by completing the game on normal. Robo-Wryn is extremely difficult to master and definitely not recommended because unlike Wryn, who recharges energy automatically, Robo-Wryn only recharges when shooting enemies or dodging attacks.

White MK1
This character is unlocked by completing the game on hard. White MK1 cannot change weapons because he always uses (you guessed it) the White Cannon, whose damage escalates as the style bar does. This character is not recommended unless very good at this game, and should never be used after completing the game on very hard (since you unlock the weapon then anyway).

The Rival
This character is interesting to pursue because, while the energy bar recharges faster, dashing and shooting both deplete it. This character is powerful if used well because time slowing can be used often. Note: This character can dash indefinitely (until his energy is depleted). This character is unlocked after completion of very hard.
Bosses
Here lies a brief guide to all the bosses in the game, including attacks and strategies.

Chopper Core


This boss is relatively easy, and it is the first one you'll encounter in the game.

Attacks
There are four main attacks this boss will try to kill you with:

  • Rockets, which can be shot down with ease
  • Ram: The boss will back up and face down (giveaway), which will give you an opportunity to double/triple jump over it
  • Rocket Barrage: The boss will fly across the screen, shooting rockets into the air. Use time slowing to shoot down the rocket (or two) directly above you and let the others hit the ground.
  • Bullet Storm: A stream of bullets will be shot out of the chopper, and can either be dodged by jumping faster than the chopper can aim upwards (it will aim towards you), or by running directly at it when on the ground. Your choice.

Strategy
It is advised that you pick up both the dual pistols and the shotgun/rocket launcher. The rocket launcher provides an easy way to shoot down rockets if you've got decent aim, and the pistols provide steady damage.

Guppy


This is the first final boss in the game (stage one). It, too is fairly easy...if you've got the hang of it.

Attacks
There are 3 main attacks this boss will present to you.

  • Minion Spawn: These little guys will pop up everywhere here, and can be easily dealt with using pistols and/or the rocket launcher.
  • Rock Blast: Guppy will make a distinctive noise which will warn you that it's about to shoot some indestructible rocks at you. Beware.
  • Smash: Guppy will turn red, move to your horizontal position (meaning whether you've jumped or not doesn't matter) and smash down, releasing minions as well. You can either dash under it or jump above it.

Strategy
Once defeated about halfway, Guppy will turn into four, smaller versions of himself. This can cause a lot of problems if you're unprepared. Each can can use each attack at will, so it can be difficult to maneuver around everything. However, each will use a lesser version of the attack. Once a mini-Guppy has been damaged sufficiently, it will spawn a swarm of minions that will come at you. Use a rocket launcher to combat this. All in all, the pistol/rocket launcher combo works the best here in my opinion. You may find other options, however.

Gibby and Stu


This boss is fairly tough for being in the second level.

Attacks
There are four main attacks from this boss.

  • Arc: One (or two, depending on what difficulty you're on) of the bosses will make an arc starting from the left or right side, and shoot some number of reflectable bullets at you. Relatively easy to dodge, but a hassle to keep in mind when avoiding other attacks, such as...
  • Barrage: Gibby and/or Stu will make an arc like the one above but shoot many bullets down, like the Chopper. The easiest way to deal with this is to get above them ASAP.
  • Parallel Attacks: Gibby and Stu will appear on both edges of your platform and shoot alternating bullets at you. Easy enough to dodge, but will get you if you're not careful.
  • Upward Strike: One of the two bosses will spring up from the ground multiple times, damaging you if you touch them and damaging you if you don't avoid the bullets the shoot at you. Use slow-motion as much as needed here. This is the most difficult to avoid of its attacks.

Strategy
It is recommended you take the katana if possible, but all you really need is your trusty dual pistols. Shotguns are a decent substitution if needed.

White MK II


Attacks
There are four attacks to avoid here.

  • Rockets: Easy enough to shoot down, but easier to dodge
  • Barrage: Many rockets will spawn, and it's your job to avoid them at any cost
  • Roll: The boss will drop to the floor and roll in your direction horizontally, followed by a jump and then the same thing on the opposite side. This is easy to dodge if you've got slow-motion or good reflexes, but can be a hassle at others.
  • Shield Attack: White will shoot his shield at you, at which point you get many crucial seconds to get loads of damage on him.

Strategy
My general advice is to bring your pistols (for the shield attack) and shoot him with the Laser Cannon for decent damage otherwise, since it pierces his shields (making it somewhat useless). This is one of the easier bosses in my opinion, but beware anyway.

Mantis Core


Attacks
There are 4 attacks to avoid here as well:

  • Bullets: Large bullets will be flung at you. These should be very easy to avoid.
  • Barrage: The Mantis will shoot many bullets downward in a way that makes them difficult (if not impossible) to avoid, and so you should jump onto the car to your right.
  • Duck: This isn't really that hard to avoid altogether if you can catch the signs beforehand. Simply dodge to the right or left and wait for it to pass.
  • Pierce: Much like the scene immediately before this boss, the mantis will poke at you repeatedly. Dash to avoid.

Strategy
Pistols are, again, the best weapon against this boss. Know how to avoid its attacks and you'll be fine. The laser rifle can be helpful during the "duck" phase.

Bunny Rockette


Attacks
I will not delve into all the specific variants of these attacks, but will go over the basics.

  • Dash and Shoot: When using slow-motion you can see Rockette as she's dashing across the screen, and can shoot at her during these dashes. It's easiest, however, to shoot when she's paused.
  • Ram: Rockette will get in her car and run you down. Jumping is the easiest way to avoid this.

Strategy
If you've got large amounts of slow-motion, this boss is a cakewalk. It can be difficult to land hits, however, which makes this boss take longer than normal to kill.
Bosses Pt. 2
As far as I can tell, I've run out of room on the previous section. Please disregard.

Laser Bots


Attacks
There are five attacks here (unsure, please let me know if I've forgotten one).

  • Lasers: Mainly, these three laser bots will shoot lasers at you, in the following fashion: Red will shoot directly at you, with the second shooting at the red bot, and the third bot shooting at the second. It's best if you see what I'm talking about myself.
  • Spin: This boss (the red one) will spin as fast as you can run, but its laser will be blocked behind the two blue bots in a triangle formation. Hide behind one of them.
  • Rapid Blasts: The two blue bots will guard your exit while the third rapidly shoots at you. This is relatively easy to dodge.
  • Spin V2: All three will spin in formation around their combined center. The red skin will shift from orb to orb, preventing you from inflicting any significant damage.
  • Spin V3: All three will be in the center of the screen, shooting at each other. They will then spin around in a tricky formation, but will still block each others' lasers.

Strategy
It's best to shoot at the red laser bot, as you deals more damage (unconfirmed) when you do so. It's also good to take a laser rifle or a rocket launcher to deal large damage when the bosses are clumped together.

Mirror Core


Attacks
There are, again, four attacks here.

  • Bouncing Bullets: It will shoot streams of bullets that will bounce off walls. This move is predictable and slow, and should be easy to dodge.
  • Ram: The Mirror Core will ram at you, and can be dodged by camping the ceiling or keeping to the far left.
  • Straight Shots: The Core will shoot parallel straight bullets which can be dodged with ease using slow-motion or clever timing.
  • Retractable Balls: Just like the section immediately before this boss, there will be orbs of increasing size coming at you. Shoot them to retract them, and jump over/dodge them easily.

Battalion


Attacks
This is, in my opinion, the most fun boss to kill, because the boss transforms into things like:
  • Bomb: Pretty self explanatory, but the blast can still be shot after the bomb's exploded
  • Shark: The Battalion will dive underground and spring up with no warning. Keep to the ceiling or keep moving.
  • Rocket Ship: The most damage can be done here. The Battalion will fly at you, flinging little minions every which way.
  • Fist: A red fist will form, then be flung towards its opposite side. Use this to get some major damage in.
Forgive me if I'm missing one or two here.

Strategy
Have fun with this one, lads. I'm not going to give you anything here, besides this: Keep moving.

Bubble Core


Attacks
The main attack you'll be faced with is some orbs that, in unison, will spawn little rods that will be flung at you at high speeds. Keep moving or shoot them to keep them at bay.

Strategy
Nothing to really say here, except use the katana or the rocket launcher to kill/reflect the orbs and their bullets.

Dragon Heart


Attacks
This one is really quite easy, considering it's the second to last boss in the game.

  • Bullets: Cannons will shoot bullets at you. Simple.
  • Poison Cannons: Poisonous-looking shots will be shot from the cannons. Just stick to the center. If the spiked walls are closed in on you, it's literally impossible to be hit by these.
  • Minions: The enemies you've seen previously in the level will spawn. Dispatch them and use the katana if you've got it to destroy the bullets spawned by the yellow enemies.
  • Wall Spikes: Don't touch these! Also, they can be blasted back with your gun.

Strategy
If you've gotten this far, you shouldn't need my help for this easy of a boss.

Rival


You've made it this far...

Attacks
Basically, take all your weapons and give them to him. He dashes, shoots bullets like you (except you can dodge his pistol bullets, whereas he cannot). He also has a nuke, which can be easily dodged by jumping away from the center of the arena (but also off the ground)

Strategy
Nothing I can tell you here that you haven't learned so far. Try to get your style meter up before the final boss fight and get loads of damage in early before you get hit.

NOTE: It has been pointed out to me that, because he is idle for a few seconds, the Rival can be dealt tons of damage from the chainsaw, if you've got it.

Good luck, my friend.
Style
Your style meter is important, and it's important to know the benefits of having a large one in addition to the ways of increasing it.

What is it?
Your style meter is basically a measure of how well you've been doing recently in your game. It transfers between levels while in arcade, and through bosses and screen changes.

How do I increase it?
There are two ways of increasing your style meter, but only one effective way: Dodging enemies and bullets will increase it slightly, and shooting enemies will increase it drastically...if you know how to do it. The easiest way to increase your style is to shoot some enemies (or a boss), swap weapons, shoot for a bit, then swap back. This will provide a rapid increase in style and should be used for the highest scores.

When does it decrease?
Style will decrease when you do one of the following:
  • Get hit: This will lower your style substantially, by about half the meter. An S rank will drop to a B in one hit.
  • Don't damage enemies for some time: After a period of time, your style will begin to drop extremely rapidly and fade out, indicating that it has been lowered to its lowest state.

What are the benefits of having an 'S' rank, besides score?
If you've got the White cannon or the character White MK1 (which will equip the White cannon), your power will increase by huge amounts if you've got an 'S' rank. With the lowest style rating, it would take 2 shots to kill the weakest enemy in the game (not to mention the horrid range). However, with the highest rating, it is extremely easy to kill any boss you choose to. The dragon's heart can be killed in this way in under 20 seconds (I believe, this is just an estimate) on very hard.
Conclusion / Final Remarks
Here's a video of the creator beating arcade mode on very hard. If this is against any sort of rule, please let me know and I'll remove it ASAP.

If you've got any remarks or comments, let me know. This is my first guide and I'd like feedback.

Thanks for reading, and good luck.

PS. I may make videos for each boss, rather than just a screenshot. Let me know if this is something you'd like.
13 Comments
lillie 🌺 28 Jan, 2016 @ 7:02pm 
My record for chopper core is 17 seconds.
General Batou 20 Jul, 2014 @ 1:22pm 
Ty for the help:B1:
Step 愛 12 Apr, 2014 @ 7:30pm 
thanks for the help xTcR | Invisible [TF-O|SE] :8bitheart:
🦄 lainverse 15 Feb, 2014 @ 6:22pm 
I just decided to add information abour the Rival for those who want to be prepared.
Chainsawing him at the beginngin is almost like a cheat, though. :wrynhappy:
🦄 lainverse 15 Feb, 2014 @ 6:19pm 
:therival: The Rival patterns (he switches between them in random order):

1. Gun attack — jumps extremally high and shoots big and not very fast bullets. Easy to avoid but hard to hit him during this phase.

2. Rockets attack — he jumps moderately high and shoots rockets at you. Last attack is a barrage of rockets.

3. Mines attack — he jumps a bit and throws mines at you and around. Explosions stays in place for a while. He throws majority of mines at your current position, so it's a good idea to move slowly in one direction.

4. Katana attack — it's "run for your life" kind of attack. He dashes at you and slashes you extremally fast. It's very hard to avoid and he reflects all your shoots back at you. So, don't shoot — RUN.

5. Nuke — Nuke falls from the sky at the middle of the arena and blast from explosion goes over the floor and then up near the walls. So, just jump both from center and from the walls.
VirtualFishbowl 14 Dec, 2013 @ 6:11am 
When i fight the Rival i use the chainsaw and katana which is pretty effective the katana for his katana move so he dosnt reflect bullets and the chainsaw because it seems to deal extra damage
Zeric 28 Sep, 2013 @ 10:23pm 
You sir, have all of my jealousy. That video is just beyond anything I could do. Props sir.
Xantic_  [author] 9 Sep, 2013 @ 4:49pm 
Thank you for the tip, HasarD, I will add it in shortly.
HasarD 9 Sep, 2013 @ 3:02am 
Hey I just killed rival with the chainsaw on V.hard. He takes really high damages from it and since he's idle at the beginning I guess it's the best weapon against him so far.
Ghostrider 7 Sep, 2013 @ 2:47pm 
Glad I helped! I hadn't noticed till now that the blue bots take damage... Thanks for the info!