A Legionary's Life

A Legionary's Life

55 ratings
General Info and Walkthrough
By titanopteryx
Some info about game mechanics, and then a walkthrough of the first mission as an example.
   
Award
Favorite
Favorited
Unfavorite
Introduction
After playing through the game many times, dying a lot at first and then reaching retirement consistently afterward, I'd like to share some info I've gained from playing the game to possibly help others reach retirement. I'll go over the basics first, and then walk through the first mission.

(This game has permadeath. A comment from the dev in the comments down below when responding to a player saying his character didn't go into the Hall of Fame informs us that alt + f4 when dying might make it so you can keep playing your character but your character goes into the hall of fame immediately when he dies even with alt + f4 and your character can't go into the hall of fame twice. So alt + f4 will allow you to keep playing the character, but anything you do with the character after doing that won't be recorded. Just some info before any players end up wasting a couple hours.)
Character Creation and Statistics

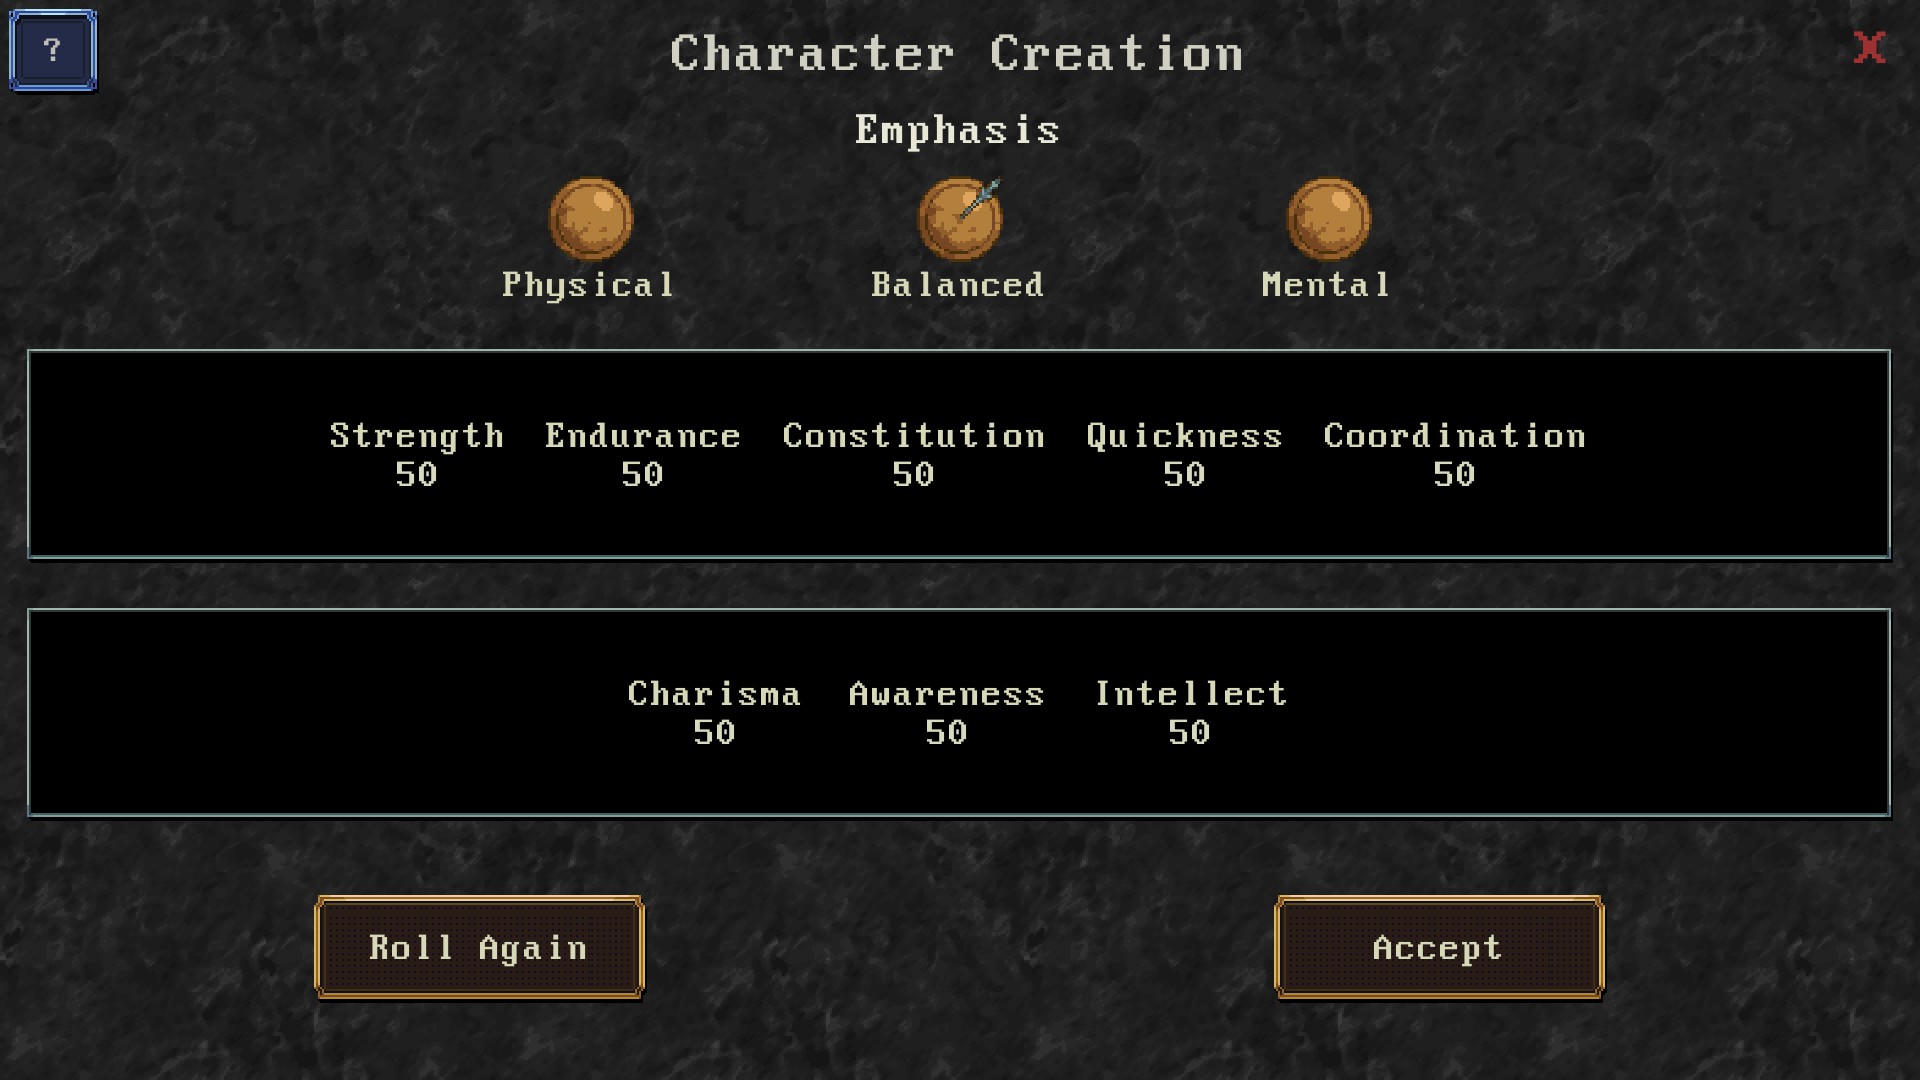
When creating your character you're first met with this screen. I'll go over the stat's in game descriptions and how they manifest in game.

Strength - "Has a direct influence on the damage you deal". Weapons in the game have a base damage range. For instance one sword, the best starting one you can start with if you buy it with points at the start, has a damage range of 4-16. Now I had rerolled until I got a str stat that was aroung 60. In game the sword's damage range was 5-17. So the damage minimum and maximum of your attacks are both increased as your strength goes up.

Endurance - "Lets you fight to the best of your ability for longer". This effects how fast you become fatigued. In battle you have a fatigue bar. It's circular. It has a picture of a man in the center. As you perform actions the bar fills in a circular manner. When it fills up the man gets slightly dimmer and the bar resets. At maximum fatigue the man is invisible. Each level of fatigue makes you less effective in combat. This also can affect the enemy which introduces some strategy I'll state later. It also means the Quickness stat affects your fatigue which I will explain in its section.

There is a random event that takes place before you get a promotion there with high strength and endurance you gain favor with the Centurian. With low str and end you lose favor.

Constitution - "Determines your capacity to absorb damage, represented by health points". This game has permadeath and if your health points ever reach zero your game ends, your score is recorded, and your save is deleted. Not only can you lose health points in fights, you can lose them in events between fights. You can die outside of battle by failing a stat check and taking damage from the event. So the more health points you have the better.

Quickness - "Affects your chance of getting a bonus action right after the first. Further actions are possible after the second, though the chance is considerably lower". In fights this means you can get an extra turn, or you can avoid missing a turn. There's a chance you'll skip your turn. Quickness lowers that chance. The way this affects fatigue is every action you take fatigues you. There's 2 types of fights in this game. Endurance fights and timed fights. Endurance fights require you to last some number of turns against an infinite amount of enemies. Timed fights have you fight a limited amount but if you beat him or them fast you gain morale and favor. So Quickness helps with timed fights but hinders you in endurance fights. Though there's a trick with endurance fights I'll go into in the fights section that will circumvent the endurance fight situation.

Edit: A recent patch makes the chance of skipping your turn decrease for each time it happens in a row. So it's less likely to skip 2, a lot less likely to skip 3, and so on.

Coordination - "Helps you recover faster and more effectively when you lose stance". In fights you have a circular stance bar. It also affects your accuracy and evasion. When it's full your accuracy is improved and you dodge attacks more frequently. When it's empty it's the opposite. When you miss attacks or the enemy successfully feints you or hits you with a shield attack, your stance bar decreases. You then need to use a move called "Recover" that is faster and more effective with higher coordination. Coordination also affects training the javelin skill. Your javelin has a chance of a bullseye. When you bullseye an enemy he can immediately die or lose his shield. So a high javelin skill makes life easier.

Charisma - "Affects your social skills and personal megnetism". This will let you pass skill checks that can raise your favor and morale if you succeed or lower it if you don't. Favor is very important as it affects skill training and the foraging mission and also promotions from what I read in game. I qualified for a promotion but there wasn't any space so it said I would get promoted at the next chance as long as I didn't lose popularity. So your popularity affects promotions. Also to train your skills high you need high favor with the troops.

Awareness - "Measures how sharp your senses and instinct are. Also used in combat when attempting or resisting feints". Being successfully feinted lowers your stance bar and it works in both directions. Awareness is also used in more skill check situations than any other stat from what I've observed.

Intelligence - "Represents your logic, decision making, problem solving skills, and education". This skill will affect some events that raise or lower your morale when passed or failed. it also lets you use the board game leisure action more effectively.

At the next screen you enter your character's name.

As you finish games you gain points that translate into points to use at character creation to boost your stats or start with better equipment or more funds. The next screen is where you allocate those points. There are also a couple of perks that let you start with higher swords and shields skills but I don't have the 4k points needed to buy and test them.

If you don't spend points on one character, the unspent points don't carry over into the next game. They reset each time, though after each playthrough the performance of your previous playthrough can add to the total points. So feel free to spend all your available points on each character.
Camp Screen

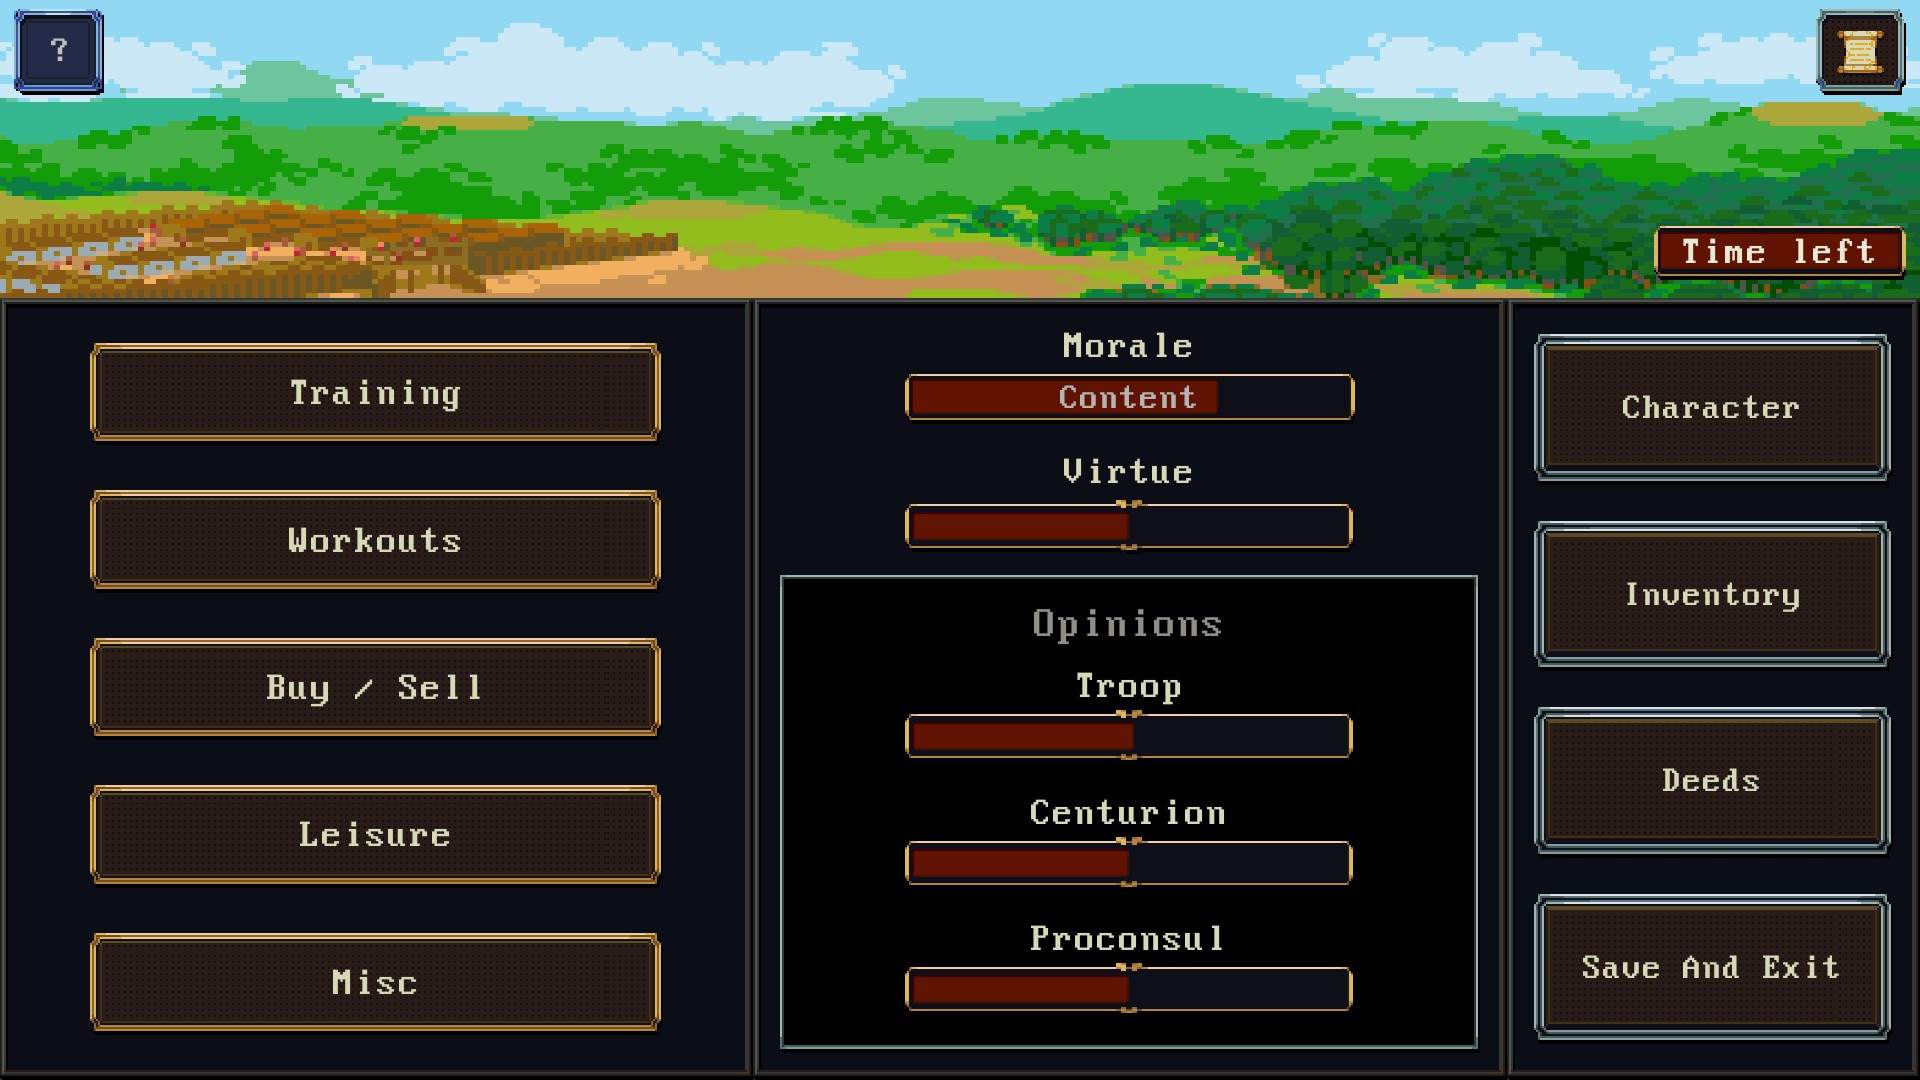
When you enter the game you reach this screen. The first thing you may see is your morale, virtue, and opinions.

Morale affects your success chance when trying to pass a skill check. It's important to keep this as high as possible. The Leisure and misc sections provide ways to do this.

Virtue gives conversation options. High virtue tends to result in events that lower your morale. low virtue options give you chances to try to obtain loot. So being immoral is probably the better choice from a gameplay perspective but it depends on if you want to roleplay a goodie goodie or a bad boy.

(EDIT): A player named taitomagatsu in the comments brought to my attention that high virtue results in random reputation increases, earlier promotion, and the best greaves in the game. I didn't know that because I always played as a jerk. So high virtue might be the better choice.

Troop reputation when low will randomly make events that lower your morale and you can't do the higher level skill trainings. High troop opinion will let you successfully perform higher tier skill training.

Centurian rep will affect the number of spots to gather food in scavenging missions. From what I read in the text when I qualified for a promotion but couldn't because there was no space, it also affects the chance at promotion.

Proconsul rep doesn't have any consistent way to raise or lower it. There's some text options in events that can effect it one way or another but if there's a way to get it higher through a camp action I haven't found which one.


Training. The 2 options at the top are javelin and solo. Solo will get your sword to 40 with maybe a few failures. After 40 you get a message saying you've outgrown the training. Javelin training I believe is affected by your coordination skill. Successfully using your javelin in events can raise your morale and possibly multiple opinions and in the best case give you a free kill toward your ending score. Failure can result in lower rep and a morale decrease. There's some options in between with either lesser or no effect.

Sparring. Anyone can be done by anyone. Good and best can only be successfully done with positive troop opinion. As you move down the list the skill caps from training increase. Sparring will either increase your shield or sword skill. Shield skill affects shield attacks which are like much more effective feints. There's a slider above the sparring options that let you decide which to focus on more.


Workouts let you increase your physical skills. Not your mental skills. mental skills can be increased by successfully completing foraging missions.


Buy / Sell gives you access to a random selection of items. This takes a segment of your camp time. If you don't like he items you can try again for another random selection. Unless you don't have enough points at character creation to upgrade your starting gear, this tends to be a waste of camp time since there's opportunities to loot better gear. For instance in foraging missions you can try to get food from a town and you may get a message saying that the town looks suspicious. You get the options to enter the town or leave. Entering the town can have you fight a bandit boss that drops short chain armor. there's a random camp event where you can get a decent sword from a weaponsmith that has either normal or boosted stats, depending on if you pass or fail the event. There's an event where if you win a race you win a good helmet.


Leisure gives methods to increase troop opinion and morale. Hang Around has a chance to raise troop opinion and morale by 1. Gambling also does but can raise morale and opinion by 1 or 2. Those 2 actions are based on your charisma. Board game is like gambling but is based on your intelligence. The last option lowers your virtue which can be good if you want to avoid some events that lower your morale. The 10 denarii it costs can start to add up though.


Misc section has options to raise the opinions of the troops and centurion, and affect morale. Extra patrol can either do nothing, raise the opinions of the troops and/or the centurion, and lastly it might get you in a fight. The fight is a timed fight so do it fast and it raises opinion and morale. The kills from the fight increase your end score and increase opinions and morale. The fights also can provide gear to loot. Guard Duty is like extra patrol, except instead of random fights your morale will decrease instead. Extra coaching requires you to be promoted twice but when you do it it increases opinions with no downside. Offer sacrifice costs 40 denarii but raises your morale. it can be as much as 20 or as low as 4 I think it was.


Character shows your current stats. Inventory will let you inspect your gear and change equipment if you have any extra. Deeds shows what you've killed and what rewards you have. And then you can save and quit.
Combat

There is 2 kinds of combat, endurance and timed. Endurance is lasting some number of turns against infinite enemies while timed are fights against a finite amount of enemies and if you beat them fast you gain opinion and morale. In endurance fights over time, right around turn 20ish, the centurian will rotate the line and the enemy will be replaced with a new one but your blue stance circle will be refilled and you'll regain 1 level of fatigue. If you get promoted to centurion then you can skip being rotated and gain opinion and morale, but your enemy will still be replaced. Or you can go ahead and rotate out but you'll lose opinion and morale.

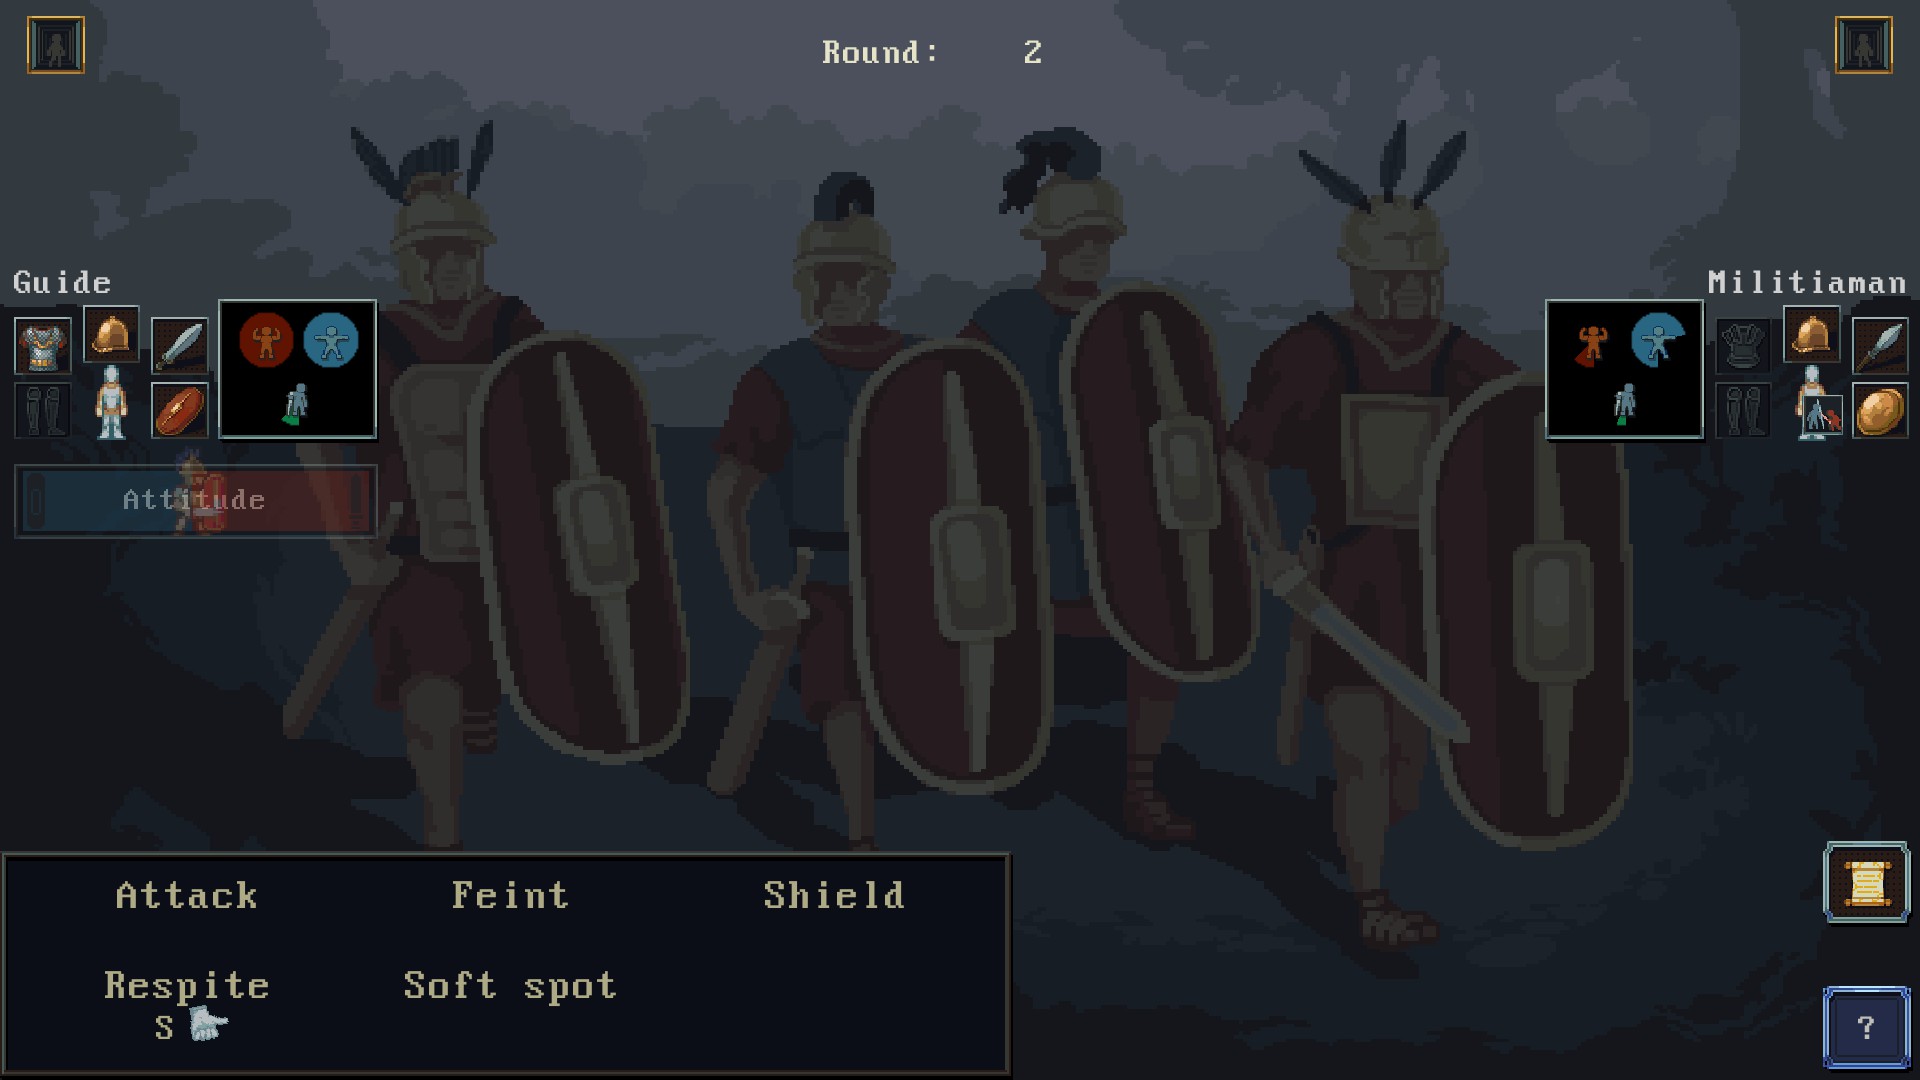
The image is of the battle screen. On the left and right you can see your and the enemy's blue stance circle, red health circle, and the fatigue bar underneith. You can also see what they have equipped. This militia man has no armor so torso hits will have full effect. If he were to have armor I might attack his arms which never seem to have any coverage from any equipment.

Under my stats on the left you see the attitude bar. This effects what stance you're in. The red side is aggressive while the blue side is defensive. When in the defensive your accuracy goes down and your defense goes up. So both sides will be less accurate. If you take the defensive stance to the left side then you lose morale each turn. Not right away, but if you stay defensive for too long then you'll start to. It's best used when trying to recover or towards turn 19 or so in endurance fight when you're just trying to coast to the end. On the red aggressive side your attacks are more accurate but so are the enemy's. It would be best to not be aggressive in endurance fights and possibly spend the whole time feinting so you don't kill the enemy and replace him with one with full fatigue. Meanwhile if you keep feinting and don't kill him he'll become more fatigued and be less likely to hit you. This gets hindered when the centurion rotates you. However every kill you get helps boost your end score so it depends of whether you're an optimist or a pessimist. Do you want do die after the enemy or do you want him to die before you? In timed battles you need to go full red.

Down at the bottom you see the actions you can take. Under attack you see the various body parts and some thumbs. At the bottom you can toggle between body parts and damage multipliers on that body part. There are 2 thumbs for each attack. H is hit chance. When it's fully up you have the highest chance to hit. When it's fully down you have the lowest chance to hit. A is the attack's chance to bypass armor. Armor has coverage. The coverage on a body part is the chance the armor will block damage to that part. he damage blocked is shown on the armor's info in your inventory screen. After damage passes that threshold the rest of the damage is applied normally.

Next is feints. There are 3 feints with 2 thumbs each. The thumb on the left is whether the feint succeeds. The thumb on the right is whether it bypasses their resistance.

Shield is more effective feints but if you miss you lose stance yourself. The thumbs are the same as feints.

Respite and recover restore fatigue and stance respectively.

Soft spot is a different form of attack where your chance to bypass an armor's coverage is increased but your chance to hit is decreased. It doesn't work if the opponent's armor has 100 coverage.
New Carthage
The first major battle you do will be when you try to take New Carthage. There will be some text and then you'll be taken to a screen similar to the camp screen but the left side just has continue.

After some text you have the opportunity to throw your javelin. This depends on your javelin skill, and morale. You have the option to throw into the enemy group which has the highest chance to succeed but doesn't really do anything other than help you avoid failing the check and losing opinion and morale. Otherwise you can try to throw at a specific target which requires a harder check but can boost morale and raise opinions and at best give a kill on your deeds screen. Afterwards a battle starts. It's an endurance fight that ends around turn 19. You can spend some time in defensive stance but watch out for if your morale starts dropping. Getting kills here can raise your morale.

In the next section you need to pass a skill check. This will change the next part of the mission. If you fail you have to try to scale a wall which will probably result in you being hit by arrows and losing health points between fights. There is an opportunity to raise your opinion with the centurion here, but you can get hit multiple times by arrows.

The other branch off from that check involves going around to another entrance and invading from there. You will enter a timed fight but if you take too long after some turns if the militiaman is still alive 2 fellow soldiers will arrive and steal your kill. (A recent patch makes kills shared. So there's no kill stealing by allies anymore). You then go to the screen with the continue button and then start another timed fight where 2 more soldiers will come and help you if you're having too much trouble with the militiaman again.

Both branches converge here. There's an option given to you to continue without looting or if you have low virtue you can try to grab some loot on the way. Then you are given a choice between fighting an endurance fight against several mercenaries with high accuracy, good armor, and do lots of damage. If you pick the red pill you get put into an endurance fight against mercenary after mercenary. Unless you just feint the whole time and try to fatigue out the first one and turtle. The centurian will eventually circle you out though. If you survive you get a bonus 100 denarii and might get promoted.

After that you're taken back to the continue screen again and given 8 morale, 80 denarii, and 100 more if you survived the mercenaries.
What Does Handiness Do?
This is a copy and paste of the Dev's description of what the handiness weapon stat does. It comes from a post he made in the forums.

Handiness is very significant. It is used linearly and it affects all of your attack rolls involving your weapon skill (normal attacks, soft spot attacks, feints).

The handiness value of swords is usually better than other weapon types.

Axe: 51
Dagger: 63
Falcata: 60 (like the average gladius)
Spear: 55
Long Sword: 57
Mace: 55
Rhomphaia: 51
Sarissa: 40 (Don't think this will make things easy. Phalanx combat works a little differently as you will hopefully see in the near future.)
Sica: 60
24 Comments
wawka 19 Feb, 2021 @ 9:04am 
ty man! i wish i read it way earlier. i spent over 70h in game without spending my points. only occasionally buying swords to test perfomance in 1st act. i've almost 5k by now :zagwow:
guide was good also. bully for you!
taitomagatsu 5 Mar, 2020 @ 2:08am 
Another point in favor of high virtue: Only with high virtue you can get the best gladius in the game.

This blade is so good, that you can easily get the grass crown with a decent character. In my last run I defeated the Thracian chieftain and all his men in 11 turns. For 4 phalangites I took only 8 turns. All thanks to this amazing sword.

The Seric Iron Gladius is obtainable through the convoy event in the Macedonia campaign. After defeating the convoy guards, the Consul will gift you a strange bar of metal, if you high relations with him. Subsequently, only with high virtue will the legion smith forge a blade for you. Otherwise, only 350 can be obtained in exchange for the bar.
taitomagatsu 19 Feb, 2020 @ 1:47am 
Thank you for including it in the Guide. I hope new players will find it helpful.
titanopteryx  [author] 18 Feb, 2020 @ 10:01pm 
Thank you for that information. I added that to the guide up where I talk about virtue.
taitomagatsu 18 Feb, 2020 @ 9:35pm 
Have to disagree on virtue.

High virtue in combination with 60+ charisma gives you regular bonuses to reputation with the troops. There are also several events where it gives you huge bonuses to tribune and consul relations. This opens the road to earlier promotions and unlocks the training against the best sparring partner far quicker, which in turn allows for a higher weapon score overall.

The best greaves in the game are only available through an event, in which you defeat a bandit leader and choose the virtuous action afterwards.
The civic crowns are also only achievable through virtuous actions. They count towards your end score. So even in regard to your end success virtue is better.

I have tested this in about 10 playthroughs. High virtue is always better.
titanopteryx  [author] 19 Oct, 2019 @ 3:14pm 
Well the dev said that the handiness value of swords are usually better than other weapon types. So with the Falcata (like a gladius which is a sword), and the long sword both having a higher value than all of a spear, a mace, and an axe, it would appear that the higher the handiness stat the better.
Rance 19 Oct, 2019 @ 3:07pm 
So. Less handiness is better?
titanopteryx  [author] 2 Oct, 2019 @ 9:42pm 
Ok, added to the bottom of character creation and statistics.
titanopteryx  [author] 2 Oct, 2019 @ 9:38pm 
You mean the points you use when starting a new character? As you complete playthroughs, whether retiring or dieing partway through, the total amount of points get added to. Unspent points don't get carried into the next character. The previous character's performance can add to the total for the next time, but aside from that the points reset each time. I'll add that above.
Ishmale Minora 2 Oct, 2019 @ 9:29pm 
So. Do Hall Of Fame points carry over if you don't use them? Might be worth adding in if they do or not.