Dungeon Defenders

Dungeon Defenders

41 次評價
Temple O' Love - NMHC Mega Guide.
由 Black Mambo № 5 發表
Temple O' Love (ToL) is a DLC challenge map.

The goal of the challenge is somewhat similar to the that of Sky O Love, but instead of making pairs you have to prevent the pairs from mating this time. Every wave spawns a unique type of monster of which the boys spawn on one side of the map and girls on the other side, mixed in is a constant spawn of Djinns and Mini Ogres. The final wave consists of Evil Heros whom you have to stop from mating each other at all costs. Once all the Evil Heros are killed, you face the Mega Cupids, 2 of them as the last hurdle between you and the achievements and more importantly the rewards!

ToL is considered as arguably one of toughest challenges for higher levels, period. Funny enough it is also one of the simplest challenges and with decent bit of practice it can also be a very easy map to farm premium accessories - Top Hats & Bows, both of which occupy the same equip slot - Brooch/Head/Hat, whichever you prefer calling it as!

My aim to create this guide was to help those who have tried and tried and tried, but still failed on this map on Nightmare Difficulty.
Problem with the map is it looks easy, it goes smooth up until the last wave where you react normally and BOOM there goes the Evil Hero. That alone is the toughest part to handle in the whole game excluding the Boss Battle, which is a Nightmare itself.
Anyways I guess this much overview of the map should be enough, for now.
   
獎勵
加入最愛
已加入最愛
移除最愛
Brief introduction to the challenge.
At first we'll start off with what sorts of problems you might face during the course of this challenge, how to cope with those problems, what characters to use and the general basics, followed by the build, and more detailed tips and tricks etc. But feel free to skip this part if you want to.
Let's start:
  • The biggest problem until you finish the building will be the obnoxiously high amount of Mini-Ogres and Djinns. So how do you tackle them? It's not easy, but having a good DPS pet helps a LOT. I prefer using the Monkey pet because having a 20-30k DPS-Monkey can 2 or 3 hit all the Ogres. Having a healing aura keeps you alive longer if you are solo building. You will have to build even during the combat phase, as the build phase time is very low and wouldn't be enough to finish building the map in time. At least that's what I think.

  • The Kobold wave. I didn't take this wave much too seriously, but had to pay for it later on after a bunch of 20 kobolds charged over a full line of Archers, those little brats! Anyways they wouldn't be much of a problem if you keep a tab at defenses and stay alert! So be careful & stay as close to defenses as possible.

  • The infamous "Evil Heros" wave. There are Squires and Huntresses, whom you have to stop from mating. Now bear in mind they have good AI and their pathing is not similar or linear to the regular mobs. They can jump over defenses, and not only that the Huntresses will constantly dodge your attacks, the Squires will have a lot of HP, generally about 60m in NM. Now, I'm sure all those who have tried this map have suffered countless amount of defeats due to random Squires mating with their counterparts at mid or anywhere else. Lots of hair has been lost due to frustration, many keyboards have been smashed and tons of profanity used! But that's understandable, it is quite frustrating indeed. But hey, not everything is easy, or is it? So how do we deal with these Squires? Basically using a lot of physical walls help. Having good DPS Monks with 16k+ Seahorses makes it easier to kill them quickly. Having an active teammate as a Barbarian helps too as you can pretty much 1 hit KO the Squires, but it's not recommended to use Barbarians on this map. One good trick to avoid Squires going at random places is - how quickly you can aggro them towards you. Once you master this little trick the Evil hero wave wouldn't end up with you losing your hair or a broken keyboard! We'll cover more on this later on.

  • The Boss! Ahhh yes, the Goblin Cupid, 2 of them. How about I just 1-Hit-Hawk-KO them like in Tavern Defense? Nah doesn't work. In fact I'm yet to kill them myself as a Barbarian, which is my ultimate goal now! Anyways having a Ranged DPS is the solution. Having a Huntress with the SL skin adds in extra bit of help. A good DPS Jester can help by rolling the wheel to heal defenses once a while as the Boss fight takes a lot of time! Having a HBoost Monk helps enormously. But your primary DPSer should be Huntress, Ranger, EV or a Jester.

  • Ok moving on to weapons. So what guns are needed? Any 100k+ Pawnshot is good, an 80k+ E-Cannon does the job, albeit the higher damage you weapon will have the quicker you can kill the Cupids! Wait...did you forgot about Krytykal Strykes? Uhh, yea I left Kryts purposely because they can't hit the Cupids, period. I've tried a lot of times from various positions but it lands maybe 1 or 2 hits out of 100 shots. Technical issues or anything else, I don't know but you can't hit the Cupids with those, at least I can't.

  • About the map once again, it's not your regular hoo-haa Akatiti map, this is one of the toughest challenges you'll face that are actually worth it. Even if you have 8k stats, not knowing what to do will result in 100% failure. No matter how pro of a builder you are, no matter how many maps you farm each day, no matter if you are an Ultimate Defender, just normally building here like other maps won't do anything. Skill & understanding the challenge is needed before you head onto it. Regardless, I'll try make sure you learn everything about this map! :)

Now that we've had a briefing about the map, let's move on to the next part - the actual build.
This is divided into a few sections - Stats, Initial Mana Run & the 1st wave building, followed by 2nd wave build/combat phase building, the final build and your hero placements.
Note that the key to complete this challenge is how well your hero are positioned. It is near impossible to clear the map with just 1 player therefore a minimum 2 players should attempt this map, and even then so it is very hard, doable but very hard and would require a lot of work from you not to mention very high amounts of DPS.
Stats and character requirement.
Stats:
  • I'll take a rough guess that 3-4k should be enough. Same with DPS & Boosters, the higher the better as always!
  • This is really a hard map with a continuous and massive flow of Ogres & Djinns. So would be very hard if you have low stats(2k or lower). Also the Boss wave will take forever if you play with a sub-par DPS. So the longer it'll take, more and more defenses are bound to go down and will go down.

Builders:
  • Auras Monk / Initiate, Trap Huntress / Ranger, Tower Buff EV & Summoner Minions. Note that your Aura radius should be higher than or at least 2.5k.

DPS:
  • As mentioned above in intro section, any ranged DPS is good. I personally prefer and use this - 2 AFK Monks with Seahorses, and 1 or 2 active Ranged DPS with a cat, Rangers in my case. I just have 2 controllers so I only triple farm the map when alone with 2 AFK Monks & my Active Ranger. Otherwise when playing with friends or hosting a public game - 2 Monks + 2 Ranged is a lethal combo!
Initial mana run and starting build.
Everything about building etc. is explained in form of visuals.
All images are uploaded in the highest possible quality, yet if you find it difficult to understand or comprehend, let me know, I'll try to make it better.
The map has a special easter egg code/puzzle. Which upon solving and completing the map will give you 1 extra accessory drop, per character. I haven't taken time to screenshot all the code locations as there is this video which shows you how to do it. I'll only link the video as I don't have the right to upload it: Dungeon Defenders - Temple O' Love Secret


Before finishing the 1st wave you MUST upgrade all the buff-beams at least.
Building Minions after the initial wave.
This wave will require you to build during both the build and combat phase, do not worry as there are archers to cover your defenses you won't have any problem. Still if you are uncertain feel free to bring in an extra character, preferably your monk.


Before moving onto the next wave make sure to upgrade as much as possible. If you 1 or 3 star everything by the 8th wave, you are doing good and won't face much problems later on.
Final build, post 8th wave.


Important things to know before & after placing the Physical Walls:
  • Firstly, we only need the PW to halt the Squires from mating. Using PWs made my life easier on this map. they also help in providing you enough time if you don't have high DPS to finish off the Squires quickly. Just makes sure they don't break unless all Squires are dealt with.

  • Only lay down the PWs after the Sharken wave is done as the Sharkens could probably smash them somewhere else.

  • Once you lay down the PWs on each side, ONLY & ONLY defend the physical walls until the Squires are killed. Defenses should keep themselves up if you have 3-4k stats, don't ignore defenses though, as the Huntresses tend to inflict a considerable amount of damage if left unchecked.

  • After you have successfully dealt with the Squires, forgot about the walls, you don't need them anymore! Let them die with full glory, they did their crucial part!

AFK / Active hero placements + Boss Fight.


  • After you are done building the PW, bring in your AFKs and place them as shown above. 1 Monk at north between the walls and minions, 1(or 2 if using 3 afks) monk at south near the wall and only just behind it.

  • Active Ranged DPS in front of the wall and between the stairs. Keep in mind - try staying under the Healing Aura as much as you can though. If you are near the wall, the mid-spawn Squire(s) will 99.9999% come towards you, i.e. instant aggro. This is the key to avoid almost 100% of all the mid mating failures.

  • If you get knock-backed far too much before they spawn they'll run mid and game over. YES, I've tried a lot of things tried placing archers even at mid but it doesn't help, they can randomly mate. But the way I've placed the wall there's absolutely no chance of them heading anywhere other than towards you as the wall is close enough to both the spawn points.

  • Remember, KEEP THE WALLS ALIVE until they Squires are dead. Keep repairing them if you don't have enough DPS.

  • After all the Squires and the females are done and dead, head into the Boss Fight Area quickly, you only get 3-5 seconds till the Bosses arrive, so be quick!

  • The Bosses are here, now what? Well, goodluck! Hopefully if you have good guns and good DPS + Boosters, you can clear the boss quickly otherwise you'll have to go north and repair some stuff, mainly auras.

  • Killed the Cupids, yay! Enjoy the drops, usually I've barely enjoyed them except for the Top Hats & Bows, but perhaps if you get better than all the 53 mana junk I've got, I'll be more than happy for you! :)

  • Also REMEMBER ABOUT THE CODE? Yeah, if you did the code, you get 1 extra accessory drop per character! But make sure to wait until the "Level Victory" text notification, the extra drops are awarded quite late, so don't remove your characters just yet! :D
End note and acknowledgments.
Now, concluding this guide I'd appreciate any feedback, comments, questions, critics or whatever input you wish to provide. Feel free to ask just about anything and do post some tips and tricks if you know more or point out something that I may have missed.
If you intend to farm this map regularly, and are having issues with certain areas let me know. Also, if you need to see a demonstration run just add me on Steam and I'll show you the build on Easy mode.
Enjoy the guide, and may the Temple Gods bless you with awesome Top Hats and Bows and much more!

<3 Mambo!


Acknowledgments:
This guide wouldn't have been possible without the help of my friends Damyon and DiscoTurkey and without their input on many areas, with whom I've co-built and farmed this map countless number of times! Thanks guys!

Major thanks to my good friend Pew for showing his initial build to me, which I've modified heavily into perfection, almost! And also for providing some very valuable tips and tricks along the way, thanks mate!

Also thanks a ton to all those players who have played this map with me on public games and provided whatever amount of input regardless if we cleared the map or failed!

And finally, I thank all of you who read the guides & provide your valuable comments and feedback!


<3 Mambo.
10 則留言
Black Mambo № 5  [作者] 2021 年 4 月 10 日 上午 6:56 
To anyone reading this guide: As I no longer play (or intend to play) Dungeon Defenders (outside of events) -- if you feel like this guide needs updating etc. Feel free to contact me, I'll add you to this guide as a maintainer and you can keep it updated if you wish!

:pinkheart: Mambo!
Black Mambo № 5  [作者] 2016 年 1 月 12 日 上午 5:28 
Unfortutantely I had almost stopped playing DunDef by the time the released the Chicken Pet, must have played 10-15 hours tops after that update. So I really do not know which one on this map would be better.
But what I say is that as long as major changes haven't taken place in DunDef, the Seahorse combined with a Cat and a Monk Hero Boost combo is and was absolutely lethal.

I've heard Chickens do decent damage as well, so it might be best to try it out! :GDNormal:

Perhaps you are better off asking this same question to my good friend Pew Pew Pew on his Pets Guide(link: http://gtm.steamproxy.vip/sharedfiles/filedetails/?id=197161711 ). :3:

Once again, I'm extremely sorry if I couldn't provide a concrete answer. I haven't played DunDef is QUITE, QUITE a long while! :squirtmeh: Although as I said above, if much hasn't changed in terms of pet buffs and nerfs, then the Seahorse + Cat + Monk Boost was probably the best and most practial combo.
changbaby 2016 年 1 月 12 日 上午 2:00 
Whats better to kill heroes - 16k seahorse as you said or 37k chicken?
Black Mambo № 5  [作者] 2015 年 5 月 11 日 下午 8:46 
Stay in the Health Aura if you are taking damage, although if your Aura Stacks(Heal+Electric+Drain+Slow) are good enough with damage, you shouldn't be facing any problems whatsoever in this map. You might want to check your auras for their radius, having a small radius means you'll definitely face issues.
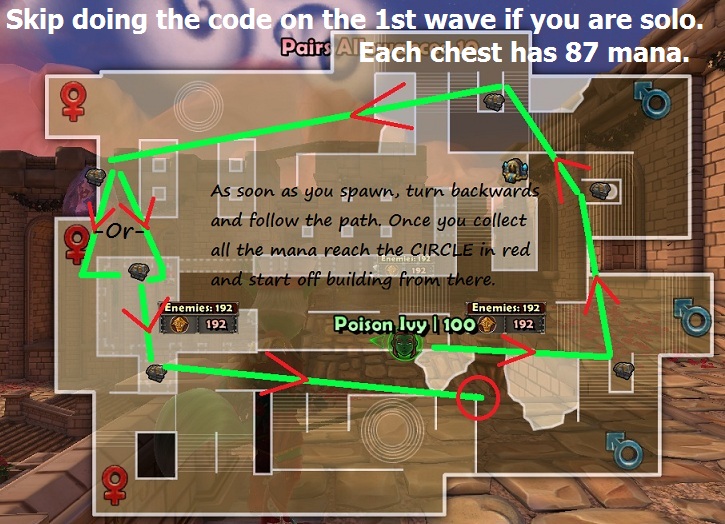
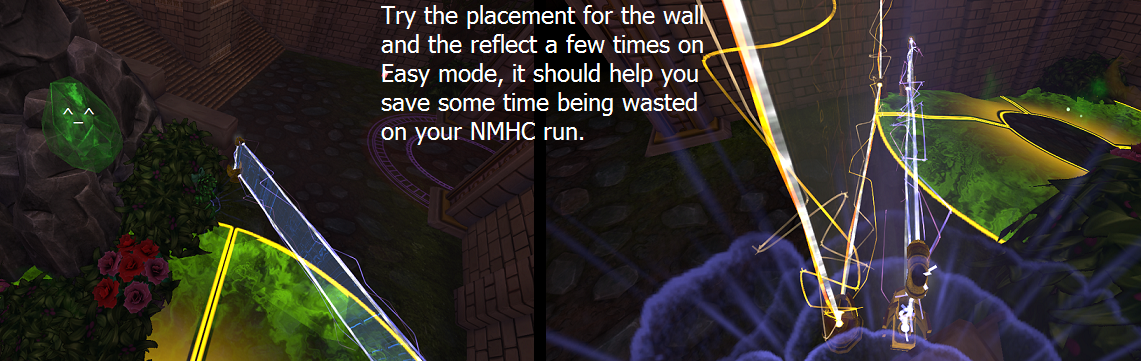
This map is very much doable with 2k to 2.5k stats, provided you are quick with building and keep an eye out on the map making sure no Djinn sells any of your towers.

I've failed quite a bit on this map myself, but when you get into the flow, it's pretty straight-forward and easy! Try it a bit, eventually you'll get the flow. :B1:

Unfortunately I don't have DunDef installed nor have I played the game in over an year, otherwise I'd have helped you.
iamsopure 2015 年 5 月 11 日 下午 3:30 
The problem is in the 1st wave you have to use a tower EV who is most likely to be raped by those ogres especially when you are trying to solo...
Black Mambo № 5  [作者] 2013 年 7 月 6 日 上午 10:40 
Yea Hero & Boss wave is like the 95% of the whole challenge rest is easy.
Amtotallymad 2013 年 6 月 21 日 上午 1:33 
Guide helps alot so thanks :). Hero wave is defo the worst wave of them all
anthony 2013 年 6 月 14 日 上午 8:59 
Ty
Black Mambo № 5  [作者] 2013 年 6 月 12 日 下午 3:35 
Thanks, do try it and post your feedback, or any help you need :)
Scrumpuppet 2013 年 6 月 11 日 上午 5:45 
epic