Monster Hunter: World

Monster Hunter: World

1,234 ratings
The Hunter’s Handbook: A Beginner's Guide to the New World
By ̧҉ ҉Minorou ꧁💀꧂
Monster Hunter World is meant to be Capcom's attempt at creating a more accessible game in the franchise, but that doesn't mean there isn't a lot to learn! This guide tries to lay the groundwork to understanding the basics, from the UI, to preparation for the hunt, the hunt itself, and the post-hunt routine. It also covers weapon types, elements, status effects, and so on.
15
4
30
2
3
3
5
5
4
2
   
Award
Favorite
Favorited
Unfavorite
Hello, Hunter!
Welcome to Monster Hunter World! This is a wonderful, quirky series with many obscure and sometimes unintuitive game mechanics. With roughly a thousand hours' worth of series experience under my belt, in anticipation of a PC release I wanted to help those new to the series, and perhaps those returning, with a guide to make things easier. I'll never claim to be an expert, but I'll provide plenty of resources for further clarification and research to help you understand the game. If you come across a term or phrase you don't understand, try the glossary near the bottom of the page.

Some key things to understand about Monster Hunter:
  • This is a notoriously difficult series to get into. It took me three solid attempts over several years to break in and finally "get" it. Capcom did their best to make Monster Hunter World the most approachable entry yet, but don't feel discouraged if you don't enjoy the game; it's not for everyone.
  • Combat is slow and deliberate. It's not a spectacle fighter. When you hit an attack button, you commit to that attack. You can't dodge or block until it's complete. You have to read your opponent and anticipate their attacks so you can respond in kind.
  • Your character has no "stats," and doesn't level up. Your character is exactly the same at the beginning of the game as they are at the end-game. The only things that improve are your supplies, weapons, armor, and your own skill and knowledge as a player.
  • There's only so much a guide can teach. If you know someone who plays monster hunter, ask them. Nothing can compare to a veteran teaching you the game and answering your questions as they come up. Even if you don't know someone in-person or online, there's plenty of resources dedicated to helping people learn this wonderful series, including the many discord servers dedicated to Monster Hunter[top.gg]. The Monster Hunter Gathering Hall[discordapp.com] is the officially partnered one.
All in all, there are two priorities in Monster Hunter:
  1. Don’t get hit
  2. Hit the monster
The order is important. If you can remember and abide by that mantra, you’ll be all right.
So, What's the Story?
Do I need to know the lore of the past games to know what's going on?
No. The Monster Hunter series has barely any story at all. Most games can nearly all boil down to: "a big monster is threatening the local ecosystem; can you take care of it?" You can jump straight into Monster Hunter World without any trouble.

Seriously, give it to me. What's the lore?
Take this first paragraph with a grain of salt; very little of it is referenced in the series directly. Some of this info comes from notes from artbooks and concept art, and may or may not be considered canon.
A long time ago, there was an ancient civilization[monsterhunter.wikia.com] of many races, including humans and wyverians, who are humanoids with four fingers and pointed ears. They possessed great knowledge and had an advanced level of technology unknown today. They exploited the wyverns and elder dragons of their time. At some point, they performed The Forbidden Act, killing numerous wyverns to create their own massive bioweapon lifeform called the Equal Dragon Weapon/Wyvern Machine Soldier. Many of these bioweapon lifeforms were made. This greatly angered the dragons, sparking the Great Dragon War. It was a terribly violent conflict that left the ancient civilization in ruins and most dragons extinct.

With most of the world in shambles and the knowledge and technology of the ancient civilization lost, humans and wyverians adopted a new culture. Instead of directly antagonizing wyverns and dragons, they would instead live alongside them with a healthy respect for nature. This isn't to say conflict ceased entirely: wyverns are a constant threat to humanoids and other monsters alike, and something needed to be done to protect the peace.

The Hunter's Guild was formed to maintain that peace. It's the central governing body of the world, and the primary way monster-related problems get solved. Officially-sanctioned hunters are not out to annihilate all monsters, rather, they're more glorified park rangers. They hunt down overpopulated animals, eliminate disruptive invasive species, and protect towns from marauding monsters. Guild Knights are dispatched to execute poachers that disobey these rules. Everything is done to learn more about the world and protect the world's ecosystem.

All right. How about Monster Hunter World specifically?
The Hunter's Guild has noticed that every ten years, elder dragons have been travelling across the ocean to the land known as the New World in a migration known as the "Elder Crossing." They established a Research Commission and sent fleets to follow these elder dragons to find out why. The first fleet was sent out 40 years ago, containing the pioneers who established the settlement in the New World. The second fleet set sail 30 years ago, and mostly had smiths and technicians to improve the settlement established by the first. The third fleet followed 20 years ago, containing mostly scholars to aid in researching the island and its ecosystem. However, the third fleet has mysteriously gone missing after a flighty mishap... The fourth fleet, from 10 years ago, contained provisions and masters of logistics, to help manage supplies and materials. Your adventure begins as an A-list hunter with the fifth fleet, coinciding with the latest Elder Crossing.

Ok. Then what's all this I keep hearing about the Tale of the Five and a Sapphire Star?
It's a creation myth written for World. This section has gone on long enough already, but you can read the legend directly in-game from a book found in your room once you unlock the Private Suite.

If you're interested, the video below covers the Tale of the Five and the Ancient Civilization nicely:
https://www.youtube.com/watch?v=G61dkb7Onjs
Making Sense of the UI - Out in the Field and in Combat
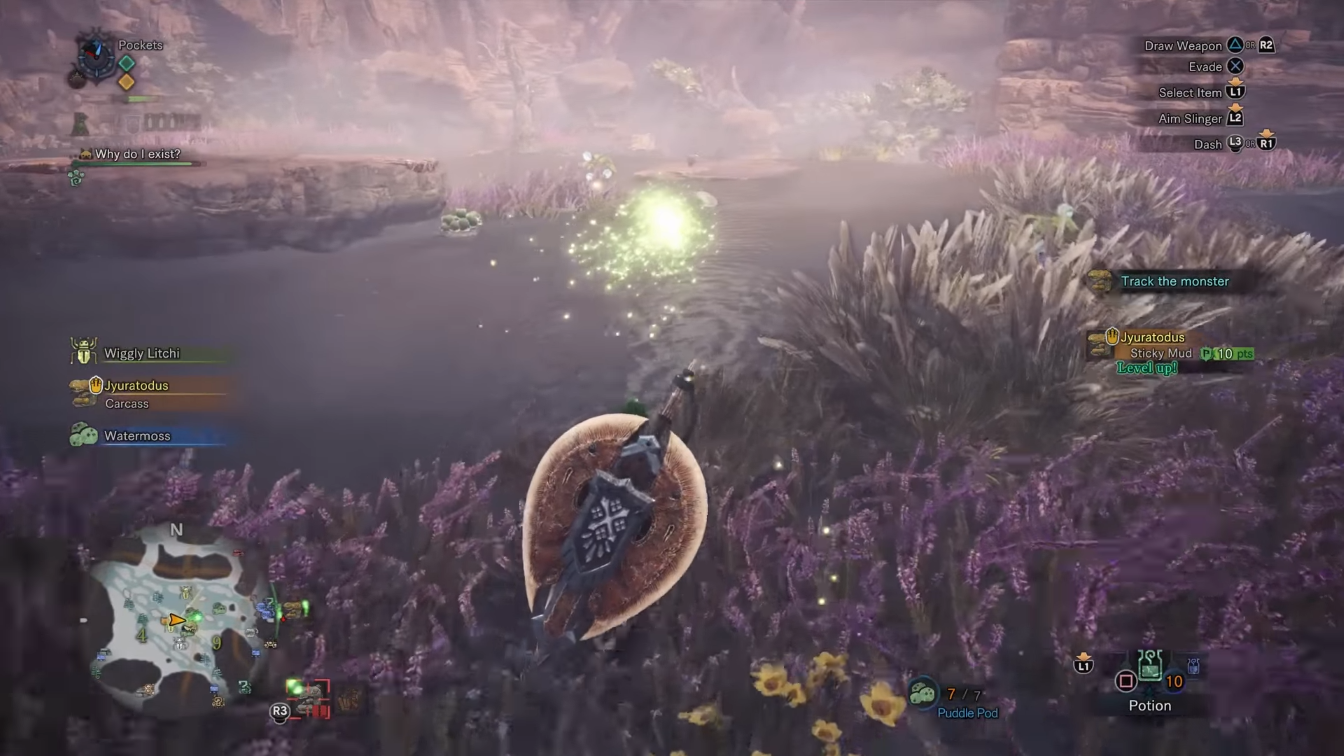
Monster Hunter has a lot of information on screen, so let's break down what you're looking at to get a better sense of what's going on. Click the image below to make it larger if you need to see more detail.


Let's start with the top left and go clockwise. Fittingly, we have the blue clock. The blue hand starts from the noon position, then slowly moves to indicate how long the quest has been. It's just barely budged, not even reaching the first notch, indicating that roughly two minutes have passed. The red hand of the clock indicates the quest time limit. Most quests have a time limit of 50 minutes, though some may vary. To the right of the clock is the player's name. Below the name is a green diamond and a yellow diamond. These expand into the health and stamina bars when in combat. Similarly, you see weapon status icons are transparent, also indicating that they are out of combat. Below that is the Palico's name and health bar. The paw print indicates that the Vigorwasp ability is available for use.

To the top right of the screen, we can see the action suggestions. This lists all available actions the player can take, as well as the button prompts to do them. This changes dynamically depending on what the player is currently doing. Pay attention to this while learning the game. If it ever gets annoying, you can disable this display in the options.

Below that is the current quest objective. Pretty straightforward.

Below the objective is a notification area. This is where research, tracking, player chat, NPC chat, and acquired loot is displayed.

At the bottom right of the screen is a small version of your item bar. The most prominently-displayed item is your currently-selected one. Pressing the button displayed there while your weapon is sheathed will use that item. You can change your currently-selected item by holding down the button displayed to the left of the item bar.
To the left of that is the ammunition currently equipped to your slinger.

At the bottom left of the screen, to the right of the minimap, is your monster lock-on. Here in the example, it's selected to focus the screen onto the Jyuratodus whenever the button on the bottom left is pressed. The green swirl on the icon indicates that is the current monster being tracked, and the red ticket on the icon indicates it's the required monster for the quest.

Displayed prominently on the bottom left is the minimap. It displays the general topography and shows points of interest such as gathering points. The outline color of the minimap will show your current status: gray if not in combat, red if in combat, purple if in combat but hidden (in bushes or using Ghillie mantle), or black while mounting a monster.

Above the minimap are a list of objects of interest close by. The scoutflies will be highlighting anything displayed on this list.

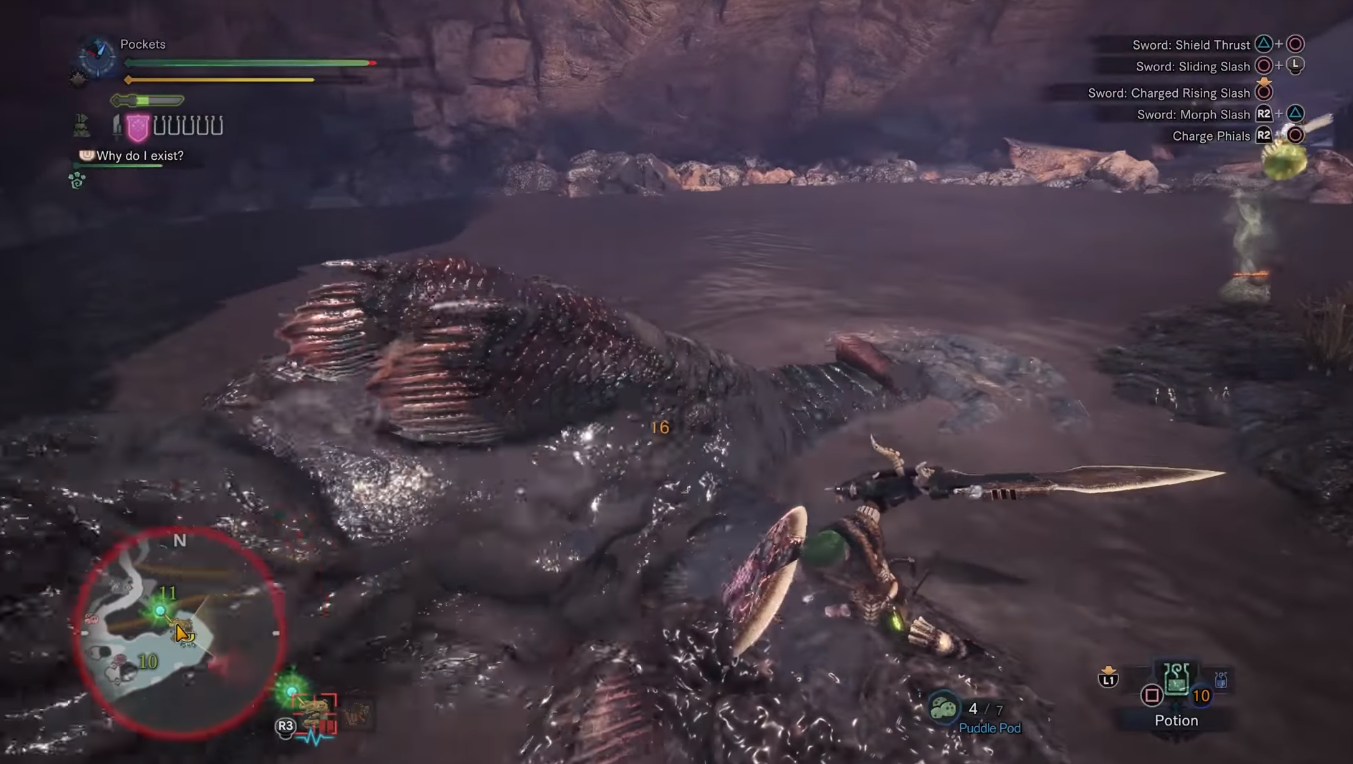
Let's take a look again while in combat. Again, click the image below to get a larger version.


The most notable change is on the top left. The clock has advanced a little bit. The green diamond and yellow diamond have expanded into the full health and stamina bars. Take note of the red portion of the health bar. This means the player has recently taken damage. The red portion will heal slowly over time, as long as the player doesn't take any further damage.

You can see, the weapon status icons are no longer transparent and are fully visible. Keep in mind that these icons will vary depending on the weapon type you're currently using. This player is using a charge blade. The vertical sword, shield, and five phials are charge blade icons, but the horizontal sword above them is common to all blademaster weapons, and is very important: the sharpness bar. It indicates how sharp your weapon currently is. In this example, this player's weapon has roughly a fifth of green sharpness left before dropping into yellow sharpness and thus, less damaging. You'll find a more thorough explanation of sharpness in the weapons section below.

In the top right of the screen, the action suggestions are still there, just changed to combat-oriented actions. These can help you discover your options in combat. Once you have your bearings, you can keep an eye on it from time to time and maybe you'll discover a move you've missed or a combo you were previously unaware of.

The item bar and slinger ammunition in the bottom right don't change their roles in combat. Don't forget to use them, though! A prepared hunter can use items and slinger ammo to make hunts much faster and easier.

Below the monster lock-on indicator is the monster's pulse. You can use that pulse to help determine when a monster is enraged, exhausted, or weak and close to death. You can see a more detailed explanation of watching the pulse here.

As mentioned above, the minimap outline is now red, indicating the player is currently in combat.
Making Sense of the UI - Map and Misc.
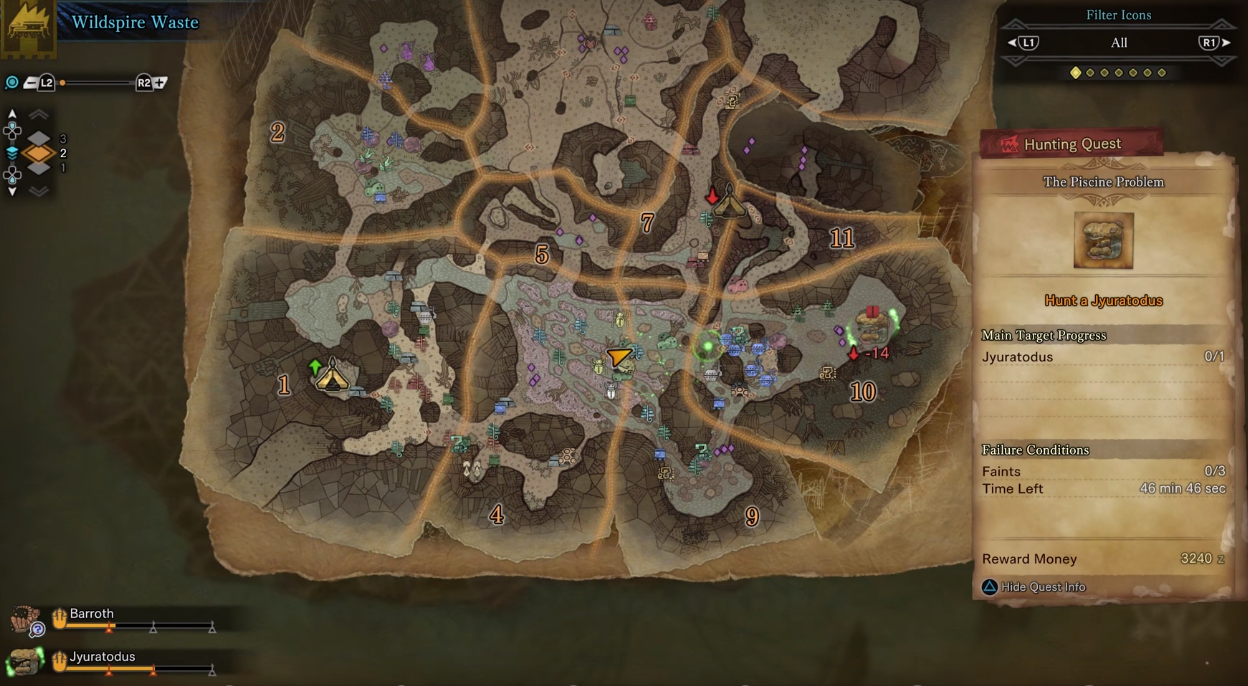
Let's bring up the map, shall we? Click the image below if you need to look closer.


This time, let's start in the middle with the map itself. The yellow arrow in the center is your character, pointing in the direction your character is facing. If you are playing in multiplayer, other characters will show up as other arrows in their respective color.

You can also see that the map itself is divided into sections, and labelled with numbers such as 1, 4, 9, etc. This can be useful when coordinating with other hunters in multiplayer. "You can find the herbivore egg in the nest in the southernmost part of area 4," for example. In this image, the player is currently near the top right edge of area 4.

The next things to notice are the many icons dotting the map, showing items you can gather, monsters roaming around, grimalkynes willing to help, camp locations, et cetera. This is helpful for gathering or determining where to go, and you can choose whether to turn these on or off (see Filter Icons in the paragraphs below).

Notice the Jyuratodus icon on the right in area 10. It has the red ticket indicating it's required for the quest. It has scoutflies circling around it, indicating it's the current scoutfly target. The downward arrow and red -14 below it indicate it's currently -14 units below the player's current elevation.

In the top left is the name and icon of the map you're on, in this case, Wildspire Waste. Below that is the zoom level. Press the buttons as indicated to zoom in or zoom out. Below the map zoom level is your map elevation. Press the buttons as indicated to change what elevation of the map you're currently looking at. Whenever you bring up your map, it will be at your current elevation by default.

In the top right are the Filter Icons. This is how you choose to enable or disable to icon displays on the map. By default, you see all icons. If that's too much and you want to focus on one thing, perhaps for a bounty, press the indicated buttons to scroll through the filters. This way, you can choose to only see gathering points, slinger ammo, traps/environmental notes, endemic life, small monsters, or nothing at all.

Taking up the majority of the right side of the screen is the hunting info. At the top of the "page" we see the type of quest, whether it's a hunting quest, kill quest, capture quest, and so on. Below that is the name of the quest itself, along with the icon of the quest target, and the quest objectives. The objectives list the progress in case there are multiple targets. The failure conditions list what can cause the quest to fail. The quest fails if ANY of these conditions are met. Most standard quests have 3 faints and 50 minutes for failure conditions, but these are often different during investigation quests. Check your map if you're ever unsure during a quest.

In the bottom left are the large monsters you're currently aware of on the map. Up to three large monsters can be in a map at any given time, though more monsters can come in after another monster departs (by leaving the area, death, or capture). Here, Barroth and Jyuratodus are the only two monsters on the map. The bars next to their icons show their tracking level. The three markers on the bar show the 3 "levels" of tracking:

Level 1: Scoutflies guide you to the next monster track.
Level 2: Scoutflies guide you to the monster directly.
Level 3: Monster status and destination is displayed to you.

Barroth cannot be seen on the map because it is only at level 1 tracking. Jyuratodus is at level 2 tracking, and thus can be seen on the map. What does level 3 mean, exactly? When the monster is at low enough health to capture, skulls will start flying out of its icon on the map and minimap. In addition, whenever it starts to run or fly to a new location, its destination will be directly marked on the map for you.

---

I know this all seems like a lot, and it is. However, it will all become second nature as you get familiar. Monster Hunter is a long game, and you have plenty of time to get acclimated at your own pace.

Whenever you're taking a break early on, take some time and look through the options menu and make sure everything is to your liking. There are some very common options that veteran hunters recommend: turn sheath settings to "Manual Sheathe," and set Camera Distance to "Far." The Auto-Sheath is actually disruptive to normal gameplay. With manual sheath you'll still automatically sheathe when running and using items, so no need to worry there. The Far camera distance is self-explanatory; you'll want to see as much of the battlefield as possible when fighting large monsters.

While you're looking around in the menus, take some time looking through the hunter's notes. It's filled with information and tips to help you.

While that covers the basics and will take you through low rank, eventually you're going to want to start customizing item sets, equipment sets, the radial menu, and maybe even the item bar. However, setting all that up at the beginning can be overwhelming at first. It can wait until you're settled in.
Preparing for the Hunt
While you may want to get out there and get killing right away, you need to get ready first.
The following is the core gameplay loop: You go out in the field to gather materials and hunt monsters. You return to town to make supplies, arms, and armor to take on tougher monsters. Repeat.

Botanical Research, AKA The Farm

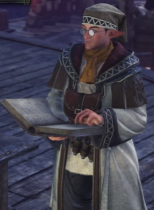
The Farm is where you can quickly and easily obtain items essential for hunting without actually gathering them out in the field. Simply walk up to this guy next to the table, select Cultivate, choose your desired item, and as you complete quests, that item will fill up in the harvest box. Choosing harder-to-get items will take more time to harvest, but not by much. You can also choose Fertilize to increase item yields, or make harvests come by faster. Using fertilizer can also net you rare items. As you get further in the game, completing sidequests can unlock more fertilizers, cultivation boxes, and space in the harvest box.

When in doubt, farm honey. Honey is your lifeblood. It's used in many common useful crafting recipes, including the Mega Potion. Another useful thing to farm are flashbugs. They go into Flashpods, which make fights with flying wyverns much easier.

Once you are in the end-game, it is possible to have all fertilizers up and running indefinitely as long as you remember to provide continuous supply of research points every 5 hunts.

Bounties, Investigations, and Deliveries
Every time you return to Astera, in front of you and to your left are three people: the Provisions Manager, Tech Chief, and Analytics Director. They form the Resource Center, and they are integral to keeping your armor up-to-date, establishing new camps, getting new mantles, and completing weekly quotas to avoid the horrors of RNG.

Always make sure you have a full list of bounties before every hunt. You might not always have favorable bounties, especially late game, but new ones always cycle in after every hunt. Delete ones you don't think you'll do within the next few hunts and replace them with ones that are easier to accomplish.

Provisions Stockpile (Vendor)
The vendor sells everyday items that can be useful to you throughout the entire game. He’s also the one that you sell items to in order to make zenny, though you can also just sell items directly from your item box. Be sure to look through his stock and note items you’d want to have: barrel bombs, ammo/coatings, the power charm, the defense charm, and so on.

Argosy (The Captain)
The Captain of the Argosy will become available to you after a certain part of the story. From him, you can obtain exotic goods. You have three sets of “inventory” for his store, and you can request different types of items for him to supply you with: consumable items, material items, and trade-in items. Consumable items are things that can help you during a hunt, such as might pills and trap parts. Material items are monster drops and item you can find in the field. Trade-in items are items used exclusively for selling for zenny. When you purchase items from the Captain, you buy the entire item set.

Tailrider Safari
When you're far enough into the game, you'll unlock the Tailrider Safari. This allows you to dispatch palicos of other players to hunt monsters and gather materials on your behalf, at the cost of some resource points. It's fairly straightforward. You can dispatch them from the Research Base or the Housekeeper in your home. Select Deploy Tailrider Safari, then choose a Palico to send. The better the palico is, the more expensive they are to send. Once you've chosen, you select a destination for them to go to. On the right, you'll see three potential paths for them to take. Simply look through all the options and see what route contains the monster or gather point you want the most, then select that destination and route. From there, you're done! It will take five quests for the Safari to complete. If you want to cancel it early, you may do so from the menu and reap the rewards they earned up to that point. Otherwise, you'll be told in the side menu when the Safari has returned after you've completed enough quests.
Choose Your Weapon - Part 1
Monster Hunter: World has fourteen different weapon types to choose from. You are not locked in to one. Your character is free to use as many of them as they see fit, and change between them as much as they want.

You start with a basic iron weapon of every type, so do yourself a favor. This game offers dozens to hundreds of hours of gameplay, so at least spend 5-10 minutes in the training room (accessible from your housekeeper) with each weapon to familiarize yourself with each one. Then do a hunt or three with the few weapons that seemed interesting to you. It's fine to "main" a single weapon type, but versatility can be helpful if you want a change of pace from your main, or need a tail cut when you main a blunt weapon, etc.

When choosing weapons, don't compare damage values between weapon types. Only compare Lances to Lances, Bows to Bows, etc. You may notice that Greatsword has a much higher damage value than most other weapon types, but that's because it's much, much slower. So don't worry about finding the "best" weapon type and use what you find works for you. Overall DPS is comparable across the board assuming basic competence with the weapon.

Sword & Shield
Often touted as the de facto beginner weapon, the Sword & Shield is not to be underestimated. It has decent versatility across the board, not lacking in any particular department except attack range. Sword & Shield is unique in that it can use items and the Slinger while the weapon is unsheathed. Best paired with elemental and status weapons. Attacks that utilize the shield deal KO damage and can knock out a monster.
Kiranico Weapon Guide[mhworld.kiranico.com]
Arrekz Weapon Video Showcase

Dual Blades
With fast attacks and dashes, dual blades are masters of elemental damage and status application. When engaging Demon Mode and draining stamina, they get a stronger moveset that makes them immune to small forms of knockback. If they deal enough damage to maximize their gauge, they enter Archdemon mode, increasing attack and extending their relentless assault. Stamina management is key to their strategy.
Kiranico Weapon Guide[mhworld.kiranico.com]
Arrekz Weapon Video Showcase

Long Sword
With long range and wide reach, it's no wonder the Long Sword is so popular. By landing attacks, the Long Sword raises its spirit gauge. By hitting the final attack of its spirit combo, the Long Sword becomes stronger. In some ways, it can be considered a weapon of momentum: as long as you can keep your spirit level up, your damage will remain high. It can reposition mid-combo with Fade Slash, and can counter attacks with Foresight Slash without missing a beat. The high-reaching vertical attacks make cutting tails easy, and its spectacular finisher, the Helm Splitter, is devastating.
Kiranico Weapon Guide[mhworld.kiranico.com]
Arrekz Weapon Video Showcase

Great Sword
Without a doubt the most iconic weapon of the series. While slow, it's also capable of incredibly destructive damage. Great Sword users benefit the most from knowing the monsters. They often adopt a hit-and-run style: hit where it hurts, then get out and wait for the next opportunity. The new shoulder tackle makes it easy to maintain a charge through monster's roars and get to the monstrous True Charged Slash. When a monster is asleep and you're not capturing it, the Great Sword user is the wake-up call.
Kiranico Weapon Guide[mhworld.kiranico.com]
Arrekz Weapon Video Showcase

Lance
The lance boasts the strongest shield in the game, but don't let that fool you: it is among the most aggressive weapons in the game. While other weapons have to sheath and run to dodge dangerous attacks, a proper Lancer is relentlessly on the monster. The attack cadence is sometimes compared to a dance. When the monster runs away, the Lance can charge and run the poor thing down.
Kiranico Weapon Guide[mhworld.kiranico.com]
Arrekz Weapon Video Showcase

Gunlance
Or "Funlance," as it's often called. A lance with a short-range cannon attached to it. It can stab, it can shoot! It can do both at the same time, with the Wyrmstake Cannon, which sticks in the monster then explodes. Shots from a Gunlance always do a set amount of damage, which is useful for hard parts that are hard to break. To cap it all off, the Wyvern's Fire takes a while to shoot, but is a huge burst of damage. Take care with sharpness, though...
Kiranico Weapon Guide[mhworld.kiranico.com]
Arrekz Weapon Video Showcase
Bonus - Caoslayer's Playlist: A Gunlance Expert

Hammer
There's beauty in simplicity. Take this big thing, and apply it directly to the monster's forehead. The Hammer is the King of KO's, and has dibs on the head in any multiplayer hunt. They can buff up quickly by Power Charging, then go ham. The charge attacks are useful for hit-and-run strikes, and the Big Bang combo is best on stunned or paralyzed monsters. Hammer boasts one of the most fun attacks in the game: the sliding spinning attack. As a blunt weapon, it can't cut tails, but at least it exhausts monsters faster.
Kiranico Weapon Guide[mhworld.kiranico.com]
Arrekz Weapon Video Showcase
Choose Your Weapon - Part 2
Hunting Horn
Everyone loves a Hunting Horn user. Every basic attack with this weapon plays a note. Play notes in a certain order, and you've completed a song. Start a performance to give the benefits of that song to you and everyone else in the party. But don't just play in the corner... you're a battle bard, not a cheerleader! Recitals HIT HARD. Kill the monster with the power of music! While everyone touts the buffs, what's lesser known is that HH is the King of Exhaust. Monsters hit by a hunting horn tire out much faster than normal, meaning an easy hunt is getting even easier.
Kiranico Weapon Guide[mhworld.kiranico.com]
Arrekz Weapon Video Showcase
Bonus - Griffted Playlist: The Smoothest Moves You'll Ever Need

Switch Axe
A Switch Axe is a decently mobile axe with high reach and wide range that has a gauge. It truly shines when it transforms into a sword that doesn’t bounce off hard monster parts and also benefits from a phial effect, depending on what axe it is. It could be bonus raw damage, element, status, or exhaust. As you build up damage with the sword mode, it starts to glow, dealing even more damage. It has the ability to use an Element Discharge, which deals out continuous damage which finishes in a huge explosion. As long as you have the gauge for it, you can seamlessly switch between sword and axe mode mid-combo for a smooth attack flow. Just watch that manage that sword gauge and don’t get it too low. Ever wanted to reload an axe?
Kiranico Weapon Guide[mhworld.kiranico.com]
Arrekz Weapon Video Showcase

Charge Blade
Arguably the most complex weapon, but one of the most versatile and rewarding once mastered. The Charge Blade charges up sword energy with sword attacks. Charge up phials with this sword energy to open up options in combat. Your weapon can transform into an axe, which can use those phials for elemental discharges in axe form. For more advanced uses, you can push the charged phials into the shield, empowering your axe mode and expanding your options further. However, nothing compares to its capstone ability, the Super Amped Elemental Discharge, which causes a massive series of explosions that cause similarly massive amounts of damage as a satisfying pay off for how long it takes to build up. Just don’t miss!
Kiranico Weapon Guide[mhworld.kiranico.com]
Arrekz Weapon Video Showcase
Arrekz Weapon Video Showcase (Extra Tips)

Insect Glaive
The Insect Glaive is really a pair of two weapons: the glaive itself, and the kinsect. The kinsect is a flying bug that follows your instructions. Your first priority is to command the kinsect to fly in and hit the monster's various body parts to gather extract and return it to you to give you buffs. Most important is red buff, which increases your attack power and gives you stronger attack animations. Once buffed up, you can command your kinsect to attack the monster at will, then attack the monster yourself. The glaive has aerial attacks which makes it easier to mount monsters, but the most damaging combos are the ones on the ground.
Kiranico Weapon Guide[mhworld.kiranico.com]
Arrekz Weapon Video Showcase

Bow
Unlike blademaster weapons which deal with sharpness, the bow has infinite arrows but has to bring along consumable coatings. By applying coatings to arrows, the arrows get additional properties such as increased damage or status effects. When shooting, maintain proper critical distance by ensuring the crosshairs have two complete circles when aiming at the monster. Arrows deal less damage if you are too far away from the monster. Charge shots by holding down the shot button, or by continuously shooting, to keep up your assault. The Dragon Piercer attack roots you in place while charging up, but deals incredible damage as it pierces through monsters, especially lengthy ones.
Kiranico Weapon Guide[mhworld.kiranico.com]
Arrekz Weapon Video Showcase
Arrekz Weapon Video Showcase (Extra Tips)

Light Bowgun
The little brother of the bowguns sacrifices a bit of damage for much more mobility. Bowgunners must buy or craft their ammo, though there's usually some free ammo in the supply box at the beginning of each hunt. The Light Bowgun's unique ability is called the Wyvernblast, an explosive mine of sorts. You can place up to three at a time on the ground. Every time damage is applied, they explode, dealing heavy damage in an area around it. Bowguns can be customized in the armory, allowing you to boost attack, increase range, reduce recoil, and so on. As you upgrade your bowgun, you gain more customization slots. Like the bow, you have to stay within the right distance to deal the most damage, but this varies with the ammo you're currently using.
Kiranico Weapon Guide[mhworld.kiranico.com]
Arrekz Weapon Video Showcase

Heavy Bowgun
The heavy bowgun moves slower than the light bowgun, but has larger clips and hits harder. Bowgunners must buy or craft their ammo, though there's usually some free ammo in the supply box at the beginning of each hunt. The Heavy Bowgun has two different special ammo, depending on the gun. The first is Wyvernheart, which turns your weapon into a machine gun for a while. It can be fired in short bursts or as one continuous stream of bullets. The second is Wyvern Snipe, a single explosive piercing shot. If fired correctly, it can ruin a large monster. The Heavy Bowgun can be customized in the same way that a Light Bowgun can, but one of the options includes a shield that can automatically block attacks for you.
Kiranico Weapon Guide[mhworld.kiranico.com]
Arrekz Weapon Video Showcase
Weapon Statistics - Sharpness
All melee weapons have a colorful sharpness bar, like so:


The colors always go in that order: Red, Orange, Yellow, Green, Blue, White. White is the sharpest a weapon can be in Monster Hunter World. As you go out on a hunt and hit monsters, the weapon will gradually dull. Thus, this weapon would go down to blue sharpness, then green sharpness, and so on. Sharpness increases damage based on a multiplier, though differently between the raw damage portion of a weapon and its elemental damage.

Raw Damage:


Elemental Damage:


The size of the color bar indicates how many hits that weapon will take before going down to the next level:


A weapon with this sharpness bar will only take a few hits before the white goes down to blue. The blue will last a while before going down to green. Keep this in mind while hunting. You restore sharpness by using a whetstone, which maximizes weapon sharpness.

In addition, some monster parts are tougher than others. If you find yourself attacking a part of a monster and bouncing off, your weapon sharpness is too low. Every time you bounce off a monster part, you're stuck in the bounce animation and your weapon loses twice the sharpness it normally would from a regular strike. However, you still do full damage to that part, so if you're trying to break that part, go get 'em, tiger. Bouncing can also be mitigated by a skill called Mind's Eye, which allows you to attack without bouncing (though double sharpness loss still applies). Some weapons have attacks that have natural Mind's Eye built in.

In short, high sharpness good, low sharpness bad. Keep your weapon within its top two sharpness levels at all times. Still confused? Perhaps this video will explain it better. It's for Monster Hunter 4U, but the main principles still apply.

Note that even blunt weapons such as Hammers and Hunting Horns still need to be sharpened. The Monster Hunter series never really bothered to care why. It's whimsical like that.

Some weapons also have affinity. This is Monster Hunter's term for critical hit chance. A critical hit deals 25% extra damage. Negative affinity means a negative critical, which will deal 25% less damage. It's fairly straightforward. Let's say a weapon has 30% affinity. Every attack has a 30% chance of being a critical hit, which deals 25% more damage. You can tell when it crits by the bright visual effect on the attack. Some weapons with high raw damage might be balanced with a negative affinity. So, a weapon with -20% affinity will have 20% chance on every hit to deal 25% less damage.

You might notice that some weapons have an element, but it's greyed out with parentheses around it. This means this weapon has a Hidden Element. If you take this weapon out on a hunt, the element has no effect at all, as if it wasn't there. You need a skill called "Free Elem" to awaken the element from that weapon. Alternatively, you can use the "Elementless" skill instead to boost the raw damage of the weapon.
Status Effects (Affecting Monsters)
Monster status effects build up behind the scenes. They have an initial threshold that must be reached before the status triggers. Once the status goes off and the duration passes, the threshold increases, meaning you'll have to apply more to get it to trigger again. In addition, if enough time passes without that status applying again, the status begins to decrease buildup. You'll have to keep attacking to ensure the status triggers.

Multiple different status effects can build up at the same time.

Primary Status Effects
Unlike element attacks which apply on every hit, primary status effects only apply on a percent chance. You can increase the chance with the Apothecary Mantle, or increase the status buildup itself with skills.

Poison
The set-it-and-forget-it status, and surprisingly effective on most monsters. When triggered, it deals damage over time to the monster, indicated by frothy purple bubbles around the mouth.

Paralysis
The ultimate teamwork status. When paralysis triggers, the monster gets stuck in place, unable to act for a few seconds. This is best done in multiplayer, where it's the cue for everyone to go ham on the monster and deal as much damage as possible.

Sleep
The most technical status effect of the bunch. When triggered, the monster will fall asleep, indicated by the combat music stopping. Players have a few seconds in the animation to stop themselves before accidentally waking the monster. The first attack that hits the monster will deal double damage, so high single-hit attacks like the Great Sword's True Charged Slash is appreciated here. This bonus also applies to barrel bombs that you can place. Thus, sleep is integral to the "sleep bombing" combat tactic. Monsters will naturally fall asleep if they get back to their nest when gravely wounded.

Blast
Who doesn't like explosions? When enough blast status builds up, it explodes on the part that was last hit, dealing a set amount of damage regardless of the monster's defense. Blast is great for breaking monster parts.

Elderseal
Found only on weapons with dragon element on it, this one tells the monster to chill out, especially elder dragons. The follow list shows the effects of elderseal when it triggers:
Kirin - Lightning armor removed
Teostra & Lunastra - Flame aura reduced and temporarily seals ability to use supernova
Kushala Daora - Wind barrier removed
Vaal Hazak - Effluvia charge reduced
Nergigante - Breaks black spikes
Xeno'jiiva - Rage duration reduced
All other monsters - Forced out of enraged state (see below)

Secondary Status Effects

KO
Also known as stun, KO is built up every time impact damage is dealt to a monster's head. When enough KO has been dealt, the monster falls over with yellow stars over its head, helpless.

Exhaustion
All monsters have stamina. Every time they attack, they use up some of that stamina. When they run out, they become sluggish, they stumble around, and their attacks become weak or unusable. Blunt weapons and exhaust ammo deal exhaust damage to monsters, causing them to become exhausted much faster. Monsters can restore stamina by successfully eating or completing a sleep cycle.

Tranq
While not widely realized as such, Tranq is a status effect. It's built up whenever a monster is hit by tranq bombs or ammo, and it can wear off if applied too early.

Enrage
After taking enough damage, a monster can become enraged. This makes them more aggressive, increasing their speed, attack, and sometimes defense. Enrage can alter behavior, such as preference for certain attacks, immunity or vulnerability to items, and so on. Enrage completely overrides exhaustion, though they will return to the exhausted state when enrage is over.

Mount
While not exactly thought of as a status, it builds like one. Damage done to the monster while mid-air is considered mount damage. When enough is built up, the mount status triggers and the hunter mounts the monster.

Mud
Some monsters cover themselves in mud, which protects them and alters their elemental weaknesses. Hit them with water damage (watermoss from the slinger counts) to remove the protective mud.
Status Effects (Affecting You)
The primary status effects that affect monsters can also affect you. You can also be paralyzed or poisoned, though unlike a monster you don't build a resistance to it after multiple inflictions.

Poison
When hit by a poison attack, your health bar will turn purple and leave behind red health. While poison does wear off, it can take a while depending on the source. You can tell it's about to expire if the poison icon is flashing. You can get rid of it right away by taking an antidote or herbal medicine, standing in a Cleanser Booster, or returning to the tent at camp. You can reduce or become immune to poison with the poison resistance skill.

Paralysis
When paralyzed, you'll immediately fall to the ground, helpless. If your palico is with you, use your map signal to tell your palico you're in danger, and they'll knock you out of paralysis. Other players can do the same if they're attentive enough. Otherwise, you'll have to wait for it to wear off. You can reduce or become immune to paralysis with the paralysis resistance skill.

Sleep
Unlike paralysis, with sleep you have a few seconds to position yourself before you fall to the ground. Try to distance yourself from the monster or get yourself closer to allies before you collapse. If for whatever reason you keep energy drinks on you, that will wake you before you fall over. Use your map signal for your palico, or hope the other players are willing to help. You can reduce or become immune to sleep with the sleep resistance skill. However, Sleep is rarely a threat in this game. Don't worry about it.

Blastblight
When hit by a blast attack, you may get afflicted by blastblight. You'll be covered in explosive powder. The next time your hunter is hit by an attack, you'll explode. Alternatively, if enough time passes, you explode anyway. Get rid of it by rolling a few times, eating a nulberry, the Cleanser Booster, or go into the tent at camp. You can reduce or become immune to blastblight with the blast resistance skill.

Fireblight
When hit by a fire attack, you may get afflicted by fireblight, which is a fancy way of saying your character is on fire. Your health will slowly decrease while leaving red health behind. You know the drill: stop, drop, and roll a few times to stop the fire. Rolling in water stops the fire immediately. Eating a nulberry, standing in a Cleanser Booster, or returning to the tent at camp works too. You can reduce or become immune to elemental blights with the blight resistance skill. You're also immune if you have 30 fire resistance.

Waterblight
When hit by a water attack (or you just walked into the monster mud...whoops), you may get afflicted by waterblight. Your stamina bar will turn blue and recover much slower if spent. This hits dual blade and bow users particularly hard. Wait for the duration to end naturally, eat a nulberry, stand in a Cleanser Booster, or enter the tent at camp. You can reduce or become immune to elemental blights with the blight resistance skill. You're also immune if you have 30 water resistance.

Thunderblight
When hit by a thunder attack, you may get afflicted with thunderblight. This increases the chances of becoming stunned. Wait for the duration to end naturally, eat a nulberry, stand in a Cleanser Booster, or enter the tent at camp. This can also be mitigated by having stun resistance through armor skills, or stun immunity through the Coral Orchestra palico gadget. Hint hint if you're struggling with a certain elder dragon. You can reduce or become immune to elemental blights with the blight resistance skill. You're also immune if you have 30 thunder resistance.

Iceblight
When hit by an ice attack, you may get afflicted with iceblight. This greatly increases stamina usage, which like waterblight, punishes dual blade and bow users quite hard. Wait for the duration to end naturally, eat a nulberry, stand in a Cleanser Booster, or enter the tent at camp. You can reduce or become immune to elemental blights with the blight resistance skill. You're also immune if you have 30 ice resistance.

Dragonblight
When hit with a dragon attack, you may get afflicted with dragonblight. This removes all element/status from your weapon. Wait for the duration to end naturally, eat a nulberry, stand in a Cleanser Booster, or enter the tent at camp. You can reduce or become immune to elemental blights with the blight resistance skill. You're also immune if you have 30 dragon resistance.

Stun
When hit by a monster's attack, you have a chance to be stunned. You'll stand in place with stars around your head, unable to act. Other players or your palico can hit you out of it if you use your signal. You can reduce or become immune to stun with the stun resistance skill, or with the palico's Coral Orchestra gadget.

Bleeding
When struck with a bleed attack, you'll lose health whenever you move. You can recover by consuming any meat item such as rations, well-done steak, or astera jerky. If you don't have meat, you can also recover by crouching in place for a few seconds. After you recover from bleeding, your red health will recover faster than normal for a short while.

Effluvial Buildup
If you breathe effluvium for too long, you become afflicted with effluvial buildup, which reduces your maximum health by half. This can be instantly cured by eating a nulberry, standing in a Cleanser Booster, or returning to the tent at camp. It will also clear if you leave the effluvial area for a short while. You can prevent effluvial buildup from standard effluvium by wearing a mantle, as the mask covers your face. Elder dragon effluvium is too strong for this, however.
Forging Weapons


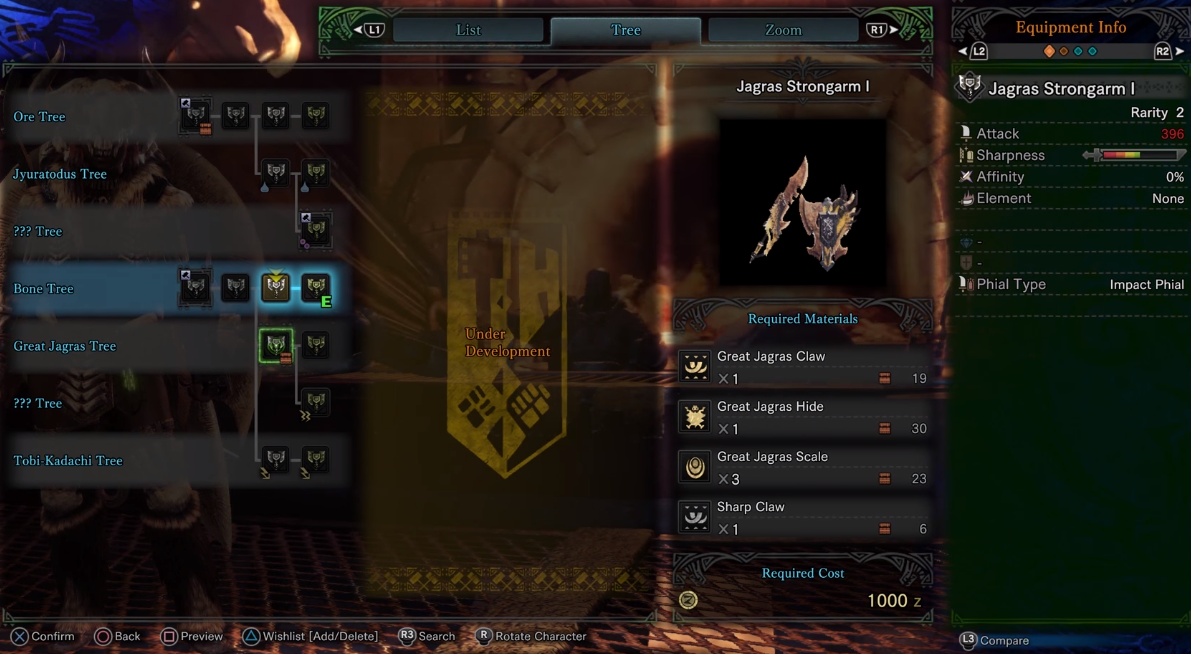
Now that you understand weapons, elements, and status, let's go over forging weapons and upgrading them. Click the image below if you need to look closer.


When you run up to the Smithy and select Forge Equipment, then Weapons, this menu will pop up. If it doesn't, look at the top of the screen and press whatever button prompt there is to see the Tree tab. This is a good way to visualize the upgrade paths your weapons can take. You start with the Ore tree and Bone tree on the far left. As you use materials and zenny, the upgrade trees will "branch" and options will open up, offering a wider selection of possible paths for your weapon to be upgraded to.

When the middle of the screen says "Under Development," that means that you cannot upgrade further past that point in the tree until you progress further in the story. The game will tell you when you've unlocked them.

You may see icons all over the weapons in the tree. In the top left can be a small hammer icon. This indicates that the weapon can be created directly with base materials. This applies to the basic ore and bone tree for each weapon, but also can happen to a few weapons further up the tree to skip a few steps and allow you to create a stronger weapon without having to upgrade first.

The bottom left can contain a variety of icons; you might recognize them as the icons of the elemental blights or status effects from the above section. This means that weapon deals that form of elemental or status damage in addition to its base damage. So if you see the thunderblight icon under a weapon, that weapon deals raw and thunder damage. If nothing shows in the bottom left corner, it only deals raw damage.

If the bottom right of the icon has a red box, that means you have a copy of that weapon in your equipment box already. If it's a green E, then that means you have that weapon currently equipped.

If the top right of the icon has a pin on it, that means you have it on your wishlist, which you can view at any time in the menu. You will be automatically notified if you obtain materials related to creating this equipment.

After you've upgrade a weapon, it will stay that way. However, if you decide against it, you can revert weapons to an earlier state. You'll regain the materials used to make the upgrade, but the money used will be lost. A few weapons with a solid boundary cannot be reverted to an earlier upgrade, but the game will warn you if this happens.

-v- The few paragraphs below are advanced level, feel free to skip and come back if you're just beginning the game. -v-

When a weapon is at its maximum upgrade level, don't think that's the end just yet. Weapons can be upgraded in a method called augmentation. When completing tempered monster investigations, you may rarely get streamstones as rewards. Depending on the type and quality of the streamstone, you can augment your weapon with one of five options:

+5 True Attack Value: As this is true attack, this scales up depending on your weapon
+10% Affinity
+10 Defense

Decoration Slot: The first upgrade adds a level 1 slot. Choosing this a second time upgrades it to a level 2 slot. Choosing it a third time makes it a level 3 slot.
Health Regeneration: As you attack a monster, sometimes you will regain health.

You might think that rarity 8 weapons are more useful than rarity 7 or rarity 6 weapons, but there is a balancing factor in weapon augmentation. A rarity 8 weapon only has one augmentation slot, and requires the rarest streamstone to upgrade. Rarity 7 weapons have two augmentation slots. Rarity 6 weapons have three augmentation slots.

You can choose the same upgrade multiple times, and the effects will stack. If you so choose, you can upgrade a rarity 6 weapon with 3 affinity augments for +30% total affinity, for example.

This video by gaijin hunter covers the augment system very well.
This Armor Isn't Just for Protection
When at the forge, select Forge Equipment, then Forge Armor.

The central form of character progression is your armor. It's not just about protecting you, however. There are four major things to consider when forging armor:

1. Can I make it?
Armor pieces require materials to make. Take a look at the required materials to see what you need. You might have to hunt a monster several times before you get the material. Some pieces require parts of a different monster, too. Some armor sets don't require monster parts at all.

2. Does it have a skill I want?
Armor pieces grant skills, which grant you various bonuses. It might make you resistant to status effects, or make you gather materials better, it might boost attack, or mount monsters easier. Similar skills can stack, up to a point. You can specialize or generalize as you please.

3. Does it have defenses and elemental resistances I want?
This is a lesser consideration compared to skills. Defense can always be upgraded, and elemental weaknesses can be mitigated in the canteen somewhat. However, it is something to be mindful of. If your armor set is very weak to fire, you should be cautious around firebreathing monsters.

4. Do I like the way it looks?
While some players don't care and are fine hunting in a clown suit, you have to admit you'll hunt a bit better if you look cool doing it. Embrace the fashion hunter. As you progress through the game, you'll unlock armor dye options for further customization, or even "Layered Armor Sets" to completely cover up armor pieces with a different appearance.

Keep in mind it's not necessary to make an entire armor set of the same monster. You can if you want, but you don't have to. In fact, many people mix and match different pieces to get the armor skills and looks they want.

Click the image below if you need to see a bigger version.


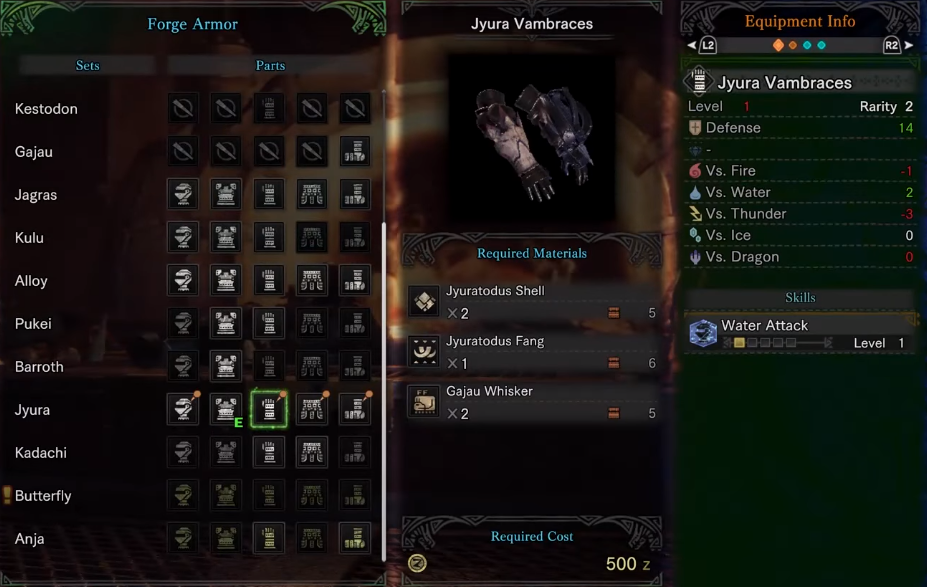
Let's explain the UI here. On the left we have all the available armor sets you have unlocked. On the far left is the name of the set, and to the right of the name is the set itself, in the order of the headpiece, chestpiece, arms, belt, and legs. If an icon is bright, that means you have the materials to make that piece of equipment. If it's dark, you do not have the materials to make it. The slashed circle icon means that item does not exist. Not all equipment sets are a set of 5; there are a few sets of 3, 2, or even 1 item. You can see most of the Jyrua set has orange pins in the top right. This indicated the player has pinned those pieces for their wishlist. The Jyura chestpiece has a green E, indicating that it is currently equipped on the player.

In the middle of the screen is the info for the currently selected piece to craft, in this case the Jyura Vambraces. You can see the required materials and quantities in the center: 2 Jyuratodus Shells, 1 Jyuratodus Fang, and 2 Gajau Whiskers. To the right of those materials you can see a small red box icon with some numbers. Those indicate how many of those items are currently in your item box. This means that the player already has more than enough materials to craft the vambraces. At the very bottom you see it will also cost 500 zenny.

At the right you'll see the statistics of the vambraces. All crafted armor starts at level 1. It will level up when you upgrade the armor. It's a rarity 2 equipment, being from an early-game monster. The vambraces give 14 Defense, -1 fire resistance, 2 water resistance, -3 thunder resistance, 0 ice resistance, and 0 dragon resistance. You'll notice that some of these numbers are red, green, or white. This is a comparison to the player's currently-equipped vambraces. As in, the Jyura vambraces offers more raw defense, less fire resistance, more water resistance, and so on.

Finally, we have the skills that the equipment provides. In this case, the vambraces give one level in Water Attack, which increases damage dealt by a water-element weapon. Many other skills will be less straightforward with their naming scheme, so check the button prompts to read the skill description to see what each skill does before committing to a piece of equipment. Notice there are 5 boxes in the Water Attack skill; one yellow, four blank. That indicates that the maximum Water Attack skill you can have is 5.

Upgrading Armor

Now, let's say you've made your armor and you like it. Great! However, it can only last you so long before you're getting crushed by monster attacks again. You need to upgrade that armor so the defense is up to par. Select Upgrade Equipment in the main Smithy menu, and select the armor piece you want to upgrade. If you can't find it, try looking for the button prompt to sort your equipment box.


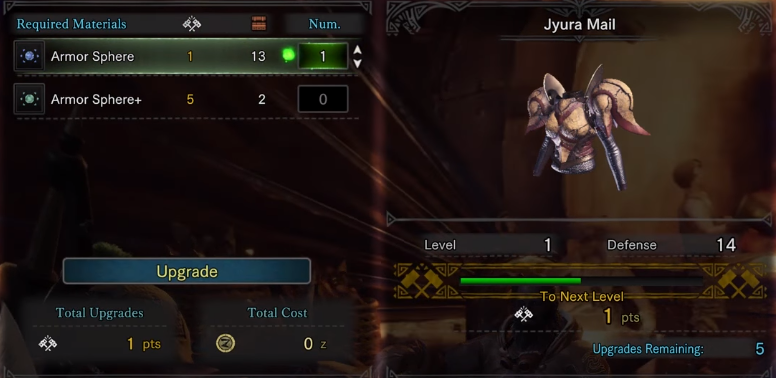
Now that you've selected the armor you want upgraded, you'll have to upgrade it with armor spheres. Armor upgrades use a point-based system. Use enough points to reach a certain threshold, and the armor will increase a level and become upgraded. In the top left, the crossed hammer icon shows how many points a specific armor sphere grants, and the red box displays how many armor spheres the player owns. Thus, in this example image, basic Armor Spheres only grant one upgrade point, and the player has 13 of them. Armor Sphere+ grants 5 upgrade points, but the player only has 2 of them. The "Num." column is how many armor spheres the player using in the armor. As the player puts more in, the green bar on the right fills up. Each time the bar completes, an upgrade can be done. Select the Upgrade button to pay the armor sphere and Zenny cost to upgrade your armor.

Look at the bottom right of the screen to see the remaining upgrades available to the armor. That's the current maximum, but don't consider that the maximum limit. Several times in the story, the armor upgrade limit will be raised higher. You are free to craft new armor or upgrade your old armor as you see fit.

Like most things in Monster Hunter, this may seem overwhelming at first, but you'll get the hang of it after a while.

Once you reach high rank, you'll find that armor sets are a little more complex. There are two armor sets per monster instead of one: The alpha α set and the beta β set. These sets will have a slightly different appearance, but the main difference is how their armor skills are set up.

The alpha set is considered a more "complete" set, with full armor skills set in. This is more convenient early on in high rank, before you have customization options with decorations. What are decorations, you ask? We'll get to that in the next section.

The beta set is considered an "incomplete" set, with decoration slots for you to customize to your liking. Most end-game players make beta equipment sets so they are not limited to the preset skills of the alpha armor.

At the extreme end-game, you’ll encounter arch-tempered monsters which offer a third armor set type, gamma γ sets. Very few monsters will have a set like this, and they’re locked behind time-limited event quests. These monsters are very difficult to take down, but the armor boasts a large suite of skills with decoration slots to add even more.

Once armor has been upgraded to its maximum level that's not the end. Just like weapons, armor can be augmented. This gives it another few steps of armor beyond its normal limits. This requires streamstones, which are rewards from tempered investigations. See the section dedicated to it below.
Decorations
The complexity never ends, does it? At the end of high rank quests, you may receive decorations, which are gems that can be put into slots in your weapons and armor. Each decoration provides you with skill points, just like armor does. Thus, you can adjust and improve armor sets to your liking.

However, decorations need to fit. Each decoration has a different size, depending on the skill. The more valuable the skill, the larger it is.

John
Level 1 Decoration
Gitte
Level 2 Decoration
Sussie
Level 3 Decoration

Decorations can only fit in a slot that's big enough for it. So, you can't use a level 3 decoration if your equipment has no level 3 slots. However, smaller decorations can fit into larger slots. Level 1 decorations can fit into anything. Keep slot size in mind when crafting weapons and armor. A weapon might look more powerful than another, but if you're hurting for level 3 decoration slots it might be handy to take the weaker weapon that offers two of them.

You can get more decorations in several ways. The Elder Melder can meld basic ones for you directly. She can also meld random ones for you. One of the most common ways to farm decorations are quest rewards from tempered investigations late in the game.
Your Best Friend, the Palico
At the beginning of the game you may have noticed after you made your character, you also made a cat, though in-world that race is called a felyne. That is your Palico, a hunting buddy that will help you out in the field. They wield weapons and armor just as you do, albeit in a smaller scale. While they do take damage in combat, it just takes them out of commission for a while. They do not need consumables for healing and are effectively invincible; you don't need to worry about its well-being.

At the smithy, choose "Forge Palico Equipment" to make weapons and armor for your Palico. It's incredibly simple to do so, as there are no upgrading or skills to worry about. There's only 3 options per set: a weapon, a headpiece, and a chestpiece. Each equipment only requires one to two pieces of common material to make. Given the effective invincibility of your palico, hunters often choose armor based on looks rather than stats.

Indeed, armor stats don't mean as much, because although your hunter doesn't have any inherent stats, your Palico does. It gains experience after each quest, and its attack and defense increase each time it gains a level. Your Palico gets progressively stronger as you play.

In addition to weapons and armor, your Palico can equip a Gadget to help support you. It starts out not very good at using it, but as it uses the gadget more, it gains proficiency and the gadget gets more useful. It maximizes usefulness at proficiency level 10.


Your Palico starts with the Vigorwasp Spray gadget, which allows it to summon a vigorwasp to heal you. At level 5, you get the ability to manually call for a vigorwasp in your item bar. At level 10 proficiency, you can call for a Vigorwasp Station, which plants a vigorwasp down on the ground for you to pick up whenever you need it.


Once you unlock all camp sites in the Ancient Forest and track the Bugtrapper grimalkynes, they give your Palico the Flashfly Cage gadget. Your palico will place a cage of flashflies down, which will blind monsters like a flashpod. At level 5, you get the ability to manually call for the flashfly cage, and sometimes your palico will place a weak shock trap. At level 10, you can manually call for a shock trap placement. As a bonus, Bugtrappers will teach your palico to how to ride small Jagras as a mount.

Find the Protectors in the Wildspire Waste by jumping down the small hole in the northeast part of the map, near the anthills. They'll ask you to find and capture their friends by using the capture net. Do so, and they provide the Shieldspire. This turns your palico into a tank, allowing it to draw the monster's attention while you get to focus on attacking, sharpening, healing, and so on. Its defensive and attention-drawing capabilities improve with level. The Protectors teach your Palico how to ride Kestodons.

Head to Area 10 in the Coral Highlands to find the Troupers riding a bunch of Shamos. Defeat them all and they will retreat. You'll find their hideout behind a waterfall in the northeast corner of Area 11. They will give you a quest to hunt two Tzitzi-Ya-Kus. Complete the quest and return for the Coral Orchestra. This is a mini-Hunting Horn that will boost your attack, defense, and status resistances. At higher levels, your Palico will be able to use the instruments more often, and you can manually call for songs to be played. This is highly recommended for any hunt you're struggling with, as buffs such as stun immunity are invaluable for ensuring victory. In addition, your Palico earns the ability to ride Shamos.

Once you've unlocked the lower portions of the Rotten Vale, put some raw meat in your inventory, load up an expedition and search for a Legiana corpse. It can appear in different areas of the map, but if you don't see one, try leaving and starting a new expedition. If the corpse is there, wait for an Odogaron to come by and pick it up and take it to its nest. Head to area 13 to find a Plunderer grimalkyne run away from you. Place the raw meat on the floor and back away until the Plunderers surround the meat. Speak to them to get the Plunderblade. This allows your palico to earn you more monster materials than you'd normally obtain from a hunt. More proficiency gives you more opportunities to get materials. This is fantastic for farming for armor and weapon sets. Your also Palico learns how to ride Girros.

In order to unlock the last gadget, you must first unlock all previous gadgets. The Lynian Researcher in Astera will ask you to find 10 Gajalaka doodles. They will be found near Gajalakas, the screaming red furry things found in high rank Ancient Forest, Wildspire Waste, Coral Highlands, and Rotten Vale. If you have trouble finding them, try filtering for small monsters on the map. Once you have all 10, the Researcher asks you to go to Elder's Recess at night. Sneak into the Gajalaka settlement undetected to receive the Meowlotov Cocktail. This will be fairly easy with the Ghillie Mantle. With the Meowlotov, your Palico will throw explosives at monsters, breaking parts easily. If you place bombs next to a sleeping monster, your Palico will do the same. Finally, your Palico learns to ride Gastodons.

Your palico will fight alongside you on every quest, with these exceptions:
  • Arena quests
  • There are 3 or more hunters in the quest
  • You put your palico on standby when in your home
Max Gains at the Canteen

A hunter doesn’t hunt very well on an empty stomach! Eat at the canteen before each hunt to enhance your stats and grant yourself buffs and unique effects. The system behind the canteen is rather complex. Different ingredients for your meal grant different effects. There is so much to cover, and the menus are so visual, that it’s far easier to learn from a video explanation. A text explanation would be a guide all its own!

Take your pick from these sources:

https://youtu.be/f8rC-f1BJhE?list=WL&t=505
https://www.youtube.com/watch?v=rS0uq7ODhH8
Now, it’s a lot of information to take in, but do you have to memorize all this? No, not really. You can go through the entire game just fine using the default meals the chef offers. The Chef’s Choice Platter is the go-to for the lazy who don’t want to bother too much and want the health and stamina to-go. The Meat Platter’s great for those who want a quicker hunt and aren’t worried about getting hit, or will supply their own max HP through other means. The Fish Platter and Veggie Platter works well for those who prefer to be on the defensive.

This isn't to say that you won't gain an edge by knowing the finer details, but it takes time and dedication to get it right. Feel free to jump into it if you feel up to diving into the nitty-gritty details of the meal system.

You can greatly expand your canteen buffs by getting more ingredients for the chef. Ingredients are obtained from all sorts of sources, just from playing the game: completing sidequests, killing certain monsters, looting rare foraging locations, and so on.

Check the fextralife graph[monsterhunterworld.wiki.fextralife.com] and the steam guide below to help you find more ingredients.
https://gtm.steamproxy.vip/sharedfiles/filedetails/?id=1472081706
Standard Hunting Procedure
At camp, you can do several things. You can go into the tent to retrieve items out of your storage, you can change your equipment, you can change your palico's equipment. If you forgot to eat, you can grab food at the mini-canteen.

Before you leave camp, be sure to visit the blue box and take the free items inside. If you're in a multiplayer quest, be courteous and only take one of each item, as the contents are shared. If you're solo and planning to use a gun or bow sometime later in your playthrough, go ahead and grab the ammo in the box, too. It'll go to waste otherwise.

If an item from the blue box says (Supply Item) in the description, such as First-aid Meds, EZ Shock Trap, or EZ Tranq, those items will be removed from your inventory when the quest ends. Therefore, it's advisable to use those items first before you use your own supply.

While running around scouting, go ahead and be a kleptomaniac. Grab everything you can, as pretty much everything has a use. Over time you'll figure out what items are more useful than others.

Items you can gather and keep have a green icon. These will make up the majority of what you find out in the field. As you gather items you might notice you're also automatically crafting items such as potions. That's a convenience feature that you can enable or disable per item in the options menu.

Slinger ammo has a blue icon. You can only have one type of ammo equipped to the slinger, so if you pick up new ammo you'll drop the old ammo to the ground. Wild slinger ammo is very plentiful, and you don't keep it after quests, so don't worry about it too much. You keep any slinger ammo you craft, such as flash pods and dung pods. See the slinger section further below in the guide for more detailed info about your slinger's abilities and the ammo you can use.

Instant-use objects and endemic life have a reddish-brown icon. These are used immediately to incur an effect. The vitalily and the vigorwasp can both be hit to restore health. The wiggly litchi can be eaten to halve stamina usage for a while. The paratoad can emit a paralyzing toxin that can affect monsters and hunters alike. Keep an eye out, and there's plenty more out there to discover.

Monster tracks and materials have a yellowish-orange icon. Gather these to increase your tracking level and receive research points. Very rarely, you might even pick up a piece of the monster itself from the tracks.

Look up! Many hunters don't realize there are often things to interact with above them. Conspicuously large rocks or crystals can be hit with the slinger to drop on the monster's head for massive damage and an instant knockover. Wedge Beetles are bright yellow insects that are placed all over the map overhead. They offer quick ways to dodge attacks, mount monsters, or travel faster around the map.

Look down! As you travel around, you might find some long drops and sheer cliffs below. Never fear! Monster Hunter has no such thing as fall damage! Falling rocks and crystals might damage monsters, but falling humans is a-ok! You can fall hundreds of feet without a care in the world. Your kneecaps are made of armorspheres!

If you’re hunting in multiplayer, take note of what weapons the other players are using. If there is a hammer or hunting horn user, let them get priority on attacking the head, so they can KO the monster. Bladed weapons are expected to go for the tail for the double benefit of removing the threat of tail attacks and getting the tail carve. Some weapon attacks disrupt other players by tripping them or knocking them away. Please be courteous and refrain from using those attacks unless you are at a safe distance from each other.

While flashbombs are useful for knocking flying monsters out of the sky, be mindful when players mount the monster in multiplayer. Many winged monsters start to fly when mounted, and a flashbomb will immediately cancel the mounting attempt, wasting the effort.

If you are fighting the monster and notice the monster is suddenly slowly falling over and the music has stopped, stop attacking! Someone in your party has caused the monster to fall asleep. The first attack against a sleeping monster will wake it up, but will also deal bonus damage. It’s common courtesy to put down explosive barrels to wake up the monster, but if you don’t have any, just let the person with the biggest single-hit attack (hint hint, it’s usually the Greatsword user) cause the rude awakening.

On the other hand, if the hunt is coming to a close, the monster may start limping away and you might find it trying to sleep at its nest to recover energy. The same sleep etiquette applies here, though you can now also capture the monster instead of killing it.
Capturing Monsters
Capturing a monster has three requirements:

1. Monster is at low health.
Easy enough. Beat down the monster, but not enough until it's dead. If the monster starts limping, it's likely capturable. If you have level 3 scoutfly tracking, the monster will start to show skulls flying out of its icon in the map and minimap. This confirms that the monster is capturable.

2. Monster is in a shock trap or pitfall trap.
If you're feeling confident, you can place the trap mid-combat and hope the monster gets caught in it. You can otherwise wait for the monster to reach its nest and capture it there. It doesn't make a difference whether its in a shock trap or pitfall trap, but shock traps are more common since they're easier to make and deploy faster.

3. Monster is afflicted with tranq status.
Your hunter throws tranq bombs straight at the ground, so get right next to the monster and start throwing. Two bombs is enough to capture a monster. If you're using a bowgun, you can also use tranq ammo.

If all three of these conditions are met at the same time, the monster will be captured. Take note, though, that the three conditions don't necessarily have to happen in that order. You can pre-tranq the monster before setting the trap, and it will still capture. If you've tranquilized the monster twice and they're in a trap, their health may not be low enough. Smack them with your weapon quickly and you may have a chance to lower their health enough to capture them before the trap runs out.

Additional notes about capturing:
  • If the quest provided EZ traps or EZ tranqs in the blue box at camp, use those instead to preserve your own supply. If you mess up, you can still use your own.
  • The in-game capture tutorial mentions that tranq bombs should be thrown at the monster's face. That is not explicitly necessary. As long as the tranq hits some part of the monster's body, it's fine.
  • Elder dragons are immune to traps and cannot be captured.
https://www.youtube.com/watch?v=nbP_wUDrQpM
Carting (Losing All Health in a Hunt)
So you went down to 0 HP and got carted. Don't worry about it; it happens to everyone. The important thing is that you learned from it. So, you're back at camp with base HP and Stamina, and maybe without most of your healing items. What now?

First, sit down at the mini-canteen and try to eat another meal. You won't be able to eat the same meal as you did for the hunt initially. Choose the next best thing you can find. If it hasn't been long enough into the hunt for you to eat yet, that's fine. Enough time might pass after the other steps. You don't necessarily HAVE to eat for a successful hunt if you can supply yourself with extra HP and stamina via other means.

Second, head back into the tent and restock all of your items. If you have an item loadout prepared, great! That saves a lot of time! If not, you can try the restock button, but that won't work on items you've used up entirely. You'll have to pick those up manually. Before you leave the tent, reflect a moment. Can you change tactics? Maybe change to a different weapon or armor better suited to the situation.

Third, make sure you're confident with your current max health and stamina. Leave the tent if you need to double-check it. It will be on the status on the right when you open the menu. Standard, no-meal health and stamina is 100 for both. Standard Chef's Choice health and stamina is 150 for both.

If you need more max health, try eating Nutrients, Mega Nutrients, Max Potion, Ancient Potion, or a Mandragora if you have 3 ranks in the Mushroomancer skill.
If you need more max stamina, try looking in the blue supply box for rations. Eat those first. If not available, try a Well-Done Steak. If you don't have one, you can kill any herbivore in the area, carve it, and cook one up with your BBQ Spit. Don't use an Ancient Potion for stamina unless you're also using it to get max health.

If you’re down to 1 cart left in the quest before the quest is failed, you may want to consider backing out of the quest. There’s no shame in retreat! You can always try again later. When you go into the options, you’ll find Abandon Quest, and Return from Quest. This may be confusing at first.

Abandon Quest means that you are reverting back to a state as if you had not gone out on the quest at all. You will lose all items you found in the quest, including items picked up and carved, but you also get back all the items you used up, including potions, pills, nutrients, etc. Abandon Quest is like a reset button. This can be useful if you used up a lot of valuable consumables for a quest and have nothing to show for it.

Return from Quest means that you come back from the quest as you are now. Items you used during the quest are lost, but you get to keep anything you’ve found during the quest. This may be useful if you didn’t use a lot of consumables or you found some rare materials out in the field.
Monster Behavior
The developers worked tirelessly to make the game as detailed as possible, in ways that most players would never notice. They wanted Monster Hunter World to feel like a living, breathing ecoystem. For example, the Pukei-Pukei's poison attacks have different properties depending on what nuts and berries it had most recently snacked on in the map.

Moving away from minutae, let's focus on monster behavior as it pertains to gameplay. When out on a quest, keep in mind what monster you're hunting. Particular monsters prefer different locales, and stick to those locations. You won't find a Jagras hiding high among the treetops, for example. If you learn where the monster patrols, eats, and sleeps, you'll have a much easier time finding them at the beginning of the hunt without needing to rely on scoutflies.

Some monsters are aggressive, some are passive. If a monster sees you, its reaction can give you some insight on its temperament. It might attack you right away, seeing you as a meal. It might ignore you, considering you not a threat. Once you attack, lesser monsters might run away, while larger monsters (most quest targets) will fight back.

Pay attention to the monster's body during the fight. It has a windup or tell before each attack. If it raises up a claw, it's likely to swipe with it. If it raises its tail, it's likely about to slam it down. Over time, you'll be able to distinguish exactly what a monster's about to do. Generally, the more dangerous an attack is, the longer windup will be.

With time, you will be able to read the monster's body language and learn the proper response for any given attack - the places where it is safe or dangerous to stand, whether it is blockable or dodgeable, how long the attacks last, and safe times/locations to attack the monster. For two examples, if Rathalos roars while standing on the ground, it will often follow up with jumping backward while shooting a fireball where it stood. When enraged, Rathian will charge forward, stop, turn, and charge again multiple times in a row.

Keep in mind that monsters will overall become faster and more aggressive when you reach High Rank, and again in Master Rank. What was a safe window before might not be so after. Once you get used to higher ranks, Low Rank monsters will seem sluggish and lethargic in comparison.

With enough experience and time, you'll begin to read monsters on intuition without even thinking about it, and be able to somewhat reliably predict what moves a monster will do even before they finish the previous attack.

Several times during the hunt, a monster will leave the area and move to a new location. Simply follow it and continue the fight. If you get lost, the scoutflies should be able to guide you. Sometimes, you'll be able to interrupt a monster before they leave, such as with a stagger, mount, or trap. Just be wary of fighting in tight spaces that limit your maneuverability. If you're fighting in a bad location, or there are multiple monsters fighting in an area, you can force a monster to relocate immediately by firing a dung pod at them.

When monsters are close together in combat, a turf war might occur. In most cases, the more dominant monster will win the turf war and deal a massive amount of damage. However, in some rare cases the lesser monster may win, especially if it is enraged while the dominant monster is weakened and exhausted. Some monsters are on more equal footing and the battle may go either way. You can use turf wars to your advantage by intentionally leading monsters close together.

After taking enough damage during a hunt, a monster will become enraged. They usually announce this with a roar, then have some other indicator such as smoke or flames coming out of their body. They attack faster and deal more damage. Fight more cautiously when a monster is enraged. If an enraged monster is focusing on you, it will follow you relentlessly. This can be dangerous, but can be used to your advantage. You can lead it to another monster to initiate a turf war, or lead it to an area with environmental hazards to knock it down.

On the other hand, monsters can also become exhausted. Monsters have stamina, which depletes by using attacks and taking blunt damage. If a monster is exhausted, they move and attack slower, and special attacks may fail. This is a great opportunity to deal damage. An exhausted monster will try to eat food, or bite at a hunter, to restore stamina.

When a monster is at low enough health, they can be captured. The next time they leave the area, they will limp and move to their nest area to go to sleep. While sleeping, the next attack against the monster will deal double damage. People often place barrel bombs next to the monster to provide a burst of damage in addition to the wakeup. Otherwise, the hunter is free to use tranq bombs and a trap for an easy capture.

Be wary of elder dragons after they return to their nest. They cannot be captured as they are immune to traps. They are more dangerous when fought at their nests, be it from their expanded moveset or from the nest itself. It's recommended to kill an elder dragon before they reach their nest if possible. Monsters stop retreating if they get staggered. One easy method to do so is by shooting them with crystalburst slinger ammo as they limp away.
Mounting the Monster
Most attacks dealt to a monster while a hunter is midair builds up an invisible "mount" meter. Once it fills up, the hunter that dealt the last midair attack will automatically climb onto the monster, called "mounting."

There are several advantages to mounting a monster. It acts as a soft form of crowd control: the monster's attention is focused on getting the hunter off its back instead of attacking. The mounting hunter can focus on a monster's head, back, or tail for part breaks. Successfully mounting a monster will topple it, granting a huge window for the hunting party to attack weak spots.

Some weapons have jumping attacks built in to the moveset, such as the insect glaive and the lance. Other weapons will have to use the environment to mount the monster. Keep an eye out for slopes, cliffs, or conspicuous mushrooms to jump off of and make a leaping attack. If you look up, you can make use of wedge beetles to zip up into the air and make an attack from above.

https://www.youtube.com/watch?v=rS47Gu4A0eI
Monsters have a low mounting threshold initially, so you should be able to mount quickly off the first few attacks. Subsequent mounts will take more hits, however.

So, you've mounted the monster. Now what? If it's your first few times doing so, the game will give you a bunch of prompts in the middle of the screen. Just do those prompts and you'll succeed. After a few hunts, those prompts will go away and you'll be on your own when mounting. Oh, no! Except... mounting is incredibly simple. Forget everything about the "hold on" button, you don't need it.

Just spam the attack button. Every time a monster is about to attempt to throw you off, just jump to a different part of the monster. Repeat. This works for every single monster in the game, up to and including tempered elder dragons.

Okay, some clarification. How do you know when a monster is about to throw you off? How do you know when you're about to do your finisher, so you can specifically hit their head, or tail? Pay attention to your minimap. It will have a massive white border. It will flash yellow every time you stab the monster. The minimap will glow orange/red when the monster is about to try to throw you off. That's your cue to move to a different body part. The rest of the screen will turn red too, but that's harder to notice in volcanic areas when the entire screen is red to begin with. Focus on the minimap. As you deal more damage, the white border will progressively turn black. When it's mostly black, you're close to doing your finisher. Jump to your desired body part, assuming you didn't just jump away from it to dodge, then attack away.

Congratulations, you are now a Mounting Master!

You might notice sometimes that the monster will fall over even if you didn't do your finisher. There are several possibilities for this. Other hunters, or your palico, might have done enough damage to the monster to stagger it, causing it to fall over, interrupting your mount. Same goes if they gave it paralysis or sleep. The monster might have even staggered itself in its attempts to knock you off by hitting a wall or obstacle. Best of all, if you mounted near a helpful grimalkyne, they will automatically pull the monster down in a net, keeping the monster down longer than your successful mount would have done anyway.
Your Post-Hunt Routine in Astera
Immediately as you load in after a hunt, you'll get updates on things that may need your attention on the right side of your screen. It will tell you things such as when you have enough items to craft something in your wishlist, when your farm is full, when the Tailrider Safari has returned, when the Argosy is in town, and so on. Take note and adjust your route as necessary.

In many ways, your post-hunt routine is just your pre-hunt preparation for the next quest or expedition. This checklist can help you remember if you're missing anything between hunts, but most of the list can be skipped if you're in a rush. If you are unfamiliar with something in the list, continue on and it will unlock later on in the story.
  • Check the Resource Center: turn in and accept new bounties, complete any available deliveries, check for any interesting investigations that may have appeared.
  • Speak to Ecological Research to turn in research points.
  • Check Botanical Research (the farm) and retrieve harvested items from the box.
  • Speak to the Elder Melder to create new decorations or hunting supplies.
  • Check the Argosy if it's in town to get items and resources.
  • Pet Poogie, maybe carry it around and see what it digs up.
  • Go into your room to and collect and dispatch the Tailrider Safari.
  • Go to the armory, create new weapons/armor, or upgrade existing equipment.
  • Speak to anyone with something above their head indicating they have something to say. This is sometimes tied to main story progression, and sometimes involves optional quests that give you benefits upon completion.
  • Every once in a while, remember to travel to the Research Base and check if there are any people to talk to for additional quests.
  • At some point in the game, you'll unlock special assignments. These are extra content that are unrelated to the Elder Crossing main story. You can determine a special assignment by a blue exclamation point over a person's head rather than the usual yellow one.
  • Go to the quest board or your handler and choose a quest.
  • While the quest is loading, go to the item box and change items and equipment appropriate to the quest you've just chosen. Use item sets and equipment sets to expedite the process.
  • If the quest is still loading, go to the canteen and choose a meal appropriate for the quest.
  • Ready up and embark on the quest. If you haven't eaten, you can sit at the mini-canteen at any campsite.

Expeditions
If at any time you want to go out into the field to gather materials or hunt monsters without embarking on a quest, you can do so by leaving town and entering an expedition. You can also start an expedition directly from the map while you're in town. While on an expedition, you have no time limits or cart limits to worry about.

Consider doing expeditions from time to time. You get requests from the researchers out in the field to capture small animals or fish up a particular fish. These lead to rewards such as canteen ingredients.

In the postgame, you can also do expeditions to pick up tempered monster tracks to unlock tempered investigations.
Your Many Gadgets and Mantles - Part 1
Gadgets and Mantles are extra pieces of equipment you can use during a hunt to give you extra utility or an edge in combat. When using one, it'll last for a set period of time before it runs out, then it will need to recharge before it can be used again. They have infinite uses, thankfully. At first, you can only take one with you at a time, but once you get far enough in the main story, you will unlock the ability to take two.

Boosters
A Booster is a stake you place in the ground. It will shoot out particle effects that grant a benefit to those who stand in its area.

Health Booster
Duration: 60 Seconds
Recharge: 180 Seconds
Effect: Any hunters and palicoes standing in the area of effect will restore health at a reasonably fast rate. Monsters are not healed by this effect.
Comment: Great to use early on to save on potions, and fantastic for cooperative teamwork in multiplayer. Be wary of too many players bunching up together at once; the monster will attack the area, denying you the heal.

Cleanser Booster
Duration: 60 Seconds
Recharge: 180 Seconds
Effect: Any hunters and palicoes standing in the area of effect will have all negative status effects removed.
Unlock: Complete the optional quest "On Nightmare's Wings".

Affinity Booster
Duration: 60
Recharge: 180
Effect: Increases the affinity of hunters and palicoes that enter the area of effect. The effect persists for a minute after leaving the cloud as well.
Unlock: Complete all quests in the Research Base, then complete the optional quest "RRRRRRumble in the Waste!"

Mantles
Mantles are an article of clothing you throw on yourself that only affect yourself. Most last for a set period of time, but some lose their effects earlier than their stated duration if broken. A mantle won't start recharging until you put it away, so if you notice your mantle's unique visual has worn off, remove it. You'll have to wait the full recharge time before using a mantle again, even if you put it away before using the full duration. As a bonus, they prevent effluvial buildup, but not from elder dragons.

Ghillie Mantle
Duration: 120 Seconds
Recharge: 300 Seconds
Effect: Temporarily conceals you from monsters, making it easier to escape, use consumables, sharpen, reload, etc. If you attack or take any damage, the effect expires immediately.
Unlock: Unlock the Botanist Research Center. This is done during the story of the game, and will be the first mantle you receive.


Glider Mantle
Duration: 180 Seconds
Recharge: 210 Seconds
Effect: Jumps last longer, which makes it easier to mount monsters. It also allows you to ride air currents in the the Coral Highlands as shortcuts.
Unlock: Complete your first assignment in the Coral Highlands.
Comment: You cannot ride up tornadoes with the Glider Mantle.


Waterproof Mantle
Duration: 180 Seconds
Recharge: 210 Seconds
Effect: Reduces water damage, nullifies waterblight, reduces mobility restrictions in muck and deep water.
Unlock: Complete the "Armory R&D: Waterproofing" delivery. Requires 3 Jyuratodus Scale+ and 1 Jyuratodus Fin+.


Iceproof Mantle
Duration: 180 Seconds
Recharge: 210 Seconds
Effect: Reduces ice damage and nullifies iceblight.
Unlock: Complete the "Armory R&D: Weatherizing" delivery. Requires 3 Paolumu Pelt+ and 1 Paolumu Wing.


Thunderproof Mantle
Duration: 180 Seconds
Recharge: 210 Seconds
Effect: Reduces thunder damage and nullifies thunderblight and paralysis.
Unlock: Complete the 5-Star quest "Gone in a Flash," which is unlocked after completing a series of capture quests in Astera.


Fireproof Mantle
Duration: 180 Seconds
Recharge: 210 Seconds
Effect: Reduces fire damage, nullifies fireblight and blastblight, and prevents damage from hot environments.
Unlock: Complete the optional quest "A Fiery Convergence".


Bandit Mantle
Duration: 180 Seconds
Recharge: 210 Seconds
Effect: Causes monsters to drop items onto the ground when you attack them. These items glow gold and have no use other than for sale to gain zenny.
Unlock: Complete the optional quest "Redefining the Power Couple".
Comment: One of the best ways to get money in the game. Feel free to bully your favorite low-rank monster with this mantle equipped for lods of emone!


Vitality Mantle
Duration: 120 Seconds
Recharge: 360 Seconds
Effect: Negates a set amount of damage before expiring, making you invulnerable while active. However, status effects, knockbacks, tremors, winds, and roars still apply.
Unlock: Complete the Low Rank optional quest "Into the Bowels of the Vale".
Comment: This is a great mantle if you have no other mantles in mind.


Challenger Mantle
Duration: 180 Seconds
Recharge: 300 Seconds
Effect: Enrages all monsters that see you. Monsters target you more often. Effect expires if you take damage.
Unlock: Complete the quest "The Red and Blue Crew".


Apothecary Mantle
Duration: 60 Seconds
Recharge: 210 Seconds
Effect: Increases probability of triggering status buildup when attacking with weapons that inflict status ailments.
Unlock: Fully research 10 monsters, then complete the quest "A Portent of Disaster".


Immunity Mantle
Duration: 120 Seconds
Recharge: 210 Seconds
Effect: Removes and nullifies all negative status effects while equipped.
Unlock: Fully research 15 monsters, then complete the quest "A Blaze on the Sand".
Your Many Gadgets and Mantles - Part 2
Impact Mantle
Duration: 90 Seconds
Recharge: 360 Seconds
Effect: Adds KO/exhaust effect to weapons, or improves KO/exhaust effect of weapons that already have it.
Unlock: Hunt 5 different Tier 1 (Barroth, Pukei-Pukei, Tobi-Kadachi, etc.) tempered monsters to unlock and complete the quest "Showdown: The Muck and The Maul".


Evasion Mantle
Duration: 90 Seconds
Recharge: 360 Seconds
Effect: Increases invulnerability window while evading, and grants a temporary attack boost when evading a monster's attack at the last second.
Unlock: Hunt 5 unique Tier 2 (Rathalos, Odogaron, Diablos, etc.) tempered monsters to unlock and complete the quest "New World Sky, New World Flower".


Rocksteady Mantle
Duration: 90 Seconds
Recharge: 360 Seconds
Effect: Grants the effects of Defense Boost, Earplugs, Flinch Free, Tremor Resistance, and Windproof armor skills.
Unlock: Hunt 3 different Tier 3 (Elder Dragon) tempered monsters to unlock and complete the quest "A Summons From Below".


Dragonproof Mantle
Duration: 120 Seconds
Recharge: 300 Seconds
Effect: Reduces Dragon element damage, nullifies dragonblight, and increases your weapon's dragon element damage.
Unlock: Complete the Special Assignment quest "The Food Chain Dominator".


Temporal Mantle
Duration: 90 Seconds
Recharge: 300 Seconds
Effect: Nullifies damage from powerful attacks by automatically evading.
Note: Duration is reduced for each auto-evade.
Unlock: Finish the Special Assignment quests "The Food Chain Dominator", "The Blazing Sun", "Pandora's Arena", then "No Remorse, No Surrender".


Assassin's Hood Mantle
Duration: 360 Seconds
Recharge: 180 Seconds
Effect: Increases movement speed by ~25%, easier to hide from monsters, and the next attack on an unaware monster deals bonus 30% to 50% damage.
Unlock: Complete the event quest "SDF: Silent, Deadly, and Fierce" to collect Senu's Feather items. Talk to the smithy and armorer, then turn in the delivery quest to obtain the mantle.
Comment: This is useful for getting across the map quickly for exploration and gathering. Use it for mining, monster tracks, and capturing endemic life.
Don't Underestimate the Slinger
Your slinger is a versatile mini crossbow/grappling hook strapped to your left arm. Using it properly will make your traversal around the map faster, and your hunts against monsters easier.

Traversal
When climbing up vines, you can press a button to use your slinger to grapple upwards. This is faster than climbing normally, but takes up a little stamina.

Keep an eye out for Wedge Beetles that are hanging around overhead. Wedge Beetles are bright yellow insects that are placed all over the map, especially near vines and cliffs. They offer quick ways to dodge attacks, mount monsters, or travel faster around the map.

Shooting Projectiles
You can equip items to the slinger and fire them whenever your weapon is sheathed. The exception is Sword and Shield, which can fire the slinger with the weapon drawn.

The net is always with you and can be equipped and unequipped at will. When fired, it will shoot out a short distance. Small endemic life such as birds or insects will be captured. Anything larger will take a small amount of damage.

In some quests, you can find slinger ammo in the blue supply box, such as paralysis knives, poison knives, and so on. They can be equipped from your item bar just like the net. They will shoot out in a straight line. Status knives are highly effective and you are almost guaranteed to inflict the status if every knife hits. If you pick up standard throwing knives from the box, you can craft them into status knives by combining them with different types of mushrooms.

While running around the map, you can gather around natural ammo for your slinger. These are temporary and are not put in your inventory. If you pick up another piece of natural ammo, the one currently in your slinger will drop to the floor.

All slinger ammo can be used to activate environmental hazards such as knocking down rocks or activating environmental hazards such as poison cups. If a monster is unaware of your presence, you can fire ammo to distract them.

Stone - A basic piece of ammo. You carry 20 at once. It deals very little damage. You can kill vespoids with stones without destroying their bodies so you can carve them.

Redpit - A basic piece of ammo. You carry 15 at once. It deals very little damage. You can kill vespoids with redpits without destroying their bodies so you can carve them.

Scatternuts - A basic piece of ammo. You carry 5 at once. Deals a small amount of impact damage and can stun monsters if shot at the head.

Brightmoss - A basic piece of ammo. You carry 5 at once. Brightens dark areas when fired at a wall. Can blind monsters similar to a flash pod if fired directly into its eyes. Useful against flying wyverns if you have good aim.

Watermoss / Puddle Pod - A basic piece of ammo. You carry 7 at once. Deals a small amount of water damage if it hits a monster. This can wash mud off Barroth and Jyuratodus, altering the elements they are weak to and exposing their weak points.

Slinger Thorn / Thorn Pod - A basic piece of ammo. You carry 2 at once. Deals a small amount of impact damage, then sticks to the monster. Deals additional damage every time the thorn is struck.

Torch Pod - A special piece of ammo. You carry 5 at once. Deals a small amount of fire damage if it hits a monster. This reheats Lavasioth's body parts after they cool down and harden. If fired at the ground, it leaves a small fire for a few seconds, which can continuously burn a monster. This fire disperses effluvium from a small area, but not elder dragon effluvium. The fire also repels most small monsters, but attracts vespoids.

Crystalburst - A special piece of ammo. You carry 5 at once. Deals impact damage, and always flinches monsters. Use crystalburst to knock monsters out of their special attacks or prevent them from running away. Seriously, crystalburst is incredibly useful against elder dragons: always pick some up if you can to cancel their most dangerous attacks.


The following pods can drop from monsters after they take enough damage:

Piercing Pod - You carry 3 at once. Pierces through the target inflict damage mutliple times. Total damage varies wildly depending on the size and orientation of the monster. Flinches monsters easily.

Thorn Pod - You carry 2 at once. The ones dropped from monsters act identical to the Slinger Thorns picked up from the environment described above: deals a small amount of impact damage, then sticks to the monster. Deals additional damage every time the thorn is struck.

Bomb Pod - You carry 3 at once. Explodes on impact for medium damage. Flinches monsters easily.

Dragon Pod - You carry 7 at once. Has high elderseal effect, and medium flinch capability. Breaks Nergigante's black spikes easily.


You can also craft slinger ammo of your own. Unlike natural slinger ammo, these pods are crafted from materials you gather and are retained in your inventory.

Dung Pod - You carry 10 at once. When fired at a monster, it causes them to move to a different area (eventually). Useful when trying to avoid fighting multiple monsters at the same time. Crafted from dung.

Flash Pod - You carry 3 at once. When fired in front of a monster, it blinds them, causing them to act erratically as they cannot see. Blinding a monster as it's flying will cause it to fall to the ground helpless, making hunts against flying wyverns much easier. Crafted from flashbugs.

Screamer Pod - You carry 3 at once. When fired above a burrowing monster such as Jyuratodus, Lavasioth, or Diablos, it causes them to emerge from the ground, disoriented. Be wary that Diablos is not affected by Screamer Pods if enraged. Crafted from screamer sacs, which are carved from Noios, the flying wyverns in Wildspire Wastes. They are harder to come by, as you can't grow these in a farm. If you use these often, it's better to meld them at the Elder Melder when she becomes available.


If a monster ever knocks you down, you can use your slinger as an emergency measure. You might be able to interrupt the monster before it attacks you again.

As said above in the hunting procedures section, conspicuously large rocks or crystals can be hit with slinger ammo to drop on the monster's head for massive damage and an instant knockover.

You can increase the amount of slinger ammo you can carry at once with the Slinger Capacity skill, but that only applies to the natural ammo found from plants and monster drops. It doesn't work with crafted pods or knives.

Some forms of endemic life, called helmcrabs, can be found around the world and can be kicked while your weapon is sheathed to get a pod. Iron Helmcrabs found in Wildspire Waste drop a Piercing Pod. Soldier Helmcrabs found in the Rotten Vale drop a Thorn Pod. A Gold Helmcrab in the Caverns of El Dorado will drop a dragon pod, while kicking a Shiny Gold Helmcrab will drop a full stack of dragon pods.

Here's a crash course for how useful the slinger can be:
https://www.youtube.com/watch?v=v0okb4DxtzI
General Tips and Tricks
  • Never, ever forget the Resource Center and its bounties. Always be working on bounties throughout the game, as the armor sphere rewards are important. Choose bounties that you think you'll complete within the next few quests; don't sit on a bounty with a high reward if you won't complete it for a while. You're making the game much harder on yourself if you don't keep a steady supply of armor spheres and keep your armor upgraded to a reasonable level. You don't need everything maxxed out to succeed, but any level of defense boost is better than nothing.
  • Some monster attacks are so dangerous, you need to DUCK AND COVER. That’s where the Superman Dive comes in! If you’re near a monster and have your weapon sheathed, start running directly away from the monster and hit the dodge button. You will leap into the air and flop ungracefully onto the floor. You are 100% invincible for the duration of this animation, which is immensely useful for the most dangerous attacks that large monsters will throw your way. Just remember that you have to have your weapon sheathed, you have to be running away from the monster, and you have to have enough stamina to dodge.
  • If you get hit hard enough to fall over prone to the ground, you are invulnerable until you get back up. It's sometimes a good idea to not press anything and wait for the monster to finish attacking before pressing any buttons to get back up. This is not a perfect solution, though: after a few seconds you'll automatically stand up, so if the timing is poor you'll just get back up right into another attack.
  • If you're at low health and close to camp, feel free to run back and get into the tent. It will fully restore your health, cure all status effects, sharpen your weapon, etc. Just about the only things it doesn't do is refresh your mantle and canteen cooldowns.
  • When fighting a monster and it runs away to another part of the map, don't just run after it; prepare. Heal up, sharpen, reload. Sometimes it will be faster to check the map and fast travel to a camp closer to the monster than to go by foot.
  • If you are struggling against a specific quest solo, try doing it multiplayer. Don't forget about the SOS function; that's what it's there for. If you're struggling to do a quest in multiplayer, try doing it solo. Trust me on this, a lot of difficult monsters are easier to handle alone. Even though their attention is on you more often, they have smaller health pools and deal less damage, meaning less chance of deadly combos or one-shot kills. The Coral Orchestra Palico gadget is also fantastic for soloing content, as the buffs (especially stun immunity) are incredible.
  • Keep an eye out for toads. If hit, they'll emit a potent gas that will float around for a few seconds and instantly inflict a status effect on contact. The type of status depends on the type of toad. Beware, the status can hit you too! You can hit the toad with your weapon, your slinger, or just give it a good kick with your weapon sheathed.
  • You don't have to sheathe to sharpen your weapon. While your weapon is out, simply use your whetstone or whetfish and your character will begin sharpening as normal. These are the only items that you don't need a sword & shield to use while unsheathed.
  • Avoid fighting in small, tight areas like corridors between zones. Try to keep the fight in large open areas to give you and your hunting party more room to maneuver around the monster. You don’t want to be holed up in a hallway of death should another angry monster or two come by.
  • Fighting a monster over and over to get its materials? Don't do a regular quest, do an investigation! Investigation quests offer additional rewards upon completion, meaning you'll likely get the items you need faster. Stop by the Resource Center to see if you have a few investigations involving the monster you're farming.
  • If you're planning to use a bowgun at some point, pick up the free ammo in the blue supply box at the beginning of each hunt and deposit it in your item box in Astera for future use. Just be careful if you're in a multiplayer hunt; you wouldn't want to steal the ammo from an actual gunner. That would be rude!
  • At some point in the game, the Power Charm and Armor Charm will be available for purchase in the store at Astera. Simply keep them in your inventory and they will provide a flat bonus to your attack and defense stats respectively. Later on in the game, you’ll fight a certain annoying explosive monster. By using item combination, you can combine the Charms with that monsters’ talons to create the Power Talon and Armor Talon, which have a stronger effect. These effects stack with the Charms, so go ahead and buy another set from the store. From then on, always keep the Power Charm, Power Talon, Armor Charm, and Armor Talon in your inventory, as they are permanent stat buffs.
  • Wearing any mantle prevents effluvium buildup, as the mask prevents inhalation.
    However, effluvium exhumed by an elder dragon is potent enough to get through the mantle's mask.
  • When fighting Radobaan or Uragaan, you can mine their backs if they fall over. Just run up to them with your weapon sheathed for the prompt.
  • When fighting Lavasioth, the lava coating the monster hardens over time, protecting it. Pick up some nearby torch pods and fire at Lavasioth; the lava will become molten again. No more bouncing off!
  • If you’re playing multiplayer and another player is stunned, asleep, or paralyzed, you can hit them to break them out of their status ailment early. This can save their life if the monster would have hit them otherwise.
  • If struggling to discover camp locations on the map, you can cheat the system by answering other players' SOS signals and flying in on their camps that you haven't found yet. This will discover that camp for you automatically.
  • This game has auto-crafting: you can set options to automatically craft items when you pick up the raw materials out in the field. The game has most useful auto-crafting on by default, so from the beginning you’ll automatically craft potions out of herbs, for example. Keep this in mind if you realize you picked up an item but can’t find it in your inventory: you probably automatically crafted it into something else. (Or it was slinger ammo and it’s now in your slinger: see the slinger section above for more details.) Autocrafting has few downsides, as base ingredients rarely have other uses. If you find yourself needing an item that you’re automatically crafting away, you can always turn off that particular auto-craft in the options menu.
  • Disable auto-sheathe. Despite the name, you'll still sheathe automatically when attempting to run or use items. It just turns off sheathing when standing still for a few seconds.
  • Customize radial menus. You can use items much faster if you become accustomed to the radial menu.
  • Set up item sets to reduce down time between hunts. Save item sets after radial menu customization, as radial menu setups are tied to item sets. They're a little crass, but the Best Friends have a bit of a crash course on how to do this.
  • Need more zenny? Don't forget to sell those trade-in items! Go to your item box in Astera and select Sell Item, then press the button prompt to sell Trade-In items. Those items have no other use except for selling for money. You might want to sell a few extra monster parts you probably don't need, either. Have 25+ Anjanath Pelts? You'll never use that many; sell a few!
  • Still strapped for cash? Equip the Bandit Mantle and start a low rank quest/investigation featuring a favorite punching bag of yours, perhaps a Great Jagras or a Jyuratodus. Equip the mantle and go to town, then pick up all the golden monster parts that fall on the floor. You'll make quick money in no time.
Stepping Into the Arena
On the Celestial Pursuit (otherwise known as the Gathering Hub), the person on the left behind the counter is the Arena Receptionist. Speak to her to accept Arena quests. These are challenge quests that play by different rules than a standard hunt. Each arena quest has you pitted against a specific monster or group of monsters, with a specific selection of armor, weapons, and items. You cannot bring your own. It's a test of a hunter's understanding of weapons and item utilization. For one-trick hunters, it forces them out of their comfort zone.
  • All arena quests take place in the arena, a specific small area built for these quests.
  • The maximum amount of players that can take on a quest is 2.
  • Players cannot join an arena quest in progress.
  • Your Palico does not join you for arena quests.
  • All arena quests are timed, and with rank designations for certain time thresholds.
  • Certain challenge arena quests have global leaderboards for the fastest completion times.
At first, you only have access to a few arena quests. You'll unlock more as you progress through the main storyline. Many hunters ignore the arena, but there are weapons and armor that unlock exclusively through arena rewards. It's a good idea to complete each arena quest at least once to see what it has to offer.
The Purple Postgame - Part 1
Once you've beaten the main story of the game, there's still more to conquer. You'll unlock the ability to fight tempered monsters, which are stronger, faster, and all-around more dangerous. In fact, your scoutflies respond to them as if they are on the same level as elder dragons, turning blue. Tempered monsters have a shiny, almost metallic sheen to them.

What do I get out of it?
Defeating tempered monsters rewards rarer decorations and streamstones. The decorations can give you almost any skill, even skills that are normally only gained by completing most of an armor set. These are very rare, and are highly sought after for their extremely useful effects. The streamstones come in different varieties, and allow you to meld decorations and upgrade your weapons and armor past their normal limits.

Each tempered monster has a specified threat level, which determines the Hunter Rank requirement to fight them and the type of streamstones you can receive for killing them.

Threat Level
HR Required
Monsters
Rewards
Level 1
HR 13+
Pukei-Pukei, Tobi-Kadachi, Anjanath, Barroth, Jyuratodus, Rathian, Paolumu, Radobaan
Streamstone Shards
Level 2
HR 30+
Rathalos, Azure Rathalos, Pink Rathian, Diablos, Black Diablos, Bazelgeuse, Uragaan, Lavasioth, Legiana, Odogaron
Streamstone, Sullied Streamstone
Level 3
HR 50+
Kirin, Nergigante, Teostra, Kushala Daora, Vaal Hazak
Gleaming Streamstone, Sullied Streamstone, Shining Streamstone

Streamstones, Streamstone Shards, and Gleaming Streamstones are primarily used for augmenting armor and melding decorations with the Elder Melder. Sullied Streamstones and Shining Streamstones are used to augment weapons. When you get one, they get identified at the end of the quest.

Streamstone
Augments
Streamstone: Sword
Great Sword, Long Sword
Streamstone: Blade
Sword and Shield, Dual Blades
Streamstone: Hammer
Hammer, Hunting Horn
Streamstone: Lance
Lance, Gunlance
Streamstone: Axe
Switch Axe, Charge Blade
Streamstone: Shaft
Insect Glaive, Bow
Streamstone: Ranged
Light Blowgun, Heavy Bowgun

Warrior's Streamstones upgrade rarity 6 and 7 weapons. A rarity 6 weapon will have three augment slots and will require 1 Warrior's Streamstone for each slot. A rarity 7 weapon has two slots, and requires two Warrior's Streamstones to augment each slot. You only need one Hero's Streamstone to augment the single slot of a rarity 8 weapon.

See the weapon forging section above for more details.
The Purple Postgame - Part 2
Great, so how do I hunt these tempered monsters?
You can identify a tempered monster in a quest by the purple outline around its icon in the quest description. You'll come across a few by talking to the NPCs in Astera and doing quests near the end of the main storyline, but the main way is through investigations.

How do you get tempered investigations? There are several ways. Once tempered monsters are unlocked, you can go out on a high rank expedition and walk around; there's sure to be blue tempered monster tracks to gather. Gathering these will give you a chance of earning an investigation.

Otherwise, you can start fighting a tempered monster. Picking up the tempered monster's tracks in the quest, breaking their parts, and killing/capturing it can all grant you even more tempered monster investigations.

Generally, picking up tracks and fighting tempered monsters of a certain threat level only grant investigations of that same threat level.

Normal investigations have bronze, silver, and gold rewards: all tempered investigations have purple rewards instead. These will be decorations and streamstones.

Any tips?
Tempered monsters represent the most hardened forms of these species. It helps to bring your A-game.
  • Make sure your weapons and armor are as fully upgraded as possible.
  • Eat appropriately for the quest. If you're fighting Tempered Kirin, it's probably for the best to eat for Elemental Resistance.
  • Be prepared: Bring demondrugs, armorskins, lifepowders, flashpods, dungpods, traps, tranq bombs, and more if need be. As you get more comfortable fighting tempered monsters, you might not need everything, but it doesn't hurt to be overprepared at first.
  • Unlike their non-shiny counterparts, tempered monsters gain resistance to flashpods, so use them wisely. After 3-4 uses, a tempered monster becomes immune to the flash effect.
  • Be patient; there's no need to rush. Unless the tempered quest has a 15-minute restriction, there's no need to take unecessary risks and get carted when you could've just taken an extra two minutes and lived. Remember, you can always heal and restock your items at camp.
Besieging Kulve Taroth For Glitz and Glory


Some monsters are fought differently than a normal hunt. Kulve Taroth is the first of what is considered a siege-type event quest. Being an event, it will only be available for a certain length of time (typically two weeks) until it ends. After that, you’ll have to wait until the event happens again.

Siege-type events are unique in that 16 players all contribute to hunting the monster. That is not to say all 16 hunt it in the same quest; it’s still hunts in groups of up to four. It’s just that each quest to hunt the monster contributes to a total "pursuit level" after which the monster is repelled, then the hunters get rewards. The siege gets easier as the pursuit level increases, until the siege ends by the the hunters finishing the victory condition: in Kulve Taroth's case, breaking off her horns in area 4.

Before you can start fighting Kulve Taroth, you’ll have to unlock her first by finishing the main storyline and reaching hunter rank 16. Then, while her siege event is active, you can find golden scales while out on quests or expeditions. Start an Ancient Forest expedition at the Southwest Camp and you’ll quickly find golden scales in the first open area. After picking them up, return to Astera to unlock the siege.

While the event is active, head into the Celestial Pursuit (the multiplayer Gathering Hub). This is where you are able to siege, because it’s a community event. You cannot access sieges from the rest of Astera. Talk to the Hub Lass on the right side of the counter. If there are not enough other players doing Kulve Taroth, go to a quest board or quest counter (the Hub Lass can do this as well), Search for an Online Session > Filter Search > Set Quest Preferences to Kulve Taroth, then hit Confirm to look for online sessions made specifically for Kulve Taroth sieges.

You can either start your own Kulve Taroth quest or join someone else’s, but the current siege is shared across everyone in the session. When you start the quest, you’ll head to a map specifically made for Kulve Taroth: the Caverns of El Dorado. Your goal is to break as many parts as possible, pushing her through the map until she sheds her coat ("is released") into area 4, where you can fully break off her horns, which spells victory and a completion of the siege. Note that her horns can be chipped, but not fully broken until she reaches area 4. In addition, after her horns are chipped, her horns will no longer take any partbreak damage until she reaches area 4.


It's extremely difficult to fully complete the siege at pursuit level 1; when quest time is at its shortest and monster part breakability is at its lowest. Most of the time it will take multiple hunts to succeed.

While I did write up my own description for how to handle the fight, but to be honest, this other guide is much more detailed and concise. Please refer to it for how the fight generally goes:

https://gtm.steamproxy.vip/sharedfiles/filedetails/?id=1555044095

I only have these miscellaneous notes to add, which aren’t covered in the guide above:

  • Kulve Taroth is mostly weak to Thunder when covered in her golden coat, then mostly weak to Ice when released.
  • The supply box at camp has an EZ Farcaster; it might be useful in emergencies or if you want to switch out gear between phases.
  • Kulve Taroth cannot be killed; she will always run away when the quest ends.
  • The fight is scaled to 4 players, and the siege itself is scaled to 16. Having less players makes things more difficult/take longer.
  • Kulve Taroth takes double damage from barrel bombs.
  • SOS flares do not work in the siege. However, other players in the same session can still join an already-started hunt if there’s room in the quest.
  • The gold plating on her head can break off, which can be carved three times.
  • Partbreaker is a recommended skill for the siege, since most of the hunt relies on breaking parts. However, take note: for the final objective, partbreaker has no effect for breaking her horns in area 4.
  • If you get hit by Kulve Taroth’s large fire breath attack and you’ve fallen onto the ground, don’t move. You will remain invincible for much longer, stopping you from taking more damage.

And what is your reward for all this work? Shiny gold end-game weapon variants with a Kulve Taroth theming! Some of these weapons offer stats you can't obtain anywhere else, and quite a few are considered the best of the best.


You can also go to the Resource Center and deliver Bushi Tickets to get two different layered armor sets: Bushi Sabi, which is a damaged-looking old armor set from an earlier Monster Hunter game and costs 15 total tickets and miscellaneous monster parts, and the Bushi Homari, a non-damaged variant that is more customizable in via color selection and costs 20 total tickets and monster parts. Both have a samurai-style look.
A Taste of MMO – The Beastly Behemoth
As part of a collaboration event, the Behemoth from the Final Fantasy series is available to fight in Monster Hunter World. However, he is no pushover – in fact, he is considered the hardest content the game has to offer!

To unlock Behemoth, you must first finish the main storyline and reach HR 16. From there, speak to the Serious Handler to unlock the Special Assignment, A Visitor from Another World. You’ll end up in the Wildspire Waste and chase some Cactuars. Eventually, you’ll find a rather special Kulu-Ya-Ku. Defeat it to end the quest. Continue the series with the next Special Assignment, The Legendary Beast. You’ll face off against the Behemoth with 9 carts available, but all you have to do is deal enough damage to chase it off. This quest is more to introduce you to his mechanics.

Unlike most monsters, he follows MMO rules and you gain “enmity” (aggro) if you repeatedly attack his head. This way, a player can fill a “tank” role to control Behemoth’s attention and allow other players to focus on dealing damage or healing. If you repel the Behemoth, you will earn the Final Fantasy XIV Jump emote.

Unlike most monsters, the Behemoth is always at multiplayer difficulty. He does not have lower health or deal lower damage if you fight him solo.

Important note: The Behemoth is considered the highest tier of end-game content. It is best to attempt him once you have fully augmented armor and weapons, some rare decorations, and a good stockpile of healing items. If you have just reached the end-game, try farming tempered monsters for a while before trying the Behemoth. Don’t ruin it for teammates!

The next Special Assignment is He Taketh It with His Eyes. This quest requires you to kill the Behemoth. Be prepared. If you succeed, you will be rewarded with the Dragon Soul kinsect, the Bacon Behemoth costume for your Poogie, and some titles and backgrounds for your guild card.

There's an even more powerful version called Extreme Behemoth which is essentially arch-tempered. Prepare thyself!

A full description on the Behemoth would be too long for this guide, so refer to these for a more comprehensive (or humorous) look.

https://www.youtube.com/watch?v=z0oRukKi9Yo
https://www.youtube.com/watch?v=a6wtqX7Rn0w
Miscellaneous Notes
This section has nothing particularly important about gameplay. It's just some trivia to help give context about the world.
  • Nergigante is the flagship monster for Monster Hunter World.
  • Rathalos is the de facto flagship monster for the Monster Hunter series as a whole.
  • All Rathalos are male, and all Rathians are female.
  • Azure Rathalos and Pink Rathian are genetic mutations of their regular species.
  • Pukei-Pukei's poison attacks have different attributes depending on the type of nuts or berries it had most recently eaten.
  • Barroth primarily eats ants.
  • Diablos are herbivores.
  • Diablos is classified as a "flying wyvern", even though they can't fly.
  • All Black Diablos are just females in heat.
  • Despite what it seems like from the end-game, elder dragons are supposed to be incredibly rare. Seeing one is canonically considered a once-in-a-lifetime event. Then again, in the context of the story, elder dragons are attracted to the new world...
  • Kushala Daora eats ore to maintain its metal-plated skin. It generates a metallic clinking sound as it moves.
  • All Teostra are male, and all Lunastra are female. Until now, Lunastra hasn't been seen in the main series since the second generation of games.
  • Because its spikes are always growing and hardening, Nergigante spends a lot of time preening itself when not in combat.
  • If you cut the tail off the final boss of the game, its innards will be a different color depending on whether it was enraged or not at the time of the cut.
  • Hunters, or at least the higher ups of the guild, are a superstitious lot. Long ago, a group of five[monsterhunter.wikia.com] experienced hunters went out to fight an elder dragon. Though victorious, a hunter died in battle. Ever since, sending five or more hunters was considered bad luck. That is why no more than four hunters are ever dispatched to a quest, even against the most dangerous of monsters, with very few exceptions. Makes sense? No? Too bad, this is Monster Hunter. We have sand whales.
Glossary
Affinity: Critical Hit Chance. Positive affinity grants 25% additional damage. Negative affinity grants 25% reduced damage.

B-52: The community nickname for Bazelgeuse.

Carting: Alternative name for dying, being knocked unconscious, or otherwise being brought to zero health. Your character is brought back to camp on a cart drawn by felynes contracted by the guild to rescue you.

Charybdis: A mechanic used in the Behemoth fight. A spell that Behemoth casts, indicated by a blue glow on his face. A tornado appears on a targeted player.

Comet: A mechanic used in the Behemoth fight. A beneficial comet is dropped on the ground, but it can be destroyed by players or the Behemoth. It protects players from the Ecliptic Meteor.

Desire Sensor: An all-knowing entity that prevents you from obtaining the material you want. If you need a gem from a monster, and you hunted it 12 times and it still hasn't dropped, that's because the Desire Sensor knows you want it, and is preventing you from getting it.

Ecliptic Meteor: A mechanic used in the Behemoth fight. An almighty spell the Behemoth uses that causes instant death. The area of effect is so wide as to be nigh inescapable. The guts skill, perfect dodging, guard up/guard 5, farcaster, being in the tent at camp won't save you. There are four known ways to survive: being behind a comet, correctly timing a Final Fantasy XIV Jump emote, sitting down at the mini-canteen at camp, or being extremely far away (at least 2+ areas distance).

Enmity: A mechanic used in the Behemoth fight. Repeatedly attacking the head causes the Behemoth to focus attacks on that particular player, indicated by a red line. This prevents Behemoth from casting Charybdis.

HR: High Rank. Designated in World by Orange-Star quests. Monsters have more health, more attacks, and are more aggressive. New materials are available in High Rank maps. Sometimes during high rank you won't start the quest at camp, but somewhere random instead.

Jay Leno: The community nickname for Uragaan.

Je suis monté: A semi-derisive catchphrase from Monster Hunter 4 Ultimate, where many french or french canadian players would use the insect glaive and spam the mounting attack and mount the monster, which would result in their character saying "Je suis monté!"

LR: Low Rank. Designated in World by Blue-Star quests. Monsters have less health and the basic set of attacks. Often described as the "tutorial" by series veterans.

Mind's Eye: An armor skill in the game that allows attacks to not bounce off a monster's harder body parts regardless of sharpness, though the sharpness still degrades faster. Some special weapon attacks always have this effect active without the armor skill.

Pickle: The community nickname for Deviljho.
Additional Resources
This guide is far from comprehensive. Feel free to check the other steam guides out there, as well as these fantastic sources:

The officially-partnered Monster Hunter Discord[discordapp.com]
Kiranico, The Monster Hunter Database[mhworld.kiranico.com]
Arrekz Youtube Channel
Gaijin Hunter Youtube Channel

About to take on Zorah Magdaros? Worried? Don't be! I slap-dashed a guide on how to take care of him easy-peasy!
https://gtm.steamproxy.vip/sharedfiles/filedetails/?id=1478756469
Brachragon has a splendid 100% achievement guide on Steam. If you've learned enough, try and rise to the challenge!
https://gtm.steamproxy.vip/sharedfiles/filedetails/?id=1471844584
Analysis on monster damage formulas
A Guide to the Endemic Life in Monster Hunter World

If you'd like some intellectually-stimulating analysis of the biology of the monsters and the ecosystems they live in, Glyde Borealis and Unnatural History History Channel offer great insights. Team Darkside put together a great compilation of lore about monsters featured in Monster Hunter World.
Credits
Monster Hunter is a massive game with a lot of mechanics. There are many things that had to be left out of this guide for brevity's sake. There are probably several things that I'm mistaken about, due to lack of testing, misunderstandings, or differences in game versions. Please let me know in the comments and I'll make adjustments as soon as I can confirm and make a correction. Monster Hunter is all about cooperation!


Time spent working on this guide:
39 hours
53 Comments
SkullViator 11 Jun @ 10:14am 
what a monster of a guide! great work.
Zarod 27 Jul, 2023 @ 7:21am 
garbage excuse for a videogame

this game doesn't deserve your awesome and well curated guide
TheWateringWizard 5 Feb, 2023 @ 5:45pm 
What an incredible guide ! Thank you for putting this much work into it
Raven Silva 8 Nov, 2022 @ 9:58pm 
Amazing guide, thank you so much! :MHRISE_OK:
Papazhoom 14 Jun, 2022 @ 8:27am 
nice
Hatwox 1 Nov, 2021 @ 3:35pm 
thanks!
̧҉ ҉Minorou ꧁💀꧂  [author] 1 Nov, 2021 @ 3:24pm 
(1/2) You make a good point. I hadn't touched on that as much as I probably should have. I wouldn't say that there are "attack phases" and "dodge phases" exactly in a standard hunt, though status effects do give you a much larger window to attack.

As people progress through the game, with experience people will learn to read the monster's body language and learn their general attack patterns. From there, it's easier to determine safe places to stand and good windows to attack the monster. Especially in higher ranked quests, you'll have to attack while the monster is also attacking to get some good hits in.

I understand the frustration, though. I've been there.
̧҉ ҉Minorou ꧁💀꧂  [author] 1 Nov, 2021 @ 3:24pm 
(2/2) Don't worry if a hunt doesn't go well the first few times you hunt a monster; you'll work through it eventually, whether by experience or by trying a different strategy. I was stuck pretty hard the first few times I faced Kirin, but I tried with different weapons and found one that worked well for me, just for that one monster.

The 50-minute quest timer for standard quests is quite generous, so there's no need to rush. Try focusing only on blocking, dodging, or even just waiting it out when a monster is enraged. You can be much more aggressive when the monster is exhausted (which could be considered a good attack phase), and balance your defensive and aggressive play when the monster is in a normal mood.

But these are just suggestions; as long as you find a way that works for you, that's the important part.
Hatwox 31 Oct, 2021 @ 5:54pm 
This doesn't tell you the 1 thing i've been hunting down
There is no Attack Wait Attack in monster Behaviour.
As in... Many people will make the "mistake" that "If the monster just attacked , I can go and attack and then get back"
"Mistake" ...cause its fucking weird.. Windows are there sure.. but they are SO LOW.. As a solo player you are expected to get hit.
Now... none is obsessed with a no-hit run... But its fustrating if you keep carting to Diablos or Nergigante.... If its not your mistake... You dodge... you went in... and you attacked.. and JUST as you attack they attack , you are left mashing your dodge button wtih no effect.

idk how to play the game but im guessing there is a dodge phase and an Attack phase.. the attack phase is just.. Flash or Exaust or Para or Sleep .... The attack phase is when you are expected to continuously dodge the monster and IF you are good enough get in damage.
Constantly attacking after an attack will get you in trouble.
esralierdo24 16 Sep, 2021 @ 1:42pm 
Update for Iceborne Please