Endless ATC

Endless ATC

71 ratings
Getting a Feel for the Basics
By tarballz
Here are just a few notes and observations that may help in developing conflict-free play of what is a very rewarding game. Most of this guide assumes that you don't limit traffic build up in any way. Frankfurt (EDDF) is a good airport to learn with as the Paris, New York, and London terminal areas are too busy for a beginner due to the presence of more than one airport in the TRACON area.
2
5
   
Award
Favorite
Favorited
Unfavorite
Introduction
This is an addictive game that provides a rewarding ATC experience in a terminal control environment. The developer provides good instructions on the game's website/blog and the game has been updated many times since the documentation was published. I share this guide to tie together my initial experiences with the game.

Be sure to read the documentation[startgrid.blogspot.com] as it does seem to be kept up-to-date.
Separation Tools
The point of the game is to guide arriving aircraft to the open arrival runways and keep departures out of the way. The game really ends up mostly handling the departures, but if you don't pay attention to them, you'll find them getting in the way of arrivals.

The rules of seperation, basically are:

  • aircraft must be laterally separated by 5 nautical miles - keep the distance rings on when you are a beginner
  • aircraft must be vertically separated by 1000 feet

An exception to this is that, on parallel approaches, aircraft can come closer, but only when both have joined the localizer for the instrument approach.
All About Arrivals
The planes keep coming and they don't stop coming

In many ways, I'd say the game is mostly about arrivals. Thus, learning all of the ways to control with just the mouse will serve you well.

useful combinations involve dragging:

  • Left Mouse Drag - set a new heading for the aircraft. If you drag onto a Navigation Aid, then the aircraft will proceed to that Navaid (they are labeled with three-letter identifiers on the screen). If you don't give further instructions, the aircraft will hold at that point. This useful if you get behind. However, take care that you don't send aircraft to the same point without the required 1000 feet of vertical separation.
  • Scroll Wheel - change altitude.
  • Right Mouse Drag - Move Screen around.
  • Middle Mouse Click - Hand off to tower or when leaving your airspace
  • Left and Right Mouse Click together - Cleared for the ILS approach. The Instrument Landing System is described in the documentation. It is used to guide the airplane into landing.
  • Right-Click and Scroll - Change airspeed

With those commands, you can issue all of the instructions you need to keep 'em separated.

Arrival tendencies

Depending on the map, arrivals typically come at you at around 8000 or 9000 feet. The terminal area is defined by a 30-nautical mile radius around either the airport or a navigational aid right near the main airport on the map. In the case of Frankfurt (EDDF), this is the FFM VOR. Be very careful of descending aircraft below the Minimum Safe Altitude marked on the terminal radar map. For instance, to the north of EDDF, there are restrictions of 5500 feet (marked 55/x on the map) and then 4500 feet (45/x) on the map, and finally 3500 feet (35/x) on the map. These can present "gotchas" when you are developing your traffic flow.

Use a basic pattern

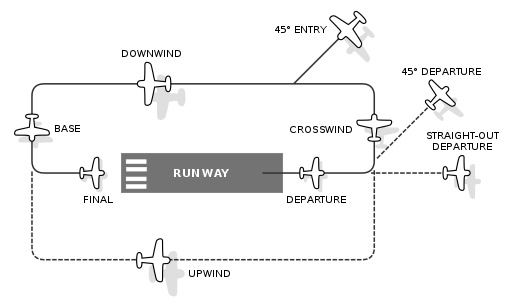
Most landing aircraft in the real world use a basic traffic pattern seen in this image.


Therefore, get aircraft into the pattern and separated by the following factors:
  • Altitude: down to 2000, 3000, or 4000 feet. The documentation has a good graphic for this
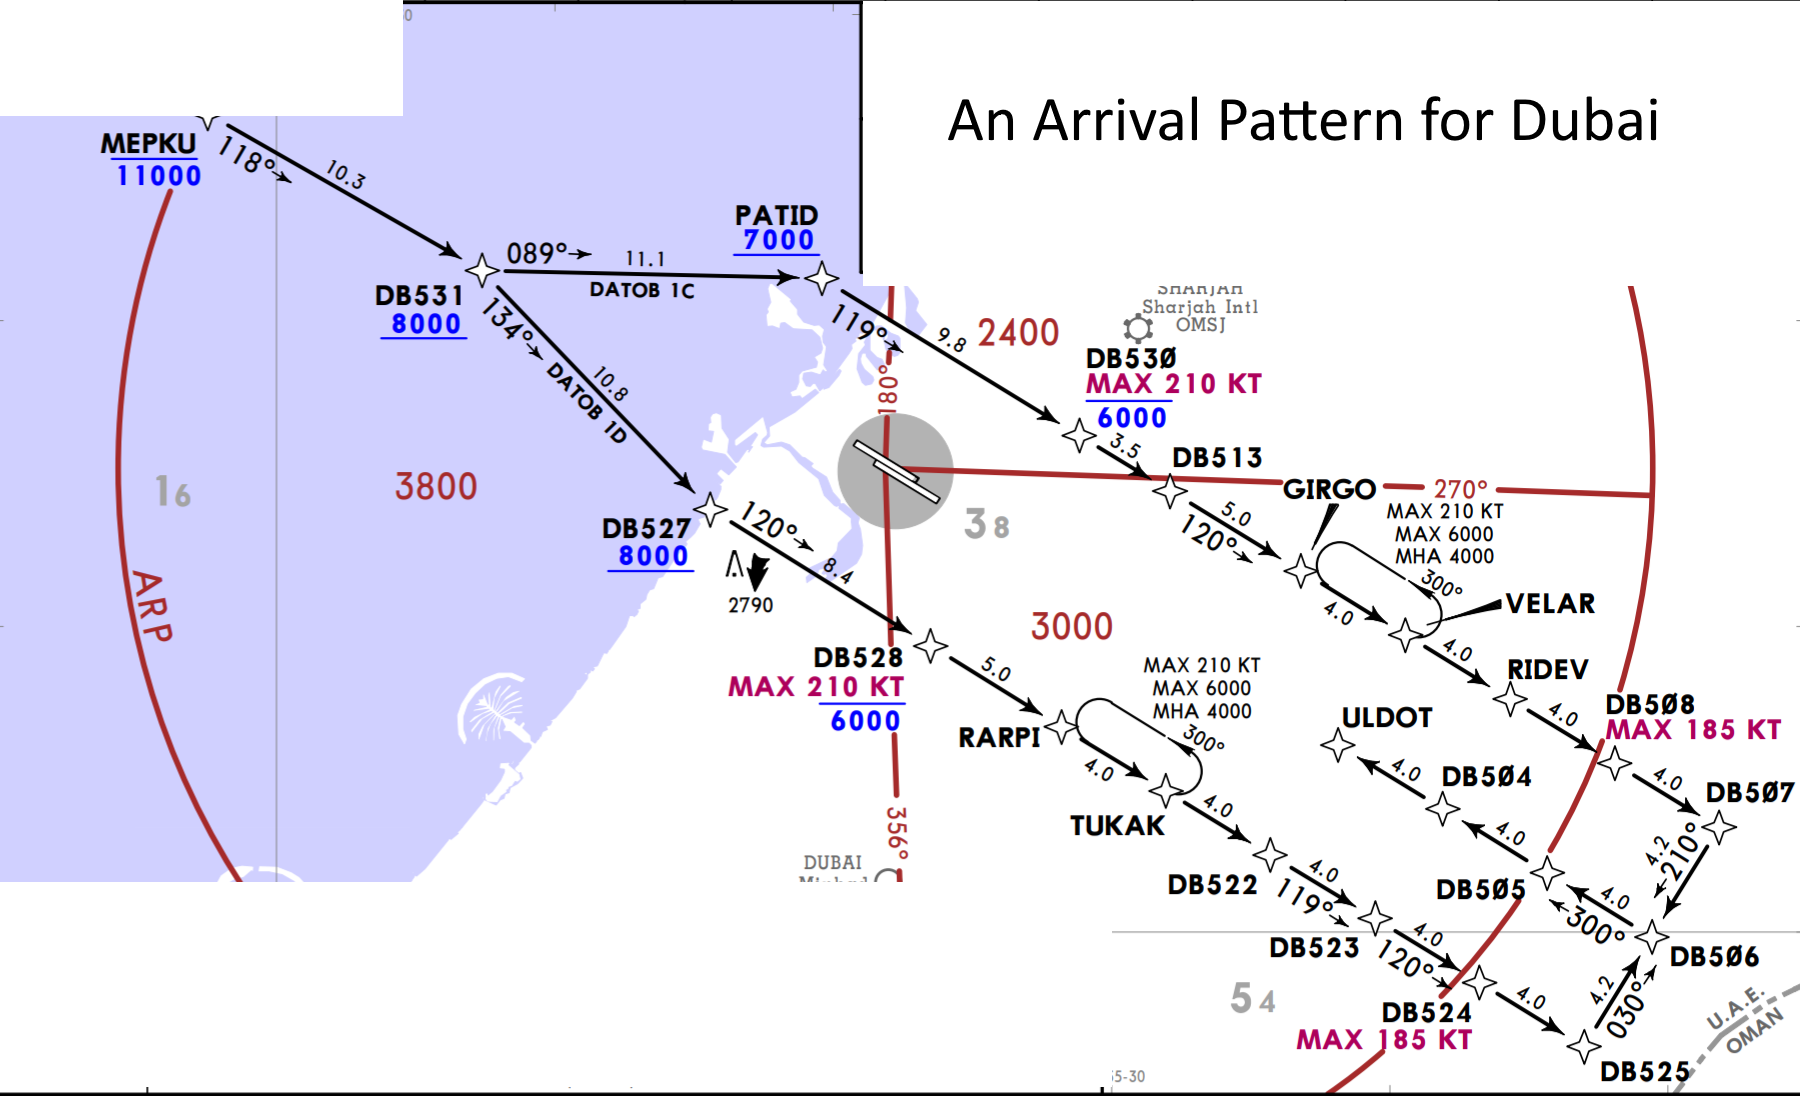
  • Speed: Consider 210 knots for the downwind leg, 180 for the base, and then perhaps 160 for the final vector to intercept the localizer. These are roughly similar to the speeds called for in published arrival procedures. Consider this arrival for a well-known airport in the Middle East:


    Take your cues from how traffic are directed there. It would be nice to just set aircraft on such an arrival prodecure in the game, but you can at least utilize the same approach to arrival management that is "embedded" into such an arrival chart.
  • Vectors - you can steer the aircraft 10 or 20 degrees to the left or right, and then back, to "wiggle" out a bit more separation.
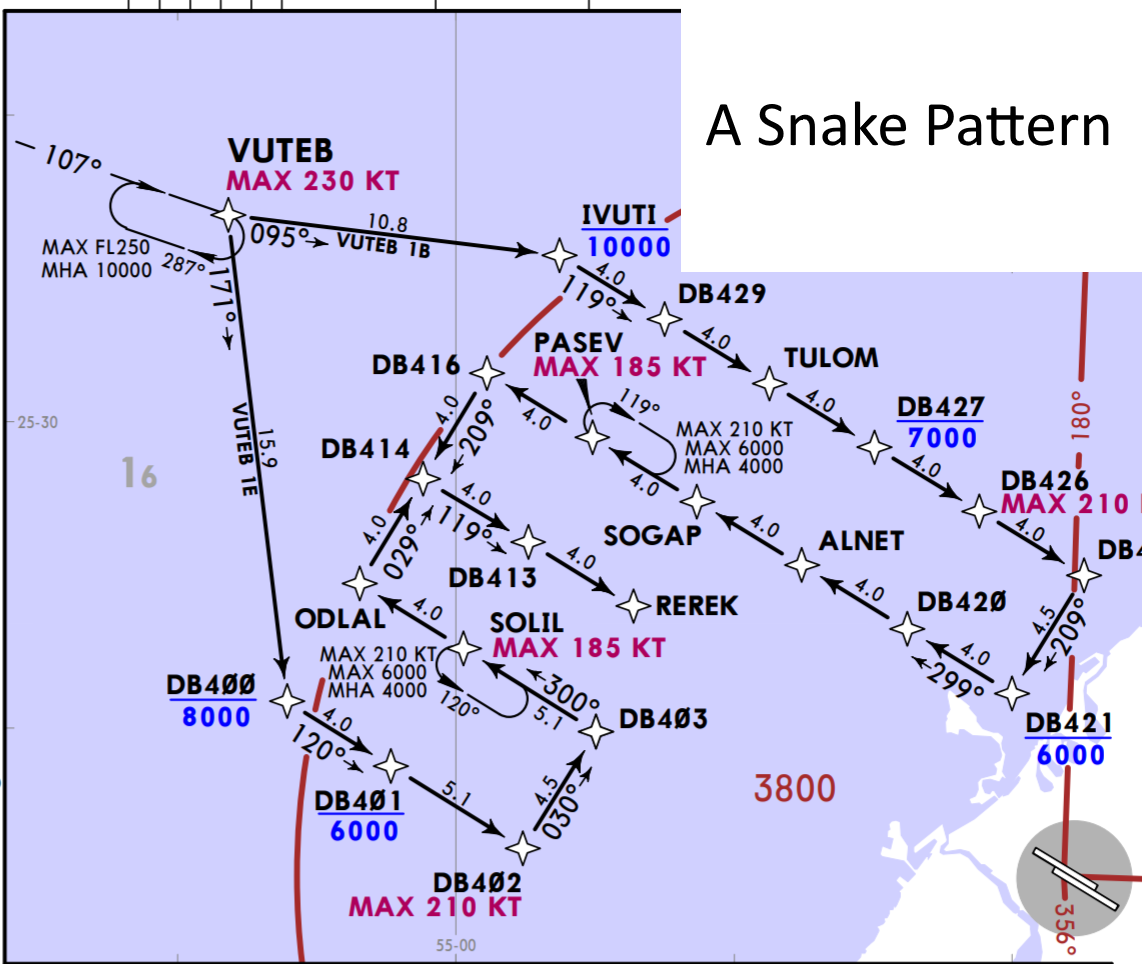
  • Extending to "S" or Snake Patterns - if the traffic really backs up, you might need to extend the pattern in a manner evident on this arrival chart (also from the same well-known middle-east airport):


Aircraft Characteristics

Although the default datablock doesn't show aircraft type information, it does show wake turbulence/weight designations. While you can select a datablock style that shows aircraft type, the wake turbulence semi-circle depicted in the game provides a quick shortcut that you can use to plan your sequencing. Wake turbulence influences how close behind a aircraft may follow another. These designations are according to Maximum Takeoff Weight ratings:

  • "Heavy" - 300,000 lbs or more. The Boeing 757 is included in this category due to exceptionally strong wingtip vortices it develops.
  • "Super" - The A380 and Antonov An-225 are the only two aircraft with this designation

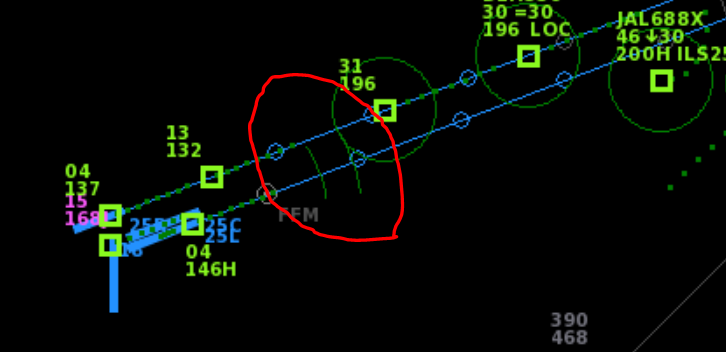
What you need to look out for are aircraft in the "Heavy" and "Super" categories as the game will depict a graphic behind them where you need to ensure that the following aircraft doesn't get any closer.

You can see these as arced lines behind the heavy or super aircraft.


Not all aircraft perform the same and the game provides a realistic mix of real aircraft types and the airlines that operate them. They are also fairly realistic for the part of the world that the airport is in. This Wikipedia article on aircraft type designators is helpful because it lets you understand the aircraft you are working with. You can follow the links to read about each aircraft's general handling characteristics.

List of ICAO Aircraft Designators[en.wikipedia.org]

The aircraft type designator is in the dialog at the bottom of the screen when you click on the radar return (the aircraft).


Use Altitude, then Speed, then Heading
If you vector a plane around too much, and delay the arrival, the game will complain. Some rules of thumb, particularly when you are vectoring from base to final, are:

  • Prior to Entering the Pattern - When you are vectoring towards the pattern, develop a habit of an altitude and speed combo that reminds you that you've begun to sequence that arrival. For instance, I might set altitude to some intermediate level (5000 or 6000 feet) and speed to 210 or 230 knots). These tell me that I've considered the arrival and have a plan for its sequencing.
  • Downwind - On the downwind leg, I start to get ready for final altitudes and slow down to 210 knots. You are starting to decide on how arrivals will merge or blend. At this stage, you are less likely to use vectoring (heading) for separate and more apt to use altitude and speed.
  • Base to Final - You need to get speed set, 170 knots is a good target, and you want to be at your final approach altitude. For parallel runways, don't forget to keep 1000 feet of separation until both aircraft are on the localizer. This takes practice and you will get separation errors until you develop a good overall flow or picture of your traffic strategy.
  • Final - Once on the ILS system, the airplane will slow to its final approach speed. Take care with the aircraft type you have on approach. A large, fast, heavy aircraft will overtake a slower airplane and you must account for this. Therefore, you can't just throw a plane on final approach and expect that your problems are over. This is moreso as you aren't really responsible for handoffs in this game and a plane will go to tower on its own.
Eventually, You'll Use Multiple Runways
As a reward for your hard work, you'll get harder work in the form of more traffic. The only way very busy airports can accommodate heavier volumes of traffic is to open up additional runways. Traffic management, and the prevailing winds, dictate that parallel runways are the most convenient way to extend arrival and departure traffic.

Working with Parallel Runways
You will get a 5-mile separation penalty with almost all parallel runway setups in the game. This presents a challenge that is mostly easy to overcome:
  • Use different altitudes - Let's take EDDF again as an example. If the wind is coming from the west, and 25R, 25C, and 25L are available. You'll eventually develop a pattern where you are landing aircraft on 25R and 25L. This is because you have some separation laterally (but not enough for the 5-file separation requirements. In this case, you use altitude.
  • High and Low - Early on in your session, decide which parallel runway will be your "high" runway, and which will be your "low." In the case of EDDF, terrain north of the airport is higher, so I might bring arrivals for 25R in on approach at 4000 feet. Then, for 25L, I'll bring aircraft in on approach at 3000 feet.
  • You gotta keep 'em separated - The importance caveat of parallel approaches is that you must maintain vertical and/or horizontal separation until an aircraft on approach has intercepted the localizer. Incidentally, this makes all approaches in the game ILS approaches. So, don't sequence aircraft such that the plane on approach to the "high" runway will descend down before the aircraft joining the localizer for the "low" runway has intercepted. A staggered sequence should help in this regard.
  • Speed helps - A trick to the "zipper" sequencing you'd need to stagger approaches to the "high" and "low" parallel runways is to develop both a pattern and speed discipline for arrivals. In fact the rhythm you set up for arrivals in EndlessATC matters much more than departures. On that note, move a departure out of the way of an arrival and not the other way around. When your aircraft rate goes above 15 to 20, the work you do to develop a good sequence for arrivals is much more valuable than inconveniencing a departure.
SIDS and STARS
The game was updated along the way to provide the community the ability to create their own sectors and airport environments. The easiest way to learn more about this feature is to either visit the Github repository setup to host user-created airports[github.com] or join the EndlessATC Discord[discord.gg].

I will save instructions on making custom airports for another guide, but it is important to note that custom airports may include Standard Instrument Departures (SID) and Standard Terminal Arrivals (STAR). These are prescribed routes to guide aircraft out of or into the terminal environment of an airport or airports. For many custom airports, these are now included. In the USA, you can view charts for SIDs and STARs freely using resources from the FAA. The best way to see these would be to visit either SkyVector[skyvector.com] or AirNav[airnav.com].

The real decision when using airports that have these features is to when to pull aircraft off of these departure and arrival routes.

SID
Aircraft will route directly to the beginning of the SID routing upon takeoff. The problem here is that they may interfere with some of your arrivals. You might want to have them maintain a heading until the conflict is clear, then move them back to a waypoint on the SID.

STAR
Aircraft will follow the STAR route until it ends, which is usually in a position to join one of the instrument procedures at an airport. When it gets busy, you might have to pull aircraft off of the STAR early to get into a flow.
A Little about Departures
Departures are Easier - Kinda
In general, you can accept a departure, climb it up to its final altitude (usually 13000 for most terminal areas) and away it goes. The game tends to be forgiving on handoffs in general. However, what is important is that you get it up to final altitude.

Departure Gotchas
The biggest problems with departures is that they will "get in the way." You will spend most of your time in the game developing a picture of how you'll handle arrivals. Whereas aircraft come to you at the end of a STAR (Standard Terminal Arrival), for departures you have to start them off on their SID (Standard Instrument Departure). There are times where you'll have to vector departures around a bit to keep them de-conflicted with your arrivals. If you don't remember to return them to the SID and give them their original departure altitude (just keep scrolling up until you can't), then you'll get a violation for not issuing a correct handoff procedure for that departure.

Keep Them Within The 30-mile boundary
In all circumstances (arrival and departure), you can't allow the aircraft to leave the 30 nautical mile ring around the airport. If you do, you will be penalized. The aircraft are good about reminding you of many "out of bounds" circumstances and other matters for your attention:

  • They can't leave the area
  • They must be on an intercept angle when crossing the localizer
  • They will hold at a navigation point unless you tell them to do something else

Slow Down
Even after several years of playing now, I find it hard to get much above the mid 20s in score at any complex airspace - NORCAL and SFO or Pairs come to mind. Part of this is due skill, of course, but some of it is also due to the following trade off:

  • Slowing arrivals down to 160 KIAS gives you more time to organize arrivals
  • Keeping arrivals that slow eventually leads to delays

Somewhere between 160 KIAS and 200 KIAS is good. On the downwind leg, it is good to keep aircraft 1000 feet above the altitude you've planned for intercept. This way, when you turn the aircraft to base and a final approach intercept course, and slow them down further, you are less likely to get a conflict.

However, this technique will cause aircraft to back up and you'll end up with the problem above - everybody will be slowed down in a long chain.
Follow Along
Occasionally, I will stream to Twitch using OBS mostly to watch the playback and analyze where I've gone wrong. I find this useful to improve. You can review or follow along here[www.twitch.tv].
More to Come
I'll update this with other observations as I find them or when they make sense. Although I only have 40 hours on the game as of this writing I have many more hours now, but the observations remain the same as this is not my first rodeo when it comes to ATC games. Although the interface is very simplified, the immersion and challenge of keeping aircraft separated in this game is rewarding. Great game for the money.
7 Comments
Hammy 25 Jan @ 2:19am 
Hi Thank you so much for the guide! I have a small problem and i can't find any guides about it, so when i turn on the readbacks and then give a instruction to an aircraft it just turns automatically off
do somebody have an idea about this problem?
tarballz  [author] 31 Dec, 2021 @ 5:59am 
Updated to include information on custom airports, SIDs, and STARs.
tarballz  [author] 29 May, 2020 @ 10:57am 
@D-Man777, I added in the material on parallel runways and approaches, thanks for the input.
GhostDE 18 May, 2020 @ 2:07pm 
@D-Man

Additional runways are issued if the Arr and Dep Rate increases and it becomes nearly impossible to send out Dep due to a solid line of inbound Arrivals. Another runway will then be opened as Outbound/Depature(they don't have the Localizer Line with the DME markings) and those cannot be used for arrivals.

Sometimes you will have 3 runways open, 2x Arrival and 1x for Depature
2gig 9 Apr, 2020 @ 12:00pm 
DMan you can land them at any runway, that's your choice, so long as it's the airport they are supposed to arrive at.
CaptRanger 31 Mar, 2020 @ 8:58pm 
Very Fun. Realistic and good docs
D-Man777 4 Apr, 2019 @ 9:55pm 
Nice beginners guide. Thanks. Could you add some information on dealing with multiple runways? I'm unlocking additional runways, but I don't know how to route planes to them. Do they request a particular runway and I'm not seeing it? Thanks.