Champions Online

Champions Online

88 ratings
BLOCK
By Orb of Muck & Scum
Defender didn't explain Blocking well enough? This guide will pretty much teach you everything you'd even want to know about blocking, ranging from the basics of how blocks work, to even some more advanced techniques.
5
   
Award
Favorite
Favorited
Unfavorite
The Basics: Why you should block.
All too often, I walk into an alert with some poor saps that think that this game plays like your typical MMO. They try to run from mobs, or use their amazing energy-builder healer on you like its actually going to help something. They might not understand that their Two-Gun Mojo power can be maintained. But then they get to the boss of the alert. The boss targets them, charges up a shot - and they just stand there, take it, and most likely die. What could have saved them?

Well, if they had gone forward in time and read this guide, that situation easily could have been averted entirely. Now, to the credit of the people who forgot to block in such a situation or those who are new to the game, this is easily excusable - the way the concept was presented in the tutorial instance of the game was such that blocking was explained literally a split second before you needed to defend against the attack of a boss, giving the player very little time to actually understand what this would have done. Yes, the tutorial didn't explain it well, and did it at pretty much the worst time imaginable. Now that you're here and reading a guide instead of getting your clock cleaned by the Big Bad Black Talon, we can switch the focus to actually learning, instead of being confused.

To begin, let's shortly explain HOW to block. In the default keyboard control setup, this is done by holding down the Shift Key. (If you are playing on an XBox controller, this is achieved by holding down one of the shoulder triggers.) As you do this, you should immediately notice that your character has gone into an unusual stance, and moves slower. This is quite deliberate, as though you now move slower, you are also prepared for any incoming attacks. Blocking can be held up indefinitely, and can immediately be ended by releasing the shift key.

Now for the specifics of what blocking does. Its benefits include:
  • Massive boost to defenses - Cuts all damage to around 1/8th of its original value.
  • Resist knocks - Blocking long enough will enable you to resist knockback from most attacks.
  • Resist holds - Save for some stuns, blocking will allow you to shrug off all holds, and even block through situations you'd normally be held in.
  • Very fast - Blocking activates instantly once you hit the shift key. The action has extremely high "priority", meaning it can be activated as a failsafe in case you accidentally fire an attack off at a different mob or want to cancel out of a risky charge attack.
Though blocking does come with a few drawbacks.
  • Slowed movement - You cannot move nearly as quickly when you are blocking. If the aim of survival is evasion over withstanding, you might want to opt to move out of the way instead of block.
  • Can't attack - Aside from moving around slowly and resisting damage, you cannot perform any attacks while blocking. Most advantages that do damage/effects to enemies while blocking usually are very weak.
  • Late effects - Hold and Knock resist is applied a bit later than damage resistance, meaning blocking too late will not allow you to stop yourself from being held or knocked.
Because of this combination of advantages and disadvantages, this makes a few distinct situations where it is highly advisable to block:
  • When you see an enemy preparing a charged attack - look out for enemies with the "Bam" markers over their heads.
  • When you are being attacked by a powerful opponent and require a healer or tank to take the heat off you.
  • When you see an enemy preparing an attack that can hold or knock you. Usually, this coincides with situation #1.

Even taking the drawbacks into account, blocking is the essential way to survive in this game for almost every character type.
Advanced Techniques: 3 types of block
Because of the difference in timing between application of damage mitigation and knock/hold resistance, the game implicitly defines three different types of block you should use. Note that, while these are explained in the terms of enemy charge attacks, they apply for any incoming attack.


Full Block
The full block is a block that begins early during the charge or preparation period of an incoming attack, and ends only after the damage has been dealt. The full block does it all; it will guarantee that you are not knocked or held by the attack (usually), and that the damage from said attack will be fully mitigated. This comes at a tradeoff of uptime to deal damage, however. As the name implies, it takes the longest to carry out.

If there's any one block you want to know how to do, it's this one. Learn to block early when you see an enemy charging up their attack, and you will almost always be safe. In the case that a full block doesn't work against a hold or knock, I suggest opting to either avoid the attack with cover, or simply moving out of the way or out of range if possible.

Late Block
Also known here as the damage block, late blocks mitigate incoming damage, but do not do anything else. If a hold or knock is fired at you in this state, you will still be sent flying or get held by the attack. However, this block has some pretty hefty implications - if you know the next incoming attack does not have any sort of secondary effects tied to it, you can use this to apply a very quick and efficient defense.

This sort of block actually is very useful when you use certain block powers, including Force Shield and Parry. In addition, when playing a tank with high knock resistance, this can be used as a substitute to the full block when dealing with high knock enemies. Because the Late Block is usually quite natural to do, and only requires a split-second application, it has the benefit of being the quickest block possible.

Premature Block
AKA a knock/hold block, premature blocks end early. This seems very strange; all damage is still let through, and you've still spent ample time to protect yourself prior to the hit, but the side effect of this block is that you will not get held or knocked. What's up with that?

Well, as it turns out, the late application of knock and hold resistance also applies to the other end; it takes longer for knock and hold resistance to wear off after you end blocking. As a result, you can end your block early if you know that the next incoming attack will perform a crowd-control effect. Especially against pesky enemies who like to hold you with charge attacks that do no damage, the premature block can be used to stop downtime from a knock or hold, and get back to beating people up.


Three different block types, each for a given scenario. I highly recommend practicing these techniques in the powerhouse. The DEMON Inner Circle Members (shown in the video) are a great test opponent for these techniques, as they have both a hold and a knock.
The Block-Essential Rogues Gallery
To particularly demonstrate how core Blocking is to the game, let's take a sample of various Supervillains and Master Villains you'll encounter. While, in normal situations, these enemies might be easily defeated on their own, or otherwise pose only a moderate threat, encountering tough versions of these enemies can make their more difficult nuances show through. With proper blocking, however (and practice! Travel around and see what master villains you can spot), you can master the block timing and other defensive tactics to make fighting these enemies much faster and safer.

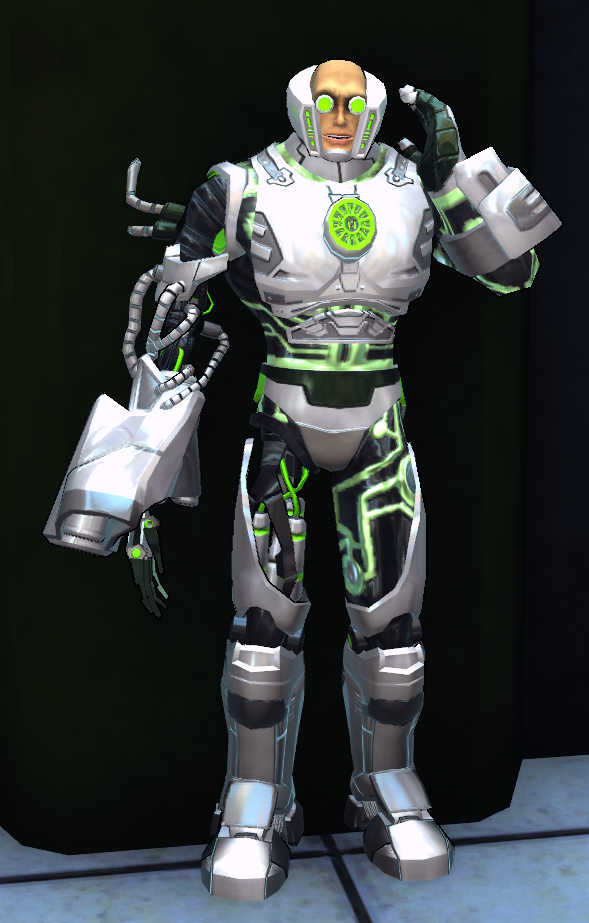
Exhibit A - ARGENT Cyborg
Far from the hardest of Master Villains, ARGENT Cyborgs are pretty standard in their fighting style: They fire chest missiles and machine guns at range, and will swing a laser sword at you in melee, none of which really threatens to trip up or severely damage you. In a big mob, the Cyborg is going to not be the first priority in an ARGENT troop - usually that falls to the mid-rank villains, the Combat Engineer and Operative. However, Cyborgs do have one thing you should watch out for: Their charged chest beam.

Their only charge attack available to them, the Chest Beam, hits in a moderately wide cylinder at 50 foot range. Unblocked, it will knock you back, deal high damage, and also will restore a very substantial portion of the Cyborg's health if he lands the hit! Thankfully, using a Full Block should cancel out the knockback effect, mitigate most of the damage, and stop the cyborg from repairing itself (so long as it doesn't hit any other allies that aren't blocking, anyway...) If in an alert with some ARGENT, do your teammates a favor, and practice blocking this guy's beam to save your team some time! To further compound this, the Cyborg's chest beam is also well-telegraphed, thanks to the purple beam symbol that shows up over his head. True for most enemies (save legendaries and supervillains) once an enemy has used a charge attack, it's put on a very substantial cooldown until it's ready again - almost no standard villain will survive to see this recharge complete, and the Cyborg is no exception.


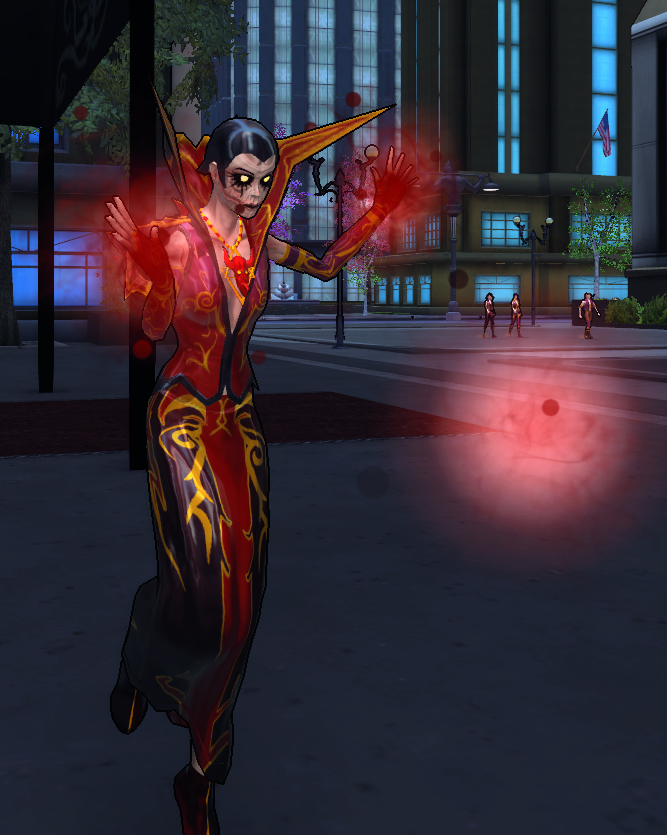
Exhibit B - DEMON Inner Circle Member
Mentioned above, and shown in the demonstration video (as a hologram), Inner Circle Members wield a variety of spells that you should practice blocking against. If you can get their routine down and successfully block their effects, you should be good to face pretty much any other traditional charged assault that foes will bring at you.

The Inner Circle Member's main attacks of concern include their Amulet Beam, their Psychotic Break blast, and their Lifedrain. None of them have traditional pop-up icon telegraphs (no purple boxes or Ka-Pow! bubbles), but they do have substantial tells, and should definitely be kept on the lookout for.

The Amulet Beam (a reskinned chest beam) deals damage and knockback, and is telegraphed by a bright purple glow appearing on the Member's chest.
The Psychotic Break blast is telegraphed by the Member holding her hands up in front of herself with dark clouds forming. This blast doesn't deal any damage, but it will hold you, giving other enemies a big opening to you hit you through.
Finally, when the Member's health gets low, they can execute their Lifedrain. This has no windup period, but does have a pretty obvious indicator that it's happening: The enemy shouts "Your soul will be mine!" and begins draining globules of essence out of you through her wand. This does high damage, and will heal the Member, so block as soon as you can!

A very solid and tough enemy overall. To make matters worse, her subordinates (particularly the Maleficia) use similar attacks, so practice your blocks to make it through DEMON attacks!


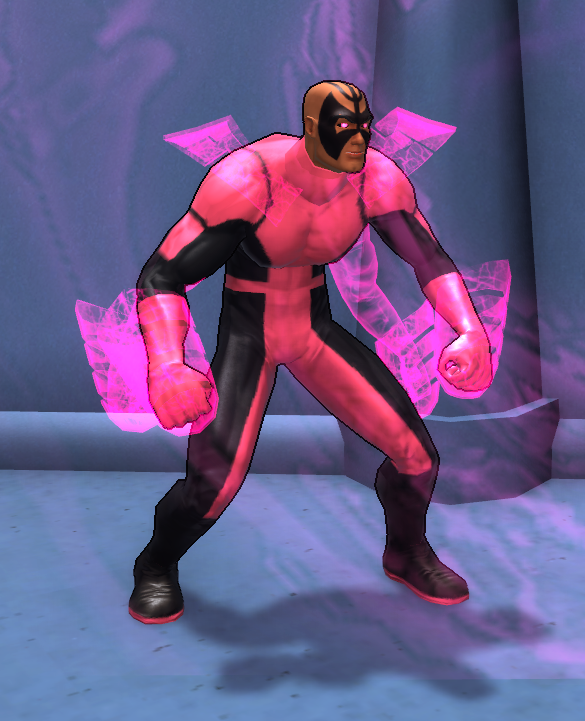
Exhibit C - PSI Agent
This four-armed behemoth, for a villain group that's usually pretty weak upfront, completely turns the Mind-over-matter theme on its head, and comes at you with fierce, sudden, and powerful attacks. The three you should look out for include his wallop, his rock throw, and his ground pound.

His wallop is a sudden melee bash that has a high chance to knock or push you backwards. There's not much that can be done about this attack, but he doesn't use it very often. Mostly, he likes using it directly after using his...
Ground Pound is a radial AoE charged smash, which has the typical telegraph symbol over his head. However (and this is very important) this attack is essentially unblockable. Its effects include a bit of damage, and a stun that will affect you, even if you block. Instead of bracing yourself for impact, what you should do when you see this being prepared is back up! He thankfully cannot move while charging this attack, so use spacing to escape the stun and followup wallop!
His final attack is his Rock Throw, which is a typical charged, telegraphed, single-target ranged attack. As soon as you see him picking up rocks, block, or else you'll get damaged and knocked back!

PSI Agent is imporant, as he introduces the concept that you can't exactly block everything in the game. Positioning is important, and when fighting enemies like Brickbusters, Gravitar, Gigaton, and the Serpent Lantern, this fact becomes all the more poignant.


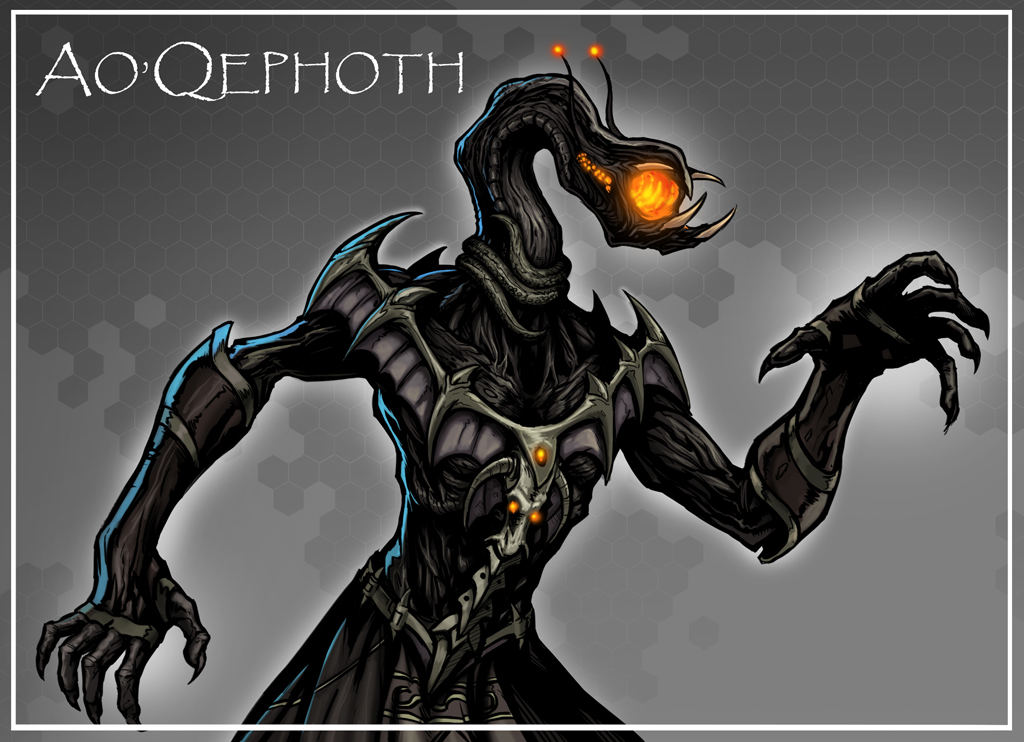
Exhibit D - Ao'qephoth
The bane of any smash-runner's existence, Ao'qephoth's claim to fame is having ungodly good lifedrain abilities - which must be countered with blocking and positioning to stop him from being effectively immortal. He does not telegraph his lifedrain attacks at all, making him probably something of the 'final test' you should take on whether you've mastered blocking.

Firstly, Ao'qephoth has a trio of telegraphed single-target attacks: A Shadow Blast, Defile, and a Shadow Hold. The blast does very high damage, but if you're a very sturdy tank, you can shrug it right off. His Defile is very similar, both in damage and in look, but has the added effect of reducing healing effectiveness (which is unblockable, unfortunately). His hold is telegraphed by him crouching down and balling up his fists. An early-block should be used on it, as it deals no damage, but it will hold. He also likes to follow it up with his lifedrain moves:
His ranged lifedrain is the same as the one used by the Inner Circle Member. It's just more important to block it here, because he heals even faster and does even higher damage. Higher numbers aside, it's the same effect and tell as usual ("Your soul will be MINE!")
He also has access to the melee Devour Essence! It is a maintain that will snare melee targets and deal high damage. Even if you block, however, he will heal (more slowly), so the most optimal course of action in this case is to move out of melee range (and if possible, stay out of melee so that he never uses this). It arguably heals even faster than his normal Lifedrain.

Most people suggest just blocking whenever he's targeting you. While this is effective at stopping his regeneration, it can be a problem if the rest of the team consists of characters less capable of doing damage than the primary fighter. Being able to sneak in edgewise strikes while under fire could be the difference between a victory and a time-out.
Conclusion
That about covers everything you should know and probably would want to know about blocking. Not only is it an integral feature of the game, but it has a number of different applications and techniques associated with it for every situation. Finally, on some enemies, a combination of strategic blocks, timing blocks, and movement, can overcome some of the tougher enemies in the game. Combine your newly learned techniques, strategies, and obtained blocking powers, take to the battle, and remember to BLOCK!
26 Comments
An R Key5993 13 Sep, 2021 @ 8:26am 
I like that this wasn't just a smart ass guide but actually give info on not only why to block but multiple techniques of blocking and even gives examples. If this guide was made out of frustration it did help some of us noobies.
genghisjayder 16 Dec, 2020 @ 6:36pm 
'wow' this will save my unleashed character, thanks.
afro, afron't 7 May, 2019 @ 11:43am 
If the author decides to take down all his excellent guides , then I will tell you how to save the information to your PC to keep them for personal reference:

>Right Click on the page
>Sage Page As
>save the html file on your pc.
This will let you access the page offline even if he takes them down.


While Cryptic obviously is not treating their customers with respect, the author is hurting even more innocent people by taking down these guides. They are the sole source of much of this information that is available to the layman. If he removes them he is acting just as bad as Cryptic in this regard by not listening to his audience. I highly encourage him not to do this. I don't want to nullify the author's choices or protest, but others need not pay for his choices.
Siegeric 11 Apr, 2017 @ 7:55am 
Something I found especially useful when Blocking is to utilize the keybind system to make Block a toggle. It can be done by using the following commands:
/PowerTrayExec 1 16
/bind <insert key> PowersCancelAllActivations
Result: Pressing Shift will toggle your Block on and keep it activated without having to hold it down, though other power activations (but not movement or auto attack activation) will turn it off. When you press <insert key>, your Block will be turned off if it is on (the same key can be used to display weapons out of combat by canceling an attack mid-charge).
DicesMuse 12 Dec, 2016 @ 1:48pm 
This has been a very helpful boon to my game play, still really new to the game but having a self-heal tic with the Grimoire this blocking tech really upped my resilience in game! Thanks!
BudderBoat 14 Apr, 2016 @ 8:56am 
Great Guide!
chaosph3nx 17 Jan, 2016 @ 6:23am 
Funny thing is, in Supervillian Onslaught I found that Grond, Gravitar, and Medusa can not only break my block but disable it for a few seconds as well. I don't remember this being the case when the update began but it is a consistent thing now. Very frustrating.
Fruittymcnutty 25 Feb, 2015 @ 9:37pm 
A good guide. I didn't know that there were different blocks based on timing. Learned something new today, thank you.
BigRed 25 Dec, 2014 @ 9:43pm 
A very good writeup. I would certainly like to see more active blocking take place in the game. :medicon:
Tenbux 11 Nov, 2014 @ 10:11pm 
Spectacular explanation. I made it all the way to 40 without understanding how the hold/knock resistance worked. Spent an awful lot of time wondering why various knocks/holds were breaking through seemingly at random in identical conditions. I assumed random chance and lag.
Now I know, and knowing is half the battle!