Project 5: Sightseer

Project 5: Sightseer

37 ratings
Advanced Start Guide
By Syrius
This guide allows you to skip obvious things like how to move etc and get straight to the starting walkthrough. It also contains a much more indepth look at game systems and concepts and aims to answer questions you might have.

Inside you'll find here helpful hints, explanations and walkthroughs. For the TLDR just read the "Game Concepts" and "To do" sections.


The guide is based on my experiences in multiplayer on a public server, having tried single player I found quite a number of inexplicable experiences/bugs, I would strongly recommended playing on a public server, there are people to answer your questions, and the whole experience seems more stable, not to mention it's how the game is intended to be played!


Usual disclaimer: I'm learning, I've been playing around 40 hours and wanted to share some of the experience I have gained in that time, hopefully answer a few questions others have. That said I am always grateful to be corrected or include things I have missed, so please if you spot something I could improve, let me know in the comments and Ill try to sort it out! Thanks.


2
   
Award
Favorite
Favorited
Unfavorite
So you're new, huh?
Game Concepts
A couple of features not immidiately apparent that its worth being aware of:
- If (when) you are playing with friends start close to each other, both when you pick your location on the planet and when building bases. The planet is HUGE and you'll want to trade.
- Weight effects your vehicle, see below.
- Rain reduces the range of your radar (and weapons, and Miners) and makes you aquaplane, sliding around like crazy.
- The game world persists once you log off. Your vehicle and your research remain even after you leave the game. (But not if everyone leaves the server)
- In your base your vehicle will draw power from the base power, allowing you to mine continuously if you have sufficienct surplus. (this is amazing and will save you hours, and hours of tedium if you set up your outposts in good places)
- Resources are eventually consumed. Extract them, but know you cant rely on them always being there, the smaller the deposit, the less materials before it vanishes.
- Certain biomes have certain Abundant Resources, this means in a desert ore extractors will bring up silicon (sand), in mountains they’ll bring up gravel. Liquid extractors will bring up water, this is particularly handy once you start balancing pollution. Not tested water extraction in a desert however...

NPC Update 30/03/18 Onwards
- Some biomes are more resource-rich than others: mountains have more resources, flatlands have less.
- NPC outposts have a percentage chance of spawning in each region (regions are 333m x 333m) that has two or more resources close together. The default setting is 50%, as things are calculated that should work out to 2.5% chance per region.
- Capturing an NPC base is an excellent start, careful if you find one with defences, they must die before you can capture it.

Driving and You
Top left of the screen next to the options bar there is a small summary of your vehicle, divided into Health(HP), Power(Pwr), and most importantly Weight(W). Hit (i) to bring it up.


HP - How healthy you are, as things stand I've only found two PvE ways to take damage: UFO's and the Night Pillar artifact. This is a pillar of stone that glows with purple bands at night and damages anything close to it. The UFO's will only defend themselves at first, but spawns escalate in quality when you destroy them, tier 2 UFOs will guard loot, take care! If you do take damage, to repair, go to an outpost with the correct resources (the resources you used to make your vehicle), right click on your damaged craft to find “repair”. HP is also indicated by the damaged portion of your vehicle appearing in red at the bottom right of the screen.

Pwr - Possibly the most frustrating stat, its the blue bar that appears and runs down when mining, or shooting energy weapons etc, this is also shown bottom right. The green number after the numeric representation of the stored power is the interesting bit, the higher this is the quicker the battery(blue bar) refills. So, turn off your modules when you want it to charge faster.

W - If your vehicle feels slugish, struggles to climb inclines or is slow. You're probably carrying too much (or moving through trees). Items in your inventory take up three resources: Volume(the % in the bottom left of the inventory(i) window and max value on the right of the window), Compartments(the squares in your vehicle's inventory(i), expandable with an external storage module), and Weight(W).
Compartments and volume have pop up warnings if you try to exceed them, weight lets you go nuts upto 200% of your capacity, at which time your vehicle is immobilised, but tbh is useless far before then, anything over 120% is a struggle, over 140% and youd best be close to home or have the patience of a saint.. A better suspension, or turbines for an aircraft, increases your carry capacity(W).

To do:
Drive around a bit, enjoy the scenery, and check those (!) for abandoned parts (marked with green stars on the mini map), upgrade your vehicle and check those resources. You're looking for a site for your base, once your first building is placed every resource and artifact on your mini map will belong to your new base, you can claim around 5-8 resources with a single base, maybe more if you get really lucky. Find a Copper site with silicon nearby (most sand, mine it to check), and as many other resources as you have patience to find, this will be your first outpost.

Scout Drones
You may find or eventually build one of these little beauties. Initially a novelty until you realise you can select a resource marker on the mini map, and by pressing (v) you can send it to scout that resource for you! You may also find cargo drones, send them after loot with (g).
Outpost Building

Setting up Shop:

Your first base should have a plentiful supply of copper and silicon, most early structures use these and/or hard metal, which can be made from copper. Aim for larger deposits, "Medium" resources are less than ideal, but the size mostly effects extraction rates so patience has the same effect as larger deposits. Smaller deposits will also be totally consumed sooner.

Beaches (and "sand") are excellent sources of silicon, no resource marker required, they'll net you 600+ ticks with your mining laser, at that high rate of extraction it won't matter much that you have to top up now and again. Different biomes have different abundant resource levels, so an extractor in the desert will bring up silicon (sand) in high quantities, the same is true with gravel in mountains for example.

< Some sandy areas will work the same as beaches, there is a slight colour difference in the sand, test it first, don't get caught out, and remember areas get depleted with overuse so you need a reasonable area of sand to mix it up. A few more unusual area's can also provide silicon, they seem associated with water however. v

Other resources that are helpful provide clean power, geothermal heat and ammonium are excellent for this. Avoid the smaller Geothermal deposits, a Tiny geothermal deposit is about as much use as catching farts for methane.

When you build your first building you will be prompted to found a faction. You can join one before hand, and then you will have access to that faction's research, making for a whole different guide, I assume from here on that you are setting up your own. Pick a good name, but you can rename later if you need to with the /renameFaction <new faction name> command.
Having other people in faction with you is a whole lot better, so play with friends, or consider joining with other new people, you each get the server ourpost limit (default 5), so more of you is better.

Once you've found your spot you need hard metals, copper can be right clicked in your inventory into hard metals, build a couple of storage containers to empty your inventory into. Sadly no way to store spare vehicle parts (yet, research later) so give them to your friends or salvage them.

If you really must hoard (trust me, I know the feeling) one of the earlier researches allow you to build a Small Defence Tower that can hold a single External module, you can use an External Storage module on this tower to hold a few things, just like you can on a vehicle.

Building up your base should start with containers, the containers you'll need are those for resources that can be harvested locally and hard metal, and any to hold the stuff you've picked up. Eventually you'll need a container for everything, so don't worry about building too many, and Gravel is very useful, have plenty of containers for it once you have the hard metal to spare.

In general (depending on biome and the abundant resources,) it’s best to let the extractors collect Gravel unless you really need it quickly, no need to mine it yourself, you can go into your Inventory(i) and right click on your mining laser to turn off gravel collection.


To do:
Mine the copper and convert it to the hard metals you need to build containers by right-clicking on it in your inventory(i) (4k per container). Build as many as you need, but at least one for each of the ore resources in your outpost (the green or orange resource indicators are those claimed by an outpost, green for yours, orange for neutral) plus one for gravel (preferably 6+ for gravel, its good to have a stockpile for constuction after the research is finished, the more gravel you have the more base you can build once the tech is researched.) Prioritise the containers for things you are going to use, copper and silicone, possibly a gas container for Ammonium if thats your fuel of choice. By now you should have some claimed resources including copper, and a bunch of lonely looking containers, but a lovely empty inventory.

Power:
Pick your power source, what you have claimed with your base (if anything applies) will help you decide:
  • Ammonium - You need a Combusion Chamber, Gas Container and a Gas Extractor near the Ammonium. You may need a solar panel (or other power source) to kick start the harvesting and get the genny up and running.
  • Geothermal - Output will vary based on the Geothermal Heat deposit size (the Efficiency will appear in a banner), no extractor or containers required, just build your small geothermal power generator(s). Spread them out near the deposit for more efficiency.
  • Solar - Build solar panels, be aware the angle of the sun effects their output so you can point them towards the sun and they provide more power, (southward seems best, regardless of hemisphere), they dont work well at night. Build batteries and an excess of power to extend their power supply through the dark hours.
  • Wind - Expensive to build up front, but nothing else required, place them high in hilly areas, in flat areas such as deserts and oceans they work particularly well, where nothing obstucts the wind. Space them out for greater efficiency. They work 24/7, but power output varies with the wind.
  • Burning Stuff - Combustion Chambers. Just like your caveman ancestors you can pollute the fk out of everything by incinerating ancient dead things (oil, coal etc), this will rake in the power. But unlike in real life, where your death probably wont occur by pollution before old age gets you, In Project 5: Sightseer pollution has real immidiate consequences. I wont spoil the surprise ;-)

To do:
Build your power system. What you have locally will guide your choice. You need +5 power to run a small extractor at full efficiency, which is the aim here, free resources! And Science!
I recommend climbing towards 40 power however with the starting generators this is a huge resource investment, so leaving your ore extractors running whilst you explore is a good plan.

You can check your Electricity production with the (misleadingly named) 24H Summary(u). It updates in real time.


Make notes on the map as you explore, recording the locations of resources you dont have inside your outpost. Trust me, you wont be able to find them when you need them!
You can right click on the map(m), but it is more accurate to park where you want the marker and type /mark <NAME>.

You're gonna need power for extractors, but also: Science!

For Science!
Outposts, what are they good for? Huh!

This section could get long, and :will: contain spoilers once you get down to the tech tree! I am working on a Tier by Tier list of technologies, costs, and results. For now, you need to build one of these:
(only one type of science building, that one -> although your colours may vary).

Research:
You can set up a Science Lab as soon as you can afford it, it consumes power (25) and resources from your containers over time to complete the research(y) you choose. If you have insufficient power research is slower, and not enough resources causes the lab to consume what you have, until one of the resources runs out, then it stops research until that resource is available again.

Building and powering two Science Labs in the same base is recommended and slightly increases productivity, but not double, both labs operate at 75% efficiency. Building 3 labs is barely an improvement over 2 labs at all (an extra 1.5 science). You get some serious diminishing returns on multiples in the same base, 2 is an ideal balance of power required to science produced in my opinion, certainly don't build more than 4 labs you actually loose science!
+16.875/time is the highest science/time production you can get, with 4 Labs. (Thanks to naib864 for the maths).

Be aware that more science labs could also consume more materials as well as power.

That said, setting up a second outpost for science is a great idea, it allows you to research two projects concurrently (or more with more bases), but a single base will only allow consecutive research no matter how many Science Labs you build.

Also consider building research bases near Artifacts, they will give faction-wide bonuses once researched that are unavailable anywhere else, they also lead on to research unavailable any other way.

This is taken from Lonestar's forum post, as it says its out of date, and some things are missing or in the wrong order, but its still a handy point in the right direction:
"Out of Date Tech Tree[cdn.discordapp.com]"

For a much better tech tree, check here[drive.google.com]: All credit to ian76g from the official game discord channel.

The following list may have unlocks (UL) that are only part of the story and it is definitely a work in progress, but combined with the Tech Tree, it makes for decent quick reference. Where the list below conflicts with the Out of Date Tech Tree the list is probably right as I made it from observation 03/2018:

Tier 1 Techs (34,000 Science Points (default))
  • Protection - Short walls, (UL Light Protection) - 12k Hard Metal
  • Maufacturing - Mk 1 Suspension, Platforms, (UL Foundations*) - 36k Gravel, 9k Hard Metal
  • Chemistry - M1 Engine, Reaction Chamber, External Gas Store (UL Explosives) - 2k x Fe, Mg, Al & Ni
  • Electronics - Mk1 Generator, Mk 1 Radar, Mk 1 Miner's Companion, (UL Automation) - 6k Silicon, 6k Copper
  • *Foundations - Surfaces, Helipad, Dock Siding - 72k Gravel.
Tier 2 Techs
  • Light Protection - Silicate Plating, Aluminium Plating (UL Heavy Protection with Metallurgy)- 12k Silicon, 12k Aluminium
  • Lasers - Mining Beam, Small Laser Beam - 12k Aluminium, 12k Silicon, 12k Copper
  • Remote Control - 2x Defensive Towers, Control Box, Wall Gate, Security Poles - 12k Si, 12k Cu
  • Automation - Mk 1 Computer, 6x Sensors (UL Drones*) - 12k Silicon, 12k Copper
  • Explosives - Small Minigun Turret, Small Balistic Turret - 12k Sulfur, 12k Ammonium Nitrate
  • *Drones - Scout & Cargo Drones, Comm Tower, Drone Hangar - 1200 Al, 1200 Si, 1200 Cu (typo?)
  • Vehicle Manufacturing - Manfacturing Hub, Puma Marauder, (UL Metallurgy) - 48k Hard Metal, 6.4k Silicon, 6.4k Iron, 6.4k Aluminium

Tier 3 Techs
  • Metallurgy - Bridge, Ramp, Floodlight, Steelmill, Cargo Stand, Mk 2: Engine, Generator, Suspension (UL Aerodynamics) - 72k Gravel, 18k Hard Metal, 32k Silicon, 2.4k Coal, (UL Industrial Standards)
  • Advanced Sensors - Mk 2 Scout Drone, Mk 2 Scanner, Radar Tower, Mk 1 Sensor Jammer - 6k Gold, 6k Copper, 6k Silicon
  • Plasma - Small Plasma Turret, (UL Superconductors) - 12k Platinum, 12k Sulfur
  • Missiles - Small Missile Launcher - 12kHard Metal, 6k Ammonium Nitrate, 2.4k Copper
  • Heavy Protection - Tall Walls, Iron Armour, Steel Armour, (UL Alloys*) - 18k Iron, 360 coal
  • Advanced Materials - Mk 2 Miners Companion, Steel Hydraulic Suspension (UL Tier 4) - 6.5k Hard Metal, 12k Copper, 12k Silicon
  • Industrial Standards - Large Extractors & Storage, Generators & Batteries(Lots of stuff) - 18k Cobalt, 12k Silver, 6k Niobium
  • *Alloys - Armours: Platinum, Cobalt, Chromium & Tungsten, (UL Lightweight Composites) - 12k Cobalt, 12k Platinum, 12k Chromium, 12k Tungsten

Tier 4 Techs
  • Aerodynamics - Turbofan Mk 1 & 2, Meerkat, (UL Air Freight*) - 24k Aluminium, 12k Silicon, 12k Copper, 12k Titanium
  • Enviromentalism - Mk 2 Wind & Solar Generators, Solar Array Mk 1 & 2, Large Geo Generator - 12k Selenium, 12k Silicon
  • Modular Design - Cobra Skirmisher, Hydro Motor, Titanium Suspension - 24k Steel, 9k Titanium, 3.2k Rubber
  • Electromagnetism - Small Rail Gun, Small Gamma Ray Turret - 12k Iron, 12k Copper, 12k Tungsten, 12k Cobalt
  • *Air Freight - Strato Freighter - 32k Aluminium, 12k C-opper, 12k Iron
  • Superconductors - Mk 1 WASTEM, Mk 2 Computer - 12k Lead, 12k Palladium, 12k Chromium, 12k Niobium
  • Lightweight Composites - Interceptor, Heavy Turbofan Mk 1 & 2 - 12k Titanium, 12k Silver, 12k Platinum

Tier 5 Techs Incomplete
  • Advanced Defensive Weaponry - Base Turrets: Beam, Ballistic, Plasma, Missile, Railgun - 12k Tungsten, 12k Cobalt, 6k Nickel, 6k Silver, 6k Magnesium
  • Magnetic Locks - Arachnid - 36k Silver, 24k Cobalt, 12k Niobium
  • Stealth Composites - Mk 2 Sensor Jammer, Stealth Composite Armour - 36k Graphine, 24k Iron, 24k Silicon, 2.4k Rubber

Also of note: pollution reduces science, high radiation, CO or Co2 will give your base pollution. You can check this both in the 24 Hour Summary(u) window or, in the map(m) window, hover over the name of your base in the map side bar.

To do:
Build your Science Lab, two once you can power and afford it, choose your Research(y), go and mine everything you need to complete it and put it in your containers. Wait, Profit!
A second base will let you research a second technology at the same time.

More bases let you extract more resources which you can then ship to your HQ with trade routes, so aim to claim resources you’ll need for science, and next time you probably won’t have to mine for the science yourself. Make this an aim going forward!

Check the +?(u) (24 Hour Average Resource Summary) symbol at the top left (when you're in an outpost) gives you info on the amount of power you're producing, you can also use the dropdown here to check your CO and CO2 emissions and how much nature is covering your donkey(:sigh: @ sensor). A little wiggle room here means you can probably go caveman to a limited extent. So a Small Combustion Chamber burning off a little coal isn't so bad, but be prepared to demolish it later, you'll need the CO and CO2 allowance for other processes. The coal still gets used in steel making, so not a wasted resource.
Note: Resources you don't produce/have won't appear on (u), looking at you CO etc...
Trade! Have you got the lobes?
Trade: Routing your Resources.
Once you have a base up, extracting and researching, you'll soon realise that waiting for research is slow. Ain't no one got the time for that when you're slumming it in a sub par, reskinned 70's hatchback with bald tyres. So strike out and look for the resources you dont already have, especially ones needed for your research, for some guidance on what you need check out the Tech Tier list in the Reseach section. But no new resource is a waste, and having duplicate copper and silicon will get your new base set up faster.

If you can find a nearby spot, 5-8+ resources, no more than 5-10 mins drive from home then you've probably found your new outpost, an artifact in there is also a plus, but consider it less valuable than any resource medium or higher. You can always build a base later to research them.

Trade(t) routes are going to help you build your new base and get all the nice new resources to your HQ. You can only trade what you have containers for at both ends, then, just like setting up your first base: build containers, power and extractors for the resources local to your new base, plus storage for copper, silicon and hard metal (to aid construction). Then, parked near your containers in your base (either end works), open the Trade(t) window, select the "New" tab, and click the obvious button at the bottom.


This starts a timer up at the top right of your screen near the mini map, this timer ends when you park up in the destination outpost (You have to begin and end landed if you fly the route). It'll ask you to accept that this is the end destination of your trade route, do as appropriate, generally "accept". And your trade route is made!
The amount of materials that can be transfered via your trade route is based on the size of the vehicle you made the run with and how quickly you got the run done, so dont dally.

In your destination base bring up the Trade(t) window again, in the "New" tab there will now be a section where you can select goods to send(see above), choose the materials and amounts, once accepted there will be a 1 badge on the Offers tab, (this can also be triggered by other players bringing trade offers to you, you can only accept in your own (faction) outposts, however I'm not sure what part faction ranks play in this process if any), open the Offers tab and accept your new trade route. You can fill your trade route, with the goods you want transfered both ways, the % in the top right of the Trade(t) window will turn red over 100% so divide up your items in the proportions you want up to 100%. You can change the proportions later if need be. (little cog button, thanks January update!)

By supplying your new outpost with some copper and silicon you wont need it locally to build it up, and now your HQ has a supply of new resources it can't usually get. Remember you need containers for the resources!

Note: you cant actually set up trade routes for resources you dont have, and this section of the guide skips out how to set up a new base, harvesting resources etc, read the base building section if you've forgotten already. A route set up will wait happily inactive until you need it tho, so dont worry if you have set trade up early.
Repeat at will, and remember trade routes can flow both ways, so if you left some resources you need at HQ, a quick modification to your trade route can get them here without a long drive!

To do:
Find a spot with 5-8+ resources you don't already have (copper and silicon duplicates are acceptable), within 5-10 mins drive of home is ideal. Now build your base as above, you'll need containers for all the resources local to your new base both there, and in your destination base. Park up by the centre of either base, open Trade(t), hit New Trade Route and make haste for your destination base, with the timer running up by the mini map.
When you arrive by the centre of your destination base, hit Accept on the pop-up, and in the Trade(t) window do the obvious. Enjoy free flowing loot!
Factions, the Basics.
Basic Factions: Because that's all we have right now.

OK, firstly I'll point you back at Technomunk's excellent Commands Guide, which gives us about 50% of the info we have, the other 50% comes from the important Neil's Getting Started guide, also here on Steam. I've shamelessly stolen the info in both guides and combined them here.

Factions are handy because each member can now build outposts on materials that others haven't and use trade routes to ship it to the faction research locations. This is important as the whole faction shares research, as I mentioned briefly earlier. Also a centralised location means that rare or high quantity materials required for building certain vehicles and attachments are all available in one location. Really large factions may have multiple centres for production. But with only a handful of people its more efficient to have a single capital, or two at most, or you risk spreading limited resources too thinly.

Once you found your faction, with the command listed below, or simply by building an outpost, you are the Rank 0 member of that faction, the highest rank possible. "You can promote people up to your level and demote/kick people lower than yours. But the officer rank levels 0 - 3 offer the following benefits:

Rank 0: Declare war against a faction or strike an alliance.
Ranks 1 - 3: Manage outposts. Setup trade routes. Change outpost and faction colors. Invite other players to the faction."

There are ranks below 3, but they don't seem to actually do anything yet. Whilst faction membership can be abused, when you leave a faction you only take your current vehicle and its contents with you, so you can't exactly loose much. So just promote everyone to where they are useful (0-3), unless you have severe trust issues. You can do this with a right click on the correct name in the Tab list, or the commands below.

Faction Commands
/leaveFaction - leave current faction. This will abandon all your outposts and reset research, however you get to keep the vehicle with its inventory.

/startCoup - start a coup, trying to become the new leader after a server-configured time (I believe default is 2 weeks). Requires others to vote in your favour.

/createFaction <faction name> - create a new faction (you must not already be in one).

/inviteFaction <player name> - {requires officer rank} invite a player to your faction (the player must not already be in one).

/kickFaction <player name> - attempt to kick a player from your faction.

/renameFaction <new faction name - {requires ownership of the faction} rename your current faction.

/promote <player name> - attempt to promote a player.

/demote <player name> - attempt to demote a player.

/war <faction name> - declare war on a faction if at peace or make peace otherwise.

/war2 <faction name> - answer to /war from the other faction.

/ally or /alliance <faction name> - toggle alliance with a given faction.

/ally2 <faction name> - answer to /ally from the other faction.

To do:
Invite friends to your faction by right clicking on the friend's name in the Tab window, which lists the population of the server.
Coordinate with your friends to Pokemon all the resources and set up trade routes to ship the materials not present in the HQ, to the HQ. This allows all research to take place there uninterrupted, but also gives a location that will always have the resources to build what you need or have newly researched.
Profit!
I'll happily expand this guide with any questions that arise, but once you have what is written here mastered you have enough basics to get you started, without the (tragically, necessary) bits about how to move and look around and how to move your jaw whilst sucking that egg.

Artefacts or some research details are probably the next upcoming sections, but they're long, numerous and occasionally mysterious beasts.
Thanks to Neil and Technomunk, head on over and give them a decent rating for the hard work. Also thank you to Ian76g and naib864 for letting me reference their work here!

Also you may want to check out:
The Patch Notes[docs.google.com], for the latest state of the game.
Ian76g’s Manual[docs.google.com] for other features and details.

Hopefully you found something useful, if you have a question ask it and I'll clarify/include/correct the guide.

8 Comments
Krzeszny 29 Aug, 2022 @ 10:27am 
@Syrius I'd add to this guide important info that once you unlock Mk.2 computers you can use any controllable vehicle as a drone - for combat support, cargo and scouting.

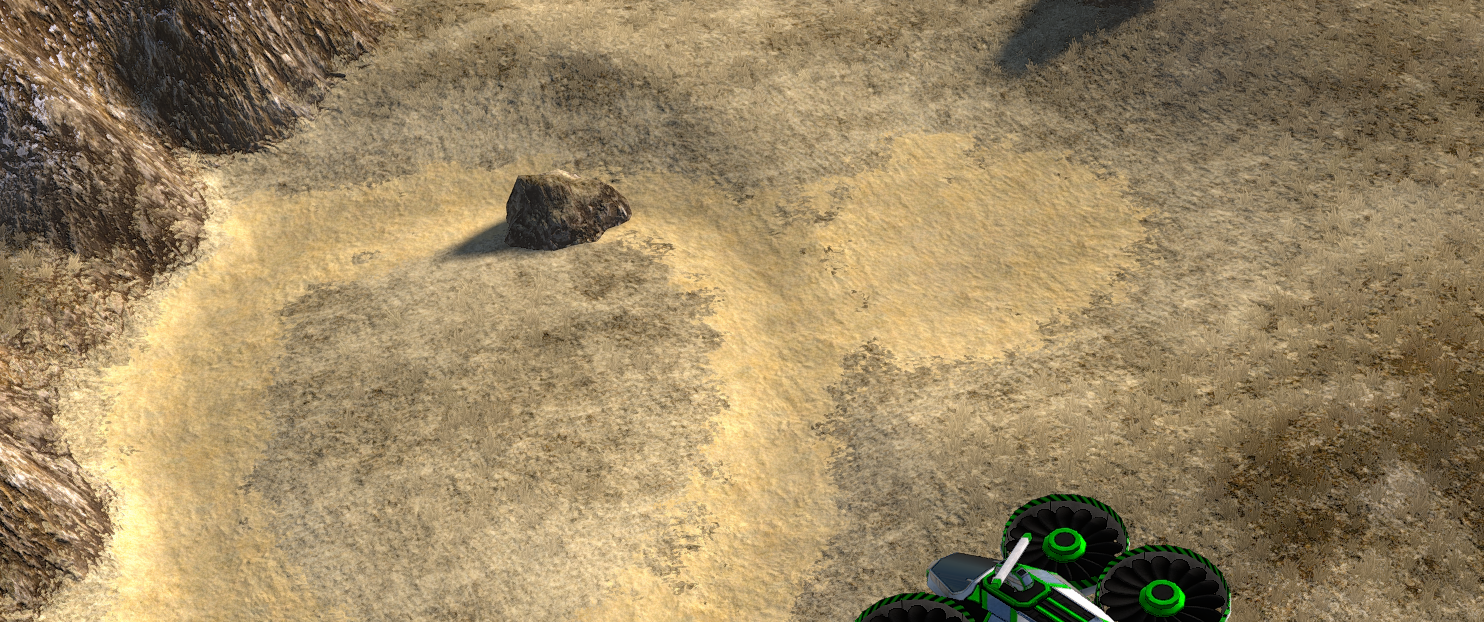
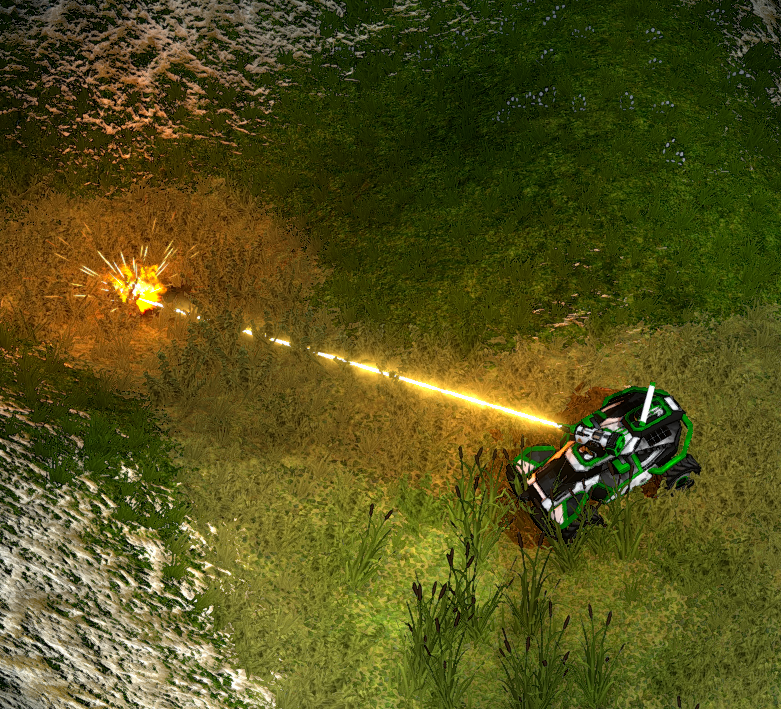
@Mika if you've never realized, you can only mine resources from specific places: sand patches, rocks, and inclinations with a special texture (tall as well as very short cliffs). Not from the ground.
K 5 Mar, 2022 @ 6:40am 
man i stuck at the tutorial. "mine 1000 titanium" i already open mining beam turret and place my car directly in front of the titanium but nothing happened. btw nice mini profile,, what game is it from?
Syrius  [author] 31 Dec, 2019 @ 2:13am 
Thanks!
I haven't played in a while, so it probably needs a jolly good update! But it's great to hear its still useful!
Awfulhorrid 30 Dec, 2019 @ 2:31pm 
Thank you for the guide, but specifically thank you for "Outposts, what are they good for? Huh!" I laughed entirely too much at that! (While singing it, of course.)
Syrius  [author] 22 Mar, 2019 @ 10:31am 
Apriciated! I added in a note to reflect it.
I haven't played in a little while so can't confirm myself, but its definitely worth knowing and I'm sure others can confirm.
Until next time I need my fix ;-)
Foreststrike 21 Mar, 2019 @ 11:27pm 
One thing I've noticed with Science Labs now is that it consumes more resources the more labs you put down.
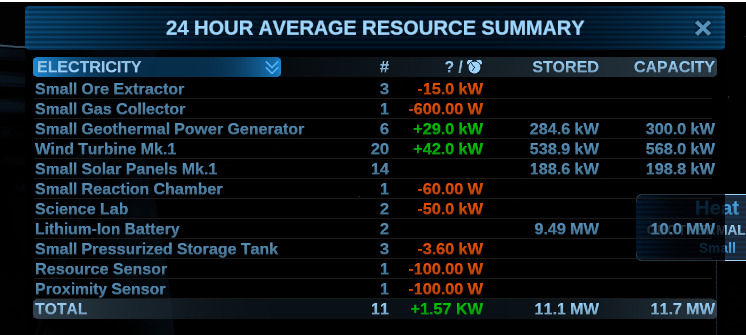
The increased resource consumption was when I placed down four labs, noting that there WAS a higher demand for resources.
I then removed two labs, also noting that the resource demands decreased.
I'm not sure of the factors, but I would hazard a guess that two science labs equates to about double the resources required to research for 7.5 per second (At no pollution).
Syrius  [author] 2 Mar, 2018 @ 3:32pm 
Thanks!
Added in your advice.
Somewhiteguy 2 Mar, 2018 @ 10:34am 
nice guide btw: you can build wind generators on the shore close to the deep water for 100%,
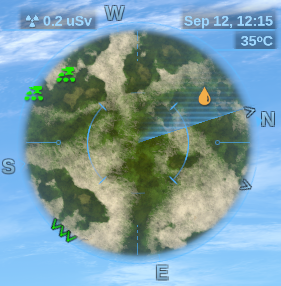
i think the best spots you can start is in the desert or near the sea (or both :D) love the no spoilers thing you did there but there is a way to reduce the pollution by creating oxigen anyway good guide and good luck in multiplayer