Arcade Moonlander

Arcade Moonlander

32 ratings
Adventure Mode Routes (Map & Guide)
By Krypsys
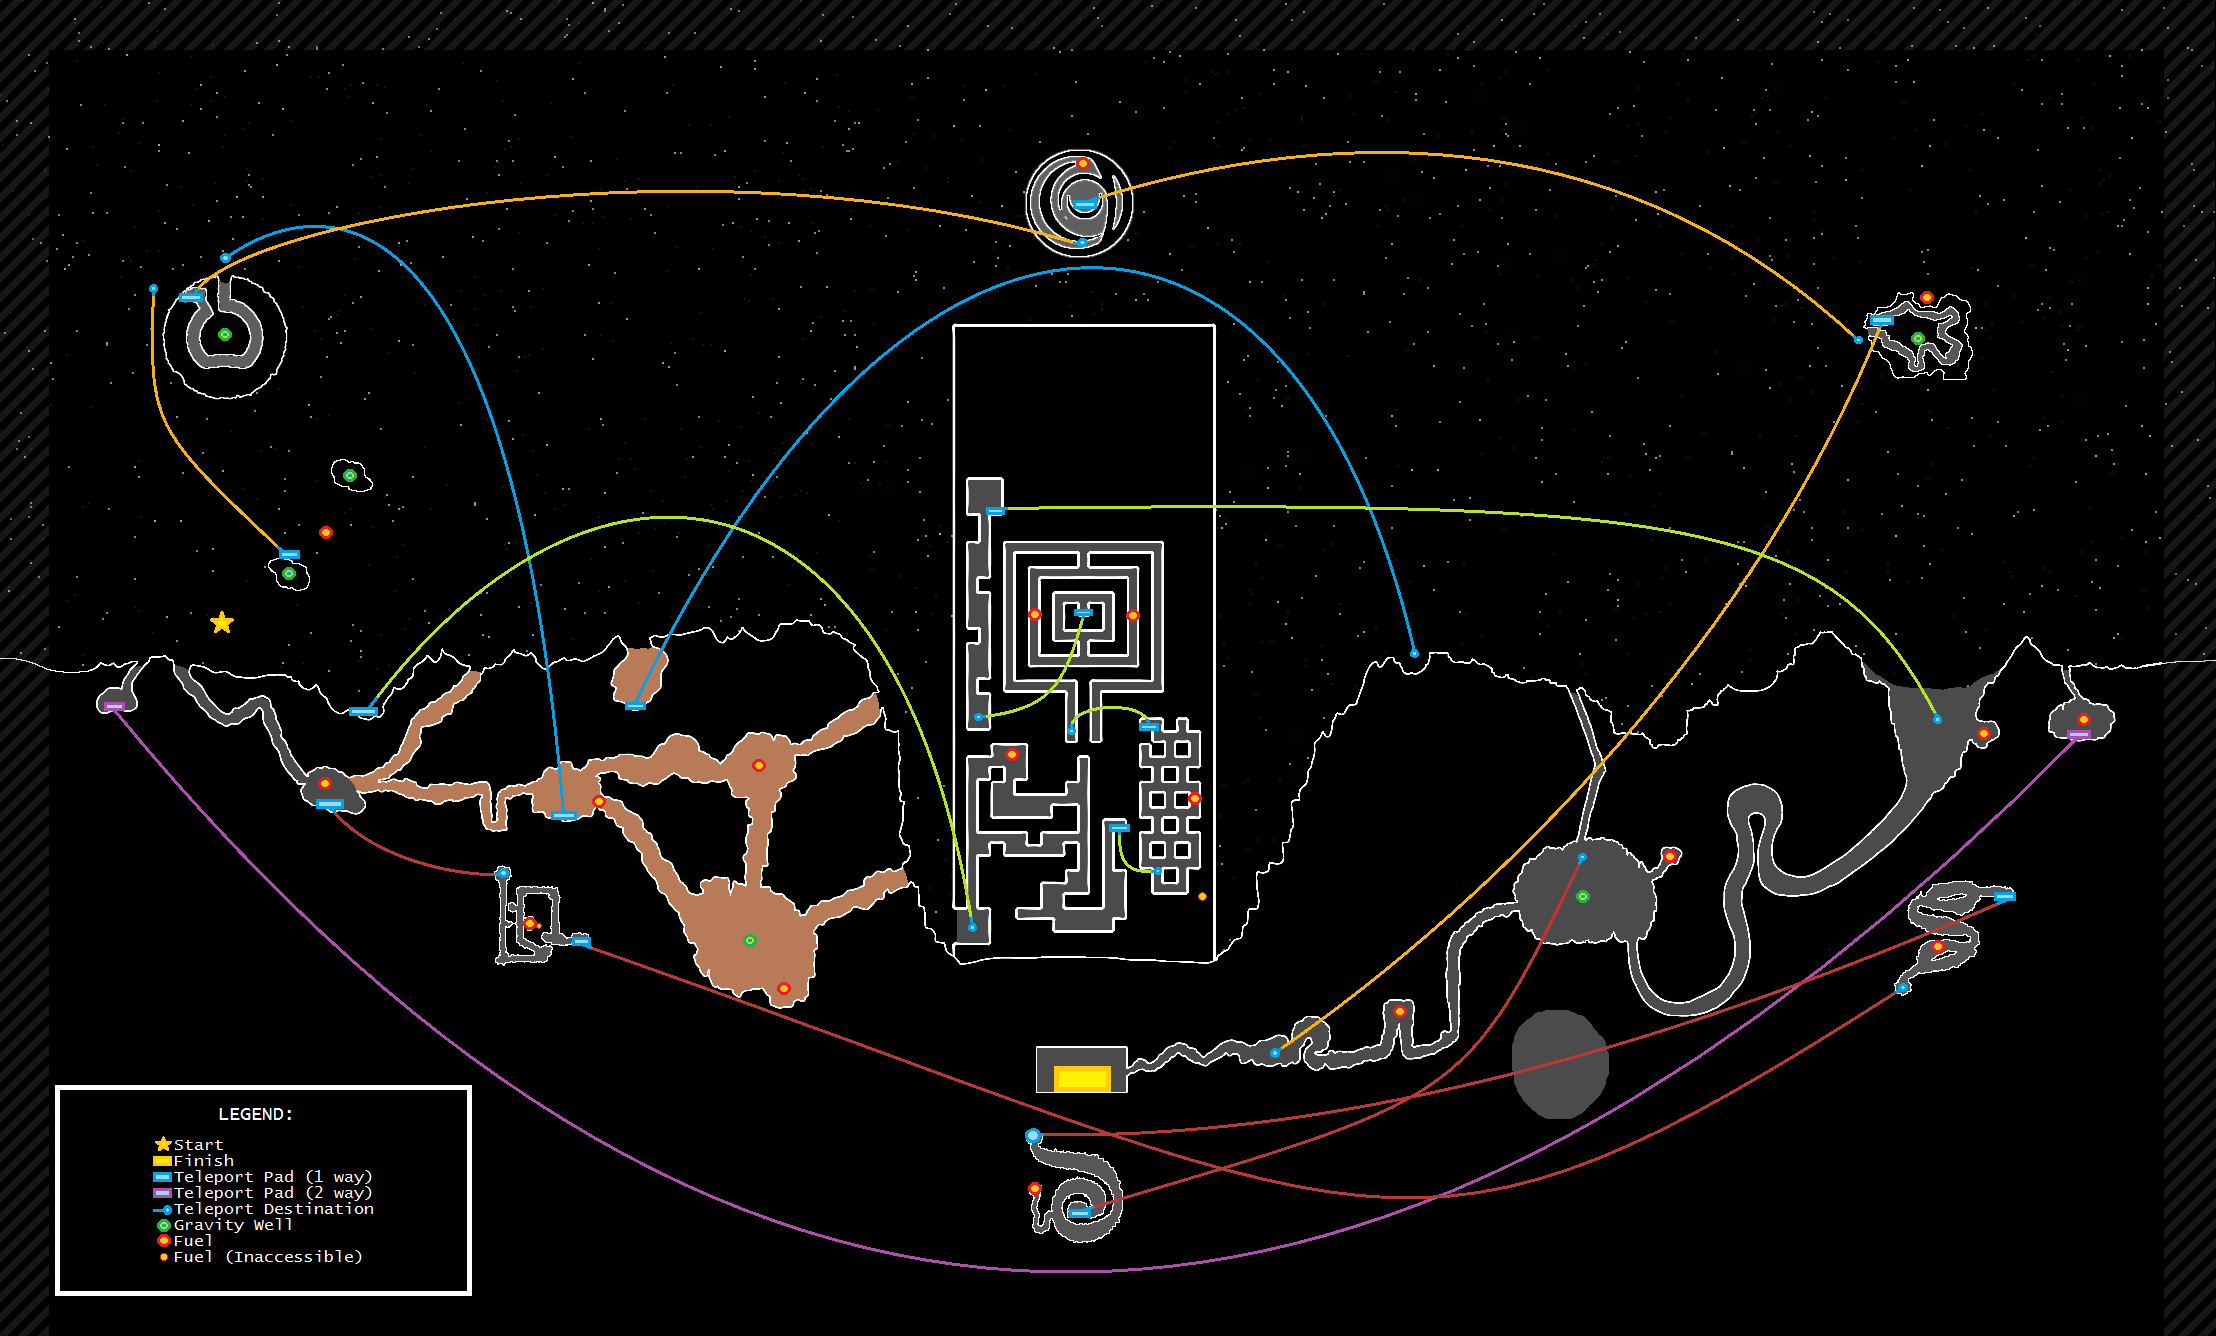
Map showing paths and items in adventure mode
   
Award
Favorite
Favorited
Unfavorite
Map

Most teleporters are unpaired (1-way) and take you to another area with no quick way to return to where you teleported from. Only two teleporters are paired (2-way), allowing you to quickly travel backwards and forwards between them. One is on the far-western side of the map, the other on the far-eastern side. The purple line on the map above shows the path between the eastern and western paired teleporters.

Guides for the individual paths (red, yellow, and green) are given below as parts of the "All-In-One Route" guide.
A Note On Gravity Wells
Gravity wells are composed of a central white core surrounded by a transparent gravity field (the circumference of which is represented by a grey circle). When inside a gravity well's field not only is your ship pulled towards the core, but the entire screen is also rotated. To understand the rotation imagine that the circular gravity field is a clock face with 12 o'clock at the top when you are outside the field. Whenever you are inside or enter a gravity field the screen is rotated by an amount equal to the number of degrees you are from zero (12 o'clock) but in the opposite direction. So, for example, if you enter at the 3 o'clock position (90 degrees clockwise from zero) the screen will rotate 90 degrees counter-clockwise. If you enter the gravity field from the zero degree (12 o'clock) position the screen will not rotate as you enter. It is often easiest and safest to enter and exit gravity fields backwards so you can thrust to prevent a crash.[/i]
Fastest Route
Fastest Route:
From the starting position on the map fly to the western paired teleporter and use it. Pick up the fuel before carefully flying out the very narrow path above the eastern paired teleporter. Once out go west over the peak and immediately descend into the wide tunnel (this is where the green route terminates). Do NOT waste time picking up the fuel tank that is in the alcove here, you do not need it.
Follow the tunnel to the cave with the gravity well and take the western path all the way to the finish.
All-In-One Route

If you want to try do this in a single run without crashing I think it is best to do the hardest path first, that way if you crash you hopefully do it early on. Therefore the order I go is:
Red path -> eastern paired teleporter -> green path -> eastern paired teleporter -> yellow path. Alternatively you could do the green path first and the red second, but the yellow path should be last because it takes you very close to the end of the level.
The light-brown area on the map is not used during this route.

Start by heading west and downwards and enter the first tunnel you come across (there are two side by side, take the one on the right) and follow the tunnel down to the cave with the fuel tank and teleporter pad. Pick up the fuel tank and then land on the teleporter pad to begin the red path.

Red Path:
I find this by far the hardest path due to the presence of hazards. The path consists of three chambers.
The first chamber is riddled with space worms so be careful and watch the timing. The only thing to note in this chamber is that it is worth picking up the fuel tank here. You don't need to get this, but if you skip it you will need to get the tank in the next chamber which is a bigger and more difficult detour.
The second chamber has stalactites which will begin to drop once you are in close enough proximity to them. There are two options: either try fly through quickly to pass under them before they fall, or slowly edge forward to trigger them in order (i.e. fly after they have fallen). The first approach is obviously faster but more risky, particularly if going for a clean run. If you didn't get the fuel tank in the first chamber you will need to get the one here.
The third chamber is also filled with stalactites. Again you will have to decide between risky speed, or a safer slow and steady option. The only thing to note is that it is worth taking the top path initially to collect the fuel tank.
The teleporter pad at the end of the third chamber marks the end of the red path, and it takes you to the large cave with the gravity well on the eastern half of the map. If you simply want to finish the level then head to the lower-western part of the cave and follow the tunnel (heading west) to the end.


Head to the Eastern Paired Teleporter:
Once you appear in the cave immediately head upwards through the narrow, but quite straight, tunnel to exit the underground area (note: do not enter the gravity field, you should not need to get the fuel tank from the cave's upper-eastern side chamber). Once outside head east. Fly over and past the large inlet to the tunnel you will see below you. This inlet is marked by a peak on either side. As you fly over the eastern (second) peak you will want to start slowing down and descending because there is a very narrow tunnel just on the other side of it which is the path you want to take. You will want to be going very slowly in order to navigate this tunnel safely. Once you are through the tunnel and into the small cave pick up the fuel tank before landing on the teleporter pad. This pad takes you to the cave with the western paired teleporter pad. Follow the tunnel by flying in a upwards and eastern direction to emerge above the ground, which is (more or less) back where you began the level.

You now want to head for the green path. From the exit of the tunnel for the western paired teleporter fly east over and past the adjacent tunnel that you originally went down to get to the red path. The ground starts sloping down so gradually descend to the depression where there is a teleporter pad which marks the start of the green path (this is the first teleporter that you encounter heading east above ground from the western paired teleporter / start of the level).

Green Path:
I find this the easiest path because there are no hazards and the chambers are wide and easy to navigate, despite many 90 degree turns. This path has four chambers, the first three of which have fuel tanks (the third having two fuel tanks).
This path is pretty straight forward and only two things are of note. Firstly, from where you teleport to in the first chamber (the beginning of the path) I head upwards all the way to the end of the corridor to collect the fuel tank. Secondly, in the third chamber you should only need to collect one of the available fuel tanks, not both. When you finish the green path you will be teleported to the large inlet to the tunnel that leads to the large cave with the gravity well on the eastern side of the map.


Return To The Eastern Paired Teleporter:
You may or may not want to pick up the fuel tank that is in the alcove on the eastern wall of the tunnel inlet (note that once you are back to the start of the level there is another fuel tank close by). You now want to head back to the eastern paired teleporter by flying up and out of the inlet and heading east just over the peak. Access the eastern paired teleporter as you did after completing the red path. Once back at the western teleporter pad fly out the tunnel to find yourself back, once again, where you began the level. The final path you need to take is the yellow path.

Yellow Path:
There are two teleporters that take you to the start of the yellow path, and it is also easy to just fly there directly (by heading upwards and slightly to the west). Flying directly is almost certainly the fastest way. Of the two teleporters, the first one is located on a meteor which lies just above and to the east of where you began the level (there are two meteors close to each other, this one is below and to the west of the other and should be the first one you encounter). If you want there is a fuel tank you can collect which lies between these two meteors. Beware that there is a gravity field around each meteor. The other teleporter is much more out of the way and accessed by flying the same direction you went to get onto the red path, but at the cave you continue onwards to take the western tunnel to another cave where the teleporter is located (brown area). It is not recommended to take this latter route, but either using the first teleporter or flying directly should be fine.

There are three meteors with internal winding tunnels that you have to navigate to complete the yellow path. There is only fuel tank within these meteors (the second) and you will collect it as you progress through the tunnel. There is another fuel tank in a depression on the outside of the third meteor however you should not need to use this. The final teleporter of the yellow path takes you into the final stretch of tunnel leading to the end of the level. Once you appear in the tunnel head west until you come to the rectangular chamber with the landing pad. Landing here will complete adventure mode!
Ghost Mode

Ghost mode is a glitch that may be enabled while playing adventure mode. Once enabled the ship will be invisible. Playing in ghost mode adds anoher level of difficulty to the game.

Enabling Ghost Mode
This can be done using any teleporter in adventure mode. To enable ghost mode you have to successfully land on a teleporter and then quickly take off and fly away from the teleporter before the teleportation can complete. If done successfully you will hear the teleportation sound and see the teleportation animation but you will not actally be teleported. Instead you will be invisible, with only your flame/smoke trail visible when you fly.

Navigating In Ghost Mode
While your flame/smoke trail and direction of flight give you an idea of your ship's orientation while in ghost mode, the minimap will show you exactly how your ship is oriented. On the minimap the centre of the ship marks your position in the level and because the map in the minimap is so small, it can appear as if the ship is touching walls or obstacles when it is not. Therefore the best way to navigate is by using the minimap to quickly check the precise orientation of the ship and the general position on the level, but then using short accelerations (up arrow) to reveal exactly where you are in the level itself.

Using Teleporters
If you successfully use a teleporter (i.e. you actually get teleported) then you will exit ghost mode. Therefore, to have a single ghost run you can't use any teleporters.

Completing A Ghost Run
Apart from the obvious challenges imposed by being invisble, the greatest challenge to completing the run is running out of fuel because you cannot use teleporters. Therefore, I suggest minimising the use of any boost, and cruising (using no power) as much as possible. Cruising has two benefits: firstly it uses much less fuel, and secondly it is a lot safer and easier (i.e. only minimal use of fuel is required to steer the ship because you are moving slowly). The only downside with this approach is that it is much slower. Clearly you will need to collect fuel tanks that you are in proximity to along the way.

The route to take is pretty straight forward. You need to begin by using a teleporter to enable ghost mode. I use the western paired teleporter because it is close to the start of the level. Once you enter ghost mode you do not have to crash, but I do so that the time for the run resets (although the total time for the run does not reset). If you are going to crash then you need to choose an initial teleporter that will let you respawn at the start of the level when you crash after entering ghost mode. Again, this is why I choose the western paired teleporter, but the teleporter on the surface below and to the east of the starting position (i.e. the teleporter that starts the green run) works equally well.

Firstly, I begin by flying between the two meteors next to where you spawn and collecting the fuel tank (this is important) before continuing on. Ultimately, to complete the level in a single run you have to fly eastward over the large rectangular structure in the middle, and then descend into the tunnel and follow it to the end. There are only two options for entering the tunnel: either enter the wide tunnel where the green path ends, or, for a greater challenge, try and navigate down the narrow path that leads directly into the chamber with the gravity well. Using the former path will allow you to get fuel as you enter the tunnel, if you use the latter path you will have to collect the fuel tank in the chamber that is off the upper eastern side of the gravity well chamber.

Exiting Ghost Mode
There are three ways to disable ghost mode: successfully use a teleporter, successfully complete the level, or exit the level.
6 Comments
NaNgong 15 Jun, 2020 @ 11:39pm 
nice
Banan_player55 28 May, 2020 @ 12:20am 
nice
merfab76 11 Apr, 2018 @ 11:09pm 
Great guide, especially the map which was very useful, thanks :)
Back of Nowhere Games  [developer] 23 Feb, 2018 @ 2:24am 
Your more than welcome :)
Krypsys  [author] 23 Feb, 2018 @ 2:21am 
Thanks very much, and thanks for the mention in the credits too! It's a good game and I look forward to the expansion!
Back of Nowhere Games  [developer] 17 Feb, 2018 @ 4:49am 
Krypsys, what can I say? This guide is amazing! Thank you so much for taking the time and effort, and for supporting the game this much.

You will be receiving a key for my next product as soon as it launches :) Plus a mention in the credits when I do the next update for Arcade Moonlander (which won't be until after my current project is launched, probably around 2 months away).

Thanks again and I hope to see the times for this game continue to fall.