Oriental Empires

Oriental Empires

269 ratings
Grand Oriental Empires Guide
By Sanvone
Semi-advanced guide with in-depth mechanics analysis, based on my over 300 hours experience of playing both single and multiplayer as well some testing sessions. It contains pretty much all important informations and strategies to optimize your empire.
3
3
2
15
5
2
2
   
Award
Favorite
Favorited
Unfavorite
Venerable Ancestors
I want to express my sincere gratitude to number of people without which this guide wouldn't be possible to compile:

Cabbage - for spending hours with me while testing various units for Warring States/Imperial Era - it was fun unveiling those late game mysteries ;),

CTSS1230 - for spending hours on tests for Bronze Age and Warring States units capability - you really did a lion share of testing that was on my list,

EphemereFMR - for some initial feedback and consulting about this guide structure, as well as pointing out some grammar mistakes,

aaror - for reviewing and checking early versions of this guide - you was of great help as there are few people with experience as vast as yours.
Introduction
Welcome to my Advanced Oriental Empire Guide, my name is Sanvone and I've put many hours into exploring this game mysteries, while having quite the blast during that time. Mostly because I spent some time testing and practicing some theories I had about this game, which provided me with experience that increased amount of fun that OE brings me. As it stands out now Oriental Empire has pretty steep learning curve and many things are different from others 4X games, so I've seen many struggling players. That inspired me to share my gathered experience and data to provide answers for those who seek them.
Important note - I play for fun so I won't squeeze for every single % of efficiency, my goal was to understand game mechanics in order to make better decisions instead of looking for single moment/number when you should do XYZ for best value.
Also it was mostly done before release so news from release build alongside Warring States campaign might not be included.
1. ECONOMY
1.1) Settling
As in every 4X strategy game one of the most important game features revolves around settling new towns/provinces/settlements (call them what you want). Even though at first glance it seems easier compared to other games in this genre (Civilization), it actually has more depth that most imagine. Mostly because instead of many different resources to be aware of, there is long-term development to plan for each Settlement. Fully developed city in late game can house over 200 population! And you start each of those with only 2 units of population, so bad city positioning can result in underdeveloped cities, which are impossible to fix.

First to settle, location can't be:
- Forest, Marsh, Sand, Steep Hill, Mountain, River, Coastal Water,
then it can't be adjacent to following terrain types
- Steep Hill, Mountain, River, Coastal Water

After settling city down, it will automaticaly create it's own territory with borders 2 hexes away from it's center. Hexes inside your territory can be transformed into farms or used for grazing flocks (as long as terrain is right), which are main ways of providing food & increasing population size. Additionally any special resource located in/adjacent to your territory is used by city. Note that if single resource is adjacent to 2 or more cities only 1 of them will be using that tile benefit. So there is nothing to gain by settling in a way that borders will be adjacent to single resource tile.

Most people don't realize it, but initially the maximum range from which city can use resource is 4 hexes instead of 2 (and tooltip won't show you this). This a neat little trick that makes this happen and allows to grab more resources with single settler: after you settle you can build farms in range of 3 hexes away from your settlement. Range 3 is hex just outside your starting city territory and after you build farm on unoccupied hex, it will get included into your territory (expanding your borders and allowing adjecency rule to take place). Remember this, as 2 resources 9 hexes away are reachable with 1 city by building 2 farms in right directions :).

The actual range is even higher for Mountain specific resources as they can be 2 hexes away from your border instead of neighboring your territory. It is well thought out mechanic. Not only it allows reaching resources located deep into mountain range, but also gives chance to locate your new cities closer to fertile plains.

There is one more trick (considered an exploit in multiplayer but you can use it in single player) - quick clearing with settler units. The whole method resolves around continously settling and disbanding your settlement, turn by turn. As when you settle it automatically clears all neighbouring forests/marshes hexes, which means you no longer need to spend several turns and technology to clear them one by one. After you pop city, as long as it has less than 10 population you can disband it and get settler unit back. Rinse and repeat. Only downside - you will go through city names quicker.


- How Far away should I settle to get most of my towns?

Question which (I think) doesn't have perfect answer. There is othery question that can be answered though: what kind of map are you playing (map size?) and what strategy will you decide on after few starting turns of intensive scouting (when do you attack?). On small maps you most likely won’t be able to harvest the fruits of long investment and will have to adopt towards plans which will yield smaller but faster results.

Generally farmers settlements can maximaly use hexes up to range of 5 hexes away and herders - 7. Soo problem solved - 10 hexes between city for farming factions and 14 for herding? Not really as there are few problems with that approach.

First of all that would be perfect scenario and maps don't tend to allow optimal settling range with it's geography (difficult terrain presence). There is also the problem of resource acquiring - if you settle 10 hexes away, most likely you will miss some resources either completely or for longer period of game length. So you have to calculate how worth it is having more farming space instead of some resource earlier. Another fact is that in 300 turn game you won't be able to create 90 farms even on your oldest cities because of time constraints as it will take at least 180 turns + whatever you will need to spend on resting your settlement once labor penalty goes high. Furthermore bad events, raids and difficult to farm terrain complicate this more. Additionaly by having ability to upgrade farmlands (Irrigation) you have alternative to take into consideration. AND the further away your settlements are the less profitable trade becomes (because of limited trading ranges and need to build more buildings with upkeep per turn to include your every city into trade hub).

So we should settle as close as possible? Four hexes between cities?
Although in theory it shift trade viability at the cost of cutting it's maximum output once mid-late game arrives I don't recommend this. Cities will have much lesser development space, which will put higher emphasis on Irrigation and by mid game you will start to fall of population wise. Even though your compact settlement formation will be harder to attack, by having authority cap you won't be able to have way more cities than your enemies. So you will end with maybe 1 more city compared to rest but all your cities will be smaller and limited in ability to grow further.

Based on my combined single and multiplayer experience I would advice settling 8 hexes away for Multiplayer (unless you are playing without maximum player saturation per map size) and 10 hexes away for Grand Campaign (cause there is plenty of land to spare).

Why 8 hexes? Because it allows 2nd lvl land export building to include 2 layers of neighbouring cities which generates great trade income mid-late game. It will also keep your focus on getting that Irrigation as viable option for late game (once you run out of farming space) which isn't bad all things considered. That is when farming is involved. With Nomadism technology settling 7 hexes away is nice because those cities won’t growth much beyond initial development so squeezing slightly more cities inside range of single bazaar/market/famous market seems like a good idea.

I would recommend also 7 hexes away for factions relying on flocks (when lands for farming are limited) as even though they seem to have bigger available range in reality most games will end before it becomes a thing (cause very slow herding population growth once you run out of space). By abiding this distance you will be able to squeze 3 layers of cities into single trade network center without sacrificing potential (non-existing in this situation) growth.
1.2.1) Resources
Now let's talk about resources:

- Rhinoceros - found in fertile plains, grant +60 income per turn,


Personal Opinion: One of the best resources throughout the game. Provides as much income as 30 population (without any additional edicts). No cost attached means pure profit. Should be sought after but as the game progresses their influence will diminish.


- Horses - found in grasslands & Fertile Plains, they grant trade good for external resource for free (you still need building to export it though)

Personal Opinion: after some more research I find them to be mixed bag. On one hand possibly great (although random in price range) trade value and no initial cost, on the other: settling into bad terrain and need to work around it. Also the terrain that houses them usually have too many of them which limits horse trading income severely,


- Wild Game - Found on Fertile Plain, grants +3 Food,

Personal Opinion: more valuable than you think because population created from this resource is unemployed, which speeds up farming/clearing/building at the same time and accelerates initial city growth = faster settler from new city. I always try to settle first-second city around it for quicker expansion although later in the game it still has it's uses,


- Fish - Found on River and Coastal Waters, grants +4 Food

Personal Opinion: gives slightly more than Wild Game but you can't farm water tiles. Still 4 extra food is nothing to sniff at and it can be of great use when found in river that you will use for irrigation. I always try to settle first-second city around it for quicker expansion,


- Kaolinite - found in hills, grants +30% for exported Ceramics trade value

Personal Opinion: Helps to establish main Pottery export city, along with quite steady support for Ceramics throughout the game, superb if there is lot of space around it to settle importing cities. Great to have mid-late game as Ceramics trade value is crazy and this makes it even more so.


- Mulberry - found in fertile plains, grants +30% for exported Silk trade Value

Personal Opinion: I find Silk trade to be less profitable throughout the game than Ceramics (less technology&building upgrades as well as higher upkeep) but on the other hand it is found on terrain which makes it easier to create importing cities around it.

- Copper - found in hills & mountain hexes, allows for construction of Copper Pit/Mine which provide small constant income and ores for external trade. Since last patch is also provides +30% Bronze Trade Value.

Personal Opinion: Cheap but doesn't provide much stable income, quite valuable once trade starts to come into picture, grab early if it's availability is limited. Possibly makes bronze trade efficient.


- Gold - Found in hills & Mountains, allows for construction of Gold Pits/Mines which provide high steady income

Personal Opinion: People overestimate it's value as it doesn't provide trade resource which mean it importance is diminished late game. Still it has the highest stable income which means it pays for itself the quickest. Fully upgrading it will cost fortune but will provide income comparable to 110 population without edicts. Long turn investment.

- Jade - Found in hills & Mountains, allows for construction of Jade Scrape/Quarry/Mine, which provide stable medium income and resource for external trade

Personal Opinion: Best minable resource. It has the best base value but will lose by the end game to ceramics because of technology support. Counts as luxury resource and is worth considering creating external cities just to import it to your empire.


And 3 hidden mountain&hills resources/locations:
(Important note: You can only build 1 of each per town. Which means you can't have 2 Monasteries in the same city etc/)


- Shrine - Allows for building&upgrading of Shrine which provides peasant happiness (10%-15%-20%) and Culture Victory Points (1-2-4), and from lvl 2 - Pilgrims as trade resource,

Personal Opinion: Great to have as it is cheap and provides not only peasant happiness but quite valuable trade good,


- Monastery - Allows for building of Monastery which provides huge peasant happiness (20%) and Culture Victory Points (2),

Personal Opinion: I usually don't build them but maybe I should? It is way quicker and cheaper to build it than last lvl shrine for the same happiness and culture points altough it has rather nasty upkeep (80) and doesn't provide trade good. Definetely great when going towards culture Victory.


- Pavilion - Allows for building & Upgrading of Pavilion which provides noble happiness, culture victory points and from lvl 2 extra noble recruitment pool

Personal Opinion: - I liked building those when Palaces had really high upkeep cost as an alternative source of noble pool bonus. They are still cheap and widely available to most cities but that noble happiness isn't as attractive as peasant one. So currently I consider them after Palaces.
1.2.2) Resources (Genghis Patch Update)

- Bamboo - Found on Forest Tiles, grants Trade Resource,

Personal Opinion: Nice and thematic trade resource but not influential enough to be prioritised. With trade value of Local Goods it isn't something worth killing for. That said given relative rarity and usually spawning in the southern part of China map it is easier to export to bigger number of settlements. Nice addition to existing trade network.


- Falcons - Found on Gentle Hills, grants Trade Resource,

Personal Opinion: Another resource that should be looked for if you are playing on steppes. Almost as valuable as Pilgrims but without associated costs, it's really lucrative. Not to mention they count as luxury resource - boosting your Nobles happiness. Worth having


- Zhennan Wood - Found on Forest Tiles, grants Trade Resource,

Personal Opinion: the most valuable commodity added in Genghis patch. 3rd most valuable trade good in the game even if it loses hugely in income to both Jade and Ceramics lategame. Counts as lucrative resource. But this is not all - unlike previously mentioned it doesn't require contruction of specific building and taking the burden of upkeep cost.


- Goat - Found on Hills/Mountain tiles, grants +2 Food,

Personal Opinion: Worse version of Wild Game but in the Mountains. Given how long does it take to construct farms on those hexes it isn't the worst. 2 extra unemployed population it provides will make any mine construction faster but not dramatically. That said it isn't something important.


- Sables - Found on Forest Tiles, grants Trade Resource,

Personal Opinion: Another steppe limited resource. Worth the same as pilgrims but doesn't require additional costs. Counts as lucrative resource. Think of it as Falcons but in Forest instead of mountains. Something to look up to.
1.3) Farming
One of main ways of growing population size inside your settlements available for both Farmers and Herder factions. Provides steady growth rate for both population and income. Quite complex when it comes to succesful management.

BASICS

Let’s put everything down first. To create farmlands player needs 3 things: free hex of right terrain type, corresponding technology and time. First of all not every type of terrain is farmable – quite the opposite.

Hex Types:
Farmable: Fertile Plains, Gentle Hills, Steep Hills,
Farmable after clearing land: Forests, Marshes,
Non Farmable: Mountains, Rivers, Water, Grassland, Dry Plain, Plateau, Sand

Before you will be able to transform various hexes into farmland you will need corresponding technologies first though:

Technologies:
Agriculture (24 turn) – allows for transforming Fertile Plains into Farmlands,
Irrigation (10 turns) – allows for upgrading Farmlands into Irrigated Farmlands,
Terracing (11 turns) – allows for transforming Gentle Hills and Steep Hills into Terraced Farmlands,
Bronze Working (8 turns) – allows for clearing of forests,
Marsh Drainage (12 turns) – allows for clearing of marshes,

Each of those 4 different farms type has different construction time:

Construction Time for various Farm Types:
Farm – 2 turns of construction,
Irrigated farm – 4 turns of construction,
Terraced gentle – 4 turns of construction,
Terraced steep – 6 turns of construction,

Once you fulfill all of those requirements you will acquire new farms. But it won’t provide food on it’s own – you need to have people who will be able to work on it. Food output is dependent on amount of population working on each of hexes. Luckily it is at least standardized and equals 1.5 food with 1 population working on hex and +2 food with 2 pop (with only exception being Irrigated farmlands which gives +3 food with 2 pop). There are also several technologies & edicts which affect this number:

Other things affecting farms production:
Bountiful harvest (event): +20% food output for 4 turns,
Flood (event): disables food output for 2 turns (1 with Flood Control) on affected hexes,
Drought (event): -20% food output for 4 turns,
Locust Swarm (event): -50% food output for 2 turns,
Private Land Ownership edict (Central Burecracy edict): +20% food output,
Private Arms Ban edict (Legalism technology): -10% food output,
Seedling Transplantation (technology): +5% food output,
Brick Faced Wells (technology): +5% food output,
Crop Rotation (technology): +5% food output,
Iron Plough (technology): +5% food output,


Efficiency
After dumping all of that data, it is finally time to analyze it and give you some tips on how to get more from your farming endeavors.

Looking straight into payoff there is no better thing than farmlands on fertile plains.With it we are getting 1 food per turn of construction. Which means than settlements located on vast fertile lowlands will grow in fastest possible way.

Next in order are Gentle Hills – 0.5 food per 1 turn of construction. Problem is that technology for them is quite late in Bronze Age. Also settling in hilly areas is tricky because there tend to be non farmable hexes in vicinity. On the other hand those hexes can offer some unique external buildings, which help with happiness (not even mentioning potential mineable resources). Because of that IMO the most ideal town would have inner ring of fertile plains with some hills on outskirt for extra resources/peasant happiness/natural defenses.

3rd place will be occupied by Irrigation approach. Half food unit/turn but with 50% less farms overall (making it more susceptible to enemy raids). For Irrigation to work settlement needs access to either river (which eats up hexes possible for agriculture) or other irrigated farms. Additionally irrigation quickens simultaneous construction once enough unemployed pop is created. Funny enough grey people serve as soft shield vs. negative food events mitigating chain reaction (when you lose food output then you start loosing people working on farms which in turn mean even less food).

Further in our top farms ranking will be forested locations as it takes 5 turn (at best) to created 1 farm in their place, which means only 0.4 food per 1 turn of labour. Of course you can quicken this process, by utilizing fast clearing exploit (I mentioned in settling section), but this is still something to remember.

Important note: as you want to clear land and build farms at the same time to (maximize efficiency) in case of limited space you can run into issues. Creating farms takes 1 turn less than clearing forests which makes it impossible to keep constructing additional farms all the time. To avoid wasting time you can throw irrigation into the mix. This way by the time you clear 2 forests (2x3 turns) hexes you will also build 1 normal farm (2 turns) and upgrade it to irrigated (4 turns). This will also help by creating extra unemployed population, cutting down clearing times (if you do't have enough unemployed population) and also bump you to 0.5 food per turn of construction ratio at the cost of bumping your labor faster.

Steep hills don’t seem great as they take 6 turn to make. Which means 0.33 food turn ratio.

Even worse are Marshes as clearing them will take 6 turns. Which means 0.25 food/turn ratio. Once again you can bump this up with irrigation to 0.375 food/turn ratio but it will generate more unrest.

In theory the worst of the worst should be forested hills areas but I’m not sure if I encountered hill hex after clearing forest. It would result in from whooping 0.22 to 0.28 food per turn of work.
(All those ratio were calculated per turn, to show in some context)

Long story short:
for farming Fertile Plains>Gentle Hills>Irrigation>Forests>Steep Hills>Marshes.
So hunt for spots which don’t require much of clearing and avoid last 2 hex types. If you have to clear land and/or build many things asap - construct irrigated farms at the start. Extra unemployed population will prevent construction from getting delayed and allow settlement to get going quicker as well as helps with pacing idle turn for unrest reduction.

Sanvone’s formula for farming
As I like to min/max to certain extent, I discovered rather easy to remember rule how to pace farms construction. Maybe it isn’t the best possible way, but it allows to keep up with AI’s without risking revolts and outgrowing opposition in Grand Campaign mid/late game population wise (mostly due to settling to cities too close by AI). Also it isn't time consuming which is great for MP and it's simplicty quickly grows into a habit. So how do I farm?

1. After settling spam farms till I reach 40 population or 40-50 unrest.
2. Then rest city for 10-15 turns
3. Build a single farm
4. Wait till growth goes lower than 1% and repeat from step 3.

This way after construction of each farm, city will have few turns of idle time during which it will start recovering from labor penalty. Over longer periods of time unrest will diminish, giving extra breathing room for implementing some edicts. It might need some adjusting to mountains or heavy forested areas but it isn't to hard.

On turn basis, it doesn't require much time. You can check it in the left menu - if city is costructing farm then you don't need to worry. If it is't then just check the color of arrow next to population number - green is ok, yellow = you need to check.
1.4) Herding
An alternative to farming, exclusive to Herder factions. Isn’t as profitable as farming but provides more flexibility which has to be exploited in order for player to remain competitive. There are few tricks and things to note for better experience while playing those factions.

BASICS
Herding settlements start with Flocks. Each Flock provides 0.5 Food and uses 1 Grazing of hex. Various hexes have minimum grazing of 0 and maximum grazing of 2 (which means those hexes will produce 1 Food). Each unit of Population can herd 2 hexes at the same time. Which means that with 2 Grazing 2 hexes fully populated with flocks each population unit will produce 2 food (meaning creating 2 population of which one is permanently unemployed). Herding doesn’t require any additional construction (like farms) and doesn’t create Labor Penalty. Expanding territory happens automatically once you run out of space and your population growth stops. After 2 turns your settlement will claim one of surrounding hexes. You can’t influence which hex will be added to territory. Still AI will prioritize hexes better for grazing and close to resources outside the city territory. Herding suffers less from two negative food events compared to farming three. Lastly herding creates tribal recruitment pool which provides cheap troop type, which can rival trained units while costing the same as militia.

Grazing value for various hex types:
Grazing 2 – Fertile Plain, Grassland, Gentle Hill, Plateau (not every),
Grazing 1 - Dry Plain (not every), Plateau (not every),
Grazing 0 – Plateau (not every), Dry Plain (not every), Farmland, Irrigated Farmland, Gentle Terraced Farmland, Steep Terraced Farmland, Mountain, Sand, Water, River, Marshes, Forest,

Grazing Range for Settlements:
Settlement lvl 1 – 4 hexes
Settlement lvl 2 – 5 hexes
Settlement lvl 3 – 6 hexes
Nomadism technology (+2 hexes)


ADVANTAGES
As you can see from data above herding can use some terrain types which isn’t farmable (Grassland and Plateau) so you can settle in less fertile territory. Generally speaking herding settlements will develop faster until they reach population of 20, then farming will start catching up to reach equal pop count around 30-40 units of it. But thanks to unique to herding factions technology called Nomadism (which makes settlers free money wise) and flocks mechanism you are gifted an unique ability to instantly settle towns with 20 population without trouble by just dissolving 9 extra settlers units inside new settlement territory. Thanks to created unemployed people and lack of construction time, herding will have easier time in forested/marshy/hilly areas as well as less damage sustained through pillaging. Less labor penalty allows to postpone those expensive unrest reducing edicts/buildings. Bigger range of usable hexes will save money that otherwise would be spent on settlement upgrades. Lastly it allows for mixture of both herding and farming inside single town.


DISADVANTAGES
To balance things out herding will have few flaws. First of all it’s growth rate can’t keep up with farming past 40 population in settlement. Generally your cities past 20 population mark will improve their food output at the same pace as city farming Steep Hills (which is almost at bottom of farming efficiency). You would need around 500 turns to create pure herding city with pop of 100 (while farming can achieve it roughly in 200 turns). Lack of Grain tax, means you earn half of farming income. Flocks require vast area as single hex doesn’t provide as much as farm do. Together with smaller cities in mid-late game your trade will be less profitable, as you won’t be able to concentrate it as effectively as farmers. Those weaknesses will force you to either adopt Agriculture or seek alternative sources of income (raiding. pillaging, mining, trade) and save money whenever possible (city upgrades, settlers, unrest management). Thankfully this economy type provides you with tools to manage but it will require more attention and activity on your part to keep pace with farming factions growth rate.
1.5.1) Trading (Genghis Patch Update)
Second most important income source in the game. Has the potential to be bigger than farming, if you know how to optimize it. Also - one of the most confusing and counter-intuitive aspects of game for most strategy players.

BASICS
To start trade you need at least 1 of 2 existing exporting building (Bazaar/Quay) and other city in trading range (in case of water trade it will also need quay to receive trade). For land trade you don’t need bazaar in every city. I’ll say it once more – Bazaars are only responsible for export and it doesn't benefit your import in any way.

Land or Water?
Generally land trade is both easier, quicker and cheaper to set up while being more technology dependent and easier to intercept. It also increases internal trade (which is a thing late game) and allows Caravansaries to be build. Makes it easier to force your trade onto others as trade over water requires cities to have quay in order to receive your exports.

In comparison waterborne trade is more expensive to set up and those buildings have higher upkeeps. It requires either a coastline or good river network for it to allow all your settlements into trade network. But it also has better trade modifiiers by 1 on each level, far greater export range and it doesn't rely on technologies (so you can upgrade to the max while land trade can't until Imperial Era) meaning it will be more profitable in the long run.

Trading Goods Value per 100 importing population
(All buildings, technologies, Resources, Edicts with Famous Market)

Textilies: 79
Local Goods : 98
Wild Horses: 98
Bamboo: 98
Bronze : 116 / ~60 (With Iron/Steel)
Fine Carpets*: 157
Falcons: 194
Sable Fur: 196
Pilgrims : 196
Iron/Steel : 206
Silk : 229
Copper : 235
Zhennan Wood: 294
Jade : 470
Ceramics: 688

(Important notes: If city A and B are exporting Local Goods or Bronze -Iron/Steel both of them will benefit 100% from each other export but city C will get usual penalties for more than 1 source. Faction bonuses not included.)
* Testes as Khwarezm which don't have access to New Weights and Measurement edict

Trade Bonuses
Connected by Roads (construction): ~20% trade value increase,
Upgrade to each building creating trade good: trade value increase based on building,
Exporting to Faction with lower Culture: +50% Ceramics, Silk, Local Goods trade value (with that faction)
Exporting to Faction with higher Culture: -50% Ceramics, Silk, Local Goods trade value (with that faction)
Shu Faction bonus: +15% trade value,
Standard Weight and Measures edict (unlocked through Legalism): +20% trade value,

Mullberry (resource) : +30% Silk trade value,
Kaolinite (resource) : +30% Ceramics trade value,
Copper (resource): +30% Bronze trade value,

Precious Metal Work (Craft Bronze Age technology): +30% Bronze trade value,
Advanced Bronze Casting (Craft Bronze Age technology): +20% Bronze trade value,
Industrial Pottery Production (Craft Warring States technology): +10% Ceramics trade value,
Malleable Cast Iron (Craft Warring States technology): +50% Iron/Steel trade value,
Abacus (Knowledge Warring States technology): +15% trade value,
Textile Printing (Craft Imperial technology): +50% Silk trade value,
Tricol Ceramics (Craft Imperial technology): +25% Ceramics trade value,
Porcelain (Craft Imperial technology): +65% Ceramics trade value,
Steel (Craft Imperial technology): +50% Iron/Steel trade value,
Hydraulic Bellows (Craft Imperial technology): +100% Iron/Steel trade value,
Coke Fueled Furnace (Craft Imperial technology): +50% Iron/Steel trade value,
Paper Currency (Power Imperial technology): +20% trade value,
Joint Stock Company (Power Imperial technology): +20% trade value,
Banking (Power Imperial technology): +20% trade value,

Total:
Trade Value +95% (110% Shu), Bronze +80%, Silk +80%, Ceramics +130%, Iron/Steel +250%,

How to trade successfully?
As you can see from data gathered above, trade require extensive support through buildings/technologies/edicts/culture (in that order). Because of it's population dependency it really starts being profitable once mid game fully arrives and your population is in hundreds. By the end of the game it can provide you with double of what taxes will yield.

Remember just three things:
- City won’t import goods it is producing atm.,
- Multiple resources don’t increase trade value beyond first bonus (Kaolinite, Mullberries, Copper, Jade, Horses)
- There is no benefit to having more than single source for each city of any given trade good while the opposite is true. As you don't export to cities which are producing same things you still pay upkeep for buildings.

The good time to start trade network is once you have around 200 population within reach of 1 city. Most of the time you will start with Pottery as it doesn't have upkeep so it will be easier to create profitable trade with just bazaar upkeep and 2 things to trade. You can start trade network earlier if you have Pilgrims/Copper/Jade as each of them has great value without relying on heavily on technologies and edicts. Horses are surprisingly good but most of the time you will have to settle in bad terrain to get them. Once your trade flourishes you can add Silk Weaver. I would advice againt trading Bronze as even with Copper bonus it's value is below Local Goods and Iron/Steel isn't worth it untill most of associated technologies are researched.
1.5.2) Trade Optimization
Trade Strategies
Generally people tend to go with trade network that maximizes profit by minimizing amount of upkeeps as well as concentrating as many cities within single export range. The best example of this idea is setting exporting city in the middle of empire, surrounded by layers of settlement within export reach. By limiting trade to your own faction you aren’t dependent on Culture points income wise and secure rather steady flow of money. The problems arise on the outskirts, where cities are adjacent to other faction’s cities. As they can export the same goods and diminish your gains. Additionally you create glaring weak point by having dominant city when it comes to income so you’ve better defend it to the last. When it comes to land variant it will require ideally vast open area for specific settling ranges, while waterborne thanks to bigger radius will just need coastline or rivers.

While gathering data for this guide I discovered another approach. It doesn’t mean the previous strategy is bad or not viable – it is a good idea. My finding resolves around Internal Trade. Internal Trade is only increased via bazaar (constant +50% to value on each of buildings so you can just build basic Bazaars). By the late game you can build pottery/silk industry with bazaar to harness more money and become impregnable towards other’s faction attempts at screwing your markets. As is stands +50% bonus to internal trade is bigger than x4/x5 multiplier from external trade! This way you will have bigger income and profit spread more evenly across your empire. You still will be exporting various resources across your empire which are tied to certain places and you may even execute this plan partially if you come across Kaolinite/Mullberries.

Other thing to consider is exploit the most of culture trade bonus. If you play one of various factions not plagued with culture/thought disadvantage you may settle between enemy cities to make most of your superior ways. By being aggressive this way and using Caravansaries you can cut enemy income considerably. Sadly after last patch enemy can just embargo you and as this tactic requires different technology priorities it isn’t as viable as it was previously. Still if you are able to sustain that status for some time – you will gain +50% trade value of several cities worth of population while enemy will gain half trade value of population from your single city.
1.5.3) Trade Routes (Genghis DLC Addition)
New addition introduced in "Life of Genghis Khan" and "Time of the Mongols" scenarios. Implemented in shape of resources on map, allow for new and interesting possibilities of income. The benefits come in 2 forms: stable +100 income from trade tax for each node you own and ability to engage in trade alongside trade route. Important note: you can benefit from node only if you have it inside settlement borders. You can say it is exclusive right for settlement which is located directly alongside each trade route. But it also means that once you secure it, you don't have to worry about others influence over specific trade node.


Exchanging Goods with Trade Routes:
Once you have one of any non-generic Trade Route node, you should start your commerce endeavours as exchanging goods with node is main benefit this new system provides. This process follows the usual trade rules already set in the game but you have to have few things in the mind.

First of all all - treat all of trade nodes from specific trade route as one entity/settlement. Meaning the more of the same type of good you export to it, the less each source of commodity will bring. Your overall income will still be the same but upkeeps will keep on rising. So as with regular trade I advocate as few exporting settlements as possible. That said if you don't own every node of specific trade route you will compete for income against others participating in trade factions. Based on situation it might be worth it to bulk your production output to take majority of trade route income for yourself. Just remember to upgrade both trade good producing building and trade exporting building as high as possible.

Secondly - to redistribute goods each trade note is providing you need to build Caravansary. Hearing that you might be lured into just building Bazaar+Caravansary in selected city and then skip constructing rest of trade infrastructure. But it is wrong as you still get trade bonuses from upgrading production buildings. Additionally Caravansary still has tendency to cut off your trade modifiers. And for trade routes all bonuses except being connected by roads still apply.

Trade Route Data


Silk Road West
Number of Nodes (Time of the Mongols): 7
Wants:
Jade - 817 (Maximum income)
Fine Carpets - 147 (Maximum income)
Provides (Via Caravansary per 100 population):
Silk - 116
Ceramics - 174


Silk Road Central
Number of Nodes (Time of the Mongols): 12
Wants:
Jade - 956 (Maximum income)
Silk - 466 (Maximum Income)
Provides (Via Caravansary per 100 population):
Fine Carpets - 73
Silk - 116
Ceramics - 174


Silk Road East
Number of Nodes (Time of the Mongols): 8
Wants:
Ceramics - 1800 (Maximum income)
Silk - 600 (Maximum income)
Provides (Via Caravansary per 100 population):
Fine Carpets - 73
Jade - 79


Falcon Trade Route
Number of Nodes (Time of the Mongols): 5
Wants:
Falcons - 282 (Maximum income)
Provides (Via Caravansary per 100 population):
Falcons - 98


Sable Trade Route
Number of Nodes (Time of the Mongols): 8
Wants:
Sable - 282 (Maximum income)
Provides (Via Caravansary per 100 population):
Sable - 98


Spice Trade Route
Number of Nodes (Time of the Mongols): 7
Wants:
Ceramics - 786 (Maximum income)
Silk - 262 (Maximum income)
Provides:
Nothing


Trade Route (Generic)
Number of Nodes (Time of the Mongols): 1
Wants:
Nothing
Provides:
Nothing
1.6) Mining
By exploring mountains you will come across various mineable ores such as copper, gold or jade. To exploit them you will have to construct external buildings on hexes with them. From my experience as long as such resource is maximally within 2 hexes of your borders you will be able to do so. So I advice against settling closer than necessary (and aiming for having it in initial territory as it will lead to less of good farming space). You will be able to construct copper and gold pits from turn 1, while jade scrape will require Jade Working technology from Craft tree.

If you were wondering about what is the juicest here is some data:

Gold
Gold Pit - cost 1200, income +40
Gold Mine - cost 2500, income +120
Deep gold Mine - cost 6000, income +220

Copper
Copper Pit - cost 800, +20 income and produces copper for trade
Copper Mine - cost 1500, +50 Income and produces more Copper for trade
Deep Copper Mine - cost 3500, +100 income and produces the most Copper for trade

Jade
Jade Scrape - Cost 1000, income +20, produces jade for trade
Jade Quarry - Cost 2000, income +60, produces more jade for trade,
Deep Jade Mine - cost 4000, income +160, produces most jade for trade,

From that data and previous section about Trading we know that Jade is best for it’s trade value and Copper will outperform gold by mid/late game. I always thought people are over valuating gold because of that. But gold is still viable especially early/mid game as it is better in larger quantities than jade and copper (diminishing returns of trade when multiple sources are present). For level 2 of those buildings you will need Churn Drill technology in Craft (with Rammed Earth Wall from Power as prerequisite) and for final level Mine Ventilation from Warring States Era. Farming factions might consider getting ability to farm hills before going fully into such areas. Mining doesn’t require population and only suffers from Earthquakes as they may damage mines, which turns them off for few turns.

How to mine efficiently?
First of all realize that each external mining building is investment that will pay for itself after 30-70 turns. Don’t invest heavily in Copper and Jade if you don’t have trade network established already as it takes too long to pay for itself from income alone. When it comes to gold you can actually base your economy around it if you have 3+ sources of it. In theory it is most beneficial to spend money on highest possible level of Gold mine to squeeze the most income in given game span but in practice I would just go towards Gold Mines (more affordable) as cost of Deep Gold Mine is too high to swallow without stopping other expenses and it pays for itself in 60 turns. When setting up mining settlements remember that you want to build them as quickly as possible. Consider getting some unemployed pop or at least 10 pop total before stopping all other construction and focusing workers on mining. This way construction time will be minimal and you will start getting those benefits sooner. When it comes to Copper and Jade you should upgrade it asap and export it directly if possible (much higher profit this way) because caravansaries don’t care for mine level. If you have to re-export it to your cities consider doing It through waterborne trade and leave that mine at level 1. When it comes to corresponding technology priority I wouldn’t focus on them. Just research them when you have both 3-4 mines to upgrade and money to do so. As an income source it most likely won’t outperform farming but with good decisions it allows to snowball more and spend money towards future successes. So in short: several gold mines are a good base for mining industry early, alone copper vein is all you need to buff your trade and Jade should always be pursued and all economy strategies based around it (if available).
1.7) Taxes
Default way of filling treasury. Taxes are one of easier methods to manage and don’t really have any in-depth tricks. Just few facts:

Type of taxes
People’s Contributions (default) : 2x Population income per turn from each settlement,
Well Field System (Edict from Flood Control technology ) : +2 income per population unit working on farm each turn,
Equal Field System (Edict from Enter Imperial Era) : +3 income per population working on farm each turn, replaces Well Field System,
Salt Tax (requires Central Burecracy Edict + Coinage Technology) : +1 income per population each turn,

Things Influencing Taxes
More than 70 Peasant unrest – reduces tax collection the more you have the worse it gets,
100 Peasant Unrest – no tax collection
Legalism Schools – increases tax collection in settlement by +15%/+22%/+30%,
Imperial University (Edict from Canon of Wisdom technology; requires Central Burecracy edict) – increases tax collection by 10%,
Imperial Secretary (Edict from Imperial Era, requires Central Burecracy edict) – increases tax collection by 10%


Efficiency
Topic somewhat related to farming. Both edict taxes should be prioritized and enacted as quickly as humanly possible. That how big of a deal they are. If you seek the best way to increase your tax income quickly you should focus on getting as many farms on fertile lands as possible. That said it is the most unrest heavy in the long run and you want to avoid going above unrest treshold which will decrease your taxes.

When it comes to Salt tax thing are somewhat more convoluted. You might find yourself pressing it turn after Central Burecracy to pay for your expenditures. That said the downside of this solution is accumulation of unrest - both peasant and noble which makes it tricky to press further edicts.
That's why I would advice delaying it a little (especially if you have huge farming economy) and implementing and waiting for Private Land Ownership edict penalties to wear off. This way you should have at least 20% more population and easier time introducing all new laws together.

Legalist schools are quite attractive when it comes to their upkeep for how many things they do provide (on top of edicts bundled together with technology). First level of them will pay for itself with 117 farming population units, 2nd - 100 and last with - 65. Which means than most of the time upgrading those will generate more and more income. That said those numbers are only for upkeep to tax break point - how matter you value all other bonuses will decide how much sooner you will build them.

When it comes to both tax increasing edicts it just pure math. Imperial Edict pays for itself at 750 farming population mark, while Imperial Secretary at 500 but in reality 400 (so basicaly you will issue this edict after you do Equal Field System). Note that if you are playing pure herder those numbers will be almost twice higher and most of the time unreachable for that style of gameplay.
1.8) Raiding & Diplomacy
Pillaging
Aspect which is often neglected and requires active behavior to be viable as income source. But after reading so far, you will come to realization that it is really lucrative. As you probably know razing single farmland gives you 50 coins. Not to shabby. But it also creates losses on whoever the owner of that hex was – he losses in short time 4-6 income from grain taxes and if it creates food shortage additional 6 income from Salt Tax and People Contribution which results in 10-12 coins per turn less. We aren’t even including aspect of slowing down or resetting settlement development.

Now let’s look at aggressor gains. You need unit to loot with and assuming you won’t do this with settlers you most likely will use either Militia/Tribesmen or Noble unit as they lack recruitment cost. If you lose them it won’t be as big of a deal. Nobles are more expensive but can deal better with limited attacks. After quick math you realize that single unit of tribesmen after reducing their upkeep creates income of 35 coins per turn of raiding farmlands. That’s equivalent of 8-9 farming population gold wise. So it really accelerates your economy. So you really should loot as much as possible to gain more of advantage.

But you must be also be smart when deciding on how much troops will you send towards neutral/enemy settlements. If you send too many (especially on GC) it will turn into loss as they will raze countryside to quickly and then will have nothing to raid. Your objective is to spend the minimum amount of time traveling and maximum amount of time looting. So spread your units across several settlements. Don’t divide them too much though as you will have to defend against sallying out defenders.

Sacking Cities
Looting settlements is different subject. Actually it is my preferred way of treatment towards newly contested cities. As it requires stronger military force and is harder you definitely want to make sure it will be profitable. City wealth depends on it’s size and structures inside it with Palaces/Schools&Temples and income/trade generating buildings being the richest targets.

After calculating cost to reward, you will want to target cities for gold in mid-late game rather than at the start. Capturing mid size city can grant you around 2000 coins and valuable bargaining chip for future peace negotiations. Money earned from conquest can be easily spent into your own huge construction projects. And after you’re done with city you can either keep it, leave it for enemy to retake (so you can loot it in the future), ransom it for money or use into persuading someone to become your vassal. Or anything else you want as settlements are really valuable on diplomacy screen. And you can be an a****ole if you want, by destroying all structures previously build by owner so he will have to spend money again :).
2. WARFARE
2.1) Scouting
Something that after witnessing several MP games I think is undervalued by most players. While you can get some valuable map information through diplomacy later, I can’t stress enough the importance of that 4x aspect enough.

Early game you want to get map information to make correct decision when it comes to your expansion direction. Missing some part of the map at best means you don’t have as good situation as you could have but at worse it means that part will be already seized by someone else. Wanting every edge you can get over your opponents, even if you can’t utilize that information you can at least use it to predict other faction course of action or estimate their potential growth for the future.
Because of that you should be sending every possible Militia Spearmen you get into fog of war. Given you aren’t in the middle of some bad start with close enemy who tries to rush you. That said you initially still need to send them as scouts to undercover such attempt. There is nothing worse than big army coming out from fog of war less than two or two from your settlement.

The bigger the map the more you will need scouts. And why only send Militia? Because it is the best solution for few reasons. First of all is their cost – they’re cheap, and their recruitment pool is quite big. Second is alternative cost in shape of Noble Dagger-Axemen. By sending them you not only pay more but move away crucial for defense unit. If you send Militia and keep Nobles in the recruitment pool you can pretty much defend against any early scout aggression (even if they scout with General Bodyguard), but you can’t do this if you do this in reverse. Additionally you would need to double the amount of units in defense for the same result while having much less scouting units (smaller recruitment pool and more costly upkeep) which still potentially would achieve nothing when it comes to early aggression.

Exploring will help you locate encounters, giving you better chance of getting those needed first. That said this part of the game doesn’t end once most of the map is revealed. You can see the whole map but in reality there is “hidden” fog of war over the areas where you don’t have currently any vision. It doesn’t seem like a big deal cause you will still get intel about settlements changing ownership. But you won’t get info about armies or fights results. Because of that leaving some far away units on lookout between other players borders is great idea. Because of that you will know what is going on and in diplomacy with human players you will have a way of determining if the other side is telling you the truth or not. For that reason meager upkeep of several militia units isn’t too high of the price as it can easily decide the outcome of game.
2.2) Recruiting & Army Composition
While creating army there are many things to consider and most of the time simply recruiting best available troops isn’t the best choice. Mostly because in different phases of game you will have to deal with different difficulties in combat as well as sustaining your armies. Then as you probably already know Units beside “manpower” have “readiness” bar and even the best of units can be destroyed by being simply run over by waves of weaker units pushing them into fights constantly. Because of that for most of the game pretty much bigger numbers are better than high quality. It is further supplemented by rather balanced upkeep without favouring elite armies.

Bronze Age
In starting era it is quite easy and simple. Mostly because of lack of choice you will create your armies from Militia and Nobles or Tribesmen and Nobles. You can freely recruit as much as possible because your labor penalty isn’t as high yet. And you want to pump them quickly both for initial conquest/dealing with bandits/exploration. Because of that I like to spread single military buildings across few cities to get more of various militia troops in the field. Most important will be Bowyer as it will give you access to Militia Archers and Tribal Horse Archers (as herding faction) and if you are playing farmers – Weaponsmith which unlock Militia Dagger-Axemen. Don’t underestimate bonus to militia/tribal recruitment pool early as it takes quite some time to replenish them. After last patch I would consider getting Palaces if you want to go towards chariots as it a really nice option currently. Especially as by the end of Era, it can unlock access to Do-or-Die Convicts Dagger-Axemen which are really cheap and great storm troopers.

I would recommend getting 2 max 3 stacks of units with at least 6 archers for breaching wooden walls reliably by the end of Bronze Age. Most of the force should be melee infantry as it will be usable in most scenarios That force will be sufficient to reliably conquer cities. You can also add more archers and force enemies into bad terrain. That would cost somewhere around 240 to 620 coins per turn. Adding both weaponsmith and bowyer will cost you around 720 gold per turn which is affordable over longer periods of time if you include some raiding&sacking cities.

Even though you can research Signaling in Bronze Age, avoid trying to get Trained Army and Trained Chariots as both infrastructure and units themselves are too expensive at this point to be reasonable. Also don’t recruit more generals – 2 should suffice for your army size.

Warring States
Things start to heat up. As your economy and population grows and you unlock new edicts, you will find it harder to spam units from single city. Labor penalty will start to become an issue and dealing with it via edicts often will either leave your Nobles furious or your income smaller. Because of that this is a great moment to start creating trained soldiers. Not only will you be able to afford them but you will get more options when it comes to selection. But still I wouldn’t go crazy with them as you’re still developing. Great thing about Barrack recruitment pool is that while it is always value 4 it replenishes in 4 turns. While Nobles take 12 turn time, and Militia 8. You will still need militia/tribal units in your armies because many army unit’s have penalties for fighting in difficult terrain. So I suggest recruiting them from newer cities, preferably with 2 lvl armory building so they get extra defence/armor.

Many new things show in this era. Among them are better walls which together with some technologies that reduce fire damage in sieges will make your archers non efficient for taking out enemy fortifications. Luckily you will get access to artillery pieces which although cost a lot, have comparable upkeep to archers while having many times better damage value vs walls. Which can save you a lot of money in the long run, as long as you can keep them safe. Another important note is that in this Era you get access to Cavalry unit as well their Noble counterpart. As cavalry is a real powerhouse it is something that sooner or later you’ll have to transits (depending on how much do you want to keep using Chariots). The last thing to consider is getting few ships to act as movable pontoon bridges. Single ship can instantly move over river up to 16 units which will safe you time and as such is something to consider.

Similary to previous era you can get access to some but not all Palace troops. Among them is Picked Swordsmen (because prerequisites aren’t high), Guard Cavalry (if you need better cavalry to deal with enemy cavalry) and Guard Halberds (which can give you an edge in fighting professional infantry). When it comes to General you most likely will have 3 (faction leader, faction heir and chancellor) but you might consider recruiting additional. Just remember that only first 2 mentioned are immune to rebels. As you will encounter revolts and rebels you will have to tinker your army composition to deal with that issue.

Beside Cavalry you should note both Heavy Spearmen as well as Spear / Crossbow units as both of them are powerful. After some extra testing I’m starting to warm up towards Chu-Ko-Nu as they can provide valuable skirmishing superiority over anything else in this era. But as other archers they really require to be massed in order to be effective.

Imperial Era
Last era of the game. Your economy will be at it’s height and so will be your capabilities. Peasant and noble unrest will be high so you will have to rely on Barracks/Stables/Palace troops more than ever. Most likely they will become the core of your army.

Gunpowder units will strain your trained army recruitment pool and artillery even more but will be worth it as they either will be better at breaching walls or ignoring armor. And you will come across multiple armored unit types. Also discovery of gunpowder will boost your archers which will become once again viable when it comes to ranged combat. Also development of cavalry will make them power to be reckoned with. So you will need to have anti cavalry presence in every of your army stacks. As most of places where battle will take places should be already cleared you will need less “light” troops and won’t be punished as often for fighting with army units in those hexes.

At this phase you’ll need every general you can get so now it would be a great time to collect any encounter granting them. Army size is difficult to predict but you should have standing army and constantly recruiting more as the game nears it’s end. Your economy should allow you to build multiple military settlements

Of a special note are also heavy cavalry units and rest of Palace infantry roster (Zhan Ma Dao, Guard Spearmen, Guard Archers). Additionally your basic militia spearmen and archers will be replaced with slightly better variants making them slightly more viable while Herders will get access to Militia Heavy Spearmen variant.
2.3) Assaulting & Defending Settlements
One of the most problematic areas in the game. Most people struggle with wrapping their minds around this subject. Defense in this game is strong as you can’t take city by starving defenders out (though you can change settlement ownership to rebels) so you would better grasp basics of effective tactic when tackling this problem.

Settlement Sizes and amount of entrances
Unwalled settlement – 4 Gates
Walled 1st lvl settlement – 4 Gates + 4 possible breaches
Walled 2nd lvl settlement – 4 Gates + 7? possible breaches
Walled 3rd lvl settlement – 4 Gates + 8 possible breaches

Attacking
As you need just a single attacking unit to enter empty entrance to win and city garrison is limited to 8 units, we can conclude that from 2nd lvl onwards settlements are easier to capture than defend using garrison alone. So if you can burn 4 gates and at least 5 section of the wall you will win easily and wipe out every single city defender remaining.

Which leads us to common problem – not bringing sufficient forces to assault cities. Generally you will need at least 2-3x times the forces defender have to swiftly conquer city. Partially because huge chunk of your army will initially consist of archers for destroying gates, towers and wooden walls. When it comes to taking settlement with Wooden Palisade I’m used to bringing between 6 to 8 archers per settlement as they provide enough firepower to disable every city defense in 2-3 turns, after which they will start firing on the troops inside. Then you have to bring some storm troops which will do the heavy lifting when it comes to defeating defending armies. The higher quality troops the better as defenders won’t break or run away. For those roles high Attack troops (Dagger-Axemen/Halberds) excel because of their offensive nature + armor piercing. Ideally it would be Palace/Trained troops but Do-or-Die Convicts work wonderfully as well while being more cost-efficient. Don’t bring Chariots or Cavalry as they don’t use their charge reliably and often dismount when battle starts.

Once you are against better wall things get trickier. Mostly because without artillery you won’t be able to make a dent in fortifications, and artillery comes by Warring States with high monetary cost attacked. That said I find them a good long term investment as their upkeep is lower than 2 units of militia archers, which pack less firepower against walls. Still ability to create those extra entrances to city is worth it. Remember to leave your siege engines stationary and facing the right directions – otherwise they won’t shoot.

But taking the right units isn’t everything. You still need to envelop city smartly. From experience I can tell you that dividing your troops around settlement does wonders as it reduces the amount of time that archers spend marching to get to the next burnable section of defenses. Additionally it prevents defenders from recruiting extra units around settlement for lifting siege.That’s why, if there are defenders inside settlement I wouldn’t attack before I finish up positioning my own troops. Those few turns pays for themselves quickly with quicker take-over and less casualties.

Before attacking, you want to choose your best units to engage in melee first by setting them on “Charge!” battle plan, so they can kill more. This will speed things up.

Defending
As a defender there are also few little tricks to be aware of. First of all you really want at least Rammed Earth walls in your settlements above 1st lvl of development to force your enemies into buying artillery pieces. 2nd lvl wall not only doubles fortification HP but also allows you to construct Shooting Galleries which increase amount of places from which defenders can shoot upon incoming enemies. And if you garrison settlement with ranged units you can take full benefit of it as each stationed troops will provide it’s ranged attack statistic or reload to towers (as long as they aren’t defending breaches in the city defences). Because of that I strongly recommend mixed weapon troops such as Spear / Crossbow, because they will not only be able to shoot from towers but also fight in melee well. And those projectiles from towers can easily shave off 200 enemies in single assault.

Having armies right beside walls on defend/support battle plans is also neat idea as it will lure enemies into range of your towers&shooting galleries. Those engagements will be worth it as archers & artillery will focus on fortifications while your own units will just focus on incoming enemies.

That said avoid sallying out from settlement as your army will move through all gates one unit at the time and will find itself isolated and most likely outnumbered. If you have to attack enemy with units inside your city – first try to move them outside city without initiating battle.
2.4) Logistic (Long-term strategy)
Preserving Army
Avoiding constant battles with your units is a key to success. As they lose in numbers and combat readiness they risk being dissolved and losing much of their fighting potential. I would say that you shouldn’t fight more than 2-3 times in a row before recuperating part of army which took the brunt of losses. Try to preserve your battle hardened troops as each chevron of experience gives them +10% to combat effectiveness and the bonus isn’t lost upon replenishing. Even though the level cap is 3 the +30% is huge difference when fighting the same but green unit as you will win while paying the same upkeep as enemy. There is even more of an reason to save units which you have limited capacity to recruit (Convicts, sometimes Nobles) or the ones which costed something to recruit (Ships, Artillery, Army troops, Palace troops). Because of that try to have reserves to fill holes that would otherwise opened when you retreat with badly damaged units.

When it comes to unit replenishment I suggest to acquire the habit of leaving 1 unit in recruitment pool for any given unit type so once your retreating units arrive to designated town, they will be able to instantly start replenishing. Together with previous advices it will allow you to grow from each engagement and start building difference which will allow you to win.

Moving Army around
Logistic takes a pretty important role as well. Waging a long distance war is difficult and time consuming. If you are successful you must have some sort of supply capability to replenish. So you either will have your own town nearby with all recruitment facilities or you get one on the site from enemy. Creating “War-camp” settlement isn’t a bad idea because you can keep it under small (and thus possible to be disbanded once it isn’t needed anymore) and still get most of recruitment pools. Try to avoid having to travel long from the frontline in order to heal your units.

Additionally logistic covers your ability to control effectively large amounts of units. Once your army size is a three digits number you will find yourself unable to throw every unit at the enemy simultaneously. Especially when you will have to travel through difficult terrain and natural obstacles. Fighting weaker enemy in the chokepoint will only lead to unnecessary losses and prolonging the war. Because of that you need to split your forces and seek as many routes to advance on your enemy as possible if he has that crucial geographical advantage. Said that you will need to think ahead in order to coordinate and time your armies to attack at roughly the same moment.

Your army movement can be enhanced by using roads and ships. Roads are especially worth it if you know that most of the game you will move your armies in single directions (because you are in some corner of the map). That said later you will need more than single line of roads to allow bigger traffic to commence without delay. Bringing some ships along army is nice. Even with single one you can instantly transport huge amount of troops across single hex river or push them behind enemy defences.
2.5) Characters in battle
Beside vast quantities of troops game provides you with small pool of individual named characters to lead your armies into battle and settlements into prosperity. Those men accompanied by bodyguards serve as small but elite unit which can affect the flow of battle. But using them as any other unit most can lead to wasting their true potential as it usually kills them quickly. Once dead they don’t provide battle bonuses for army they were commanding.

As you probably already learned – characters possess two different statistic – Qi (Energy) and Ren (Virtue). Those points are randomly assigned upon unit creation but can be altered by time flow, being injured, technologies and faction traits. They will vary within range of 0 to 5. The more points your character has the better he is. Both are useful in battle.

Each point of Qi will provide 7% boost in fighting statistic (max 35%) while Ren will increase Morale by 1 point for every 2 Ren. Because of that Qi will benefit Trained/Noble/Palace Troops more than Peasants because they already have pretty high morale while Ren will mostly help Peasants and Tribal units who struggle to stay in battle for longer periods of time (might potentially allow them to survive chariot/cavalry charge).

Generals Bodyguards come in various types. You start game with dagger-axemen bodyguard but can also change it to Chariot (when correlated technology is researched). Once you reach Imperial Era it will change to swordmen retinue.

Bodyguards Types:
Dagger Axemen – default, (Atk: 11 Def: 21 Ar: 12 Mo:6 Mv: 4 Men: 20)
Light Chariots – (Atk:14 Ran:14 Def:46 Ar: 37 MO:6 MV:6)
Heavy Chariots - (Atk: 17 Ran: 14 Def: 52 Ar: 43 MO:6 MV:6)
Four Horse Chariots - (Atk: 24 Ran: 14 Def: 61 Ar: 52 MO:6 MV:6)
Swordmen – (Enter Imperial Age edict), (Atk: 10 Def: 24 Ar: 14 Mo:6 Mv: 4 Men: 20)

For that purpose you want your generals to be present during fights as often to possible. The good thing is they don’t have to engage to support others. Even though in-game help suggests sending them into the fray for most important fights I wouldn’t bother. You can and IMO should leave them back in safe distance far from any harm. For that purpose battle orders like Reserve/Defend are ideal. Even though those units are fierce warriors (they have slightly higher statistic than yours your nobles, and their Qi affects them too) and can benefit from many technologies (They benefit from chance to kill with bladed weapons technologies and they get access to unique Mountain Armor technology which gives them +10 armor which results in +10 defence as well) I don’t think that risking your general getting wounded (which can lower his Qi) or killed is worth it.
One last tip is to remember about Retreat order. It is always better to sacrifice troops to slow down pursuers than to lose good general.
2.5) Unit types
2.5.1) Militia

Peasant Light Spearmen (Bronze Age/Imperial Farmers)
(ATK: 4 Def: 8/10 Arm: 5/7 Mov: 4 Morale: 2, Men: 66, Cost: 0 / Upkeep: 15)
Upgrades: +2 Defence / +2 Armor (Armor Works), +2 Defence / +2 Armor (Armor Factory),
Description: Basic military unit, available for recruitment in most farming cities from turn 1 to turn 300. Cheap and weak but you can recruit them anywhere. As the game progresses will make most of your drafted to defend settlements armies. Doesn’t get penalties on difficult terrain so you can use them for that purpose. Upgrades to have slightly more Defence and armor in Imperial Era. One of the weaker units in the game.


Peasant Light Archers (Bronze Age/Imperial Farmers)
(Atk: 4 Rang: 3 Def: 4/6 Arm: 3/5, Mov: 4, Morale: 2, Men: 60 Cost 0 / Upkeep: 15)
Upgrades: +2 Defence / +2 Armor (Armor Works), +2 Defence / +2 Armor (Armor Factory), +2 Ranged (Gunpowder)
Requires: Bowyer
Description: Basic ranged unit. Capable of breaching wooden walls and igniting all gates&towers. Thanks to bow and lack of penalties for fighting in difficult terrain can give you tactical edge while fighting others. Cheap and Flexible but still one of the weaker units in the game. Because of Imperial Era upgrades becomes relevant once more in late game.


Peasant Long Spearmen (Bronze Age ALL/Warring States Herders only)
(Atk: 3 Def: 10 Arm: 3 Mov: 4 Morale: 2, Men: 72, Cost: 0 / Upkeep: 15)
* ATK x2 vs Cavalry and Chariots
* Defense x4 vs Cavalry and Chariots
* Major Combat Penalty in Forest and Steep Hils. Moderate Combat Penalty in Marshes
Upgrades: +2 Defence / +2 Armor (Armor Works), +2 Defence / +2 Armor (Armor Factory),
Requires: Military Drill technology (Power)
Description: Exclusive to first age for farmers unit and stays until Warring States for Herders. Use them as counter to chariots&cavalry charges as it is the thing they’re meant for. Even with it they can counter those types of units only if charged – if enemy will skirmish they will lose most of the time as they lack any form of armor. As a herder you can offset it somehow by armor upgrades. Also they do poorly in difficult terrain. All in all not the best infantry unit to fight any other infantry unit.


Peasant Dagger-Axemen
(Atk: 6 Def: 7, Arm: 5 Move: 4, Morale : 2, Men: 60, Cost: 0 / Upkeep: 15)
* Armor Penetration 50%
Upgrades: +2 Defence / +2 Armor (Armor Works), +2 Defence / +2 Armor (Armor Factory),
Requires: Weaponsmith
Description: Your first proper melee units as Farmers. Higher Attack and armor penetration make them much better at dealing with enemies, while they still are able to fight in difficult terrain without sweat. They reliably will beat other militia units but still lose to tribal units in Bronze age. Their only weakness is lack of any anti-cavalry specialty. A must buy in every situation.


Peasant Halberds
(Atk: 6 Def: 6 Arm: 3 Move: 4 Morale: 2, Men: 60, Cost: 0 / Upkeep: 15)
* Armor Penetration 50%
* Defense x2 vs Cavalry and Chariots
* Moderate Combat Penalty in Forest/Steep Hills/Marshes
Upgrades: +2 Defence / +2 Armor (Armor Works), +2 Defence / +2 Armor (Armor Factory),
Requires: Weaponsmith, Enter Warring States Era (Farmers), Enter Imperial Era (Herders)
Description: They replace previous Dagger-Axemen while gaining extra defence against cavalry and chariots and penalty to fighting in difficult terrain. They perform almost identical to it’s predecessors outside difficult terrain while being able to take Light and Heavy Chariot charge head on and win (but not Four Horse variant or any cavalry unit). Mostly because of poor morale and statline. If you want to make most of them against cavalry you will have to receive charge with other unit and let halberds join it.


Peasant Chu-Ko-Nu (Farmers only)
(Atk: 4 Ran: 3 Def: 4, Arm: 3, Movement: 4, Morale: 2, Men: 60, / Cost: 0, Upkeep: 15)
* Shots ineffective vs Armor
Upgrades: +2 Defence / +2 Armor (Armor Works), +2 Defence / + 2 Armor (Armor Factory)
Requires: Crossbowmaker, Chu-Ko-Nu technology (Knowledge),
Description: Unique farmer militia variant. Quantity has a quality of it’s own. Can shoot 10 bolts before reloading which result in faster fire rate compared to archer variant but at the cost of only half bow range. Because of that they aren’t great in 1vs1 against melee infantry. Lacks ability to breach palisade or gates&towers compared to bow unit. Reigns supreme in ranged duels as it not only outshots Militia or tribal archers but also Trained Archers, Crossbows and Spear / Crossbow. That said once armor upgrade are taken into account they start to struggle but still perform admirably. Because of that they are a good unit to garrison your cities with or supplement your Crossbow units.


Peasant Heavy Spearmen (Imperial)(Herders only)
(Atk: 4 Def: 10, Arm: 5, Movement: 4, Morale: 2, Men: 60, / Cost: 0, Upkeep: 15)
* Atk x2 vs Cavalry and Chariots
* Def x4 vs Cavalry and Chariots
* Moderate Combat Penalty in Forest/Steep Hills/Marshes
Upgrades: +2 Defence / +2 Armor (Armor Works), +2 Defence / + 2 Armor (Armor Factory)
Requires: Barracks, Enter Imperial Era edict,
Description: Quite interesting discovery while preparing guide. The only militia unit in the game that needs Barrack. They replace long-spearmen while getting a little more “oomph”. Cheap and great counter to enemy cavalry. As their morale is worrying at this stage of the game it can be taken care of by other means. Definetely something to use in imperial era as herders with agriculture.
2.5.2) Tribesmen

Tribal Light Spearmen
(Atk: 6 Def: 9, Arm: 5, Movement: 4, Morale: 2, Men: 60, / Cost: 0, Upkeep: 15)
Upgrades: +2 Defence / +2 Armor (Armor Works), +2 Defence / + 2 Armor (Armor Factory),
Description: Militia counterpart for herders. Really great stat line for cost, can give Trained units a run for their money. As it lacks any penalty for fighting in difficult terrain it will reign supreme in those engagements against most other units. It can beat militia units which means it is capable of conquering cities once breaches are established.


Tribal Light Archers
(Atk: 6 Ran: 4 Def: 5, Arm: 3, Movement: 4, Morale: 2, Men: 60, / Cost: 0, Upkeep: 15)
Upgrades: +2 Defence / +2 Armor (Armor Works), +2 Defence / + 2 Armor (Armor Factory), +2 Ranged (Gunpowder),
Requires: Bowyer,
Description: Think of it as professional soldier for the cost of militia. Best cost efficient archer unit in the game, shots as well as Trained Archers. Not only they provide firepower but also can fight in melee against other militia units well (or even win on charge command easily). Add lack of penalty for fighting in difficult terrain and you have something reliable to count on.


Tribal Horse Archers
(Atk: 6 Ran: 7 Def: 15, Arm: 13, Movement: 8, Morale: 2, Men: 24, / Cost: 0, Upkeep: 30)
* Can enter Steep Hills
* Major Combat Penalty in Forest/Marshes & Minor Penalty on Steep Hill
Upgrades: +2 Defence / +2 Armor (Armor Works), +10 Defence / + 10 Armor (Armor Factory),
Requires: Bowyer, Horse Archery technology (Knowledge)
Description: Best tribal unit hands down. Even though they have less than half the foot archers they’re more than capable of skirmishing down enemies. Highly mobile unit can move up to twice the normal distance and travel through steep hils. They’re capable of breaking other militia/tribal units 1vs1 upon charge. Even with high upkeep for that category, you save on recruitment. Which makes them affordable to amass more than Farmers and earlier as they’re the only cavalry unit available in (late) Bronze age Era. One of the brighter aspects of the herding factions.
2.5.3) Nobles

Noble Dagger Axemen
(Atk: 10 Def: 14, Arm: 9, Movement: 4, Morale: 4, Men: 30, / Cost: 0, Upkeep: 35)
* Armor Penetration 50%
Upgrades: +3 Defence / +3 Armor (Armory),
Description: default noble unit. Most think of them as heavy infantry but truth of the matter is that they don’t receive any penalty while fighting in difficult terrain. Great for charging into breaches in enemy settlements. Quite sturdy against missile fire and are really capable when it comes to melee.


Noble Archers
(Atk: 8 Ran: 5 Def: 11, Arm: 7, Movement: 4, Morale: 4, Men: 30 / Cost: 0, Upkeep: 35)
Upgrades: +3 Defence / +3 Armor (Armory),
Requires: Bowyer, Composite Bow (Knowledge)
Description: ranged variant of noble unit. Really nice all around unit – better shooting capability and armor allows them to win ranged duels (against any militia/tribal variant) while good attack and defense enables them to fend off militia in melee. They struggle more against armored enemies compared to Dagger Axemen variant but you can recruit them both. Mix of ranged weapon and lack of penalties for fighting in forests/marshes/steep hills make them ideal for luring enemy onto bad terrain. Great in early game for garrison duty in walled cities.


Noble Chariots (Light / Heavy / 4-Horse)
Atk: 11/16/26 Rang: 13 Def: 37/43/52, Arm: 33/38/47, Movement: 6, Morale: 4, Men: 9 (3 chariots)
/ Cost: 0, Upkeep: 35)
* Armor Penetration 50%
* Attack strength x2 vs Cavalry & Chariots (4-Horse Chariot only)
* Major Combat Penalty in Forests/Marshes/Steep Hills
* Slow in Forests/Marshes
Upgrades: + 5 Def / +5 Armor (Armory), Heavy Chariots technology (Power), 4-Horse Chariot technology (Power),
Requires: Gentlemen Ride Chariots (Edict)
Description: Power to be reckoned with during Bronze Age era and to lesser extent Warring States era. First cavalry type unit which means more mobility. Capable of inflicting heavy casualties upon charge on most militia&tribal units or winning safely by harassing. They are quite flexible – skirmish against melee infantry and charge ranged units for win. They require extensive research in order to achieve full glory and you lose access to previous Noble unit variants, once you decide on them. But you get best unit variant for free (except upkeep), at full strength (as opposed to other noble units which are half the size) and without any infrastructure requirement.


Noble Cavalry (Farmer only)
(Atk: 13 Def: 28, Arm: 21, Movement: 6, Morale: 4, Men: 18, / Cost: 0, Upkeep: 35)
* Armor Penetration 50%
* Attack x1.5 vs Foot
* Major Combat Penalty in Forests/Marshes & Minor Penalty on Steep Hills
* Slow in Forests/Marshes
Upgrades: + 4 Defence / +4 Armor (Armory),
Requires: Gentlemen Ride Horses (Edict),
Description: Powerful cavalry unit for farmer faction which excels at fighting infantry. They will charge and route many infantry units as long as they don’t fight anything with anti cavalry capabilities. Beat Chariots, (Tribal) Light Horse Archers and Trained Halberds one on one. They replace all other noble unit when it comes to recruitment but are worth it. They have only ¾ of their counterparts. Great choice as you save over 200 gold on recruiting them over other cavalry options. Available from Warring States era onwards.


Noble Horse Archers (Herder only)
(Atk: 8 Ran: 8 Def: 25, Arm: 21, Movement: 6, Morale: 4, Men: 24 / Cost: 0, Upkeep: 30)
* Major Combat Penalty in Forests/Marshes & Minor Penalty on Steep Hills
* Slow in Forests/Marshes
Upgrades: + 4 Defence / +4 Armor (Armory),
Requires: Gentlemen Ride Horses (Edict), Bowyer,
Description: Noble cavalry variant for herder factions. Which is surprisingly slightly better than their’s farmers counterpart. Mostly because of full unit size it is capable of barely beating down Noble Cavalry in melee. Interesting to note that they aren’t evenly matched against Trained Halberds. Their high Armor allow them to win against lighter Horse Archers. Available from Warring States era onwards.


Noble Armored Archers (Herder only)
(Atk: 8 Ran: 8 Def: 29, Arm: 25, Movement: 6, Morale: 4, Men: 24, / Cost: 0, Upkeep: 30)
* Major Combat Penalty in Forests/Marshes & Minor Penalty on Steep Hills
* Slow in Forests/Marshes
Upgrades: + 4 Defence / +4 Armor (Armor Factory),
Requires: Gentlemen Ride Horses (Edict), Armor Works, Horse Armor technology (Craft)
Description: Herder exclusive Noble unit. It can have up to 4 more defence and armor than Noble Horse Archers but only with last level of Armor Factory. Other than this it is similar to standard noble horse archer. You won’t really recruit them till you can replace them with next unit.


Noble Heavy Cavalry (Herder only)
(Atk: 11 Ran: 8 Def: 30, Arm: 25, Movement: 6, Morale: 4, Men: 24, / Cost: 0, Upkeep: 40)
* Atk x2 vs Cavalry&Chariots
* Atk x1.5 vs Foot,
* Major Combat Penalty in Forests/Marshes & Minor Penalty on Steep Hills
* Slow in Forests/Marshes
Upgrades: +8 Defence /+8 Armor (Armor Factory)
Requires: Gentlemen Ride Horses (Edict), Armor Works, Stirrups (Knowledge)
Description: Replaces Noble Armored Archers. Get multipliers versus cavalry/chariots and infantry as well as better statline. Last level of armory provides bigger bonuses and even though it is currently less armored than Cataphracts from Stables, ability to recruit that kind of cavalry for free from any city without Stables is tremendous. In open field that unit will reign supreme against almost anything.
2.5.4) Convicts

Do-or-Die Convicts
(Atk: 9 Def: 7, Arm: 5 Move: 4 Morale: 4, Men: 60, Cost: 15 / Upkeep: 15)
* Armor Penetration 50%
* No armor upgrades
Requires: Weaponsmith, Prison
Description: Unique unit unlocked through Tought technology tree. Unlocked towards end of Bronze age. Count as peasant but has slight cost associated with it as well as different recruitment pool (acting the same as militia pool). Equiped with Dagger-Axes they have advantage of having 3 attack more and double the morale of militia. Sadly they don’t benefit from armor upgrades which makes them suicide troops. They excel in melee fights against militia/tribal infantry as well those with penalty on difficult terrain. Keep them protected from cavalry charges or missiles. They are more affordable than Trained Dagger-Axemen and better as long as you don’t include armor upgrades. Interesting thing to note – they win melee even against best chariots after being charged.


Do-or-Die Convicts Swordsmen
(Atk: 8 Def: 10, Arm: 7 Move: 4 Morale: 4, Men: 60, Cost: 15 / Upkeep: 15)
* No armor upgrades
Upgrades: +10% Chance to kill with bladed weapon,
Requires: Weaponsmith, Prison, enter Imperial Era (edict)
Description: Replacament for previous unit. They trade armor penetration and 1 attack for 3 extra defence and 2 armor. Even though they are somewhat inferior to their Dagger-Axemen predecessors they still benefit from how cheap they are and various technologies benefits. Swordsmen beat militia/tribal units, are affordable and available early in Imperial Era while still having fighting chance against Barrack infantry mostly thanks to lack of penalty on difficult terrain and superior morale.
2.5.5) Encounter Army

Bandit Light Spearmen
(ATK: 4 Def: 8/ Arm: 5/ Mov: 4 Morale: 2, Men: 66 Cost: Depends on Encounter / Upkeep: 15)
Description: Same as Militia Light Spearmen


Warrior Retinue (Dagger-Axe)
(Atk: 10 Def: 14, Arm: 9 Move: 4, Morale : 4, Men: 30 Cost: Depends on Encounter / Upkeep: 35)
* Armor Penetration 50%
Description: Same as Noble Dagger-Axemen.


Warrior Retinue (Cavalry)
Atk: 11 Def: 19, Arm: 13, Movement: 6, Morale: 3, Men: 24 / Cost: 0, Upkeep: 40)
* Armor Penetration 50%
* Atk x1.5 vs Foot
* Major Combat Penalty in Forest/Marshes/Steep Hills
* Slow in Forest/Marshes
Description: Same as Cavalry from Stables.
2.5.6) Trained Army

Trained Archers
(Atk: 6 Ran: 4 Def: 6, Arm: 3, Movement: 4, Morale: 3, Men: 60, / Cost: 140, Upkeep: 30)
Upgrades: +2 Defence /+2 Armor (Armory), +2 Defence /+2 Armor (Armor Works), +3 Defence / +3 Armory (Armor Factory), +2 Ranged Attack (Gunpowder)
Requires: Barrack, Bowyer
Description: More than straight upgrade to archers. While their ranged attack is higher and they get armor upgrades starting from armory, you can actually make them your frontline troops against other infantry units. In ranged duels they win against Militia and Noble counterparts as well as Spear / Crossbow and Crossbowmen. Great at difficult terrain, flexible (can breach wooden walls) and relatively cheap to unlock when it comes to buildings. Recruitable in each era. Thanks to gunpowder late game they become viable once more.


Army Dagger-Axemen
(Atk: 8 Def: 8, Arm: 5, Movement: 4, Morale: 3, Men: 60, / Cost: 140, Upkeep: 30)
* Armor Penetration 50%
Upgrades: +2 Defence /+2 Armor (Armory), +2 Defence /+2 Armor (Armor Works), +3 Defence / +3 Armory (Armor Factory),
Requires: Barrack, Weaponsmith,
Description: Trained variant of dagger-axe infantry. Really important for Farmers briefly early on, while herders have access throughout the game instead of Halberds (which make you use that lack of difficult terrain penalties). Great at dealing with militia/tribesmen and noble infantry. Their superior morale and armor upgrades allow them to barely survive chariot charges and their armor penetration is great asset. Great unit choice for quelling rebellions.


Army Halberds
(Atk: 8 Def: 8, Arm: 3, Movement: 4, Morale: 3, Men: 60, / Cost: 140, Upkeep: 30)
* Armor Penetration 50%
* Def x2 vs Cavalry and Chariots
* Moderate Combat Penalty in Forest/Steep Hills/Marshes
Upgrades: +2 Defence /+2 Armor (Armory), +2 Defence /+2 Armor (Armor Works), +3 Defence / +3 Armory (Armor Factory),
Requires: Weaponsmith, Barrack, Enter Warring States Era edict (Farmers), Enter Imperial Era edict (Herders),
Description: Replacement for Dagger-Axemen. Get’s anti-cavalry capability while trading away lack of penalties on difficult terrain. They are actually capable of defending against any chariots charges. Really universal unit whether it goes against infantry or cavalry. They will struggle against best cavalry units in the game though. Weakness against missiles can be offset through armor upgrades.


Heavy Spearmen
(Atk: 6 Def: 14 Arm: 7 Movement: 4 Morale: 3, Men: 60, / Cost: 100, Upkeep: 30
* Atk x2 vs Cavalry and Chariots
* Def x4 vs Cavalry and Chariots
* Moderate Combat Penalty in Forest/Steep Hills/Marshes
Upgrades: +2 Defence /+2 Armor (Armory), +2 Defence /+2 Armor (Armor Works), +3 Defence / +3 Armory (Armor Factory),
Requires: Barracks, Enter Warring States Era edict (Farmers), Enter Imperial Era edict (Herders)
Description: Solid frontline infantry which excels against cavalry and chariots. Initially best melee unit of Warring states when it comes to infantry on infantry combat. Ideal choice for receiving cavalry/chariots charges and then slowly dismantling mounted enemies. Also cheap and doesn’t require additional buildings. Even with few drawbacks (terrain penalties, not benefiting from technologies for bladed weapons and not so high attack values for quicker city assaults) they’re impressive. Important for Farmers as otherwise they will lack decent anti-cavalry components early in Warring States.


Trained Crossbows (Farmers only)
(Atk: 6 Ran: 5 Def: 6, Arm: 3, Movement: 4, Morale: 3, Men: 60, / Cost: 100, Upkeep: 30)
* Shots ignore 50% armor,
Upgrades: +2 Defence /+2 Armor (Armory), +2 Defence /+2 Armor (Armor Works), +3 Defence / +3 Armory (Armor Factory),
Requires: Barrack, Crossbow Maker,
Description: Another farmer Warring States exclusive unit. And quite interesting too. First ranged unit with armor penetration and lower recruitment cost but having only half the bow range, slower reload and worse trajectory (you will need to position them at the front of your armie. Because of that Crossbows struggle in ranged duels against most other units but they’re capable of inflicting more casualties on melee infantry given the chance. The more armored enemy is the more you will get out of them. Great for taking out those pesky Chariots from far and garrisoning walled cities– they basically replace Noble Archers. They complement Chu-Ko-Nu quite nicely.


Spear / Crossbow (Farmers only)
(Atk: 6 Ran: 5 Def: 14, Arm: 7, Movement: 4, Morale: 3, Men: 60, / Cost: 170, Upkeep: 30)
* Mixed Weapon Types
* Shots ignore 50% armor
* Atk x2 vs Cavalry and Chariots
* Def x4 vs Cavalry and Chariots
* Moderate Combat Penalty in Forest/Steep Hills/Marshes
Upgrades: +2 Defence /+2 Armor (Armory), +2 Defence /+2 Armor (Armor Works), +3 Defence / +3 Armory (Armor Factory),
Requires: Barrack, Crossbow maker, Combined Arms technology (Power/Warring States),
Description: First hybrid unit you will unlock as a Farmer faction. It’s a mix of Heavy Spears and Crossbows which is great but not absurd. As only half your men in unit are equipped with shooting weapon you will lose against most other ranged units. That said they are ideal as frontline troop against Cavalry/Chariots and beat any other melee unit in Warring States. Mostly due to the fact that those crossbowmen keep shooting enemies from behind. Their flexibility means they’re solid choice for city garrison as they can act as both breach defender or ranged support for towers.
What are it’s weaknesses? Terrain penalty, higher recruitment cost and technology investment as well being somewhat more vulnerable to flanking as your more squishy units are in the back.


Trained Beehive Rocketeers
(Atk: 7 Ran: 7 Def: 8, Arm: 3, Movement: 4, Morale: 2, Men: 20, / Cost: 210, Upkeep: 30)
* Explosive Ammunition
Upgrades: +2 Defence /+2 Armor (Armory), +2 Defence /+2 Armor (Armor Works), +3 Defence / +3 Armory (Armor Factory), Thunderclap bomb?,
Requires: Barrack, Bowyer, Beehive Rocket Launcher technology (Power/Imperial Era)
Description: First gunpowder unit available. They can shot 10 projectiles before needing to reload, and they’re slightly more damaging per shot than fire arrows but greatly inaccurate. They don’t have high requirements but are expensive themselves – for every 2 Beehive Rocketeers you could recruit 3 units of Trained Archers! Add their small unit size and all of sudden they aren’t so attractive. Avoid melee at all costs because their morale is bad.


Trained Three Eyed Gunners
(Atk: 7 Ran: 15 Def: 8, Arm: 3, Movement: 4, Morale: 2, Men: 30, / Cost: 140, Upkeep: 35)
* Shots Ignore Armor
Upgrades: +2 Defence /+2 Armor (Armory), +2 Defence /+2 Armor (Armor Works), +3 Defence / +3 Armory (Armor Factory),
Requires: Barrack, Bowyer, Iron-Foundry, Three Eyed Gun technology (Power/Imperial Era),
Description: Second and last gunpowder infantry unit. Able to fire three times before needing to reloading with great ranged value they will tear through any armor but at smaller range. While similar to Crossbows they have only half their number (30 gunners vs 60 crossbowmen) they ignore 50% more armor and fire a little faster. Great for garrisoning settlements with which allows them to fire continuously. Will win against militia&tribal&barrack ranged troops. While cheap to recruit they have quite the requirement when it comes to infrastructure. On the other hand – Iron-Foundry will be able to pay for itself quite easily. ½ bow range. Avoid melee at all costs because their morale is bad.
2.5.7) Stable's Troops

Trained Chariots (Light/Heavy/4-Horse)
(Atk: 11/14/21 Rang: 12 Def: 37/42/51, Arm: 33/38/47, Movement: 6, Morale: 3
/ Cost: 420, Upkeep: 55)
* Armor Penetration 50%
* Major Combat Penalty in Forest/Marshes/Steep Hills
* Slow in Forest/Marshes
Upgrades: Armorer (+5 Defence/Armor), Heavy Chariot technology (Power/Bronze Age), Four Horse Chariot technology (Power/Bronze Age),
Requires: Stables, Light Chariot technology (Power/Bronze Age),
Description: Inferior variant of chariots compared to their noble counterpart. Mostly due to horrendous price for single unit (420!) and upkeep (55!) which makes them difficult to amass.
On top of that you need Stables which means building Palace (so 2000 gold upfront and 140 upkeep ouch). Ah and their statline is also worse compared to Nobles, while having the same numbers (unlike other blue to red units) and lacking bonus modifier vs chariots and cavalry. The only advantage I see is faster recruitment pool replenishment - 6 turns for Stables in contrast to 12 for Noble’s. Still they perform almost as good as Noble Chariot units. If you can and want them you just have to wait till you research best chariot variant cause those are non refundable/upgradable once purchased. Still I wouldn’t bother as you will have better option to spend that recruitment pool in Warring States.


Cavalry (Farmers)
(Atk: 11 Def: 19, Arm: 13, Movement: 6, Morale: 3, Men: 24, / Cost: 280, Upkeep: 40)
* Armor Penetration 50%
* Atk x1.5 vs Foot
* Major Combat Penalty in Forest/Marshes/Steep Hills
* Slow in Forest/Marshes
Upgrades: Armorer (+2 Defence/Armor), Armor Works (+6 Defence/Armor), Armor Factory (+4 Defence/Armor), Enter Warring States Era edict,
Requires: Stables, Weaponsmith,
Description: Slightly less powerful counterpart of Noble’s Cavalry for Farmers. Unlike Chariots this unit is actually worth recruiting as it is cheaper and more effective. With more men per unit (24 so 6 more than Nobles) they will be capable of beating their counterparts while still having combat modifier against infantry + armor penetration allowing them to wreck havoc across battlefields.


Light Horse Archers (Farmers)
(Atk: 6 Ran: 6 Def: 16 Arm: 13, Movement: 8, Morale: 3, Men: 24, / Cost: 280, Upkeep: 35)
* Can Enter Steep Hills
* Major Combat Penalty in Forests/Marshes & Minor Penalty on Steep Hills
Upgrades: Armorer (+2 Defence/Armor),
Requires: Stables, Bowyer, Horse Archery technology (Power / Bronze Age), Enter Warring States Era edict,
Description: Horse Archer variant for Farmers. With better statline but also cost attached it will prove difficult to spam them like Herders. They only benefit from single armor upgrade but sooner than herder counterpart. Capable of firing in 360 angles while moving and routing some militia unit upon charging. Great mobility – with 8 hexes per turn you will be more than able to force fights twice and additionally can travel through steep hills for flanking manouvers.


Heavy Horse Archers
(Atk: 6 Ran: 6 Def: 24, Arm: 21, Movement: 6, Morale: 3, Men: 24, / Cost: 350, Upkeep: 40)
* Major Combat Penalty in Forests/Marshes & Minor Penalty on Steep Hills
* Slow in Forests/Marshes
Upgrades: Armor Factory (+4 Defence/Armor),
Requires: Stables, Bowyer, Armor Works, Horse Archery technology (Power / Bronze Age),
Description: Heavier variant of horse archers. With higher defense and armor at the cost of 2 less movement this unit is better suited to melee that Light Horse Archers. Even though they have way higher armor you must charge them into light horse archers to counter them. Otherwise you will lose as much if not more than enemis. They cost 25% more so for every 5 LHA you will get 4 HHA.


Cavalry Crossbows (Farmers)
(Atk: 6 Ran: 6 Def: 16, Arm: 13, Movement: 6, Morale: 3, Men: 24, / Cost: 280, Upkeep: 40)
* Shots ignore 50% armor
* Major Combat Penalty in Forest/Marshes/Steep Hills
* Slow in Forest/Marshes
Upgrades: Armorer (+2 Defence/Armor), Armor Works (+6 Defence/Armor) ,Armor Factory (+4 Defence/Armor),
Requires: Stables, Crossbowmaker,
Description: Another Farmer’s exclusive unit. At first may seem like a Light Horse archer but you should treat it as alternative to Heavy Horse archers cause they’re also slower. Unlike previous 2 units this one get full benefit of armor boosting buildings which at last lvl ties it with Heavy Horse Archers. They also are capable on shooting&reloading while moving which means they perform better than foot skirmishers against infantry. As any other mounted ranged unit they will be outdone in ranged duels due to lower model count. Being as costly as default farmer’s horse archers they are great at harassing armored units thanks to 50% armor penetration bolts.


Cataphracts Cavalry
(Atk: 9 Def: 37, Arm: 33, Movement: 6, Morale: 3, Men: 24, / Cost: 420, Upkeep: 50)
* Atk x2 vs Cavalry&Chariots
* Atk x1.5 vs Foot,
* Major Combat Penalty in Forests/Marshes & Minor Penalty on Steep Hills
* Slow in Forests/Marshes
Upgrades: Armor Factory (+12 Defense/Armor),
Requires: Stables, Iron-Foundry, Armor Works, House Armor technology (Knowledge / Imperial Era)
Description: Description: Heavy armored cavalry which finally provides you sturdy but expensive unit to choose. Even though their melee attack is lower than standard cavalry and they lack armor penetration they get access to anti-cavalry modifiers. Good formation breaking unit which can survive to tell the tale.


Cataphracts Archers
(Atk: 9 Ran: 6 Def: 37, Arm: 33, Movement: 6, Morale: 3, Men: 24, / Cost: 490, Upkeep: 50)
* Atk x2 vs Cavalry&Chariots
* Atk x1.5 vs Foot,
* Major Combat Penalty in Forests/Marshes & Minor Penalty on Steep Hills
* Slow in Forests/Marshes
Upgrades: Armor Factory (+12 Defense/Armor), +2 Ranged Attack (Gunpowder)
Requires: Stables, Iron-Foundry, Armor Works, Stirrups technology (Knowledge / Imperial Era)
Description: Replaces Cataphracts for Farmers and is the only heavy mounted unit with ranged unit for them. Expensive.


Army Heavy Cavalry (Herders)
(Atk: 9 Ran: 6 Def: 29, Arm: 25, Movement: 6, Morale: 3, Men: 24, / Cost: 420, Upkeep: 50)
* Atk x2 vs Cavalry&Chariots
* Atk x1.5 vs Foot,
* Major Combat Penalty in Forests/Marshes & Minor Penalty on Steep Hills
* Slow in Forests/Marshes
Upgrades: Armor Factory (+8 Defense/Armor), +2 Ranged Attack (Gunpowder)
Requires: Stables, Armor Works, Stirrups technology (Knowledge / Imperial Era)
Description: More affordable replacement for both Cataphracts variants. Even though it is less tanky it can be recruited from 2nd lvl settlements which is huge for herding factions. It is still usable against bulk of enemy units.
2.5.8) Palace's Troops Part 1

Picked Swordsmen (Farmers)
(Atk: 8 Def: 14 Arm: 7 Movement: 5 Morale: 4, Men: 60, / Cost: 170, Upkeep: 35
* 25% combat bonus in marsh or forest,
* Not slowed down on Marshes,
* No armor upgrades
Upgrades: +10% chance to kill with bladed weapon from Variable Composition Sword tech. (Craft, Imperial Era)
Requires: Palace, Swordsmith, Armorer (Imperial Era)
Description: Achievable by end of Warring States first sword unit for farmers factions. Compared to other sword unit (convicts) they have 4 more defence, 1 more movement (which is handy) no penalty to movement on marshes and combat bonus in forests/marshes. Which makes from unit already capable of beating down most of other “light” troops something that can destroy better infantry on those hexes. Initially they’re as strong as Heavy Spearmen without any armor upgrades in infantry fights. Sadly they don’t get armor upgrades themselves. On the other hand they have bladed weapon. Still lack of any anti-cav property makes them mostly as specialized ambushers.


Guard Halberds (Farmers)
(Atk: 9 Def: 17,Arm: 10, Movement: 4 Morale: 4, Men: 60, / Cost: 170, Upkeep: 35
* Armor Penetration 50%
* Defence x2 vs Cavalry&Chariots
* Moderate combat penalty Marshes, Forests and Steep hills,
Upgrades: No Armor upgrades,
Requires: Palace, Weaponsmith, Armor Factory,
Description: Another unit available in late Warring States. It is better but more expensive version of Trained Halberds. Attack increased by 1, Defence by 2 and Morale by 1. It’s importance comes from the 2 facts. First is that it is capable of beating down Heavy Spearmen most often. Second is ability to counter any Cavalry that Enemy might throw at you charging – even Cataphracts!. Because of that they are ideal choice for open field battles as they have few weaknesses until more Imperial era units start showing up.


Guard Cavalry (Farmers)
(Atk: 12 Def: 33, Arm: 25, Movement: 6 Morale: 4, Men: 24, / Cost: 420, Upkeep: 50
* Armor Penetration 50% (In Warring States only),
* Atk x2 vs Cavalry&Chariots (In Imperial Era only),
* Atk x1.5 vs Foot,
* Major Combat Penalty in Forests/Marshes & Minor Penalty on Steep Hills
* Slow in Forests/Marshes
Upgrades: No armor upgrades, Horse Armor technology (into Guard Cataphracts)
Requires: Palace, Stables, Armor Factory, Horse Riding technology (Knowledge / Bronze Age)
Description: At first glance statline comparable to Noble’s Cavalry (which is something as Noble’s units have in most cases the best attributes) 1 less attack for 5 defense and 3 more armor with 6 more men per unit (24 vs 18 nobles). Even though they will beat Noble Cavalry one on one they perform worse against infantry and will lose to fully upgrade Trained Halberds while Nobles would won. They also have some unique weapon swap depending on era. In Warring states they have Dagger-Axe thus they have armor penetration and benefit from +bladed weapon techs. In Imperial Era they get some spear thus getting modifiers against mounted enemies allowing them to win against both Noble and regular Cavalry one on one. Doesn’t require much technology wise as you can get them without ability to get Noble Cavalry. Additionally Palace pool has the quickest replenishment.


Guard Spearmen
(Atk: 7 Def: 23, Arm: 14, Movement: 4 Morale: 4, Men: 60, / Cost: 170, Upkeep: 35
* Attack x2 vs Cavalry&Chariots,
* Defence x4 vs Cavalry&Chariots
* Moderate combat penalty Marshes, Forests and Steep hills,
Upgrades: No armor upgrades,
Requires: Palace, Armor Factory, Enter Imperial Era edict,
Description: One of the best melee infantry units in the game. It beats every other infantry unit one on one (except next unit on this list) making it the best option that Herders get access to. Absurdly high defence against cavalry means that no horse stand a chance, and high armor value make them well balanced and difficult to counter. Their only weakness is the penalty on difficult terrain and somewhat low offensive power which can stop them in place. They are available later than Halberd variant but are actually cheaper infrastructure wise to produce. Even though they don’t benefit from bladed weapons bonus to kill chance technologies they are strong.


Guard Archers (Farmers)
(Atk: 8 Rang: 5 Def: 23, Arm: 14, Movement: 4 Morale: 4, Men: 60, / Cost: 210, Upkeep: 35
* Mixed Weapon Types
* Attack x2 vs Cavalry&Chariots,
* Defence x4 vs Cavalry&Chariots
* Moderate combat penalty Marshes, Forests and Steep hills,
Upgrades: No armor upgrades, +2 Ranged Attack (Gunpowder)
Requires: Palace, Armor Factory, Combined Arms technology (Power / Warring States), Enter Imperial Era edict,
Description: The strongest unit we have found so far. Another combined arms type unit. This time it’s a mix of spearmen and archers (20-40 mix). Noteworthy is the high ranged attack, ability to burn walls and all around great statline for ranged warfare with normal unit size. Really flexible unit than can both assault and defend breaches as well as provide useful projectiles to towers or just burn them. Nothing can beat them one on one in melee and in ranged duels only Three-Eyed Gunners can match them. All that for only 210 gold is a bargain. That said they still receive terrain penalties and are somewhat more vulnerable to being flank as your squishy archers are in the back and on the sides.


Picked Zhan Ma Dao (Farmers)
(Atk: 7 Def: 9, Arm: 3, Movement: 4 Morale: 4, Men: 40, / Cost: 180, Upkeep: 35
* Armor Penetration 50%
* Attack x3 vs Cavalry&Chariots,
* Defence x2 vs Cavalry&Chariots
* Moderate combat penalty Marshes, Forests and Steep hills,
Upgrades: Armorer (+2 Defense/Armor), Armor Works (+2 Defense/Armor), Armor Factory (+3 Defense/Armor), +10% chance to kill from Variable Sword Composition technology (Craft / Imperial Era)
Requires: Palace, Swordsmith, Enter Imperial Era edict,
Description: Interesting new type of units that farmers get. It excels in quickly dismantling enemy cavalry. That said because of smaller unit size and somewhat lower Defence with all armor upgrades, they are actually vulnerable to heavy cavalry charges. But if you can take enemy charge with other unit and allow Zhan Ma Dao to attack now stationary cavalry they will slaughter them quickly thanks to their highest in the game modifier against cavalry. When it comes to infantry they will struggle to win against anything other than militia/tribal units.


Guard Cataphracts (Farmers)
(Atk: 10 Def: 51, Arm: 45, Movement: 6 Morale: 4, Men: 24, / Cost: 420, Upkeep: 50
* Atk x2 vs Cavalry&Chariots
* Atk x1.5 vs Foot,
* Major Combat Penalty in Forests/Marshes & Minor Penalty on Steep Hills
* Slow in Forests/Marshes
Upgrades: No armor upgrades, Stirrups technology (into Imperial Guard Cavalry),
Requires: Palace, Stables, Armor Factory, Horse Armor technology (Craft / Imperial Era)
Description: Replaces Guard Cavalry and loses 2 melee attack but gains 18 Defense and 22 Armor. Costs the same but is more universal and harder to kill. They will be able to beat reliably Trained Halberds on Charge. For some reason only Farmers get access to this unit. Not only more durable against missiles but frankly anything that doesn’t have armor penetration or bonus modifier will struggle.
2.5.8) Palace's Troops part 2

Imperial Guard Cavalry (Farmers)
(Atk: 10 Rang: 7 Def: 51, Arm: 45, Movement: 6 Morale: 4, Men: 24, / Cost: 560, Upkeep: 65
* Atk x2 vs Cavalry&Chariots
* Atk x1.5 vs Foot,
* Major Combat Penalty in Forests/Marshes & Minor Penalty on Steep Hills
* Slow in Forests/Marshes
Upgrades: No armor upgrades,
Requires: Palace, Stables, Armor Factory, Stirrups technology (Knowledge / Imperial Era)
Description: Replaces Guard Cataphracts and gains access to bow while preserving all previous bonuses. The drawback being their cost goes through the roof. For increase of 140 in cost and 15 in upkeep I would think twice before deciding on them. As unlocking them will unlock also Cataphract Archers who cost 70 more. It allows to augment your big skirmishing armies with durable first row but is it really worth it?


Khan’s Guard (Herders)
(Atk: 10 Rang: 7 Def: 51, Arm: 45, Movement: 6 Morale: 4, Men: 24, / Cost: 560, Upkeep: 65)
* Atk x2 vs Cavalry&Chariots
* Atk x1.5 vs Foot,
* Major Combat Penalty in Forests/Marshes & Minor Penalty on Steep Hills
* Slow in Forests/Marshes
Upgrades: No armor upgrades,
Requires: Palace, Stables, Armor Factory, Stirrups technology (Knowledge / Imperial Era)
Description: Copy-paste of previous unit but with different name and circumstances. While Farmers can just stop at Guard Cataphracts or decide on Stable variant, Herders don’t really have this luxury as they don’t have anything that this unit is replacing and will get access to it anyway. Khan’s Guard is waay better than both variants of Heavy Cavalry although it cost a ton. That said it will be easier to implement into your armies of horse archers as all other units (Tribal&Noble) are free and you most likely have rather big recruitment pool thanks to Palaces. On top of that combining 6 morale with way more armor than anything else you have means this unit will be able to tank projectiles for rest of your units.
2.5.9) Artillery

Whirlwind
(Atk: 0 Rang: 10 Wall dmg: 10 Fire dmg: 30 Def: 30 Arm: 30, Mov: 3, Morale: 3,
Cost 700 / Upkeep: 20)
* Explosive Ammo,
* Shots ignore 50% armor,
* Slow Forest/Marshes,
Upgrades: +2 Ranged / +30 Fire (Flaming Pitch), Thunderclap Bomb,
Requires: Artillery Camp, Whirlwind technology (Power / Warring States)
Description: With 3 artillery pieces per unit it will bring down palisade in 10 shots which means 4 salves. Even though for longest time I was really skeptical about this particular artillery unit I started to warm up towards it. As the first siege weapon it is quite cost efficient allowing you to save on archers as long as you protect it. One unit of Whirlwind will do damage comparable to several archers while taking each turn around as much as single militia unit. With fire damage upgrades it get’s even better. Even though it will struggle against anything better than wooden palisade in most cases even at the imperial era phase you will encounter those. Listed as anti-personnel I found it underwhelming against AI compared to other artillery pieces. Still it benefits from thunderclap bomb and can do better in large battles than single archer unit.


Crouching Tiger
(Atk: 0 Rang: 24 Wall dmg: 20 Fire dmg: 50 Def: 20 Arm: 20, Mov: 3, Morale: 3,
Cost 1050 / Upkeep: 20)
* Explosive Ammo,
* Shots ignore armor,
* Slow Forest/Marshes
* Can Breach Earthen Walls,
Upgrades: +4 Ranged / +50 Fire (Flaming Pitch) Thunderclap Bomb,
Requires: Artillery Camp, Crouching Tiger technology (Power / Warring States)
Description: MvP of this category. Solid, universal and efficient. You could compare it to certain german tank model from WWII and it wouldn’t shame the comparison. It is all you would most likely need throughout the whole game to siege quickly. With 3 artillery pieces per unit it breaks down palisades in 5 shots meaning 2 salves. It outperforms Whirlwind even when firing at infantry as it completely ignores armor. The downside of cost (50% more than Whirlwind) isn’t such a big deal when you have limited recruitment possibility (Artillery camp grants only 2 slots) but make sure to protect them well as those beauties take a while to pay for themselves.


Giant Double Crossbow (Farmer only)
(Atk: 0 Rang: 15 Wall dmg: 7 Fire dmg: 0 Def: 50 Arm: 50, Mov: 3, Morale: 3,
Cost 560 / Upkeep: 20)
* Piercing shots
* Shots ignore armor,
* Slow Forest/Marshes
Upgrades: None
Requires: Artillery Camp, Giant Double Balista technology (Power / Warring States)
Description: The cheapest artillery available for Farming factions only. Grants a mean for obtaining cheap full armor penetration. Comes with 2 artillery pieces per unit. Performs actually worse versus Siege targets than Whirlwind and doesn’t benefit from fire damage upgrades. Quite inaccurate for my taste. A viable choice if your enemies are heavy armored and you want to deal them some casualties without closing by. That said they will need some meatshield for protection.


Giant Triple Crossbow (Farmer only)
(Atk: 0 Rang: 25 Wall dmg: 12 Fire dmg: 0 Def: 30 Arm: 30, Mov: 3, Morale: 3,
Cost 700 / Upkeep: 20)
* Piercing shots
* Shots ignore armor,
* Slow Forest/Marshes
Upgrades: None
Requires: Artillery Camp 2, Giant Triple Balista technology (Power / Imperial Era)
Description: Better version of previous unit. Costs more while packing more of a punch. Actually I like this variant less as it requires 2nd level of Artillery Camp and I didn’t feel difference. Additionally technology is located in Imperial Era which is quite busy. If I remember correctly you also need other technology to unlock 2nd level of Artillery camp so it comes even later while it costs more (no more advantage of being really affordable) and struggles against both fortifications and units. I can’t advice it with clear conscience.


Four Legged Trebuchet
(Atk: 0 Rang: 40 Wall dmg: 30 Fire dmg: 70 Def: 50 Arm: 50, Mov: 3, Morale: 3,
Cost 1400 / Upkeep: 20)
* Explosive Ammo,
* Shots ignore armor,
* Slow Forest/Marshes
* Can Breach any Walls,
Upgrades: +10 Ranged / +70 Fire (Flaming Pitch), Thunderclap Bomb
Requires: Artillery Camp 2, Four Legged Trebuchet technology(Power / Imperial Era)
Description: The most expensive artillery piece in the game while not the best when it comes to firepower. A single salve from this unit should bring any palisade down with all fire damage upgrades. Capable of destroying all walls it surely is powerful tool. But the cost as well as next units makes it no-buy for me.


Muslim Trebuchet
(Atk: 0 Rang: 40 Wall dmg: 60 Fire dmg: 90 Def: 50 Arm: 50, Mov: 3, Morale: 3,
Cost 700 / Upkeep: 20)
* Explosive Ammo,
* Shots ignore armor,
* Slow Forest/Marshes
* Can Breach any Walls,
Upgrades: +10 Ranged / +90 Fire (Flaming Pitch), Thunderclap Bomb
Requires: Artillery Camp 2, Muslim Trebuchet (Power / Imperial Era)
Description: The most cost efficient artillery when it comes to fortification destruction. Cost the same as Whirlwind which makes every previous artillery piece costing 700+ obsolete, deals the most damage to walls what not to like? Maybe the fact that it divers you even further from unlocking gunpowder units in Imperial era and previously unlocked 4-legged trebuchet isn’t attractive. But you are unlocking it for this.


100 Tigers Rocket Launcher
(Atk: 0 Rang: 15 Fire dmg: 3 Def: 50 Arm: 50, Mov: 3, Morale: 3,
Cost 840 / Upkeep: 20)
* Explosive Ammo,
* Shots ignore 50% armor,
* Slow Forest/Marshes
* Can Breach any Walls,
Upgrades: Thunderclap Bomb,
Requires: Artillery Camp 2, 100 Tiger Rocket Launcher (Power / Imperial Era)
Description: The most satisfying artillery unit for me. Cart armed with hundreds of rockets which are fired rapidly can travel big distances and decimate any big gathering of targets. Even though each individual rocket deals small damage it quickly ads up. Only 50% armor penetration might seem underwhelming but taking fire rate into consideration it is plenty. Just be careful to not hit your own troops as the rain of firework will continue for a while.


Small Cannon
(Atk: 0 Rang: 50 Wall dmg: 80 Fire dmg: 0 Def: 50 Arm: 50, Mov: 3, Morale: 3,
Cost 840 / Upkeep: 20)
* Explosive Ammo,
* Piercing Shots
* Shots ignore armor,
* Slow Forest/Marshes
* Can Breach any Walls,
Upgrades: Thunderclap Bomb
Requires: Artillery Camp 2-3, Small Cannon (Power / Imperial Era)
Description: Hybrid type of artillery which joins Piercing and explosive properties of missiles. Damage comparable to Crouching Tiger while it costs way less it can produce more casualties against infantry.
2.5.10) Fleet

River Boat
(Atk: 6 Rang: 3 Def: 150, Arm: 150, Movement: 6 Morale: 3 / Cost: 210, Upkeep: 55
* Can carry 1 infantry unit
* Can’t enter Sea/Ocean
* Slow Coastal Water
Upgrades: Gunpowder (Ranged +2)
Requires: Boatyard,
Description: First available boat. Designated for river boat but you most likely will use it for scouting as well. Great for instantly moving units across 1 hex rivers or quickly transporting settlers if land route consists many forests/marshes. When it comes to combat capability it will get destroyed by any units capable of breaching wooden walls without much of an fight. Once you unlock next unit’s you most likely will stop producing River Boats once and for all. The only situation I think it can be a viable choice if you are by coast and have many Boatyards for quicker production of Small Sailing Junk.


War Junk
(Atk: 6 Rang: 3 Def: 350, Arm: 350, Movement: 6 Morale: 3 / Cost: 210, Upkeep: 55
* Can carry 1 unit
* Can’t enter Sea/Ocean
* Slow Coastal Water
Upgrades: Gunpowder (Ranged +2)
Requires: Shipyard,
Description: Shows down the naval technology line in Warring States and totally replaces it’s predecessor. For the same cost you get much sturdier boat with more men and no limitation for transporting unit type. Which will make them great for transporting cavalry/chariots/artillery units inland. Even though it requires higher lvl building it is completely cost efficient compared to to River Boats – it is better to have fewer Shipyards pumping War Junks out rather than more Boatyards with River Boats.


Small Sailing Junk
(Atk: 6 Rang: 3 Def: 150, Arm: 150, Movement: 6 Morale: 3 / Cost: 280, Upkeep: 70
* Can carry 1 infantry unit
* Can’t enter Ocean
* Slow Rivers
Upgrades: Star Charts (Knowledge / Warring States), Gunpowder (Ranged +2)
Requires: Boatyard, Junk Sails (Knowledge / Warring States)
Description: First ship designated for open waters. More expensive than river ships offers greater mobility in coastal waters and upon researching upgrade – open seas hexes. Which means it can vanish from other players radars for surprise naval landings. Because of speed advantage in coastal waters and unability of river vessels to enter open seas it can be used for hit&run blockades of naval trade routes. Really flexible and can be produced from Boatyards.


Large Sailing Junk
(Atk: 6 Rang: 3 Def: 350, Arm: 350, Movement: 8 Morale: 3 / Cost: 420, Upkeep: 85
* Can carry 1 infantry unit
* Slow Rivers
Upgrades: Star Charts (Knowledge / Warring States), Marine Compas (Knowledge / Imperial Era), Gunpowd )Ranged +2)
Requires: Shipyard,
Description: Bigger version of previous vessel. Similary to War Junk-River Boat comparison it is sturdier and allows to carry any unit type. Outside of this it has 2 more movement points and upon researching technology it can enter not only open sea but also ocean hexes. Which further enhances his potential speed. The only problem is associated with it much higher cost and upkeep as well as requirement for Shipyard meaning it will be much bigger investment.


Flying Tiger Paddlewheeler
(Atk: 6 Rang: 3 Def: 225, Arm: 225, Movement: 8 Morale: 3 / Cost: 280, Upkeep: 55
3. ) Can carry 1 infantry unit
Upgrades: Gunpowder (Ranged +2),
Requires: Shipyard, Paddle Wheel (Knowledge / Imperial Era)
Description: Hybrid type of vessel for both river and open water travel – comparable to river boat and small sailing junk but sturdier and faster. Ideal for traveling from one river to another but only with infantry units on board. Ship sadly lacks ability to swim through open seas and ocean hexes which limit’s it’s somewhat. Great for logistic duties around armies but you still will need war junks.
3. AUTHORITY, CULTURE, UNREST
3.1) Authority
One of the 2 faction ratings that you acquire through technologies, edicts and managing your Faction Leader & Heir in respect to battles and encounters. It serves as a soft cap for settlement limit as each settlement over authority results in Noble Unrest. There are some things to note.


Temporary sources of Authority
Winning Big Battle = +1 Personal Authority for Faction Leader/Heir if present.
1 Vassal = +1 Authority
3+ Vassals = +2 Authority (not cumulative)
Authority penalty upon becoming New leader (Heir) = (-3) (goes down by one every turn)
Authority penalty upon becoming new leader (no heir) = (-9) (goes down by one every turn)
Encounters – Various increases and decreases in personal authority of Faction Leader&Heir


Sources of Authority:
Military Drill (Power / Bronze Age) = +1 Authority
Paper Currency (Power / Imperial Era) = +2 Authority
Banking (Power / Imperial Era) = +1 Authority
Advanced Bronze Casting (Craft / Bronze Age) = +1 Authority
Divination (Thought / Bronze Age) = +1 Authority
Priest King (Thought / Bronze Age) = +2 Authority
Oracle Bones (Thought / Bronze Age) = +1 Authority
Mandate of Heaven (Thought / Bronze Age) = +2 Authority
The Five Punishments (Thought / Bronze Age) = +1 Authority
Book of Rites (Thought / Warring states) = +1 Authority
Imperial Rites (Thought / Imperial Era) = +1 Authority
Neo Confucianism (Thought / Imperial Era) = +1 Authority
Horse Domestication (Knowledge / Bronze Age) = +1 Authority
Calendar (Knowledge / Bronze Age) = +1 Authority
Astronomy (Knowledge / Bronze Age) = +1 Authority

Relocate the Nobles Edict (Priest King technology) = +2 Authority
Central Burecracy Edict (Bamboo Strips technology) = +2 Authority
Official Historian Edict (History technology) = +1 Authority
Ban Dangerous Books (Legalism technology) = +3 Authority

Max authority from technologies and edicts = 24

Authority effects:
Each settlement above Authority number = +10% Noble unrest
Each point of Authority above your settlement number = +3% Noble Suppression
Each point of Authority above your settlement number = +2% Peasant Suppression


Said all that it is not too difficult to accumulate around 30 Authority in late game, as so far I’ve seen up to value of 5 personal authority strictly gained from winning big battles alone. Of course it need extra care to not choke yourself once your faction leader dies, meaning planning ahead and grooming future leaders in preparation. And avoid losing faction leader when there is no heir available as the penalty is really severe and most likely will divide your empire.
As the data above shows, authority mostly comes from Thought technology tree so this is something to remember while playing various factions with penalties in this area. Of course you can adjust but most likely will have to adjust having various non-authority related technologies from that tree. I didn’t included some edict cancelation penalties and Grand Commandant edicts cause you can revert those changes.
As the game progresses authority starts to play important role in quelling your settlements unhappiness. With maxed Authority you will suppress nobles for around 60% and Peasants for around 40% which many overlook. Which in reality allows you to safely settle not 24 but 30 settlements. If you want to squeeze for more (as I do) then go over soft cap – you can in most scenarios have 3 more settlements than your limit and be safe. If you accumulate some personal authority on your faction leader you can even possess 40 (!) settlements while being safe. This is one of the most overlooked aspects in macro managing your empire as people are too scared to go above authority limit because they’re not knowing the risk vs reward.
3.2) Culture
Other rating of your empire. At first glance seems boring and lacking impact. But in reality it is really important in many economical aspects. Not only can you win by accumulating tons of culture rating but it also affects your foreign trade income as well as happiness of your cities. Because of that I’m a fan of culture (and thought tree in general) as a way towards optimizing your empire instead of winning and would even take into consideration factions with faster cultural research rate in games with disabled cultural victory condition.

Condition of Cultural Victory: 50 Cultural Victory Points +50% of 2nd faction in CVP ranking

Culture Victory Points = Culture + Culture Victory Points from buildings & encounters

Sources of Culture:
Military Theory (Power / Warring States) = +1 Culture
Jade Working (Craft / Bronze Age) = +1 Culture
Precious Metal Work (Craft / Bronze Age) = +1 Culture
Bamboo Strips (Craft / Bronze Age) = +1 Culture
Paper (Craft / Warring States ) = +2 Culture
Guzheng (Craft / Imperial Era) = +1 Culture
Mountain Armor (Craft / Imperial Era) = +1 Culture
Opera (Craft / Imperial Era) = +1 Culture
Stone Rubing Copying (Craft / Imperial Era) = +1 Culture
Wood Block Printing (Craft / Imperial Era) = +2 Culture
Ilustrated Books (Craft / Imperial Era) = +1 Culture
Caligraphy (Craft / Imperial Era) = +1 Culture
Painting (Craft / Imperial Era) = +2 Culture
Shamanism (Thought / Bronze Age) = +1 Culture
National Myth (Thought / Bronze Age) = +1 Culture
Ancestor Worship (Thought / Bronze Age) = +1 Culture
Ying and Yang (Thought / Bronze Age) = +1 Culture
I Ching (Thought / Bronze Age) = +1 Culture
Enlist Shi (Thought / Bronze Age) = +1 Culture
Astrology (Thought / Bronze Age) = +1 Culture
Poetry (Thought / Bronze Age) = +1 Culture
Tea Culture (Thought / Warring States) = +1 Culture
History (Thought / Warring States) = +1 Culture
Neo Confucianism (Thought / Imperial Era) = +4 Culture
Lineage Groups (Thought / Imperial Era) = +1 Culture
Literature (Thought / Imperial Era) = +1 Culture
Literary Criticism (Thought / Imperial Era) = +1 Culture
The Five Elements (Knowledge / Bronze Age) = +1 Culture
Tai Chi (Knowledge / Warring States) = +1 Culture
Equal Temperament Scale (Knowledge / Imperial Era) = +1 Culture

Imperial University Edict (Canon of Wisdom technology) +2 Culture
Civil Service Examinations Edict (Confucianism technology) = +2 Culture
Patronize the Arts (Poetry Technology) = +2 Culture
Official Historian Edict (History technology) = +1 Culture
Ban Dangerous Books Edict (Legalism technology) = -5 Culture

Max Culture from technologies and edicts = 43 (without Ban Dangerous Books)

Sources of CVP:
Pavilion = 1 Culture Victory Points
Summer Palace = 2 Culture Victory Points
Monastery = 2 Culture Victory Points
Shrine = 1 Culture Victory Points
Famous Shrine = 2 Culture Victory Points
Legendary Shrine = 4 Culture Victory Points
Palace = 1 Culture Victory Points
Grand Palace = 2 Culture Victory Points
Royal Palace = 4 Culture Victory Points
Theater = 2 Culture Victory Points
All lvl 1 Temples&Schools = 1 Culture Victory Point
All lvl 2 Temples&Schools = 2 Culture Victory Points
All lvl 3 Temples&Schools = 4 Culture Victory Points
Various encounters

Max Culture VP from single city = 10-18 (without external buildings / with all external buildings)

CVP doesn’t affect trade or unrest (but those buildings often come with separate unrest&happiness modifiers).

Cultural Victory Strategy
As you probably realized it is impossible to achieve with culture points alone. You will have to build some buildings to push towards victory while focusing on culture techs as often as possible. This mean you will want those mountain hexes for external buildings for extra CVP. Additionally those locations will be easier to defend (thanks to natural chokepoints) but on other hand it will prove more difficult to develop big settlements. You might think that going for Herders will help but I advice against. You will have to go for farming either way and herders will struggle to make use of all the extra happiness. When it comes to buildings you will want to build Palaces more than other players because on top of providing CVP you will get access to 2nd lvl walls. Schools and temples are a hard choice as the one you would want the most (Budhism) comes way to late (Imperial Era) so I would stick to the cheapest ones (Taoist). I strongly suggest to go for Theater spam only at the last moment cause they are more expensive upkeep wise.

Other Culture Boons
Having more Culture than Faction you are trading with = +50% Trade value for Silk, Ceramics, Local Goods,
Having less Culture than Faction you are trading with = -50% Trade Value for Silk, Ceramics, Local Goods,
X Culture = +2X Noble Happiness
X Culture = +X Peasant Happiness
3.3) Managing Public Order (Genghis Patch Update)
Important Unrest levels:
70+ Peasant Unrest – You start getting less income from taxes,
100 Peasant Unrest – You are not getting any taxes,
80+ Peasant Unrest – You can’t recruit Militia/Tribal units Units,
80+ Noble Unrest – You can’t recruit Noble Units,

List of things influencing Public Order:
Contructing Farms/Roads/Buildings : +1 Peasant Unrest (Labor Penalty) for each after initial few,
Clearing Forests/Marshes : +1 Peasant Unrest (Labor Penalty) for each after initial few,
Recruiting Militia/Tribal/Convict unit : +1 Peasant Unrest (Military Service) for each after initial few,
Recruiting Nobles : +2 Noble Unrest (Military Service) for each after initial few,
Having more cities than authority : +10% Noble Unrest for each city above authority,
Access to Luxury Good (Fine Carpets, Falcons, Sable Fur, Zhennan Wood Ceramics, Silk, Jade) : +7% Noble Happiness for each,
Not constructing or clearing for a turn : -1 Labor Penalty,
Not recruiting for a turn : -1 Military Service,
Having Food Shortage : +40 Peasant Unrest until fixed.
Having more than 50-60 Unrest : +Previous Grievances in place of vanishing unrest,
Various Edicts : Effect depend on Edict
Various buildings : Effect depend on building

Events:
Bumper Harvest : -20% Peasant Unrest / Food modifier x 1.2 for 4 turns
Nine-tails Fox : -10% Peasant Unrest, -20% Nobles Unrest for 3 turns
Phoenix Sighted : -20% Peasant Unrest, -20% Noble Unrest for 3 turns

Comet : +15% Peasant Unrest / +20% Noble Unrest for 3 turns
Eclipse : +25% Peasant Unrest / +30% Noble Unrest for ? turns
Disease Outbreak : Kills some population, Army Efficiency Reduced / +10% Peasant
Unrest, +10% Noble Unrest for 4 turns
Earthquake : Kills some population, Damages some buildings / +10% Peasant Unrest, +10% Noble Unrest for 3 turns
Major Earthquake : Kills some population, Damages some buildings, +20% Peasant Unrest, +30% Noble Unrest for 4 turns
Flood : floods up to 2 tiles from river hexes, disabling those hexes for 2 turns (Gentle Hills, Steep Hills, Forests, Mountains act as Barriers)

Drought : +15% Peasant Unrest / Food Modifier x 0.8 for for 4 turns
Red Rain : +20% Peasant Unrest, +20% Noble Unrest for 2 turns
Locust Swarm : +20% Peasant Unrest / +15% Noble Unrest, Food Modifier x 0.5 for 2 turns

The Importance of your subject happiness
Unrest mechanic is one of the key and most difficult mechanics for newer players In the game. Important because rebellions that spawn through negligence are time and coin consuming to crush and difficult because you need to keep going above and beyond in order for your empire to keep growing. The general idea is that you want your cities be on the safe side of an edge – growing as quickly as possible but not having to pay price for going overboard.

Efficiency:
I touched this topic somewhat while introducing my formula for farming. Generally I like to keep my Unrest in lower 40’ties % as it gives me enough breathing room that, if I’m hit with even 2 medium negative events it goes barely above 70% which can be managed with few extra units. That said there aren’t many events that will keep hitting you hard. The most important thing beside that is to build granaries as the most severe penalty is incurred because of food shortages. Basic granary doesn’t takes much but saves food up to 2 turns worth. Meaning that with full granary you will survive not only raiding but also – Floods, Droughts and most importantly – Locust Swarms.

Generally while making this guide I realize that I’m maybe over valuating them and build them too early as it turns out you don’t need to keep building new farms in order to fill them. So I would suggest building granary in every city of size 30+ as from that point event’s will cause more damage through food depravation. Once you have them up and running, your empire as a whole will become more resistant and stable against chains of bad luck.

When it comes to squeezing more out of your cities generally I consider that those things are the best in descending order (each next being more costly thus worse than previous):
1. Preventing too high of the unrest in the first place,
2. Using governors with high Ren once few cities skyrocket,
3. Invest in unrest reducing buildings,
4. Invest in unrest reducing edicts,
5. Suppress cities with units.

In conclusion you will want to move onto next step while the previous one isn’t enough anymore. That said you should avoid stacking cities full of “police units” as it costs too much income with larger empires. Few units is fine (especially for border cities) but at some point it isn’t profitable anymore when you’re recruiting units with 35 upkeep per turn to just build few farms more.
3.4) Edicts Part 1
Here I’ll analyse all the edicts currently in the game.

Grand Commandant
Requirements: None
Cost: 0
Upkeep: 80
Temporary Effect: None
Permanent Effect: Add General Character, -1 Authority
Cancellation Effect: -1 Authority for 20 turns
My Opinion: First edict available in each game. It can have some uses since turn 1 (if you are spawned next to some other faction and want to rush them, extra bodyguard unit is great asset, or if there is plenty of encounters you want to take before others) since it can be re-issued after penalty for cancellation expires. Additionally edict is continuous so if your current Grand Commandant dies you will get new one next turn. Other than that you will take it once your empire starts booming and you will start maximizing your armies. Cheaper money wise but that -1 Authority can be harder to ignore compared to others characters from edicts. I usually issue this after quite late to have full benefit of extra Qi/Ren from technologies and better Chariot variant. It’s usually safer to fight with Grand Commandant rather than your Faction leader/heir. But also less rewarding if you will win big battles.

Well’s Field System
Requirements: Flood Control (Power / Bronze Age)
Cost: 0
Upkeep: 0
Temporary Effect: Peasant Unrest +10% for 10 turns,
Permanent Effect: Peasant Unrest +10%, Noble Unrest -10%, Grain Tax: 2 per person
Cancellation Effect: This edict may not be cancelled
My Opinion: Your first pick as farmer faction in every game and as herder faction once you can farm. It doubles your income from farms and provides happiness boost for Nobles which is equivalent of 1 authority point early on. It is best to issue as quickly as possible before of that temporary Unrest hit. If you issue it while your settlements are still small, the penalty will go away before too much labor would stop you from constructing additional farms. The longer you delay it – the harder it is to implement it. Also of an important note – you gain +2 income per farming population unit (green) so unemployed/herding population doesn’t count which means irrigated farms earn way less after taking construction time into account.

Relocate Nobles
Requirements: Priest King (Thought / Bronze Age)
Cost: 0
Upkeep: 0
Temporary Effect: Noble Unrest +20% for 20 turns,
Permanent Effect: Authority +2,
Cancellation Effect: -1 Authority for 20 turns
My Opinion: Important edict because together with technology it grant’s total of +4 authority, allowing for expansion. Funny enough if you have at least 2 more cities than your authority limit you can issue this without changing total noble unrest level as penalty for each authority point is -10% which balances itself. I would also advocate to issue this earlier rather than later cause it will get progressively harder to implement.

Move Capitol
Requirements: Priest King ( Thought / Bronze Age), Having your Faction leader in non-capitol settlement
Cost: 500
Upkeep: 0
Temporary Effect: Noble Unrest +15% for 10 turns,
Permanent Effect: Moves capitol to the settlement where the faction leader currently is.
Cancellation Effect: This edict lasts 10 turns and may not be cancelled during this time
My Opinion: One of the edicts implemented not so long ago. It gives you opportunity to truly emigrate your empire into other place and mitigate penalties for nobles based on distance to capital if you expand more in some directions. Also the capitol is the place that many Faction Leader and Heir as well as edict spawned charaters will show up so you might want to move it closer to borders at some point.


Gentlemen Ride Chariots
Requirements: Light Chariot (Power / Bronze Age)
Cost: 0
Upkeep: 0
Temporary Effect: Noble Unrest +10% for 15 turns,
Permanent Effect: Changes unit availability
Cancellation Effect: This edict may not be cancelled
My Opinion: First noble recruitment altering edict. Once issued it replaces infantry nobles (Dagger-Axemens/Archers) with noble chariot unit (which quality depends on progress into chariots technologies). The penalty isn’t harsh and you get access to free to recruit chariots from every city. It’s optional and you can do as good without them but if you want early mounted units you probably will issue it. Let’s be honest – it is your only viable source of steady stream of chariots as those from Stables will bankrupt you before you can get even 9 of them… It can be replaced with Gentlemen Ride Horses Edict in Warring States Era and by itself expires in Imperial Era.

Enlist a Shi
Requirements: Logographic Script (Thought / Bronze Age)
Cost: 0
Upkeep: 80
Temporary Effect: None
Permanent Effect: Add Bureaucrat Character, Noble Unrest +5%
Cancellation Effect: None
My Opinion: Cheaper than Grand Commandant and more easy to implement once you’re over authority city limit. But is actually worse if you are below it. Still I prefer him over Grand Commander as there is no penalty when dismissing him. As his statistic are randomized upon recruiting I don’t see obstacles to led him armies to lead or cities to govern. As with the previous character I prefer to get him when I have both Qi/Ren bonuses and some better (Chariot if I’m investing in them)

Edict of Self Criticism
Requirements: Mandate of Heaven ( Thought / Bronze Age), Having some bad encounter,
Cost: 1000
Upkeep: 0
Temporary Effect: None
Permanent Effect: Leader Personal Authority -2, Cancels unrest due to disasters
Cancellation Effect: This edict lasts 20 turns and may not be cancelled
My Opinion: Great reset button once chain of bad things happen. So you were hit by earthquake followed by fire and finished by disease? At this point you are more than happy to sacrifice personal authority and even getting those -20% Noble Unrest to just prevent towns from going into rebellions. It doesn’t seem to negate hit to unrest from food shortage though. Which is what hurts the most so you will still need some food stored. Also remember that personal authority can go into negative but is tied to character. So if your venerable leader is unlucky enough to incite heaven’s wrath he might as well be not so lucky to survive next city assault… against walls… alone.

Patronize the Art
Requirements: Poetry (Thought / Bronze Age)
Cost: 0
Upkeep: 200
Temporary Effect: None
Permanent Effect: Culture +2,
Cancellation Effect: Noble Unrest +5% for 10 turns,
My Opinion: Often overlooked edict (even by me) mostly because it has a not so small upkeep. Extra Culture allows sometimes to catch up some trading bonus with other factions or quell some unrest while it is pricey (+4% Noble and +2 Peasant Happiness). Most likely will be pursued by people who want to achieve cultural victory. That said you can cancel it at any point so it gives you extra flexibility in controlling trade between you and other faction.

Central Bureaucracy
Requirements: Bamboo Strips (Craft / Bronze Age)
Cost: 0
Upkeep: 500
Temporary Effect: Noble Unrest +25% for 20 turns,
Permanent Effect: Add Bureaucrat Character, Peasant Unrest -10%, Authority +2
Cancellation Effect: -1 Authority for 20 turns
My Opinion: One of the more important edicts which is a milestone in your empire growth progression. Not only does it provide authority and peasant happiness boost but also bunch of other important edicts to unlock. The easiest way to implement it is to wait for Salt Tax which it unlocks to pay for CB upkeep. But you can also pay for it over longer time by spending that extra peasant unrest which allows for quicker growth of your cities. That said it will be somewhat tricky with that Noble unrest to modernize your empire quickly. A character is more of a cheery on the top of cake to be honest.
3.5) Edicts Part 2
Salt Tax
Requirements: Central Burecracy Edict, Coinage (Power / Bronze Age)
Cost: 0
Upkeep: 0
Temporary Effect: None
Permanent Effect: Noble Unrest +10%, Peasant Unrest +20%, Tax: 1 per person,
Cancellation Effect: -1 Authority for 20 turns
My Opinion: Another edict which introduces new type of tax to your subjects. This time it is applied per capita/unit of population which means you finally benefit from those unemployed. But everything has it’s cost and now your people are less happy. If you use it together with CB to pay for edict upkeep take note that altogether it will be +35% Noble Unrest for 20 turns (after which it will go down to 25%) and +10% Peasant Unrest. It isn’t as profitable as farming tax but plays huge role for herding empires as they lack lands to make full use of former and they struggle to get decent income anyway. That said you have that extra character from other edict which you can throw into most unstable settlement to prevent them from rebelling. Most of the time I would wait with implementation so the Central Bureucracy temporary penalty goes away and I have more population.

Private Land Ownership
Requirements: Central Burecracy Edict,
Cost: 0
Upkeep: 300
Temporary Effect: Noble Unrest +10% for 10 turns
Permanent Effect: Peasant Unrest -10%, Food production x1.20
Cancellation Effect: Noble Unrest +20% for 20 turns, Peasant Unrest +10% for 10 turns,
My Opinion: One of the reasons for issuing Central Bureaucracy. A permanent +20% to food production and reducing Peasant unrest by 10%. In reality Peasant unrest will be reduced by even more because at point of implementing this law, most of your cities will have some labor unrest which means you can turn all construction off and let them grow while recovering from labor. Sadly it doesn’t affect any food source other than farms which means that flocks and resources won’t benefit. At least it combines with other food bonuses so you can actually get modifier as high as +40% to food output. That said population produced from it will be unemployed which means they won’t pay grain tax (but still will pay People’s Contribution and Salt Tax) as well as count for trade income. Temporary penalty is not bad but boy take care to not be forced into cancelling it. Last important note – it will help fill your granaries quickly or kind of counter draughts/floods/locust swarms.

Land Redistribution
Requirements: Central Burecracy Edict,
Cost: 3000
Upkeep: 0
Temporary Effect: Noble Unrest +20% for 20 turns, Peasant Unrest -10% for 80 turns,
Permanent Effect: None,
Cancellation Effect: This edict lasts 80 turns and may not be cancelled during that time
My Opinion: Repeatable edict that allows you reduce Peasant unrest over long period of time at the cost of money and shorter term higher noble unrest. If you can implement it I advice to do so as it allows to create 10 farms more over this period. Problem is that once it expires your unrest will go back to normal which will force you to reissue it unless you took care of that some other way. Still it is a great tool for larger empires as it is more affordable to spend 3000 once rather than build some unrest reducing buildings in each of your let’s say 15+ cities which will have some upkeep attached each turn.

Enter Warring States Era
Requirements: Enough Technologies from Bronze Age researched,
Cost: 1000
Upkeep: 0
Temporary Effect: Noble Unrest +15% for 10 turns,
Permanent Effect: Enables technologies and units,
Cancellation Effect: This edict may not be cancelled
My Opinion: Edict that you always will want to issue. I wouldn’t say that this is a no-brainer and should be issued asap though. As it changes some available to recruit units (I’m mostly talking about Dagger-Axemen -> Halberds change for farming factions) sometimes you might want to prolong decision about progressing through ages. That said you don’t need every technology from previous era to be successful and even if you are lacking something it is still researchable in Warring States Era. So usually there is little sense in delaying it too much. It costs some money and causes some Noble Unrest but it shouldn’t be an issue.

Gentlemen Ride Horses
Requirements: Enter Warring States Era edict, Horse Archery (Knowledge / Bronze Age)
Cost: 0
Upkeep: 0
Temporary Effect:
Permanent Effect: Changes unit availability, Cancels edict Gentlemen Ride Chariots,
Cancellation Effect: This edict may not be cancelled
My Opinion: Second and last noble recruitment altering edict. This ones forces your nobility to serve as Cavalry, providing you with free to recruit units of melee cavalry (farmers) or horse archers (herders). As this unit is really powerful and only option for Nobles to serve in last era you will issue it sooner or later. The thing is that it replaces your previous chariot variant. It can also be issued without Chariot edict first. In both cases it is optional during Warring States and depends on your choice but you will issue it in Imperial Era always. Of a note is that it also enables with some technologies access to some heavy cavalry noble variant for herders.

Appoint a Strategist
Requirements: Military Theory (Power / Warring States)
Cost: 0
Upkeep: 150
Temporary Effect: None
Permanent Effect: Add General Character, Noble Unrest +5%
Cancellation Effect: None
My Opinion: One of the most expansive characters to get (without other boons) but at least he doesn’t reduce your authority. So usually you will recruit him after Shi but before Grand Commander. As with Shi because of lack of any Cancellation Effect you can re-issue edict until you get someone decent. Because of the time frame in which he is accessible I doubt he will help with gathering encounters at this point.

Imperial University
Requirements: Central Burecracy Edict, Canon of Wisdom (Though / Warring States)
Cost: 0
Upkeep: 300
Temporary Effect: None
Permanent Effect: Culture +2, Peasant Unrest -10%, Increase Tax Collection x1.1
Cancellation Effect: -1 Authority for 20 Turns,
My Opinion: Another edict to help alleviate problems with peasants. At the same time it boosts culture and increase tax collection which means that it will pay for itself with 750 farming population. Note worthy is the lack of anything that pisses nobles which makes it easier to implement

Promotion in Battle
Requirements: Legalism (Thought / Warring States),
Cost: 0
Upkeep: 0
Temporary Effect: Noble Unrest +10% for 20 turns,
Permanent Effect: Peasant Unrest -10%, Food Production x 0.9, Battle Morale +1
Cancellation Effect: Authority -1 for 20 turns, Peasant Unrest +20% for 20 turns,
My Opinion: Interesting optional edict which reduces overall food production for some Peasant happiness and better morale for your troops. As morale for your fighting units goes between 2 to 6 an extra +1 is a huge increase especially for your Militia/Tribal/Trained troops (which have 2/3 Morale). That said that negative modifier for food reduces your population size but, it only applies to agriculture. Which means that if pure herding societies can afford this, it will make their tribal units almost identical to trained troops without this edict. And it is really affordable.

Standard Weights and Measures
Requirements: Legalism (Thought / Warring States),
Cost: 1000
Upkeep: 0
Temporary Effect: Noble Unrest +20% for 10 turns, Peasant Unrest +20% for 10 turns,
Permanent Effect: Trade Income x 1.20
Cancellation Effect: Authority -1 for 20 turns,
My Opinion: Huge trade income improvement for hard but brief penalties. Together with Roads and Abacus from Knowledge tree boosts trade income by around ~55% which allows your Markets/Wharfs or Ports to start economical boon. With right economic network it pays for itself quickly and you always will want to have it. By the time you research it, usually you should have cities big enough that if your trade is up and running you issue this edict.
3.6) Edicts Part 3
Ban Dangerous Books
Requirements: Legalism (Thought / Warring States),
Cost: 500
Upkeep: 0
Temporary Effect: None,
Permanent Effect: Noble Unrest +10%, Culture -5, Authority +3,
Cancellation Effect: Culture -3 for 20 turns,
My Opinion: The most controversial edict I think. Mostly because it has a steep price for what you are getting. Culture reduction is huge while Authority gain mostly allows you to settle 1 city more on it’s own. Why? Because that +5 Culture provided +10% Noble Happiness and extra Unrest consumed what 2 points of authority could provide. You will have to find some combination of edicts to make this work and even then you will lose much toward cultural and points victory. So I would just skip it.

Private Arms Ban
Requirements: Legalism (Thought / Warring States),
Cost: 0
Upkeep: 0
Temporary Effect: Peasant Unrest +30% for 20 turns,
Permanent Effect: Peasant Unrest -20%, Noble Unrest -10%, Militia and Tribesmen availability x 0.5
Cancellation Effect: Noble Unrest +20% for 10 turns,
My Opinion: One of the two recruitment pool altering edict. This one cut’s your militia, tribal and ALSO Convicts (about which game doesn’t inform you) recruitment pool in half. That said it doesn’t seem to affect extra bonuses from buildings (except Prison) – just the baseline. Then you have to wait 20 turns to get full benefit of Peasant unrest meanwhile having ability to manage nobles better or settle additional city. It’s a long investment but once you are there that reduced unrest will allow you to spam farms for a while. As it doesn’t cost anything I would recommend it for farming factions which can rely on Trained units to be a core of their armies. I wouldn’t go for it with Herders or if I rely on convicts.

Official Historian
Requirements: History (Thought / Warring States)
Cost: 0
Upkeep: 100
Temporary Effect: None
Permanent Effect: +1 Authority, +1 Culture
Cancellation Effect: Noble Unrest +5% for 10 turns,
My Opinion: Really cheap edict for it’s edict. I would gladly pay 100 coins per turn for both extra point of authority and culture at any point. Also there are no temporal hits to happiness or initial cost so what not to like? Maybe only that the prerequisite to History is Canon of Wisdom which takes long to research. But at the same time it also unlockes some edicts along the way. I always pick this edict as soon as I have.

Enter Imperial Era
Requirements: 48 Technologies from Bronze Age + Warring States researched,
Cost: 1000
Upkeep: 0
Temporary Effect: Noble Unrest +15% for 10 turns,
Permanent Effect: Enables technologies and units,
Cancellation Effect: This edict may not be cancelled
My Opinion: Last era progressing unit. This one will change some of your units availability (Convicts will be armed with swords, Militia gains a little more defencem Chariots will disappear, Nobles would be only trainable in Cavalry variant, palace will unlock it’s full unit rooster). I don’t see any reason for delaying this edict unlike Warring States as you’re usually running out of useful things to research at this point and Imperial era has many great choices.

Equal Field System
Requirements: Enter Imperial Era edict,
Cost: 2000
Upkeep: 0
Temporary Effect: Peasant Unrest +10% for 10 turns, Noble Unrest +10% for 20 turns,
Permanent Effect: Grain Tax: 3 per person, cancels edict Well Field System
Cancellation Effect: This edict may not be cancelled
My Opinion: Huge improvement to your farming income (+50%) it get’s rid of any unrest modifiers over long run and cancels previous law. Interestingly it doesn’t require flood control which means that it is less research intensive in case of herders who just unlocked agriculture by Imperial Era or didn’t have it at all? Extra income from your farms will allow you to snowball out of control in late game. No brainer to take in 95% of cases. The 5% being non-farming herding faction when you are using that Noble unrest bonus.

Fubing Militia System
Requirements: Enter Imperial Era edict,
Cost: 0
Upkeep: 500
Temporary Effect: None,
Permanent Effect: Militia and Tribesmen availability x 1.5, Militia Attack +20%
Cancellation Effect: Authority -1 for 20 turns,
My Opinion: The second recruitment pool altering device. This in contrast to Private Arms Ban actually boost your recruiting capacity, while providing no happiness modifiers but it has not so small upkeep. At this point of the game your cities will be either close or at already at 3rd settlement level with population in 3 digits meaning you can get much from single city. But your empire stretches also over long distances so you might find yourself short of troops. The only thing that will limit you is Peasant unrest due to military service. As well as with Private Arms Ban edict only affect baseline recruitment and doesn’t takes bonuses from buildings into consideration (Prison being an exception). Because of that you get extra Convicts which is great (jump from 4 to 6). Herders make more of this edict as their tribal pool is rather difficult to rise past certain size and those units are definitely worth considering and additionally they get some unique potent anti-cavalry militia unit in last era. In case of enacting both this and Private Arms Ban edict you will end up with 75% of original recruiting capacity.

Imperial Secretary
Requirements: Enter Imperial Era edict, Central Bureaucracy edict,
Cost: 0
Upkeep: 200
Temporary Effect: None,
Permanent Effect: Noble Unrest -15%, Tax Collection x 1.1
Cancellation Effect: Authority -1 for 20 turns,
My Opinion: Another great and yet not so expensive edict. This one not only provides rare Noble Unrest benefits but also increases your tax income by 10%. Which means that with Equal Field System it will pay for itself with just 400 farming population. If you have also Salt tax then anything above 333 farming population will give you more than you pay for it (that’s without any food bonuses). I find this edict better than Salt Tax for herders as it will pay for itself with 1000 population while together with Salt Tax the magic number goes down to 666 while it still gives room for more settlements.

Civil Service Examinations
Requirements: Enter Imperial Era edict, Central Bureaucracy edict, Confucianism (Thought / Bronze Age)
Cost: 0
Upkeep: 100
Temporary Effect: Noble Unrest +15% for 10 turns,
Permanent Effect: Culture +2,
Cancellation Effect: Authority -1 for 20 turns,
My Opinion: Easy to omit edict in technology tree. Cheaper than Patronize the Art edict while granting the same benefits. That said Patronize doesn’t require Central Bureacracy and is accessible 2 eras faster. Still this is great for that extra culture and all the benefits it brings. But I find it more optional and you definitely can live without it unless it just happens to allow you to reach some crucial culture levels.

Trade Venture
Requirements: Joint Stock Company (Power / Imperial Era)
Cost: 3000
Upkeep: 0
Temporary Effect: None,
Permanent Effect: Receive 250 income per turn,
Cancellation Effect: This edict lasts 25 turns and may not be cancelled during this time,
My Opinion: Really late game edict. Great way of investing money over longer periods of time. In total we gain 3250 more than we initially invest. That said we might re-issue this again after it runs it’s course. There is no drawback so issue it! Just make sure you are safe without those invested money for next 13 turns.
3.7) Edicts Part 4
Seek Minor Loan
Requirements: Banking (Power / Imperial Era)
Cost: 0
Upkeep: 250
Temporary Effect: None
Permanent Effect: Receive 1000 money.
Cancellation Effect: This edict lasts 5 turns and may not be cancelled during this time,
My Opinion: Another late game edict which can provide you with money at once. The cost being you will pay back more. Unlike Trade Venture this edict allows few trick with it. First of all – if you are barely under debt you can use it to recover ability to recruit units faster. Second of all before huge recruitment drive you can use it to boost your treasury to be able to recruit more. Remember that by the end leftover moneys doesn’t matter but whatever your armies will conquer – do.

Seek Major Loan
Requirements: Banking (Power / Imperial Era)
Cost: 0
Upkeep: 200
Temporary Effect: None
Permanent Effect: Receive 2500 money.
Cancellation Effect: This edict lasts 20 turns and may not be cancelled during this time,
My Opinion: The bigger brother of previous edict. Pay 4000 over 20 turn to get 2500 now. You can issue both of Loans at the same time. Rest you know from previous paragraph. Helps with getting expensive units while you have low income.
4. TECHNOLOGY
4.1) Power Technology Tree
Bronze Age
Opening for farmers in this category is a no brainer – Flood control for getting Well Field System edict which will double your income. Getting it as soon as possible is great idea because not only does it come with +10% noble happiness (replacing 1 authority for extra cities) but also allows to time penalty to go away before too much labor accumulates, making it easier to manage. Also cutting floods duration doesn’t hurt. Then I suggest focusing on unlocking new farmable hexes. Irrigation is great if you have access to river and bunch of forests to clear, or you have really limited farmable space. Terracing Will allow farmers to go into mountain for getting more trading goods. You can also go for +5% food output technologies if you have vast area of plains as it will speed up your growth rate a little.

Getting Rammed Earth wall will be mostly for unlocking mines because it will be long before you can and will have to build them (as you need Palace to upgrade Wooden Palisade), but roads can be handy when your empire runs across several rivers. Trade bonus is less important before turn 100 so it can be delayed otherwise. On the other hand Coinage shouldn’t be postponed and be researched once you have around 200 population within single city trade distance, as it will allow you to upgrade Bazaar into Market increasing both trading radius and it’s value.

When it comes to military technologies: some people swear by Military Drill as they like using Militia Long Spearmen and like that extra authority. Personally I don’t like that unit and can manage without authority, and the only thing it unlocks is Signaling which I usually can postpone towards around 50-60 turns.

Chariot tree technologies are something that I still can’t wrap my mind around. It depends mostly on how well chariots perform and I already experienced them both performing well and bad. At the moment of release they again seem to shine brightly. They’re also first mobile unit. Getting Light Chariot technology will be necessary at some point cause it unlocks Stables needed in Warring States era for recruitment of trained mounted units. Light Chariots are also enough to use against foot melee armies. Heavy Chariot and 4-Horse Chariot technologies upgrade your new chariots making them better at melee and more durable (especially to arrows). Handy when you want to counter enemy chariots with your own. It also automatically applies to general bodyguard. Just remember that by entering Imperial era you will lose ability to field those units. That said you will have to sacrifice something (most likely some farming technologies) in order to get them and then you had better make maximum use of them.

As a herder you’ll have to initially decide whether you have enough fertile plains for agriculture to be worthwile. If you have – research it and Flood Control as it will be enough. If you don’t then switch to military technologies. No matter what your priority should be unlocking Nomadism as it saves you money on recruiting settlers and allow to postpone settlement upgrades.

Warring States Era
There is less technology in this segment than in Bronze Age meaning you will have time to research things from previous era. Signaling is one such thing and it makes more sense because some barrack units are tied to this era and at this point you should start being able to sustain professional armies. Draining Marshes is nice but not vital as you should avoid those areas. You will want unlocking Whirlwinds and Crouching Tigers as they are great investment over time for conquering walled settlements. Giant Crossbow has yet to charm me – it can deal big losses to incoming enemies and is cheap but also vulnerable and need careful positioning. So I would skip it. Combined Arms will give you rather nice unit type (Spear and Crossbow) for defending settlements but it needs Crossbow researched. Last +5% food output technology means you can max your agriculture efficiency. I tend to leave those technologies and research them once labor in settlements gets high. Once I get them I can stop constructing additional farms letting them relax while they still grow in size, reducing unrest in process. Appoint Strategist is matter of faction – if I have bonus to researching that technology rate and I need extra character I’ll grab him early. Or need extra fighting efficiency/settlement happiness.
Improved Walls Construction can be skipped till Imperial Era as at this point you will most likely just be building rammed earth walls on your border cities, But it unlocks Shooting Galleries which can be build onto Rammed Earth Walls to improve casualties done to besieging armies which can allow for unlikely comeback.

Imperial Era
Has way more toys than Warring States. I can generally be split into 3 big trees: Classic Artillery, Gunpowder Units and Trade bonuses.
The first category provides you with ability to upgrade Artillery Camp to Artillery Workshop (Four Legged Engine tech) which doubles recruitment pool and allows construction of more advanced siege weapons. Giant Triple Crossbow is upgraded but more expensive counterpart of Double Giant Crossbow and as such I suggest skipping it entirely. On the other hand Muslim Trebuchet should be acquired fast as it has the best cost efficiency when it comes to wall breaking artillery.
Gunpowder units provide few new units type but the most important will be Three-Eyed Gunners and 100 Tiger Rocket Launchers. I would skip Small Cannons because of the requirements that take almost forever. Thunderclap Bomb is a nice addition to some artillery units but doesn’t affect unit performance as much as I would hope.
Lastly Trade technologies are all great. Ability to upgrade Markets into Famous Markets boosts your economy and further trade value bonuses together with new money granting edicts provide money quickly for those late game final offensives.
Because of the limited turns you most likely won’t be able to research everything so you will have to choose wisely. What complicates things more is the fact that both gunpowder tree and trade tree require some long research in other technology branches. Because of that classic artillery is little better than it seems. There is also passive wall upgrade which is a choice when on defensive.
4.2) Craft Technology Tree
Bronze Age
It’s actually pretty simple. Start with Bronze Making to get ability to clear forest, then pick Advanced Bronze Casting for ability to build Weaponsmith and start recruiting dagger-axemen troops. Then go straight away towards High Tin Bronze for that extra chance to kill in melee. After that take Armorer as it will benefit you more earlier and it can provide extra edge for your noble troops. You will want then to pick up Decorated Ceramics to finish it around turn 50 when you can actually start lucrative trade networks. Jade Working is situational (you need jade) but I wouldn’t rush it as it is mostly trade resource so you can take it before taking pottery. Then you can pretty much skip Precious metal work ad wait with Silk, Churn Drill (which requires tech from power) and Bamboo Strips towards later. Ceramics roof tiles are a nice technology to have because it is a passive and will unlock 2nd food output upgrade in Power . Lastly Ship Building isn’t needed fast because of cost associated (you will need quay + boatyard and ships aren’t exactly cheap) but depending on geography you might consider buying single boat for scouting rivers and/or transporting settlers to avoid difficult terrain (on which they move 1 hex per turn)

Warring States Era
There is less must have technologies in this era. You will want to start with Industrial Pottery Production as it will provide serious increase in your trade income once you upgrade Pottery Workshop. Then I usually take Coat of Plates for Armor Works which provides nice armor upgrades for almost every troop type. Iron Casting and Malleable Cast Iron you will mostly take to unlock Iron Armor (Armor Factory and passive reduced chance to be hit for all troops) and Sword Making (which after building Swordsmith unlock Picked Swordsmen through Palace recruitment Pool) as you won’t be building Iron/Steel Foundry until one of your cities reaches final settlement upgrade level. Lastly Iron Plough will be a nice way of reducing labor unrest when timed properly so you can stop all construction in most cities and still have some growth rate. I wouldn’t bother with ship durability upgrade as currently archers will demolish your armada with it or without. The same goes for Theaters – you won’t be in position to mass build them yet. Paper is a nice upgrade to your culture and you will want it before entering Imperial Era so once you progress you can start working on technologies it unlocks asap. Given less important technologies you can pick up what you lack from previous era – now it would be a great time to invest more in mines cause your trade starts to generate respectable amount of money. Same goes for Silk and Bamboo Strips (as you will be closer to 500 population milestone at which you can offset Central Burecracy upkeep with Salt tax)

Imperial Era
Given how strong cavalry I this game is you will want to start with Horse Armor which unlocks Cataphracts units. However you might delay it in favour of getting Woodblock Printing first which will unlock Paper Currency in Power (which starts path of some serious late game trade bonuses). Both Steel and Variable Sword Composition will give your units armed with blades some extra “ompf” in fights and should be researched earlier rather than later. Both pottery related technologies should be given priority over rest of technologies as the gain is enormous. Then would go Silk and then last 2 Steel/Iron upgrades. Mountain Armor isn’t as important as you most likely shouldn’t risk your named characters in battles. The rest of technologies provide culture so you can skip them entirely or focus on them if you are nearing Culture victory/Point Victory.
4.3) Thought Technology Tree
Bronze Age
One of my favourite technology trees. Most people say it is the most boring. As most technologies are given priorities because of what they unlock to research further. For first era there are 2 strategies in my mind that are viable. You will start either of them with Shamanism and Ying Yang (as the first unlocks both next important technologies and Ying Yang is unlocks technologies in Knowledge that you want to research as Farmer; As herder you can skip Ying Yang and dive straight into further technologies)

First build order is focused on getting more authority asap. So you will want to go with Ancestor Worship->Priest King. After this I usually switch to 2nd route cause it takes too much time to get extra 2 authority from Mandate of Heaven. This focus is great for factions who struggle with Cultural/Thought research rate.

Second build order goes for Divination then Oracle of Bones, and Logographic Script. From which point you can research many interesting things such as most schools&temples or court. If you want early technology bonuses from temples I suggest Taoist as it grants +Knowledge and is quite cheap and doesn’t provide any technology penalties. It comes with noble penalty but at this point you shouldn’t have too many settlements yet. The Five punishment is even better as after costly upgrade court to prison (requires Palace) you can start mass recruit Do-or-Die Convicts which demolish pretty much most other units in melee while being dirty cheap.

Poetry, I-Ching and Astrology can be skipped for Warring States era and I wouldn’t recommend researching all schools&temples. Wei Qi is fun but I prefer to include it only if I have some bonuses in this category of technologies to offset some faction penalties to combat. Especially as it comes only when you get new general and in first era you shouldn’t have more than 3 generals.

Warring States Era
There isn’t much to choose from! First of all don’t instantly start researching Tea culture unless you are behind in thought development as in most cases it takes too long to recover time lost on researching it. Most likely you will just continue picking techs you didn’t finished in last era.
Canon of Wisdom is better than Tea Culture (And you don’t want both…) cause it provides extra edict as well as unlock another technology. History is nice cause that Edict provides extra authority as well. Better start with Legalism as it comes with many new Edicts which you will find useful. And book of rites also provides extra authority as long as you researched Confucianism in previous era.
Other than that research 3 +culture technologies that I mentioned in previous section. They won’t take long and will provide you with more benefits that some of this era technologies.

Imperial Era
Sadly in last era there still isn’t much to research. Most likely you will start with Lineage Groups cause it is needed for Joint Stock Company in Power tree which will give you some serious increase in trade. After this you will continue with whatever you are lacking in previous eras. Confucianism will finaly give you Civil Servants Examinations edict.
Then you will go for Imperial Rites or if you want: Buddhism and Neo-Confucianism. Literature and Literacy Criticism are a nice choice if you need culture as they will provide it quicker than previous technologies. It is entirely possible that at some point you will research everything.
4.4) Knowledge Technology Tree
Bronze Age
Interesting tree as it has 2 separate paths. Depending on what faction type (Farmers/HerderS) you are playing. I would start with Horse Domestification as it provides authority and unlocks Stables.

If I’m playing Farmers then I will switch to Calendar/Astronomy followed by 3 Medical upgrades followed by Five Elements and Flaming Pitch. You don’t really need further cavalry technologies as you won’t get anything more in this era. Composite Bow is a choice if you expect to be defending settlement with Wooden Palisade a lot.

If I’m playing Herders then after Horse Domestification I go straight towards Horse Archery. The good thing about it is rather early Noble Archers access (and some herder factions are really great with mass bows) and after finishing this route – unique ability to recruit Tribal Horse Archers before most cavalry units are available. Then I proceed with rest of technologies as usual.

Warring States Era
I usually start with Mathematics for Abacus and that sweet trade boost. Then I follow with whatever I didn’t had time to get from previous era towards Massage/Anasthetic. Depending on faction I might consider going for Crossbow/Chu-Ko-Nu troops as farmer because having more options is great. While other options aren’t so great. Ships upgrades are situational (depending on map type) but as currently they are pretty underwhelming I wouldn’t invest too much. As this is the last era Chariots are available I don’t rush for Horse Archery and settle with Horse Riding which unlocks Guard Cavalry from Palaces (still needs armor factory though). This provides me with time to finish Flaming Pitch before hiting Enter Imperial Era phase. I also like having Tai-Chi before progressing to next era (so I can get Kung-Fu and c’mon – who doesn’t like some martial arts +combat effectivness :D)

Imperial Era
Generally there are only 4 important technologies in this era when it comes to Knowledge. The most important most likely being Gunpowder – not only it unlocks many new troops but it also improves flammable projectiles damage. Be sure to research Flaming Pitch from Bronze Age before though as it takes a while.

Stirrups is another great technology which allows fielding mixed weapon cavalry which is really nice especially for herders. It requires Horse Armor so it can go as 2nd priority with some turns spent elsewhere after Gunpowder finishes.

Lastly both Blood Circulation and Kung-Fu are passive bonuses that help not only with preventing bad events but also winning wars in the long run. And as such shouldn’t be neglected.

When it comes to naval technologies I would value Marine Compass more than new ship type. As in previous sections – extra culture from Equal Temperament Scale should be focused if going for Cultural/Point Victory.
4.5) Long-Term Research Strategy
When it comes to managing technologies – order of picking them isn’t everything. Managing bonuses and penalties makes adopting certain strategies somewhat unique depending on what technological rate spin chosen faction has. But it also should be taken into consideration while buying extra research rate from encounters. I strongly advice against stacking strongly single category throughout the game for some ridiculous amount. Why? Because you don’t need every technology and with high research rate you run risk of running out of things to research – which ultimately makes your bought bonus useless for several turns.

That said you want those bonuses spread out. Because if you have them equally divided it means that you are progressing faster in balanced way. You might want to tinker to adjust your strategy toward specific goal but keep in mind things about various technology tree balance:
  • POWER – IMO the 2nd most important tree throughout the game, has a way of getting extra research rate through Legalism Schools and is actually sensible to stack up for Imperial Era as it has many time consuming things towards end game. If you don’t have bonus for it consider buying one from encounter if you are lucky.

  • CRAFT – the most important tree throughout the game as it has the most things to offer. Sadly Mohism schools decrease Power development rate so it is better to take those bonuses from encounters. The only factions which I wouldn’t buy extra research rate are the ones who combine high Craft research rate bonus with penalty to other technologies (some herders) because only 2 of those properties together can lead to researching everything and idle turns. For all else –you can amass more bonuses

  • THOUGHT – tree that starts loosing importance as the time goes on. As there is several ways of getting extra rate from technologies I wouldn’t buy it in encounters. With so few technologies in Warring States and Imperial Era I wouldn’t bother at all to be honest. Unless faction I’m playing has some problems. Actually I would use any extra research rate for Schools that penalizes that category. Buddhism improves research rate but it comes late and uhh – there is lack of vital though technologies outside Bronze Age.

  • KNOWLEDGE – Another tree that has easy access to improving it’s research rate but doesn’t offer much once it is achieved. One thing it has going for it – Taoist schools doesn’t hurt research rate and together with bonuses from technologies you can stack high research speed for Flammable Pitch + Gunpowder. Because of that I wouldn’t buy it from encounters
48 Comments
Hajduk 29 Apr, 2023 @ 4:25pm 
Awesome guide, but it doesn't mention how to manage characters, court or offices. Was the guide made before those were added to the game? I find it really useful to issue edicts which open offices for military characters, which are a great way to groom your heir, reliably increasing their authority stats. Same with the Advisor office, which is basically a training office for future important positions for scholars. Another important part is keeping everyone married to have a steady supply of characters to lead your armies and fill offices. You can directly marry through the dedicated action button only members of your immediate family, but you always receive three possible brides/concubines, and the other two that you turned down can be married to any character as long as they are not too closely related. I have not yet purposefully tested if the Qi and Ren stats of the parents affect the stats of the offspring.
Sanvone  [author] 27 Feb, 2023 @ 5:50pm 
Dexter: Yes but it is not optimal. Caravansaries don't track building upgrades and resource bonuses offering only the most basic level of good. They also have 100 upkeep. Then they re-export everything they have, meaning they screw your income anyway. You might want to upgrade trade buildings as high as possible meaning even more upkeep and still get less overal income.
There might be cases when Caravansaries are worth it to just plug some good into trade network, but most often than not there are not. And in cases it even works out this way it is of little impact.
Dexter 27 Feb, 2023 @ 12:11pm 
thanks for the guide, its worth gold.

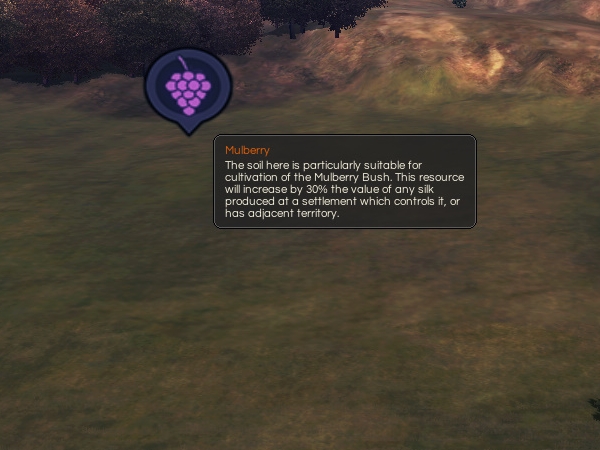
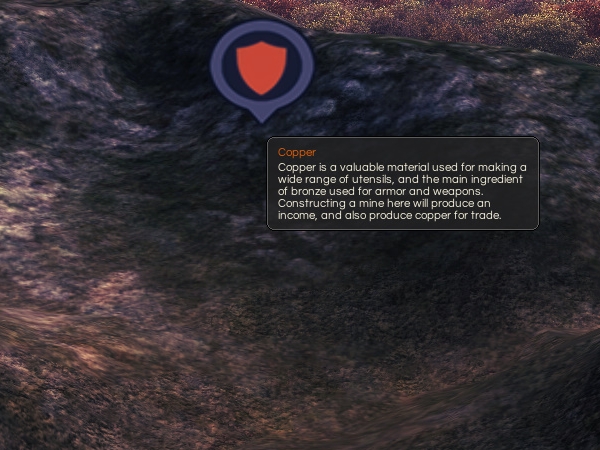
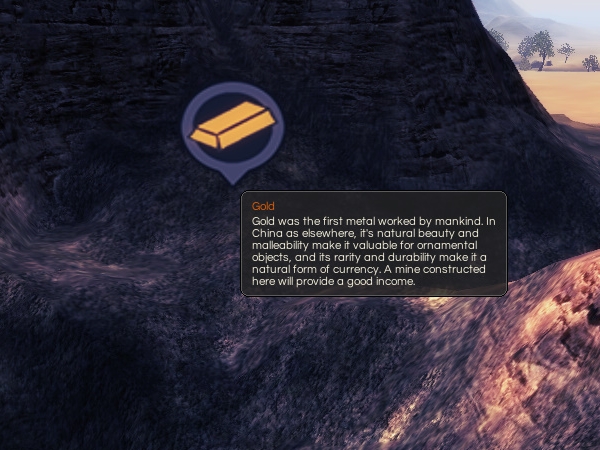
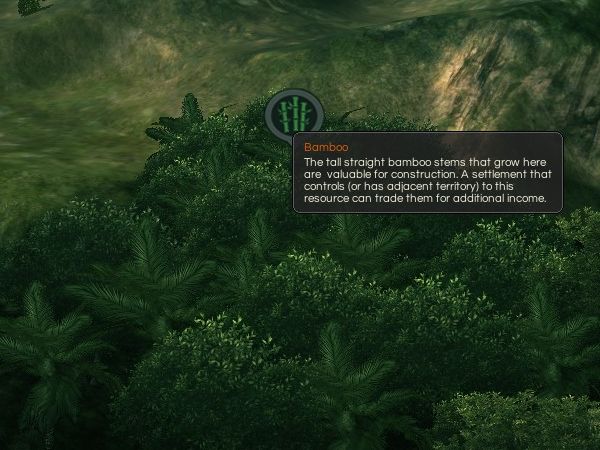
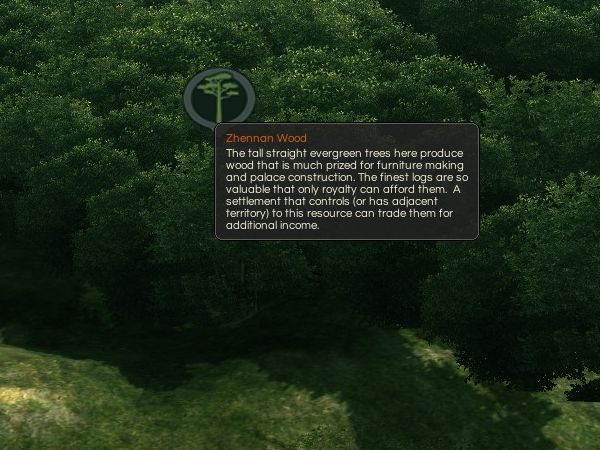
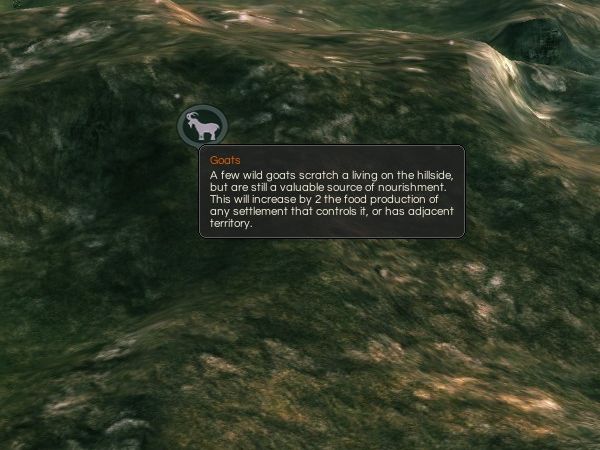
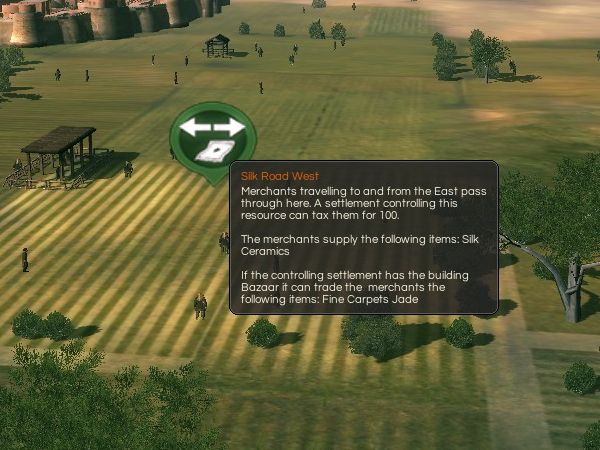
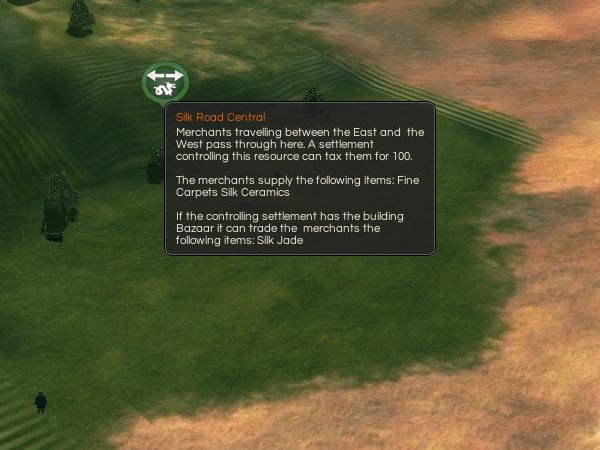
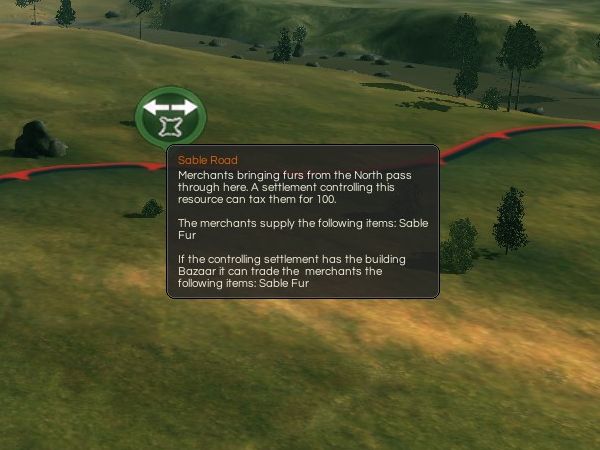
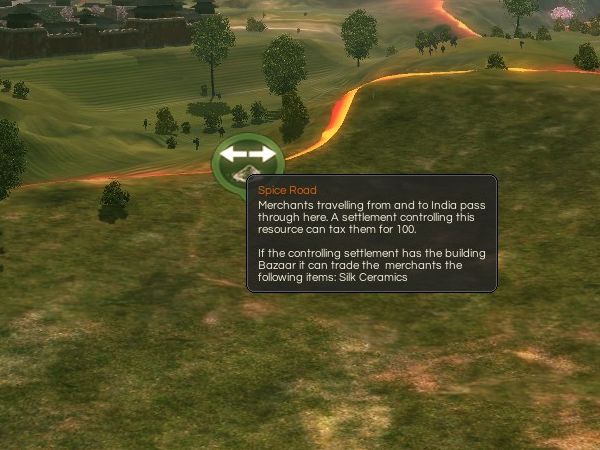
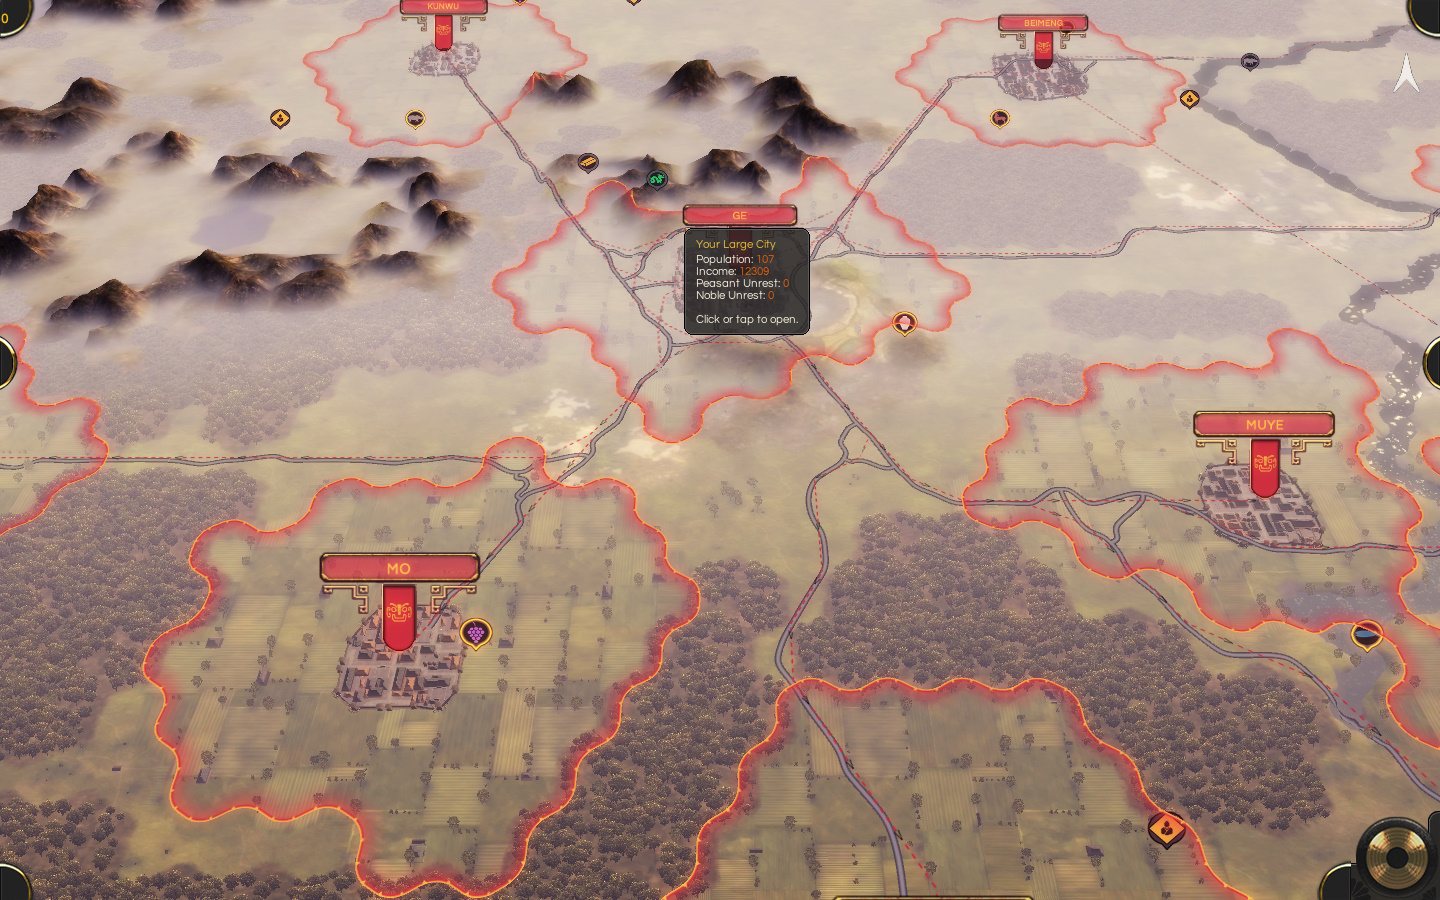
I just want to make sure I understood this trade mechanic correctly: no matter how many cities or pops I have, I will only need one location, where a trade good is produced, as long as I trade it with caravansaries to every single city?
Yorginvik 9 Jan, 2022 @ 3:06am 
Thank you for this great guide
Daedwartin 31 Oct, 2021 @ 11:10am 
BTW, you might want to do a look over of edicts. Grand Commandment for example now seems to be a lot more important as you get access to the court position as well which provides a bonus to infantry.
Mr.MM 6 May, 2021 @ 9:14am 
These peasants are a bunch of ungrateful lot. We were working hard to prevent the neighbors from attacking because they want to do whatever they want. Then, they stab us from the back by revolting!

By the Emperor! If you do not settle down! I will reduce your size to half!
Sanvone  [author] 23 Dec, 2020 @ 5:02am 
This comment is awaiting analysis by our automated content check system. It will be temporarily hidden until we verify that it does not contain harmful content (e.g. links to websites that attempt to steal information).
Saiz 21 Dec, 2020 @ 11:21pm 
Are there any multiplayer community for top players of this game?
ti3hjmd 22 Aug, 2020 @ 9:37am 
Wow! I appreciate you sharing your experience and knowledge of the game.
Sir_Davin 23 Apr, 2020 @ 1:12pm 
and on 2.5.5
Maybe you could add a describtion there for the bandit troops. i think they're a useful early game garrison unit, because they supress peasants aswell as nobles. And peasant troops don't benefit from early game armour anyway