Mirage: Arcane Warfare

Mirage: Arcane Warfare

37 ratings
How to Host a Dedicated Mirage Server
By NotJohnny
This guide will help you install & configure your own Mirage Dedicated Server.
   
Award
Favorite
Favorited
Unfavorite
Important Information
Non-Official
Your server will not be an Official server as those provided by Torn Banner are.

Your private server will have the following restrictions;
  • No XP earned (no ranks gained)
  • No item drops (weapons or non-weapon gear)
  • No custom modifications via Override config files will operate on official servers
Download and Install Server Files
The Mirage: Arcane Warfare Dedicated Server tool must be installed to run a server. This only needs to be installed on the Host PC

1) Open Steam and click on LIBRARY, select TOOLS


2) Locate Mirage: Arcane Warfare - Dedicated Server in the list and right-click on it

3) Install the Mirage: Arcane Warfare - Dedicated Server with the Install option


Tip: While you wait for the server to install, add the server to your Favourites list to locate it easier later.

Installing the server with the Steam Console Client
Downloading SteamCMD

Windows
1. Create a folder for SteamCMD.
For example
C:\steamcmd
2. Download SteamCMD for Windows: https://steamcdn-a.akamaihd.net/client/installer/steamcmd.zip
3. Extract the contents of the zip to the folder.

Running SteamCMD

Windows
Open a Command Prompt and start SteamCMD.
cd C:\steamcmd steamcmd

SteamCMD Login

Anonymous

To download most game servers, you can login anonymously.
login anonymous

With a Steam account

Some servers require you to login with a Steam Account.
login <username>
Next enter your password.

If Steam Guard is activated on the user account, check your e-mail for a Steam Guard access code and enter it. This is only required the first time you log in (as well as when you delete the files where SteamCMD stores the login information).
You should see a message stating that you have successfully logged in with your account.

Downloading an app

1. Start SteamCMD and log in.
2. Set your app install directory.
force_install_dir <path>
3. Install or update the app using the app_update command.
4. Once finished, type quit to properly log off of the Steam servers.
quit

Validate

validate
Validate is a command that will check all the server files to make sure they match the SteamCMD files. This command is useful if you think that files may be missing or corrupted.

Source
https://developer.valvesoftware.com/wiki/SteamCMD#Downloading_SteamCMD
Create Server Shortcut
Once installed, the easiest way to launch a server is to create a desktop shortcut and use command line properties to host a server with the desired map.

Navigate to your Server Files
Follow these steps to locate your server files:

1) Go to Steam Library > Tools
2) Right Click on Mirage:Arcane Warfare - Dedicated Server and select Properties
3) Click on the Local Files Tab and click the Browse Local Files button


4) Alternately, you can navigate here manually (this filepath assumes you have the default Steamfiles location, otherwise navigate to your Steamfiles folder);
  • C:\Program Files (x86)\Steam\steamapps\common\Latte Dedicated Server\TBL\Binaries\Win64

Create a Shortcut
In the same Win64 folder, right click on TBLServer.exe and select CREATE SHORTCUT
Drag this to your desktop for easy access or place it in a location of your choice.

Enter a Command Line
1) Right click on your new shortcut and select properties
2) Add <mapname> -log to the end of the Target (NOTE space before and after mapname)

Sample Full Command Line:
"C:\Program Files (x86)\Steam\steamapps\common\Latte Dedicated Server\TBL\Binaries\Win64\TBLServer.exe" to_bazaar -log


Note that everything within quotations ( " " ) is automatically generated by the shortcut. Your command line is added to the very end of this line.

In this example, the server will use the Team Objective map Bazaar as the start map.

The -log property will launch the server with a status window so you can see it running and follow along with current status. You can stop the server by closing this status window.

Launching without the -log property will launch the server invisibly; you will only be able to stop the server by using your Windows Task Manager (look for TBL-Server.exe)
Putting your server on the internet
To put your server on the internet so others around the world can join your server you must put
"-port=XXXX -queryport=XXXX" into the Target of your server shortcut.


To make your server still be on the internet but not visible to others remove "-queryport=XXXX"
For people to connect to your server you must provide them your IP and port.
For example "192.168.0.1:7420"

Basic Server Settings
The following configuration settings will let you adjust your server name, number of player slots, & class limits.

To be able to change server settings you must create a new file called OverrideEngine.ini in Latte Dedicated Server\TBL\Saved\Config\WindowsServer (If you don't have a Saved folder you must launch the server first, this will create one). You can copy the contents of the DefaultGame.ini file in to OverrideEngine.ini or just copy it over and rename it.

Edit the server's OverrideEngine.ini file and search for the following lines and edit them as you wish. For reference, the defaults are shown in these examples.

bVACEnabled=1
Enable or disable Steam’s VAC on your server. Note that VAC is enabled by default. Set to 0 to disable.

Edit the server's OverrideGame.ini file and search for the following lines and edit them as you wish. For reference, the defaults are shown in these examples.

MaxPlayers=12
Set the maximum number of player slots.
WARNING: Performance of the server will be strongly affected by high player-counts

MinPlayersToHostForBackend=2
Minimum number of players required on the server before a match will begin.

VoteKickType=TeamOnly
Adjust whether votekicks can be performed by anyone or teammates-only. Can be set to TeamOnly or All.

TimeBannedFromServer=600
Length of time (in seconds) a votekick ban lasts. Default is 10 minutes.

ServerName=Default Mirage Server Name
Set the name of your server. This will show in the Server Browser and on the Scoreboard.

.MapList=to_academy
.MapList=to_ravine
.MapList=to_bazaar
Maplist rotation. Add a new line for each map you wish to include.
To exclude a map from your rotation, add a new line with -MapList= and the name of the map you wish to exclude.
You cannot exclude the map in your shortcut launch properties; you must change the shortcut properties if you wish to exclude. See the Create Server Shortcut topic for more details about shortcuts.

.ClassLimits=(PawnClassRef=/Game/Characters/Pawns/TBL_Taurant.TBL_Taurant_C,ClassLimit=-1)
This property will allow you to adjust class limits per team for each of the 6 classes.
Adjust the number at the very end of these lines to set the number of class slots per team.

ConfigWarmupTime=30
Adjust the length of the pre-match warm-up time (in seconds). Adjusting this value will lengthen or shorten the time given to select a team & class before being allowed to leave the spawn area.

AutoBalancePlayersByTeamNumbers=false
Allow AutoBalance to balance by number of players per team. Set to True if you want players balanced at random to even out the number of players per team.

AutoBalancePlayersByKills=false
Allow AutoBalance to balance by top-scoring players per team. Set to True if you want players to be balanced by moving a top-scoring player to be swapped to even out the number of players per team.

AutoBalanceTimeUntilForcedRespawn=10
Length of time in seconds before a player is swapped after receiving the autobalance message.

TimeBetweenTeamKillBalanceChecks=60
Length of time in seconds between checking for balanced teams.

IgnoreAutoBalanceStageTimeRemaining=120
Length of time in seconds that autobalance is disabled near the end of the match. Increase this value to disable autobalance earlier in the match, decrease the time to disable it closer to the end of the match.

IdleWarningTime=100
Length of time in seconds before you receive a warning for being idle in a server (not moving).

IdleKickTime=120
Length of time in seconds before you are kicked from the server for being idle (not moving).

bConfigBotAssistedServer=False
Set to true if you want the server to be bot assisted. Will fill the server with bots that human players will replace.
Add Yourself (and others) as Server Administrator
Under DefaultGame.ini, add your steam64 ID under [/script/tbl.backendservices] with "+AdminAccountIds=" before it

Find your Steam64 ID here; it's the long number that begins with 7.
https://steamid.xyz/


[/script/tbl.backendservices] +AdminAccountIds="YourID" +AdminAccountIds="YourFriendID"


To make someone a Mod on your server do the same as above but use

+LimitedAdminAccountIds="ModID"
Running the Server and Joining
Make sure you have steam running on your PC. If you intend to run the Server on a separate PC, that PC must also have Steam running.

Double click on the shortcut you’ve now created to launch a server (a log window should pop up and start adding lines of text rapidly; this is your server launching and loading assets), this usually takes about a 30 seconds to load the server up. It will look like this when completed

Launch the game client, and join the game through the server browser

Changing the Map
You can create a second shortcut, or change the map name in the command line prior to running the server.
If you want to change maps while a server is running, open the console (default key is ` on an English keyboard) on a client PC to bring up the console and enter the following command:
admin servertravel mapname
Tip: Map names will be shown as suggested options in the console as you type
Administrator Commands
Important Commands for Server Operators:

open <ipaddress>
Description: Join a server directly via IP address (useful for joining your own server or a friend's server)
Usage: open 127.0.0.1 would connect to a server running the same machine as your game

admin servertravel <mapname>
Description: Change maps. Mapnames will auto-complete as you type, see Maplist below for full mapnames.
Usage: admin servertravel to_academy will change maps to Academy

admin pause
Description: Toggle pause/unpause

adminkickbyplayername
Description: Kick someone out of your server by typing their name. Default time that player is removed for is 10 minutes (600 seconds, can adjust this in Defaultgame.ini)
Usage: adminkickbyplayername 3troll5me would temporarily ban the player named 3Troll5me from the server for 10 minutes.

Adminkickbyplayerid
Description: Kick someone out of your server by typing their Steam64ID. Default time that player is removed for is 10 minutes (600 seconds, can adjust this in Defaultgame.ini). You must first obtain their ID via Steam prior to using this.
Usage: adminkickbyplayername 765XXXXXXXXXXXXXX would temporarily ban the player with ID 765XXXXXXXXXXXXXX from the server for 10 minutes.

admincancelvotekicks
Description: Cancels votekicks currently in progress

admincancelvotekickbans
Description: Cancels any current ban by votekick

tbssetstagetime <minutes>
Description: Adjust round timer in minutes
Usage: tbssetstagetime 5 adds 5 minutes to the round timer

tbsendwarmup
Description: Ends warmup timer and starts match

tbssetteamscore <team number> <score>
Team numbers: Azar =0, Bash =1
Score: variable by map
Description: Adjust the score of your server by team
Usage: tbssetteamscore 0 45 will set Azar team’s score to 45 points
Note: This command does not currently work for LTS/Arena modes.

adminsay <text>
Description: Admin messages, will show your name as the admin
Usage: adminsay Hello everyone! would display your message as red text starting with <ADMIN>

serversay <text>
Description: Appears as a red-text server message with no name attached
Usage: serversay Hello everyone!

admin exit
Shut down your server.

Mod Commands

limitedadmin servertravel <mapname>
Description: Change maps. Mapnames will auto-complete as you type, see Maplist below for full mapnames.
Usage: admin servertravel to_academy will change maps to Academy

limitedadmin pause
Description: Toggle pause/unpause

adminkickbyplayername
Description: Kick someone out of your server by typing their name. Default time that player is removed for is 10 minutes (600 seconds, can adjust this in Defaultgame.ini)
Usage: adminkickbyplayername 3troll5me would temporarily ban the player named 3Troll5me from the server for 10 minutes.

Adminkickbyplayerid
Description: Kick someone out of your server by typing their Steam64ID. Default time that player is removed for is 10 minutes (600 seconds, can adjust this in Defaultgame.ini). You must first obtain their ID via Steam prior to using this.
Usage: adminkickbyplayername 765XXXXXXXXXXXXXX would temporarily ban the player with ID 765XXXXXXXXXXXXXX from the server for 10 minutes.

admincancelvotekicks
Description: Cancels votekicks currently in progress

admincancelvotekickbans
Description: Cancels any current ban by votekick

tbssetstagetime <minutes>
Description: Adjust round timer in minutes
Usage: tbssetstagetime 5 adds 5 minutes to the round timer

tbsendwarmup
Description: Ends warmup timer and starts match

tbssetteamscore <team number> <score>
Team numbers: Azar =0, Bash =1
Score: variable by map
Description: Adjust the score of your server by team
Usage: tbssetteamscore 0 45 will set Azar team’s score to 45 points
Note: This command does not currently work for LTS/Arena modes.

adminsay <text>
Description: Admin messages, will show your name as the admin
Usage: adminsay Hello everyone! would display your message as red text starting with <ADMIN>

serversay <text>
Description: Appears as a red-text server message with no name attached
Usage: serversay Hello everyone!

Fun Stuff

addbots <num>
Description: Add a number of bots to your server. These will be auto-assigned a team.
Usage: addbots 3 would add 3 bots to your server

removebots
Remove all bots from the server...spectacularly.

slomo <num>
Description: Adjust server speed, default value is 1, where 1 = 100% of normal speed.
Usage: slomo 1.2 would set your server speed to 120%

god
Toggle godmode. Invulnerability, abilities have no cooldown. Press 'B" while godmode is activated to toggle no-clipping mode to fly through walls/floors.
Banning Players
You may be occasionally required to remove a player from your server and wish to prevent them from rejoining.

1) While in your server, bring up the scoreboard (Default key is Tab)
2) Right click to bring up mouse controls
3) Right click on the player you want to ban and select Ban


This will ban the player from your server.
After the next map change (called servertravel), their steam ID will be in the Game.ini file located in the your server's Saved folder.
This folder is typically located here;
C:\Program Files (x86)\Steam\steamapps\common\Latte Dedicated Server\TBL\Saved\Config\WindowsServer

To Unban a player;
1) Open the Game.ini file
2) Search for their Steam ID and delete that ID from the list
3) Save the file
4) Restart the server
Troubleshooting
If Game Clients are unable to see the server in the server browser
  • Confirm the Client (game) and Server computers have Steam running
  • Confirm that the Client and Server are running the same “Steam Beta” version - default is "None"
  • Attempt to join the server by IP
    • From the game's main menu, open Console with tilde key and type “open IPADDRESS”
  • Ensure that both the game and client are allowed in the computer's firewall
  • Forward ports by adding the following to the shortcut start line commands

If your server feels "laggy" or players stutter when moving
  • Monitor your CPU performance via the Windows Task Manager (press Ctrl+Shift+Esc) and determine if TBLServer.exe is occupying 100% of one of your CPU cores. If it is occupying all of a CPU core, try reducing the MaxPlayers value
  • Ensure that your internet bandwidth is not occupied with streaming, downloading, etc.
Config Datatable Overrides
DataTable Overrides will allow the server admin to change certain aspects of the game, such as the health of the characters, how fast the characters move, or the swing speed of certain attacks.

Overrides are only associated with the server they are created for; if a player moves to another server they will be using the overrides specified by the server admin of that server (or default if no overrides have been set).

You will not be able to use overrides on official servers by editing the overridegame.ini in your own local files.

You must run your server at least once so it will create the Saved config folder (Latte Dedicated Server\TBL\Saved)

In Latte Dedicated Server\TBL\Saved\Config\WindowsServer folder, open the file OverrideGame.ini.

Search for the section [/script/tbl.tblgamemode] and add your data table overrides by adding this line;
.DataTableOverrides=(TableName="TABLENAMEHERE",RowName="ROWNAMEHERE",PropertyName="PROPERTYNAMEHERE",Value="VALUEHERE")
Tablename= the name of the datatable you are calling
RowName= the row of the datatable you are calling
PropertyName= the column of the datatable you are calling
Value= the value you are changing


Example

This would change the max health of the Taurant to 420 from 190
[/script/tbl.tblgamemode] .DataTableOverrides=(TableName="CharacterStats",RowName="Taurant",PropertyName="MaxHealth",Value="420")

This would make the Tinker's Longsword windup slower (Release and Recovery times would be unchanged).
[/script/tbl.tblgamemode] .DataTableOverrides=(TableName="AnimationData",RowName="TinkerCutSlash",PropertyName="Windup ",Value="10")

For full datatables, view the AnimationDataTable and CharacterStatsDatatable text files located in
C:\Program Files (x86)\Steam\steamapps\common\Latte Dedicated Server\TBL\Content\DataTableOverrides
Maplist
to_Bazaar
to_Academy
to_Ravine
ctf_Bridge
ctf_Courtyard
ctf_DryDock
ctf_Lighthouse
ctf_Mirrors
ctf_RockBottom
ps_Courtyard
ps_DryDock
ps_Lighthouse
cp_Bridge
cp_Courtyard
cp_RockBottom
cp_SunkenCity
tdm_Bridge
tdm_Courtyard
tdm_DryDock
tdm_FalconRidge
tdm_Mirrors
tdm_RockBottom
tdm_SunkenCity
ar_BloodMoon
ar_CellBlock
ar_OldArena
ar_Spire
ar_StormDrain
ar_ThePit
ar_Tunnel

Note: Bots have difficulty with pathfinding on the following maps;
to_Academy
to_Ravine
ar_StormDrain
ctf_DryDock
25 Comments
Yeti 5 Feb, 2023 @ 8:39pm 
RIP Mirage. Thank you for making this guide. Doesn't seem to work for me, but I appreciate you putting this out there.
Tahirchik 25 Jan, 2020 @ 9:19am 
Где игра? где онлайн игра была топовой где она сейчас Разрабы
Zehyr 13 Oct, 2018 @ 7:52pm 
Thanks a lot for this amazing guide CreamCorn.
All work fine and i can now again play at this underated game
(i'm a Chivalry veteran but i love Mirage so much :azar:).
Just two things during map rotation it stay on the next map and it disconnect me and i must reconnect me and it work fine it appear at all map rotation.
Last thing, for me the OverrideEngine.ini doesn't work (i think the file isn't read) i must directly modify the Defaultgame.ini.
I'm really sad for Mirage but you bring me hope^^
(ps: sorry for my bad english)
Maltradak 8 Sep, 2018 @ 6:35am 
I need help - it doesnt update in the steam CMD when I choose the path and want to update it :(
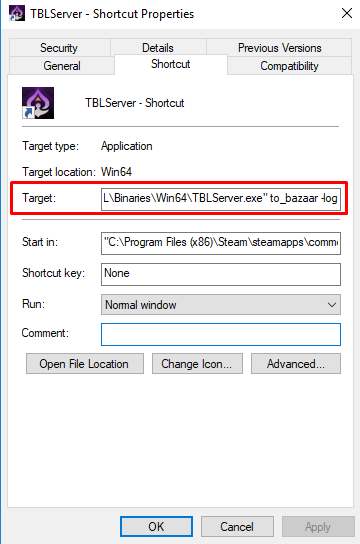
Does anyone know how this works ?
PoppaDaddy 22 Feb, 2018 @ 7:54am 
Is there a way to add the 'Mod Commands' or 'fun stuff' (tbssetstagetime or addbots) to the Dedicated Server command lines? It's okay doing it once I've started the server...

But it would be really nice if I could 'addbots' and set the game time in the server command lines. Is that possible? I tried it with 'addbots' and it didn't work? Maybe I'm doing it worng. Is there a specific section is should go under?
[FOR] Reason 28 Dec, 2017 @ 6:41pm 
Please update this guide to include the Mirage:AW SteamCMD AppID#... :spazdunno:
+app_update 369630

... then delete my comment after so others will have the ID in the future! :spazwinky:


Kruz 16 Nov, 2017 @ 5:43pm 
This is dumb. just let me start a custom game with my friends with the matchmaking button instead of making me do this dumb shit.
yaeMhay 31 Oct, 2017 @ 3:13pm 
Omg are u pple(producers) crazy, put custom mathmaking in server browser official game
Gadzooks739 28 Oct, 2017 @ 1:10pm 
Im still having trouble finding the server
Consume 22 Oct, 2017 @ 11:34pm 
Me and a buddy are having problems trying to make ourselve's admins. He's got the
+AdminAccountIds="his steam64 ID" as well as the 2 lines above that, and yet it still thinks he's not an admin, any help?