Grimoire : Heralds of the Winged Exemplar

Grimoire : Heralds of the Winged Exemplar

65 ratings
Hyperborea Maps and Notes
By The Weak
Maps and notes about the areas within Hyperborea, the world you explore in this game, including potential loot and enemies. You won't find any in depth information on party building here, but there will be spoilers.

Currently, the maps within Avian Mountains (starter region), Fertile Crescent, City of Waterport, The Lochs, Nerukruel Pyramid, Gideon, Harradan Groves, Kublai Axis, Royal Aviary Park/Imperial Palace, Skull Wilderness, Skulheim, Raven Wildes, and Castle Moravia are complete, and there are several other areas that have maps but still need work.
2
3
2
2
3
2
   
Award
Favorite
Favorited
Unfavorite
NOTE ON RECENT LACK OF PROGRESS
I want to assure folks who are using this guide, or anyone new who might pop in, that this guide has not been abandoned. I injured my foot pretty badly a few days ago, which makes it very difficult to use my computer as it is currently set up, and the painkillers have had a bad influence on my thoughts and actions. Going to take some time to heal, and hopefully I will be back to mapping soon. If it takes longer than expected I will give another update. Sorry for the wait.


10/12/2017
What is this guide? / Patch Inconsistencies
All of the maps of areas within the Avian Mountains (the starter region of the game) are complete, with as many details as I could find about each one, which was the initial promise of the guide. There are also several other regions of mid-end game that are complete, and I work on it a little every day. That said, please note that this game has had a ton of updates since it has officially come out. Some of the information below might be changed or fixed at any time.*

Due to the nature of this game I am probably missing stuff. If you catch anything, such as missing loot or a hard to find event, let me know and I will add/fix it and give you credit, but please site your source if your information comes from somewhere else, like a discussion forum or a Wiki, so I can credit and list them as resources as well. I would also like to know how you found it, if any in game hints exist. I am still playing the game and am avoiding looking up too much information about it for fun, so I would appreciate it if folks would try not to spoil anything that is revealed further in the game than the maps currently shown here. If the map does not show a WIP next to the title, it's fair game.

Progress on maps beyond the Avian Mountains will be slow, but steady. I am busy, and trying to form proper loot lists through save scumming is so time consuming and boring that I have literally fallen asleep at my computer while doing it. I ask for a little patience as I pluck away at it, and promise to note if I decide to be lazy about documenting anything. UPDATE: Patch 1.2.0.26-R did not really make the game harder in mid-end game, but it did make combat quite a bit more tedious (at least for a level 5-6 party that was created before the experience fixes). Because of this, expect smaller updates less often.

The maps of every area in the Avian Mountains were completed on 8/24/2017.
The maps in Fertile Crescent and Gideon were completed on 9/1/2017.
The maps in Skull Wilderness and Skulheim were completed on 9/6/2017.
The maps in Kublai Axis were completed sometime around 9/13/2017.
The maps for the Imperial Palace and areas connected within were completed on 9/16/2017.
The maps for Castle Moravia were completed on 9/18/2017.
The maps for Raven Wildes areas that are not Castle Moravia were completed on 9/20/2017.
The maps for Nerukruel Pyramid and Harradan Groves were completed on 9/25/2017
The maps for City of Waterport and many nearby connecting areas were completed on 9/27/2017.
The maps for Royal Aviary Park and the Lochs were completed on 10/3/2017.

GAME UPDATE: All information about susceptibility in the Avian Mountains, Fertile Crescent, Gideon, Harradan Groves, Skull Wilderness, Skulheim, Kublai Axis Sections and parts of the Blackspire Mountains, Royal Aviary Park and Imperial Palace Sections were composed by playing day 1 up to version 1.2.0.25-R, so any patch after that may render any notes on enemy weaknesses incorrect. I will update things as I take the time to check them.
Another thing to note is that some great weapons had their stats changed, which might make my notes on the really good ones worthless. I will probably just go through and delete that information to future proof the guide from that sort of thing, but I haven't done anything about it yet.
UPDATE: If you are playing from a patch created prior to 1.2.0.26-R many, if not all, of the enviromental changes that patch brought are not implemented into your save due to how the save system works. That means a lot more information could be incorrect than I realized. Since I am not keen on doing another excruciatingly slow playthrough from the beginning to check the differences before I have a majority of the maps done (at least not past the Avian Mountains for patch testing, but those are pretty fast) I decided to just keep picking away at it with what I have now. If anyone finds anything that would be wrong due to a patch, let me know and I will credit you.

For folks that clicked this guide looking for drama: I have a nice little section all the way at the bottom of the guide for that. Please check that before bothering me about drama.
There are other guides, so why use this one?
The long story short is that I started to make a guide, but other folks published before me because I am slow. I have no intention of stepping on anyone's toes.

Dexter's guide has party advice, bigger maps with less detail, and he holds your hand through each area showing one way to get out of the Avian Mountains. From the little I have read it seems like an excellent guide and will probably be more what you are looking for if you don't like to mess with details or rambling guide creators. I am not sure how he handles spoilers. I have been told that the early game walkthrough portion of his guide is close, but not finished. I will update the status if someone tells me when it changes.

This guide is more of an information dump on each area, though I have included a bare bones walkthrough to get through early game efficiently. It has more Map details showing Safe Havens, lists what kind of loot you can get from the randomized Treasure Chests so you can decide if you want to save scum them or if it is even worth opening, lists enemies you can encounter, and has a few details on alternate ways you can do things. It has a huge amount of spoilers, though the puzzle hints and solutions are behind spoiler tags by request. Overall it is a pretty dry guide, and only of use to folks who like to milk every zone for what it is worth.
BASIC STARTING ADVICE
I don't save scum level ups and generally do not care about min maxing, thus I am a poor choice of advisor in that respect. I am not going to tell you what characters you should create. There are other guides that cover those kind of details if you want that kind of information. This section is only if you are looking for some basic starter advice that works.

I want to note that there are some folks that have made claims that the game is unplayable unless you start with maxed out bonus rolls and save scum level ups. This is untrue. While I do not deny that it would make the game easier, good tactics and clever use of mechanics work out just fine, with a few very powerful spells and items to reward folks who play around with things, just like any decent Wizardry-like game. If it makes you feel good to save scum for better stats, go for it, but don't feel like you have to do it if it isn't fun for you.
Crowd Control
It might seem odd to start talking about status effects before character creation, but it is very important advice that works in almost every Wizardry-like game. Crowd Control will make the game easier and if you want to spend less time grinding and have a better chance at surviving you should invest in it early, though keep in mind that not every enemy will be susceptible to every effect and that the things listed below are only things you can start the game with. There are plenty more to be found/learned. Do not underestimate consumables.

Races that have innate crowd control abilities:
Vamphyr = Charm
Aeorb = Mindflay (Damage, Insanity)
Leonar = Battle Roar (Fear)
Saurian = Stinking Bile (Light Damage, Nausea)
To use special attacks in battle, right click the circle next to the character's portrait (the default icon is two crossed swords) and choose USE POWER at the bottom of the menu. The character will use their ability after you press BATTLE, which you can do after you have selected actions for all of your characters.

Classes that can start with crowd control spells:
Cleric = Sleep
Wizard = Charm, Sleep, Blinding Flash, Irritation
Thaumaturge = Blinding Flash, Irritation
Sage = Charm
Necromancer = Insect Swarm (chance for Irritation and Confusion), Brain Rot (Insanity and Confusion), Irritation, Dread (Fear)
To use magic in battle, right click the circle next to the character's portrait (the default icon is two crossed swords) and choose SPELL in the menu. Click the magic type that the spell belongs to (Square Icons), click the spell itself, click the dice for the power level you want (more power = better or longer effect, but more mana used), then select Cast. Once again, the character will use their spell after you press BATTLE, which you can do after you have selected actions for all of your characters.

Classes that can equip instruments:
Bard, Sage, Jester (Advanced Class)
If an instrument is equipped, the character will use it when they attack normally. You can also USE them in your inventory (all classes can do this, but I only recommend it with classes that have the Music Skill). Sage will only ever use instruments once per combat round, but Bard and Jester can use them more than once (their target within the row is randomized each use) with higher Music Skill.

Bards have a chance to start the game with a Lyre of Slumber. If you start the game with a Bard in your party and they have different equipment it would be to your advantage to quit, reroll the Bard, and try again until you get one. If you plan on using recruitable NPCs and want to use a Sage, you can fill your NPC slot with a throwaway Bard for a Lyre of Slumber, equip it to your Sage, then dump the extra Bard. There are other powerful instruments that can be found as early as the Village of Crowl in a few random treasure spots, which you can save and reload to get if you have the patience.

Versions 1.2.0.25-R (and earlier) vs. Version 1.2.0.26-R (and beyond)
In version 1.2.0.25-R and earlier, spells and status effects were very easy to land, making the beginning of the game a breeze if you utilized status effects in battles. You could even do silly things like have a Berseker play a Flute effectively. Version 1.2.0.26-R changed all that, requiring some skill in Spell Skills and Music to even have a small chance at inflicting enemies and doing magic damage in general. That doesn't mean that Crowd Control is worthless and the game is impossible to start, but it does mean that you will need to plan your magic users and Bards carefully if you want an easier time in early game and beyond.

Because of the changes, I recommend all classes that start with magic (Cleric, Wizard, Thaumaturge, Sage, Necromancer) and Bards put any extra bonus points from character creation into Skills. When you start the game, put those points into Skills related to the character's magic types (Sorcery/Alchemistry/Litany/Necromancy, and later Arcanum), or in a Bard's case pump them into Music. You need at least 5 points to start seeing successes. Continue to pump points into your Magic/Music skills as you level to keep up with enemies. Your characters will still miss a lot in the beginning, but this will give them a better chance to survive before you have the levels/Skills to land magic more frequently. I suppose this is where some min-maxer type folks may complain that putting bonus points into Skills at the start of the game is a waste, but the choice between an easier early game or a potentially more powerful end game (but not by much unless you save scum levels and grind a lot) is a decision you will have to make for yourself.

While classes that do not have Magic Skills (yet) or Music can't use magic and instruments effectively, they can use consumable scrolls and artifacts well if you invest in their Invocation/Incantation Skills (If you are unsure what Skill is needed, Assay the Item). It is something to consider if you do not have anything better to put points in.
Races and Sex
Most pros and cons of each Race are shown when you select them during character creation, but there are some hidden benefits and negatives when it comes to Class Skill Point gain and distribution, as well as Vitality and Magic regeneration. Skill Point gain and distribution is a bit complex to discuss here, so please refer to other guides that cover that sort of thing. For the most part, if the description of the Race says that it would be good at that class then it will probably work out. There are a few exceptions to that though.

As mentioned, Vitality and Magic regeneration is based on Race and the differences are quite huge. For example, Humans and Drow have absolutely terrible Magic regeneration, so if you make them magic users you will either have to chug Faery Water or Rest for ages until you start finding equipment with M+ (Mana regeneration) later in the game. Barrowers, Wolfin, and Aeorb have great Magic regeneration and make excellent magic users if you don't like to waste time. Feyfolk have decent Magic regeneration, but their Vitality regeneration is very slow. That is easier to work with though, since you can recover Vitality with food and the Restore spell. Keep little details like this in mind when choosing your race/class combinations.

An extra note for the Vamphyr Race is that the game describes their stat penalty as being for outdoors, but it really means any map with open air. They still retain their penalty when inside of houses that do not have their own map or in dungeons with open air areas (large doorways serving the function of windows count as open air). Watch what you equip them with, because the stat penalty effects their maximum weight. If they are overburdened in the sunlight then they will not be able to take action.

A character's sex plays a part in their starting stats, with Males given a little more STR and less FEL, and Females given a little more FEL and less STR.
Classes
As mentioned before, there are good character creation guides that already exist (at least for version 1.2.0.25-R and previous versions. Not sure about beyond that.) so I am not going to waste time going through every detail. That said, here are some quick descriptions of the classes to get you through early game for the sake of completion. Keep in mind that these are just my opinions. I am sure there are folks out there that disagree with me.

Basic Physical Classes
You want at least two of these to inhabit the first two slots of your party (the top slot of both the left and right party columns), and having them occupy the top four slots is even better. In early game they will be taking the brunt of the damage, and mages don't have great options in terms of equipment. In mid to end game there will be more enemies that will have the ability to attack your back row, but hopefully you will have decent defenses by then, such as magic spells that protect your party. Note that physical classes can eventually learn some magic, but many of them will take a long while to get to that point.

Warrior is a good class that has some really good options for equipment. If you don't want to have to worry about anything fancy it's a decent choice.

Berserker is a really good class with a good selection of potential equipment, though their signature Berserk Skill has the chance to target your party instead of the enemy. That seems to happen less as that skill is leveled up. They have the Lethal Blow Skill, which allows a small chance to instantly kill an enemy when it procs.

Ranger is a very powerful class. While it does not have the armor selection of a Warrior it can equip many powerful weapons and can learn the Lethal Blow Skill, which allows a small chance to instantly kill an enemy when it procs. They have other good utility skills as well, such as Lockpicking/Inspection and Nature Lore. They start to learn spells at level 4.

Thief honestly seems a little lackluster compared to other classes, but they are not bad. As expected, they are good for Lockpicking/Inspection and Robbery. In case you were wondering how Backstabbing works (which is not exclusive to Thief), what you need to do is Hide first (success based on the Stealth Skill), then your attacks after that will have bonus damage.

Metalsmith is a strong class with a decent selection of equipment and has access to the Lethal Blow Skill, which allows a small chance to instantly kill an enemy when it procs. However, their signature skill, Metallurgy, has some issues. See skills for some brief info on it.


Basic Magical Classes
You want to keep these classes in the back row / bottom of the party columns so that short range enemies have to go through your physical focused classes first. Some of them have better defensive options than others, but for the most part you want to keep them away from the front line.

Bard is a class that focuses on the use of Instruments, and it can be argued that they could be considered a physical based class. Instruments have magical-like effects and they start gaining access to both Cleric and Wizard spells at level 3, so I put them here. This is a really good class that makes the game significantly easier if you have one. The higher their Music Skill is, the higher the chance they will use Instruments multiple times in one combat round. While they might not have an amazing selection of potential equipment, they can still hold their own if you decide to give them some physical capablilities. They have a good selection of Skills besides Music, including Lockpicking/Inspection, Robbery, and Diplomacy.

Cleric is a healing focused class. They don't have a great equipment selection, but they can do well with Blunt weaponry. They get access to Restore early on, a Spell that recovers Vitality. This is an excellent spell for limiting the need to Rest, saving your characters from the effects of aging, as well as being able to help weak Swimmers stay alive. As they level they get access to a few nice attacking spells as well. They have access to the Diplomacy Skill, if that's your thing.

Wizard is a good class with a great selection of spells they learn as they level. They get access to spells like Detect Secret and Identify early on, and have quite a few damage related spells to choose from. They do not gain healing spells naturally.

Thaumaturge is a sort of hybrid damage dealer/healer with a strong focus on elemental damage. Their spell progression is only a tad slower than a Wizard or Cleric, and honestly it is not much of a negative.

Sage is a utlity focused class, and very good at what they do. While they do not get much in the ways of offensive magic, they get spells like Detect Secret and Identify early on, along with access to some Cleric spells which help quite a bit for first playthroughs, and eventually get Improved Identify so you don't have to cart stuff to an Oracle to get extra information. They can also can equip Instruments, though unlike Bards (with their multi-use capabilities) increasing a Sage's Music Skill only helps their chance to hit enemies with them. For utility skills they have an excellent selection with Ancient History, Lockpicking/Inspection, Diplomacy, and Nature Lore. They are also one of two classes with access to Metallurgy.

Necromancer is a class that focuses on spells related to the dead. They do not get very many spells and there is not a huge variety, but the spells they do get are very good. Insect Swarm alone can get you through many of the tougher early game encounters, and their summons are capable of trivializing some fights. They are also needed for an optional, but fun event in mid game.


Advanced Classes
These are classes that you will probably have to multiclass into, though some Races are able to get them as options for their first class if they have a strong bonus roll.

Templar is a strong class with a great selection of potential equipment. They also learn Cleric Spells early on, though I don't know the exact level. Like Clerics, they cannot use some weapons such as Offhand Daggers, but they are not as limited and it shouldn't be an issue. They have access to the Diplomacy Skill, if that is your thing.

Pirate is another strong class. They might not have a selection of potential equipment that is equal to Warriors, but it is still very good. They can learn the Lethal Blow Skill, which allows a small chance to instantly kill an enemy when it procs. They have access to some good utility skills, such as Lockpicking/Inspection, Robbery, and Diplomacy.

Assassin is yet another strong class that is basically an advanced (and much better) Thief. They can learn the Lethal Blow Skill, which allows a small chance to instantly kill an enemy when it procs. They also have a special signature skill called Ninjitsu. If, for some reason, you don't have good weapons for them they can do quite well with just their fists. As expected, they come with Lockpicking and Robbery. They also learn spells.

Jester is an incredibly powerful class with very steep stat requirements, which is basically a better version of Bard. They have access to the Music Skill and a Bard's ability to use instruments multiple times, Lethal Blow, a Ninja's Ninjitsu Skill, two unique skills called Iajitsu and Trickery, Lockpicking/Inspection, and Robbery. They also have access to spells. That said, their potential equipment selection is a little lacking, but with this kind of power does it matter?
Multiclassing
This section is lazy, and only exists because multiclassing is possible in the game so I wanted to mention it, but Steam Guide letter count restrictions prevented me from putting it in the class section above.

As far as switching classes goes, I have not tried it since it was updated. You can change your class at level 3 in the character's status screen if they have the minimum stat requirements to do it. The amount of exp you need for your next level does not change, so the later you wait the longer it will be for that character to advance in their new class. This promotes heavy save scumming to make effective early advanced classes, which is out of the range of what I would consider fun. I might play around with it and write up better information, but don't count on it. Look at another guide if you need help planning that sort of thing out.

As a side note, apparently there was a bug with multiclassing where changing a character's class technically worked, but Skills were not properly applied or something along those lines. I don't know if that is still the case, and since the current patch as of this writing is 1.2.0.26-R, which has bugged Skills on character generation, it is not really worth testing at the moment. If you still want to try multiclassing, just be aware of it and save before you switch classes. That way you can reload if the proper skills are not applied.
Stats
No one has accurate information on stats yet. Not even the Grimoire Wiki. That said, I can share some basic information on what has consistantly worked for me and will be honest about things I do not know.

The first thing to note is that your characters will gain points for three different stats when they level up, separate from the Bonus Points, so don't panic if your Bonus Points are low unless you are a min-maxer. Where they gain those stats can help guide you on the kind of stats they need for their Class.


SPE (Speed) is arguably the best stat in the game for every character. The faster your characters can act, the faster you can apply status effects and potentially kill enemies before they have a chance to attack. I am a little fuzzy on how this stat relates when it comes to spells. It does seem to increase the speed of spellcasting, but the effect is not very dramatic and stronger enemy types will usually take their turn before any magic is cast.

CON (Constitution) effects Vitality increases on level up and is also useful for every character. It might help resist sickness type ailments, but that's just a guess based on what it does in other games.

DEV (Devotion) effects a character's magic pool increases on level up. The effectiveness of Magic Users is mostly taken care of by their Skill level, rather than Stats, but it would be good to invest in their DEV so they can use magic more frequently and/or higher spell ranks.

STR (Strength) and AGI (Agility) seem to effect the chance to Penetrate with physical weapons. Physical Fighters should invest in these stats. STR effects max weight, which will allow characters to wear heavier equipment without becoming overencumbered. I think AGI effects the character's Evasion chance.

INT (Intelligence: increased chance of skill up on success) and WIS (Wisdom: increased chance to skill up on failure) do not seem to effect the potency of magic like most RPGs, though once again I could be wrong or they might be bugged. Casters (and all classes, for that matter) tend to gain a decent amount on their own when they level up, so for the most part you can use your Bonus Stat Points elsewhere. Spell School Skills and Power Level (Magic Pool) increase magic potency, so focus on those if you want more damage/accuracy out of spells.

DES (Destiny) is an interesting stat that can very rarely save your character from death at the cost of 1 DES stat (the game announces it when it happens). I would not call it vital since you cannot control it, so don't rely on it, but it is an interesting stat to put points in if you can't decide.

WIL (Willpower) probably has to do with evading mental effects, though I am not 100% sure.

FEL (Fellowship) probably has something to do with Diplomacy, but I am not sure. I tried playing around with it, but I didn't see much of an effect. I have been pretty successful ignoring this stat, so whatever it does is not vital.

MET (Metabolism?)... I have no clue what this does. I would guess it would have had something to do with FOO (Food Bar) if it was implemented into the game (it's not, so you can ignore it). The Grimoire Wiki claims it affects HP/VIT/MP regeneration (which is affected by the characters race), but I honestly was not able to see a difference when I tested it. If it does affect regeneration you would probably have to use a ton of points for it to be noticable. Like FEL, I have been pretty successful ignoring this stat. Consuming food/drinks and using the Restore spell work really well, and there is always Resting if you prefer a slower way of regenerating.
Skills
For the most part, higher Skills > higher Stats, not that you have to choose one over the other. You can get along fine with lowish stats and levels, but low Skills make the game much harder. Any Skill with 0 points cannot be raised through use. Some skills are easily grindable (Martial Skills, Swimming, Climbing, Robbery, Scout, Scribe), some go up naturally but slowly (Invocation, Stealth, Lockpicking, Mythology), and some don't seem to skill up on their own at all (I've never seen a natural point increase in Ancient History). Always put at least 1 point into Skills you want to use. Unlike Bonus Stat Points, the game does not allow you to save Skill Points to use for later levels. Unused points will erase the next time you level, so use them or lose them.

BUG (version 1.2.0.25-R and earlier): Skill Points from the Character Creation Bonus Roll, if you chose that option for that character, do not show up until you click an arrow next to a Skill. After clicking they will show up properly.

UPDATE: Patch 1.2.0.27-R introduced a bug fix that makes certain Skills learnable after reaching a certain level for characters created from that patch on, rather than always being available. This was always the case for magic skills, which appeared after a class could learn magic (As far as my experience tells me anyway. There could have been an exception somewhere.), but was not the case for things like Sage and Lockpicking Skill or Metalsmith and Metallurgy Skill.


Magic and Music
I said it earlier, but it bears repeating: Magic users should pump their magic skills to hit better with spells (Sorcery, Litany, Necromancy, Alchemy, and Arcanum for later in the game). Bards should focus on Music to use instruments, and Sage can benefit from Music as well if you want to use them for that. Music will level up on its own, but it is painfully slow. Focus on them and you will have an easier time in the game.
Update: The Dev has stated that you need at least 5 points in Magic/Music Skills to start mitigating fizzles and general ineffectiveness. That number is not a cap, and you will still see a lot of missing/resisting at such a low number. You will want to continue to raise these skills as you progress through the game.


Martial Skills
As far as NO PENETRATION woes are concerned, the issue mostly goes away once you've gained some Levels/Skill increases/Better Weapons. Keep VIT (the green bar) high if you can. You can replenish VIT by Resting, casting Restore, or eating. The Bless (not great) and Enchanted Blade (very good) Spells also increase the chance to Penetrate. Other than using Skill Points earned when leveling up, characters only get Martial Skill ups when they deal the killing blow. If you have a character who is lagging behind you might want to switch up your tactics so that they can land the final hit. If you rely on magic kills for every fight your physical fighters will stink.

As a side note, the Lethal Blow skill (Ranger, Berserker, Metalsmith, Pirate, Assassin, and Jester start with it) is really good. Pump your Physical Skill points into it and find weapons capable of LETHAL (use Assay). When you start seeing it activate in battle it should start skilling up from there on its own.


Survival/Utility Skills
No matter what classes you start with, always put 1 point into Swimming (do this first) and Climbing as soon as you have points to put into Physical Skills. Points past 1 are a bit of a waste, since you can skill them up by using them.

The Inspection Skill is required to complete a Miniquest. The higher the Skill is, the faster you can succeed, though even high numbers might require a few attempts. I don't know the minimum requirement, if there is one. It pairs well with Lockpicking, so any character with that sort of Skill focus is a good choice.

Some skills allow you to read hints and reveal things faster, such as Scout, Ancient History, Nature Lore, and Mythology. You can still kill unknown enemies and brute force puzzles without them though.

Diplomacy is another skill that you can work around (Charm spell, stealing, etc), but is nice to have when interacting with NPCs. Especially if you like to play a "good" guy. Pick one character and commit to it if you want to utilize it.

The Barter Skill is apparently bugged, or at least in version 1.2.0.25-R, and does nothing. Metallurgy exists as a Skill, but was never properly implemented. While they will probably be fixed in the future I would not recommend putting points in either of them, at least while they are bugged.
UPDATE: Apparently Metallurgy does have some function, but the Item Workshop does not show what is mergable with it. I have never found any combinations for it, though I honestly didn't try too hard, so I can't confirm that it works.
Recruitable NPCs
A majority of Recruitable NPCs in this game have always been very powerful. Post version 1.2.0.26-R they are even moreso. You can play the game without recruiting them, but choosing to do so will make the game significantly easier. If you are struggling, or just don't like starting slow, consider swapping some in. If you are the type that usually uses their own party, but doesn't want to deal with early game grinding, you could bench a party member for an NPC recruit until most of your original characters have the levels/Skills to land what you need to, then swap the NPC for your benched character (Dismissed original characters are found in Shrine of the Raptor as skeletons. They will be alive when you add them to the party again, so you do not need to raise them.). This has the added effect of staggering level gain, making it easier to save scum for extra stats if that is your thing.

All that said, NPCs are a resource for folks still getting used to the game and those that simply want to use them. You can still play the game quite successfully without them. Play in whatever way that makes the game the most fun for you.
Miscellaneous Advice
Try things multiple times
If at first you don't succeed, and it doesn't blow up in your face, try again. This works for -almost- everything (scribe/using spellbooks, deciphering stuff, etc.), or at least in early game. There are spells you can cast to boost certain Skills/Stats if you need to. Even if you have 100 in a Skill needed to perform an action you still have a chance to fail. Just keep trying as long as you can stand it.

Use the Detect Secret Spell when exploring
The Detect Secret Spell is great, revealing most hidden items, pressable bricks, and illusory walls with a sparkle that appears on its icon in the upper left hand portion of the visual window. Even if you have characters with maxed out Scout Skill you will want it on when you are exploring, since they will still miss things on occasion. That said, there are a few things that the spell should probably reveal, but it doesn't react. Another spell you can try if you are looking for something is Locate Item, which is quite handy.

Water and Cold/Lightning do not mix
Cold and Lightning effects will bounce off water and kill your party instead. Instruments that have a cold effect (Halcyonic Lyre) will do the same. Whether you are swimming or on a boat, make sure to switch to some other type of damage. It is important to note that even if the spell does not say it will reflect back at you in water, if it is Cold or Lightning based it definately will, so do not trust the lack of information.

Don't Rest every time you stub your toe
In version 1.2.0.25-R, and previous versions, where there was a sort-of-permadeath effect that caused older characters to die randomly. Version 1.2.0.26-R changed it so that characters are immortal, but will take stat penalties as they get older. I admit, I have never run into either problem so I am not sure how serious these effects were/are. I can, however, tell you that most of your aging is going to come from Resting. The solution is to not use Rest for every little thing. You can restore Vitality by having your characters eat food, which the game practically throws at you, or by using the Restore spell. You can recover magic points by drinking Faery Water, or slowly over time just by walking around and doing other things. Eventually you will start finding equipment that has M+ (Magic Regeneration) on it, which helps quite a bit, the earliest that I know of being Farulosonoth's Staff found in a Perk Chest in Samhain Mausoleum. If you find yourself in a position where you absolutely must Rest, cancel the Rest as soon as you have recovered what you need, which will save turns (make sure your characters are not inflicted with Sleep), rather than sleep through the whole night.
Setting your starting point
On the main menu choose Configuration and click the button next to Game Start to change it. Each one has their own bonuses, and it is possible that they give you access to end game conditons that you may not have otherwise.


SANCTUARY
The easiest start, and has been recommended by the dev as a good choice for beginners. If you choose this Option you will find your starting map, Sanctuary, in the Village of Crowl section. The free exp and Skills can take the edge off of early game difficulty, and the Star Gauntlet (don't forget to equip the ammo) can be used to take out tough enemies while you find your bearings.

Exclusive access to the Sanctuary in the Village of Crowl.
Sanctuary Oracle: Can (Improved) Identify up to 10 items.
Navigation Computer: Gives you maps for three starter areas.
Training Termninal: Can train three specific Skills up to but not beyond 12 per character, and can be used as many times as you'd like.
Metabolic Enhancement Deck: One time 1000xp for each character in the party.
Items: Xenomorph Keycard (used to access the Alien Barracks, which is located much later in the game), Star Gauntlet with 99 Muon Power Cell Ammo, Dimension Door and Teleport Scrolls.


THE SHRINE
The default start, which is pretty easy. If you choose this Option you will find your starting map, Briarpatch Woods, in the Briarpatch Woods section. While there is no mid/late game benefit, having access to something that can cure Disease in early game makes this a very strong choice.

Exclusive access to the southern portion of the Shrine of the Raptor and Shrine Subterranea.
Owl Statue - In Shrine Subterranea. Can Identify Items.
Colored Light Dance Party - In Shrine Subterranea. Reduces status effects when you step in it, but not all at once. Keep stepping on and off of it until it clears your ailment. (Credit to lor1keet)
Items: Owl Figurine (Used to access the exclusive Shrine of the Raptor areas)


WILDERNESS
An average start, not as easy as the two choices above due to being farther from recruitable NPCs and Safe Havens (though the tile you start on is one), but not too difficult either. This start offers very little in terms of benefit, since you can get a copy of the starter Key later in the game, along the way to an unskippable objective. If you choose this option you will find your starting map, Gardens of Midknight, in the Gardens of Midknight section.

Item: Key of the Ancients (used to access Grand Refuge of the Ancients, which is located later in the game). The other way to get this key is from Recruiting or Stealing it from Princess Dahlia in Shrine of the Psychopomp, which is in Skulheim.


EERIE WASTES
It is a bit awkward to judge this start in terms of difficulty. On one hand, the enemies in the starter area have a tendancy to Disease and there is nothing to cure it until you leave (Set WANDERING MONSTERS to NEVER in CONFIGURATION if you want an easier time). On the other, the map is really tiny, you are surrounded by Safe Havens, and the exit takes you directly into Village of Crowl (which can be difficult at the beginning of the game if you are unprepared). If you choose this option you will find your starting map, Eerie Wastes, in the lonesome Eerie Wastes section.

One time exclusive access to the Eerie Wastes. You can't go back once you leave.
Item: Skull of Hathor Sogg (I have no idea what this item does specifically, but there is an area in mid game with the same name as the Skull. You probably have to use it on the pedestal to access a majority of the area. You will understand what I mean when you get there.)


IMPRISONED
This is the hardest start of the five by far, with enemies that can inflict Disease and nothing to cure it, Vanguard enemies in the next map over (Set WANDERING MONSTERS to NEVER in CONFIGURATION if you want an easier time), no Safe Havens (though there is a healing Fountain in The Armory), and a decent amount of exploration needed before you can relax. You will come out of it well geared if you can manage to pick the chests along the way though. As far as mid/late game benefits, the special Key that you can get is not very valuable, since you can enter, 100% explore, and loot every treasure chest in Castle Moravia without it. You do have to take a long walk to work around not having it though. If you choose this option you will find your starting map, Crowl Prison, in the Village of Crowl section.
Version 1.2.0.26-R+ Advice: I would not recommend this starting point if you do not like difficulty or saving frequently. The changes to Magic and Music make this start even more difficult than it was before.

Exclusive access to Crowl Prison.
Early access to The Armory in the Village of Crowl.
Items: Moravia Key (Unlocks something in Castle Moravia, probably the front door. You can get around it by using the Monolith in Great Hall of Samhain after you have aquired the Moongate Crystal in mid game.), Various Random Loot (See Crowl Prison for more details).
1.2.0.26-R Character Creation Skill Bugs
Version 1.2.0.26-R introduced some bugs which caused many classes to be missing critical skills on any character created, though any character created before and after the patch are uneffected. If you are running the game on this patch I advise updating to the newest patch before creating characters.

UPDATE: Version 1.2.0.27-R is better and playable, and some Skills are now learned as the characters level rather than being available from the start, but not all of the character creation skill bugs have been ironed out for every race/class combination. If your character is missing a critical skill, such as Swimming, they should hopefully gain it after leveling. Another bug is that some race/class combinations that should be able to use extra Bonus Points left over after character creation (if the roll is high enough) are unable to.
STUFF YOU SHOULD KNOW
Map Icons
S (Green S) = Starting Point, for starter zones only

S (Blue S) = Safe Haven. If there is a Fireplace and you can light it, you can rest in front of it without being harassed by enemies.

⇒ (Gold Arrow) = Party location and direction

⇒ (Red Arrow) = Change zones

↑▤ (Black Arrow with Ladder) = Ascend/decend floors

▷ᴅ (Striped Triangle pointing toward or away from a Small Capital D or U) = Stairs down and up

◎ (Circle in Circle) = Something is there, or it is a Hole or landing spot.

Ⓧ (Red Circle with X / Footnote Icon) = Something is there, with description tied to its number beneath the map

? (Black Question Mark) = Something there, but I have no idea what it is or am not 100% sure

[ (Indent in Wall) = Something on the wall (Plaque, Terminal, Window, etc.)

✝ (Tiny Black Cross) = Skeleton

▅ (Black Rectangle w/ White Lock and Black line on top of it) = Treasure Chest

▣ (Square with Black Square Inside) = Crate. Can also signify other things, like beds and monoliths.

● (Black Circle with Fuzzy Edges) = Bush

O (Circle with a Tiny Notch in the upper left corner) = Pot or Barrel, sometimes a hanging chain or a cocoon.

🞩 (X with Small Diamond Shape in the Middle) = Debris

O (Red O) = Search for Item

▬ (Green Line) = Hidden Door or Invisible Wall, search for and touch a special spot on the wall to reveal or bump your head into it to pass through

┋ (Dotted Line) = Closed Gate or Spider Web blocking the way

■ (Black Square) = Pit Trap

■ (Blue Square) = Water

■ (Red Square) = Lava

^
A (Arrow with and A or D) = An Ascent/Decent

░ (Tiny Black Dots Pattern) = Shallow Water

░ (Tiny Black Star Pattern) = Warp Tile

░ (Tiny Red Star Pattern) = Dark Zone


Note that I am aware that the in game footnotes can overlap. I tried catching it when I could, but I am also lazy. It isn't too hard to figure out what is what though.

Also note that I am probably missing Safe Havens, since they are not discovered every time you step on a tile. If you know of a Safe Haven that is not listed let me know and I will give you credit.
Enemies and Status Effects
As your party becomes stronger you will attract stronger enemies (or at least that is how it is supposed to work). Since I am exploring at low levels (with Wandering Monsters set to NEVER to keep it that way) it is possible that there are enemies I won't run into. If you are attacked by something that is not listed, let me know and I will credit you.

The enemy lists under the Avian Mountain map sections show some status effects they are susceptible to, but not all. I was listing weaknesses as a reference to help folks out in early game, but in hindsight it would have been easier and more informative to post effects they are immune to instead. I will probably fix it at some point, but for now I have a lot more to work on.

If you want some general information on susceptibility:
Almost everything in early game is susceptible to Sleep, Charm, Confuse, Paralyze, and Fear.
If it is a non-undead humanoid then Insanity probably works.
If it has a body (not ghosts) then Irritation probably works.
If it uses sonar (bats) then Shrill Noise works, and Blind does not.
If it casts spells then you probably want to try Silence. (Note that Silence is not working in version 1.2.0.25-R)
If it is a ghost then physical attacks will not connect unless using a magic weapon or buffed with the Enchated Blade Spell, and they cannot be knocked Unconscious.

Almost all status effects have a chance to clear when the inflicted enemy is hit or over time. Sleep is immediate, Paralysis usually takes a while, and Charm seems to be able to take the longest beating, though that could be a coincidence. Unfortunately, it does not seem to work the other way around, at least the hitting bit, so you will need Consumables and Spells to clear the same effects from your party members.

Blind causes enemies to miss more often.
Fear, Insanity, Nausea, and (I think) Irritation can sometimes cause an enemy to not act that turn, but they still have a chance to. Some Fear based effects cause enemies to run away.
Sleep, Paralysis, Hold, and Stone cause an enemy to not act while they are inflicted.
Unconsiousness causes an enemy to not act and is inflicted by blunt weapons, though there are some sharp ones that are an exception to that rule.
Confusion can cause an enemy to attack anyone, both your party members and other enemies.
Charm can cause an enemy to either not act, target your party, or target other enemies.
Disease and one version of Curse both inflict various status effects over a very short period of time, Curse being the harsher version of the two.
The other version of Curse is on equipment, making it unremovable until the Curse is temporarily lifted. Curse can never be completely purged from an item, so if you equip it again you will still have to lift the Curse to remove it.
Poison deals a small portion of damage at random intervals, usually after each turn in battle but not always.
Slow does exactly as described, slowing the target down so that it takes longer for them to act in battle.
Silence, in most games, will make it so the target cannot cast spells. Unfortunately it does not seem to work (version 1.2.0.25-R).

UPDATE - ENCHANTED BLADE SPELL: Version 1.2.0.27-R changed the Enchanted Blade Spell to allow characters without magical weapons to attack Ghosts while the buff is active.

GAME UPDATE: The Dev announced that he was fixing enemy resistances to status effects to make them harder to land. All information about susceptibility in the Avian Mountains, Fertile Crescent, Gideon, Harradan Groves, Skull Wilderness, Skulheim, Kublai Axis Sections and parts of the Blackspire Mountains, Royal Aviary Park and Imperial Palace Sections were composed by playing day 1 up to version 1.2.0.25-R, so any patch after that may render any notes on enemy weaknesses in those sections incorrect.
Potential Loot and Early Game Recommendations
While there is some static loot (if it is Ammo the amount you get is randomized), a large majority of chests, crates, barrels, etc. are randomized from different pools of loot. The amount of loot you receive is usually randomized by a few pieces as well, but there is typically some item types that you can count on being there. For example, if an early game Treasure Chest gives you a Ring it is likely to always have a Ring in it, though the Ring itself is randomized. Not every item type is static though. If you are looking for something specific save before you loot and reload if you don't get what you want.

The loot listed is only the stuff I was able to get via save scumming, and is the main reason this guide is so slow to update maps. There might be more rare loot than is listed, but there are only so many times I can save scum without becoming bored out of my mind. If you find something that is not listed, let me know the item and location and I will credit you.

As far as recommendations on what to look for in early game, I suggest picking up a variety of instruments. Bard, Sage and Jester can equip them, and can also USE them straight from the inventory (I don't recommend wasting time USE-ing them with other classes as of version 1.2.0.26-R). Bard and Jester will always have an advantage, due to being able to randomly use the instrument multiple times in one combat round when they have a high Music Skill. The instruments that do not rely on charges in early game include:
Lyre of Slumber - Sleep (Bards can start with one)
Muting Lyre - Silence (Silence does not work in version 1.2.0.25-R, possibly earlier)
Swaying Lute - Charm
Lethe Harp - Paralysis
Thistle Whistle - Shrill Sound (Includes damage) and is also Offhand so you can equip it with something else.
Hotfoot Banjo - Tarantulla (a.k.a. Dance/Insanity)
Cacaphony Harp - Confusion. In early game it can be found in The Wizard's Sky Barge, a few floors in Samhain, and Lalain Falls.
Halcyonic Lyre - Cone of Cold (Damage. Used to be Deep Freeze, but was nerfed), though in early game it can only be found if you pick Imprisoned as your starting point as far as I know.
There are more instruments available in mid-end game.

In general, it is a good idea to pick up a Mindread, Identify, Detect Secret, Locate Person, and a Locate Item Scroll if you do not have the spells. Wizard's Eye would also be useful, but I have only found it in Spellbook form or from a Perk Chest item (Glorious Orb of Codexia) in early game. You can Save, use them for gleaning key words from NPCs and finding hidden things, then Reload and use your newfound Metagame-y powers, preserving your scrolls for future savescumming.

For early stuff that you would actually consume, Armorplate(stacks, which might be a bug, and the spellbook is called Armor Shield), Magic Screen(stacks, which might be a bug), and Enchanted Blade Scrolls are pretty nice, and their Spellbooks are even better if you have a magic user (though it seems all classes become magic users at some point). You can use them before boss battles to buff your party because they stay on outside of battle, and can give you protection against physical damage(Armorplate), magical damage(Magic Screen), and help you penetrate(Enchanted Blade). Raghilda can cover Armorplate and Little Rosy can cover Magic Screen, if you prefer really early recruitable NPCs over consumables. You might also want to find and keep a Raise Dead scroll.

For early weapons, other than the special static weapons (Caliburn, Moon Singer, Farulosonoth's Staff), it really depends on what characters you have and what Skills you want to work on, but for physical fighters anything tagged with *LETHAL* is pretty great. Be on the lookout for Knuckle Duster, which is an offhand Hammer&Mace weapon (According to Assay. Should be a Fist weapon...). You can potentially get it in Crowl Prison (if you choose the Imprisoned starting point), The Armory, and Samhain Mausoleum, and it is a pretty good choice for physical fighters in early game if you are looking for potential extra damage/crowd control. It has a chance to Incapacitate enemies on hit, which is pretty nice (Lead Balls have that chance as well, as do all blunt weapons and a few special ones). Thistle Whistle, already mentioned above with the instruments, is another great offhand for Bards and Sages as long as you are not using Lyre of Slumber (it will knock the Sleep off). Gauche (Bladesmanship) is another offhand weapon, but other than that it is nothing special. Still, it does not require charges and all but two classes can equip it, so having a couple around in early game if you run out of darts and balls can come in handy.
Note that putting a short range weapon in a character's Offhand will mess with the range of their Mainhand weapon, so your character will target whichever enemy row you chose for your Offhand, even if you chose a different one for your Mainhand. While you can still equip an Offhand while wielding a two-handed weapon they won't (or at least shouldn't) proc, but any stat bonuses on the Offhand will still be active.
Not Sure If Bug?: In version 1.2.0.25-R, a character with a Shield in their Offhand seems to use their Mainhand weapon for extra attack damage, which looks like it results in higher damage overall. It is possible that I am wrong and missed a calculation somewhere. I need to test it further.

For early Armor, other than the easy to get static armor (Avian Helm, Blood Set, Gnorff's Cloak of Bafflement, Wulven Dash Boots), once again it depends on what characters you have, but keep an eye out for equipment that goes on hands, legs and feet. You won't start seeing good options for these, at least not frequently, until you leave the Avian Mountains. Make sure to keep an eye on your character's equip load (the giant circle with the percentage in the middle in the equipment screen). Anything over 100% will cause the character to become overencumbered, which means that they will not be able to take actions in combat. In early game (and in my opinion for the entire game) it is a good idea to prioritize good weapons over good armor, unless your characters are slow.
Shops and Stealing
First a quick note on the Robbery Skill, which effects how well a character can Steal. It is easy to level up (put at least 1 point in it) because you can Charm NPCs to bypass the concequences of failure (or at least in version 1.2.0.26-R and previous versions), or steal from Gorlo since he seems to never catch you (thanks to Rpguy for finding that, also works in version 1.2.0.26-R and previous versions).

To buy and sell to and from an NPC (only works if the NPC has items to sell), right click the action icon (the round button) next to any character's portrait and choose BUY or SELL. For buying, Shops only restock their items once you have bought/stolen all of their goods (again, thanks to Rpguy for pointing that out). For selling, items sold to NPCs will not show up in their shop inventory, so be careful. Once it is sold it is gone for good. If you do not want to lose the item, drop it on the ground in a safe and easily remembered spot instead, via the brown square on the right side of your inventory. See Inventory Shenanigans for more information.

Most of the Shops seem to contain static items, but a few are randomized (like Trimestes). The stuff listed in the guide are only things that I have seen them carry, so your game might have different things available.

Any item listed in a Shop is Stealable, but you cannot choose what item you take. To steal, right click the action icon (the round button) next to any character's portrait (perferably one with points in the Robbery Skill) and select STEAL. If you are looking for something specific it might take a while. If you are unsuccessful in Stealing and are caught, you will anger your target NPC. Anger them enough and they might attack, with most of them also calling the guards. As mentioned above, casting Charm on the NPC beforehand will bypass the consequence of failure.

If an NPC has a Key Item, such as a literal Key, you can steal it to bypass whatever condition they normally have in order to get it the nice way. Stealing Key Items can have negative effects, such as missing out on short but unique events, and there are a few bugs involved. For example, if you steal the Museum Ticket from Trimestes and talk to him about it afterwards, he acts as if he still has the Ticket and will sell you nothing if you try to buy it. Stealing the Ticket also locks you out of seeing the Refund event, though it is not important.

If you need money you can steal an NPC's stuff and sell it back to them. Once again, be careful if the target has a Key Item and you want to avoid the consequences of that. You cannot sell Critical Items. An important thing to note is if you try to give back a stolen Critical Item (drag the item onto the NPC), some NPCs will immeditately become Hostile and call guards (though they may still (Improved) Identify it for you). Some don't seem to care though. If you anger an NPC this way, run, and return, the NPC forgets that you stole their stuff, with their mood being what it was before the incident, though you can trigger the fight again if you want to.

As a side note for Critical Items that you get through "nice" means, or with NPCs that do not seem to care if you show them stolen goods, placing key items on top of NPCs will sometimes get them to (improved) Identify them for you. This is almost guaranteed if you got the item from the NPC.

BUG: In version 1.2.0.25-R and previous versions the Barter Skill (intended to be used with Buying and Selling) is bugged and does not work. You might want to check if it has been fixed in whichever version you are playing before putting any points into it.
Infinite Money
If you didn't catch it in the previous section, you can make infinite money through the Robbery Skill. Just find an NPC, steal their goods, sell their stuff back to them, reload the area (if necessary), and repeat.
Murdering NPCs
Killing any NPC, even in self defense, is considered Murder. You can initate battle with most NPCs by simply clicking the BATTLE button, though you also provoke them into attacking you by performing actions they do not like, such as getting caught stealing or cursing at them in the Parser. Some will try to attack you after certain events, or if you have certain items. Very few (I only know of one) cannot be attacked with the BATTLE button and will never attack you under certain circumstances, even if they really hate you. Succesfully killing an NPC will have them drop any Shop or Key items they have on them.

As expected, there are serious consequences for killing an NPC, beyond not having access to them anymore. As far as I know there is no way to secretly assassinate anyone, so other NPCs will telepathically know it was you and hate you for it, even if the NPC you killed attacked you first. Some will outright attack you, while others will just be uncooperative. Make sure you are prepared before you make the choice to kill.

As a side note, if an NPC attacks you and you do not want to kill them, running away is almost always an option. The angry NPC will likely still be angry with you even if you run, but other NPCs will not hate you for it.
NPC Moods, Negotiation, and Bribary
When you approach, or are approached by an NPC, the game will print their attitude toward you in the text box. You can see further details about their mood by looking at the Drama Mask Bar (shows player vs. enemy health in battle). If both bars are grey then the NPC is neutral toward you. If there are green dots on the left side of the bar, that means that they like you or you have done something they approve of. If there are red dots in the right side of the bar that means that they do not like you, or you have done something that they do not approve of. Both sides of the bar are exclusive, so you can have an NPC that both likes and hates you at the same time, but the red/hate side takes precedence over the green/like side.

Note that some NPCs will never forget some actions, no matter what you do, so keep that in mind.

As expected, the NPCs mood effects how they interact with you. For example, an NPC that extremely angry might immediately attack you, or walk away after a few turns. For the angry NPCs that do not attack immediately you can attempt to Negotiate (which replaces the Talk option if the NPC is angry enough). A successful Negotiation can remove a red dot, but failure will make them angrier. High Diplomacy and Fellowship might have some effect on Negotiation, but in my tests I could never get much better than using a character with no Diplomacy and little Fellowship. I may have just been unlucky. Removing a few red dots might not be enough and the NPC can walk away, so you might have to approach them again and keep trying.

Another way to improve an NPCs mood is to BRIBE them, though some NPCs cannot be bribed. Each Bribe costs 2000 gold and will usually take a chunk of red dots away. Most of the time it will add green dots to the left side of the bar as well. Some NPCs will just take your money and not change their mood at all, while others it might take a few Bribes before you start seeing any changes. Unlike Negotiation, Bribes never make an NPC angrier, so it has no risk.

BUG: In version 1.2.0.26-R and previous versions, some NPCs have a bugged mood bar where sometimes they will forgive/forget certain actions you have taken when you do things they approve of, only to have them suddenly remember that you did the thing they forgave/forgot a meeting or two later. I have not come across an instance where this will get in the way of a playthrough, but it is still good to know.
Inventory Shenanigans
It has been mentioned elsewhere, but the brown square to the right of your Inventory scroll represents the ground. Any item put in that square is placed on the ground of that tile, and it will stay there. You can use this function to "store" items that you don't necessarily need right away, but think you might want later. Just remember where you put them. You can place quite a few items on an individual tile (I have not tested the maximum, if there is any), but you will only be able to see the first thing you put down. If you want to pick up items past the first you will have to pick up and put down every item in the stack that is on top of it until the item you want shuffles to the top.

One use of dropping items is that some NPCs have an event trigger based on items inside of your inventory and will telepathically know it is there even if there is no good reason that they should. If you want to avoid triggering such events, you can drop the item in a safe spot before you interact with them. Critical Items, which are not droppable by default, can be dropped if you go into CONFIGURATION and choose NEVER next to CRITICAL ITEM LOCK. Be careful of this though, since you don't want to lose anything important.

Another thing you can do is have a full inventory when you pick up critical items that would normally trigger a boss fight. Instead of the battle, the critical item will drop harmlessly to the ground to be swapped for another item, skipping the fight all together.
Combining Items
You will need to know how to combine items to progress in the game. Some items can be combined by simply placing one item on top of another, but not all items work that way. Using the Item Workshop to combine things always works for Critical Items.


If you look next to each character portrait you will see three buttons; one looks like a scale, one says OK (unless they are inflicted with something), and the one underneath both of them has a small knife and hammer. The knife and hammer button will take you to the Item Workshop screen.


Click on the items you want to combine in the tiny scroll bar in the Item Workshop window (not your main inventory scroll bar) to place them in the two empty slots in the upper left hand corner of the screen. Once they are both there, click on one of them and then click the Merge Items option on the right side of the Item Workshop window. If it is still darkened out you need to select an item, the item is unable to be combined with the second item you have chosen, or in a few rare cases you have to select the other item instead.

As a side note, you can make various types of consumables by combining certain items (the game will show you what you can combine if you select it while it is in the upper portion of the Item Workshop). For some things you need the appropriate Skill to do it. Metallurgy apparently does have some function, but the Item Workshop does not currently show any of it (version 1.2.0.27-R).

Version 1.2.0.26-R, and previous versions, Bugs: Another note is that combining one stack of items with another stack of the same item will sometimes cause you to have less of that item. Save before you try it. Vending Tokens can stack to a pretty high number (254), but using 100+ of them in a vending machine will turn the stack to 99 no matter what. All tokens above that will be permanently lost.
Locked Doors and Gates
First a quick note on the Lockpicking and Inspection Skills, both of which are important for picking locks on Doors and Treasure Chests. If you decide you want to be able to pick locks, commit to it with one character that has the Skills. And by commit, I don't mean that you have to dump your bonus Skill points into it (1 point in Lockpicking and Inspection will do to start, 5-10 if you want a better chance at the start of the game), but pick all locks you can find to milk them for every point.

There are several types of Locked Doors/Gates in the game. If you LOOK at the door and it says LOCKED, or select Pick Lock from the pull down menu (right click the circle button next to any NPC, perferably one with actual Lockpicking skills) and it gives you a word puzzle then the door is obviously pickable. There are also doors that have no interaction when looked at which require a Key, lever, NPC event, or just need to be touched from the other side to open. As far as I know, all Skull Gates must be opened with a lever, key, or an event and you cannot pick them.

The Door Lockpicking puzzle is a combination of a riddle, a word jumble, and a game of Hangman, with a few extra rules. The answer to the riddle is the solution, and you must pick the letters in the correct order/column going left to right in order to unlock the door. The amount of revealed letters is determined by your Lockpicking Skill, possibly Inspection Skill as well (You want both). A correct letter cannot be next to another correct letter in a column, so you can use that knowledge to make smarter guesses. Choosing an incorrect letter will reveal that letter if it was a ? and cause one of your green stars at the bottom to turn red, which indicates how many misses you can get before the trap goes off. The Inspection Skill can protect you from a miss, randomly allowing you to keep a star green if you messed up. While doing the puzzle you can click ABORT at any time and try again, which gives you a different riddle and resets the puzzle. If this explaination was hard for you to follow, there is a step by step example underneath this section that you can take a look at.

The second way to open a Locked Door (not including keys) is through brute force. To activate that option simply walk into the door three times and the prompt for it will appear, with two giant ?s blocks and a button with four arrows. Select the ? blocks one at a time, then choose a character for them. After they are placed, click the four arrow button a few times to try and force the door open. The action drains Vitality and will take several pushes, but the door will eventually be openable (the game will let you know). Some plus sides to doing it this way is that you do not need Lockpicking and Inspection Skills, nor do you need Magic, and I don't think you can trigger a trap doing it this way (at least I have never seen it).

The third way to open a Locked Door (not including keys) is to cast the Knock Knock Spell, though there is a possibility of failure and also a chance to trigger the lock's trap. The plus to doing it this way is that casting Knock Knock can bypass some negative events that can occur at certain doors if you try to pick the lock or force the door open.

The benefits of picking a lock over using a key, magic, or forcing it open is a chance to raise a character's Lockpicking Skill, which benefits opening locked chests as well, and it can help you avoid tedious Diplomacy to get to some areas faster. The minor downside is that if you have a Critical Key that can be used to open the door you just picked, you won't be able to drop it on the ground unless you set CRITICAL ITEM LOCK to NEVER in CONFIGURATION. See the Inventory Shenanigans section for more information.

It is probably important to note that even if you make the correct choices when Lockpicking you can rarely trigger the trap, even if you have very high Lockpicking and Inspection. I am not sure if that is a bug, or by design.
Example of Unlocking Doors
As mentioned above, unlocking doors is the combination of a riddle, a word jumble, and a game of Hangman with some specific rules that can help you make smart decisions when faced with tough guesses. Having good Inspection and Lockpicking Skills on the character attempting to pick the lock will reveal more letters, which means less guesswork, and will also randomly protect you if you click the wrong thing.

The first thing is that it helps if you are good with riddles so you can guess what the final answer is, but if not you can take a guess for your first move and slowly work from there until the answer is revealed. A good first move is to try a vowel in the second column. It won't work every time, but if it turns out correct you can use the rules to make smarter guesses. Another thing you can do if you do not know the answer, or think you have messed up too badly and do not want to risk triggering the trap, is to click ABORT, then try to unlock the door again. You will be given a different riddle, and the puzzle will be reset.

That said, on to the example.

Here is a Major Lock Level VI door, which only has one star to make a mistake with:


We know the answer to the riddle is MIRROR, so we can work with that to reveal the correct locations. Three of the letters we need are not revealed in the correct columns. Note the O in the fourth column, which we know is wrong because the fourth letter of MIRROR is R. We can click on all of the Rs that are in the correct columns though. There is a rule to the game that does not allow a correct letter to be next to another correct letter, so we can assume this:


This reveals the fifth letter right away (Which was technically revealed because we know that it is not E or N, but bear with me. It wasn't easy getting a good example for this. Haha.), so now we have this:


Now it gets a little trickier. We know that the second letter cannot be in the middle, both because it isn't K and it cannot be next to the R, which means it has to go on the top or the bottom of its column. We know the first letter isn't B, so it can either be in the top or middle of its column. If the first letter happens to be in the top spot, then that would reveal the second letter's position easily, but I am not feeling very optimistic so I guess the middle (which is technically the least efficient of the two guesses, but I was trying to invite danger for the purpose of the example)...


...and it turns out to be correct. Which means we are still stuck with two options for the second letter, but at least we know it isn't in the middle because of the rules and the fact that we know it isn't K. Time to take a stab in the dark...


You'll notice that I guessed the top one and was wrong, but my Inspection skill saved me, allowing me to keep my green star, which means two more chances to get it right. Since there was only one place the second letter could be at that point, I clicked the correct option, then clicked OPEN, and was on my way.
Locked Door Riddle Answers
If you do not know the answer to the riddle you can Abort and try again. This list probably does not have every riddle, because if I tried to save scum to discover them I would get bored and the game seems to favor picking the same ones over and over anyway (Or maybe the riddle list is shorter than I expect?).


MINOR LOCK LEVEL I
Multiply me against my own and I remain solitary as myself = ONE
Chester and Hazel are my relations but no kin to me = NUT
A Shining alabaster vault am I that holds within a golden heart = EGG
It returns to drink the blood of the young when it grows hungry = WAR
I spin upon my own self in dance that endlessly revolves around my start = TOP
Born into misery but strong in prime and short of breath I lay down to sleep = MAN

MINOR LOCK LEVEL II
You cinch me upon my girth that is your girth = BELT
Those who are struck by me lose their nerve and resolve = FEAR
It requires two companions one after another to do this journey = WALK
My arrows strike the heart and my daggers the soul = LOVE
Whenever you take pains to take this you avoid sorrow = CARE

MINOR LOCK LEVEL III
None can change a strand with his oath or return it to its field when it is harvest = HAIR
The hot breath of the earth from its hidden lungs = LAVA
A spine that is straight and a tongue to separate a hundred siblings = BOOK

MINOR LOCK LEVEL IV
One who feels this is proofed against his foe and flight = BRAVE
Precious in falling we cannot be collected or saved = TEARS
No man may wear this cloak but it conceals their misdeeds = NIGHT
He who embraces me is soon corrupted by my embrace in turn = POWER

MINOR LOCK LEVEL V
These rings bind without a betrothal = CHAIN
A Fire in the belly that vomits forth steel = FORGE
This royal battle is always thirty two and thirty two = CHESS

MAJOR LOCK LEVEL VI
A dream without sleeping eyes closed but no weeping = TRANCE
Break me and be accursed yet curse me I curse thee back = MIRROR
With six legs we toil and a blade dragged across our mother = FARMER

MAJOR LOCK LEVEL VII / VIII / IX and MASTER LOCK X / XII / SUPREME
A wax vault of golden treasure and a thousand daggers to guard it = BEEHIVE
None bend this bow but five are bent by it = RAINBOW
Ivory ladies on a field of green their suitor all in black = TENPINS
Locked Treasure Chests
Locked Treasure Chests can be unlocked using the Pick Lock option (or a Key, though not all Locked Treasure Chests have one), but the minigame is different than the one for locked doors. There are brown squares marked with ?s attached to jeweled chains on either side of a giant keyhole. Pressing the brown ? blocks have a chance to reveal a number which also reveals its pair, turn the block red and not reveal anything, and/or "botch" which turns a green star red or activates a trap. Higher Inspection Skill makes it more likely you will reveal a number and less likely you will activate a trap. The goal is to click the jewels on the chains matching each number, though you do not have to do each set in numerical order (1-1, 2-2, etc). Missclicking a chain can activate a trap, or make the Chest unopenable for that attempt, forcing you to ABORT and try again (this resets the puzzle). Successfully picking the lock increases Lockpicking skill and does not require you to open the chest, so saving after it is picked will make for faster save scumming if you are looking for a specific item inside. If this explaination was hard for you to understand, I have a step by step example of picking a Locked Treasure Chest below this section.

The Knock Knock Spell can open Locked Treasure Chests, but it still has a chance to trigger the trap. If you open one this way you will lose out on an opportunity to raise your Lockpicking Skill. On the plus side, it can be used to bypass any extra negative consequences attempting to pick the lock manually might have.

Like with Locked Doors, even if you make the correct choices when Lockpicking you can rarely trigger the trap, even if you have very high Lockpicking and Inspection. I am not sure if that is a bug, or by design.

BUG: In version 1.2.0.26-R, as well as previous versions, there is a bug that does not show you the correct amount of green stars for the chest lockpicking puzzles. It will always show 5, no matter what. It does not effect your ability to complete the puzzle.
Example of Unlocking Treasure Chests
As explained earlier, unlocking Treasure Chests is a different minigame from unlocking doors. It is much harder, since every click that has a chance to reveal a number has a chance to set off the trap, even if it goes well! On top of that, there seems to be a bug (version 1.2.0.26-R and earlier) that misrepresents how many green stars (botches) you have to work with. Once again, Lockpicking and Inspection are the Skills you need to be successful and protect yourself against botches.

On to the first example:

I wasn't around any really hard locks at the time I was writing this, so this Major Lock Level VI will have to do. It shows five green stars but do not be fooled! The reality is that we only have 2 or 3 botches before the trap springs, unless the Inspection skill saves us:


The first step is to try and reveal numbers, which you can do by clicking the brown ? blocks connected to each chain. The numbers on the left hand side are always in numerical order, so I am going to click down the right hand side. It honestly does not matter which side you pick though, since you need to know the numbers on both sides to match them, and successfully revealing one number always reveals its match on the other side:


As you can see, my Thief was quite successful, revealing all but one number. I don't have to click the last brown ? block and risk botching it, because I already know that it matches with 6, the last brown ? block on the left side. But that was too easy. I am going to click ABORT, then try picking the lock again which will reset the puzzle.


(Many ABORTS later...) Not so successful this time, and my Thief even botched once! The next step is to click the two remaining brown ? blocks on the left hand side and hope I get a good result (note that you cannot reveal a red ? block unless you reveal its pair). If the first click reveals the number I will not have to try the second brown ? block because the pair will be obvious, but if it doesn't I will have to take the risk:


My Thief was completely unsuccessful, so I either have to make a guess or ABORT (or use Locksmith's Glue, but I do not have any at the moment). I am choosing to guess, so the next step from here is to click the red jewel on the chain next to a number, then click the red jewel of its pair. You do not have to do them in numerical order, but they have to match.


Like so. This was a really lucky guess which also revealed the positions of both 4s! If I had guessed wrong the trap would have sprung because my Thief had botched earlier. As a side note, if you click two jewels of numbers that do not match and the trap doesn't spring you can't try again on that puzzle (that I know of), so you will have to click ABORT to reset. Now to click the rest of the red jewels to match their paired numbers.


And we're done! All that is left is to click OPEN and the lock will be removed. After that would be a good time to save if you like to save scum the contents of chests.
Swimming and Climbing Skill
I mentioned this earlier in the guide, but it is worth repeating: The first time you are able to put points into Physical Skills, put one point into Swimming and one point into Climbing, no matter what class the character is. This will allow that character to not die immediately when trying to perform these actions and give them the ability to grind these Skills.

Crossing water safely requires the Swimming Skill. The more Swimming Skill a character has, the less their Vitality goes down as they swim (it's a percentage, so having higher Vitality has no benefit), the less likely they are to die, which happens when a character's Vitality hits 0 as they step onto water. You cannot drown during a battle (that I know of...), even if you hit 0 Vit while fighting, but you can drown before the battle starts. You can counteract the Vitality drain a little by casting Restore or eating certain foods to restore Vitality before taking another step. If you try to Save/Reload in water your characters will take an extra hit to Vitality and possibly die, so you can't cheese it that way. Waterwalkers (USE them like an Item) can let you bypass the need to Swim as long as the buff lasts, which is 6-9 steps if you do not get into a fight, but is immediately erased in battle and if you step onto dry land.

Aquavia is a great place to train Swimming Skill. You can grind for it by walking back and forth over a single water tile, or you can put more points into it when a character levels up (kind of a waste, since it goes up fast). Don't forget to stop and Rest to restore Vitality between steps (set WANDERING MONSTERS to NEVER in CONFIGURATION to speed up the Resting process, or use a nearby Safe Haven), but know that you cannot rest on water. Only the first step into water guarantees a Skill point, so don't grind over multiple water tiles.

As far as the amount of Swimming Skill needed if you want to traverse water comfortably and don't want to rely on Restore and eating every step, 60 Skill will let a character cross three water tiles in a row and have a sliver of Vitality left over.

Ascending or Decending a cliff safely (shown with a window that shows the difficulty and the potential fall damage) requires the Climbing Skill. Falling results in damage, and some Fragile items could break (usually crystal or glass). You can be attacked after successfully climbing, but you will get your skill ups (if your characters got any) after the battle is finished. Casting Featherfall can protect your party if they fail. Each time you successfully climb, the spot you are at will decrease in difficulty a little bit. This won't negate the negative effects of falling, but it will make it easier to succeed the next time you climb it.

The Climbing Skill is increased the same way Swmming Skill is, minus the Vitality drain. You can keep using the same climbing spot over and over until you are comfortable, even if you have lowered its difficulty. Lalain Falls to Crescent Wilderness is a good spot to grind the Skill. Unlike Swimming Skill, it does not increase with every climb so it can take a while.
Walking on Lava
Lava deals 25-30 damage per step. You can stop and heal in between steps, and fighting on Lava does not produce extra damage. Destiny (DES) can randomly save a character from dying to it, consuming a DES point in the process, but it is very unreliable. Ring Pro Fire and the Fire Shield Spell (and I imagine all protection against Fire) does not mitigate Lava damage.

The only legitimate way I know to cross Lava safely, other than to step-heal-step-heal, is to USE a charge from Firewalkers, a type of footwear. You must USE it like an item, because equipping them will not protect you. The Firewalking effect lasts for 6-9 steps (it's random) and is cancelled if you step on solid ground or enter a battle. The Firewalking icon does not disappear when the effect is gone, only the step after, so do not trust it.

There are some game mechanics you can exploit to cross (which I expect will probably be fixed at some point), though it is a tedious and dangerous method. You can find more information related to the exploit under the Dominion Caverns Map.
Raising the Dead
When a character's HP hits 0, or an enemy lands a Lethal Blow/Death spell, they are dead, indicated by a skull replacing their portrait. There are two types of spells that can raise them. One is a lesser version, Resurrection, usable with items such as Caduceus of Life, which does not work on every race/class and cannot be used to raise anyone who has been dead for more than 7 days. The other is the Raise Dead spell which seems to work for everyone, including some NPCs, though it will sometimes fail, even when cast with maximum power.

The consequence of being raised is a permanent loss of that character's CON stat. It seems like it is always -10. When that character levels up again they usually get a good amount of it back, but not every point. It isn't too bad as long as that character is not constantly dying, but deaths can add up. If you want to avoid this consequence, you can use the tried and true method of saving frequently and reloading if a character dies.

As a side note, the DES (Destiny) stat has a random chance to save a character from a Lethal Blow (Skill) that would have otherwise killed them, though it consumes 1 DES stat point for every rescue.
Eldritch Magic
Spoiler tags are there for a reason. If you don't want to be spoiled, don't hover over them.

If you look at any character's spellbook you might notice that there is a fuzzed out magic type labeled ELDRI (Eldritch). This is a special magic type that cannot be naturally learned by any class, and you cannot Scribe spells to it (shown by black and red spellbooks with pentagrams) while the type is fuzzed out. It might be worth mentioning that there are Spellbooks that contain non-Eldritch spells (Arcanum) that are blocked from Scribing until you unlock Eldritch. Not sure if that is a bug or not.

To unlock it you have to ask certain NPCs about ELDRITCH (ELDRI does not work). Only the characters in the party at the time you ask will get it unlocked. Once you have asked an NPC about it you cannot unlock it from them again. Any characters you pick up afterward will not be able to use it unless you ask another NPC with Eldritch knowledge.

As for the "where," there are two NPCs in early game that can unlock it for you: Magus Trimestes in the Bronze Cauldron, and Mistral if you choose to resurrect him. There are a few others later in the game as well.
As a side note recruitable NPCs that can unlock Eldritch for you do not have it unlocked for themselves when you recruit them, even if you used them to unlock it for the rest of your party. You have to find another NPC to unlock it for them.

Once you have it unlocked you can attempt to Scribe Eldritch Magic, but know that characters who attempt it can be inflicted with Insanity. It is easily cured, but you will probably want to be near a Safe Haven before you try it, just to be safe.
Battle Bugs
Sometimes the game won't register an action as OK in battle, which prevents you from starting a combat round, even though there should be nothing wrong with it. This tends to happen most frequently with the Retreat function, which should still be usable even if it is a battle you cannot actually run from. If it really is an action you can take and the game just bugged a bit, change the character's action to something else, then change it back and it should register as OK. If that does not fix it then there is probably something else going on. Be sure to check for status effects, or in the case of Spells that the character has enough Magic points to perform it.

Sometimes characters get stuck and won't take action in battle, even if the game says that their action is OK and allowed you to initiate the combat round. This sometimes happens when you switch actions in battle, most frequently going from using one item (Consumable, Invocation, or Instrument) and switching to another item the next round. The first thing to do is to check if you have a status effect preventing them from acting. If that isn't the case, change the character's action to something else, such as Attack or Spell (if they have any), then change it back to what you want and select BATTLE. This should unstick the character and they should begin to act normally. If that doesn't work and you've recently upgraded the weapon that the character is using, the weapon might be bugged with 0 range. It's easy to see if your character gets an extra attack but nothing happens. Simply swap out weapons and they should be able to act again. Don't forget to report the weapon so that it can get fixed.
---------------------------------------------------------
THE AVIAN MOUNTAINS
Bare Bones Early Game Cheat Sheet
This is a list of stuff to do to leave early game, posted in a convenient order with relative difficulty in mind. It includes picking up special loot and items for optional quests. It does not include every detail, such as how to solve the puzzles, what bosses you'll face, what the consequences of certain actions are, and does not say exactly how to walk to every area. See the individual map sections for that kind of information (Ctrl+F is your friend). You can do quite a bit of this in a different order if you'd like, though the list below takes locked areas/key acquisition and limiting backtracking into account. That said, do what is fun for you. This whole section is a spoiler, so don't read it if you don't want to:

Part One: Cenotaph of the Black Lich
(Optional: Find/Buy a Raise Dead Scroll (Caduceus of Life won't work) before going into the Cenotaph of the Black Lich if you want to save some time. It is not required to progress in the game, but you can get it along the way to other objectives. There's a free static-loot one in the Shrine of the Raptor, and Argosyre sells the Scroll and the Spellbook if you prefer that. Trimestes usually sells one as well.)

(Optional: Explore Shrine of the Raptor to get used to the game.)

Get the King's Crest from Aquavia.

(Optional: If you do not care about Smithers' quest, which gives experience, you can save time later by stealing/murdering for the Royal Seal now. Otherwise, wait until "Part Two".)

Go to the Catacombs beyond the Locked Door in Crusader Temple. You can receive/steal/murder for the Key from Gorlo in Crowl Archives, pick the lock on the door, or force it open.

Get the Dead Rat from Catacombs. Get the Hand of Glory from Crypt of Monks.

(Optional: Get the Ivory Scrollcase from Spirit Caves.)

Use the Hand of Glory to open Cenotaph of the Black Lich.

(Optional: Get the Tome of the Spider from Cenotaph of the Black Lich.)

Get the Bane of Hobknob and Spirit Goblet in Cenotaph Vault. Use the Bane of Hobknob with the Dead Rat to get to Pit of Hobknob. Do not discard the Bane of Hobknob.

(Optional: Pick up the Seahorse Signet from Pit of Hobknob.)

Use the Spirit Goblet in Cenotaph Vault to open the way to Inner Sanctum.

Get Mistral's Bones from Inner Sanctum. Use a Raise Dead Scroll on the Bones for speed/recruitment, or take them to Crypt of Monks for dramatic flair. You get a Key of Saints either way. Do not sell the Necrostaff. (If you choose to go to Crypt of Monks, you can turn in quest items for Krone and Gorlo while in the Village, instead of waiting.)


Part Two: Gathering Necessary Stuff
Go to Tomb of Saint George with the Key of Saints. Get the Cosmic Egg from Raptor Grotto.

(Optional: Get Amulet Astrixus and give it to Sir Coffergus, both in The Eyrie.)

(Optional: Get the Magic Sack and Caster Gear from The Wizard's Sky Barge.)

(Optional: If you have the King's Crest from Aquavia, as was suggested in "Part One", you can get the Letter of Marque from Ukluk Mining Company to finish Smithers' quest.)

Get the Deepsink Ore in Deepsink Project. Smash the Deepsink Ore and the Cosmic Egg in the Crusher. (If you have already combined the necessary items to create the Royal Seal of Loogmar, you can do the rest of Samhain now and do Krone, Gorlo, and the Museum of Magic>Mechano Owl>Nest after reaching the shortcut to Sacred Pools in Seal of the Horror.)

Get the Royal Seal from Smithers in Crowl Supply Store, if you haven't already. You can finish his quest (Give him the Letter of Marque), steal it, or murder him for it. Combine the Royal Seal with the King's Crest to get Royal Seal of Loogmar.

(Optional: Go to Mantor Garrison and give Captain Krone the Seahorse Signet, show him the Necrostaff, then ask him about Commendation for Krone's Commendation.)

(Optional: Go to Crowl Archives and give the Tome of the Spider to Gorlo.)

Get the Jewelled Egg in the Museum of Magic, beyond the locked door in Bronze Cauldron, combine it with the Cosmic Egg Yolk, and use the result to get the Mechano Owl. You can buy/steal a Museum Ticket from Trimestes, pick the lock, or force the door to get to it. (See the Museum of Magic map for puzzle information).

Put the Mechano Owl in the Nest at The Eyrie. It will find you later, wherever you are, so you can keep exploring.


Part Three: Samhain
Use the Stepping Stones in Samhain Gorge to get to the entrance of Great Hall of Samhain, and the Royal Seal of Loogmar to unlock the first Gate inside. Get the Rotgut Tincture and use it to pass the Chain Gate.

(Optional: Get Caliburn in Samhain Mausoleum. Open Perk Chests if you have Perk Keys.)

(Optional: Get the Wizard Bag in Samhain Underworld.)

Get the Panegyric Tribute, Prayer Shawl, Funeral Wreath, Burial Mask, Pyre Starter, and Walking Cane from Bowels of Samhain. Complete the Dirge in Samhain Underworld. Get Alonzo's Remains, show them to the Stone Face for the "Chamber of the Waters" Key, then combine the Remains with Charon's Toll.

(Optional: Get Alonzo's Ashes in Chamber of the Waters and take them back to the Stone Face in Samhain Underworld.)

Get the Mercury Fish and give it to another Stone Face, both in Chamber of the Waters.

(Optional: Get the Ruby Broach in Seal of the Horror and take it to Raghilda to complete her quest via the Sacred Pools shortcut. If she is in your party the quest will automatically complete when you pick it up, but you get less exp for it.)

Use the Key of the Exemplar on the magic green gate in Vault of the Exemplar. If you put the Mechano Owl in the Nest and somehow reached this point without it finding you and giving you the Key, Rest and it will come. If you skipped that puzzle, go back and do it. Get the Lachesis Tablet, then take the ladder to Lalain Falls and you are out of the Avian Mountains/early game.

If you keep the default setting for Wandering Monsters on Rare, touch almost every tile in each area for both filling out your map and extra random battles, and do every quest, your character's levels will be around 5-6 by the time you leave Lalain Falls without any grinding (at least in version 1.2.0.25-R).
---------------------------------------------------------
VILLAGE OF CROWL SECTION
Sanctuary starts in the Sanctuary map. If you want to make this start even easier, go to the Wayfarer's Inn at the southwest corner of the Village of Crowl and recruit Raghilda, then go into Briarpatch Woods and recruit Little Rosy (Random Encounter).

Imprisoned starts in the Crowl Prison map. The special chest there is hard to pick, so it would be smart to raise your Inspection and Lockpicking Skills, find some Locksmith's Glue, or get access to the Knock Knock Spell and come back. I am not sure if a Locksmith's Key can open it or not. Once you enter The Armory I strongly suggest saving frequently. The Vanguard Troops are very difficult and will likely wipe you a few times as you make your way out. Set WANDERING MONSTERS to NEVER in CONFIGURATION for an easier time. I suggest avoiding the Vanguard Soldiers fight in Mantor Garrison, at least until you've leveled/geared up a bit, but it is possible to do at level 1 if you are stubborn.
Village of Crowl - Map, Events, and NPCs


1. Locked Door. Minor Lock Level II.

2. Notice of Peasant Flogging Cancellation.

3. Notice of Missing Expedition Force and Window. Click the window and Type EXPEDITION to open the nearby door. Once inside, if you do not have the Seahorse Signet (Found in Pit of Hobknob) you are forced out of the building (the first time you do this a character's Mythology will increase, if you have anyone with that skill). A hint about the Missing Expedition is that Trimestes says they went missing in the Cenotaph if you ask about it. The door cannot be picked.

4. Locked Door. Minor Lock Level I. There is also a poster of the Golden Baby on the wall.

5. Rules of the House.

6. Locked Door. Minor Lock Level II.

7. Wayfarer's Inn. Poster about a missing person named Clara, blond with a ruby broach, sister to Raghilda, last seen at the Temple Baths.

8. Raghilda. Recruitable NPC. She wants to know the whereabouts of her sister. If you ask about Depetrify she tells you she can make a potion from a Nightshade, Amaranth, and Mandrake Root (I haven't tried this yet). Give her the Ruby Broach from Seal of the Horror to complete her quest and receive 500 exp for each character in the party.

9. ACME Crossroads Merchanter. Place Vending Tokens on top of it to access its wares.

10. Vanguard Warehouse. Door locked with Minor Lock Level IV.

11. Secret Brick on West Wall. Covers the Pit Trap in the Vanguard Warehouse.

12. Jackalope Battle. Sometimes accompanied by Packrats. It is fast, hits fairly hard, and can attack quite a few times per turn. It is susceptible to a lot of different types of crowd control though, so if you (smartly) started the game with any it would be wise to use it. It will probably take out a character or two if you try at level 1, but you can get some items that can ressurect the fallen(see the Raising the Dead section for the consequences of that), such as the Caduceus of Life that you can choose from Trimestes (Bronze Cauldron) if you mention Rosy, or from Shrine of the Raptor. You can also find/buy a Raise Dead Scroll, but you might want to save them for later if you can. If you are having NO PENATRATION woes you can recruit Raghilda and/or Little Rosy and cast Magic Missle, or use Poison if you have it.

13. Oily Liquid / Tallow. I don't know if it is used for anything yet. Noting it just in case.

14. Locked Door. Minor Lock Level IV.

15. Crate. Inside is a Shipping Manifest for goods imported from the city of Kublai Axis, signed by Lieutenant Shrike. There are also a couple of random consumables you can take.

16. Locked Door. Minor Lock Level III. This door is not locked if you chose Sanctuary as your starting point.

Mordecai is an NPC you can randomly encounter as you walk around.
If you have Lachesis in your inventory he will threaten you and ask for the Tablet.
If you type YES, the Lachesis Tablet is removed from your inventory and he leaves. The next time you encounter him you can Steal the Tablet back and Exit the encounter normally. He won't threaten you again. He will even (Improved) Identify if for you if you try to give it back to him, but he won't take it. I don't know if anything comes of letting him keep the Tablet.
Typing anything but YES, or just pressing enter to say nothing, causes him to fight you, and you cannot Retreat. He has a ton of HP, packs quite a punch, can cause Nausea, and is strong against Confusion. Sleep, Charm (which I recommend), and Paralysis can work, and you can also knock him Unconscious. When you kill him the only NPCs that get angry are Krone and Shrike.

If you do not want to fight him or give him the Tablet, drop it in a place you can remember, trigger Mordecai's encounter and leave, then pick up the Tablet again. As long as it is not in your inventory he won't threaten you.

E. The small green E is your landing spot when you warp from Eerie Wastes, if you choose that starting point.

Note that the ladder to Sanctuary does not exist if you did not choose Sanctuary as your starting point.

The ladder to The Armory only appears after you have pulled the chain in The Armory to reveal it.

The open Pit Trap in the Vanguard Warehouse is instant death, and the game will warn you once before you try and step on it.


NPC KEYWORDS
Mordecai (Random Encounter) - I haven't found any words he reacts to in any special way.
*Mordecai cannot be Bribed.
**He becomes Hostile if you cast Mindread.

Raghilda (Recruitable) - Clara / Sister, (Ruby) Broach, Potion, Depetrify, (Samhain) Horror
Village of Crowl - Shops, Loot, And Enemies
SHOPS
Raghilda:
Consumables: Garlic, Leg of Ham, Iron Rations, Galen Apple, Rock Salts, Cherry Wine, Baldercake, Crimson Ambrosia, Oatmeal Cookie, Neutral Medium

ACME Crossroads Merchanter:
Scrolls: Divination (4 tokens), Mind Read (5 tokens), True North (2 tokens), Locate Item (6 tokens), Knock Knock (3 tokens)
Consumables: Remove Curse (3 tokens), Cure Lt. Condition (2 tokens), True Seeing (3 tokens), Cherry Wine (1 token), Wonder Adhesive (3 tokens), Crimson Ambrosia (4 tokens), Iron Rations (1 token), Galen Apple (1 token), Baldercake (1 token)
Other: Luck Stone (6 tokens), Silver Spoon (1 token)


POTENTIAL LOOT
EVENT 15. Crate
Consumables: Cure Lt. Wounds, Cure Heavy Wounds, True Seeing, Remove Curse, Neutralize Poison, Stink Bomb, Cherry Wine, Lether Liqeur, Rock Salts, Baldercake, Iron Rations, Spoiled Rations
Other: Soothing Stone, Vending Token

1. Crate
Weapons: Truncheon, Bullwhip
Instuments: Thistle Whistle (Shrill Sound)
Thrown/Ammo: Barbed Arrows, Lead Ball
Scrolls: Magic Missle

2. Shallow Water: Swamp Leech. This Item can Detoxify in exchange for damage.

3. Shallow Water: Vending Tokens. Always seems to be 42 of them, assuming that is a Hitchikers reference.

4. Debris: Burning Oil.

5. Locked Chest (Minor Lock Level III)
Weapons: Shortsword, Bast(Steam Censored)ard Sword, Poison Dagger, Bullwhip, Cat 'O 'Nine Tails
Instuments: Lyre of Slumber, Muting Lyre (Silence), Swaying Lute (Charm)
Thrown/Ammo: Throwing Knife, Feather Dart, Lead Ball, Flute of Chaos
Armor: Flannel Shirt, Leather Jerkin, Phrygian Cone, Flannel Pants, Leather Pants, Cotton Cloak, Silk Robe, Sandals
Scrolls: True North, Identify
Spellbooks: Direction, Bless, Detect Secret, Charm
Consumables: Bag of Sparkles, Nematic Dust, Nausea Powder, Rock Salts, Red Pepper, Cherry Wine, Pilgrim Tea, Leg of Ham
Other: Cobalt Sapphire, Silver Spoon
*The loot seems to pull from the same table as the other Treasure Chest(#7) in this area.

6. Debris: Burning Oil.

7. Treasure Chest (Minor Lock Level III)
Weapons: Shortsword, Bast(Steam Censored)ard Sword, Poison Dagger, Cat 'O 'Nice Tails, Bullwhip
Instruments: Lyre of Slumber, Muting Lyre (Silence), Swaying Lute (Charm)
Thrown/Ammo: Feather Dart, Throwing Knife, Lead Ball, Flute of Chaos
Armor: Phrygian Cone, Cotton Cloak, Silk Robe, Flannel Shirt, Leather Jerkin, Flannel Pants, Leather Pants, Sandals
Scrolls: Detect Secret, Identify, True North
Spellbooks: Detect Secret, Bless, Direction, Charm
Consumables: Nausea Powder, Bag of Sparkles, Rock Salts, Leg of Ham, Cherry Wine
Other: Cobalt Sapphire*, Silver Spoon
*The loot seems to pull from the same table as the other Treasure Chest(#5) in this area.

Very rarely (as of the patch I am testing this on) you can get a Common Gate Key drop after battles in this area. You can also rarely get Pole Forks for defeating vanguard enemies.


ENEMIES
Giant Rat - Susceptible to Sleep, Charm
Packrat - Susceptible to Sleep, Charm
Stinkbug - Can Poison. Susceptible to Sleep, Charm
Fire Beetle - Can Irritate. Has a Fire based Breath. Susceptible to Sleep, Charm
Black Bats - Can Disease. Susceptible to Sleep, Charm, Shrill Sound
Brigands - Susceptible to Sleep, Charm, Insanity
Jackalope - Has a Breath attack. Susceptible to Sleep, Charm, Insanity, Irritation
Vanguard Soldiers (If you attack Raghilda, also a chance to encounter at Garrison Doorway)
Vanguard Bowmen (If you attack Raghilda, also a chance to encounter at Garrison Doorway)
Mordecai - Can cause Nausea. Susceptible to Sleep, Charm, Nausea, Insanity, Paralysis
Sanctuary


1. Skeleton w/ Terminal Code "ABEND." You do not need to search it to type in the code at the terminals.

2. Briefing Console. Type ABEND. Tells you a win condition (I think?): Find the Black Seed, kill the White Owl, its associates, and all witnesses, destroy the Barracks, then return to Reality Hijinx corportate headquarters.

3. Sanctuary Oracle. Can identify 10 items. To use it, drop the item onto the giant stone head. Dropping an item that has already been identified consumes a charge, so be careful.

4. Navigation Computer. Using it gives you maps for Briarpatch Woods, Village of Crowl, and Gardens of Midknight. The precentage still starts at 0 and the tiles are darkened, so you will be able to see where you have personally explored.

5. Metabolic Enhancement Deck. One time use only. Touch the clock on the wall for a free 1000xp for each character in your party. If you are planning on using early recruitable NPCs you might want to wait until you have them in your party before using it. Also a Safe Haven, though there do not seem to be any enemies here.

6. Training Terminal. Type ABEND. Trains characters in the Firearms, Accuracy, and Iron Hand Skills up to 12 Base points. You can use it as many times as you'd like, and across as many characters as you'd like, including recruitable NPCs. Characters at or beyond 12 Base points cannot use it to train further.

◎. Reality Hijinx Jump Pad. Also a Safe Haven, though there do not seem to be any enemies here.

?. There is a clicking sound when you walk on this tile for the first time. It might be a trigger to get the ladder to Sanctuary to appear in Village of Crowl, but I cannot be sure.

Treasure: You always get the following items: Xenoform Passcard, Dimension Door Scroll, Teleport Scroll, Star Gauntlet, Muon Power Cell w/ 99 charges. The Xenoform Passcard allows access to the Alien Barracks (Possibly the Barracks mentioned at the Breifing Console). The Muon Power Cell is used with the Star Gauntlet. The Dimension Door spell is used with Teleport spell.


Only people who choose Sanctuary as their starting point can access this area.
Bronze Cauldron


1. Magus Trimestes. Ask him about the Museum of Magic / Ticket / Pass and he will offer to sell you a Museum Ticked for 500g. You can also steal the Museum Ticket, though the door it unlocks is pickable. If you ask him about Rosy he will offer you your choice of one of the following items, listed in order: Stun Rod, Wand of Fireballs, Wand of Rainbows, Caduceus of Life, Stave of Missles, Rod of Nightmares

2. Trimestes' Bookcase. Nothing important here that I am aware of, but it's a cute detail. One of the books claims that the White Owl is his personal confidante, which might come into play for the Sanctuary goal, but is likely just a joke.

2. Locked Door. Major Lock Level VII. You can unlock it with the Museum Ticket.


NPC KEYWORDS
Magus Trimestes - Magic, Museum (of Magic) (500 gold), Pass / Ticket (500 gold), Refund, (Little) Rosy (One Free Wand/Staff/Rod**), Strangers, Cenotaph, Expedition, Eldritch (Unseals this magic type), Wand, Vanguard, (Little) Daisy
*Stealing the Ticket locks you out of the Refund scene, which is only for fun. If you steal the Ticket and then try to buy it he will take your gold, but you will not get a second Ticket.
**You get some extra text if you talk to Trimestes with Little Rosy in your party, but it is not important.


SHOPS
Magus Trimestes:
Scrolls: Magic Missle, Fireball, True North, Identify, Knock Knock, Detect Secret, Mindread, Raise Dead, Locate Item, Locate Person, Armorplate
Spellbooks: Healing
Consumables: Elysium Berries, True Seeing Potion, Nematic Dust, Halomancic Salts, Bag of Slumber, Bag of Terrors, Bag of Sparkles, Bag of Chuckles.
*This shop is slightly randomized.


POTENTIAL LOOT
EVENT 1. Magus Trimestes: Museum Ticket, pick of one rod (see event above for the list)


ENEMIES
Vanguard Soldiers (If you attack or anger Trimestes)
Vanguard Marines (If you attack or anger Trimestes)
Vanguard Bowmen (If you attack or anger Trimestes)
Museum of Magic


1. Out of Order. Nothing happens when you pull the lever.

2. Chronoworks of Kroondergraf. The answer to the puzzle is found in the Catacombs. The order to press the buttons is Spin Wheel, Blow Trumpet, Twist Crank, Turn Key, Pull Lever, and Wind Coil. When done correctly you will get the Jeweled Egg (Critical Item). If you have the Cosmic Egg Yolk, which you can get by taking the Cosmic Egg from Raptor Grotto to Deepsink Project and crushing it, use the Item Workshop to combine the two together to create the Mechano Egg (Critical Item). Place the Mechano Egg onto the Chronoworks to receive a Mechano Owl, which needs to be taken to the Nest at The Eyrie.

3. Roaring Rings of Rama. Pulling the lever reveals them.

4. Moonbeams of Morgatu. The first time standing here sometimes improves someone's Scout Skill by one point, but not always. Going back and forth over the tile does not seem to trigger more Scout Skill, so save beforehand if you want it.

5. Humming Hyacinths. Touching the alcove reveals them.

6. Aromas of Arkadriom. Touching the pot reveals the smells. There is a map marker for the pot, but I do not know what it means, if anything.

7. The Enigma Well. Touch the well to decend to the Enigma Well floor.


POTENTIAL LOOT
EVENT 2. Chronoworks of Kroondergraf: Jeweled Egg (Critical Item)
Enigma Well


1. Description of the Enigma Well.

2. Time.

3. Entropy.

4. Eternity.


ENEMIES
Packrat - Susceptible to Sleep, Charm
Crowl Supply Store


1. Crandall Smithers. Give him the Letter of Marque (drop it on top of him), found in Ukluk Mining Company from Samhain Gorge, and he will give you the Royal Seal Necklace (Critical Item) and 400 exp to each member of the party. Combine the Royal Seal with the King's Crest, found in Aquavia, to make the Royal Seal of Loogmar (Critical Item). Later in the game when you have the Golden Lock (found in Tabernacle of Music), give it to him and he will offer to use it to make a suit of Golden Armor for 40,000 gold. If you accept he tells you to wait for several days and come back to see if it is done. Ignore that and ask him about GOLDEN ARMOR for Golden Armor, Golden Helm, Golden Greaves, and Golden Gauntlets. The game will announce that you have completed a miniquest and give each member of the party 1000exp.


NPC KEYWORDS
Smithers - Father, Ukluk (Mining Company), Loogmar, Marque, Bridge, (Samhain) Chasm, Forge, Museum (of Magic), Golden Lock, Golden Armor
*You can steal the Royal Seal Necklace from him. Combining the stolen Royal Seal Necklace with the King's Crest right away allows you to skip Smithers' quest, but you will not be able to enter an area later if you combine them before using the King's Crest as a key and will miss out on some experience (not game breaking). If you want to 100% all the maps that you can, wait until you after you explore Ukluk Mining Company to combine them.
**If you try to give him the Letter of Marque after stealing the Royal Seal he will only comment on how his necklace has been stolen. You do not get any experience points and the Letter of Marque does not disappear.
***Showing him the stolen Royal Seal will cause him to call the guards immediately.


SHOPS
Smithers:
Weapons: Longsword, Shortsword, Bast(Steam Censored)ard Sword, Pole Fork, Lance, Throwing Knife, Poison Dagger, Handaxe, Battle Axe, Broadsword, Shortbow, Forge Hammer
Shields: Wooden Buckler
Thrown/Ammo: Needle Darts, Barbed Arrows
Armor: Leather Helm, Leather Gloves, Brigadine
Consumable: Wonder Adhesive
Other: Fireseed


POTENTIAL LOOT
EVENT 1. Smithers: Royal Seal Necklace (Critical Item)


ENEMIES
Vanguard Soldiers (If you attack or anger Smithers)
Mantor Garrison
You need to type EXPEDITION to the window outside and have the Seahorse Signet, or choose the Imprisioned starting point to enter this building.


1. Locked Door. Major Lock Level VII. You cannot use Pick Lock on this door from the east side, so people who choose the Imprisoned start cannot go through it until they complete the Expediton quest.

2. Locked Door. Minor Lock Level IV.

3. Locked Door. Major Lock Level VII. You cannot use Pick Lock on this door from the north side, so people who choose the Imprisoned start cannot go through it until they complete the Expedition quest.

4. Vanguard Soldiers Fight. Sometimes you have to fight some Vanguard Marines immediately after the first battle, but not always. These guys are very tough if you are low level and chose the Imprisoned starting point. If your characters are slow the Soldiers might end up taking a few out. Try and land some controlling status effects as soon as possible (Charm is an excellent choice if you have it), and use magic to get around any NO PENETRATION issues you might have. Poison also works well.

5. 83 Gold. This is also a Safe Haven if you light the Fireplace.

6. Captain Krone. When he asks you to give him the signet, type YES (or say No to get him to leave) for 500 gold, 250exp per character, and his mood will increase. The Seahorse Signet will disappear. Show him the Necrostaff (place it on top of him) and he will give you an Armoury Key and his mood will increase again. You get to keep the staff. Ask about Commendation/Recommendation when his mood is high and he will give you Krone's Commendation. This item is used to speak with Lieutenant Shrike and join the Vanguard in Kublai Axis, though there are three other ways to do that if you don't want/can't get this Commendation.

7. Map. Nothing important, but it fills you in on what the Vanguard Marines are up to.


NPC KEYWORDS
Captain Krone - Expedition, (Black) Lich, Bridge/Chasm, Commendation/Recommendation
*You can steal the Seahorse Signet back if you want it. Showing it to him afterward does not anger him.
**As a side note, there are a lot of hints about Keywords that point to Krone from other NPCs, but most of them are red herrings.


POTENTIAL LOOT
EVENT 5. 83 Gold

EVENT 6. Captain Krone: 500 gold, Armory Key, Krone's Commendation


ENEMIES
Vanguard Soldiers Susceptible to Sleep, Charm, Fear, Insanity.
Vanguard Marines Has access to Thistle Whistle. Susceptible to Sleep, Charm, Fear, Insanity.

You will be attacked by guards as you roam about, even if you have the Seahorse Signet.
The Armory


1. Lever. Opens a nearby Skull Gate(#2).

2. Skull Gate. Opens with a nearby lever(#1). You cannot use Pick Lock on the Gate.

3. Lever and Treasure Chest. The lever opens a nearby Skull Gate(#2)

4. Lever and Skull Gate. The lever opens up the nearby Skull Gate. Only people who chose the Imprisioned starting point will have access to it. You cannot use Pick Lock on the Gate.

5. Lever. Opens a nearby Skull Gate(#6).

6. Skull Gate. Opens with a nearby lever(#5). You cannot use Pick Lock on the Gate.

7. Fountain. Heals HP and Vitality. Seems infinite use.

8. Lever. Opens a nearby Skull Gate(#9).

9. Skull Gate. Opens with a nearby lever(#8). You cannot use Pick Lock on the Gate.

10. Skull Gate and Lever. Blocks the Ethergate to Kublai Axis. The lever to open it is on the south side of the Gate. You cannot pick the lock.

When you get to the ladder to Village of Crowl on the map, pull the chain to bring it down.

The western hallway blocked by a Skull gate can only be accessed by people who choose the Imprisoned starting point.

The original map shows 97% because I copy/pasted a few maps together to cover the Imprisoned-only hallway. If I replay the game to the point where you can access the Warp Tile with an Imprisoned party I will change it, but for now this works.


POTENTIAL LOOT
EVENT 3. Treasure Chest (Minor Lock Level IV)
Weapons: Baselard, Bearded War Axe, Ball & Chain
Thrown/Ammo: Barbed Arrows, Sleeper Arrow, Drain Arrow, Shuriken
*The items in this chest seem static.

1. Treasure Chest (Minor Lock Level IV)
Weapon: Lucerne Hammer, Bearded War Axe, Blowgun
Thrown/Ammo: Blowdarts
Ring: Ring of Deflection
Scrolls: Recharge, Armorplate
*The items in this chest seem static.

2. Treasure Chest (Minor Lock Level IV)
Weapons: Composite Bow
Thrown/Ammo: Flame Arrow, Stone Bullets
Rings: Ring of Smiting
Scrolls: Locate Person, Raise Dead
Consumables: Paralysis Dust, Poison Dust
*The items in this chest seem static.

3. Treasure Chest (Minor Lock Level IV)
Weapons: Martel de Fer
Scrolls: Magic Screen, Enchanhted Blade, AntiMagic, Raise Dead
Consumables: Stink Bomb, Blink
*The items in this chest seem static.

4. Crate
Weapons: Beaked Axe*, Knuckle Duster
ThrownAmmo: Throwing Knife*, Stone Bullets*
Armor: Leather Gloves*
Consumable: Cure Heavy Wounds, True Seeing*, Bag of Sparkles, Bag of Chuckles, Dracaena Petals, Rock Salts
*You always seem to get the marked items.

Very rarely you can get Pole Forks to drop after battle.


ENEMIES
Vanguard Soldiers Susceptible to Sleep, Charm, Fear, Insanity.
Vanguard Marines Has access to Thistle Whistle. Susceptible to Sleep, Charm, Fear, Insanity.
Crowl Prison


1. Skeleton: Moravia Key

Only people who choose Imprisoned as their starting point can access this area.


POTENTIAL LOOT
EVENT 1. Skeleton: Moravia Key

Treasure Chest (Major Lock Level IX):
Weapons: Fist Mace, Beaked Axe, Bec De Corbin, Awl Pike, Goupillon, Threaded Lash, Shortbow, Longbow, Slurbow, Knuckle Duster
Instruments: Muting Lyre, Thistle Whistle (Shrill Sound), Halcyonic Lyre (Cone of Cold)
Thrown/Ammo: Sleeper Arrow, Poison Arrow, Cosmic Cryer, Throwing Knife, Feather Dart
Armor: Burgonet, Bascinet, Flannel Shirt, Chainmail, Ringmail, Camail, Cestian Girdle, Copper Plate, Platemail, Vambraces, Pauldrons, Cuirass Leggings, Sandals, Waterwalkers, Firewalkers
Shield: Target Buckler
Ring: Ring of Deflection, Ring of Smiting, Ring of Featherfall, Ring Pro Frost
Staff/Rods: Fizzlestick, Stave of Missles, Wand of Fireballs, Freezer Rod, Beholder Stave
Scrolls: Armorplate, Mindread, Enchanted Blade, Wither, Raise Dead, Magic Screen
Spellbooks: Bless, Missle Shield, Firestorm, Featherfall, Hermetic Gag (Arcanum), Rainbow Rays (Eldritch)
Consumables: Cure Paralysis, Stone To Flesh, Acid Splash, Bag of Sparkles, Sleep Sands, Halomantic Salts, Rock Salts, Cherry Wine, Water Glass, Locksmith's Glue
Other: Cobalt Sapphire, Luck Stone


ENEMIES
Packrat - Susceptible to Sleep, Charm
Cophrophages - Can Disease. Susceptible to Sleep, Charm
Flesh Grubs - Can Disease. Susceptible to Sleep, Charm
Crusader Temple


1. Argosyre. If you have killed the Horror of Samhain or entered the Sacred Pools from the back way and Retreated from his special encounter, he will attack you on sight. You can still choose to Retreat if you want to avoid the consequences of killing him. As far as I know you can no longer try and get on his good side at this point.

2. Dried Blood.

3. Notice. Tells you to make an offering to Argosyre before going into the Baths, which is a reference to the Bath Offerings Jar in the Sacred Pools. You do not have to donate to proceed.

4. Locked Door. Master Lock Supreme. Unlocked with the Key of the Catecombs.


Note that this area is known as both Crusader Temple and Crusade Temple in the game.

All three cubbies are Safe Havens, but since there are no enemies it doesn't matter.


NPC KEYWORDS
Argosyre - Scandal / Bishop, Esoph, Mistral
*Argosyre becomes more Hostile if you cast Mindread.
**if you try to Recruit Argosyre the game tells you there is no room for Magus Trimestes...
***Showing the Key of the Catacombs (even if you got it the nice way), Tome of the Spider, Mistral's Letter, Monk's Bones, or Key of Saints to Argosyre angers him. If you anger him enough in this way he will leave.


SHOPS
Argosyre:
Staff/Rods: Caduceus of Life
Scrolls: Divination, Magic Moth, Raise Dead
Spellbooks: Raise Dead
Consumables: True Seeing, Remove Curse, Faery Water, Pilgrim Tea, Cherry Wine, Crimson Ambrosia, Galen Apple, Baldercake, Elysium Berries, Hobor's Holy Hash, Cure Disease, Iron Rations, Cure Lt. Condition, Cure Heavy Wounds


ENEMIES
Vanguard Soldiers (If you attack or anger Argosyre)
Mad Monk (If you attack or anger Argosyre)
Crowl Archives


1. Gorlo. Ask Gorlo about the Catacombs or the Key and if you have good Diplomacy, or Charm him beforehand, he will offer to give you the Key of the Catacombs if you will find and return the Tome of the Spider. Type YES and he will give you the Key. Stealing the Key is another option, or you can ignore the Key and pick the lock on the door it opens. When you get it, giving Gorlo the Tome of the Spider will grant every character in the party 1000 exp, finishing his quest. You can no longer speak with him about the Tome/Book, but you can Recruit him from this point on. If you recruit him will give you back the Tome of the Spider, and he will not take it back if you Dismiss him.

2. Books Sealed in Wax. On the topic of deaths and burials of monks. This is a hint that you can use Gorlo to puzzle out one of the things you can do with the Monk's Bones found in the Inner Sanctum of the Cenotaph of the Black Lich. Drag and drop the bones on to him to see what he has to say.


NPC KEYWORDS
Gorlo (Recruitable) - Crusader Temple, Catacombs, Key, Scandal, Argosyre, (Saint) George, Esoph, Bishop, Mistral, Book, Hobknob
*High Diplomacy or Charm will get more information out of him.
**You can steal the Tome of the Spider from him after finishing his quest. If you try and give the stolen book back he will call the guards immediately.


SHOPS
Gorlo:
Spellbooks: Direction, Detect Secret, Magic Bells, Bless, Charm, Knock Knock, Missle Shield, Identify, Wizard's Eye, Remove Curse


POTENTIAL LOOT
EVENT 1. Gorlo: Key of the Catacombs


ENEMIES
Vanguard Soldiers (If you attack or anger Gorlo)
Sacred Pools


1. Bath Offerings. Touching the jar asks you pay 5000 gold. Doing so unlocks the nearby door, but it is also pickable.

2. Locked Door. Minor Lock Level V. Can also be unlocked by paying 5000 gold to the Bath Offerings Jar, or opened without needing to unlock it from the other side.

3. Dried Blood and Torn Fabric.

4. Signs of Struggle.

5. Signs of Dragging Past the Gate. The Skull gate is unlocked with the dial on the other side. You cannot use Pick Lock on the Gate.

6. Dial. Click it to unlock the nearby Skull Gate.

7. If you go into Sacred Pools from the back way, Argosyre will confront and attack you here, accompanied by Vanguard Soldiers and a Mad Monk. You can either kill them (has the same consequences as murder, even though this is technically self defense), or Retreat (choose it as the character's action in Battle)..
If you choose to fight, get Armorshield, Magic Screen, and Enchanted Blade up beforehand if you can. Try and stick Argosyre with a controlling status effect as soon as possible. He will drink healing potions, cast some pretty nasty spells at you, and try to call more guards into the fight if he is not Charmed or Paralyzed. He will also move to the back row on any turn that he is not the farthest away from the front. The Vanguard Soldiers can hit pretty hard and have some range, and the Mad Monk will try and pelt your party with spells, so watch out for that. As expected, controlling status effects work good against them as well. When you win you will receive all of Argosyre's Shop items, but everyone in Village of Crowl will be angry with you, except Raghilda..
If you choose to Retreat, Argosyre will go back to his usual spot in Crusader Temple, but he will still try to kill you. The Villagers will not hate you if you always run away though.

This area is also known as the Temple Baths.
You cannot rest on the pink and black tiles in this area.


ENEMIES
Amoebic Slime - Susceptible to Sleep, Charm
Vanguard Soldiers - Susceptible to Sleep, Charm, Fear, Insanity.
Mad Monk - Susceptible to Sleep, Charm, Confuse, Nausea, Fear, Insanity (+Dancing), Paralyze
Argosyre - Can cast spells that have status effects including Nausea, Curse, Paralyze, and Insanity. Susceptible to Sleep, Charm, Confuse, Nausea, Fear, Insanity (+Dancing), Paralyze (has some resistance)
Catacombs


1. Acme Bereavement Vending

2. Skeleton. Click it to get a Vending Token.

3. Skeleton. Click it to get a Vending Token.

4. Waters of Mourning. LOOK at this spot to reveal a hint carving that says, "In grief (the password) we pass on, for the sake of grief (the password again) we allow our beloved to pass on."

5. Refreshing Fountain. Fills Vitality when you drink it. Seems like it is infinite use.

6. Skeleton. Click it to get a Vending Token.

7. Ungrateful Dead. They pack quite a punch, cause Irritation and Insanity, and are Immune to Poison and Insanity. They are susceptible to Sleep, Charm, Confuse, Paralyze, and Fear though, so try and land those status effects if you have them. They are weak to Fire and Hold Undead. Casting Armorplate before the battle, if you have it, can help protect you while you try and set things up in your favor.

8. Crypt Cleaner. It is Immune to Sleep, Charm, Confuse, Fear, and Insanity, but it is susceptible to Irritation, Nausea, and Paralyze if you have access to those effects. Strangely, it can be Silenced even though it has no mouth. It has quite a bit of HP, but a few rounds of magic damage should bring it down.

9. Cute Wizardry reference. Nothing important, but fun enough to note.

10. Apparition. Type GRIEF to open the nearby Skull Gate.

11. Skeleton. Click it to get the Key of The Mystery.

12. Skull Gate. Unlocked with the Key of The Mystery. Cannot use Pick Lock.

13. Wall Mosiac. Hint about the Chronoworks of Kroondergraf puzzle in the Museum of Magic. The mosiac shows a larrikin (which I assume represents the party) with a trumpet, a cracked egg housing a cosmic eye (Cosmic Egg/Yolk), and an owl in flight(Mechano Owl). LOOK to get a little story filled with hints:
"Spineless (Spin Wheel) are those who trumpet (Blow Trumpet) the
virtues of idleness, yea, twisting (Twist Crank) on
their own gibbet of sloth they turn (Turn Key),
pulled (Pull Lever) by the winds (Wind Coil) to and fro until
at last they fall and crack upon the
earth broken by their own lethargy."

14. Burial Urn. Touch it to find a Dead Rat (Critical Item) inside.


SHOPS
Acme Bereavement Vending
Thrown/Ammo: Undead Warder (5 tokens)
Scrolls: Divination (4 tokens), True North (2 tokens), Locate Person (3 tokens), Hold Undead (5 tokens)
Consumables: Garlic (2 tokens), Black Lotus (1 token), Mandrake Root (1 token), Skullcap (1 token), Grave Moss (1 token), Lethe Liqeur (1 token), Iron Rations (1 token), Galen Apple (1 token), Baldercake (1 token)
Other: Soothing Stone (1 token), Silver Spoon (1 token)


POTENTIAL LOOT
EVENT 2. Skeleton: Vending Token

EVENT 3. Skeleton: Vending Token

EVENT 6. Skeleton: Vending Token

EVENT 11. Skeleton: Key of The Mystery

EVENT 14. Burial Urn: Dead Rat (Critical Item)

1. Burial Urn
Consumables: Cure Lt. Wounds, Cure Lt. Condition, Nausea Powder, Nematic Dust, Rock Salts, Red Pepper, Pilgrim Tea, Cherry Wine, Lether Liqeur, Oatmeal Cookie, Leg of Ham
Other: Silver Spoon

2. Treasure Chest (Minor Lock Level IV)
Weapons: Shortsword, Bast(Steam Censored)ard Sword, Poison Dagger, Cat 'O 'Nine Tails, Bullwhip
Instruments: Lyre of Slumber, Muting Lyre, Swaying Lute (Charm)
Thrown/Ammo: Feather Dart, Throwing Knive, Lead Ball, Flute of Chaos
Armor: Phrygian Cone, Silk Robe, Cotton Cloak, Flannel Shirt, Leather Jerkin, Flannel Pants, Leather Pants, Sandals
Scrolls: Identify, Detect Secret, True North
Spellbooks: Bless, Direction, Charm, Detect Secret
Consumable: Nausea Powder, Nematic Dust, Bag of Sparkles, Rock Salts, Red Pepper, Leg of Ham, Pilgrim Tea, Cherry Wine
Other: Cobalt Sapphire*, Silver Spoon

3. Burial Urn:
Consumables: Elysium Berries, Woundwort, Black Lotus, Toadweed, Amaranth, Swamp Leech

Very rarely (as of the patch I am testing this on) you can get a Perk Key drop after battles in this area.


ENEMIES
Amoebic Slime - Susceptible to Sleep, Charm
Earwhiggs - Susceptible to Sleep, Charm
Flesh Grubs - Can Disease. Susceptible to Sleep, Charm
Cophrophages - Can Disease. Susceptible to Sleep, Charm
Black Bats - Can Disease. Susceptible to Sleep, Charm, Shrill Sound
Ungrateful Dead - Can Irritate, cause Insanity. Susceptible to Sleep, Charm, Confuse, Paralyze, Fear.
Crypt Cleaner - Susceptible to Nausea, Paralyze, Silence
Crypt of Monks


1. Sister Slumberworth's Skeleton. Doesn't seem to do anything.

2. Brother Scratchet's Skeleton. Doesn't seem to do anything.

3. Cleric Ropollo's Skeleton. Doesn't seem to do anything.

4. Bishop McCulloch's Skeleton. Touch it to get the Hand of Glory (Critical Item). This is used to open the Cenotaph of the Black Lich.

5. Brother Sangurna's Skeleton and a Hidden Door to the west. The Skeleton doesn't seem to do anything.

6. Mistral's Burial Alcove. If you place the Monk's Bones (found in Inner Sanctum of the Cenotaph of the Black Lich) in the Alcove the spirit of Mistral appears, gives you the Key of Saints (Critical Item), and hints/warns you of things that are happening. If you place the Bones you cannot resurrect Mistal.


POTENTIAL LOOT
EVENT 4. Bishop McCulloch's Skeleton: Hand of Glory (Critical Item).

EVENT 6. Mistral's Burial Alcove: Key of Saints (Critical Item)

Very rarely (as of the patch I am testing this on) you can get a Common Gate Key or Locksmith's Key drop after battles in this area.


ENEMIES
Packrat - Susceptible to Sleep, Charm
Amoebic Slime - Susceptible to Sleep, Charm
Black Bats - Can Disease. Susceptible to Sleep, Charm, Shrill Sound
Festerboil - Can Irritate and Disease. Susceptible to Sleep, Charm
Xombi - Susceptible to Sleep, Charm, Paralyze, Fear
BRIARPATCH WOODS SECTION
The Shrine starts in the Briarpatch Woods map. If you choose it I suggest going to the Shrine of the Raptor and exploring that first, then make your way to the Village of Crowl to pick it clean of loot. You can recruit Little Rosy (random encounter) in Briarpatch Woods fairly quickly if you are interested in making things even easier, and Raghilda can be found in the Wayfarer's Inn at the Village of Crowl, though you will have to go through the Green Hand Gang first.
Briarpatch Woods


Little Rosy is a Recruitable NPC that is found in a Random Encounter in this area. She is very good recruit for as early as you can get her. If you rescue her sister, Little Daisy, from the Snark Mistress, which can be found outside of the Avian Mountains, she will give you 4400 gold as a reward. She does not have a special reaction if you have Little Daisy in your party. As a side note, I am looking for any in game hint to ask Rosy about her sister by name (the Sister Keyword does not work) that would allow the player to know about the kidnapping before rescuing Little Daisy. If anyone knows of one I will give you credit.
UPDATE: Little Rosy was nerfed in version 1.2.0.27-R. I don't use her myself, except for quest testing, so I don't remember how good she was before the patch. Checking her out now, she still seems plenty strong and is a great choice at the beginning of the game for new players, or people who just like to use NPC recruits.

1. Plant Battles. The first fight always seems to be against a Chlorazoid, then there is another battle against a random enemy type immediately after. Search the spot afterwards to uncover the bodies of dead adventurers and 7-9 pieces of random loot.

2. Green Hand Gang. They have a very high resistance to Mesmeric effects, so Sleep and Charm are not very useful. That said, they are very susceptible to Insanity, Irritation, and Confusion. Mindflay, Insect Swarm, and Brain Rot are great if you have them. If you get your crowd control up as soon as possible they are not very hard. For those having NO PENETRATION woes, you can try and land a Poison effect if you have one to help out with damage, or recruit Little Rosy and use her overpowered (at this time) spells.

3. Cornerstone of Hyperborea. It is always there if you choose The Shrine as your start, but for other starts it is not always there at first, but will eventually pop up. I do not know what causes the disappearance, but if you use the Journal and want to fill out as many entries as you can, be aware that it is an issue. This spot also happens to be a Safe Haven.

4. Rest / Battle. If you attempt to sleep here you will be attacked. After you win you find a Pointy Stick (limited use Spear w/ Blinding Flash)


NPC KEYWORDS
Little Rosy (Random Encounter, Recruitable) - Bronze Cauldron, Trimestes, Master, Museum, Wand, (Little) Daisy, (Black) Pierre, Snark (Mistress)


POTENTIAL LOOT
EVENT 1. Plant Battles Spot
Weapons: Bone Dagger*, Poison Dagger, Slingshot, Handaxe
Thrown/Ammo: Poison Dart.
Wands: Wand of Fireballs
Scrolls: True North, Locate Item, Enchanted Blade, Detect Magic
Other: Soothing Stone
*The Bone Dagger always seems to be in the loot pile, and it is a Cursed Weapon.

EVENT 4. Rest/Battle Spot - Pointy Stick

1. Bush - Elysium Berries

2. Shallow Water - Black Lotus

3. Shallow Water - Swamp Leech. Detoxifys on use in exchange for health.

4. Normal Ground - Swamp Leech

5. Bush - Galen Apple. Cures Disease.

6. Locked Chest (Minor Lock Level 1)
Weapons: Broad Axe, Bullwhip, Javelin
Thrown/Ammo: Feather Dart
Scrolls: Locate Item, Identify, Detect Secret, Magic Screen, Enchanted Blade
Spellbooks: Healing Spellbook*
Consumables: Remove Curse, Stink Bomb, Neutralize Poison, Lethe Liquer, Cure Lt. Condition, Cure Lt. Wounds, Bag of Whispers, Bag of Terrors
Other: Cobalt Sapphire, Soothing Stone
*It always seems to have a Healing Spellbook in the loot pile.

Very rarely (as of the patch I am testing this on) you can get a Perk Key or Common Gate Key drop after battles in this area.


ENEMIES
Cophrophages - Can Disease. Susceptible to Sleep, Charm
Earwhiggs - Susceptible to Sleep, Charm
Flesh Grubs - Can Disease. Susceptible to Sleep, Charm
Mudwasp - Can Irritate. Susceptible to Sleep, Charm
Glowmoth - Can Blind. Susceptible to Sleep, Charm
Night Lily - Can Poison. Susceptible to Sleep, Charm
Weeping Violet - Susceptible to Sleep, Charm
Chlorazoid - Susceptible to Sleep, Charm
Festerboil - Can Irritate and Disease. Susceptible to Sleep, Charm
Blood Leech - Can Drain Vitality. Susceptible to Sleep, Chatm, Fear, Nausea, Confuse, Paralysis, Dancing
Green Hand Gang - Susceptible to Insanity, Irritation, Confusion
Shrine of the Raptor


1. Skeleton - 100 gold, Raptor Map, and a Raise Dead Scroll. USE the Map to fill out your own for this area, which makes it easier to figure out where all of the hidden doors are.

2. Water Fountain - Refreshes Vitality for the character who drinks from it. Seems like it is infinite use.

3. Party Member Tomb - If you dismiss your original party members they will turn up here. Click the skeletons in the alcoves to see who it is and retrieve them. They will rejoin the party alive with all of their Levels, Skills, and Magic they learned before you dismissed them.

4. Orb - Shows you a Vision. The first time you touch it you can choose a character to grant 1-6 Devotion. It is random, so you can save and reload for the best bonus if you have the patience. As a side note, stepping back and forth near the invisible wall is a cheesy (but boring) way to up Scout Skill a bit. Use Detect Secret to increase the chance that Scout activates.

5. Heiroglyphic Symbols. Mentions the Havoc/Black Seed, the Owl, and a War. There is nothing special about it, other than the lore.

6. Water Fountain - Heals the character who drinks from it. Seems like it is infinite use.

7. Alcove - Only for parties that started in The Shrine. Place the Owl Figurine into the alcove to remove the wall.

8. Lachesis Hint - This may have something to do with a winning condition and it is fairly long, so what is written is in its own separate section at the bottom of this guide.

9. Nemesis Hint - This may have something to do with a winning condition and it is fairly long, so what is written is in its own separate section at the bottom of this guide.

10. Atropos and Megaera Hints - This may have something to do with a winning condition and it is fairly long, so what is written is in its own separate section at the bottom of this guide.

11. Arachne and Scylla Hints - This may have something to do with a winning condition and it is fairly long, so what is written is in its own separate section at the bottom of this guide.

12. Aurora Hint - This may have something to do with a winning condition and it is fairly long, so what is written is in its own separate section at the bottom of this guide.

13. Thanatos and Gorgon Hints - This may have something to do with a winning condition and it is fairly long, so what is written is in its own separate section at the bottom of this guide.


Note that only players who set their start to The Shrine can explore the southern portion of this map.

The Safe Haven northwest of the exit to Briarpatch Woods is the landing point if you use the one way warp in Vault of the Exemplar.


POTENTIAL LOOT
EVENT 1. Skeleton - 100 gold, Raptor Map, Raise Dead Scroll. This loot seems static, but I could be wrong.

1. Treasure Chest in Alcove
Staff/Rods: Caduceus of Life*
Scrolls: True North*, Knock Knock, Fireball, Locate Item, Enchanted Blade, Divination, Mindread, Armorplate, Hold Monsters
Consumables: Leg of Ham*, Iron Rations*, Cherry Wine*, Cure Lt. Condition*, Cure Lt. Wounds*, True Seeing, Cure Paralysis, Dazzler Dust, Neutralize Poison.
Other: Silver Spoon*
*These items always seem to be in the chest.


ENEMIES
Packrat - Susceptible to Sleep, Charm
Shrine Subterranea


1. Colored Light Dance Party - Reduces status effects when you step in it, but not all at once. Keep stepping on and off of it until it clears your ailment. (Credit to lor1keet)

2. Owl Statue - Can Identify items dropped onto it.


Note that you cannot enter this area if you did not choose The Shrine as your start.


ENEMIES
Amoebic Slime - Susceptible to Sleep, Charm
Packrat - Susceptible to Sleep, Charm
Aquavia


1. Pushable Brick on the North Wall. Touching it lowers a drawbridge in the center of the room so you can access the chest.

2. Treasure Chest in Alcove. Has a Rusty Gate Key inside, which opens the nearby Skull Gate. This tile is also a Safe Haven.

3. Skull Gate. Opened with the Rusty Gate Key. Cannot be picked.

4. Broken Pottery. There doesn't seem to be anything special about it. This is also a Safe Haven.

5. Skinkasaur. Sometimes accompanied by Packrats. This fight is pretty easy, since it is susceptible to pretty much every controlling status effect. Just apply what you can and keep poking at it until it dies.

6. Hole in the wall. Just some flavor text and a Journal Entry.

7. Southern/Left Wall Dial. Part of a puzzle, with the solution found in the Aquavia Causeway. Set it to the Sun Icon.

8. Middle Wall Dial. Part of a puzzle, with the solution found in the Aquavia Causeway. Set it to the Moon Icon.

9. Northern/Right Wall Dial. Part of a puzzle, with the solution found in the Aquavia Causeway. Set it to the Star Icon.

10. Band of Brigands. Another easy fight. The amount that attacks you is randomized. As far as I can tell they are no different than the ones normally found in Village of Crowl.

11. Locked Door. Minor Lock Level I.

12. Treasure Chest in alcove. Has the King's Crest inside. If you already have the Royal Seal Necklace (Smithers in Crowl Supply Store has it) you can combine them to create a Royal Seal of Loogmar. If not, just hang onto it until you do. If you stole the Royal Seal Necklace and want to 100% all the maps that you can, wait until you explore Ukluk Mining Company to do it or you will lock yourself out of a room (not game breaking).

13. Calming Fountain. Seems to have infinite use.

Purple letters show Warp destinations, and green letters show the Warp starting points. A starts in in the Causeway and C returns to it.

?. The map shows a doorway to the south, but as far as I know it is just a wall. Possibly a graphical glitch in the game.

This dungeon is a great place to train Swimming Skill.


POTENTIAL LOOT
EVENT 2. Treasure Chest in Alcove: Rusty Gate Key (Critical Item)

EVENT 12. Treasure Chest in Alcove: King's Crest (Critical Item)

1. Treasure Chest in Alcove (Minor Lock Level III):
Weapons: Shortsword, Longsword, Bast(Steam Censored)ard Sword, Poison Dagger, Bone Dagger, Quarterstaff, Cat 'O 'Nine Tails, Bullwhip
Shields: Wooden Buckler
Thrown/Ammo: Lead Ball, Poison Dart, Feather Dart, Throwing Dagger, Flute of Chaos
Instruments: Lyre of Slumber, Muting Lyre, Swaying Lute (Charm), Lethe Harp (Paralysis)
Armor: Phrygian Cone, Leather Helm, Flannel Shirt, Cotton Cloak, Silk Robe, Leather Jerkin, Flannel Pants, Leather Pants, Sandals
Rings: Ring Pro Frost, Ring Pro Fire
Staff/Rods: Caduceus of Healing, Stave of Missles
Scrolls: True North, Detect Secret, Identify, Detect Magic
Spellbooks: Bless, Healing, Direction, Detect Secret, Identify, Charm
Consumables: Cure Lt. Condition, Cure Lt. Wounds, Bag of Sparkles, Bag of Slumber, Nematic Dust, Nausea Powder, Rock Salts, Red Pepper, Oatmeal Cookie, Leg of Ham, Pilgrim Tea, Cherry Wine, Lethe Liqeur
Other: Cobalt Sapphire, Silver Spoon
*It seems like the items from this chest pull from the same pool at the Treasure Chests in the Spirit Caves, which is a similar pool as the Treasure Chests in the Village of Crowl (minus the chance for a ring).

2. Treasure Chest in Alcove (Minor Lock Level III):
Ammo: Needle Darts
Scrolls: Hold Monsters, Hold Undead, Magic Missle, Firestorm, Earthquake, Lightning, Crushing Hand, Enchanted Blade, Magic Screen
Consumables: Remove Curse, Neutralize Poison, Stink Bomb, Acid Splash, Bag of Sparkles, Bag of Slumber, Bag of Terrors, Nematic Dust, Crimson Ambrosia, Locksmith's Glue

3. Barrel:
Weapons: Shortsword, Longsword, Bone Dagger, Gauche, Truncheon, Bipennis, Pole Fork, Lance, Bullwhip
Instuments: Lyre of Slumber, Muting Lyre, Lethe Harp (Paralysis), Hotfoot Banjo (Tarantella)
Shield: Wooden Buckler
Thrown/Ammo: Needle Dart, Feather Dart, Poison Dart, Throwing Dagger
Armor: Phrygian Cone, Leather Vestment, Leather Helm, Mail Coif, Flannel Shirt, Leather Armor, Leather Pants, Sandals, Spiked Bracer
Ring: Ring Pro Fire, Ring Pro Frost, Ring Pro Magic
Staff/Rod: Caduceus of Healing, Caduceus of Life, Stun Rod, Stave of Missles, Torpedo Rod
Scrolls: Divination, Identify, Detect Magic
Spellbooks: Healing, Bless, Identify, Charm, Wizard's Eye, Fire Shield, Armor Shield (Armorplate)
Consumables: Cure Lt. Condition, Cure Lt. Wounds, Cure Heavy Wounds, True Seeing, Stink Bomb, Bag of Sparkles, Bag of Chuckles, Bag of Whispers, Bag of Slumber, Nematic Dust, Cherry Wine, Lethe Liqeur, Spoiled Rations, Iron Rations, Rock Salts, Leg of Ham, Oatmeal Cookie, Baldercake
Other: Cobalt Sapphire
*I am not 100% certain, but the items seem to pull from the same pool as one of the Treasure Chests on this floor (#4).

4. Treasure Chest in Alcove (Minor Lock Level III):
Weapons: Shortsword, Longsword, Bone Dagger, Gauche, Truncheon, Bipennis, Pole Fork, Lance, Bullwhip
Instrument: Lyre of Slumber, Muting Lyre, Lethe Harp (Paralysis), Hotfoot Banjo (Tarantulla)
Shield: Wooden Buckler
Thrown/Ammo: Throwing Knives, Feather Darts, Poison Dart, Stone Bullets
Armor: Phrygian Cone, Leather Vestment, Leather Helm, Flannel Shirt, Leather Armor, Leather Pants, Sandals, Spiked Bracer
Ring: Ring Pro Fire, Ring Pro Frost, Ring Pro Magic
Staff/Rod: Caduceus of Healing, Caduceus of Life, Stun Rod, Stave of Missles, Torpedo Rod
Scrolls: Bless, Remove Curse, Detect Magic, Remove Magic
Spellbooks: Healing, Identify, Wizard's Eye, Charm, Armor Shield
Consumables: Cure Lt. Condition, Cure Lt. Wounds, Cure Heavy Wounds, True Seeing, Stink Bomb, Bag of Chuckles, Bag of Slumber, Bag of Sparkles, Nematic Dust, Cherry Wine, Lethe Liqeur, Spoiled Rations, Iron Rations, Leg of Ham, Baldercake, Rock Salts
Other: Cobalt Sapphire
*I am not 100% certain, but the items seem to pull from the same pool as the Barrel on this floor.

Very rarely (as of the patch I am testing this on) you can get a Locksmith's Key drop after battles in this area.


ENEMIES
Amoebic Slime - Susceptible to Sleep, Charm
Packrat - Susceptible to Sleep, Charm
Cophrophages - Can Disease. Susceptible to Sleep, Charm
Earwhiggs - Susceptible to Sleep, Charm
Flesh Grubs - Can Disease. Susceptible to Sleep, Charm
Piranha - Susceptible to Sleep, Charm, Confuse, Fear
Brigands - Susceptible to Sleep, Charm, Insanity
Skinkasaur - Susceptible to Sleep, Charm, Confuse, Insanity, Paralyze, Fear
Aquavia Causeway


1. Hint about the Thanatos Tablet. It talks about King Loogmar departing to the "house of shadows"(dead), and a curse (invocation of Thanatos) placed upon anyone who disturbs his rest. That his remains will not see the light of day, and the sound of water will be a mourning song in his honor.

2. Hints about this dungeon. It talks about the servant Shiva-Han-Goromu being a guardian mummy. That their heart will not be stopped "within the confines of the vessel of infinite time" (Canopic Jar) and that it is fortified by the Sun, Moon, and Star (Solution to the dial puzzle on the first floor).

3, Another hint. "A quaff of azure sight for you to see what is not and what is true." I think this is just a generic hint to use a Potion of True Seeing to find hidden walls, but if that is the case you can find them without using one.

4. Lever that opens the nearby Skull Gate.

5. Boat. Use it to traverse the water.

6. Skull Gate. Opened with the nearby lever. Cannot use Pick Lock on it.

7. A notice asking people to bathe their feet in the sacred pool nearby. Pretty sure it's just flavor text.

8. Lever. Opens the Skull Gate at the far end of the Ossuary, where the skeletal remalns are (#11). Also a Safe Haven.

9. Lever and a Skull Gate. If you set the dials on the first floor correctly you can use the lever to open the Gate. If not, you will not be able to use the lever. You cannot use Pick Lock on the Gate.

10. Treasure Chest in alcove. Has a Canopic Jar inside. Get this before you try and take on the boss for an easier time.

11. Skelatal Remains and a Skull Gate. The gate is unlocked with a lever (#8). You cannot use Pick Lock on the Gate.

12. Shiva-Han-Goromu. Sometimes comes with Black Bats and Packrats. Have a character USE the Canopic Jar (as in select USE > right click) and they will throw it in battle, dealing damage and inflicting the boss with Poison. It is weak to a lot of controlling status effects, so even if you didn't pick up the jar you can use them to your advantage and make the fight relatively easy. Keep in mind that Poison from sources other than the Canopic Jar don't work. If you have any Fire based spells/scrolls/abilities, or Hold Undead, it is weak to both.

13. The Skeleton of King Loogmar.

Purple letters show Warp destinations, and green letters show the Warp starting points. A goes to the first floor of Aquavia, which is where the starting point for C is. It's one big loop. The Warp Tile (Glowing Dotted Ground, marked with an A on the map above) is technically a Safe Haven.


POTENTIAL LOOT
EVENT 10: Treasure Chest in alcove: Canopic Jar (Special, but not vital, item)

1. Treasure Chest in Alcove:
Weapons: Longsword, Cat 'O 'Nine Tails, Bone Dagger
Armor: Death Mask
Staff/Rods: Caduceus of Life
Consumables: True Seeing
Other: Gold Leaf
*It seems that you always get the above items.

Very rarely (as of the patch I am testing this on) you can get a Perk Key and Locksmith's Key to drop after battles in this area.


ENEMIES
Amoebic Slime - Susceptible to Sleep, Charm
Packrat - Susceptible to Sleep, Charm
Earwhiggs - Susceptible to Sleep, Charm
Flesh Grubs - Can Disease. Susceptible to Sleep, Charm
Piranha - Susceptible to Sleep, Charm, Confuse, Fear
Black Bats - Can Disease. Susceptible to Sleep, Charm, Shrill Sound
Shiva-Han-Goromu - Susceptible to Sleep, Charm, Paralyze, Insanity, Fear
GARDENS OF MIDKNIGHT SECTION
Wilderness starts in the Gardens of Midknight map. If you want to make things easier go to the Village of Crowl first and recruit Raghilda at the Wayfarer's Inn, then go to Briarpatch Woods from there and recruit Little Rosy (Random Encounter).
Gardens of Midknight


1. Monolith Covered in Glyphs. Spoilers for things past early game: Touch the Moongate Crystal to the Runes on the Monolith to teleport to Nerukzan Woodlands.You are also warped to this spot using the same method on the Monolith in Royal Aviary Park.You can get the Moongate Crystal from Green Mandarin in Celestial Watchtower, which can be reached through Kublai Axis.


POTENTIAL LOOT
1. Shallow Water - Swamp Leech, Detoxifys in exchange for damage.

2. Bush - Elysium Berries

3. Bush- Galen Apple, Cures Disease

Very rarely (as of the patch I am testing this on) you can get a Common Gate Key drop after battles in this area.


ENEMIES
Stinkbug - Can Poison. Susceptible to Sleep, Charm
Fire Beetle - Can Irritate. Has a Fire based Breath. Susceptible to Sleep, Charm
Mudwasp - Can Irritate. Susceptible to Sleep, Charm
Glowmoth - Can Blind. Susceptible to Sleep, Charm
Night Lily - Can Poison. Susceptible to Sleep, Charm
Chlorazoid - Susceptible to Sleep, Charm
Phangshrub - Susceptible to Sleep, Charm
Black Bats - Can Disease. Susceptible to Sleep, Charm, Shrill Sound
Giant Bat - Can Drain Vit/Sleep. Susceptible to Sleep, Charm, Shrill Sound
Brigands - Susceptible to Sleep, Charm, Insanity
Spirit Caves
For version 1.2.0.27-R and beyond, having access to the Enchanted Blade Spell or Scrolls is recommended if you want to fully explore this cave.


1. Voice that says "Plugh".

2, Guano Odor. Forced battle against a Giant Bat, sometimes accompanied a few groups of Black Bats, but not always.

3. Skeleton with Ivory Scrollcase. You can pick up the Scrollcase from the ground (the single brown square to the right of your inventory). As the name implies, you can right click the Ivory Scrollcase to store up to 16 Scrolls.

4. Ghost. It's a ghost type enemy, so straight physical attacks are not going to hurt it. Use magic and magic weapons (such as Bone Dagger) to damage it, or cast the Enchanted Blade Spell to allow normal weapons to land hits (version 1.2.0.27-R+). You can still control it with some status effects, such as Sleep, Charm, Fear, and Confusion, and can damage it with Mindflay, but it is immune to the Insanity effect. It casts magic that can one shot low HP characters, so if you have Little Rosy (or someone else high enough for the spell) try and have Magic Screen up before you start the battle. If you can land Charm quickly enough that will put a stop to its attacks. I didn't have Silence at the time, but it is bugged with the (current at the time of this writing) patch I am using anyway so it wouldn't work even if you could inflict it.

5. Banshee. It's a ghost type enemy, so straight physical attacks are not going to hurt it. Use magic and magic weapons (such as Bone Dagger) to damage it, or cast the Enchanted Blade Spell to allow normal weapons to land hits (version 1.2.0.27-R+). You can still control it with some status effects, such as Sleep, Charm, Fear, and Confusion, and can damage it with Mindflay, but it is immune to the Insanity effect. It can do a lot of damage across your entire party with its Wail, which will probably take out a few characters if you are trying this at level 1. You cannot stop the Wail with Charm.
This strat may no longer work in version 1.2.0.27-R+ since Little Rosy was nerfed: If you recruited Little Rosy and Raghilda (and haven't leveled up to potentially change their speeds) they are usually fast enough to cheese the fight. Have Little Rosy cast Magic Missle (she usually acts first), Raghilda cast Sleep (she usually acts second), and everyone else try to Hide to keep them from waking it up. The recruits should act first, so you can lock down the Banshee before it can act.

6. Toxic Water. Any character that drinks this will be poisoned.


POTENTIAL LOOT
EVENT 3. Skeleton: Ivory Scrollcase

1. Treasure Chest (Minor Lock Level III)
Weapons: Shortsword, Longsword, Bast(Steam Censored)ard Sword, Bone Dagger, Quarterstaff, Bullwhip, Cat 'O 'Nine Tails
Instruments: Lyre of Slumber, Muting Lyre, Lethe Harp (Paralysis), Swaying Lute (Charm)
Thrown/Ammo: Lead Ball, Throwing Knife, Feather Dart, Poison Dart, Flute of Chaos
Armor: Phrygian Cone, Leather Helm, Flannel Shirt, Leather Jerkin, Cotton Cloak, Silk Robe, Flannel Pants, Leather Pants, Sandals
Rings: Ring Pro Fire, Ring Pro Frost
Staff/Rods: Caduceus of Healing, Stave of Missles
Scrolls: True North, Detect Magic
Spellbooks: Identify, Direction, Healing, Bless, Charm, Detect Secret, Detect Magic
Consumables: Rock Salts, Red Pepper, Nausea Powder, Bag of Slumber, Bag of Sparkles, Nematic Dust, Cure Lt. Condition, Cure Lt. Wounds, Pilgrim Tea, Cherry Wine, Lethe Liqeur, Oatmeal Cookie
Other: Cobalt Sapphire, Silver Spoon
*It seems like the items from this chest pull from the same pool as a Treasure Chest in Aquavia, which is a similar pool as the Treasure Chests in the Village of Crowl (minus the chance for a ring). I am not 100% certain, but I am pretty sure it is the exact same table as the second Treasure Chest in this area.

2. Treasure Chest (Minor Lock Level V):
Weapons: Shortsword, Longsword, Bast(Sream Censored)ard Sword, Poison Dagger, Bullwhip, Cat 'O 'Nine Tails
Instuments: Lyre of Slumber, Muting Lyre (Silence), Swaying Lute (Charm)
Thrown/Ammo: Lead Ball, Feather Dart, Flute of Chaos
Armor: Leather Helm, Phrygian Cone, Flannel Shirt, Leather Jerkin, Cotton Cloak, Silk Robe, Flannel Pants, Leather Pants, Sandals
Rings: Ring Pro Frost
Staff/Rods: Stave of Missles
Spellbooks: Direction Spellbook, Detect Secret Spellbook, Charm Spellbook
Consumable: Bag of Slumber, Nausea Powder, Nematic Dust, Rock Salts, Red Pepper, Pilgrim Tea, Cherry Wine, Oatmeal Cookie
Other: Cobalt Sapphire, Silver Spoon
*It seems like the items from this chest pull from the same pool as a Treasure Chest in Aquavia, which is a similar pool as the Treasure Chests in the Village of Crowl (minus the chance for a ring). I am not 100% certain, but I am pretty sure it is the exact same table as the second Treasure Chest in this area.

Very rarely (as of the patch I am testing this on) you can get a Common Gate Key drop after battles in this area.


ENEMIES
Amoebic Slime - Susceptible to Sleep, Charm
Flesh Grubs - Can Disease. Susceptible to Sleep, Charm
Black Bats - Can Disease. Susceptible to Sleep, Charm, Shrill Sound
Giant Bat - Can Drain Vit/Sleep. Susceptible to Sleep, Charm, Shrill Sound
Toadstool - Susceptible to Sleep, Charm
Ghost - Can Irritate, Fear, Slow and Drain Magic. Susceptible to Sleep, Charm, Fear, Confusion
Banshee - Susceptible to Sleep, Charm, Fear, Confusion
Cenotaph of the Black Lich
You must explore the Catacombs in the Village of Crowl first before you can explore this area.


1. Sealed Door. LOOKing at the door gives you the hint you need to unlock it. Drag the Hand of Glory (Found in the Crypt of Monks, which is in the Catacombs) onto it to open it. The Hand will disappear. You cannot use Pick Lock.

2. Forced Battle. It is only against a Festerboil, sometimes with Cophrophages or Flesh Grubs, which you should have encountered and know how to deal with by now. Charm or Paralyze the Festerboil, kill the others, then focus fire the Festerboil down.

3. Bookshelf. There isn't anything important here. Just a joke spot.

4. Bookshelf. Click it for the Tome of the Spider (Critical Item). LOOK at it to read some ritual lore. You can give this book to Gorlo in the Crowl Archives for some experience and unlock him as a potential recruit.


POTENTIAL LOOT
Event 4. Bookshelf: Tome of the Spider (Critical Item)

1. Treasure Chest (Minor Lock Level III)
Weapons: Shortsword, Longsword, Bast(Steam Censored)ard Sword, Poison Dagger, Cat 'O 'Nine Tails, Bullwhip
Instruments: Lyre of Slumber, Muting Lyre, Swaying Lute (Charm)
Thrown/Ammo: Lead Ball, Poison Dart, Feather Dart, Throwing Knive, Flute of Chaos
Armor: Phrygian Cone, Leather Helm, Flannel Shirt, Leather Jerkin, Silk Robe, Cotton Cloak, Flannel Pants, Leather Pants, Sandals
Ring: Ring Pro Frost
Staff/Rod: Stave of Missles
Scroll: True North, Detect Secret, Identify
Spellbook: Identify, Charm, Bless, Detect Secret, Direction
Consumables: Cure Lt. Condition, Bag of Slumber, Bag of Sparkles, Nausea Powder, Nematic Dust, Rock Salts, Red Pepper, Pilgrim Tea, Cherry Wine, Leg of Ham, Oatmeal Cookie
Other: Cobalt Sapphire, Silver Spoon
*Seems like the loot from this chest draws from the same table as most of the Treasure Chests in the Avian Mountains.

Very rarely (as of the patch I am testing this on) you can get a Perk Key or Common Gate Key drop after battles in this area.


ENEMIES
Amoebic Slime - Susceptible to Sleep, Charm
Toxic Amoeba - Susceptible to Sleep, Nausea, Confuse, Fear, Paralyze
Cophrophages - Can Disease. Susceptible to Sleep, Charm
Flesh Grubs - Can Disease. Susceptible to Sleep, Charm
Festerboil - Can Irritate and Disease. Susceptible to Sleep, Charm
Vampire Bat - Susceptible to Sleep, Charm, Confuse, Paralyze, Fear
Cenotaph Vault
You need the Dead Rat from the Catacombs to progress on this floor.


1. Dry Well. Filled with Rats and a corpse. Click the well to find the Bane of Hobknob (Critical Item) in the hands of the corpse there (Dartagnan).

2. Skull Gate. Opened by answering the Stone Face's question correctly(#3). Cannot use Pick Lock.

3. Stone Face. He asks you a question, the answer of which can be found if you thoroughly talked to Gorlo back in Crowl Archives. Type ESOPH to open the Skull Gate to the left/west.

4. Suspended Cocoon. Touch it to be given three choices. Choose "Cut the cocoon free of web" to reveal Junga Din, a friendly NPC. You can talk to him, recruit him, or leave (EXIT) immediately. No matter what you choose to do, even if you anger him on purpose, he will give you the Spirit Goblet (Critical Item), so you cannot miss it. You can steal it as well. He cannot be found at this exact spot again after he leaves, but he will be a random encounter on this floor afterward. He tends to favor the tile two steps south of the shortcut gate after you come up from the Pit of Hobknob.

5. Altar. You might want to Save before you do this: Put the Dead Rat you picked up in the Catacombs into the alcove. Then use the Bane of Hobknob you got from the Well on the Alcove. You will fall into the to Pit of Hobknob. Do not discard the Bane of Hobknob (via Configuration > Critical Item Lock > Never). You will need it later in the game.

6. Lever. Opens the nearby Skull Gate(#7).

7. Skull Gate. Opens with the nearby lever(#6). Cannot use Pick Lock.

8. Lever. Unlocks the Skull Gate to the northwest(#9).

9. Skull Gate. Unlocks with the lever to the southeast(#8). Cannot use Pick Lock.

10. Stone Face. He asks for a drink. Use the Spirit Goblet on it to open the nearby Skull Gate(#11). The Goblet does not disappear.

11. Skull Gate. Unlocks by giving the nearby Stone Face the Spirit Goblet(#10). Cannot use Pick Lock.


NPC KEYWORDS
Junga Din (Recruitable, Random encounter after first meeting): Arachnid/Spider, Bridge/Chasm/Gorge, (Black) Lich, Hobknob, Samhain, (Spirit) Goblet, Dartagnan, Apprentice, Where (is) Dartagnan, Where (is) Hobknob, Where (is) Lich


POTENTIAL LOOT
EVENT 1. Dry Well: Bane of Hobknob (Critical Item)

EVENT 4. Cocoon/Junga Din: Spirit Goblet (Critical Item)

1. Shallow Water: Vending Tokens


ENEMIES
Giant Rat - Susceptible to Sleep, Charm
Flesh Grubs - Can Disease. Susceptible to Sleep, Charm
Black Bats - Can Disease. Susceptible to Sleep, Charm, Shrill Sound
Toxic Amoeba - Susceptible to Sleep, Nausea, Confuse, Fear, Paralyze
Xombi - Susceptible to Sleep, Charm, Paralyze, Fear
Pit of Hobknob


Hobknob is a random boss encounter on this floor. You might want to cast the Armorplate spell if you have it, before you start walking around. Hobknob has a lot of HP, hits very hard multiple times, can Drain HP from your characters and heal himself, and can also summon Attercobs into the battle. That said, he is weak to many status effects, so the battle is easily controlled if you can survive the first turn and land some on him. I suggest Charm or Paralyze. Unlike with the Canopic Jar, do not try to use the Bane of Hobknob (it Fears the user).

1. Landing Point from the Cenotaph Vault. You cannot return this way.

2. Missing Expedition Force. Search their remains to get the Seahorse Signet (Critical Item). This is the proof you need at Mantor Garrison back in Village of Crowl.

The other skeletons in the area all have little bits of text, but it's nothing important.

The map of Samhain Gorge (when it is done) can be found in the Samhain section, below the Eerie Wastes section.


POTENTIAL LOOT
EVENT 2. Skeletons: Seahorse Signet (Critical Item)

1. Shallow Water: Vending Tokens

2. Treasure Chest (Minor Lock Level V)
Staff/Rods: Fizzlesticks
Scrolls: True North
Consumables: Cure Heavy Wounds, Cure Lt. Condition, Neutralize Poison, True Seeing*, Poison Dust
*Most of this loot seems static. Sometimes you don't get the True Seeing Potion.

Very rarely (as of the patch I am testing this on) you can get a Perk Key drop after battles in this area.


ENEMIES
Flesh Grubs - Can Disease. Susceptible to Sleep, Charm
Terrormites - Susceptible to Sleep, Charm, Confuse, Nausea, Paralyze, Fear
Cophrophages - Can Disease. Susceptible to Sleep, Charm
Stinkbug - Can Poison. Susceptible to Sleep, Charm
Fire Beetle - Can Irritate. Has a Fire Based Breath. Susceptible to Sleep, Charm
Tarantula - Susceptible to Sleep, Charm, Confuse, Nausea, Fear, Paralyze
Attercob - Susceptible to Sleep, Charm, Confuse, Irritate.
Hobknob - Can Drain HP and summon Attercobs. Susceptible to Sleep, Charm, Confusion, Nausea, Fear, Insanity, Paralyze.
Inner Sanctum


1. Black Lich, accompanied by Xombis and/or Giant Rats. You might want to cast Armorplate, Magic Screen, and Enchanted Blade before the battle if you have them. He has quite a bit of HP, some magic resistance, casts magic, can Drain your character's HP, and force them to Dance which causes Insanity. The Black Lich loves to retreat behind his minions at the end of the turn, so you may have to take out the extra enemies before you can reach him with your physical fighters. He is immune to some, but not all Insanity effects (you can make him Dance) and Poison, and can break Paralysis fairly quickly, but he is susceptible to Silence (bugged in the patches I tested on), Sleep, Charm, Confuse, Fear and Irritation. Hold Undead also works well. It might be that I was just really lucky every time I tried it, but the Lich seems very easy to knock unconscious so you might want to equip Lead Balls, use blunt weapons, or even Summon Undead to take advantage of that. When you defeat the Black Lich he will drop Necrostaff (can be used to increase Captain Krone's mood), Ring Pro Magic, and Blood Tamarinde.

2. Glowing Light Dance Party. It might act like the one in the Shrine Subterranea and lessen the duration/effect of status effects every time you step on it, but I have not had any status effects on my characters every time I have come down here so I have not tested it yet.

3. Energixing Fountain. Refills magic when characters drink it.

4. Lever and Skull Door. The lever opens up the Skull Door. You cannot use Pick Lock on it.

5. Hidden Alcove. Touch a pressable brick on the south wall to reveal an Alcove, then touch the Skeleton inside to take Mistral's Letter (Critical Item) and Monk's Bones (Critical Item). LOOK at the letter to reveal that the next step in this questline is to take the bones to Crusader Temple in Village of Crowl, or more specifically you want to put the Bones in Mistral's Alcove, which is in Crypt of Monks, which is in the Catacombs. Another way you can do it is cast a Raise Dead spell on the bones (Caduceus of Life does not work, but a Raise Dead Scroll does), which also gives you the opportunity to recruit him (he has a great spell selection). Either way, you will get The Key of Saints (Critical Item), which opens a door in the Tomb of Saint George.


NPC KEYWORDS
Mistral (Recruitable, You can talk to this NPC if/when you raise him from the dead, wherever you choose to resurrect him) - Esoph, Key, (Black) Lich, Eldritch (Unlocks that magic type)


POTENTIAL LOOT
EVENT 1. Black Lich: Necrostaff, Ring Pro Magic, Blood Tamarinde

EVENT 5. Hidden Alcove: Mistral's Letter (Critical Item) and Monk's Bones (Critical Item).


Treasure Chest (Major Lock Level VI):
Weapon: Bone Dagger
Thrown/Ammo: Stone Bullets, Undead Warder
Armor: Death Mask
Ring: Ring of Smiting
Scrolls: Magic Screen
Spellbook: Fire Shield, Remove Curse
Consumable: True Seeing
*The items in this chest seem static.


ENEMIES
Giant Rat - Susceptible to Sleep, Charm
Xombi - Susceptible to Sleep, Charm, Paralyze, Fear
Black Lich - Can Drains HP and force your characters to Dance. Susceptible to Silence, Sleep, Charm, Confuse, Fear, Irritation
Tomb of Saint George
You need the Key of Saints, given to you by Mistral to pass the Skull Gate.


1. Locked Door. Minor Lock Level IV.

2. Curative Fountain. Seems to be infinite use.

3. Decorative Relief. LOOK at it to reveal that it is a map showing Saint George's path. He had found the way to Samhain through the northwest corner of the Gardens of Midknight, which is the Cenotaph of the Black Lich. The game will fill in your map for this area.

4. Locked Skull Door. Opened with the Key of Saints which you can receive from Mistral in two different ways. You cannot use Pick Lock.

5. Saint George's Skeleton. Click on it after the initial lore for a little more information and a hint that a special sword exists.

6. Strange Fountain. Drains the Vitality of any character that drinks from it.

The Mosiacs on the walls, both before and after the Skull Gate, not listed above depict several things:
Saint George's coat of arms, which is an upright sword and a harp between two battling chimera.
What looks like a decorative relief, but is actually a map of the path of Saint George.
A dying knight being carried away from battle and into a tomb.
A knight battling a monster armed only with a sword and shield.
A knight using a holy symbol to drive a creature into a cave.
A group of men sealing a cave with a shadowy beast inside.

A knight feeding a monster with his own blood.
A knight worshipping an abomination.


Despite the warning, there seems to be no consequences to leaving your shoes on, and no benefit to taking them off.


POTENTIAL LOOT
1. Shallow Water: Vending Token


ENEMIES
Giant Rat - Susceptible to Sleep, Charm
Earwhiggs - Susceptible to Sleep, Charm
Flesh Grubs - Can Disease. Susceptible to Sleep, Charm
Cophrophages - Can Disease. Susceptible to Sleep, Charm
The Eyrie


1. Sir Coffergus. He always seems to be be in this spot when you first come to the Eyrie. After that he wanders around as a random encounter, but he still likes to show up in this spot. Exit and reenter the Eyrie or rest several times and wander around when you want to meet him again. Give him the Amulet Astrixus to complete his quest for 300 exp per character in the party and the ability to recruit him. He will give you the Knightly Catechism and the Amulet Astrixus upon joining. You can also show him the Encoded Catechism you can find in Samhain Mausoleum to turn it into a Knightly Catechism.

2. Paving Stones with Dark Brown Clay. LOOK at this spot for the Amulet Astrixus (Critical Item). This is what Sir Coffergus is looking for.

3. Nest. Once you have the Mechano Owl (See Museum of Magic for more information on how to make it), place it onto the Nest and it will fly away. I am not sure how much in game time must pass (you can continue exploring or Rest), but eventually the Mechano Owl will return to you, no matter where you are, give you Key of the Exemplar and a hint: L-A-C-H-E-S-I-S.

4. Treasure Chest. Open it for an Avian Helm (Critical Item). This spot is also a Safe Haven.

5. Dark Circle. Equip the Avian Helm to someone in your party, then Rest (you can interrupt it to make it faster). You will be teleported to the The Wizard's Sky Barge (optional area) and receive 1000 exp per party member.


NPC KEYWORDS
Sir Coffergus (Random encounter, Recruitable) - Eyrie, Quest, Amulet / Astrixus, Catechism
*High Diplomacy or Charm will get more information out of him.
**You can steal a Knightly Catechism (Critical Item) from him, which bypasses some tasks/recruitment for hints to a puzzle. You do not need the book if you know the answer. Looking at the book reveals a hint: "Courage," "Humility," "Devotion," "Sobriety," "Honesty," "Loyalty," "Duty." He does not mind if you show him the stolen book.
***You can steal the Amulet Astrixus back after you finish his quest. He does not mind if you show it to him after it is stolen.


POTENTIAL LOOT
EVENT 2. Paving Stones with Dark Brown Clay: Amulet Astrixus (Critical Item)

EVENT 4. Treasure Chest: Avian Helm (Critical Item)

1. Shallow Water: Vending Token


ENEMIES
Stinkbug - Can Poison. Susceptible to Sleep, Charm
Fire Beetle - Can Irritate. Has a Fire based Breath. Susceptible to Sleep, Charm
Electromaggot - Can deal magic damage. Susceptible to Sleep, Charm, Confuse, Nausea, Fear, Paralyze
Mudwasp - Can Irritate. Susceptible to Sleep, Charm
Blood Leech - Can Drain Vitality. Susceptible to Sleep, Charm, Fear, Nausea, Confuse, Paralysis, Dancing
Dragonfly - Can Instantly Kill. Susceptible to Charm, Confuse, Fear, Paralyze
Condor - Susceptible to Sleep, Charm, Confuse, Nausea, Fear, Insanity, Paralyze
Raptor Grotto


1. Giant Nest. Touch the Nest to get a Cosmic Egg (Critical Item). You might remember a reference to "Cosmic" in the Catacombs. which is a hint that this item relates to that puzzle. If you LOOK at the egg the description says that it is seemingly impenetrable, which is a hint that you need to use the Crusher in Deepsink project to open it.

2. Tub of Bad Waters. Petrifies anyone who drinks from it.

3. Skeleton. LOOK at it to get a Ring of Swordsmen. It gives 12 AGI and 12 Swordsmanship to whoever equips it, but it is a cursed item. This spot is bugged, so even if you take the ring Detect Secret will still detect something is there, but you cannot get anything else from this spot.

As far as I know you can't do anything with the dangling chains.

The hall that looks like an exit in the southeast portion of the map is actually a dead end.


POTENTIAL LOOT
EVENT 1. Giant Nest: Cosmic Egg (Critical Item)

EVENT 3. Skeleton: Ring of Swordsmen.

1. Treasure Chest
Weapons: Shortbow
Thrown/Ammo: Barbed Arrows
Armor: Phrygian Cone, Leather Helm, Leather Gloves
Spellbooks: Magic Bells, Leaping Sparks*
*The loot in this chest is static, except you will sometimes not get the Leaping Sparks Spellbook.

2. Dead End: Rock Salts

3. Treasure Chest (Major Lock Level VI)
Weapons: Shortsword, Longsword, Bone Dagger, Poison Dagger, Truncheon, Lance, Pole Fork, Cat 'O 'Nine Tails, Bullwhip, Quarterstaff
Shields: Wooden Buckler
Instruments: Lyre of Slumber, Muting Lyre, Lethe Harp, Hotfoot Banjo
Thown/Ammo: Flute of Chaos, Stone Bullets, Poison Dart, Feather Dart, Throwing Knive
Armor: Phrygian Cone, Leather Helm, Leather Vestment, Leather Helm, Silk Robe, Flannel Shirt, Leather Jerkin, Leather Armor, Leather Pants, Sandals, Spiked Bracer
Rings: Ring Pro Fire, Ring Pro Frost, Ring Pro Magic
Staff/Rods: Stun Rod, Stave of Missles, Torpedo Rod, Caduceus of Healing
Scrolls: Detect Magic, Detect Secret, Identify
Spellbooks: Bless, Healing, Detect Secret, Armor Shield (Armorplate), Charm, Wizard's Eye, Identify
Consumables: Cure Lt. Wounds, Cure Lt. Condition, True Seeing, Stink Bomb, Bag of Sparkles, Bag of Chuckles, Bag of Whispers, Nematic Dust, Rock Salts, Red Pepper, Spoiled Rations, Iron Rations, Oatmeal Cookie, Leg of Ham, Lethe Liqeur, Cherry Wine
Other: Cobalt Sapphire, Silver Spoon

Very rarely (as of the patch I am testing this on) you can get a Perk Key drop after battles in this area.


ENEMIES
Amoebic Slime - Susceptible to Sleep, Charm
Mudwasp - Can Irritate. Susceptible to Sleep, Charm
Black Bats - Can Disease. Susceptible to Sleep, Charm, Shrill Sound
Giant Bat - Can Drain Vit/Sleep. Susceptible to Sleep, Charm, Shrill Sound
Toadstool - Susceptible to Sleep, Charm
Oreworm - Can Irritate and Destroy Weapons. Susceptible to Sleep, Charm, Nausea, Confuse (some resistance against it), Fear, Paralyze
The Wizard's Sky Barge
See The Eyrie for information on how to get to this area.


1. Landing point from the Eyrie. You cannot return from this spot.

2. Library. Nothing important here. Just some lore, jokes, and journal entries.

3. Displacer. It is strong and has multiple attacks, a lot of HP, can use Blink (a.k.a. Flickers Out, as one would expect a Displacer Beast to do), and can Paralyze your party members, but it is also weak to a lot of controlling status affects. Inflict it with some and go to town on it. Casting Armorplate beforehand, if you have it, can help protect your party before you set up your status effects.

4. Wizard of Worrfair. They can cast various spells and drink Invisibility Potions. Cast Magic Screen beforehand, if you have it, to protect you while you inflict your usual status effects. then poke him to death. Even though you can inflict Silence, it doesn't actually stop them from casting spells successfully, so it is best to use something else, like Charm or Paralyze. After the battle is over you will be well rewarded with a Red Phyrgian Cap, Blood Shawl, Blood Tunic, Blood Robes, Firestorm Spellbook, Divination Spellbook, Magic Missle Spellbook, and a Faerie Staff.

5. Magic Sack. Pick it up from the ground and put it in your inventory (the brown square to the right of the Inventory Scroll). You can place "magic" items in it, such as Wands, Rods, and Potions, similar to how you can place scrolls into a Ivory Scrollcase, and it really helps organize your inventory.

6. Warp Tile back down to The Eyrie (Landing at EVENT 5).

What looks like open doors that lead into nothing are actually giant windows. Pointing your party toward them will give you some extra lore bits. One of the smaller inner windows (east looking west) gives you a hint that someone is in the central area.

There are some books in the Library (northwest corner, west shelf) that say that they are written in an Ancient Language. I was unable to translate them with every party I have brought here, so either they can never be translated or 70 Ancient History is not enough.


POTENTIAL LOOT
EVENT 4. Wizard of Worrfair
Armor: Red Phyrgian Cap, Blood Shawl, Blood Tunic, Blood Robes
Staff/Rods: Faerie Staff
Spellbooks: Firestorm, Divination, Magic Missle

EVENT 5. Magic Sack

Treasure Chest (Minor Lock Level V)
Weapons: Gauche, Pole Fork, Lance, Quarterstaff, Bone Dagger, Truncheon, Battle Axe, Duckbill, Bipennis
Shields: Wooden Buckler
Instruments: Muting Lyre, Lethe Harp, Hotfoot Banjo, Cacaphony Harp (Confusion)
Thrown/Ammo: Piercer Arrow, Barbed Arrows, Throwing Knive, Needle Darts, Feather Darts
Armor: Leather Hood, Leather Vestment, Mail Coif, Wizard Cap, Flannel Shirt, Leather Armor, Spiked Bracer, Sandals
Accessories: Ring Pro Fire, Ring Pro Frost, Ring Pro Magic, Amulet of Might
Staff/Rods: Stave of Missiles, Torpedo Rod, Sparkler Rod, Wand of Webs, Stun Rod, Caduceus of Life, Caduceus of Healing
Scrolls: Divination, Detect Magic, Magic Missle, Knock Knock
Spellbooks: Bless, Healing, Armor Shield (Armorplate), Wizard's Eye, Fire Shield, Knock Knock, Magic Bells
Consumables: Cure Lt. Wounds, Cure Heavy Wounds, Remove Curse, True Seeing, Neutralize Poison, Baldercake, Spoiled Rations, Iron Rations, Cherry Wine, Lethe Liqeur, Rock Salts, Bag of Sparkles, Bag of Whispers, Bag of Chuckles
Other: Cobalt Sapphire, Soothing Stone, Vending Tokens


ENEMIES
Stinkbug - Can Poison. Susceptible to Sleep, Charm
Fire Beetle - Can Irritate. Has a Fire based Breath. Susceptible to Sleep, Charm
Terrormites - Susceptible to Sleep, Charm, Confuse, Nausea, Paralyze, Fear
Displacer - Can Paralyze. Susceptible to Sleep, Charm, Confuse, Nausea, Fear, Insanity, Paralyze
Wizard of Worrfair - Susceptible to Silence(Bugged. Don't use it.), Charm, Confuse, Nausea, Fear, Insanity, Paralyze
EERIE WASTES SECTION
Eerie Wastes starts in the Eerie Wastes map... which is the only map in this section. Honestly, I am a tad disappointed and feel like I am missing something. Like the other starting points, if you want to make things easier recruit Raghilda at the Wayfarer's Inn once you warp to Village of Crowl, then go to Briarpatch Woods from there and recruit Little Rosy (Random Encounter).
Eerie Wastes


1. Skeleton. After the flavor text is finished, touch the Skeleton to pick up the Skull of Hathor Sogg.

2. Warp Tile. Takes you to the Village of Crowl, two steps west of the Garrison.


You can only explore this map if you choose the Eerie Wastes as your starter zone.
Once you leave I don't think you can return, so do not forget your Skull.


ENEMIES
Cophrophages - Can Disease. Susceptible to Sleep, Charm
Flesh Grubs - Can Disease. Susceptible to Sleep, Charm
Black Bats - Can Disease. Susceptible to Sleep, Charm, Shrill Sound
Giant Bat - Can Drain Vit/Sleep. Susceptible to Sleep, Charm, Shrill Sound
Toadstool - Susceptible to Sleep, Charm
SAMHAIN SECTION
Because Samhain is so large I am putting it in its own section here. It is still part of the Avian Mountains and I consider it an early game zone.
Samhain Gorge
You can reach this area through the Pit of Hobknob in the Cenotaph of the Black Lich.


1. Fluoroscopy Dial. Click the dial to change the symbol it points to, to give you a different effect when touching the nearby Orb(#2). Moon is the proper setting, and will give you a Wizard's Eye view of the floor as well as fill in your map. For the others: Sun = Nothing, Lightning = Causes Nausea, Star = Casues Blindness.

2. Orb on a pedastal. Touch the orb after changing the dial(#1) for an effect. See the dial settings above for the effects.

3. Skull Gate. Unlocked with a lever inside the room it closes off(#4). Cannot be picked.

4. Lever. Opens the nearby Skull Gate(#5)

5. Spot where there used to be a bridge. Aquire the Stepping Stones in Deepsink Project and come back to this spot. The next bit can be confusing, since it flies in the face of how you've probably been using items so far: Choose any character and set their action (circle button) to USE (Flexing arm holding a hammer Icon). Next, pick up the Stepping Stones from your inventory and place them onto the USE Icon to create a bridge across the chasm.

The black squares on the map are all Pit Traps. The game will warn you when you step close, but if you step into them you will die.

The tiles with the little black stars only show up after you have properly used the Stepping Stones.

I have not yet found a way to reach those three tiles surrounded by Pit Traps to complete the map, if it is even possible to get to them.


ENEMIES
Black Bats - Can Disease. Susceptible to Sleep, Charm, Shrill Sound
Giant Bat - Can Drain Vit/Sleep. Susceptible to Sleep, Charm, Shrill Sound
Attercob - Susceptible to Sleep, Charm, Confuse, Irritate.
Tarantula - Susceptible to Sleep, Charm, Confuse, Nausea, Fear, Paralyze
Oreworm - Can Irritate and Destroy Weapons. Susceptible to Sleep, Charm, Nausea, Confuse (some resistance against it), Fear, Paralyze
Ukluk Mining Company


1. Refreshing Fountian. Restores Vitality to any character that drinks from it. Seems it is infinite use.

2. Lever. Makes a flushing sound. Pretty sure that is all it does.

3. Refreshing Fountian. Restores Vitality to any character that drinks from it. Seems it is infinite use.

4. Lever. Makes a flushing sound. Pretty sure that is all it does.

5. Refreshing Fountian. Restores Vitality to any character that drinks from it. Seems it is infinite use.

6. Lever. Using the lever dumps you into Cistern Zero.

7. Debris. LOOK at it to receive a Broken Harness (Critical Item), with a descritpion of how it needs a new Linchpin. If you use the Harness on the chain in this state you will die.

8. Specialty Parts Chest. Minor Lock Level III. Contains a Linchpin (Critical Item). Sometimes taking this item crashes the game, so save beforehand. With both the Broken Harness and the Linchpin in your possession, open the Item Workshop, click both items to get them in the upper left hand corner slots, then select the Linchpin. Click Merge Items to combine them into an Outrigger Harness (Critical Item). Take the item to the Chain and Cable (#12).

9. Iron Plaque. A hint to make sure you check and fix the Harness before you use it.

10. Wooden Wall. LOOK at the wall to get rid of it.

11. Skull Gate. LOOK at the gate for a clue on how to unlock it. Use the King's Crest, found in Aquavia, on the Gate to open it. You get to keep the Crest. If you have already combined the King's Crest with the Royal Seal you cannot open this gate, but that won't effect your ability to get out of the mountains. If you stole the Royal Seal and put combining it on hold to 100% this map, you can safely combine the two items after you have unlocked the Gate. The Gate cannot be picked.

12. Chain/Cable. Use the Outrigger Harness on the chain to cross the gap. You keep the Outrigger Harness after use. Using the Broken Harness will result in death.

13. Chain/Cable. Use the Outrigger Harness on the chain to cross the gap. You keep the Outrigger Harness after use. Using the Broken Harness will result in death.

14. Lantern. Click the pushable brick on the south wall to turn on a projection of Leraus Stonecutter, which will fill you in on what happened here, as well as a hint about the two halves of the seal (King's Crest and Royal Seal). After the lengthy loredump, look at the alcove in the west wall and open the Treasure Chest for a Letter of Marque (Critical Item). This is what Smithers is looking for.

The red square is lava. Standing on it does damage to the entire party.

There is an un-clickable/LOOK-able sign next to the Skull Gate(#7). Probably a bug with the version I am playing on.

The black squares marking the Pit Traps were added by me to make them easier to reference. They are not on the in-game map.


POTENTIAL LOOT
EVENT 7. Debris: Broken Harness (Critical Item)

EVENT 8. Specialty Parts Chest (Minor Lock Level III): Linchpin (Critical Item).
*Sometimes taking this item crashes the game. Save beforehand.

EVENT 14. Treasure Chest: Letter of Marque (Critical Item)

1. Barrel
Consumables: Cure Lt. Wounds, Cure Lt. Condition, Nausea Powder, Nematic Dust, Rock Salts, Red Pepper, Leg of Ham, Oatmeal Cookie, Pilgrim Tea, Cherry Wine, Lethe Liqeur.
Other: Silver Spoon
*I can't be 100% sure, but it looks like this Barrel pulls from the same pool as the other Barrels.

2. Treasure Chest (Minor Lock Level III):
Thrown/Ammo: Needle Darts
Armor: Leather Armor, Ringmail
Accessory: "Pride of The Mines"*, Ring of Protection
Scrolls: True North*
Consumables: Cure Lt. Wounds, Nematic Dust*, Spoiled Rations*, Cherry Wine*, Locksmith's Glue, Scrying Crystal
Other: Blood Ruby*, Jade Cornet*, Gold Leaf
*Marked items seem to always be there. Everything else is randomized.

3. Barrel
Consumables: Cure Lt. Wounds, Cure Lt. Condition, Stink Bomb, Nematic Dust, Nausea Powder, Rock Salts, Red Pepper, Pilgrim Tea, Cherry Wine, Lethe Liqeur, Spoiled Rations, Oatmeal Cookie, Leg of Ham
Other: Silver Spoon
*I can't be 100% sure, but it looks like this Barrel pulls from the same pool as the other Barrels.

4, Barrel
Consumables: Cure Lt. Wounds, Cure Lt. Condition, True Seeing, Stink Bomb, Nematic Dust, Rock Salts, Red Pepper, Cherry Wine, Lethe Liqeur, Oatmeal Cookie, Iron Rations, Leg of Ham
Other: Silver Spoon
*I can't be 100% sure, but it looks like this Barrel pulls from the same pool as the other Barrels.

5. Bed: Cobalt Sapphire.

Very rarely (as of the patch I am testing this on) you can get a Perk Key drop after battles in this area.


ENEMIES
Packrat - Susceptible to Sleep, Charm
Giant Rat - Susceptible to Sleep, Charm
Mudwasp - Can Irritate. Susceptible to Sleep, Charm
Black Bats - Can Disease. Susceptible to Sleep, Charm, Shrill Sound
Flesh Grubs - Can Disease. Susceptible to Sleep, Charm
Terrormites - Susceptible to Sleep, Charm, Confuse, Nausea, Paralyze, Fear
Mad Miners - Susceptible to Sleep, Charm, Confusion, Nausea, Fear, Insantity, Paralysis
Blood Leech - Can Drain Vitality. Susceptible to Sleep, Charm, Fear, Nausea, Confuse, Paralysis, Dancing
Oreworm - Can Irritate and Destroy Weapons. Susceptible to Sleep, Charm, Nausea, Confuse (some resistance against it), Fear, Paralyze
Wrokwyrm - Susceptible to Sleep, Charm, Nausea, Confuse, Fear, Paralyze
Skinkasaur - Susceptible to Sleep, Charm, Confuse, Insanity, Paralyze, Fear
Cistern Zero


1. Landing spot from Ukluk Mining Company.


POTENTIAL LOOT
Very rarely (as of the patch I am testing this on) you can get a Perk Key drop after battles in this area.


ENEMIES
Cophrophages - Can Disease. Susceptible to Sleep, Charm
Amoebic Slime - Susceptible to Sleep, Charm
Toxic Amoeba - Susceptible to Sleep, Nausea, Confuse, Fear, Paralyze
Flesh Grubs - Can Disease. Susceptible to Sleep, Charm
Toadstool - Susceptible to Sleep, Charm
Festerboil - Can Irritate and Disease. Susceptible to Sleep, Charm
Blood Leech - Can Drain Vitality. Susceptible to Sleep, Charm, Fear, Nausea, Confuse, Paralysis, Dancing
Deepsink Project
You can save some time if you have the Cosmic Egg from Raptor Grotto before you explore this area.


1. Wall Plaque. A hint that this floor is a giant Dark Zone. It mentions Infravision, but I was unable to find any item or spell that will allow you to be able to see. Use your Map and the sound of your characters hitting walls to traverse the area. Detect Secret and high Scout Skill can also help out, and your cursor will still change if it is over something you can interact with. You will probably want to save frequently, due to the Poison Gas traps. One more thing to note is that the hidden wall to the north of this tile can only be opened from the other side.

2. Purifying Fountain and Combination to the Crusher Room. The combination to the Crusher Room is three bolts. The fountain seem to be infinite use.

3. Deepsink Ore Vein. Click it to get Deepsink Ore (Critical Item).

4. Lever. Opens the southwest Skull Gate(#5).

5. Skull Gate. Opens with the northern lever(#4). Cannot be picked.

6. Lever. Will not move unless the correct combination is on the nearby dials(#6). Opens the eastern Skull Gate(#11).

7. Three Dials. The correct combination is found on the plaque next to the Fountain(#7). Set all three dials to the Bolt symbol.

8. Poison Gas. As expected, it Poisons your entire party. Walk around it. As a side note, the "Pride of the Mines" Accessory, found in Ukluk Mining Company, has TOX100 and prevents Poison on the character who equips it. Doesn't help eveyone else though.

9. Poison Gas. As expected, it Poisons your entire party. Walk around it. As a side note, the "Pride of the Mines" Accessory, found in Ukluk Mining Company, has TOX100 and prevents Poison on the character who equips it. Doesn't help eveyone else though.

10. Pushable Brick. Press it on the south wall to unlock a shortcut. It can only be opened from the north side.

11. Skull Gate. Opened with the southwest lever if the correct combinatioon is used(#6).
Cannot be picked.

12. Crusher Alcove and Lever. There are two things you need to do here. First, make sure the lever is in the upright position. Place the Deepsink Ore inside the Alcove to get Stepping Stones (Critical Item). You need to take these Stones to where the old bridge was in Samhain Gorge. Next, click the lever into the upright position again and place the nigh-indestructible Cosmic Egg, found in Raptor Grotto, into the Alcove to get the Cosmic Egg Yolk (Critical Item). If you already have the Jeweled Egg, found in the Museum of Magic, go to the Item Workshop menu and combine it with the Yolk to get the Mechano Egg (Critical Item). You need to take the new egg back to the Museum of Magic at some point.

13. Powder. Detect Secret goes off on this tile, but when you LOOK at it you get nothing but a description and the alert goes away.


POTENTIAL LOOT
EVENT 6. Deepsink Ore Vein: Deepsink Ore (Critical Item)


ENEMIES
Amoebic Slime - Susceptible to Sleep, Charm
Black Bats - Can Disease. Susceptible to Sleep, Charm, Shrill Sound
Giant Bat - Can Drain Vit/Sleep. Susceptible to Sleep, Charm, Shrill Sound
Toadstool - Susceptible to Sleep, Charm
Mad Miners - Susceptible to Sleep, Charm, Confusion, Nausea, Fear, Insantity, Paralysis
Great Hall of Samhain
You need the Royal Seal of Loogmar to explore this area.


1. Skull Gate. The hint on how to unlock this door is given in Smithers' questline, but you do not have to do it to open it. Use the Royal Seal of Loogmar on the door, which you get by combining King's Crest (found in Aquavia) and Royal Seal (Smithers has it) with the Item Workshop (central button in any character's portrait area). The Royal Seal of Loogmar disappears, but the Gate will open.

2. Orb on a pedestal. You can toggle the light by clicking on it. It must be toggled on to be able to activate the Stone Menhir a.k.a. Monolith(#4) later in the game

3. Orb on a pedestal. You can toggle the light by clicking on it. It must be toggled on to be able to activate the Stone Menhir a.k.a. Monolith(#4) later in the game

4. Stone Menhir. Spoilers for things past early game: Activate all five "Orb on a Pedestals" on this floor, then touch the Moongate Crystal to the Runes on the Monolith to teleport to Ramparts of Moravia.You are also warped back to this spot using the same method on the Monolith in Ramparts of Moravia.You can get the Moongate Crystal from Green Mandarin in Celestial Watchtower, which can be reached through Kublai Axis.

5. Orb on a pedestal. You can toggle the light by clicking on it. It must be toggled on to be able to activate the Stone Menhir a.k.a. Monolith(#4) later in the game

6. Orb on a pedestal. You can toggle the light by clicking on it. It must be toggled on to be able to activate the Stone Menhir a.k.a. Monolith(#4) later in the game

7. ACME Vending Machine

8. Orb on a pedestal. You can toggle the light by clicking on it. It must be toggled on to be able to activate the Stone Menhir a.k.a. Monolith(#4) later in the game

9. Black Stewpot. Clicking on it gives you a hint on what to do. Use the Glass Vial on the Pot to obtain Rotgut Tincture (Critical Item).

10. Blackened Corner. First you have to fight a Xombi. After the battle you can take the Glass Vial (Critical Item). This is what you need to obtain the liquid in the Black Stewpot.

11. Circle of Salt (Black Circle). Sleeping on this spot gives some optional flavor text.

12. Pressable Brick. Press it to reveal an Alcove with a Skeleton. Touch the skeleton for some items, including a Clutcher Talon.

13. Samhain Oracle. Place items onto the bowl in the statues hands to have them (improved) Identified. It can identify 25 items before running out of charges, and items that have already been fully identified before being placed into the bowl count toward those charges. As a side note, it cannot ID the Lethe Harp for some reason (not that you would need to).

14. Skull Gate and Rusted Chain. Touch the chain for a hint about what to do. Use the Rotgut Tincture on the Chain to remove the rust, then pull the Chain to open the Gate.


POTENTIAL LOOT
EVENT 8. Blackened Corner: Glass Vial (Critical Item)

EVENT 12. Skeleton:
Instument: Muting Lyre
Staff/Rods: Fizzlestick, Torpedo Rod, Ice Wand
Other: Clutcher Talon
*These items seem to be static.


SHOPS
ACME Vending Machine
Scrolls: Divination (4 tokens), Magic Moth (9 tokens), True North (2 tokens), Locate Item (6 tokens)
Consumable: Remove Curse (3 tokens), Stink Bomb (2 tokens), True Seeing (3 tokens), Evil Off (6 tokens), Wonder Adhesive (3 tokens), Crimson Ambrosia (4 tokens), Iron Rations (1 token), Galen Apple (1 token), Baldercake (1 token), Invisibility (9 tokens)
Other: Luck Stone (6 tokens), Silver Spoon (1 token)


ENEMIES
Amoebic Slime - Susceptible to Sleep, Charm
Xombi - Susceptible to Sleep, Charm, Confuse, Paralyze, Fear
Wrokwyrm - Susceptible to Sleep, Charm, Nausea, Confuse, Fear, Paralyze
Tarantula - Susceptible to Sleep, Charm, Confuse, Nausea, Fear, Paralyze
Mad Miners - Susceptible to Sleep, Charm, Confusion, Nausea, Fear, Insantity, Paralysis
Miner '49er - Susceptible to Sleep, Charm, Confuse, Nausea, Fear, Insanity, Paralyze
Oreworm - Can Irritate and Destroy Weapons. Susceptible to Sleep, Charm, Nausea, Confuse (some resistance against it), Fear, Paralyze
Samhain Mausoleum - Map and Events


1. Lever. Touching this lever can effect the others nearby. From the default positions, flip this lever and the one to its left to the up postion to unlock a Skull Gate(#5).

2. Lever. Touching this lever can effect the others nearby. From the default positions, flip this lever and the one to its right to the up postion to unlock a Skull Gate(#5).

3. Lever. Touching this lever can effect the others nearby. If you follow the instructions for levers #1 and #2 this lever will automatically go to the up position for the Gate.

4. Lever and Skull Gate. Touching this lever can effect the others nearby. If you follow the instructions for levers #1 and #2 this lever will automatically go to the up position for the Gate. It doesn't matter if you can unlock this Gate or not, since you can access what is behind it by opening the other gate(#5) You cannot pick the lock on the Skull Gate.

5. Skull Gate. Unlocked by solving the nearby lever puzzle. Flip lever #1 and #2 to put them all in the correct position. You cannot pick the lock.

6. Curative Fountain. Seems like it is infinite use.

7. Baron Von Zhular's Skeleton. Described as the Patron of the Knight Errants, which is a Hint. Touch the Skeleton to receive the Encoded Catechism (Critical Item). You can bring this book to Sir Coffergus in the Eyrie, who can translate it into a Knightly Catechism, which gives you the answer you need when you LOOK at it. You don't need the book if you know the answer.

8. Stone Face. Gives you a hint when you click on it.

9. Skull Gate. Unlocked by the Mausoleum Key. Cannot be picked.

10. Skeleton. LOOKing at the ground will tell you that there is rubble on the ground and deactivate Detect Secret. It's basically a hint that the west wall has a pushable brick that opens to a secret room.

11. Treasure Chest. Major Lock Level VIII. Has a Mausoleum Key (Critical Item) inside. This tile is also a Safe Haven.

12. Stained Glass Window and a Plaque. The Window depicts a dying knight being handed a sword by an angel. The Plaque tells you that this spot/shrine is a keepsafe for Caliburn, the holy weapon of the Knights Errant, and that none but the baptised in heart, body, and mind shall pass. To pass you must stand on the Sacred Pool of Babtismal Waters first(#13), which causes the Window Wall to disappear. You don't need to do anything else.

13. Sacred Pool of Babtismal Waters (Colored Light Dance Party). After you step on this tile, go to the Stained Glass Window(#12) and the wall will disappear, revealing Caliburn's room.

14. Reliquary of the Catechism/Stone Face. It will ask you if you know the seven virtues of a knight. The answer is found by LOOKing at a Knightly Catechism, which you can get three different ways involving Sir Coffergus in The Eyrie, but you do not need it if you know the answer already. The answer, which must be pressed in order, is Courage, Humility, Devotion, Sobriety, Honesty, Loyalty, Duty.

15. Caliburn. There is a hint about it on a nearby plaque. To take the sword you must Answer the Stone Face in the Reliquary of the Catechism correctly(#14), then approach the sword.

I think most of the skeletons here are references to backers of the game (It was on Indiegogo in 2012, I think?) and jokes, but I could be wrong. None of the skeletons that are unmarked seem to "say" anything important, but some of them are amusing.

The loot in the Treasure Boxes in the southern portion of the Mausoleum are very powerful and definately worth farming Perk Keys for if you want an edge, though try and avoid that empty one.
Samhain Mausoleum - Loot and Enemies
POTENTIAL LOOT
EVENT 7. Baron Von Zhular's Skeleton: Encoded Catechism (Critical Item)

EVENT 11. Treasure Chest (Major Lock Level VIII). Mausoleum Key (Critical Item)

EVENT 15. Caliburn a.k.a. Caliburnus
6D8 Damage
Range 2
FIR25
10 Swordsmanship
TOHIT 10
HITVS 40 vs Infernal and Evil
Save 100
Sharpen
Capable of Lethal Blow
Can hit Ghost Types
Charges drain enemy magic on hit and transfer some of it to the wielder

1. Treasure Chest (Major Lock Level VIII)
Weapons: Rusty Sword, Gauche, Truncheon, Duckbill, Battle Axe, Bipennis, Pole Fork, Lance, Slingshot, Flagellum, Slingshot
Instrument: Muting Lyre, Hotfoot Banjo, Cacaphony Harp
Thrown/Ammo: Needle Darts, Feather Dart, Horn of Winter, Barbed Arrows, Piercing Arrow, Throwing Knive
Armor: Leather Vestment, Leather Hood, Mail Coif, Wizard's Cap, Flannel Shirt, Leather Armor, Brigandine, Greaves, Sandals, Spiked Bracer
Accessories: Ring Pro Frost, Ring Pro Magic, Ring of Protection, Amulet of Might
Staff/Rods: Stave of Missles, Caduceus of Life, Wand of Webs, Sparkler Rod, Stun Rod, Zapper Rod, Torpedo Rod
Scrolls: Magic Missle, Knock Knock, Locate Person
Spellbooks: Bless, Magic Bells, Fire Shield, Armor Shield, Remove Curse, Wizard's Eye, Knock Knock
Consumable: Cure Heavy Wounds, Remove Curse, True Seeing, Neutralize Poison, Stink Bomb, Bag of Sparkles, Bag of Whispers, Bag of Chuckles, Rock Salts, Spoiled Rations, Baldercake, Iron Rations, Cherry Wine
Other: Gold Leaf, Soothing Stone, Cobalt Sapphire, Vending Token

2. Treasure Chest (Major Lock Level VIII)
Weapons: Rusty Sword, Gauche, Broadsword, Battle Axe, Duckbill, Bipennis, Lance, Slurbow, Slingshot, Flagellum, Knuckle Duster
Shield: Heraldic Shield
Instruments: Muting Lyre, Hotfoot Banjo, Cacaphony Harp
Thrown/Ammo: Horn of Winter, Barbed Arrows, Piercer Arrows, Feather Dart, Needle Darts, Throwing Knive
Armor: Leather Vestment, Leather Hood, Wizard Cap, Mail Coif, Flannel Shirt, Brigadine, Greaves, Sandals, Sollerets
Accessory: Ring Pro Frost, Ring Pro Magic, Ring of Protection, Amulet of Might
Staff/Rods: Stave of Missles, Ice Wand, Sparkler Rod, Torpedo Rod, Zapper Rod, Caduceus of Life, Wand of Webs
Scrolls: Locate Person, Locate Item, Knock Knock, Magic Missle, Divination, Magic Missles, Magic Screen
Spellbooks: Bless, Knock Knock, Magic Bells, Fire Shield, Armor Shield, Raise Dead, Remove Curse
Consumable: Cure Heavy Wounds, Neutralize Poison, Remove Curse, True Seeing, Bag of Sparkles, Bag of Whispers, Rock Salts, Baldercake, Iron Rations, Cherry Wine
Other: Cobalt Sapphire, Soothing Stone, Gold Leaf, Vending Token

3. Treasure Chest (Unlocked with Perk Key): Gnorff's Cloak of Bafflement
AC 20
16 Stealth

4. Treasure Chest (Unlocked with Perk Key): Moon Singer
6D8 Damage
Range 3
TOHIT 10
HITVS 40 vs Asian (Decapitates Assassins and creatures of non-Indian Asian origin)
Save 100
Sharpen
Capable of Lethal Blow and Unconscious
Can hit Ghost Types

5. Treasure Chest (Unlocked with Perk Key): Lute of Nirvana (8 Charges)
Casts Healing Cloud

6. Treasure Chest (Unlocked with Perk Key): Farulosonoth's Staff (16 Charges)
Casts Create Light
MES10
TOHIT 20 vs. Infernal
Save 90
M+ (I think this means Magic regeneration)
Can hit Ghost Types

7. Treasure Chest (Unlocked with Perk Key): Wulven Dash Boots
EAR10 (Earth)

8. Treasure Chest (Unlocked with Perk Key): Glorious Orb of Codexia (9 Charges)
Casts Wizard's Eye

9. Treasure Chest (Unlocked with Perk Key): Ring of Joy (9 Charges)
MEN20 (Mental)

10. Treasure Chest (Unlocked with Perk Key): Empty

Very rarely (as of the patch I am testing this on) you can get a Locksmith's Key drop after battles in this area.


ENEMIES
Cophrophages - Can Disease. Susceptible to Sleep, Charm
Mad Miners - Susceptible to Sleep, Charm, Confusion, Nausea, Fear, Insantity, Paralysis
Bronze Crusader - Susceptible to Sleep, Charm, Confusion, Nausea, Fear, Insantity, Paralysis
Crypt Cleaner - Susceptible to Nausea, Paralyze, Silence
Samhain Underworld


1. Pushable Brick. Touch the brick on the east wall to cause a grate to cover the nearby Pit Trap.

2. Pit Trap and Plaque with Runes. Touch the nearby brick(#1) to cover the Pit Trap, allowing you access to the Plaque. To translate the Runes select a character with the Ancient History Skill, such as a Sage. You may need to try several times before you are successful, and if you never put any points into it you might never be.. When successfully translated, you get the following instructions:
"Bird Cage Combination"
Moon, Moon...
Fire, Fish...
Fire, Fish...
Man...


3. Skull Door. To unlock it use the combination shown at the Runes(#2),
which is Moon, Moon, Fire, Fish, Fire, Fish, Man
.

4. Bird Cage. LOOK to get a Pheonix Feather.

5. The Legion. You should be familiar with how to deal with the Undead by now. The Legionaires have a high chance to knock characters unconscious. They are vunerable to several status effects, though they tend to break out of Paralysis quickly, can be made Unconscious themselves, and Hold Undead is amazing against them. Land appropriate affllictions (I suggest Charm, which stops them from acting) and poke/magic them to death.

6. Barrel of Beer. Heals the character that drinks from it. Seems like it is infinite use.

7. Fountain with the "Taste of Eternity". Turns any character who drinks from it to stone.

8. Skeleton. Pick up the item on the ground (the brown square to the right of your Inventory Scroll) for a Wizard Bag.

9. Locked Door. Major Lock Level VIII. Pick it or force it open.

10. Barred Window. Touch it for a hint that describes the sound of singing.

11. Colossus Adder. This is the first unskippable boss creature that can Instantly Kill on hit (unless I was just lucky with the other ones). It is susceptible to most status effects and can be knocked unconscious, though it resists Paralysis and is immune to Insanity. Cast Armorplate before the battle to protect yourself from attacks, if you have it. Try and land a controlling status effect as soon as possible. Charm seems to work well, as usual. I didn't have access to it at the time of testing, but Hold Monster might work as well.

12. Alonzo Sagursu's Skeleton. See #14 for instructions.

13. Bull Statue. See #14 for instructions.

14. The Dirge (Stone Face). This first bit isn't really a spoiler because it outright tells you, but I am using spoiler tags just in case someone wants them. Click on it and it tells you its purpose is to sing a funeral Dirge for its late Master, Alonzo Sagursu, and give him a proper burial. It tells you what is needed and that you will be rewarded with a Key.
The items are found in Bowels of Samhain.
To do what needs to be done for the Ritual you have to do the following in any order:
Put the Burial Mask and the Walking Cane on Alonzo Sagursu's Skeleton(#12).
Put the Funeral Wreath on the Dial(#15).
Give the Panegyric Tribute to the Stone Face(#14).
Equip the Prayer Shawl onto any character.

Next Use the Pyre Starter on the Bull Statue and sit through the dirge.
After that click on Alonzo Sagursu's Skeleton(#12) to receive Alonzo's Remains and Charon's Toll, then click on the Stone Face for more instructions and the "Chamber of the Waters" Key .
Once you have Alonzo's Ashes from Chamber of the Waters, you can take them back to the Stone Face and place them on it for 2000exp per character in the party.
As a side note I was not able to raise Alonzo from the dead. I do not know if it is impossible, or if I just didn't have the right stuff to do it.

15. Dial. See #14 for instructions.

16. Locked Door. Unlocked with the "Chamber of the Waters" Key. The lock cannot be picked.


POTENTIAL TREASURE
EVENT 4. Bird Cage: Pheonix Feather

EVENT 8. Skeleton: Wizard Bag.

EVENT 14. The Dirge (Stone Face): "Chamber of the Waters" Key (Critical Item)

1. Treasure Chest (Major Lock Level VI)
Weapons: Shortsword, Longsword, Bone Dagger, Gauche, Truncheon, Bipennis, Pole Fork, Lance, Quarterstaff, Bullwhip
Shield: Wooden Buckler
Instruments: Lyre of Slumber, Muting Lyre, Lethe Harp, Hotfoot Banjo
Thrown/Ammo: Needle Darts, Poison Dart, Feather Dart, Throwing Knive
Armor: Phrygian Cone, Leather Vestment, Leather Helm, Mail Coif, Flannel Shirt, Leather Armor, Leather Pants, Spiked Bracer, Sandals
Accessories: Ring Pro Fire, Ring Pro Frost, Ring Pro Magic
Staff/Rods: Stave of Missles, Torpedo Rod, Stun Rod, Caduceus of Healing, Caduceus of Life
Scrolls: Detect Magic, Divination
Spellbooks: Bless, Healing, Wizard's Eye, Fire Shield, Charm, Armor Shield
Consumables: Cure Lt. Wounds, Cure Lt. Condition, Cure Heavy Wounds, True Seeing, Stink Bomb, Bag of Sparkles, Bag of Whispers, Bag of Slumber, Nematic Dust, Rock Salts, Spoiled Rations, Iron Rations, Oatmeal Cookie, Baldercake, Leg of Ham, Cherry Wine, Lethe Liqeur
Other: Cobalt Sapphire
*This chest seems to pull from the same pool as chest #3.

2. Treasure Chest (Major Lock Level VI)
Weapons: Bone Dagger
Armor: Death Mask
Accessories: Ring of Power
Consumables: True Seeing, Coffin Orchids
Other: Gold Leaf*
*This chest seems to have static loot, though sometimes you do not get the Gold Leaf.

3. Treasure Chest (Major Lock Level VI)
Weapons: Bone Dagger, Gauche, Battle Axe, Duckbill, Bipennis, Truncheon, Pole Fork, Lance, Quarterstaff
Shields: Wooden Buckler
Instrument: Muting Lyre, Lethe Harp, Cacaphony Harp, Hotfoot Banjo
Thrown/Ammo: Throwing Knive, Feather Dart, Needle Darts, Barbed Arrows, Stone Bullets
Armor: Wizard Cap, Leather Vestment, Leather Hood, Mail Coif, Flannel Shirt, Leather Armor, Spiked Bracer, Sandals
Accessories: Ring Pro Fire, Ring Pro Frost, Ring Pro Magic, Amulet of Might
Staff/Rods: Caduceus of Healing, Caduceus of Life, Stave of Missles, Torpedo Rod, Sparkler Rod, Stun Rod, Wand of Webs
Scrolls: Detect Magic, Knock Knock, Remove Curse, Divination
Spellbooks: Bless, Healing, Wizard's Eye, Magic Bells, Fire Shield, Armor Shield, Knock Knock
Consumables: Cure Lt. Wounds, Cure Heavy Wounds, Remove Curse, Neutralize Poison, True Seeing, Stink Bomb, Bag of Sparkles, Bag of Whispers, Bag of Chuckles, Wonder Adhesive, Rock Salts, Spoiled Rations, Iron Rations, Baldercake, Cherry Wine, Lethe Liqeur
Other: Cobalt Sapphire*, Soothing Stone
*This chest seems to pull from the same pool as chest #1.

Very rarely (as of the patch I am testing this on) you can get a Perk Key drop after battles in this area.


ENEMIES
Tarantula - Susceptible to Sleep, Charm, Confuse, Nausea, Fear, Paralyze
Wrokwyrm - Susceptible to Sleep, Charm, Nausea, Confuse, Fear, Paralyze
Mad Miners - Susceptible to Sleep, Charm, Confuse, Nausea, Fear, Insantity, Paralysis
Miner '49er - Susceptible to Sleep, Charm, Confuse, Nausea, Fear, Insanity, Paralyze
The Legion/Legionaire - Can knock characters unconscious. Susceptible to Sleep, Charm, Confuse, Fear, Blind, Irritation, Paralyze (has some resistance)
Colossus Adder - Can Instantly Kill. Susceptible to Sleep, Charm, Confuse, Nausea, Fear, Paralyze (has some resistance)
Bowels of Samhain


1. Treasure Chest. Major Lock Level VI. Inside is a Panegyric Tribute (Critical Item) This item is used in the Dirge Ritual in Samhain Underworld.

2. Treasure Chest. Major Lock Level VI. Inside is a Prayer Shawl (Critical Item). This item is used in the Dirge Ritual in Samhain Underworld.

3. Treasure Chest. Major Lock Level V. Inside is a Funeral Wreath (Critical Item). This item is used in the Dirge Ritual in Samhain Underworld.

4. Skeleton. Click on it to get the Burial Mask (Critical Item). This item is used in the Dirge Ritual in Samhain Underworld.

5. Rusty Iron Cauldron. Click on it to get the Pyre Starter (Critical Item). This item is used in the Dirge Ritual in Samhain Underworld.

6. Skeleton Bones. Click on them to get the Walking Cane (Critical Item). This item is used in the Dirge Ritual in Samhain Underworld.

The dotted lines are giant spider webs. You cannot get rid of them, so go around them.


POTENTIAL LOOT
EVENT 1. Treasure Chest (Major Lock Level VI): Panegyric Tribute (Critical Item)

EVENT 2. Treasure Chest (Major Lock Level VI): Prayer Shawl (Critical Item)

EVENT 3. Treasure Chest (Major Lock Level V): Funeral Wreath (Critical Item)

EVENT 4. Skeleton: Burial Mask (Critical Item)

EVENT 5. Rusty Iron Cauldron: Pyre Starter (Critical Item)

EVENT 6. Skeleton Bones: Walking Cane (Critical Item)

1. Treasure Chest
Consumable: Spoiled Rations, Iron Rations x3
*This loot seems static.


ENEMIES
Flesh Grubs - Can Disease. Susceptible to Sleep, Charm
Cophrophages - Can Disease. Susceptible to Sleep, Charm
Amoebic Slime - Susceptible to Sleep, Charm
Toxic Amoeba - Susceptible to Sleep, Nausea, Confuse, Fear, Paralyze
Festerboil - Can Irritate and Disease. Susceptible to Sleep, Charm
Blood Leech - Can Drain Vitality. Susceptible to Sleep, Charm, Fear, Nausea, Confuse, Paralysis, Dancing
Attercob - Susceptible to Sleep, Charm, Confuse, Irritate.
Miner '49er - Susceptible to Sleep, Charm, Confuse, Nausea, Fear, Insanity, Paralyze
Chamber of the Waters - Map, Events, and Shop
You will need Swimming Skill on this floor. The Refresh spell and Vitality restoring food can help a bit if your Skill is low. You do not need to swim on every tile. See the Swimming and Climbing section for more information.


1. Funeral Pyre. Combine Alonzo's Remains with Charon's Toll in your Item Workshop to create Alonzo Sangursu, then place those on top of the Pyre to get Alonzo's Ashes. Once done you can take the Ashes back to the Stone Face in Samhain Underworld to complete the quest. Despite what the instructions said, you do not need to use the Turtle..

2. Turtle. 60 Swimming is enough to reach it comfortably. You can ride the Turtle like a boat across water tiles.

3. Rubblish. LOOK at it to find a flagstone, which triggers the wall to open.

4. Unusual Fountain. Turns whoever drinks from it into a rat, duck, or frog. You can Rest if you want the transformation gone. Used to reach the Acme Vending Machine.

5. Black Cauldron. Cast Haste on a character (perferably the one with the highest SPE), click the pot, then select the Hasted character to attempt to catch a Mercury Fish (Critical Item). It can take several tries, and it is possible to do without Haste if you've been lucky with Bonus Points and have been deciding to pump SPE. Zephyr Cola bought from the Acme Vending Machine gives the drinker Haste if you don't have the spell. You do not have to be transformed to catch one.

6. Barred Window. Click on the Window and select any character that has been transformed (all three transformations work) and they will flip the switch, which opens up the nearby Skull Gate.

7. Skull Gate. Unlocked by following the instructions for the Barred Window(#6). The Gate cannot be picked.

8. Acme Vending Machine.

9. Lever. Flip it by following the instructions for the Barred Window(#6).

10. Stone Face. It asks for a taste of quicksilver. Give it the Mercury Fish.

11. Skull Gate. Unlocked by giving the Stone face what it wants.

Green Letters show the Warp starting points, purple letters show Warp destinations. They all loop so you can't get lost.

The dotted line shows the fastest way across the water to reach the Turtle.


SHOP
Acme Vending Machine
Zephyr Cola (1 token)
Chamber of the Waters - Loot and Enemies
POTENTIAL LOOT
EVENT 5. Black Cauldron: Mercury Fish (Critical Item)

1. Treasure Chest
Instruments: Lethe Harp*
Thrown/Ammo: Cupid's Arrow
Armor: Wizard's Cap*
Staff/Rods: Zapper Rod*, Fizzle Stick
Scrolls: True North*, Divination*, Locate Person*, Mindread*, Lightning*
Spellbooks: Identify
Consumables: True Seeing*, Scrying Crystal*
*The loot seems to be mostly static, though sometimes you do not get Cupid's Arrow, Fizzle Stick, and/or Identify Spellbook.

2. Treasure Chest (Major Lock Level VI)
Weapons: Shortsword, Longsword, Bone Dagger, Poison Dagger, Gauche, Truncheon, Pole Fork, Lance, Cat 'O 'Nine Tails, Bullwhip
Shields: Wooden Buckler
Instruments: Lyre of Slumber, Muting Lyre, Hotfoot Banjo, Lethe Harp
Thrown/Ammo: Throwing Knive, Feather Dart, Poison Dart, Flute of Chaos
Armor: Phrygian Cone, Leather Helm, Leather Vestment, Silk Robe, Flannel Shirt, Leather Jerkin, Leather Armor, Leather Pants, Spiked Bracer, Sandals
Accessories: Ring Pro Fire, Ring Pro Frost, Ring Pro Magic
Staff/Rods: Stave of Missles, Torpedo Rod, Stun Rod, Caduceus of Healing
Scrolls: Detect Magic, Identify
Spellbooks: Healing, Detect Secret, Identify, Bless, Charm, Armor Shield, Wizard's Eye
Consumables: Cure Lt. Wounds, Cure Lt. Condition, True Seeing, Stink Bomb, Bag of Chuckles, Bag of Whispers, Bag of Sparkles, Bag of Slumber, Nematic Dust, Rock Salts, Red Pepper, Spoiled Rations, Iron Rations, Oatmeal Cookie, Leg of Ham, Cherry Wine, Lethe Liqeur
Other: Cobalt Sapphire, Silver Spoon
*The loot seems to be pulled from the same table as Treasure Chest #3, #4, and #6.

3. Treasure Chest (Minor Lock Level V)
Weapons: Shortsword, Longsword, Bone Dagger, Poison Dagger, Gauche, Truncheon, Pole Fork, Lance, Cat 'O 'Nine Tails, Bullwhip, Quarterstaff
Shields: Wooden Buckler
Instruments: Lyre of Slumber, Muting Lyre, Lethe Harp, Hotfoot Banjo
Thrown/Ammo: Throwing Knive, Feather Dart, Poison Dart, Flute of Chaos
Armor: Phrygian Cone, Leather Vestment, Leather Helm, Silk Robe, Flannel Shirt, Leather Jerkin, Leather Armor, Leather Pants, Spiked Bracer, Sandals
Accessories: Ring Pro Fire, Ring Pro Frost, Ring Pro Magic
Staff/Rods: Stave of Missles, Torpedo Rod, Caduceus of Healing, Stun Rod
Scrolls: Detect Magic, Detect Secret
Spellbooks: Healing, Bless, Charm, Identify, Detect Secret, Armor Shield, Wizard's Eye
Consumables: Cure Lt. Wounds, Cure, Lt. Condition, True Seeing, Stink Bomb, Bag of Whispers, Bag of Sparkles, Bag of Slumber, Bag of Chuckles, Nematic Dust, Rock Salt, Spoiled Rations, Oatmeal Cookie, Iron Rations, Leg of Ham, Cherry Wine, Lethe Liqeur
Other: Cobalt Sapphire, Silver Spoon
*The loot seems to be pulled from the same table as Treasure Chest #2, #4, and #6.

4. Treasure Chest (Major Lock Level VII)
Weapons: Longsword, Bone Dagger, Gauche, Truncheon, Duckbill, Bipennis, Pole Fork, Lnce, Quarterstaff
Shields: Wooden Buckler
Instruments: Muting Lyre, Lethe Harp, Hotfoot Banjo, Cacaphony Harp
Thrown/Ammo: Poison Dart, Feather Dart, Needle Darts, Stone Bullets, Throwing Knive
Armor: Leather Vestment, Leather Hood, Leather Helm, Mail Coif, Flannel Shirt, Leather Armor, Sandals, Spiked Bracer
Accessories: Ring Pro Fire, Ring Pro Frost, Ring Pro Magic, Amulet of Might
Staff/Rods: Stave of Missles, Sparkler Rod, Torpedo Rod, Stun Rod, Caduceus of Healing, Caduceus of Life
Scrolls: Divination, Remove Curse, Detect Magic
Spellbooks: Healing, Bless, Identify, Wizard's Eye, Fire Shield, Knock Knock, Armor Shield
Consumables: Cure Lt. Wounds, Cure Heavy Wounds, Cure Lt. Condition, Remove Curse, True Seeing, Stink Bomb, Bag of Chuckles, Bag of Slumber, Bag of Sparkles, Rock Salts, Spoiled Rations, Iron Rations, Oatmeal Cookie, Baldercake, Cherry Wine, Lethe Liqeur
Other: Cobalt Sapphire, Soothing Stone
*The loot seems to be pulled from the same table as Treasure Chest #2, #3, and #6.

5. Shallow Water: Vending Token

6. Treasure Chest (Minor Lock Level V)
Weapons: Shortsword, Longsword, Bone Dagger, Poison Dagger, Gauche, Truncheon, Pole Fork, Lance, Bullwhip, Cat 'O 'Nine Tails, Quarterstaff
Shield: Wooden Buckler
Instruments: Lyre of Slumber, Muting Lyre, Lethe Harp, Hotfoot Banjo
Thrown/Ammo: Flute of Chaos, Poison Dart, Feather Dart, Throwing Knive
Armor: Phrygian Cone, Leather Vestment, Leather Helm, Silk Robe, Flannel Shirt, Leather Jerkin, Leather Armor, Leather Pants, Spiked Bracer, Sandals
Accessories: Ring Pro Fire, Ring Pro Frost, Ring Pro Magic
Staff/Rods: Stave of Missles, Torpedo Rod, Stun Rod, Caduceus of Healing
Scrolls: Detect Secret, Detect Magic, Identify
Spellbook: Bless, Identify, Charm, Armor Shield, Detect Secret, Wizard's Eye
Consumables: Cure Lt. Wounds, Cure Lt. Condition, True Seeing, Stink Bomb, Bag of Sparkles, Bag of Chuckles, Bag of Whispers, Nematic Dust, Rock Salts, Red Pepper, Spoiled Rations, Iron Rations, Oatmeal Cookie, Leg of Ham, Cherry Wine, Lethe Liqeur
Other: Cobalt Sapphire
*The loot seems to be pulled from the same table as Treasure Chest #2, #3, and #4.

Very rarely (as of the patch I am testing this on) you can get a Perk Key drop after battles in this area.


ENEMIES
Amoebic Slime - Susceptible to Sleep, Charm
Toxic Amoeba - Susceptible to Sleep, Nausea, Confuse, Fear, Paralyze
Piranha - Susceptible to Sleep, Charm, Confuse, Fear
Ramorae - Susceptible to Sleep, Silence, Dancing, Charm, Irritation, Confusion, Paralysis
Flesh Grubs - Can Disease. Susceptible to Sleep, Charm
Terrormites - Susceptible to Sleep, Charm, Confuse, Nausea, Paralyze, Fear
Blood Leech - Can Drain Vitality. Susceptible to Sleep, Charm, Fear, Nausea, Confuse, Paralysis, Dancing
Seal of the Horror


1. Acme Vending Machine

2. Skeleton. Look at it to get Ruby Broach. This is the item that Raghilda is looking for. If Raghilda is in your party when you pick it up her quest completes and you receive 200 exp for each character in the party. If not, you have to go back to Village of Crowl and give it to her there, which will give you 500 exp instead.

3. Fountian with Bad Waters. Paralyzes anyone who drinks from it.


SHOP
Acme Vending Machine
Thrown/Ammo: Flame Arrow (2 tokens)
Scrolls: Armorplate (2 tokens), Locate Item (3 tokens), Magic Screen (2 tokens), Cosmic Gate (5 tokens)
Consumables: Paralysis Dust (1 token), Lethe Liqeur (1 token), Cure Paralysis (2 tokens), Stone to Flesh (3 tokens), Cure Heavy Wounds (2 tokens), Halomancic Salts (1 token), Invisibility (4 tokens), Blink (4 tokens), Remove Curse (2 tokens), Cure Disease (5 tokens), Evil Off (6 tokens)


POTENTIAL LOOT
EVENT 2. Skeleton: Ruby Broach.

Very rarely (as of the patch I am testing this on) you can get a Common Gate Key drop after battles in this area.


ENEMIES
Packrat - Susceptible to Sleep, Charm
Black Bats - Can Disease. Susceptible to Sleep, Charm, Shrill Sound
Barghestii - Susceptible to Sleep, Charm, Confuse, Nausea, Fear, Paralyze
Mad Monk - Susceptible to Sleep, Charm, Confuse, Nausea, Fear, Insanity (+Dancing), Paralyze
Abode of the Horror


The Samhain Horror is a boss that is randomly encountered on this floor and you cannot Retreat from it. It hits really hard and its attacks come with an innate Phantasmal Hand effect (Crushing Hand spell), has a huge reach, can Drain HP, and can cause Fear. It is also immune to Insanity, Blind, and Unconscious. It resists Charm and Paralyze, but it is still possible and to land them. This battle is all about surviving the first round while inflicting a controlling status effect on it as soon as possible (I have had better luck with Paralyze, but that could be a coincidence). Casting Armorplate and Enchanted Blade as soon as you enter this floor is a good idea, though even Armorplate might not protect you well enough. If you picked up Caliburn this is a great fight to equip it if you haven't already. If you have access to it, the spell Deep Freeze can make short work of the Horror (as well as almost every enemy in the game) as long as it doesn't Fizzle. If you are struggling and do not have a Thaumaturge, you can recruit Little Rosy and level her until she can learn it.
Defeating the Horror triggers Argosyre's murderous intent, whether you used the back way to get into the Sacred Pools or not.


POTENTIAL TREASURE
1. Treasure Box (Major Lock Level VI)
Weapons: Skullbuster, Composite Bow
Thrown/Ammo: Flame Arrow
Scrolls: Lightning, Magic Screen, Armorplate
*The loot in this chest is static, but you might want to save scum for more arrows. I have seen up to a stack of 85. Watch your weight though. I don't know of a way to split stacks in this game.

2. Treasure Box (Minor Lock Level III)
Weapons: Shortsword, Longsword, Bast(Steam Censored)ard Sword, Bone Dagger, Poison Dagger, Quarterstaff, Bullwhip, Cat 'O 'Nine Tails
Shields: Wooden Buckler
Instruments: Lyre of Slumber, Muting Lyre, Swaying Lute, Lethe Harp
Thrown/Ammo: Feather Dart, Poison Dart, Throwing Knive, Lead ball, Flute of Chaos
Armor: Phrygian Cone, Leather Helm, Silk Robe, Cotton Cloak, Flannel Shirt, Leather Jerkin, Flannel Pants, Leather Pants, Sandals
Accessories: Ring Pro Fire, Ring Pro Frost
Staff/Rods: Stave of Missles, Caduceus of Healing
Scrolls: True North, Identify, Detect Secret, Detect Magic
Spellbooks: Healing, Bless, Charm, Direction, Detect Secret, Identify
Consumables: Cure Lt. Wounds, Cure Lt. Condition, Bag of Slumber, Bag of Sparkles, Nausea Powder, Nematic Dust, Rock Salts, Red Pepper, Oatmeal Cookie, Leg of Ham, Pilgrim Tea, Cherry Wine, Lethe Liqeur
Other: Cobalt Sapphire, Silver Spoon
*There is probably more randomized loot in this chest, but I was really unlucky with testing and kept getting the same exact item set over and over the last 12 save scums I tried (and that was after several other save scum attempts). Too boring for me to continue.


ENEMIES
The Samhain Horror -Can Drain HP and Fear. Susceptible to Sleep, Charm (has some resistance), Confuse, Fear, Paralyze (has some resistance)
Vault of the Exemplar
You need the Key of the Exemplar to explore this area and exit the Avian Mountains.


1. Green Gate. Unlock it with the Key of the Exemplar that you get from using the Mechano Owl at the Nest in The Eyrie, then waiting for it to return to you.

2. Lever. Click it to unlock the nearby Skull Gate(#3).

3. Skull Gate. Unlocked with a nearby lever(#2). Cannot be picked.

4. Refreshing Fountain. Restores magic to any character that drinks from it.

5 . Refreshing Fountain. Restores magic to any character that drinks from it.

6. I just want to emphasize that this is a one way teleport to Shine of the Raptor. You can't quickly warp back if you step on it. Walking back here can be very annoying, depending on what your character's Swimming Skill is and where you left the Turtle in the Chamber of the Waters.

7. Treasure Chest. Inside is the Lachesis Tablet (Critical Item), and 4000exp for each character in the party. Having the Lachesis Tablet in your inventory triggers Mordecai's threats.


POTENTIAL LOOT
EVENT 7. Treasure Chest: Lachesis (Critical Item)

1. Treasure Chest
Shields: Heraldic Shield
Thrown/Ammo: Avenger Talisman
Armor: Hoodoo Hoodie, Hoodoo Tunic, Hoodoo Robes, Ringmail, Copper Plate
Accessory: Ring of Swordsmen
*The loot in this chest is static.

2. Treasure Chest
Weapons: Zweihander*, Stilleto, Guisarme
Consumables: Dazzler Dust, Halomancic Salts, Hobor's Holy Hash, Safety Glass
*The loot in this chest is mostly static, though sometimes you do not get the Zweihander.
Lalain Falls


The descent into Crescent Wilderness is the first (that I know of) use of Climbing Skill that you will come across in the game. Cast Featherfall, if you have it, to help characters with low Climbing Skill survive if you fail.


POTENTIAL LOOT
1. Treasure Chest (Major Lock Level VI)
Weapons: Longsword, Bone Dagger, Gauche, Bipennis, Pole Fork, Lance, Quarterstaff
Shields: Wooden Buckler
Instruments: Muting Lyre, Hotfoot Banjo, Lethe Harp, Cacaphony Harp
Thrown/Ammo: Throwing Knive, Needle Darts, Poison Dart, Feather Dart, Stone Bullets
Armor: Leather Vestment, Leather Hood, Leather Helm, Mail Coif, Flannel Shirt, Leather Armor, Sandals, Spiked Bracer
Accessories: Ring Pro Fire, Ring Pro Frost, Ring Pro Magic, Amulet of Might
Staff/Rods: Stun Rod, Stave of Missiles, Torpedo Rod, Sparkler Rod, Caduceus of Life, Caduceus of Healing
Scrolls: Detect Magic, Divination
Spellbooks: Healing, Bless, Identify, Wizard's Eye, Knock Knock, Fire Shield, Armor Shield
Consumables: Cure Heavy Wounds, Cure Lt. Condition, Remove Curse, True Seeing, Stink Bomb, Bag of Chuckles, Bag of Whispers, Bag of Sparkles, Bag of Slumber, Rock Salt, Spoiled Rations, Iron Rations, Oatmeal Cookie, Baldercake, Cherry Wine, Lethe Liqeur
Other: Cobalt Sapphire, Smoothing Stone
*The items seem to pull from the same pool as Treasure Chest #3.

2. Treasure Chest (Major Lock Level VIII)
Weapons: Rusty Sword, Gauche, Battle Axe, Duckbill, Bipennis, Flagellum, Pole Fork, Lance
Instruments: Muting Lyre, Hotfoot Banjo, Cacaphony Harp
Thrown/Ammo: Piercer Arrow, Barbed Arrows, Needle Darts, Feather Dart, Horn of Winter, Throwing Knive, Stone Bullets
Armor: Wizard Cap, Leather Vestment, Leather Hood, Mail Coif, Flannel Shirt, Leather Armor, Brigadine, Greaves, Sandals, Spiked Bracer
Accessories: Ring Pro Frost, Ring Pro Magic, Ring of Protection, Amulet of Might
Staff/Rods: Caduceus of Life, Stave of Missiles, Sparkler Rod, Zapper Rod, Torpedo Rod, Stun Rod, Wand of Webs
Scrolls: Knock Knock, Divination, Magic Missile, Raise Dead
Spellbooks: Bless, Knock Knock, Magic Bells, Armor Shield, Remove Curse
Consumables: Cure Heavy Wounds, Remove Curse, Neutralize Poison, True Seeing, Stink Bomb, Bag of Whispers, Bag of Chuckles, Bag of Sparkles, Neutral Medium, Rock Salts, Spoiled Rations, Iron Rations, Baldercake, Cherry Wine
Other: Cobalt Sapphire, Gold Leaf, Soothing Stone, Vending Token
*The loot from this chest seems to pull from the same table as Treasure Chests #1 and #3, but seems to have a better chance at getting a Rusty Sword, Flagellum, Brigadine, Greaves, Horn of Winter, Ring of Protection, and Gold Leaf. That could just be coincidence though.

3. Treasure Chest (Major Lock Level VI)
Weapons: Bone Dagger, Gauche, Battle Axe, Duckbill, Bipennis, Pole Fork, Lance
Shields: Wooden Buckler
Instruments: Muting Lyre, Hotfoot Banjo, Cacaphony Harp
Thrown/Ammo: Feather Dart, Needle Darts, Stone Bullets, Barbed Arrows, Throwing Knive
Armor: Wizard Cap, Leather Vestment, Leather Hood, Mail Coif, Flannel Shirt, Leather Armor, Sandals, Spiked Bracer
Accessories: Ring Pro Fire, Ring Pro Frost, Ring Pro Magic, Amulet of Might
Staff/Rods: Stave of Missiles, Sparkler Rod, Torpedo Rod, Wand of Webs, Caduceus of Life, Caduceus of Healing
Scrolls: Detect Magic, Divination, Magic Missile
Spellbook: Bless, Magic Bells, Healing, Knock Knock, Wizard's Eye, Fire Shield, Armor Shield
Consumables: Cure Lt. Wounds, Cure Heavy Wounds, Remove Curse, True Seeing, Neutralize Poison, Stink Bomb, Bag of Whispers, Bag of Chuckles, Bag of Sparkles, Rock Salts, Baldercake, Cherry Wine, Lethe Liqeur
Other: Cobalt Sapphire, Soothing Stone, Vending Token
*The items seem to pull from the same pool as Treasure Chest #1.


ENEMIES
Amoebic Slime
Mudwasp - Can Irritate
Flesh Grubs - Can Disease
Glowmoth - Can Blind.
Black Bats - Can Disease.
Giant Bat - Can Drain Vit/Sleep.
Oreworm - Can Irritate and Destroy Weapons
Attercob
Jackalope - Has a Breath attack.
Coecanthes
RECRUITABLE NPCs in EARLY GAME
Utilizing some recruitable NPCs will make the game easier. Their Stat and Skill amounts are randomized a little, and some are far better than others in terms of what they are capable of. Any Spells they start with are static. You can Recruit them from the NPC interaction pulldown menu, which you can access by right clicking the circle icon next to one of your character's portraits.

Dismissing an NPC will tell you where they go, and you can recruit them again. However, they will lose any Stat/Skill increases and Spells they have gained/learned while traveling with you, so I would not recommend Dismissal unless you really want to get rid of them, or you have only just recruited them and want to dupe their equipment (Poison Daggers for everyone!).

Raghilda
Human Female Cleric
Found: Village of Crowl, inside the Wayfarer's Inn
Recruit: Say Yes when she asks you to help her find her sister after clicking the Recruit option in the NPC interaction menu. Gives you Stone to Flesh Potions when recruited the first time.
Equipment: Comes equipped with a Poison Dagger, but cannot reequip it if you remove it. Is naked, otherwise.
Dismissed: Village of Crowl, inside the Wayfarer's Inn


Note that she is a very good character for the beginning of the game.


MARTIAL SKILLS
Hammer&Mace
Shield
Slings&Boas
Staff&Rod


PHYSICAL SKILLS
Climbing
Evasion
Hand-to-Hand
Inspection
Scout
Stealth
Swimming
Throwing


MENTAL SKILLS
Arcanum
Assaying
Barter
Diplomacy
Incantation
Invocation
Litany
Mythology
Scribe


SPELLS
Dancing Lights
Magic Missle
Sleep
Armorplate
Cure Light Cond
Cure Light Wounds
Charm
Confusion
Little Rosy
Feyfolk Female Thaumaturge
Found: Random Encounter in Briarpatch Woods
Recruit: No special recruitment conditions.
Equipment: Equipped with a Poison dagger, but is otherwise naked.
Dismissed: Random Encounter in Village of Crowl


Note that she is a very good character for the beginning of the game, even with the version 1.2.0.27-R nerf.


MARTIAL SKILLS
Bladesmanship
Hammer&Mace
Slings&Boas
Staff&Rod


PHYSICAL SKILLS
Climbing
Evasion
Hand-to-Hand
Inspection
Scout
Stealth
Swimming
Throwing


MENTAL SKILLS
Alchemistry
Arcanum
Assaying
Barter
Incantation
Invocation
Mephistics
Mythology
Nature Lore
Scribe


SPELLS
Blinding Flash
Leaping Sparks
Magic Missle
Charm
Confusion
Magic Screen
Gorlo
Human Male Cleric
Found: Crowl Archives in the Crusader Temple, which is in Village of Crowl
Recruit: Find the Tome of the Spider in Cenotaph of the Black Lich and give it to him. He is recruitable afterward. He gives back the Tome of the Spider once recruited.
Equipment: Comes equipped with a Throwing Knive and a Wand of Rainbows.
Dismissed: Crowl Archives


MARTIAL SKILLS
Hammer&Mace
Shield
Slings&Bolas
Staff&Rod


PHYSICAL SKILLS
Climbing
Evasion
Hand-To-Hand
Inspection
Scout
Stealth
Swimming
Throwing


MENTAL SKILLS
Arcanum
Assaying
Barter
Diplomacy
Incantation
Invocation
Litany
Mythology
Scribe


SPELLS
Chilling Touch
Paralysis
Cure Disease
Magic Screen
Junga Din
Human Male Thief
Found: Cenotaph Vault in Cenotaph of the Black Lich (Random encounter after the first meeting)
Recruit: After you cut open the suspended cocoon you can recruit him
Equipment: Bast(Steam Censored)ard Sword
Dismissed: Village of Crowl (I haven't checked this properly yet)


MARTIAL SKILLS
Archery
Axe&Scimitar
Backstabbing
Bladesmanship
Hammer&Mace
Lash&Chain
Shield
Slings&Bolas
Spear&Lance
Staff&Rod
Swordsmanship


PHYSICAL SKILLS
Climbing
Evasion
Hand-to-Hand
Inspection
Lockpicking
Robbery
Scout
Stealth
Swimming
Throwing


MENTAL SKILLS
Alchemistry
Assaying
Barter
Incantation
Invocation
Mephistics
Mythology
Scribe
Mistral
Human Male Cleric
Found: Wherever you resurrect his bones. Cannot be raised if you lay the bones to rest.
Recruit: Cast Raise Dead on the Monk's Bones found in the Inner Sanctum in the Cenotaph of the Black Lich.
Equipment: Throwing Knife (cannot reequip if removed) and a Stave of Missles
Dismissed: It says Crypt of Monks in the Catacombs, but I have not found him there. It is possible that he just disappears.


MARTIAL SKILLS
Hammer&Mace
Shield
Slings&Bolas
Staff&Rod


PHYSICAL SKILLS
Climbing
Evasion
Hand-To-Hand
Inspection
Scout
Stealth
Swimming
Throwing


MENTAL SKILLS
Arcanum
Assaying
Barter
Diplomacy
Incantation
Invocation
Litany
Mythology
Scribe


SPELLS
Chilling Touch
Paralysis
Bless
Cure Disease
Cure Heavy Wounds
Cure Light Condition
Cure Light Wounds
Cure Paralysis
Stone to Flesh
Magic Screen
Sir Coffergus
Human Male Templar
Found: The Eyrie (Random Encounter)
Recruit: Find the Amulet Astrixus in the Eyrie, then give it to him. Gives you Knightly Catechism and the Amulet Astrixus when recruited the first time.
Equipment: Longsword and Kite Shield
Dismissed: The Eyrie (Random Encounter)


MARTIAL SKILLS
Archery
Axe&Scimitar
Bladesmanship
Hammer&Mace
Lash&Chain
Shield
Slings&Bolas
Spear&Lance
Staff&Rod
Swordsmanship


PHYSICAL SKILLS
Climbing
Evasion
Hand-to-Hand
Inspection
Scout
Stealth
Swimming
Throwing


MENTAL SKILLS
Assaying
Barter
Diplomacy
Incantation
Invocation
Litany
Mythology
Scribe


SPELLS
Leaping Sparks
Magic Missle
Missle Shield
Armorplate
Enchanted Blade
Magic Bells
Mirror Image
---------------------------------------------------------
AREAS NOT IN THE AVIAN MOUNTAINS
I plan on plucking away on maps beyond the Avian Mountians below this section. Other than having to start post-early game in Crescent Wilderness, you can go in any direction you'd like from this point on. Don't feel like you have to follow the order the maps are posted in as they are completed, especially since I favor exploring dangerous areas over towns.

Another thing to note is that while the Avian Mountians section is mostly complete in terms of the different things you can do (though there are one or two things I still need to figure out / test), any section below this is more likely to be missing connections/quests to other areas. I will try my best to fill out things as I find them, and will show at least one way of doing things, but I cannot promise that every option will be noted.

WIP
---------------------------------------------------------
FERTILE CRESCENT SECTION
Crescent Wilderness


Morgana LeFey is an NPC you will come across via random encounter. If you show her a Tablet she will give you a Druid's Burnoose in return, and fill in your map showing where you can find the "Green Way", which is through the Barrow Caverns. You do not lose the Tablet doing this.

Just going into the Harradan Groves will give your party 100exp for each character, and you'll get 50exp for entering City of Waterport.
There is a tile that shows open ground in the southeast corner of the map. It seems like it is just a glitch in the graphics.


NPC KEYWORDS
Morgana LeFey: Green Way, Owl, Wicker (Man), Grove, Tablet, Where (is) Green Way, Where (is) Grove, Where (is) Wicker (Man)
*You can steal the Druid Burnoose from her if you don't want to get it the nice way, though you will probably need to Charm her beforehand to succeed. She doesn't get upset when you show the stolen cloak to her, and does not try to stop you if you leave after showing her, but she will attack you if you try and show her a Tablet afterwards.


POTENTIAL LOOT
1. Shallow Water: Swamp Leech

2. Shallow Water: Black Lotus

3. Bush: Galen Apple


ENEMIES
Night Lily - Can Poison.
Chlorazoid
Monarch Nettle
Blood Leech - Can Drain Vitality.
Dragonfly - Can Instantly Kill.
Treant - Immune to Unconscious.
Royal Bestiary


1. Floorplan. Clicking on it fills yout you map.

2. Reference Section Room. There are two bookcases inside here where you can pick up some Journal Entries.

3. Exhibit Feed Room. There isn't anything but an empty barrel and rotting food. Noting it anyway just in case it comes into play later, though it seems unlikely.

4. Guest Shop Room. There are two bookcases inside here where you can pick up some Journal Entries, including a list of names you can jot down for later reference:
Lord Ahriman
Khan Raji
Morraha
Princess Dahlia
Count Orloch
Tellurius Boondoggle


The Fireplaces are not Safe Havens.


POTENTIAL LOOT
Treasure Chest (Major Lock Level VII)
Instrument: Screecher (Shrill Sound)
Accessory: Ring of Deflection
Scrolls: Hold Monsters, Magic Moth
Consumables: Dragonic Bile, Bug Off
*It seems like this chest is static.

You can get a Perk Key or Locksmith's Key drop after battles in this area. It might just be that I have been lucky, but they seem to drop more often here than elsewhere.


ENEMIES
Tarantula
Colossus Adder - Can Instantly Kill.
Banshee - Ghost Type.
Reaver
Bestiary Underground


1. Bed. LOOK at it for a Keeper's Key with 10 Charges. This is also a Safe Zone.

2. Skull Gate. Closes off the Brobdingag exhibit. Unlock it with Keeper's Key. There is nothing special inside. You cannot pick the lock.

3. Skull Gate. Closes off the Gynocore exhibit. Unlock it with Keeper's Key. You cannot pick the lock.

4. Gynocore. It asks you a riddle:
What always runs but never walks,
often murmurs, never talks, has
a bed but never sleeps, has
a mouth but never eats?

The answer is RIVER.
If you answer right, she will leave. If you answer wrong, you will be attacked. If you kill her you can step on this spot again to be asked the riddle once more. This is a bug.

5. Skull Gate. Unlock it with Keeper's Key. There is nothing special inside. You cannot pick the lock.

6. Refreshing Fountain. Any character who drinks from it restores Vitality. Drinking from it will reveal a Key. Take it for the Dragon Key (Critical Item).

7. Skull Gate. Closes off the Neo-Pinocchio exhibit. Unlock it with Keeper's Key. There is nothing special inside. You cannot pick the lock.

8. Skull Gate. Closes off the Jackalope exhibit. Unlock it with Keeper's Key. There is nothing special inside, unless you count the Jackalope. You cannot pick the lock.

9. Skull Gate. Closes off the Woozle exhibit. Unlock it with Keeper's Key. There is nothing special inside. You cannot pick the lock.

10. Skull Gate. Closes off the Q'orl the Magnificent exhibit. Unlock it with Keeper's Key. You cannot pick the lock.

11. Q'orl. He is a friendly NPC, but you cannot speak to him directly at first. Mindread does not work either. Place the Dragon Key onto him. He will speak to you afterward and reward you with 2000exp for each character in the party. You can then talk to him normally. Once you try to leave he will leave as well and become a random encounter on this floor. It seems like there is more to him, but I have not figured it out yet (I have tried asking about Astral Plane, Astral Vison, and also tried sleeping in various spots. I even tried using Dragon Control on him.).

12. Two Plaques. One is a joke, the other details how the Wizard Balderdash captured Q'orl in the Astral Plane, as well as a few other details.

13. Skull Gate. Closes off the Heffalump exhibit. Unlock it with Keeper's Key. There is nothing special inside. You cannot pick the lock.

14. Skull Gate. Unlock it with Keeper's Key. There is nothing special inside. You cannot pick the lock.

15. Skull Gate. Closes off the King of Serpents exhibit. Unlock it with Keeper's Key. You get a Journal Entry for entering it. You cannot pick the lock.

16. Cockatrice. It can Petrify characters, so Stone to Flesh Potions/Spell can come in handy (Mistral comes with the spell, if you recruited him). It is susceptible to Sleep, Charm, Confusion, Nausea, Fear, Insanity, and Paralysis. After killing it you get Braided Golden Cord (Critical Item) and Cockatrice Feather (Critical Item). As for what you do with those items, the Braided Golden Cord is used in the Tabernacle of Music. I haven't found where to use the Cockatrice Feather yet..

17. Straw and Chains. Look here for a Mirror Shard.

The three Skull Gates in the lower left corner are unopenable, but the other side is reached through Q'orl's exhibit.


NPC KEYWORDS
Q'orl (random encounter after quest): Other than small talk (You, Where You, Job), I was not able to find any special keywords.


POTENTIAL LOOT
EVENT 1. Bed: Keeper's Key

EVENT 6. Refreshing Fountain: Dragon Key (Critical Item)

EVENT 16. Cockatrice Battle: Braided Golden Cord (Critical Item), Cockatrice Feather (Critical Item)

EVENT 17. Straw and Chains: Mirror Shard.

1. Treasure Chest
Weapons: Broadsword, Beaked Axe, Awl Pike, Bec De Corbin, Goupillon, Threaded Lash, Shortbow, Longbow, Slurbow, Knuckle Duster
Shields: Heraldic Shield, Target Buckler
Instrument: Muting Lyre, Thistle Whistle, Halcyonic Lyre (Cone of Cold)
Thrown/Ammo: Throwing Knive, Cosmic Cryer, Feather Dart, Sleeper Arrow, Poison Arrow
Armor: Bascinet, Flannel Shirt, Ringmail, Chainmail, Cestian Girdle, Copper Plate, Camail, Pauldrons, Vambraces, Cuirass Leggings, Sandals, Sollerets, Firewalkers, Waterwalkers
Accessories: Ring Pro Frost, Ring of Smiting, Ring of Deflection, Ring of Featherfall
Staff/Rods: Stave of Missles, Freezer Rod, Ice Wand, Beholder Stave, Fizzlestick
Scrolls: Mindread, Magic Screen, Hold Monsters, Wither, Locate Item, Armorplate
Spellbooks: Bless, Raise Dead, Missle Shield, Firestorm, Rainbow Rays (Arcanum), Hermetic Gag (Arcanum)
Consumables: Cure Paralysis, Stone to Flesh, Acid Splash, Sleep Sand, Bag of Sparkles, Halomancic Salts, Rock Salts, Locksmith's Glue, Water Glass, Cherry Wine
Other: Cobalt Sapphire*, Luck Stone

2. Treasure Chest (Major Lock Level VI)
Staff/Rods: Caduceus of Life, Caduceus of Healing
Consumables: Fungal Anodyne
*The items in this chest are static.

3. Treasure Chest (Major Lock Level VI)
Consumables: Cure Lt. Wounds, Cure Heavy Wounds, Cure Lt. Condition, Neutralize Poison, Cure Paralysis, Stone to Flesh
*The items in this chest are static.

Very rarely you can get a Perk Key or Locksmith's Key drop after battles in this area. It might just be that I have been lucky, but they seem to drop more often here than elsewhere.


ENEMIES
Packrat
Attercob
Barghestii
Reaver
Jackalope - Has a Breath attack.
Blinkcat - Can Paralyze, Casts Sound Mind.
Gynocore
Cockatrice - Can Petrify
Barrow Caverns


1. Druid Archmage, sometimes with Friends. The "Friends" are randomized to include Druid, Wicker Cultists, or a group of Dark Faeries. If you approach them with Morgana's Druid Burnoose equipped to any character you are allowed to pass. If you do not have it equipped, even if it is in your inventory, you will be attacked.
I should note that even if you do this event the friendly way you will still be attacked while exploring the Caverns. It does not matter if you keep the Druid Burnoose equipped.
If you choose to fight it can be rough, but it is still possible if you've only just left early game. Cast Magic Screen and Enchanted Blade beforehand if you can, and use controlling status effects like Paralyze to keep the friends in line, if there are any. If there are Dark Faeries get them controlled as soon as possible. The Druid Archmage can be knocked unconscious, so take advantage of that if you can. If you have a Necromancer with Summon Undead you can use that to keep him controlled while you deal with any other enemies. When you win you get several Spellbooks including Lightning, Magic Missle, Leaping Sparks, Fireball, and Hermetic Gag (Eldritch), though it seems like you do not get Fireball every time (it could be that they are all randomized). Morgana doesn't seem to mind if you murder them.

2. Hidden Wall. Can only be opened from the north side.

3. Pushable Rock on the south wall. Closes the nearby pit, making it safe to walk across and allowing you to avoid the Lava tiles.

Note that there is a pretty big difficulty spike here, if you explore it just after leaving the Avian Mountains.

Stepping on the hole in the ground causes you to fall into the Barrow Pits. Cast Featherfall to avoid taking damage/breaking items. You cannot sleep in the Pits, or on top of the ladders you use to get back up, so be prepared before you drop.


POTENTIAL LOOT
1. Potential Treasure (Minor Lock level III)
Weapons: Shortsword, Longsword, Bone Dagger, Gauche, Truncheon, Bipennis, Pole Fork, Lance, Quarterstaff, Bullwhip
Shields: Wooden Buckler
Instruments: Lyre of Slumber, Muting Lyre, Lethe Harp, Hotfoot Banjo
Thrown/Ammo: Stone Bullets, Throwing Knive, Poison Dart
Armor: Phrygian Cone, Leather Vestment, Leather Helm, Mail Coif, Flannel Shirt, Leather Armor, Leather Pants, Sandals, Spiked Bracer
Accessories: Ring Pro Fire, Ring Pro Frost, Ring Pro Magic
Staff/Rods: Stave of Missles, Torpedo Rod, Caduceus of Life, Caduceus of Healing, Stun Rod
Scrolls: Identify, Divination
Spellbooks: Bless, Healing, Charm, Identify, Armor Shield, Fire Shield, Wizard's Eye
Consumables: Cure Heavy Wounds, Cure Lt. Condition, True Seeing, Stink Bomb, Bag of Slumber, Bag of Whispers, Bag of Chuckles, Bag of Sparkles, Nematic Dust, Rock Salts, Spoiled Rations, Iron Rations, Oatmeal Cookie, Baldercake, Leg of Ham, Lethe Liqeur, Cherry Wine
Other: Cobalt Sapphire


ENEMIES
Dragonfly - Can Instantly Kill.
Myconorids - Can Paralyze.
Phase Spiders - Can Poison.
Druid - Casts Spells and uses Items. Can inflict Charm and Poison.
Wicker Cultists - Cast Spells. Can use invisibility. Can inflict Fear, Irritation, Confusion, Curse, and make characters Unconscious.
Druid Archmage - Casts Spells and uses Items. Can inflict Poison, Charm, Nausea.
Dark Faeries - Casts Spells. Can inflict Sleep, Charm, Hold, Confuse, Blind, and potentially summon Dragonfly.
Barrow Pits
You cannot sleep here, even at the Safe Havens (possible bug?). Be prepared before you drop down.


1. Landing Spot from the Barrow Caverns. You cannot go back up from this point.


ENEMIES
Wrokwyrm
Skinkasaur
Barrow Arbor


1. The Grove Entrance.

2. Party's thoughts. There is not a Journal Entry and it is not important, but stepping here tells you a bit of lore on the area.

3. Knotted Treestump. LOOK at it to discover a Tablet there. You will be attacked by The Wicker Man before you can pick it up.
The Wicker Man can inflict nausea, even when Charmed, and is very diffcult to Penatrate, even with Enchanted Blade up. Still, he can be inflicted with most controlling status effects and Unconsciousness, except Fear. You can even make him Dance. Slap Paralyze on him and chip away. When you win you will get a Druid Tunic, Druidic Hood, Druidic Robes, and the Atropos Tablet (Critical Item).
Sadly, it does not seem you are given the option of placing another Tablet on The Wicker Man to side with the Druids this way, despite what Morgana told you. Morgana also does not react to killing her god and taking the Atropos Tablet.

4. Dangling Roots. Just a Journal Entry.

5. Fire Pit with Meat. Nothing special here but a unique graphic.

6. Blackened Skeleton. Another Journal Entry.

7. Skeleton. Click on them for the Bones of Medea. You can cast Raise Dead on the bones to bring Medea back to life. If you speak with her about Prophecy she says she can warn you about danger if you Recruit her, quite possibly in the Hecatombs of the Sphinx which is where she goes if you recruit and dismiss her, but it could also just be a hint about a generic warning you can get later if you have any Necromancer in your party. I honestly don't know much about her yet.


NPC KEYWORDS
Medea (Wherever you bring her back to life, Recruitable): Magic, Prophecy


POTENTIAL LOOT
EVENT 3. Knotted Treestump: Atropos Tablet(Critical Item)

EVENT 7. Skeleton: Bones of Medea.


ENEMIES
Coecanthes
Dragonfly - Can Instantly Kill.
Dryad
Shriekers
Marshlight - Ghost type, I think? Can Charm and "Starve" a character (Seems to do nothing but deplete the pointless FOO bar). Resists Unconsiousness, Charm, Cold, and Sonic Effects.
Mermaid
Dark Fairies - Casts Spells. Can inflict Sleep, Charm, Hold, Confuse, Blind, and potentially summon Dragonfly.
The Wicker Man - Can inflict Nausea.
Crescent Valley


1. Knok-Knok. When the Treant approaches you the game describes him as being annoyed at an angry buzzing sound coming from within his leaves. You cannot read his mind. If you ask him about Insect or Wasp he will ask you to go to their Queen's Hive and burn them out in exchange for secret "froots", then prompts you for a YES or NO. I don't know if answering the prompt matters, but he is happy if you type YES. He becomes a random encounter after you meet him the first time. Once you have killed the Hive Empress, find Knok-Knok again and type WASP for 1000 gold, 2000 exp, Galen Apples, Elysium Berries, Garland of Thorns (Cursed), and Dracaena Petals.

2. Deathstone. If you have a Necromancer in your party, or anyone with a decent Ancient History Skill, they will warn you that touching it will result in death for anyone and all who are around them unless they are well versed in the Necromantic arts. Even with a Necromancer that has a high Necromancy Skill, touching it is prone to failure, which means the instant death of the entire party. If you want to see it succeed you will likely have to try several times.
Success results in your Necromancer receiving Death Resistance (I've seen +11, but didn't test more due to the crashing bug) and a vision:
"They see themselves within a vast dark
chamber underground and in the middle
of a pool of light stands the mighty
Metronome Mysterium.
They can see the hands of the
Clock of Fate turning more slowly,
agonizingly slowly... until finally
they shudder to a halt and stop.
They can hear the sounds of a great
cry go up from the darkness all
around the clock and some infinite
horde pouring forth out of the
black inky nothingness to flood the
entire world with evil."

BUG WARNING: Touching the stone can cause the game to crash, at least in version 1.2.0.25-R. It was added to the list of fixes for patch 1.2.0.26-R but I have yet to test it.

3. Fishing Well. Clicking on it lets you know that you could fish here with a long enough line. Put Fishing Line(100ft) onto the well to cast a line and pull up a Ichysaurus. This completes a Miniquest and gives 1000exp to each member of the party. You get to keep the Fishing Line. See Event #4 in Sargasso of the Kraken for more information on how to get the Fishing Line(100ft). As for what to do with your prize, Chiang in the Carnivale Bazaar is interested in rare fish.

4. Well. Click on it to descend into the Hive Labyrinth.


NPC KEYWORDS
Knok-Knok (Random Encounter after first meeting): Insect/Wasp, Hive


POTENTIAL LOOT
1. Treasure Chest (Major Lock Level VIII)
Weapons: Claymore, Shortbow, Longbow, Crossbow, Cranequin, Threaded Lash, Bolas, Awl Pike, Javelin, Berdiche
Instruments: Thistle Whistle, Hotfoot Banjo
Thrown/Ammo: Horn of Winter, Sheolic Pipes, Drain Arrow, Piercer Arrow, Feather Dart
Armor: Cap O 'Rushes, Bascinet, Flannel Shirt, Leather Jerkin, Jazeraint Pants, Spiked Bracer, Firewalkers
Accessory: Ring Pro Frost, Ring Pro Magic, Ring of Deflection
Staff/Rods: Faerie Staff
Scrolls: Identify, Hold Monsters, Armorplate, Magic Screen, Wither, Lightning, Crushing Hand
Spellbooks: Direction, Remove Curse, AntiMagic
Consumables: Faery Water, Dazzler Dust, Arsenic, Hemlock, Wolfsbane, Mandrake Root, Mistletoe, Black Lotus, Water Glass, Bug Off, Talisman of SpiderClimb, Pilgrim Tea
Other: K.O. Rock, Luck Stone


ENEMIES
Stinkbug - Can Poison.
Fire Beetle - Can Irritate. Has a Fire based Breath.
Glowmoth - Can Blind.
Night Lily - Can Poison.
Chlorazoid
Monarch Nettle
Treant - Cannot be knocked Unconscious.
Hive Labyrinth


1. Hole. Click on it to decend to Empress Wasp Mound. If you are having trouble, the clickable portion is underneath part of the UI border once you are standing on it.


ENEMIES
Mudwasp - Can Irritate.
Dragonfly - Can Instantly Kill.
Myconorids - Can Paralyze.
Empress Wasp Mound


1. Hive Empress. If her Stinger Penetrates a character's defenses, they are dead. She can also cause Nausea. She is susceptible to most controlling status effects, except Insanity. You can knock her unconscious as well. Get her under control as soon as possible and chip away at her health. I forgot to check if using Bug Off can protect you during this fight. Once she is dead you can return to Knok-Knok in Crescent Valley for some rewards, no Fire necessary.


Every tile on this floor is a Safe Haven, except where the Empress is.


ENEMIES
Hive Empress - Can inflict Instant Death, Nausea.
Nether Passage


1. Ducat and the Tunnel Plumbers. After an introduction he will attempt to extort money from you. The amount varies, and seems to be a large percentage of whatever gold you have on hand, plus a slight randomization. If this is not your first meeting then Ducat will acknowledge if you have met him before, or if you have joined the Vanguard.
If you pay the amount is deducted from your total gold and he will tell you the Owl Chest combination: Fire, Fire, Moon, Star, Man, Bird
If you refuse he and his friends will attack, his friends consisting of a randomized amount of Highwaymen, Brigands, and/or Dark Rangers. Highwaymen and Brigands don't do anything special, but the damage they inflict can add up. Dark Rangers can cast some really nasty spells, so if they are there take care of them as fast as possible. Ducat himself can cast spells and Invoke his weapon to inflict Blind, but he usually chooses to strike for a significant amount of damage. As always, controlling status effects are the way to go, and they do not seem to have any resistances. Still, you might want to cast Armorplate and Magic Screen beforehand to protect your party members while you get things under control. When you win you will receive up to two Gauche (though sometimes you don't get any), Ducat's sword Daguerro, and Ring of Swordsmen. If you want the stats for the sword:
One Handed
5D8 Damage
Range 1
Sharpen
SYS10
25 Swordsmanship
TOHIT 30
Capable of Lethal Blow


2. Draining Fountain. Drains Magic from any character who drinks from it. This tile is also a Safe Haven.

3. Curative Fountain. Seems like it is infinite use.

4. Acme Vending Machine

5. Nether Owl Chest, which has a complex lock that uses pictographs. You can get the combination by paying Ducat when you meet him in this area. You do not need to pay him for the combination to work though. The combination is Fire, Fire, Moon, Star, Man, Bird. The contents are listed in the Potential Loot section below.


SHOP
Acme Vending Machine
Scrolls: Divination (4 tokens), True North (2 tokens), Locate Item (6 tokens), Knock Knock (3 tokens)
Consumables: Remove Curse (3 tokens), Cure Lt. Condition (2 tokens), True Seeing (3 tokens), Cherry Wine (1 token), Crimson Ambrosia (4 tokens), Oatmeal Cookie (1 token), Iron Rations (2 tokens), Galen Apple (1 token), Baldercake (1 token)
Other: Luck Stone (6 tokens), Silver Spoon (1 token), Locksmith's Glue (4 tokens)


POTENTIAL LOOT
EVENT 5. Nether Owl Chest:
Weapons: Composite Bow, Toxibarb
Thrown/Ammo: Horn of Horror, Flame Arrow
Armor: Blood Shawl, Blood Tunic, Blood Robes, Megiddo Ivy
Other: Luck Stone
*The loot in this chest is static.


ENEMIES
Amoebic Slime
Toxic Amoeba
Flesh Grubs - Can Disease.
Terrormites
Giant Bat - Can Drain Vit/Sleep.
Brigand
Highwaymen
Dark Rangers - Can Blink (a.k.a. Flicker Out) and cast Spells, including those that inflict Silence, Drain, Web, Slow, Nasuea, and cause Instant Death, as well as buff with Enchanted Blade.
Ducat - Can cast Spells and inflict Blind.
CITY OF WATERPORT SECTION
City of Waterport


1. Two Notices. The southern notice gives you a little info on what is going on: Lord Ahriman used the Vanguard Marines to evacuate and close the city.. The northern one states that no trespassers will be allowed and looting is punishable by death, but also says that previous inhabitants may enter to collect their possessions. This is a hint.

2. Reaver Guard and Door will approach you when you step on this tile. He will ask your business in Waterport and and a text prompt will appear. The hints to the correct answer are found on the northern notice right behind you (and the fact the Reaver asks if you can read), or asking any NPC that responds to WATERPORT. The correct answer is POSSESSIONS, and with it the Reaver will unlock the door and give you a little more information about what is happening in town. Even if you have permission to enter you will still be attacked by Vanguard Marines in random battles.. If you do not guess correctly the guard steps away and you can either step back and forth to re-trigger the Reaver and try again, or pick the lock on the door, which is Master Lock Level X, or you can use the Knock Knock spell. There are consequences to that though, as you will be approached by a random number of Vanguard Marines (3 to 5) on the other side and are forced to fight and win against them (you cannot run). I do not know if there are further consequences, but Shrike and Ahriman do not seem to mind if you enter this way.

3. Wanted Poster for the Baby. Not important. It's just a copy of the other wanted posters.

4. Locked Door. Locked with Major Lock Level VI.

5. Waterlogged Sacks. Pick up the Canvas Sack from the ground square (next to the inventory scroll) and place it in your inventory for more space. You can put anything but Critical Items in it, so it's quite handy.

6. Locked Door (Major Lock Level VI)

7. Bed. You can click on it for a description of the state of the bed. LOOK at it to find an Eyepatch (Critical Item).

8. Water Soaked Papers. LOOK at it to find various commerce related papers, the Harbor Master's letters complaining about rising tides, a record of a serpent-man attack, and finally an Engineer's Memo, which you can take. LOOK at the Memo and click the down arrow in the lower left hand corner to learn about Waterport's electrophoresis generators and what is used to power them.

9. Bookshelf. Click it to get Kelpy Lullabye (Critical Item).

Successfully descending into Nerukzan Woodlands gives each memeber of the party 75exp.


POTENTIAL LOOT
EVENT 7. Bed: Eyepatch (Critical Item).

EVENT 9. Bookshelf. Click it to get Kelpy Lullabye (Critical Item).

1. Shallow Water: Vending Tokens

2. Treasure Chest (Major Lock Level VI)
Weapons: Shortsword, Longsword, Bone Dagger, Gauche, Bipennis, Truncheon, Pole Fork, Lance, Quarterstaff, Bullwhip
Instruments: Lyre of Slumber, Muting Lyre, Hotfoot Banjo, Lethe Harp
Thrown/Ammo: Throwing Knive, Needle Darts, Feather Darts, Poison Darts
Shields: Wooden Buckler
Armor: Phrygian Cone, Leather Vestment, Leather Helm, Flannel Shirt, Leather Armor, Leather Pants, Spiked Bracer, Sandals
Accessories: Ring Pro Frost, Ring Pro Fire, Ring Pro Magic
Staff/Rods: Stave of Missiles, Torpedo Rod, Stun Rod, Caduceus of Healing, Caduceus of Life
Scrolls: Identify, Detect Magic, Divination
Spellbooks: Healing, Bless, Identify, Charm, Wizard's Eye, Armor Shield, Fire Shield
Consumables: Cure Lt. Wounds, Cure Heavy Wounds, Cure Lt. Condition, True Seeing, Stink Bomb, Bag of Slumber, Bag of Sparkles, Bag of Whispers, Bag of Chuckles, Nematic Dust, Rock Salts, Iron Rations, Spoiled Rations, Baldercake, Leg of Ham, Cherry Wine, Lethe Liqeur
Other: Cobalt Sapphire

You will sometimes get Locksmith's Key or Common gate Key drops after battles in this area.


ENEMIES
Brigands
Highwaymen
Mutineers
Vanguard Marines - Has access to Thistle Whistle.
Naga Scavengers
Marshlight Ghost type. Can Charm and "Starve" a character (Seems to do nothing but deplete the pointless FOO bar). Resists Unconsiousness, Charm, Cold, and Sonic Effects.
Quiddick Harbor


1. Barrel. Click it to get Rope (25 ft.) (Critical Item).

2. Tidal Pool. Standing on it will give you a Journal Entry. Find the Homeless Crab in Loch Lalain and the Crabshell in Hall of Commerce. Combine them to make Hermit Crab. Change a character's Action Icon to USE, then pick up the Crab and place it on the USE Icon to put it in the Tidal Pool. This completes a Miniquest, which gives each member of the party 1000exp. To save time for the curious, Chiang is not interested in the Hermit Crab.

3. Wall Map. Clicking on it will fill out your map of the area.

4. Crate. Click it to get Baling Hook (Critical Item). You can combine the Baling Hook with the Rope (25ft.) to get Rope & Hook by dropping one on top of the other. You can also use the Item Workshop if you prefer that.

5. Wellshaft. Clicking on it will tell you that you need something to descend into it. Use the Rope & Hook on the Well, then you can enter the Well to descend into the Hall of Commerce. Doing this is unnecessary, since you can reach where it would take you another way.

There are Skull Gates blocking the way out into the water. I am pretty sure that you are not meant to open them.


POTENTIAL LOOT
EVENT 1. Barrel: Rope (25 ft.) (Critical Item)

EVENT 4. Crate: Baling Hook (Critical Item)

1. Barrel: Bag of Whispers.


ENEMIES
Sandfleas
Coecanthes
Marshlight - Ghost type. Can Charm and "Starve" a character (Seems to do nothing but deplete the pointless FOO bar). Resists Unconsiousness, Charm, Cold, and Sonic Effects.
Hall of Commerce


1. Ducat and the Tunnel Plumbers. After an introduction he will attempt to extort money from you. The amount varies, and seems to be a large percentage of whatever gold you have on hand, plus a slight randomization. If this is not your first meeting then Ducat will acknowledge if you have met him before, or if you have joined the Vanguard.
If you pay the amount is deducted from your total gold and he will tell you the Saltwyrm Owl Chest combination: Star, Man, Moon, Star, Bird, Fish
If you refuse he and his friends will attack, his friends consisting of a randomized amount of Highwaymen, Brigands, and/or Dark Rangers. Highwaymen and Brigands don't do anything special, but the damage they inflict can add up. Dark Rangers can cast some really nasty spells, so if they are there take care of them as fast as possible. Ducat himself can cast spells and Invoke his weapon to inflict Blind, but he usually chooses to strike for a significant amount of damage. As always, controlling status effects are the way to go, and they do not seem to have any resistances. Still, you might want to cast Armorplate and Magic Screen beforehand to protect your party members while you get things under control. When you win you will receive up to two Gauche (though sometimes you don't get any), Ducat's sword Daguerro, and Ring of Swordsmen.

2. Inconspicuous Corner. LOOK at this tile to discover a salt sack covering brown tufts of fur and rat poop.

3. Treasure Chest (Major Lock Level VII). Open it to find Gear Band (Critical Item).

4. Acme Vending Machine.

5. Inconspicuous Cubby. LOOK at this tile to discover Sawdust and Chicken Bones.

6. Inconspicuous Cubby. LOOK at this tile to discover Fishing Line (25ft). See Event #4 in Sargasso of the Kraken for more information on this item.

7. Barrel. Click on it to find a Crabshell (Critical Item).

8. Inconspicuous Cubby. LOOK at this tile to discover dirty laundry.

9. Party Thoughts. Stepping on this tile lets you in on a little more of what happened here, if you didn't already figure it out on your own, and gives you a Journal Entry.

10. Shaft of Light. You can ascend here if you use the Rope & Hook on the Well in Quiddick Harbor.

11. Skeleton. Click it to get Tricorn Hat (Critical Item).

12. Utility Box in Alcove. Open it for a Magneto Disk (Critical Item).

13. Abandoned Tool Chest in Alcove. Open it for a Magneto Disk (Critical Item).

14. Barrel. Click on it for Stuffed Parrot (Critical Item).

15. Inconspicuous Corner. LOOK at this tile to discover traces of goo and ash.

There are a lot of little descriptions and I didn't have the room to type all of them, so only the ones that set of Detect Secret are listed. They are fun, but do not seem to matter.


SHOPS
Acme Vending Machine
Scrolls: Divination (4 tokens), True North (2 tokens), Locate Person (3 tokens)
Consumables: Soothing Stone (1 token), Silver Spoon (1 token), Garlic (2 tokens), Cure Lt. Wounds (3 tokens), True Seeing (3 tokens), Chattery Teeth (6 tokens), Nausea Powder (1 token), Lethe Liqeur (1 token), Undead Warder (5 tokens), Iron Rations (1 token), Galen Apple (1 token), baldercake (1 token), Neutralize Poison (5 tokens)


POTENTIAL LOOT
EVENT 3. Treasure Chest (Major Lock Level VII): Gear Band (Critical Item)

EVENT 6. Inconspicuous Cubby: Fishing Line (25ft)

EVENT 7. Barrel: Crabshell (Critical Item).

EVENT 11. Skeleton: Tricorn Hat (Critical Item)

EVENT 12. Utility Box in Alcove: Magneto Disk (Critical Item)

EVENT 13. Abandoned Tool Chest in Alcove: Magneto Disk (Critical Item).

EVENT 14. Barrel. Click on it for Stuffed Parrot (Critical Item).


ENEMIES
Mutineer
Vanguard Marines - Has access to Thistle Whistle.
Troglodytes
Smuggler's Hideout - WIP


1. Cooking Meat

2. Skull Gate. You cannot pick the lock.

3. Barred Window. When you approach the window you will hear voices saying that Jaqque is expecting a man sent from Pierre that is wearing a hat, parrot, and eyepatch, and that no one else is to be allowed past the Gate. This is a hint.

4. Skull Gate. Click on it to get a reaction from the Pirate on the other side. If you click on it without any preparation the game will give you a hint. Equip the Tricron Hat, Eyepatch, and Stuffed Parrot you can find in City of Waterport and Hall of Commerce. It does not matter if you wear them on one character or three, since the game only seems to check if they are equipped or not. After everything is on, touch the Gate and the guard will say that Nefarge is waiting for you and opens it. You can safely unequip the items after that.

5. Jaqque Nefarge is a neutral NPC who approaches you when you step on this tile. He will ask you where his loot is, asks if you were sent by Pierre, then asks if you have his 6800 crowns.
If you give him the gold he will take it and tell you Pierre only owed him 3200 crowns (as far as I know there is no way to give him that amount). Still, Jaqque praises you for being good folk and welcomes you to the Smuggler's Hideout, changing his mood to friendly. You will be able to talk with him afterward and he has a lot to say. Go through his keywords to learn more about what is going on.
If you refuse to give him the gold he says that you are not who he thought you were and calls you spies, but he doesn't attack. If you try to talk with him afterward he demands Tribute before he'll say anything. Bribing him does not work, though he will still take your money. When you leave him he will still allow you to poke around the Hideout even though you didn't pay. If you want to give him his Tribute you will have to meet with him again (Reload the area. You do not have to Rest.) and choose to pay the 6800 crowns. The price does not go down.
No matter which you choose, you can steal Blacky's Diary from him. LOOKing at it reveals what looks like a code, which is typed in the next spoiler section. SEAHORSE, CRAB, TURTLE, FISH, MERMAID, DOLPHIN

6. Cooking Meat

7. Cooking Meat

8. Crate with Shipping Labels. Click it for Y-Adaptor Plug (Critical Item).

9. Mutineers. When you approach them they accuse you of trying to steal their treasure and attack you. It's not a hard fight.

10. Mutineers. When you approach them they insult you and attack. It's not a hard fight.

11. Skull Gate. You cannot pick the lock.

WIP - Still need to find the Key that opens one of the Skull Gates to reach the Treasure Chest.


NPC KEYWORDS
Jaqque Nefarge: (Lord) Ahriman, Bahomet (Megalith)/Kraken, (Black) Pierre, Boat/Ship/Intrepid, (Loch) Lalain / Loch Titan, Mermaid, Naga, Neriad, Nick, Pirate, Snark Mistress, Vanguard, Waterport, Zephyr Isles
*Mindread says he is thinking about Helmet, but he does not have any special reaction to the word.
**Having good Diplomancy Skill or casting Charm will get more information out of him.
***You can steal Blacky's Diary (Critical Item) from him. As far as I know there is no nice way to get it from him. He does not mind if you show him the stolen book.


POTENTIAL LOOT
EVENT 8. Crate with Shipping Labels: Y-Adaptor Plug (Critical Item)

1. Shallow Water: Vending Tokens


ENEMIES
Buccaneers
Mutineers
Crow's Nest Level One


Every tile in this area is a Safe Haven, even the ladder tiles.
Crow's Nest Level Two


1. Inconspicuous Corner. LOOK at this tile to find Fishing Line (25ft.). See Event #4 in Sargasso of the Kraken for more information on this item.

Every tile in this area is a Safe Haven, including Event #1 and both ladders.


POTENTIAL LOOT
EVENT 1. Inconspicuous Corner: Fishing Line (25ft.)
Crow's Nest Tower


1. Signal Lantern. Stepping on this tile describes the lantern, and a few other thoughts on it.

2. Porthole. Approaching it descibes that you can see Waterport blow.

3. Porthole. Approaching it describes Seagulls screeching at you.

Every tile in this area is a Safe Haven, including all Events and the ladder.
Electrophoresis Works


1. Hydro Lift. Click the wooden sign on the wall to read that it leads ot the Pump Control Room. Pulling the chain does nothing. After fixing the Phoresis Generator in the Generator Room and closing the circuit in the Potentiator Lab you will be able to pull the chain and descend into Tidal Pumps Station. It will not work until both are fixed.

2. Well. Clicking on it reveals that it is filled with seawater. Once you have flipped the Master Pump Control Switch in Tidal Pumps Station the water level in the well goes down, revealing a ladder to Saltwyrm Caves. The hints that they are somehow connected, other than the fact that I decided against keeping it a secret on the map above, is the description of the seawater being pumped away and that there are wells in the Tidal Pumps Station.


ENEMIES
Electromaggot - Can deal magic damage.
Oreworm - Can Irritate and Destroy equipment.
Generator Room


1. Phoresis Generator. Click on it for a description of the device, and that its flywheel is rotating freely. Put the Gear Band, found in Hall of Commerce, on the generator. If you click the device again the game will tell you that something has been disconnected on the top of the control box. Put the Y-Adaptor Plug, found in Smuggler's Hideout, on the generator and the device will turn on the nearby lanterns to indicate that it is working. If you click it again the game will tell you that power will be available to the Potentiator Tanks. You do not have to do the extra clicks for hints if you do not want to, but you have to put both items on the generator in the correct order.


ENEMIES
Electrapede - Can deal magic damage that also has a chance to Instantly Kill.
Potentiator Lab


1. Description of Potentiator Tanks. Tells you exactly what you are looking at and gives you a Jounral Entry.

2. Warning Plaque. Clicking it will tell you that discharging the water without a working generator will result in damage to the tanks and give you a Journal Entry.

3. Dial. For a hint read the Engineer's Memo that can be found in City of Waterport. Put one of the Magneto Disks found in Hall of Commerce onto the Dial. The Tank will break and you will be attacked by Electromaggots (it does not matter if you power the generator in the Generator Room first). You will be allowed to step onto the water tile inside the Tank afterward for an extra bit of map percentage. It does not matter that the Tank burst. When both Magneto Disks are placed the circuit to the Phoresis Generator is complete.

4. Dial and Tank. Facing the Tank will give you a description of what is inside and a Journal Entry. For a hint about the Dial read the Engineer's Memo that can be found in City of Waterport. Put one of the Magneto Disks found in Hall of Commerce onto the Dial. When both Magneto Disks are placed the circuit to the Phoresis Generator is complete.

As far as I know you can never get 100% on this map, because you cannot break the south Tank.


POTENTIAL LOOT
You will sometimes get Locksmith's Key drops after battles in this area.


ENEMIES
Electromaggot - Can deal magic damage.
Tidal Pumps Station


1. Hydro Lift. Pulling the chain takes you to Electrophoresis Works.

2. Light Switch. The warning on the wall says not to play with it. Clicking it turns the light on and off. Clicking it repeatedly does not seem to have any negative consequences.

3. Well. Clicking on it reveals that you hear a strong current running through the pipes beneath it.

4. Master Pump Control Switch. Click to pull water from the underground caves. This allows access to the Saltwyrm Caves in Electrophoresis Works.

5. Well. Clicking on it reveals that you hear a strong current running through the pipes beneath it.

The ◎ marks are holes in the ceiling and do not seem to have any purpose.


ENEMIES
Electromaggot - Can deal magic damage.
Saltwyrm Caves


1. Cooking Meat.

2. Skeleton. LOOK at it for Stingor, a dagger weapon.

3. Troglodyte Ceremony. There are many Troglodytes dancing around, and a Shaman chants "Oh-toh-yog-soggoth!!" which is answered by the others with "Rama-lama-ding-dong!!". When they notice you they grab their weapons and you will be attacked by several Trog Shaman. After winning the fight, a trembling but friendly Saurian puts his hands up in surrender, but begins to ask if the Deep Ones will eat him, and that he would not taste good. He introduces himself as Glib-Glub. You can ask him some Keywords to know a little about what was going on. You can also recruit him if you'd like. He has decent Vitality and good, but not overpowered stats for a Warrior. I don't know much about him yet. He becomes a random encounter after your first meeting.

4. Wooden Debris. Click on it for Deep One Totem (Critical Item).

5. Cooking Mystery Meat.

6. Saurian Ambush. If you are not confident in your party you might want to save and cast Armorplate before stepping on this tile. You will be forced into battle against quite a few Trog Warriors. They are no different than the mobs that attack you elsewhere on this floor, capable of instantly killing your party members. Having access to a buff that can protect characters against Missile type attacks might help. Get them controlled with status effects as soon as you can and hope your characters are not too stupid about targeting them. If all of your characters are relatively fast, have your slower characters try and land status effects (if they are not capable of Magic or Music, status inflicting items can work well) so that your faster characters can get hits in without disturbing whatever you use to control the situation. After the first battle there will be three more (making it four consecutive battles), still consisting of many Trog Warriors. Afterward you are free to continue exploring.

7. Saltwyrm Owl Chest. The combination is found by paying Ducat in Hall of Commerce. You do not have to pay Ducat for the combination to work. The combination is Star, Man, Moon, Star, Bird, Fish. The contents are listed in the Potential Loot section.

8. Treasure Chest (Major Lock Level IX). There is nothing special about the chest itself, but the tile is also a Safe Haven and I want to keep the map tidy if I can. The loot is listed in the Potential Loot section.

9. Ancient Stone Slab. Click it to show the Nautilus Mosiac Buttons, which consist of Mermaid, Dolphin, Fish, Seahorse, Crab, and Turtle. For a hint steal Blacky's Diary from Jaqque Nefarge in Smuggler's Hideout, then LOOK at it. The answer is SEAHORSE, CRAB, TURTLE, FISH, MERMAID, DOLPHIN. Pressing the correct combination removes the west wall.

10. Magic Green Gate. Use the Key of the Exemplar on it to remove it.

11. Treasure Chest. Open it for the Scylla Tablet (Critical Item).

There are little signs of Troglodytes as you explore. I didn't list them because I was in a rush and am also lazy.


NPC KEYWORDS
Glib-Glub: Deep One, (Deep One) Totem


POTENTIAL LOOT
EVENT 2. Skeleton: Stingor

EVENT 4. Wooden Debris: Deep One Totem (Critical Item)

EVENT 7. Saltwyrm Owl Chest
Weapons: Thorndoom, Fangor, Sabre Halberd, Faerie Staff, Quicksilver
Armor: Nocturne
Spellbooks: Etherwarp(Eldritch)
Consumable: Chomping Teeth, Dazzler Dust
*The items in this chest are static.

EVENT 8. Treasure Chest (Major Lock Level IX).
Weapons: Rusty Sword, Broadsword, Gauche, Duckbill, Battle Axe, Bipennis, Truncheon, Flagellum, Lance, Slingshot, Knuckle Duster
Instruments: Muting Lyre, Cacaphony Harp, Hotfoot Banjo
Thrown/Ammo: Throwing Knive, Piercer Arrow, Barbed Arrows, Feather Dart, Needle Darts, Horn of Winter
Shields: Heraldic Shield
Armor: Wizard Cap, Leather Vestment, Leather Hood, Mail Coif, Flannel Shirt, Brigandine, Greaves, Sandals, Sollerets
Accessroies: Ring Pro Frost, Ring Pro Magic, Ring of Protection, Amulet of Might
Staff/Rods: Stave of Missiles, Zapper Rod, Sparkler Rod, Torpedo Rod, Ice Wand, Wand of Webs, Caduceus of Life
Scrolls: Divination, Locate Person, Locate Item, Magic Screen, Magic Missile, Knock Knock
Spellbooks: Bless, Remove Curse, Knock Knock, Raise Dead, Magic Bells, Fire Shield, Armor Shield
Consumables: Cure Heavy Wounds, Neutralize Poison, Remove Curse, True Seeing, Bag of Sparkles, Bag of Whispers, Rock Salts, Baldercake, Iron Rations, Cherry Wine, Soothing Stone
Other: Cobalt Sapphire, Gold Leaf, Vending Tokens

You will sometimes get Locksmith's Key drops after battles in this area.


ENEMIES
Sandfleas
Troglodytes
Trog Shaman
Trog Warriors - Capable of Instant Kill.
THE LOCHS SECTION
Loch Lalain


1. Scuttled Boat. You cannot use this Boat, but you have a chance at gaining a point in Scout Skill for a party member if you step on this tile.

2. Lysandra is a friendly, enchanted harp NPC. I couldn't find any Keywords that she reacts to, but if you ask her stuff she will say that all she knows is the music of the Lake and the Song of the Chariot. The hint on what to do is found the in Tablet Hints about the Aurora Tablet in Shrine of the Raptor (The Shrine Start only, and the hint does not apply to the Tablet) and the fact that she only knows music. There might be another hint found LOOKing at one of the Tablets, but I have foolishly been putting them in their proper place after finding them and forgot to jot down what they say. Show her the Kelpy Lullabye, found in City of Waterport, and she will study the book and sing it for you, summoning the Kelpie Chariot. Afterward, she vanishes (you can reload the area if you want to talk to her again), but you get to keep the book. The Kelpie Chariot can be ridden like a Boat/Turtle across the water.

3. Powerful Current and Shadow. Some foreshadowing and a Journal Entry.

4. Debris. LOOK at it to find a Homeless Crab (Critical Item). Combine the Homeless Crab with the Crabshell, found in the Hall of Commerce, to get Hermit Crab. Take it to Quiddick Harbor for a Miniquest.

5. H.M.S. Intrepid. Click on the Boat to board it.

6. Inconspicuous Spot. LOOK here to see something glittering on the ocean floor. Equip the Diving Bell that you can get from Admiral Boondoggle on the Upper Deck of the H.M.S. Intrepid, then LOOK at this spot. The equipped character will retrieve a Bell Clapper (Critical Item). See Event #1 in Bell Tower for more information.

There are few spots on the beach that have text, and at least one that gives you a Journal Entry (might have to face the sea). I forgot to mark them, but they are not hard to find.


NPC KEYWORDS
Lysandra: She does not respond to anything in any special way, with the exception of her name/Job/Profession/Trade. She won't even respond to most small talk.
*You cannot use Mindread.


ENEMIES
Fire Beetle - Can Irritate. Has a Fire based Breath.
Sandfleas
Trog Warriors - Capable of Instant Kill.
Piranha
Ramorae
Dragon Carps
Hydra
Colossochely
H.M.S. Intrepid


1. Treasure Chest "Pantry". Click on it to find that it has been cleaned out, but you can take the Pantry itself to hold food items and save inventory space.

There are little notes when you step on certain tiles throughout the ship. I didn't list them because I forgot and am too lazy to go back over things that are not relevant to progression.


POTENTIAL LOOT
EVENT 1. Treasure Chest "Pantry": Pantry

1. Barrel:
Weapons: Rusty Sword, Knuckle Duster
Instruments: Thistle Whistle
Scrolls: Locate Item
Consumables: Cure Paralysis, Stone To Flesh, Faery Water, Sleep Sand, Halomancic Salts, Rock Salts, Cherry Wine, Luck Stone, K.O. Rock


ENEMIES
Sandfleas
Mutineers
Buccaneers
Intrepid Upper Deck


1. Admiral Boondoggle is a friendly NPC. When you approach he lets you know what happened to him, and you can press for more details using Keywords. Ask him about RESCUE, then type YES when prompted to gain his trust. Afterward, ask about DIVING BELL and CHART and he will give you Diving Bell and Dead Ringer Chart. If you don't say yes or bring up rescue, then try to get the items through talking, he will demand rescue first. If you made him angry (which you'd have to do intentionally), saying you will send a rescue party will remove one anger point. You can also heal him via the HEAL NPC action (right click a character's action icon to choose it), which will get you more information about the locations of the bell pieces if you show him the Chart(see "GAME CRASHING BUG" below). If you leave and want him to speak with him again, reload the area.
As a side note he does not accept anything to eat or drink, despite the description you get when you first meet him. Another thing is that I am pretty sure there is no real Rescue. Both Shrike and Ahriman only have generic "what about" texts when bringing him up, and it doesn't seem like you can Recruit him. If I am wrong and I missed something somewhere, let me know and I will credit you.
GAME CRASHING BUG: In version 1.2.0.26-R, perheps earlier versions as well, if you get the Dead Ringer Chart the nice way, Heal Boondoggle, then and show him the Chart, he will give you more information on where to find the Bell Pieces (Loch Lalain, Loch Titan, Sargasso), but the game will crash. Since you cannot get any information from the Dead Ringer Chart with LOOK or USE this bug seems to make the item worthless. If you do not heal him and show him the Chart, or show him the Chart after stealing it, it does not crash the game but you do not get any extra information that way. This bug was fixed in version 1.2.0.27-R, though I haven't had the chance to test it yet.


NPC KEYWORDS
Admiral Boondoggle: (Lord) Ahriman, Balderdash, Boat/Intrepid, Coward, (Dead Ringer) Chart, Diving Bell/Helmet, Kraken, Pirate, Waterport, Chili Sardines, Rescue
*Charming does not seem to negate the consequences of stealing and he will become Hostile toward you, even if his friendliness is more than his anger.
**You can steal Diving Bell (Critical Item) and Dead Ringer Chart (Critical Item) from him. If you ask about the items after you stole them he will acknowledge their theft. If you show the stolen goods to him he will still (Improved) Identify them for you, but he will not give you any extra information.


ENEMIES
Mutineer
Buccaneers
Loch Titan


Neriad is a friendly mermaid NPC found in Random Encounters in this area. You can ask her about a few things, but her main concern seems to be about Nick. If you find Nick and use the HEAL NPC action on him, Neriad acknowledges it the next time you meet, but other than that she does not seem to do or say anything special. To save time for the curious even though she says that she collects sea shells if you ask about her Job, she will not accept Crabshell or Conch Helmet. Despite Jaqque Nefarge telling you about a reward for finding her and bringing her over to their side, there does not seem to be a way to do so.

1. Inconspicuous Cubby. LOOK here for Fishing Line (25ft). See Event #4 in Sargasso of the Kraken for more information on this item.

2. Inconspicuous Spot. LOOK here to see something glittering on the ocean floor. Equip the Diving Bell that you can get from Admiral Boondoggle on the Upper Deck of the H.M.S. Intrepid, then LOOK at this spot. The equipped character will retrieve a Bell Fragment (Critical Item). See Event #1 in Bell Tower for more information.

3. Snark Mistress. Click the boat to board it.

4. Inconspicuous Spot. LOOK here to see a metallic shape on the ocean floor. Equip the Diving Bell that you can get from Admiral Boondoggle on the Upper Deck of the H.M.S. Intrepid, then LOOK at this spot. The equipped character will retrieve a Bell Hasp (Critical Item). See Event #1 in Bell Tower for more information.

There is a text event that appears if you go to Zephyr Isles and come back, just south of the buoy. It details how scary the Sargasso is, so it may be a missplaced event.


NPC KEYWORDS
Neriad: Boat, Intrepid, Diving Bell/Diving Helmet, Kraken, Mermaid, Nick, Water, Waterport, Bahomet, Methuselah/Gorgonra, Sargasso, (Little) Daisy
*You can steal Shellhorn Salepsis. She does not care if you show her the stolen goods and will (Improved) Identify it for you. I do not know how to get it a nice way, if one exists, but it is not marked as Critical so don't feel like you have to steal it.
**You can Bribe her and she will take your gold, but she will not gain friendly points for it.


POTENTIAL LOOT
Event 1. Inconspicuous Cubby: Fishing Line (25ft)

1. Treasure Chest (Major Lock Level VII):
Weapons: Shortsword, Longsword, Bastard Sword, Bone Dagger, Poison Dagger, Cat 'O 'Nine Tails, Bullwhip, Quarterstaff
Shields: Wooden Buckler
Instruments: Lyre of Slumber, Muting Lyre, Swaying Lute, Lethe Harp
Thrown/Ammo: Throwing Knive, Feather Dart, Poison Dart, Lead Ball, Flute of Chaos
Armor: Phrygian Cone, Leather Helm, Flannel Shirt, Silk Robe, Cotton Cloak, Leather Jerkin, Flannel Pants, Leather Pants, Sandals
Accessories: Ring Pro Fire, Ring Pro Frost
Staff/Rods: Stave of Missiles, Caduceus of Healing
Scrolls: True North, Identify, Detect Magic, Detect Secret
Spellbooks: Bless, Identify, Detect Secret, Charm, Healing, Direction
Consumables: Cure Lt. Wounds, Cure Lt. Condition, Nematic Dust, Nausea Powder, Bag of Slumber, Bag of Sparkles, Rock Salts, Red Pepper, Oatmeal Cookie, Leg of Ham, Pilgrim Tea, Cherry Wine, Lethe Liqeur, Silver Spoon
Other: Cobalt Sapphire

2. Treasure Chest
Weapons: Rusty Sword*, Necktwister*
Armor: Phrygian Cone*
Spellbooks: Fireball*, Wizard's Eye*
Consumables: Bag of Terrors, Bag of Sparkles, Halomancic Salts
Other: Locksmith's Glue
*The marked items seem static. Unmarked items are random.

You will sometimes get Locksmith's Key drops after battles in this area.


ENEMIES
Sandfleas
Trog Warriors - Capable of Instant Kill.
Dragon Carps
Seawitch
Siren
Water Elemental
Dragon Turtle
Snark Mistress
Version 1.2.0.26-R: You are sometimes not allowed to Rest in the Snark Mistress until you reach the Lower Berth, but sometimes you can, even in places that wouldn't allow you to before. Pretty sure this is a Bug. It doesn't hurt anything. Just be aware of it.


1. Window. Look through it to see Pirates playing cards.

2. Locked Door to Private Captain's Quarters. When you stand in front of it and face the door you can hear voices. Clicking on the doors makes your party knock, which causes the voices to go quiet. You cannot pick the door. Solve the short puzzle in Lower Berth of the Snark (#2, #6) to open the door.

3. Black Pierre is a neutral NPC. After some descriptions you will be able to interact with him. Try talking with him and he will tell you that he won't trust you unless you become a member of his crew, and you can't join his crew unless you win a contest. You are then presented with four choices (not including cancel): Pimp Slapping Contest, Drinking Contest, Fancy Stitch Embroidery, and Cancel (does nothing but back out).
Choosing Pimp Slapping Contest leads to three more racially charged selections: Ah Axed Choo Uh Quesshun Punk Bop, Whey Be Mah Money Backhand, and Dis Be Fo Yo Momma King Hit. Most of the time, Pierre will slap the character you chose to talk with, inflicts them with unconsiouness or blindness, and says you failed. I do not know what stats are required to win, if any, or if it is entirely random, but the higher up the list you select the more likely you are to win.
Choosing Drinking Contest leads to three more selections: Bootleg Hyperborean Rum, Paper Filtered Shaving Tonic, and Drainpan Recycled Cleaning Solvent. Most of the time, Pierre will hand the character you chose to talk with a drink, which will inflict them with Nausea or Paralysis, and says you failed. Sometimes the character you choose will win though, and they will receive 400exp if they win the first choice, 700exp if they win the second choice, and 1000exp if they win the third choice. I do not know what stats are required to win, if any, or if it is entirely random, but if it is anything like the other two catergories the higher up the list you select the more likely you are to win.
Choosing Fancy Stitch Embroidery leads to three more selections: Simple Cross Hatch, Double Figure Eighty-Eight, and Cascade Whorl of Death. Most of the time, Pierre will show a pattern and hands over some knitting tools to the character you chose to talk with, which will inflict them with Confusion or Insanity, and says that you failed. Sometimes the character you choose will win though, and they will receive 400exp if they win the first choice, 700exp if they win the second choice, and 1000exp if they win the third choice. I do not know what stats are required to win, if any, or if it is entirely random, but the higher up the list you select the more likely you are to win.
If you win a contest Pierre will let you join his crew. Even if you join, he doesn't seem to have a lot to say. Whether you join or not he lets you explore his Cabin.

4. Pierre's Chest (Master Lock Supreme). If you try to pick the lock of this chest, Black Pierre will appear and become very angry. If you Exit to make him go away you can attempt to pick the lock again and he will not try to stop you. You can unlock it with Pierre's Chest Key. Casting Knock Knock also avoids the Pierre encounter. Items are listed in the Potential Loot section.

5. Bookshelf. Click it for some extra information about what is going on and a Journal Entry.

6. Chain and Warning Sign. Click on the sign to be told about the Singing Fairy and to not tap the glass. Pull the chain to cause the Fairy in the barrel to sing. Clicking on the glass from this side will tell you that it is too thick.

7. Glass Panel. If you clicked the other side of the glass you are told that this side is thinner. Clicking on it or bumping it does nothing. Put the Tuning Fork, found in Lower Berth, on the glass to cause it to shatter. Black Pierre will approach you and be very angry.
If you did not join his crew he will demand a ransom of 140,000 gold. If you pay he tells you to take the Fairy and leave. If you refuse he will summon some Mutineers and attack you. Black Pierre uses Throwing Knive and casts Wither and Hurricane. He is strong against Fear and Nausea, but he doesn't seem to have any resistances to anything else. Killing Pierre rewards you with Mollusk Master helmet (Critical Item), Pierre's Chest Key (Critical Item), and sometimes a Throwing Knive as well. Bug: In version 1.2.0.26-R, if Pierre casts Hurricane he has a chance to stop attacking for the rest of the battle. He might kill a party member with it, but he'll be pretty easy to take down after that.
If you joined his crew he won't attack you, so just click Exit to get him to leave you alone.
If you murdered Black Pierre earlier you will be forced to fight some Buccaneers instead.


8. Barrel. Click the Barrel twice and Little Daisy, a Recruitable NPC, will emerge from it. You will get 3000exp for each member of the party. You can talk with her afterward. If you have met Little Rosy (I am not sure if it is possible to not meet her, unless you save scum through early game), she will acknowledge that fact if you ask about ROSY. If you have Little Rosy in your party she will acknowledge it if you ask about ROSY. If you do not have Little Rosy and you speak to her with a woman character she has some extra text if you ask about ROSY. As far as recruitment, she is very similar to Rosy, with slightly different starter spells, good Vitality and Magic, and excellent stats. If you travel all the way back to Rosy after rescuing Daisy she will acknowledge your accomplishment with a reward of 4400 gold. You do not get the reward if Little Rosy is in your party, but if you dismiss Rosy and find her again she will reward you (don't dismiss her unless you don't want her in your party, since she will lose all of her progress).

There are several things inside the Private Cabin that you can click on. I did not list everything.


NPC KEYWORDS
Black Pierre: Contest (starts the challenge again****), (Little) Daisy, Kraken, Helmet (Gives you a Journal Entry, but he does not say anything)
*You cannot Steal from him, even when he is charmed.
**You can Bribe him and he will take your gold, but he will not get any friendship points or lose any anger points.
***Murdering Pierre will reward you with Mollusk Master helmet (Critical Item, Cursed, AC 16, MEN 25, 25 Scout, VS Marine/Kraken, M+), Pierre's Chest Key (Critical Item), and a sometimes a Throwing Knive. I do not know of a nice way to get these items.
****If you win another Contest you get a small gold reward. 100 gold for the first selection, 200 gold for the second selection, and probably 300 gold for the third selection but I was too busy/lazy to confirm it.
*****Attempting to recruit him tells you there is no room for Jaqque Nefarge (version 1.2.0.26-R).

Little Daisy (Recruitable): (Black) Pierre, (Little) Rosy, Neriad


POTENTIAL LOOT
EVENT 4. Pierre's Chest (Master Lock Supreme/Pierre's Chest Key):
Weapons: Cutlass
Armor: Whistler (Cursed, SON32, 24 Archery)
Scrolls: Crushing Hand
Consumables: Zephyr Cola, Iron Rations, Cherry Wine
Other: Cobalt Sapphire
*The contents of this chest are static.

You will sometimes get Perk Keys after battles in this area.


ENEMIES
Cophrophages - Can Disease
Buccaneers
Mutineers
Black Pierre. Casts Wither and Hurricane. Saves vs Air (Nausea) and Mental (Fear) effects.
Lower Berth of the Snark


1. Barrel. Click it to take All Purpose Barrel, which gives you extra inventory space by allowing you to place things inside of it.

2. Crate. Click it to get Cracker Soda (Critical Item).

3. Crate. Click it to get Djinn Bottle with three charges. Successfully Assaying the item reveals that it is a Mascot item. USE it to summon the Djinn inside, who states that it will not serve you until you speak its name, and after you speak its name you must know the password for the wishes you want. Note that each time you summon him you consume a charge, even if you do not make a proper wish, so don't summon him until you are ready. I have not found its name in game yet, though someone spoiled it for me about a month prior to this writing (they said they found the answer in the RPG Codex forums. From what I can tell, credit goes to Kayerts or iqzulk, and it was mentioned that this information was found in the game's resources). Because some folks insist that the information cannot be found while playing the game, I will list the information you need below just in case. For the curious, the name you can find in Grand Refuge of the Ancients does not work.
For folks looking for answers:
Its name is AGDULHANISH.
The passwords are:
ABBAKOOKOO = Teleports you to the Astral Plane.
ALAVARZOO = All characters in the party advance to their next level.
ALAKASHAR = Heals your party. If everyone's HP is full the wish is not used. Could be worthwhile in a pinch, but you can't use it in battle.
ARRAKEEZAR = Resurrects a single dead party member. You will be prompted to choose. If no one is dead or you press ESC the wish will not be used. I am unsure if the raised character gets a penalty or not.
ALAVANZOO = Unlocks Eldritch in your party member's spellbooks. You can do this with other NPCs, so it is not the best choice.
ANASHSANSAR = Restores STR permanently removed by certain enemy attacks. Note that the dev is planning on changing how STR drain works in a patch beyond 1.2.0.26-R (the effect won't be permanent).
ABBADOODOO = You are prompted to name an item. It does not seem to know about good equipment or Critical Items, but it does recognize a lot of not-so-valuable consumables. You can get a few unimportant starter keys from it, but not things like Owl Figurine, Xenomorph Keycard, or Skull of Hathor Sogg. If you type in something that it does not recognize the wish will not be used.
*Note that you cannot use the same password twice.


4. Crate. Click on it for Tuning Fork (Critical Item). This tile is also a Safe Haven.

5. Locked Door (Master Lock Level X). Unlocking the door and stepping past it gives you a description of the state of the Cargo Hold.

6. Barrel of Pickling Vinegar and Ceiling Grate. Standing on this tile gives a description of a cigar smell wafting in from above, as well as the sound of voices. Put Cracker Soda onto the Barrel. This will open the door to the Private Captain's Quarters above (#2 on the Snark Mistress Map).

There are several Barrels that you either cannot interact with, or clicking on it pops off the top with no description. I didn't bother to note those.


NPC KEYWORDS
Bottle Djinn (wherever you USE the Djinn Bottle): Djinn, Wishes
*If you try to read its mind, it laughs at you. (It may be that you need to cast a higher rank of Mindread, but at the time I talked to it the only character I had that knew the spell could only manage up to rank 3.)


POTENTIAL LOOT
EVENT 1. Barrel: All Purpose Barrel

EVENT 2. Crate: Cracker Soda (Critical Item)

EVENT 3. Crate: Djinn Bottle

EVENT 4. Crate: Tuning Fork (Critical Item).

Treasure Chest (Major Lock Level VIII)
Weapons: Bolas
Thrown/Ammo: Horn of Winter
Staff/Rods: Caduceus of Healing
Spellbooks: Deadly Blades(Eldritch)
*The loot on this chest is static.


ENEMIES
Sandfleas
Spore Fungi
Buccaneers
Mutineers
Zephyr Isles
If you come to this area using the Monolith it is possible to explore around comfortably if you have decent Swimming Skill, but I do not recommend swimming into Loch Titan from here. You can access a boat in Loch Lalain, which you can use to explore.


Nick 'O 'The ' Deep is a friendly turtle NPC that you can meet through a Random Encounter in this area. If you try to talk with him you will see that he is injured, but he will still talk to you normally. Use the HEAL NPC action to heal Nick. He will gain some friendly points and acknowledge your effort when you leave him. It takes a very long time to fully heal him if you use characters that only have Cure Light Wounds (18 casts without Litany Skill), but you can more than max out his friendly bar. Using Cure Heavy Wounds is much faster (5 casts with Litany Skill), but you will get less points toward friendship. Even if you fully heal him you will still get the note about his injuries when you try to talk with him. When he is fully healed he will give you more information about what happened to him when you ask about PIRATES or SNARK and will fill out your map and mark where they hid their treasure.

1. Monolith. Touch the Moongate Crystal to the Runes on the Monolith to teleport to Royal Aviary Park.You are also warped to this spot using the same method on the Monolith in Nerukzan Woodlands.You can get the Moongate Crystal from Green Mandarin in Celestial Watchtower, which can be reached through Kublai Axis.

2. Dry Earth. LOOKing at this spot reveals nothing unless you get information from Nick that a treasure is here. The Treasure Chest is locked with Master Lock Level XII and the contents are listed in the Potential Loot section.

3. Skeletons. Clicking on them gives you a little information and a Journal Entry.

4. Acme Vending Machine.

5. Acme Vending Machine.

6. Bottling Machine and Debris. LOOK at this spot for a Burning Oil.

7. Roman Stone Marker. Click the cross marker, then click a character to attempt to translate it (I am guessing it requires Ancient History). Successfully translating it reveals some lore and gives you a Journal Entry: Pliny the Elder claims these Isle in the name of Emperor Vespasian and Rome. This tile is also a Safe Haven.


NPC KEYWORDS
Nick 'O 'The ' Deep: Bahomet (Megalith), Intrepid, Kraken, (Loch) Lalain, Loch Titan, Neriad, Sargasso, Snark (Mistress), Waterport, Pirates
*After you heal him and gain at least one friendship point, Bribing him can get you more. Bribing him before that results in him taking your gold, but no friendship point. Friendship points do not really matter though, and you cannot get information on the secret treasure chest this way.


POTENTIAL LOOT
EVENT 2. Dry Earth/Treasure Chest (Master Lock Level XII):
Armor: Phyrgian Cap, Waterwalkers
Accessories: Amulet vs. Sorcery
Scrolls: Earthquake, Firestorm, Hold Monsters
Spellbooks: Cosmic Gate
Consumables: Repel Undead, Black Pearls, Silver Spoon, Talisman of SpiderClimb, Jack of Diamonds, Clutcher Talon
*The contents of this chest are static.

EVENT 4. Acme Vending Machine:
Consumables: Zephyr Cola (1 token)

EVENT 5. Acme Vending Machine:
Consumables: Zephyr Cola (1 token)

EVENT 6. Bottling Machine and Debris. LOOK at this spot for a Burning Oil.

1. Shipping Crate
Consumables: Cure Heavy Wounds, Neutralize Poison, Remove Curse, Stink Bomb, Rock Salts, Spoiled Rations, Iron Rations, Baldercake, Cherry Wine, Lethe Liqeur, Soothing Stone
Other: Vending Tokens

2. Shallow Water: Vending Tokens


ENEMIES
Flesh Grubs - Can Disease.
Blood Leech - Can Drain Vitality.
Monarch Nettle
Siren
Seawitch
Water Elemental
Sargasso of the Kraken


The Kraken is a boss that is encountered if you try to pass the red Xs marked on the map above. It is very fast, has a ton of actions, and hits quite hard. It also tends to focus on your backrow characters, and can easily kill them off before you have a chance to move. It can target anyone who successfully Hides, so that will not protect you. It also has a Grab attack that has a fancy orb like graphic, but the game does not print what it does, if anything. It saves against System Effects (Slow), Mesmeric Effects (Charm), Mental Effects (Fear, Insanity), and Air (Nausea). That leaves Sleep, Confusion, Paralysis, Irritation and Stone for crowd control, though note that it can break through Paralysis and Stone pretty quickly. Confusion is a good choice here, since it can attack itself. I did not have a Hold Monster scroll at the time I was testing this battle, but it might be worth a shot. Be very careful with the spells that you cast in this battle, due to it being in the water. Cold and Lightning spells will bounce back and hit your party, even if their descriptions do not say they will (ex. Chilling Touch, Deep Freeze, etc.). Acid Cloud and Toxic Vapors work pretty well at chipping away at its HP, and Drain spells seem to work pretty good as well. Winning the fight allows you to continue through the area.
If you do not want to fight the Kraken kill Black Pierre in Snark Mistress to get the Mollusk Master helmet. Equip it to a character before attempting to cross a tile where the Kraken can appear, then approach it. It will leave you alone, allowing you to pass. If you are wondering if you will miss out on anything by not fighting it, the Kraken does not drop any loot and the low experience you get for killing it really isn't worth the trouble.

1. Skeleton. Click it for a Quest Pouch, an item with extra inventory slots. 1.2.0.26-R BUG?: I assume this Pouch is for storing quest items, but you can't put any Critical Items into it, or anything for that matter. You might want to pass on this item and save an inventory space until it gets fixed.

2. Inconspicuous Spot. LOOK here for Fishing Line (25ft). See Event #4 in Sargasso of the Kraken for more information on this item.

3. Inconspicuous Spot. LOOK here to see something glinting beneath the waves. Equip the Diving Bell that you can get from Admiral Boondoggle on the Upper Deck of the H.M.S. Intrepid, then LOOK at this spot. The equipped character will retrieve a Bell Fragment (Critical Item). You will be attacked by Dragon Carps immediately afterward. See Event #1 in Bell Tower for more information.

4. Inconspicuous Cubby. LOOK here for Fishing Hook. You can find 4 Fishing Lines: one in Hall of Commerce, one in Crow's Nest Level Two, one in Loch Titan, and one right here in Sargasso of the Kraken. After you have collected them, merge them all together for Fishing Line (100ft). Note that there are potential Journal Entries for Fishing Line (50ft) and Fishing Line(75ft) if that sort of thing interests you (cast Improved Identify and Assay each time you combine one with another, or use an Oracle statue). Once you have Fishing Line (100ft), combine it with Fishing Hook for Fishing Hook(100ft). You can use this item at the Fishing Wells in Crescent Valley, Skull Wilderness, and Dominion Exemplar.

As mentioned already, the red Xs on the map are where you can encounter the Kraken.

There are a few Journal Entries. One is as you pass through the cave coming into the area and you cannot miss it, and the other is on top of the Debris next to two of the Xs. I didn't bother marking them on the map.

Climbing into the Wildes of Bahomet gives 100exp to each member of the party.


POTENTIAL LOOT
EVENT 1. Skeleton: Quest Pouch

EVENT 2. Inconspicuous Spot: Fishing Line (25ft.)

1. Treasure Chest (It's dark. Click the lower part of the window to open it)
Spellbooks: Locate Item, Danger Sense, Divination, Crushing Hand*
*The loot in this chest is static, though sometimes you do not get Crushing Hand.


ENEMIES
Sandfleas
Dragon Carp
Water Elemental
The Kraken: Has a Grab attack (no idea what it does). Resists System Effects (Slow), Mesmeric Effects (Charm), Mental Effects (Fear, Insanity), Air (Nausea).
BAHOMET MEGALITH SECTION
Wildes of Bahomet


1. Skeletons. Click it for 358 gold.

2. Several Trog Warriors will attack you on this spot. They are no different than other Trog Warriors you can find elsewhere, but watch out for their Instant Death capabilities. You can avoid this fight by taking the long way around.

Climbing into the White Cliffs gives each member of the party 150exp.

The ◎ icon on the map is a well that you cannot interact with.


POTENTIAL LOOT
EVENT 1. Skeletons: 358 gold

1. Barrel:
Weapons: Knuckle Duster
Scrolls: Locate Item
Consumables: Cure Paralysis, Neutralize Poison, Stone To Flesh, Cherry Wine, Soothing Stone, Luck Stone
Other: Vending Token


ENEMIES
Flesh Grubs - Can Disease
Amoebic Slime
Toxic Amoeba
Glowmoth - Can Blind
Blood Leech - Can Drain Vitality
Monarch Nettle
Marshlight - Ghost type. Can Charm and "Starve" a character (Seems to do nothing but deplete the pointless FOO bar). Resists Unconsiousness, Charm, Cold, and Sonic Effects.
Trog Warriors - Capable of Instant Kill
White Cliffs


1. Coast of Hyperborea. Simply stand on this tile to complete a Miniquest and receive 2000exp for each member of your party.

2. Treasure Chest (Master Lock Level X). Open it to find a Talenton, along with some other static loot which is listed in the Potential Loot section.

3. Limestone Sheet (looks like a Monolith). Click it to reveal some text: It talks about how the writers were Roman explorers that landed on the continent in the third century. They were attacked by monsters and lost their navigator and captain. It describes that Pliny The Elder, who was their Chief Naturalist, was the one who chronicled their experiences for the next expedition to read.

4. Dragon Turtle. It attacks you as you swim over him. It is no different than any other Dragon Turtle, but if you are using Waterwalkers to traverse this portion of the cave you will lose your buff.

5. Inconspicuous Spot. LOOK here to see something glittering at the bottom. Equip the Diving Bell to any character, then LOOK to get a Caduceus of Life.

6. Treasure Chest (Master Lock Level XII). There is nothing special about the chest, and the items you might find inside are listed in the Potential Loot section. This tile is also a Safe Haven, which is the only reason I used an event marker for it.

7. Stone Pillar. Click it to reveal that it is a marker left behind by a Roman expedition. LOOK at it to reveal that it has an empty socket the size and shape of a small coin. Put the Talenton onto the pillar to read some script etched into the side of it, typed here in case it is important later:
"Neither by ship nor on foot would you find the marvellous road to the assembly of the Hyperboreans. Never the Muse is absent from their ways... lyres clash and flutes cry and everywhere maiden choruses whirling. Neither disease nor bitter old age is mixed in their sacred blood; far from labor and battle they live.
...ascribed to... Pindar, stung on the lips by a bee as a boy.


POTENTIAL LOOT
EVENT 2. Treasure Chest (Master Lock Level X)
Armor: Garland of Thorns
Consumables: Galen Apple, Elysium Berries, Dracaena Petals, Skullcap, Coffin Orchids, Amphorae (Restore Youth)
Other: Talenton (Coin)
*The items in this chest are static.

EVENT 5. Treasure Chest (Master Lock Level XII):
Weapons: War Hammer, Wooden Club, Cudgel, Morningstar, Spoked Mace, Ball & Chain, Ball Flail, Cat 'O 'Nine Tails, Cestus, Holy Symbol
Instruments: Muting Lyre, Thistle Whistle, Cacaphony Harp, Hotfoot Banjo
Thrown/Ammo: Flame Arrow, Stun Arrow, Cupid's Arrow, Lead Ball
Armor: Wizard Cap, Psi Garland, Leather Vestment, Leather Hood, Mail Coif, Leather Jerkin, Brigandine, Greaves, Spiked Bracer, Sandals
Accessories: Ring Pro Frost, Ring Pro Magic, Ring of Protection, Amulet of Might
Staff/Rods: Wand of Webs, Stun Rod, Sparkler Rod, Zapper Rod, Torpedo Rod, Caduceus of Life
Scrolls: Magic Missile, Knock Knock, Hold Undead, Divination
Spellbooks: Knock Knock, Magic Bells, Armor Shield, Fire Shield, Remove Curse, Wizard's Eye
Consumables: Cure Lt. Condition, Neutralize Poison, Cure Paralysis, Stone To Flesh, Evil Off, Bag of Sparkles, Bag of Whispers, Spoiled Rations, Iron Rations, Baldercake, Cherry Wine, Soothing Stone, Luck Stone
Other: Gold Leaf

1. Treasure Chest (Master Lock Level XIII)
Weapons: Broad Axe, Halberd Pike, Joust, Cudgel, Morningstar, Ball & Chain, Poison Lash, Cestus, Composite Bow, Faerie Staff
Shields: Kite Shield
Instruments: Muting Lyre
Thrown/Ammo: Throwing Knive, Stun Arrow, Flame Arrow, Feather Dart, Sheolic Pipes
Armor: Mithril Armet, Heaume, Flannel Shirt, Lamellar, Jazeraint Shirt, Hauberk, Bronze Plate, Jazeraint Pants, Mail Chausses, Sandals, Spur Sollerets
Accessories: Ring Pro Frost, Ring of Power, Amulet vs. Hypno, Amulet vs. Sorcery
Staff/Rods: Stave of Missiles, Rod of Nightmares, Wand of Rainbows
Scrolls: Fireball, Firestorm, Crushing Hand, Lightning, Cosmic Gate, Deep Freeze
Spellbooks: Bless, AntiMagic, Cosmic Gate, Recharge(Arcanum), Invisibility(Arcanum)
Consumables: Blink, Faery Water, Paralysis Dust, Dazzler Dust, Bag of Sparkles, Rock Salts, Cherry Wine, Dragon Control, Mirror Shard, Clutcher Talon, Ace of Hearts, Jack of Diamonds, Prankstone, Scrying Crystal
Other: Cobalt Sapphire

2. Treasure Chest (Major Lock Level VIII)
Weapons: Rusty Sword, Broadsword, Awl Pike, Bec De Corbin, Flagellum, Goupillon, Threaded Lash, Slingshot, Shortbow, Longbow, Slurbow, Knuckle Duster
Shields: Target Buckler, Heraldic Buckler
Instruments: Muting Lyre, Thistle Whistle, Halcyonic Lyre
Thrown/Ammo: Throwing Knive, Feather Dart, Poison Arrow, Sleeper Arrow, Horn of Winter
Armor: Bascinet, Flannel Shirt, Chainmail, Brigandine, Ringmail, Cestian Girdle, Cuirass Leggings, Greaves, Vambraces, Sandals, Sollerets, Waterwalkers, Firewalkers
Accessories: Ring Pro Frost, Ring of Protection, Ring of Smiting, Ring of Featherfall
Staff/Rods: Fizzlestick, Stave of Missiles, Freezer Rod, Zapper Rod, Ice Wand, Beholder Stave
Scrolls: Enchanted Blade, Magic Screen, Armorplate, Locate Person, Locate Item, Mindread
Spellbooks: Bless, Remove Curse, Missile Shield, Firestorm, Raise Dead, Rainbow Rays(Arcanum)
Consumables: Cure Paralysis, Stone To Flesh, Sleep Sand, Bag of Sparkles, Halomancic Salts, Rock Salts, Cherry Wine, Luck Stone
Other: Cobalt Sapphire, Gold Leaf

3. Treasure Chest (Major Lock Level VIII)
Weapons: Rusty Sword, Broadsword, Duckbill, Battle Axe, Flagellum, Goupillon, Slingshot, Shortbow, Slurbow, Knuckle Duster
Shields: Heraldic Shield
Instruments: Muting Lyre, Thistle Whistle, Cacaphony Harp, Halcyonic Lyre
Thrown/Ammo: Throwing Knive, Feather Dart, Needle Darts, Barbed Arrow, Piercer Arrow, Poison Arrow, Horn of Winter
Armor: Wizard Cap, Leather Hood, Bascinet, Flannel Shirt, Chainmail, Ringmail, Brigandine, Greaves, Vambraces, Sandals, Sollerets
Accessories: Ring Pro Frost, Ring of Protection, Ring of Featherfall, Amulet of Might
Staff/Rods: Wand of Webs, Stave of Missiles, Sparkler Rod, Ice Wand, Freezer Rod, Ice Wand, Zapper Rod
Scrolls: Magic Missile, Knock Knock, Locate Item, Locate Person, Mindread, Magic Screen, Raise Dead
Spellbooks: Bless, Knock Knock, Magic Bells, Missile Shield, Remove Curse, Raise Dead, Rainbow Rays(Arcanum)
Consumables: Neutralize Poison, Cure Paralysis, Stone To Flesh, Remove Curse, Neutral Medium, Bag of Sparkles, Cherry Wine, Soothing Stone, Luck Stone
Other: Cobalt Sapphire, Gold Leaf, Vending Tokens


ENEMIES
Flesh Grubs - Can Disease
Blood Leech - Can Drain Vitality
Condor
Dragon Turtle
Bahomet Megalith


1. Hole in the Ceiling

2. Pressure Plate. Moving on it opens and closes the Hole at #4. See Event #4 for more information.

3. Pressure Plate. Moving on it opens and closes the Hole at #4. See Event #4 for more information.

4. Hole. Opened and closed with the two pressure plates to the south. Standing on it while open leads to Pit of Bahomet. Stand on the pressure plate just south of the Hole (#3), turn to face one of the walls which will activate the pressure plate again, then strafe across the hole (Z and X keys).

5. Urn. Click it for Serpentine Key (Critical Item).

6. Keyhole. Put the Serpentine Key on it to remove the nearby wall.

7. Wall. See Event #6.

8. Pressable Brick on the east wall. Press it to open the south wall.

The map percentage is 99% because it is impossible to get to the tile past the Exit Arrow via normal means, at least as of this writing.


POTENTIAL LOOT
EVENT 5. Urn: Serpentine Key (Critical Item)

You can sometimes get Locksmith's Key drops after battles in this area.


ENEMIES
Naga Scavengers
Naga Shaman
Naga Firstborn - Can buff themselves with Strength.
King Cobra
Pit of Bahomet


1. Landing Spot from Bahomet Megalith. You cannot return from this tile.
2nd Coil


1. Naga Warriors will approach and attack your party when you stand on this tile.

2. Pit with Chain. To close the Pit Trap See Event #10. Pull the Chain to close another Pit Trap (#11).

3. Pit with Chain. To close the Pit Trap See Event #11. Pull the Chain to close another Pit Trap (#12).

4. Pedestal. Click it to see the words "SERPENT THRONE." Place a Cobra Statue onto the lower part of the Pedestal. The Statue and Pedestal will disappear, but a Pit Trap will be covered (#7).

5. Treasure Chest. Open it for three Cobra Statues (Critical Item).

6. Pictographs. Click on it to see that it depicts three serpents on three thrones and get a Journal Entry.

7. Pit Trap. See Event #4 on how to close it.

8. Pedestal. Click it to see the words "SERPENT THRONE." Place a Cobra Statue onto the lower part of the Pedestal. The Statue and Pedestal will disappear, but a Pit Trap will be covered (#9).

9. Pit Trap. See Event #8 on how to close it.

10. Pedestal. Click it to see the words "SERPENT THRONE." Place a Cobra Statue onto the lower part of the Pedestal. The Statue and Pedestal will disappear, but a Pit Trap will be covered (#2).

11. Pit with Chain. To close the Pit Trap See Event #2. Pull the Chain to close another Pit Trap (#3).

12. Pit Trap. See Event #3 on how to close it.


POTENTIAL LOOT
EVENT 5. Treasure Chest: Cobra Statues x3 (Critical Item)

You will sometimes get Perk Key or Common Gate Key drops after battles in this area.


ENEMIES
Naga Scavengers
Naga Warriors
King Cobra
3rd Coil


1. Chain. Pull it to close a Pit Trap (#2).

2. Pit Trap. Closed by pulling the chain at Event #1.

3. Chain. Pull it to close a Pit Trap (#4).

4. Pit Trap. Closed by pulling the chain at Event #3.

5. Chain. Pull it to close a Pit Trap (#6).

6. Pit Trap. Closed by pulling the chain at Event #5.

7. Chain. Pull it to close a Pit Trap (#8).

8. Pit Trap. Closed by pulling the chain at Event #7.

9. Chain. Pull it to close a Pit Trap (#10).

10. Pit Trap. Closed by pulling the chain at Event #9.

11. Chain. Pull it to close a Pit Trap (#12).

12. Pit Trap. Closed by pulling the chain at Event #11.

13. Remote Viewing Glass. Click on the glass to see visions of the 4th Coil, which is described as being navigated in the same way the 2nd and 3rd Coils are. There is another vision of the 5th Coil, where many Naga are waiting to stop your ascent. Afterward there is another vision of the 6th Coil, where the Gorgon Medusae and her stone inducing gaze tends to Naga children. And finally you are given a vision of the Megalith Spire, a hall of glass that houses the Methuselah Gorgon'Ra. This tile is also a Safe Haven.

14. Heiroglyphics. Click on it to see a depiction of a war between Naga and other Hyperborean races, showing something buried beneath them sending out evil rays of influence.

15. Skeleton. Click the bones for a description. LOOK at them for a Snakeskin Pouch. It's an item meant to hold other things in your inventory to save space, but I didn't seem to have anything that fit in it, so I have no idea what it's supposed to be able to store.

Some of the Urns are dry and empty. I did not bother marking them, but they are easy to see due to the fact that they are not tagged as having potential loot.


POTENTIAL LOOT
Note that I did not give the Urns the full reset treatment, because if I had this section would have taken several more hours of my time. There are probably other things that can be found in them, and they seem to pull from the same loot pool so you can look at other Urn lists for an idea of what you might find.

EVENT 15. Skeleton: Snakeskin Pouch

1. Treasure Chest (Master Lock Level XIII)
Shields: Adamantium Shield
Accessories: Restoration*
Spellbooks: Rainbow Rays(Arcanum), Deadly Blades(Eldritch)
Consumables: Medusa Dust*
*The items in the chest are mostly static, though sometimes you do not get Restoration or Medusa Dust.

2. Treasure Chest (Master Lock Level XIII)
Weapons: Earthduster
Thrown/Ammo: Fiery Dart
Accessories: Ring Pro Magic, Ring of Featherfall
Scrolls: Magic Screen
Consumables: Mirror Shard
Other: Gold Leaf, Blood Ruby, Lustrous Amethyst
*The items in this chest are static.

3. Urn
Consumables: Black Pearls, Harpy Crown, Black Rose, Blood Tamarinde, Feverfew, Golden Flaxseed, Swamp Leech, Prankstone

4. Urn
Consumables: Galen Apple, Pink Lady, Blackberries, Elysium Berries, Amaranth, Black Lotus, Black Rose, Coffin Orchids

5. Urn
Consumables: Galen Apple, Blood Tamarinde, Black Lotus

6. Urn
Consumables: Pink Lady, Elysium Berries, Blackberries, Amaranth, Blood Tamarinde, Harpy Crown, Prankstone

7. Urn
Consumables: Galen Apple, Blackberries, Black Pearls, Black Rose, Black Lotus, Harpy Crown, Coffin Orchids, White Bryon, Swamp Leech, Prankstone

8. Urn
Consumables: Galen Apple, Pink Lady, Blackberries, Amaranth, Blood Tamarinde, Black Rose, Black Lotus, Harpy Crown, Coffin Orchids, Feverfew, Golden Flaxseed, Swamp Leech, Prankstone

9. Urn
Consumables: Galen Apple, Pink Lady, Blackberries, Elysium Berries, Amaranth, Blood Tamarinde, Golden Flaxseed, White Byron, Swamp Leech


ENEMIES
Naga Scavengers
Naga Warriors
Naga Shaman
Naga Firstborn - Can buff themselves with Strength.
King Cobra
4th Coil


1. Chain. Pull the chain to close a Pit Trap (#2).

2. Pit Trap. The game will warn you if you try to pass through the illusionary wall, but you can still die if you push through, so be careful. Close it by pulling the chain at Event #1.

3. Chain. Pull the chain to close a Pit Trap (#4).

4. Pit Trap. Close it by pulling the chain at Event #3.

5. Chain. Pull the chain to close a Pit Trap (#6). This tile is also a Safe Haven.

6. Pit Trap and Chain. The game will warn you if you try to pass through the illusionary wall, but you can still die if you push through, so be careful. Close the Trap by pulling the chain at Event #5. Pull the chain on this tile to close a Pit Trap (#7)

7. Pit Trap and Chain. The game will warn you if you try to pass through the illusionary wall, but you can still die if you push through, so be careful. Close the Trap by pulling the chain at Event #5. Pull the chain on this tile to close a Pit Trap (#8)

8. Pit Trap. Close it by pulling the chain at Event #7.

9. Treasure Chest (Master Lock Level XII). Trying to pick the lock manually will result in being attacked by some Naga Firstborn. They are no different than the other Naga Firstborn you should have encountered as you've explored. Once they are defeated you can pick the lock normally. Casting Knock Knock bypasses the fight. There is nothing special about the contents of the chest, which are listed in the Potential Loot section.

10. Chain. Pull the chain to close a Pit Trap (#11).

11. Pit Trap. Close it by pulling the chain at Event #10.


POTENTIAL LOOT
EVENT 9. Treasure Chest (Master Lock Level XII).
Weapons: Rusty Sword, Broadsword, Awl Pike, Bec De Corbin, Flagellum, Goupillon, Threaded Lash, Slingshot, Shortbow, Longbow, Slurbow, Knuckle Duster
Instruments: Muting Lyre, Thistle Whistle, Halcyonic Lyre
Thrown/Ammo: Throwing Knive, Sleeper Arrow, Poison Arrow, Feather Dart, Horn of Winter
Shields: Heraldic Shield, Target Buckler
Armor: Bascinet, Flannel Shirt, Chainmail, Brigandine, Cestian Girdle, Cuirass Leggings, Greaves, Vambraces, Sandals, Sollerets, Waterwalkers, Firewalkers
Accessories: Ring Pro Frost, Ring of Protection, Ring of Smiting, Ring of Featherfall
Staff/Rods: Fizzlestick, Stave of Missiles, Zapper Rod, Freezer Rod, Ice Wand, Beholder Stave
Scrolls: Locate Item, Locate Person, Mindread, Enchanted Blade, Armorplate, Magic Screen, Wither
Spellbooks: Bless, Firestorm, Remove Curse, Missile Shield, Raise Dead
Consumables: Cure Paralysis, Stone To Flesh, Sleep Sand, Bag of Sparkles, Halomancic Salts, Rock Salts, Cherry Wine, Luck Stone
Other: Cobalt Sapphire, Gold Leaf

1. Urn
Consumables: Galen Apple, Pink Lady, Elysium Berries, Black Pearls, Amaranth, Blood Tamarinde, Black Lotus, Coffin Orchids, Golden Flaxseed, White Bryon, Prankstone

2. Urn
Consumables: Pink Lady, Elysium Berries, Blackberries, Amaranth, Blood Tamarinde, Harpy Crown, Black Lotus, Black Rose, Coffin Orchids, Golden Flaxseed, Feverfew, White Byron, Swamp Leech, Prankstone


ENEMIES
Naga Scavengers
Naga Warriors
Naga Shaman
Naga Firstborn - Can buff themselves with Strength.
King Cobra
5th Coil


1. Chain. Pull the chain to close a Pit Trap (#2).

2. Pit Trap. The game will warn you if you try to pass through the illusionary wall, but you can still die if you push through, so be careful. Close it by pulling the chain at Event #1.

3. Chain. Pull the chain to close a Pit Trap (#3).

4. Pit Trap. The game will warn you if you try to pass through the illusionary wall, but you can still die if you push through, so be careful. Close it by pulling the chain at Event #4.

5. Serpent Oracle. Place an item on its mouth to (Improved) Identify it. It can identify 7 things before being drained. Things that have already been identified count toward it's charges. Version 1.2.0.27-R and possibly earlier: There are some things that the Oracle will fail to Identify. From what I have tested, it seems to happen with some items that have already been identified, but there doesn't seem to be any consistancy within item catergories.

6. Chain. Pull the chain to close a Pit Trap (#7).

7. Pit Trap. Close it by pulling the chain at Event #6.

8. Chain. Pull the chain to close a Pit Trap (#9).

9. Pit Trap. The game will warn you if you try to pass through the illusionary wall, but you can still die if you push through, so be careful. Close it by pulling the chain at Event #8.

10. Plaques. Click the one on the north wall to see a dipiction of two snakes coiled around the sun and a narrator note about xenophobia, and get a Journal Entry. Click the one on the east wall to see a dipiction of heavens, a flat earth, and a coiled wyrm with its tail in its mouth underneath it all, and get a Journal Entry.

11. Plaque. Click it to see a dipiction of a crowned Naga woman being prayed to by other Naga.

12. Plaques. Click the one on the east wall to see a dipiction of the life cycle of the Naga, from Egg, to hatching, to war, and finally old age and death, travelling down a burrow that holds the wyrm with its tail in its mouth, and get a Journal Entry. Click the one on the south wall to see a dipiction of the Naga caste system, with the Queen who is the mother of all at the top, served and protected by male Naga warriors, and assisted by female assassins that reside near her at the top of the Megalith. The eggs in the nursery are tended to by what looks like a robed human woman. You also get a Journal Entry.

13. Chain. Pull the chain to close a Pit Trap (#14).

14. Pit Trap. The game will warn you if you try to pass through the illusionary wall, but you can still die if you push through, so be careful. Close it by pulling the chain at Event #13.

15Chain. Pull the chain to close a Pit Trap (#15).

16. Pit Trap. Close it by pulling the chain at Event #16.


POTENTIAL LOOT
I admit that I am becoming lazy with loot lists, especially now that I know that there are plans to either change or add to them in the future. Testing other things has also been cutting into what little free time I have to do this guide. There is probably more to be found in these, at least as of this writing, but it shouldn't be anything you can't get elsewhere.

1. Treasure Chest (Master Lock Level XIII)
Weapons: Fist Mace, Beaked Axe, Bec De Corbin, Awl Pike, Threaded Lash, Shortbow, Longbow, Cestus
Shields: Target Buckler
Instruments: Muting Lyre, Thistle Whistle, Halcyonic Lyre
Thrown/Ammo: Throwing Knive, Feather Dart, Sleeper Arrow, Poison Arrow, Cosmic Cryer
Armor: Bascinet, Flannel Shirt, Chainmail, Camail, Cestian Girdle, Copper Plate, Cuirass Leggings, Vambraces, Pauldrons, Sandals, Waterwalkers, Firewalkers
Accessories: Ring Pro Ring of Deflection, Ring of Smiting, Ring of Featherfall
Staff/Rods: Fizzlestick, Stave of Missiles, Wand of Fireballs, Freezer Rod, Beholder Stave
Scrolls: Mindread, Fireball, Armorplate, Enchanted Blade, Wither, Hold Monsters
Spellbooks: Bless, Featherfall, Missile Shield, Firestorm, Rainbow Rays(Arcanum), Hermetic Gag(Arcanum)
Consumables: Cure Paralysis, Stone To Flesh, Acid Splash, Sleep Sand, Bag of Sparkles, Halomancic Salts, Rock Salts, Luck Stone, K.O. Rock, Water Glass
Other: Cobalt Sapphire, Locksmith's Glue

2. Treasure Chest (Master Lock Level XIII)
Weapons: Broadsword, Beaked Axe, Bec De Corbin, Awl Pike, Threaded Lash, Shortbow, Longbow, Slurbow, Knuckle Duster
Instruments: Muting Lyre, Thistle Whistle, Halcyonic Lyre
Shields: Target Buckler
Thrown/Ammo: Throwing Knive, Poison Arrow, Sleeper Arrow, Feather Dart, Cosmic Cryer
Shields: Target Buckler
Armor: Bascinet, Chainmail, Camail, Ringmail, Cestian Girdle, Copper Plate, Cuirass Leggings, Pauldrons, Sandals, Sollerets, Waterwalkers, Firewalkers
Armor: Ring Pro Frost, Ring of Deflection, Ring of Smiting, Ring of Featherfall
Staff/Rods: Stave of Missiles, Freezer Rod, Ice Wand, Beholder Stave
Scrolls: Locate Item, Armorplate, Magic Screen, Enchanted Blade, Hold Monsters, Wither
Spellbook: Bless, Firestorm, Missile Shield, Raise Dead, Rainbows Rays(Arcanum), Hermetic Gag(Arcanum)
Consumables: Cure Paralysis, Stone To Flesh, Acid Splash, Sleep Sand, Bag of Sparkles, Halomancic Salts, Rock Salts, Cherry Wine, Water Glass, Luck Stone
Other: Cobalt Sapphire, Locksmith's Glue


ENEMIES
Naga Warriors
Naga Shaman
Naga Firstborn - Can buff themselves with Strength.
King Cobra
6th Coil - WIP
Megalith Spire - WIP
NERUKZAN WOODLANDS SECTION
Nerukzan Woodlands


Greech the Leech is a friendly, recruitable NPC that is found in random Encounters in the area. If you ask him about himself he will say he has an interest in instruments, and that he will (improved) identify them for you. He is actually true to his word, though he doesn't have anything special to say about any that I have found, other than changing his text slightly for certain instruments. He will not identify or react to Pipes Majesyk. As far as recruitment goes, he starts with pretty good HP, Vitality, and Magic for where you can pick him up, and his stats are average.

1. View of Nerukruel Pyramid. This spot has a ton of Journal Entries. The game describes a blue light atop the Pyramid as your party takes in the view. A terrified Rhattu will rush toward the party, but it is shot with a beam of light from the top of the Pyramid and is killed. You may have also noticed several skeletons in the immediate area. In case all this went over your head, this is a warning that going that way will be dangerous. Be prepared before heading in that direction. If you cross the "point of no return" inside of the Pyramid the same fate as the Rhattu awaits your party when you step on this tile until you solve the dungeon. If you are not feeling confident about your current setup, have a backup save prepared before you go inside of it.

2. Bridge and Rhattu Tribe. A random amount of Rhattu Rangers will attack you as you try and cross the little bridge. They are no different than the other Rhattu Rangers that you have probably already encountered in this area. You can avoid this fight by simply not standing on this tile.

3. Monolith. Touch the Moongate Crystal to the Runes on the Monolith to teleport to Zephyr Isles. You are also warped to this spot using the same method on the Monolith in Gardens of Midknight. You can get the Moongate Crystal from Green Mandarin in Celestial Watchtower, which can be reached through Kublai Axis.


NPC KEYWORDS
Greech the Leech (Recruitable, Random Encounter): Other than small talk, I was unable to find any words that he had a unique reaction to.
*You cannot use Mindread on him.


SHOPS
Greech the Leech
Instruments: Swaying Lute, Lyre of Slumber, Thistle Whistle
Armor: Feathered Hat
Consumables: Wonder Adhesive


POTENTIAL LOOT
You can sometimes get Perk Key drops after battles in this area. There is also a chance for Stilleto to drop after fighting either Rhattu or Rhattu Rangers.


ENEMIES
Fire Beetle - Can Irritate. Has a Fire based Breath.
Glowmoth - Can Blind.
Blood Leech - Can Drain Vitality.
Monarch Nettle
Banshee - Ghost Type. Can Wail (Multi-target damage), which it will still use if Charmed. Immune to Insanity.
Rhattu
Rhattu Rangers - Casts Leaping Sparks, Insect Swarm, Irritation, and @Spelltag (Multi-target Curse). Can also buff with Cerebral Shield.
Temple of Hathor-Sogg - WIP


WIP

1. Pedestal of the Skull

Note: This place shares the name of the Skull found in the Eerie Wastes Starting Map.
My current game did not start there and I don't know if there is another copy of the Skull in game yet, so it may take me a while to make proper notes for this map. If I had to guess, I'd say using the Skull of Hathor-Sogg on the Pedestal probably closes the pit ahead of it, but I could be wrong.
Garden of the Oracle


1. Pit that leads to Prophesy Pitfall, like all of the others. Close it by using a lever in Prophesy Pitfall, found close to your landing spot after falling down this pit (#11 on that map).

All ◎ marks on this map are Pits.


POTENTIAL LOOT
1. Deep Water: Black Lotus


ENEMIES
Stinkbug - Can Poison.
Fire Beetle - Can Irritate. Has a Fire based Breath.
Man 'O 'The 'Woods - Immune to Unconscious.
Highwaymen
Displacer - Can Blink and inflicts Paralyze.
Prophesy Pitfall


1. Lever. Clicking it closes the nearby pit (#2)

2. Pit. Covered by using the lever to the north (#1)

3. Lever. Clicking it closes the west pit on the other side of the nearby glass (#8)

4. Pushable Brick on the east wall. Push it to close a pit to the south (#5)

5. Pit. Covered by using the pushable brick to the north (#4)

6. Lever. Clicking it closes the pit to the north on the other side of the nearby glass (#7)

7. Pit. Covered by using the lever to the south, on the other side of the nearby glass (#6)

8. Pit. Covered by using the east lever on the other side of the nearby glass (#3)

9. Pushable Brick. Covers the north pit on the other side of the nearby glass (#10).

10. Pit. Covered by using the pushable brick to the south, on the other side of the nearby glass (#9)

11. Lever. Click it to cover the western pit leading to the stairs to Chasm of the Oracle in Garden of the Oracle(#1 on that map). This tile is also a Safe Haven.

All ◎ marks on this map are landing spots from Garden of the Oracle.

Both hidden walls can only be opened from the west side.


POTENTIAL LOOT
You will sometimes get Locksmith's Key to drop after battles in this area.


ENEMIES
Phantom - Ghost Type.
Crypt Cleaner - Immune to Sleep, Charm, Confuse, Fear, and Insanity
Phase Spiders - Can Poison.
Displacer - Can Blink and inflicts Paralyze.
Chasm of the Oracle


1. Pushable Brick. Raises a piece of land to the northwest so you can cross a gap (#2).

2. Pit Trap. Cover it with a piece of land that is raised by pushing a brick to the southeast(#1).

3. Lever. Raises a piece of land to the southeast so you can cross a gap (#4).

4. Pit Trap. Cover it with a piece of land that is raised by pushing a brick to the northwest(#3).

5. Lever. Raises a piece of land to the southeast so you can cross a gap (#6).

6. Pit Trap. Cover it with a piece of land that is raised by using a lever to the northwest(#5).

7. Lever. Raises a piece of land to the southeast so you can cross a gap (#8).

8. Pit Trap. Cover it with a piece of land that is raised by using a lever to the northwest(#7).

9. Skeleton. Pick up the Jewelry Box from the ground tile (next to the Inventory Scroll) and place it in your inventory for more space. You can put accessories inside of it.

10. Lever. Raises a piece of land to the northwest, which creates a shortcut(#11).

11. Pit Trap. Cover it with a piece of land that is raised by using a lever to the southeast(#10).

12. Pushable Brick. Raises a piece of land to the north so you can cross a gap (#13).

13. Pit Trap. Cover it with a piece of land that is raised by pushing a brick to the south, making a quicker way back out(#12).

14. Pushable Brick on the north wall. Raises a piece of land to the XXX so you can cross a gap (#15).

15. Pit Trap. Cover it with a piece of land that is raised by pushing a brick to the XXX(#14).

16. Lever. Raises a piece of land to the west so you can cross a gap(#17).

17. Pit Trap. Cover it with a piece of land that is raised by using a lever to the east(#16).


POTENTIAL LOOT
EVENT 9. Skeleton: Jewelry Box

1. Treasure Chest (Major Lock Level VI)
Weapons: Shortsword, Longsword, Bone Dagger, Gauche, Bipennis, Pole Fork, Lance, Truncheon, Bullwhip, Quarterstaff
Shields: Wooden Buckler
Instruments: Lyre of Slumber, Muting Lyre, Lethe Harp, Hotfoot Banjo
Thrown/Ammo: Throwing Knive, Feather Dart, Poison Dart, Stone Bullets
Armor: Phrygian Cone, Leather Vestment, Leather Helm, Mail Coif, Flannel Shirt, Leather Armor, Leather Pants, Spiked Bracer, Sandals
Accessories: Ring Pro Frost, Ring Pro Fire, Ring Pro Magic
Staff/Rods: Stun Rod, Torpedo Rod, Stave of Missiles, Caduceus of Life, Caduceus of Healing
Scrolls: Detect Magic, Remove Curse, Identify
Spellbooks: Bless, Healing, Identify, Fire Shield, Charm, Armor Shield, Wizard's Eye
Consumables: Cure Lt. Wounds, Cure Heavy Wounds, Cure Lt. Condition, Treu Seeing, Stink Bomb, Bag of Sparkles, Bag of Chuckles, Bag of Slumber, Bag of Whispers, Nematic Dust, Rock Salts, Spoiled Rations, Iron Rations, Baldercake, Oatmeal Cookie, Leg of Ham, Cherry Wine, Lethe Liqeur
Other: Cobalt Sapphire

2. Treasure Chest (Master Lock Level X)
Weapons: Rusty Sword, Broadsword, Awl Pike, Bed De Corbin, Flagellum, Goupillon, Slingshot, Shortbow, Longbow, Slurbow, Knuckle Duster
Shields: Target Buckler, Heraldic Shield
Instruments: Muting Lyre, Thistle Whistle, Halcyonic Lyre
Thrown/Ammo: Throwing Knive, Piercer Arrow, Sleeper Arrow, Poison Arrow, Feather Dart, Horn of Winter
Armor: Bascinet, Flannel Shirt, Chainmail, Ringmail, Brigandine, Cestian Girdle, Copper Plate, Cuirass Leggings, Greaves, Vambraces, Sandals, Sollerets, Waterwalkers
Accessories: Ring Pro Frost, Ring of Protection, Ring of Smiting, Ring of Featherfall
Staff/Rods: Fizzlestick, Zapper Rod, Beholder Stave, Ice Wand, Stave of Missiles
Scrolls: Magic Missiles, Locate Person, Locate Item, Mindread, Armorplate, Magic Screen, Raise Dead, Remove Curse
Spellbooks: Bless, Firestorm, Remove Curse, Raise Dead, Missile Shield, Rainbow Rays (Arcanum)
Consumables: Cure Paralysis, Stone To Flesh, Sleep Sand, Bag of Sparkles, Halomancic Salts, Rock Salts, Cherry Wine, Luck Stone
Other: Cobalt Sapphire, Gold Leaf, Vending Tokens

You will sometimes get Perk Key drops after battles in this area.


ENEMIES
Crypt Cleaner - Immune to Sleep, Charm, Confuse, Fear, and Insanity
Phase Spiders - Can Poison.
Displacer - Can Blink and inflicts Paralyze.
Judgement Seat


1. Lever. Click it to raise some land to the east, allowing you to cross a gap(#2).

2. Pit. Raise some land here by clicking a lever to the west(#2).

3. Lever. Click it to raise a bridge to the northwest, allowing you to cross a gap(#4).

4. Pit and Skull Gate. Raise a bridge here by clicking a lever to the southeast(#3). Stepping on this tile unlocks the Skull Gate.

5. Bull Statue Oracle. Place an item on its bowl to (improved) Identify it. Unlike other Oracles, this one does not seem to have a limit to it.


POTENTIAL LOOT
1. Treasure Chest (Major Lock Level VI)
Weapons: Bone Dagger, Gauche, Duckbill, Battle Axe, Bipennis, Truncheon, Pole Fork, Lance, Quarterstaff
Shields: Wooden Buckler
Instruments: Muting Lyre, Cacaphony Harp, Lethe Harp, Hotfoot Banjo
Thrown/Ammo: Throwing Knive, Needle Darts, Feather Dart, Barbed Arrows, Stone Bullets
Armor: Wizard Cap, Leather Vestment, Leather Hood, Mail Coif, Flannel Shirt, Leather Armor, Spiked Bracer, Sandals
Accessories: Ring Pro Frost, Ring Pro Fire, Ring Pro Magic, Amulet of Might
Staff/Rods: Stave of Missiles, Caduceus of Life, Caduceus of Healing, Stun Rod, Torpedo Rod, Sparkler Rod, Wand of Webs
Scrolls: Detect Magic, Remove Curse, Divination, Knock Knock
Spellbooks: Healing, Bless, Knock Knock, Wizard's Eye, Fire Shield, Armor Shield, Magic Bells
Consumables: Cure Lt. Wounds, Cure Heavy Wounds, Remove Curse, True Seeing, Stink Bomb, Bag of Chuckles, Bag of Sparkles, Bag of Whispers, Rock Salts, Spoiled Rations, Iron Rations, Baldercake, Cherry Wine, Lethe Liqeur, Wonder Adhesive, Soothing Stone
Other: Cobalt Sapphire

2. Treasure Chest (Major Lock Level VI)
Weapons: Bone Dagger, Gauche, Duckbill, Battle Axe, Bipennis, Truncheon, Pole Fork, Lance, Quarterstaff
Shields: Wooden Buckler
Instruments: Muting Lyre, Cacaphony Harp, Lethe Harp, Hotfoot Banjo
Thrown/Ammo: Throwing Knive, Barbed Arrows, Needle Darts, Feather Dart, Stone Bullet
Armor: Wizard Cap, Leather Vestment, Leather Hood, Mail Coif, Flannel Shirt, Leather Armor, Spiked Bracer, Sandals
Accessories: Ring Pro Frost, Ring Pro Fire, Ring Pro Magic, Amulet of Might
Staff/Rods: Caduceus of Life, Caduceus of Healing, Torpedo Rod, Stave of Missiles, Sparkler Rod, Stun Rod, Wand of Webs
Scrolls: Remove Curse, Divination, Knock Knock, Detect Magic
Spellbooks: Bless, Healing, Fire Shield, Armor Shield, Knock Knock, Wizard's Eye, Magic Bells
Consumables: Cure Lt. Wounds, Cure Heavy Wounds, Neutralize Poison, Remove Curse, True Seeing, Stink Bomb, Bag of Sparkles, Bag of Whispers, Bag of Chuckles, Rock Salts, Spoiled Rations, Iron Rations, Baldercake, Cherry Wine, Lethe Liqeur, Wonder Adhesive, Soothing Stone
Other: Cobalt Sapphire


ENEMIES
Crypt Cleaner - Immune to Sleep, Charm, Confuse, Fear, and Insanity
Phase Spiders - Can Poison.
NERUKRUEL PYRAMID SECTION
Nerukruel Pyramid


1. Hieroglyphs. The western glyphs show Rhattu Priests carrying a crystal to the top of the Pyramid and gives you a Journal Entry. The northern glyphs show spear wielding Rhattu forcing a beast into the Pyramid and gives you a Journal Entry.

2. Hieroglyphs. The western glyphs show a Rhattu village scene and gives you a Journal Entry. The southern glyphs show what looks like a Rhattu trial and gives you a Journal Entry.

3. Urn. Click on it to see that it is filled with flowers and berries. It does not seem important.

4. Urn. Click on it to see that it is filled with a cloudy liquid that smells like seawater. It does not seem important.

5. Heiroglyphs. The northern glyphs show Rhattu children and Elders sadly shuffling into the Pyramid and gives you a Journal Entry. The eastern glyphs show a monster eating Rhattu bones, with the soul of the Rhattu ascending, and gives you a Journal Entry.

6. Heiroglyphs. The eastern glyphs show a Rhattu standing outside of the Pyramid, which has a mystic eye on top of it, and gives a Journal Entry. The southern glyphs shows a Rhattu ascending steps into heaven, into a pair of welcoming hands, and gives a Journal Entry.

7. Point of No Return... well, no return is a little dramatic. Once you step on this tile if you try to leave without finishing the dungeon your party will be instantly killed a few steps outside. Make sure you are prepared, or at least have a backup save handy before you cross this spot.

8. Vermint is an irritated NPC whom the party finds repairing a fresco. When you first approach him he tells you that is the lair of the Soul Eater and that none can escape this place, with the Orb of Nerukzan/Chrytosphere destroying any who try. He says that your fate was sealed the moment you crossed the threshold, which isn't entirely true, since you can take several steps in and still have the ability to leave. Ask him some of his keywords to get a better idea of what is going on. After you leave, if you wish to speak with him again you have to reload the floor. He does not react to Snivels, but he does react to the death of Grendel by summoning Rhattu and Rhattu Rangers, then attacking you. It is not a hard battle.

9. Mystic Priest and Mystic Acolyte. Stepping on this tile interrupts their consecration ceremony. The Rhattu in charge speaks, "Hakketh Vukata Dominis Du Garrutes!!" which is translated as death to the blasphemous trespassers, then you are forced to fight against them. There is always one Mystic Priest, but the amount of Mystic Acolytes is randomized. They are not terribly difficult, so just battle as you normally do.

10. Barrel. Open it to find Snivels, a young Rhattu hiding inside, who happens to be a friendly, Recruitable NPC. He will tell you that he has been ordered to give himself to the Soul Eater, and that he is afraid of doing so. If you talk with him he will say that he will lead you through the Path of the Elders in exchange for letting him escape with you, and he is true to his word. His stats are low/average, but his skills are pretty decent and he has good Vitality and Magic considering his low level. He will gain levels very fast, and his HP, Vitality and Magic values get very good as he levels. He becomes a Random Encounter on this floor after meeting him the first time. He does not react to the death of Grendel as a wandering NPC, even if you had him in your party when you killed it and meet Snivels in Nerukzan Woodlands after dismissing him.

11. Three Skull Gates. I do not think you can open them, but you can go around them another way. You cannot pick them.

12. Runed Plaque and Lever. Clicking the Plaque reveals runes that translate to Flesh Poison. The lever is described as being covered in a brown syrup that smells like almonds. Clicking the lever without protection results in your entire party being inflicted with Poison (you can cure it normally). The hint on how to protect yourself is on the item itself if you have Improved Identify, though one of the ways to get the item is a small hint as well. To avoid the Poison, equip a pair of Vulcanic Gloves to any member of the party before you touch the lever. When you flip it that character will automatically use the gloves. You can get the gloves in two places; Steal them or murder Vermint the Mason, or get them from the randomized Treasure Chest on this floor (they are usually inside, but not always). The gloves are very heavy, so keep that in mind if you want to keep them on. USE-ing the gloves on it does not work and will result in the party being Poisoned.. However you decide to do it, flipping the lever opens the Skull Gate to the south(#13).

13. Skull Gate. Unlocked with the nearby lever(#12).

14. Refreshing Fountain. Decreases Status Effects for the character that drinks from it. They may need to drink from it a few times to rid themselves of whatever they have been inflicted with. Note I do not recommend waiting to use this fountain to cure the Nausea that your party will be inflicted with on the floor above, or at least not for all of your party members, because there is a static battle before you can reach it.

15. Plaque. Click on it and it will tell you that this is the way to the Path of the Elders.


NPC KEYWORDS
Vermint: Chrytosphere/All Seeing Eye/Eye of Nerukzan, Elders/Ancestors, Entrance/Threshold, Escape/Leave, Grendel/Soul Eater, Path, Where (is) Grendel, Where (is) Chrytosphere
*You can steal Vulcanic Gloves (TOX20) from him.

Snivels: Chrytosphere/All Seeing Eye/Eye of Nerukzan, Elders/Ancestors, Grendel/Soul Eater, Path, Entrance/Threshold, Escape/Leave, Where (is) Grendel


POTENTIAL LOOT
Treasure Chest (Major Lock Level IX)
Instruments: Halcyonic Lyre
Armor: Vulcanic Gloves (TOX20), Firewalkers
Spellbook: Fire Shield
Consumables: Acid Splash, Gris Gris Bag, Pilgrim Tea
*The items in this chest are randomized, but you almost always get Vulcanic Gloves and always seem to get Pilgrim Tea.

You will sometimes get a Stiletto drop after battles with Rhattu.


ENEMIES
Packrat
Giant Rat
Black Bats - Can Disease.
Giant Bat - Can Drain Vit/Sleep.
Skinkasaur
Rhattu
Rhattu Rangers - Casts Leaping Sparks, Insect Swarm, Irritation, and @Spelltag (Multi-target Curse). Can also buff with Cerebral Shield.
Rhattu Acolyte
Rhattu Priest
Vermint
Upper Pyramid


1. Runed Plaque and Lever. Clicking the Plaque reveals runes that translate to Flesh Poison. The lever is described as having the same substance on it as the lever on the floor below. Clicking the lever without protection results in your entire party being inflicted with Poison (you can cure it normally). The hint on how to protect yourself is on the item itself if you have Improved Identify, though one of the ways to get the item is a small hint as well. To avoid the Poison, equip a pair of Vulcanic Gloves to any member of the party before you touch the lever. When you flip it that character will automatically use the gloves. You can get the gloves in two places; Steal them or murder Vermint the Mason, or get them from the randomized Treasure Chest on the first floor (they are usually inside, but not always). The gloves are very heavy, so keep that in mind if you want to keep them on. USE-ing the gloves on it does not work and will result in the party being Poisoned.. However you decide to do it, flipping the lever opens the nearby Skull Gate(#2).

2. Skull Gate. Unlocked with the nearby lever(#1).

3. Skull Gate. You cannot unlock this door, but you can get on the other side of it another way.

4. Stone Face and Skull Gate. Click on the Stone Face and it will tell you that none but the purified shall pass the Gate, and tells you to give up. If you have pulled the chain in the purification chamber the Stone Face will acknowledge it and ask what you are offering to Grendel in exchange for passage through the Gate. For hints on what to type the Plaques of the Rhattu Codex in the Meditation chamber give you the words you have to use and their meanings. As for the correct order, the Rhattu Priest at Event #9 on the first floor speaks the Rhattu language at you, though that isn't much of a hint since he does not use any of the words mentioned in the Codex Plaques, and the friendlier Rhattu speak English (or whatever the common language of Hyperborea is). Without much to work with, I used the tried and true find-the-starting-point-and-go-clockwise method that works on many of the puzzles in this game. The correct answer is VUTAK NER DAKKUTES AKATA (My soul I bring as an offering). After saying the correct answer the Stone Face instructs you to leave your goods in the oblation chest before your final test and to not leave the path on your way (I did not find any chest that you could put things in, so don't worry about it), then opens the nearby Skull Gate.

5. Chain in Purfication Chamber. Pulling the chain will cause fumes to rise through the grate and coat your party, causing everyone to become inflicted with intense Nausea. You do not have to remain Nauseated, so you might want to cure it as soon as you can or your party will be helpless in battle. After you have done this, go to the Stone Face(#4).

6. Plaque of the Rhattu Codex. Clicking it tells of a Rhattu religious rite and includes a translation: "AKATA"(as an offering), "AKARKATA"(they offered), "AKARRAKA"(offered).

7. Plaque of the Rhattu Codex. Clicking it tells of a Rhattu religious rite and includes a translation: "NAR DAKKUTA"(they bring), "NER DAKKUTES"(I bring), NEK DAKKUTAK(he brings).

8. Plaque of the Rhattu Codex. Clicking it tells of a Rhattu religious rite and includes a translation: "VUTOK"(your soul), "VUTAR"(their soul), "VUTAK"(my soul).

9. Meditation Chamber. Rest in this spot to have a nightmare. It's not important, but it's still fun. You can still be attacked when Resting here.

10. Meditation Chamber. Rest in this spot to have a nightmare. It's not important, but it's still fun. You can still be attacked when Resting here.


POTENTIAL LOOT
Treasure Chest (Major Lock Level IX)
Weapons: Rusty Sword, Broadsword, Battle Axe, Bed De Corbin, Flagellum, Goupillon, Slingshot, Shortbow, Longbow, Slurbow, Knuckle Duster
Instruments: Muting Lyre, Thistle Whistle, Halcyonic Lyre
Thrown/Ammo: Throwing Knive, Barbed Arrows, Piercer Arrow, Poison Arrow, Feather Dart, Horn of Winter
Shields: Heraldic Shield
Armor: Wizard Cap, Bascinet, Flannel Shirt, Chainmail, Ringmail, Bridandine, Copper Plate, Cuirass leggings, Greaves, Sollerets
Accessories: Ring Pro Frost, Ring of Protection, Ring of Smiting, Ring of Featherfall
Staff/Rods: Fizzlestick, Stave of Missiles, Ice Wand, Freezer Rod, Zapper Rod, Wand of Webs
Scrolls: Mindread, Magic Screen, Locate Item, Locate Person, Knock Knock, Magic Bells, Raise Dead, Remove Curse
Spellbooks: Bless, Missile Shield, Firestorm, Raise Dead, Rainbow Rays(Arcanum)
Consumables: Neutralize Poison, Cure Paralysis, Stone To Flesh, Sleep Sand, Bag of Sparkles, Rock Salts, Cherry Wine, Wonder Adhesive, Luck Stone
Other: Cobalt Sapphire, Gold Leaf

You will sometimes get Common Gate Key drops after battles in this area.


ENEMIES
Packrat
Giant Bat - Can Drain Vit/Sleep.
Barghestii
Rhattu Rangers - Casts Leaping Sparks, Insect Swarm, Irritation, and @Spelltag (Multi-target Curse). Can also buff with Cerebral Shield.
Ziggurat Nexus


1. Skull Gate. Unlock it by using a lever to the north(#8). You cannot pick the Gate.

2. Skull Gate. I don't think you can open it, but you can walk around to the other side. You cannot pick the Gate.

3. Pushable Brick. Push it to close a pit to the west(#4).

4. Pit. Cover it by pressing a brick to the east(#3).

5. Skull Gate. Unlocked with the Nexus Key. You cannot pick the Gate.

6. Plaque. Click it to read that the apex is where the four guardians hold the ancestral bones.

7. Pushable Brick. Push it to close a pit to the north(#8).

8. Pit and Lever. Cover the pit by pressing a brick to the south(#7). The lever is described as having a dark sticky syrup on it. Clicking the lever without protection results in your entire party being inflicted with Poison (you can cure it normally). The hint on how to protect yourself is on the item itself if you have Improved Identify, though one of the ways to get the item is a small hint as well. To avoid the Poison, equip a pair of Vulcanic Gloves to any member of the party before you touch the lever. When you flip it that character will automatically use the gloves. You can get the gloves in two places; Steal them or murder Vermint the Mason, or get them from the randomized Treasure Chest on the first floor (they are usually inside, but not always). The gloves are very heavy, so keep that in mind if you want to keep them on. USE-ing the gloves on it does not work and will result in the party being Poisoned.. However you decide to do it, flipping the lever opens a Skull Gate to the south(#1).

9. Treasure Chest. Open it for a Nexus Key (Critical Item).


POTENTIAL LOOT
EVENT 9. Treasure Chest. Open it for a Nexus Key (Critical Item).

1. Shallow Water: Vending Token

2. Treasure Chest (Major Lock Level VI)
Thrown/Ammo: Sheolic Pipes
Accessories: Ring Pro Fire, Amulet vs. Sorcery
Armor: Night Hood, Night Robe, Night Leggings
Staff/Rods: Fizzlestick
Scrolls: Hold Monsters, Lightning
Spellbooks: Wizard's Eye
Consumables: True Seeing
*The items in this chest are static.


ENEMIES
Packrat
Flesh Grubs - Can Disease.
Black Bats - Can Disease.
Giant Bat - Can Drain Vit/Sleep.
Blood Leech - Can Drain Vitality.
Barghestii
Rhattu
Pyramid Apex


1. Bull Statue with Bowl. Click on the bowl to see that is is filled with burnt Rhattu Bones (Critical Item), which you can then take.

2. Bull Statue with Bowl. You can't seem to click on this one.

3. Bull Statue with Bowl. Click on the bowl to see that is is filled with burnt Rhattu Bones (Critical Item), which you can then take along with Zandrithar Totem. If you have explored Harradan Groves you might recall coming across the Caverns of Zandrithar.

4. Bull Statue with Bowl. You can't seem to click on this one.


POTENTIAL LOOT
EVENT 1. Bull Statue with Bowl: Rhattu Bones (Critical Item)

EVENT 3. Bull Statue with Bowl. Rhattu Bones (Critical Item), Zandrithar Totem

You can sometimes get Stilleto drops after fighting either Rhattu or Rhattu Rangers.


ENEMIES
Black Bats - Can Disease.
Giant Bat - Can Drain Vit/Sleep.
Electrapede - Can deal magic damage that also has a chance to Instantly Kill.
Rhattu
Rhattu Rangers - Casts Leaping Sparks, Insect Swarm, Irritation, and @Spelltag (Multi-target Curse). Can also buff with Cerebral Shield.
Chrytosphere Mount


1. Hieroglyphs. Click them to see A downward looking eye, with a Death's Head above it, at the Pyramid's apex, with a figure of a Rhattu exiting at the base of the Pyramid.

2. Heiroglyphs. Click them to see a group of Rhattu Priests casting a net over the crystal at the apex of the Pyramid.

3. Chrytosphere. Clicking on it causes your party to be inflicted with Blind. Use the Copper Damper Mesh on it and it will stop glowing, but your party will still be Blinded in the process. This will allow your party to escape the Pyramid. Afterward, click on it again and choose a character with high Inspection Skill. If you don't have anyone who has Inspection Skill or you can't seem to manage it you can come back later, but keep in mind that even if you have very high Inspection Skill it can still take several tries. Succesfully doing so gives you Eye of Nerukzan(Critical Item) and completes a Miniquest, which gives every character in the party 3000exp.


ENEMIES
Rhattu Rangers - Casts Leaping Sparks, Insect Swarm, Irritation, and @Spelltag (Multi-target Curse). Can also buff with Cerebral Shield.
Path of the Elders


1. Carvings. Click it to see a smart Rhattu avoiding pits as his fellow companions fall into them.

2. Lever and Skull Gate. Click the lever to open the Skull Gate. You cannot pick the Gate.

3. Hole. Leads to the Domain of Grendel. Unlike most holes, you can ascend from this spot, so it is not one way. You do not seem to need Featherfall to protect yourself or you fragile items here.

4. Rhattu Skeleton. Pick up the Ring Pouch from the ground tile (brown square to the right of the Inventory Scroll) and put it in your Inventory for more space. The bag, as its name implies, can hold rings.

5. Pressable Brick on the north wall. Clicking it covers one of the Pit Traps to the southwest(#6).

6. Pit Trap. Cover it by clicking the pressable brick to the northeast(#5).

7. Treasure Chest. Open it for the Key of the Domain (Critical Item).

Unlike most Pit Traps that give you a warning when you attempt to step into them, pits in the Dark Zone do not do this. I wish I could tell you some simple step rules to avoid them, but there aren't any. Use your minimap combined with the map above to navigate, or cast Wizard's Eye to help you locate the pits. If you have Snivels in your party he will fill out your map for you as well as mark where Grendel can be located. He does not mark where the Key is though, or how to close the Pit to get to it.


POTENTIAL LOOT
EVENT 7. Treasure Chest. Open it for the Key of the Domain (Critical Item).

You will sometimes get Perk Key and Locksmith's Key drops after battles in this area.


ENEMIES
Black Bats - Can Disease
Giant Bat - Can Drain Vit/Sleep.
Skinkasaur
Rhattu
Rhattu Rangers - Casts Leaping Sparks, Insect Swarm, Irritation, and @Spelltag (Multi-target Curse). Can also buff with Cerebral Shield.
Domain of Grendel


1. Stone Face. Click it to see that it is exhaling blue mist. In the hallway leading to Grendel, just before the Skull gate, Snivels will comment on the properties of the Blue Mist and tell you that you can only stop it by stuffling the Stone Face with bones. This is the only hint about what to do with the Rhattu Bones that I know of. When you have used both Rhattu Bones on both faces you will be able to cast Magic, as well as use Music and Special Abilities in Grendel's chamber.

2. Stone Face. Click it to see that it is exhaling blue mist. In the hallway leading to Grendel, just before the Skull gate, Snivels will comment on the properties of the Blue Mist and tell you that you can only stop it by stuffling the Stone Face with bones. This is the only hint about what to do with the Rhattu Bones that I know of. When you have used both Rhattu Bones on both faces you will be able to cast Magic, as well as use Music and Special Abilities in Grendel's chamber.

3. Plaque and Skull Gate click the plaque for a fancy invitation:
"Enter my hearth, ye bright spark,
ye feeble coil of blood and bone,
in this furnace all flesh is
consumed that the spirit might be
burned into paradise."

The Skull Gate is unlocked with the Key of the Domain. You cannot pick the Gate.
You cannot Rest beyond this gate, even at the Safe Havens. If you decide to confront Grendel without stopping the Blue Mist, cast your buffs here.

4. Party thoughts. If you have not stopped the Blue Mist your party will feel drained, and there is a warning that magic will not work in this chamber. Heed that Warning, because it effects all Magic, Music, and Special Abilities.

5. Description of a Large Figure stirring the contents of a black kettle with a wooden plank. It notices your party, and attacks, revealing that it is Grendel, the Soul Eater. Hopefully you buffed yourself outside of this room. It gets a decent amount of turns, hits pretty hard, and Breathes Fumes (Inflicts Poison or Instant Death), but if you came prepared you should be able to win as long as you can survive his initial attack (if your party isn't already super fast through SPE pumping). It saves against Air (Nausea) and Mental (Fear, Insanity) effects, but does not have any special resistances to anything else, including Irritation. He breaks Charm, Paralysis and Stone very easily though. Unconscious seems to work the best. If you stopped the Blue Mist you can use all of your abilities normally. If you did not stop the Blue Mist you cannot successfully use Magic, Music, or Special Abilities. The fight is still cheese-able by equipping weapons capable of inflicting Unconscious (mostly blunt weapons, with some exceptions).

6. Black Pot filled with boiling water.

7. Treasure Chest and Pressable Brick. Open the Treasure Chest for the Copper Damper Mesh (Critical Item). The pressable brick is on the east wall, and clicking it removes a wall to the south(#8).

8. Stained Glass Window. Remove the west wall by clicking a pressable brick to the north(#7).

9. Chain. Pull it to remove the south wall.

10. Magic Green Gate. Remove it with the Key of the Exemplar.

11. Treasure Chest. Open it for the Nemesis Tablet (Critical Item).

As you make your way beyond Grendel's chamber, if you have Snivels in your party you will be treated to a little wrap up of his storyline.


POTENTIAL LOOT
EVENT 7. Treasure Chest and Pressable Brick: Copper Damper Mesh (Critical Item).

EVENT 11. Treasure Chest: Nemesis Tablet (Critical Item)

1. Treasure Chest (Master Lock Level X)
Weapons: GraveGuide, Giant Killer
Accessories: Ring of Smiting
Scrolls: Magic Moth, Earthquake
Consumables: Gris Gris Bag, Crimson Ambrosia
*The items in this chest are static.

You will sometimes get Locksmith's Key after battles in this area.


ENEMIES
Flesh Grubs - Can Disease
Cophrophages - Can Disease
Amoebic Slime
Toxic Amoeba
Black Bats - Can Disease
Giant Bat - Can Drain Vit/Sleep
Oreworm - Can Irritate and Destroy equipment
Grendel - Can Breathe Fumes (Inflicts Poison or Instant Death)
GHOST CITY OF GIDEON SECTION
Desolation of Gideon
There are a lot of Ghost-type enemies here. Make sure you have a way of dealing with them before you start exploring.


1. Krellspar. A recruitable NPC. Talk to him for an idea of what to do. He tells you that some people took the Key To The City into the Ruins, and that there is something horrific in the Aquifer under the Hedgemaze of Gideon. He also warns you not to sleep in the Ruins, which is a hint for a later event. Once you meet him he becomes a Random Encounter. He does not react to the Key when you find it, the Mirror of Reflekshun, or killing Knorlos Knossos.

2. Graveyard Entrance. Just some lore and a Journal entry.

3. Headstones. More lore.

4. Unkempt Monument. LOOK at it to find a Dreamcatcher.

5. Skull Gate. I do not know of a way to open it (as of patch 1.2.0.25-R) and it may be there just for looks. Like all Skull Gates, it cannot be picked.


NPC KEYWORDS
Krellspar (Random Encounter after first meeting, Recruitable): Gideon, Aquifer, Key (To The City)


POTENTIAL LOOT
EVENT 4. Unkempt Monument: Dreamcatcher


ENEMIES
Flesh Grubs - Can Disease.
Fire Beetle - Can Irritate. Has a Fire based Breath.
Phangshrub
Glowmoth - Can Blind.
Dragonfly - Can Instantly Kill.
Phantom - Ghost Type.
Wraith - Ghost Type. Can Drain HP and Fear. They also have a Breath attack.
Spectre - Ghost Type.
Ruins of Gideon


1. Skeleton - LOOK at it for the Key To The City (Critical Item). Detect Secret does not activate on it. Not sure if that is a bug. I forgot to check the Detect Item Spell, but it would probably work.

2. Skull Door. Unlocked with the Key To The City. You cannot pick the lock.

3. Toxic Fountain. Inflicts Disease on any character that drinks from it.

4. Bizzare Fountain. Drains Vitality from any character that drinks from it.

5. Bad Water Fountain. Inflicts Disease on any character that drinks from it.

6. Bones of a Bard. Click the pushable brick on the west wall to reveal an alcove, which contains a Treasure Chest. Click the chest to get the Barding Kit, an inventory organizing item that can store Instruments.
WARNING: Placing an Instrument into the Barding Kit will make that item inaccessible in battle (unless there is some hidden way to do it).

There seem to be Spinner Tiles on this floor (or some really bizarre graphic/sound glitches), which change your direction when stepped on. They only trigger once, and it is very obvious when it happens. If you feel disoriented you can simply look at your map.


POTENTIAL LOOT
EVENT 1. Skeleton: Key To The City (Critical Item)

EVENT 6. Treasure Chest: Barding Kit

1. Barrel
Weapons: Rusty Sword, Knuckle Duster
Scrolls: Locate Item
Consumables: Cure Heavy Wounds, Neutralize Poison, Remove Curse, True Seeing, Rock Salts, Iron Rations, Baldercake, Cherry Wine
Other: Vending Token, Soothing Stone

2. Treasure Chest (Major Lock Level VIII)
Weapon: Bearded War Axe, Halberd Pike, Fist Mace, Bolas
Shield: Target Buckler
Armor: Platemail*, Spiked Bracer, Battle Gauntlet, Greaves
Staff/Rods: Rod of Nightmares
Scrolls: Magic Missile*, Deep Freeze, Mindread, Fireball
Consumables: Stone to Flesh*
*Marked items always seem to be static.


ENEMIES
Mad Monk - Casts Spells.
Jackalope - Can "Breathe Fumes" (Damage)
Insane Leonarae
Psyclops - Regenerates HP. Can inflict Confusion and Insanity. They will still Screech when Charmed. Cannot be made Unconscious and are Immune to Mental effects and Drain, and resist Sonic effects.
Hedgemaze of Gideon


1. Pool Drain. Clicking on the drain (it's obscured by the UI window) prompts you to pull the plug the same way you would force a door open. Click the giant ?s and select characters with high STR for them, then press the button with the four arrows on it, which will drain a little Vitality as the characters make their attempt. I don't know the exact numbers needed, but 30+ STR on each character works, which is pretty generous. Less than that and the attempt will probably fail. I tried to get it open using the Strength Spell on my Mages (natural 20 STR each) just for kicks, but it didn't work. Once you succeed, the water will be drained. Click the drain again to pick up the Lavaliere of Swords, Lavaliere of Cups, Lavaliere of Pentacles, and the Lavaliere of Batons.

2. Urn painted with swords and blades. Place the Lavaliere of Swords into it, and it will fill with water.

3. Urn painted with cups and mugs. Place the Lavaliere of Cups into it, and it will fill with water.

4. Urn painted with batons, sticks, and spears. Place the Lavaliere of Batons into it, and it will fill with water.

5. Urn painted with pentacles and interwoven stripes. Place the Lavaliere of Pentacles into it, and it will fill with water.

6. Well filled with clear blue water. Place each card themed pendant in the appropriate Urn to magically drain the water from the well. Click the well afterward to descend into Gideon Reservoir.


POTENTIAL LOOT
EVENT 1. Pool Drain: Lavaliere of Swords, Lavaliere of Cups, Lavaliere of Pentacles, Lavaliere of Batons


ENEMIES
Stinkbug - Can Poison.
Fire Beetle - Can Irritate. Has a Fire based breath.
Glowmoth - Can Blind.
Night Lily - Can Poison.
Chloraziod
Monarch Nettle
Treant - Cannot be knocked Unconscious.
Gideon Reservoir
You will need Swimming Skill (and some VIT food/Refresh Spell if you don't have enough to cross 5 water tiles) or Waterwalkers (with two charges) to explore this area.


1. Urn. Click it for Lavaliere of Swords.

2. Urn. Click it for Lavaliere of Batons.

3. Refreshing Fountian. Restores the Vitality of the character that drinks from it. Seems like it is infinite use.

4. Notice of Construction. Just a bit of lore and a Journal Entry.

5. Urn. Click it for Lavaliere of Cups.

6. Urn. Click it for Lavaliere of Pentacles.

7. Warning Plaque. More lore and a Journal Entry.

8. Skeleton. Click the Skeleton to find Mirror of Reflekshun. This spot is also a Safe Haven.


POTENTIAL LOOT
EVENT 1. Urn: Lavaliere of Swords.

EVENT 2. Urn: Lavaliere of Batons.

EVENT 5. Urn: Lavaliere of Cups.

EVENT 6. Urn: Lavaliere of Pentacles.

EVENT 8. Skeleton: Mirror of Reflekshun


ENEMIES
Dragon Carps
Mermaid
Wraith - Ghost Type. Can Drain HP and Fear. They also have a Breath attack.
Spectre - Ghost Type.
Water Elemental - Cannot be knocked Unconscious.
Green Quandary


1. Minotaur. It is really fast, so even if you have been pumping speed you might want to cast Armorplate and hope it protects your party before you challenge it. When it "bites" a character with its axe swing it has a chance to Paralyze, so be prepared for that. As far as controlling status effects go, it resists Mental effects (Fear, Insanity), but everything else seems to stick, including Unconsciousness. It has quite a bit of HP, so even if you keep it controlled it will take a while to kill unless you use high damaging magic spells.

2. Well. Click on it to descend to the Hecatombs of the Sphinx.


POTENTIAL LOOT
1. Treasure Chest (Major Lock Level VII)
Weapon: Stiletto, Wooden Club, Boar Spear, Blowgun, Bullwhip
Instruments: Lethe Harp, Hotfoot Banjo
Thrown/Ammo: Flame Arrow, Sleeper Arrow, Poison Arrow, Feather Dart, Poison Dart, Stone Bullets
Armor: Leather Vestment, Leather Hood, Mail Coif, Flannel Shirt, Leather Jerkin, Leather Gloves, Rerebraces, Moccasins
Accessories: Ring Pro Fire, Ring Pro Magic, Ring of Featherfall
Staff/Rods: Wand of Webs, Torpedo Rod, Fizzlestick
Scrolls: Identify, Locate Person, Enchanted Blade, Mindread
Spellbooks: Direction, Wizard's Eye, Fire Shield, Missile Shield, Knock Knock, Featherfall
Consumables: True Seeing, Stink Bomb, Jar O 'Bugs, Dazzler Dust, Garlic, Amaranth, Toadweed, Woundwart, Mistletoe, Pilgrim Tea


ENEMIES
Stinkbug - Can Poison.
Fire Beetle - Can Irritate. Has a Fire based Breath.
Glowmoth - Can Blind.
Monarch Nettle
Marshlight - Ghost type, I think? Can Charm and "Starve" a character (Seems to do nothing but deplete the pointless FOO bar). Resists Unconsiousness, Charm, Cold, and Sonic Effects.
Banshee - Ghost type. Has a multi-hitting Wail, which it will still use if Charmed.
Jackalope - Has a Breath attack.
Insane Leonarae
Minotaur - Can Paralyze. Resists Fear and Insanity. Will attack the party when Charmed.
Hecatombs of the Sphinx


1. Dracosphinx and Lever. The Sphinx will ask you a riddle:
A pointed sword that descends from
the air, greets the dawn with a
drink, is shattered by the sun.
What is it?

The correct answer is ICICLE, but ICE also works.
Answer right and it will disappear. Answer wrong and you will have to fight it. Either way, you get access to the lever.

2. Gynocore and Lever. The Sphinx will ask you a riddle:
A fat hat on a stool, needs no sun
upon his seat, likes it where it's
damp and cool, sometimes good enough
to eat?

The correct answer is TOADSTOOL, but MUSHROOM also works.
Answer right and it will disappear. Answer wrong and you will have to fight it. Either way, you get access to the lever.

3. Dracosphinx and Lever. The Sphinx will ask you a riddle:
With two hands he numbers them in
sequence, one after the other, each
gesture following the next, until he
arrives where he began, plain of face
and as humble at the end as in the
very beginning.
What is he?

The correct answer is CLOCK, but WATCH also works.
Answer right and it will disappear. Answer wrong and you will have to fight it. Either way, you get access to the lever.

4. Chimerasphinx and Lever. The Sphinx will ask you a riddle:
Zeno said I shall set out, upon a
walk to Zanzibout. Zeno walked half
a day, he looked about and was
halfway.
Now Zanzibout was a half day away,
so Zeno said enough today.
The morning after he set out,
and was soon half the way
to Zanzibout.
When did Zeno reach his destination?

The correct answer is AFTERNOON. NOON works too.
Answer right and it will disappear. Answer wrong and you will have to fight it. Either way, you get access to the lever.

5. Dracosphinx and Lever. The Sphinx will ask you a riddle:
This one fell a little ways, soon was
joined by his fellows, until at last
his mother was naked and without the
least bit of shade.
Of what do I speak?

The correct answer is LEAF, but LEAVES also works.
Answer right and it will disappear. Answer wrong and you will have to fight it. Either way, you get access to the lever.

6. Dracosphinx and Lever. The Sphinx will ask you a riddle:
I found a stick that weighed two
pounds, I sawed it up and passed it
'round, I cut it into pieces eight,
then added up the sun of weight.
It wasn't the same stick I though
I found, for the sum no longer
weighed two pounds.
Where did the missing weight of the stick I found go?

The correct answer is SAWDUST.
Answer right and it will disappear. Answer wrong and you will have to fight it. Either way, you get access to the lever.

7. Lever. You cannot use it until you have answered all three riddles on the west side(#1, #3, #5). Afterward, clicking it opens the nearby Skull Door(#8).

8. Skull Door. Unlocked with the nearby lever(#7). Like all Skull Doors, it cannot be picked.

9. Lever. You cannot use it until you have answered all three riddles on the east side(#2, #4, #6). Afterward, clicking it opens the nearby Skull Door(#10).

10. Skull Door. Unlocked with the nearby lever(#9). Like all Skull Doors, it cannot be picked.

11. Blind Stone Face. Touch it and it asks you to light three lights, learning the lore behind Gideon, and return to it (it also misspells "Reflektion"). It will tell you how many you have left if you click it before you have lit all three. Return and click on it once all three Orbs are lit to open the nearby Skull Gate(#12).

12. Skull Door. Unlocked by lighting the three Orbs (#13, #14, #15) and touching the Stone Face(#11). Like all Skull Doors, it cannot be picked.

13. Orb on a Pedestal. Click on it to light it up, which gives you a vision of Gideon's past, the second in the sequence. Tells the story of how the sorcerer Knorlos Knossos used shadows in bedroom mirrors to stalk the children of Gideon and steal their dreams.

14. Orb on a Pedestal. Click on it to light it up, which gives you a vision of Gideon's present, the third in the sequence. It shows you a corrupted dream root/vine growing beneath Gideon, spreading into the city's mirrors and used like a straw by Knorlos Knossos to suck the dreams of the townsfolk. This spot is also a Safe Haven.

15. Orb on a Pedestal. Click on it to light it up, which gives you a vision of Gideon's past, the first in the sequence. It shows you what a great city Gideon once was, but that something was secretly preying on their hopes and dreams. This spot is also a Safe Haven.

POTENTIAL LOOT
Treasure Chest (Major Lock Level VIII)
Thrown/Ammo: Cupid's Arrow
Staff/Rods: Fizzlestick, Zapper Rod
Scrolls: Raise Dead, Lightning, Magic Moth
Spellbooks: Raise Dead
Consumables: Cure Disease, Remove Curse, True Seeing, Evil Off, Faery Water, Crimson Ambrosia, Galen Apple, Elysium Berries, Baldercake, Hobor's Holy Hash, Iron Rations*, Pilgrim Tea*, Cherry Wine*

Sometimes you will get a Perk Key or Common Gate Key after battle.


ENEMIES
Packrat
Fire Beetle - Can Irritate. Has a Fire based Breath.
Barghestii
Fire Elemental - Ghost type. Regenerates Health. Has a breath attack that can deal damage and inflict Irritate. Immune to Unconsciousness, Sleep, Charm, Nausea, and Insanity. Absorbs Fire.
Dracosphinx
Gynocore
Chimerasphinx - Uses Glowing Aura (Polymorph), Breaks Paralysis quickly.
Halls of Reflekshun


1. Lever. Clicking it covers the nearby Pit Trap(#2).

2. Pit Trap and Treasure Chest. Cover the trap by using the nearby lever(#1). The Treasure Chest is locked with Master Lock Level X. Open it for the Looking Glass Key (Critical Item).

3. Skull Gate. Unlocked with the Looking Glass Key. Cannot be picked.

4. Looking Glass. Return here with the Book of Reflekshun, set a character's action to USE, then drag the book on top of the Icon. This will cause a Jabberwocky to burst through the glass in front of you... behind you... and attack. If it Penetrates a character's defense they will be Instantly Killed, and it can inflict Fear. It resists Fear, but other controlling status effects seem to land normally. To kill it easily, simply equip the cursed Vorpal Blade to any character and have them attack. Any non-Vorpal Blade wielding character can either try and land a status effect, or simply HIDE to avoid being targeted (requires Stealth Skill to be successful). If you do not want to use the intended Vorpal Blade method you can still kill it normally. Just treat it like any other boss. You do not lose the Book of Reflekshun.

5. Lantern and Plaque. Click the Lantern to turn it on, then read the plaque for instructions:
Stand and face the mirror and read from the book to call forth the creature who lives on the other side.

6. Acme Vending Machine

7. Strange Fountain. Turns any character who drinks from it into a frog, rat, or duck.

8. Lever. Click it to cover the nearby Pit Trap(#9).

9. Pit Trap. Use the nearby lever(#8) to cover it.

10. Lever. Using it unlocks one of the nearby Gates(#11).

11. Two Skull Gates. The south Gate is unlocked with the nearby lever(#10). The Gate facing east is unlocked by following the instructions at the Drink-Me Nook(#12). As expected, you cannot pick either one.

12. Drink-Me Nook. The name on the plaque gives you a clue to think about Alice in Wonderland. Change a character's form at the Strange Fountain (#7), then return to this tile, click on the window, and choose the transformed character to flip a lever (which doesn't actually exist...) on the other side. This opens the east facing Skull Gate nearby(#11).

13. Treasure Chest. Major Lock Level IX. There is a Vorpal Blade inside, which gives you a Journal Entry. If you assay the Vorpal Sword you get some more hints to think about Alice in Wonderland and a warning about an enemy you will face soon, which just happens to be weak to the weapon. The randomized contents that I have found are listed in the Potential Loot section.

14. Bookshelf. Click on it to take the Book of Reflekshun(Critical Item), with a note that "REFLEKSHUN" is spelled oddly.

15. Lever. Using it covers the nearby pit(#18).

16. Skull Gate. It cannot be picked, but you can walk around it.

17. Skull Gate. When you approach Knorlos Knossos will whisper to you and say that he has a Tablet, he knows you have come for it, goes on about how great he is, then dares you to come after him. He will then open the Gate for you.

18. Pit Trap and Skull Gate. Use the nearby lever (#15) to cover the Pit. The Skull Gate cannot be picked, but you can walk around it.


SHOP
Acme Vending machine
Scrolls: Divination (4 tokens), True North (1 token), Locate Person (3 tokens)
Consumables: Cure Lt. Wounds (3 tokens), Neutralize Poison (5 tokens), True Seeing (3 tokens), Garlic (2 tokens), Nausea Powder (1 token), Galen Apple (1 token), Iron Rations (1 token), Baldercake (1 token), Lethe Liqeur (1 token), Chattery Teeth (6 tokens), Undead Warder (5 tokens)
Other: Soothing Stone (1 token), Silver Spoon (1 token)


POTENTIAL LOOT
EVENT 2. Pit Trap and Treasure Chest (Master Lock Level X): Looking Glass Key (Critical Item).

EVENT 13. Treasure Chest (Major Lock Level IX)
Weapons: Vorpal Blade*
Thrown/Ammo: Sleeper Arrow
Armor: Chainmail, Cuirass Leggings, Vambraces, Sollerets
Scrolls: Lightning, Armorplate
Consumables: Talisman of Spiderclimb*
Other: Luck Stone*
Items found by Gemmary: Poison Lash, Firestorm Spellbook, AntiMagic Scroll
*You always get the Vorpal Blade. You seem to always get the marked items as well. I zoned out and accidentally saved before I was able to do more tests, so this list might be lacking.
**Vorpal Blade stats are:
Cursed
Two-handed
4D8 Damage
Range 2
TOHIT 20
HITVS 50 vs Carroll, Jabberwocky
SOR10
10 Swordsmanship
M+ (Magic Regeneration)
Capable of Lethal Blow

1. Barrel
Weapons: Rusty Sword, Knuckle Duster
Scrolls: Locate Item
Consumables: Cure Heavy Wounds, Neutralize Poison, Remove Curse, True Seeing, Rock Salts, Iron Rations, Baldercake, Cherry Wine
Other: Soothing Stone, Vending Token

2. Treasure Chest (Master Lock Level X)
Weapons: Cudgel, Broad Axe, Beaked Axe, Bec De Corbin, Fist Mace, Threaded Lash, Awl Pike, Poison Lash, Cestus
Shields: Target Buckler, Kite Shield
Instruments: Muting Lyre
Thrown/Ammo: Cosmic Cryer, Sheolic Pipes, Feather Dart, Throwing Knive, Sleeper Arrow
Armor: Burgonet, Flannel Shirt, Camail, Jazeraint Shirt, Cestian Girdle, Lamellar, Platemail, Copper Plate, Cuirass Leggings, Pauldrons, Sandals, Spur Sollerets, Waterwalkers
Accessory: Ring Pro Frost, Ring of Deflection, Ring of Smiting, Amulet vs. Hypno, Amulet Vs. Sorcery
Staff/Rods: Stave of Missiles, Wand of Fireballs, Beholder Stave, Fizzlestick
Scrolls: Enchanted Blade, Hold Monsters, Wither, Lightning, Cosmic Gate
Spellbooks: Bless, Featherfall, Firestorm, AntiMagic, Cosmic Gate, Hermetic Gag (Arcanum)
Consumables: Acid Splash, Sleep Sand, Paralysis Dust, Bag of Sparkles, Halomancic Salts, Rock Salts, Cherry Wine, Water Glass, Scrying Crystal
Other: Cobalt Sapphire, Locksmith's Glue, Clutcher Talon, K.O. Rock


ENEMIES
Terrormites
Electromaggot - Can deal magic damage.
Psyclops - Regenerates HP. Can inflict Confusion and Insanity. They will still Screech when Charmed. Cannot be made Unconscious, are Immune to Mental effects and Drain, and resist Sonic effects.
Dreamdusters - Casts Spells, including Deep Freeze. Can inflict Confusion and Unconsciousness.
Jabberwocky - Can cause Instant Death, Fear. Resists Fear.
Well of Reflekshun


1. Lever. Click it to open the Skull Gate to the north(#2).

2. Skull Gate. Unlocked with a lever to the south(#1).

3. Bridge Control. Click it twice (Moon setting) to raise both pieces of the bridge. Once it is up is will not go down. For the sake of completion, Sun is the default, Lightning only raises the east piece of the bridge, and Star doesn't seem to do anything.
*I noticed that the map is missing a 3. Sorry about that! The Bridge Control Dial is to the right/east of #2.

The unnumbered Ⓧ icons are where the pieces of the bridge appear.
The Pit Trap icons are not on the in-game map. I included them for easier reference.


ENEMIES
Flesh Grubs - Can Disease.
Terrormites
Electromaggot - Can deal magic damage.
Dragonfly - Can Instantly Kill.
Psyclops - Regenerates HP. Can inflict Confusion and Insanity. They will still Screech when Charmed. Cannot be made Unconscious, are Immune to Mental effects and Drain, and resist Sonic effects.
Dark Faeries - Casts Spells. Can inflict Sleep, Charm, Hold, Confuse, Blind, and potentially summon Dragonfly.
Dreamdusters - Casts Spells, including Deep Freeze. Can inflict Confusion and Unconsciousness.
Hold of Knossos


1. Pushable Brick on the North Wall. Pushing it covers the nearby Hole(#2) so you can cross over safely. WARNING: Closing the Pit before you have entered it blocks off Spiral Deathtrap forever.

2. Hole to Spiral Deathtrap. Cast Featherfall to land safely. The pit can be covered by pressing a brick on a wall nearby (#1).

3. Skeletons. Click on them to check out the flower, with a description of their sleep inducing scent and a Journal Entry. LOOK to see that the plant has a face, and get another Journal Entry. If you Rest on this spot you get some flavor text. Rest again and you'll see that the flower has grown. Rest a third time (wait until everyone's status is OK before waking them up) and you will be attacked by The Sprout From Hell, described as the soul of Knorlos Knossos. Its Nettlespike causes Instant Death if it Penetrates, Tentacle has an extra Phantasmal Hand effect on it, and It can deal a ton of damage with its Acid Cloud attack. HIDE can protect characters from being affected by it, and from being targeted in general, if they are successful. It does not seem to have any special resistances to controlling status effects or Unconsciousness, so try and land them as soon as possible, just as you would any other boss.. If you kill The Sprout From Hell before confronting Knorlos Knossos, the boss fight seems much easier. As a side note killing Knorlos Knossos first does not get rid of the plant, so you can still fight it if you want to.

4. Skull Gate. Unlocked with a nearby lever(#14).

5. Chain. Pulling it covers two Pit Traps(#8, #12). Pulling it again uncovers them.

6. Chain. Pulling it covers two Pit Traps(#9, #13). Pulling it again uncovers them.

7. Chain. Pulling it covers two Pit Traps(#10, #11). Pulling it again uncovers them.

8. Pit Trap. Covered by pulling the southern most chain(#5).

9. Pit Trap. Covered by pulling the middle chain(#6).

10. Pit Trap Covered by pulling the northern most chain(#7).

11. Pit Trap Covered by pulling the northern most chain(#7).

12. Pit Trap. Covered by pulling the southern most chain(#5).

13. Pit Trap. Covered by pulling the middle chain(#6).

14. Lever. Clicking it unlocks the nearby Skull Gate(#4).


POTENTIAL LOOT
Treasure Chest (Major Lock Level VIII)
Weapons: Broadsword, Beaked Axe, Bec De Corbin, Awl Pike, Goupillon, Threaded Lash, Shortbow, Longblow, Slurbow, Knuckle Duster
Shield: Target Buckler, Heraldic Shield
Instruments: Muting Lyre, Halcyonic Lyre, Thistle Whistle
Thrown/Ammo: Sleeper Arrow, Poison Arrow, Feather Dart, Cosmic Cryer, Throwing Knive
Armor: Bascinet, Flannel Shirt, Chainmail, Ringmail, Camail, Cestian Girdle, Copper Plate, Cuirass Leggings, Vambraces, Sandals, Sollerets, Firewalkers, Waterwalkers
Accessories: Ring Pro Frost, Ring of Deflection, Ring of Featherfall, Ring of Smiting
Staff/Rods: Stave of Missiles, Ice Wand, Freezer Rod, Fizzlestick, Beholder Stave
Scrolls: Mindread, Enchanted Blade, Armorplate, Magic Screen, Locate Item, Wither, Hold Monsters
Spellbooks: Bless, Firestorm, Missile Shield, Raise Dead, Hermetic Gag (Arcanum), Rainbow Rays (Arcanum)
Consumables: Cure Paralysis, Stone to Flesh, Acid Splash, Sleep Sand, Bag of Sparkles, Halomancic Salts, Rock Salts, Cherry Wine, Water Glass
Other: Cobalt Sapphire*, Luck Stone, Locksmith's Glue


ENEMIES
Psyclops - Regenerates HP. Can inflict Confusion and Insanity. They will still Screech when Charmed. Cannot be made Unconscious, are Immune to Mental effects and Drain, and resist Sonic effects.
Warlocks
Bandersnatch - Seems to have very high Evasion.
The Sprout From hell - Can cause Instant Death, use Acid Cloud, and regular attacks have a Phantasmal Hand effect.
Spiral Deathtrap


1. Landing Spot from Hold of Knossos. You cannot return from this point.

2. Skeletons and 3 plaques. The plaques on the wall detail the sorry end to a band of adventurers, which give you a few Journal Entries. It hints on what not to do to escape this area.


POTENTIAL LOOT
Treasure Chest (Master Lock Level X)
Instruments: Cacaphony Harp
Thrown/Ammo: Stone Bullets
Armor: Waterwalkers*
Staff/Rods: Beholder Stave
Scrolls: Locate Item*, True North*
Spellbooks: Armor Shield*, Knock Knock
Consumables: True Seeing*, Acid Splash
*Marked Items always seem to be in the chest.

You can sometimes get a Locksmith's Key drop after battles. It could just be coincidence, but seems pretty frequent compared to most areas.


ENEMIES
Attercob
Spore Fungi
Marshlight - Ghost type, I think? Can Charm and "Starve" a character (Seems to do nothing but deplete the pointless FOO bar). Resists Unconsiousness, Charm, Cold, and Sonic Effects.
Electrapede - Can deal magic damage that also has a chance to Instantly Kill.
Tower of Knossos


1. Megalith. If you touch it you hear music. Get Umbilica(#4), then Rest on this tile and your party will be transported next to the cocoon on the other side of one of the webs(#8). This actually took me a few minutes to find, but only by trying different things that worked for other puzzles. If anyone knows where the in game hint is for sleeping at this specific spot (not just the hints about dreams), if there even is any, please let me know. As a side note for folks who might want to save a trip later, the Moongate Crystal does not work on this Monolith.

2. Web. There is a description of a cocoon when you approach it. See #1 and #8 on how to get past and destroy it.

3. Web. See #1 and #8 on how to destroy it.

4. Treasure Chest. Major Lock Level VI. Inside is Umbilica (Critical Item), which doubles a cursed weapon.

5. Bookshelf. Clicking on it reveals the first book in a series that gives you a hint: Slumbering cocoon must be sewn together of ectoplasm and fed the blood of infants to produce a clone. Cut the silver umbilical cord with a magic blade or it will hatch.

6. Bookshelf. Clicking on it reveals a second book in a series: About cultivating a plant in the dream world to produce astral fruit, which can then be fed to an etheric spirit, which grows in a cocoon, which can act as a bridge between the astral plane and the real world.

7. Bookshelf. Clicking on it reveals a third book in a series: Taking anti-reality from the astral and etheric planes can destroy the world.

8. Cocoon. You can get here by Resting at the Monolith(#1). Don't forget to get Umbilica first(#4). Pick up Umbilica and place it at the top part of the cocoon, where it connects to the ceiling. After a brief description of the result of your actions, the Webs on this floor will disappear. If you warp to this spot before you have found Umbilica (or even after if you really wanted to) you can Rest again and you will be warped back to the Megalith(#1).(Credit goes to Gemmary)

The Pit Traps are not shown on the in-game map. I added them for easier reference.


POTENTIAL LOOT
EVENT 4. Treasure Chest (Major Lock Level VI): Umbilica (Critical Item)

1. Barrel
Consumables: Cure Lt. Wounds, Cure Heavy Wounds, Neutralize Poison, Remove Curse, True Seeing, Stink Bomb, Rock Salt, Spoiled Rations, Iron Rations, Baldercake, Cherry Wine, Lethe Liqeur
Other: Soothing Stone, Vending Token

2. Urn
Consumables: Red Pepper, Woundwart, Amaranth, Toadweed, Black Lotus, Swamp Leech
*I cannot be 100% sure, but I think all of the Urns pull from the same table.

3. Urn
Consumables: Bag of Slumber, Rock Salts, Amaranth, Hemlock, Arsenic, Skullcap, Coffin Orchids, Swamp Leech
*I cannot be 100% sure, but I think all of the Urns pull from the same table.

4. Urn
Consumables: Amaranth, Hemlock, Arsenic, Coffin Orchids, Dracaena Petals, Swamp Leech
Other: Luck Stone
*I cannot be 100% sure, but I think all of the Urns pull from the same table.

5. Urn
Consumables: Rock Salts, Amaranth, Hemlock, Skullcap, Dracaena Petals, Swamp Leech
*I cannot be 100% sure, but I think all of the Urns pull from the same table.

6. Barrel
Consumables: Cure Lt. Wounds, Cure Lt. Condition, Cure Heavy Wounds, True Seeing, Stink Bomb, Rock Salts, Spoiled Rations, Iron Rations, Oatmeal Cookie, Baldercake, Cherry Wine, Lethe Liqeur
Other: Soothing Stone

7. Barrel
Weapons: Rusty Sword, Knuckle Duster
Instruments: Thistle Whistle
Scrolls: Locate Item
Consumables: Neutralize Poison, Cure Paralysis, Rock Salts, Baldercake, Cherry Wine
Other: Soothing Stone, Vending Token


ENEMIES
Ghost - Can Irritate, Fear, Slow and Drain Magic.
Banshee - Ghost type. Has a multi-hitting Wail, which it will still use if Charmed.
Dragonfly - Can Instantly Kill.
Psyclops - Regenerates HP. Can inflict Confusion and Insanity. They will still Screech when Charmed. Cannot be made Unconscious, are Immune to Mental effects and Drain, and resist Sonic effects.
Dark Faeries - Casts Spells. Can inflict Sleep, Charm, Hold, Confuse, Blind, and potentially summon Dragonfly.
Dreamdusters - Casts Spells, including Deep Freeze. Can inflict Confusion and Unconsciousness.
Warlocks
Observatory of Knossos


How the puzzle works: Touching any Orb on a pedestal causes it to glow or turn off, affecting other Orbs, but not all of them, with a taunting disembodied voice that will speak to you for the first several clicks. The idea is to light all the orbs by touching the correct ones. The "trick": If you visualize the Orbs as the face of a clock (which is how they are numbered on the map), each Orb lights the two adjacent ones according to their position/number, with the exception of the western Orb in the northern room(#11), which lights itself and the three ahead of it (clockwise). The solution: Touch #1, #4, #7, and #10 to summon the boss. The order does not matter.

1. Orb on a Pedastal. Effects #1, #2, #12.

2. Orb on a Pedastal. Effects #1, #2, #3.

3. Orb on a Pedastal. Effects #2, #3, #4.

4. Orb on a Pedastal. Effects #3, #4, #5.

5. Orb on a Pedastal. Effects #4, #5, #6.

6. Orb on a Pedastal. Effects #5, #6, #7.

7. Orb on a Pedastal. Effects #6, #7, #8.

8. Orb on a Pedastal. Effects #7, #8, #9.

9. Orb on a Pedastal. Effects #8, #9, #10.

10. Orb on a Pedastal. Effects #9, #10, #11.

11. Orb on a Pedastal. Effects #1, #2, #11, #12.

12. Orb on a Pedastal. Effects #1, #11, #12.

Knorlos Knossos is summoned when you successfully solve the puzzle, usually accompanied by Neurophrites (one or two clusters of two or three...). If you have killed The Sprout From Hell* he is slow and the fight seems quite a bit easier. If you have not killed The Sprout From Hell* he is very fast and gets a lot of attacks, so many that the first time I tried him I fell asleep while trying to document what he did (granted, I was pretty tired). His Reach can inflict Curse and rarely cause Instant Death. He casts some pretty nasty spells like Life Drain, Antimagic, Solar Flare (Blindness), Midnight Sphere (Transfix), Crushing Hand, Disintigrate (Instant Death), and Destroyer Vortex (a persisant spell, like Insect Swarm) which does a lot of damage and can inflict Irritation, Nausea, Poison and Disease. He can also buff himself with Magic Screen and Deflection Screen. On top of all that, he is very hard to Penetrate, or at least if you do not kill The Sprout From Hell*, so you might want to stick with magic damage against him once you have him controlled. Speaking of controlling status effects, Sleep, Nausea, and Insanity don't connect but Charm, Paralyze, and Confusion do. Once you win you receive the Aurora Tablet, Sheolic Pipes, Seven Leagues Boots, Soul Harvester Instrument, Lethe Harp, Dreamcatcher, and Phoenix Feather.
*It is possible that I am reading into the whole "Sprout From Hell is Knorlos Knossos' soul" thing too much, and that it was just coincidence that it was an easier fight if the Sprout was killed first, but it was pretty consistant throughout my tests (5 battles to completion for both Sprout killed and not killed, 10 battles total)


ENEMIES
Neurophrites - Can inflict Insanity. Cannot be knocked Unconscious.
Knorlos Knossos - Can Cast Spells, Including some Buffs. Can inflict Blind, Irritation, Nausea, Disease, Poison, Life Drain, Transfix, Curse, and Instant Death. Immune to Sleep and Insanity, and resists Nausea.
HARRADAN GROVES SECTION
Harradan Groves


1. The Entity. It is friendly, but it will get angry if you cast Mindread and inflict Insanity on the caster. Becomes a Random Encounter after you meet it the first time. It has a special comment if you show it Baby Quilt Cover that you can pick up from the east side of Oblivion, and it will (Improved) Identify it for you, but other than that you get nothing from it.


NPC KEYWORDS
The Entity (Random Encounter after the first meeting): Other than the usual smalltalk I haven't found anything special that it reacts to.


POTENTIAL LOOT
You can rarely get a Common Gate Key drop after battles.


ENEMIES
Glowmoth - Can Blind.
Chlorazoid
Night Lily - Can Poison.
Monarch Nettle
Treant - Immune to Unconscious.
Conachur's Cabin


BUG WARNING: In patch 1.2.0.25-R, using a both a save created after the save wipe (I forgot the patch number) and another save that was created while the named patch was active, Elias does not seem to return to his Cabin after you meet him once. It is possible that he moves elsewhere, but I have not found him anywhere. If you decide to meet him the only sure way of keeping him around is recruitment. Meeting Elias and not Recruiting him, or not aquiring the Wolf's Head ring locks you out of Shrike's first task in Kublai Axis.

1. Charcoal Drawings. Just some flavor and a Journal Entry.

2. Locked Door. Major Lock Level VIII. Trying to leave after finding the hidden manacles will make Elias Conachur to approach you, who is recruitable. Ask him about CURSE and LYCAN to learn about his troubles. If you recruit him he gives you the cursed Wolf's Head Ring (Critical Item). Either having Elias in your party or having the Wolf's Head ring is required to finish an optional questline in Kublai Axis.

3. Room Description that explains that someone was here recently, and conditions they are living in.

4. Manacles, stained with blood and littered with animal hair.

As a side note, sleeping through the night on the bed does not produce any fun results.


NPC KEYWORDS
Elias Conachur (Recruitable): Curse/Damned, Forest/Woodlands/Woods, Beast/Lycan/Lycanthrope/Werewolf
*You can steal the Wolf's Head from him. He does not mind if you show it to him afterward, but he will not take it back.


SHOP
Elias Conachur
Consumables: Wolf's Bane, Garlic, Woundwart, Amaranth, Toadweed, Black Lotus, Mistletoe, Mandrake Root, Scullcap, Dracaena Petals, Stench Weed, Feverfew, Golden Flaxseed, Periwinkle, Peckle Plantain, Blood Tamarind, White Byron, Archangelicus


POTENTIAL LOOT
1. Iron Pot: Garlic
Caverns of Zandrithar


1. Pedestal of the Skull. Use the Zandrithar Totem (found in Pyramid Apex on top of Nerukruel Pyramid) on the Pedestal to close the Pit Trap to the west(#2)

2. Pit Trap. Follow the instructions for Event #1 to raise the ground, allowing you to pass.

3. Flaming Axe Above Pillar. Click the pillar to take the Entropy Axe. LOOK at the axe to reveal that a human soul is trapped inside. Assay will also show that it is a "Mascot". USE the Axe to summon the Axe Ego. You can ask it about itself for a little info, and you can also Recruit it. Its HP, Vitality, Magic, Stats, and Skills are really high. Some stats even break 100 (WIS, STR, SPE).


NPC KEYWORDS
Axe Ego (Recruitable, Anywhere you USE the Entropy Axe): I was not able to find any words, other than small talk, that it had any special reaction to.
*You cannot use Mindread.


POTENTIAL LOOT
1. Treasure Chest (Master Lock Level X)
Shield: Diamond Luna (Cursed)
Spellbooks: Destroyer Vortex (Eldritch)
Other: Acme Slugs
*The items in this chest are static.

2. Barrel
Instrument: Thistle Whistle
Consumables: Cure Paralysis, Stone to Flesh, Sleep Sand, Halomancic Salts, Rock Salts, Faery Water, Cherry Wine
Other: K.O. Rock, Luck Stone

3. Treasure Chest (Major Lock Level IX)
Weapons: Ball & Chain, Morningstar, Spoked Mace, Halberd Pike, Joust, Poison Lash, Composite Bow, Cranequin, Faerie Staff
Shields: Holy Heater, Crusade Kite
Instruments: Muting Lyre
Thrown/Ammo: Throwing Knive, Flame Arrow, Feather Dart, Coronet of Chaos
Armor: Heaume, Mithril Armet, Flannel Shirt, Bronze Plate, Hauberk, Maxamilian Plate, Golden Armor, Jazeraint Pants, Mail Chausses, Sandals
Accessories: Ring Pro Frost, Ring of Power, Ring of Swordsmen, Ring of Polymorph, Periapt of Accursed Wind
Staff/Rods: Stave of Missiles, Rod of Nightmares, Wand of Rainbows
Scrolls: Deep Freeze, Firestorm, Earthquake, Firestorm, Crushing Hand, AntiMagic, Recharge
Spellbooks: Bless, Disintegrate, Recharge(Arcanum, The spell seems bugged), Invisibility(Arcanum), Illusion(Arcanum)
Consumables: Blink, Invisibility, Faery Water, Dazzler Dust, Bag of Sparkles, Rock Salts, Cherry Wine, Prankstone, Dragon Control, Mirror Shard, Talisman of SpiderClimb
Other: Cobalt Sapphire

4. Treasure Chest (Major Lock Level VI)
Weapons: Fist Mace, Beaked Axe, Awl Pike, Bec De Corbin, Goupillon, Threaded Lash, Shortbow, Longbow, Slurbow
Shields: Target Buckler
Instruments: Muting Lyre, Thistle Whistle, Halcyonic Lyre
Thrown/Ammo: Throwing Knive, Poison Arrow, Sleeper Arrow, Feather Dart, Cosmic Cryer
Armor: Burgonet, Flannel Shirt, Chainmail, Camail, Ringmail, Cestian Girdle, Copper Plate, Platemail, Cuirass Leggings, Pauldrons, Vambraces, Sandals, Waterwalkers, Firewalkers
Accessories: Ring Pro Frost, Ring of Deflection, Ring of Smiting, Ring of Featherfall
Staff/Rods: Fizzlestick, Freezer Rod, Stave of Missiles, Wand of Fireballs, Beholder Stave
Scrolls: Fireball, Armorplate, Enchanted Blade, Hold Monsters, Wither, Mindread
Spellbooks: Bless, Featherfall, Firestorm, Missile Shield, Rainbow Rays(Arcanum), Hermetic Gag(Arcanum)
Consumables: Cure Paralysis, Stone To Flesh, Acid Splash, Bag of Sparkles, Halomancic Salts, Rock Salts, Cherry Wine, Water Glass, Luck Stone, K.O. Rock
Other: Cobalt Sapphire, Locksmith's Glue

5. Debris: Burning Oil

6. Treasure Chest (Major Lock Level VIII)
Weapons: Ball & Chain, Fist Mace, Cudgel, Morningstar, Threaded Lash, Poison Lash, Composite Bow, Faerie Staff, Cestus
Shields: Kite Shield
Instrument, Muting Lyre
Thrown/Ammo: Throwing Knive, Feather Dart, Stun Arrow, Cosmic Cryer, Sheolic Pipes
Armor: Burgonet, Flannel Shirt, Lamellar, Jazeraint Shirt, Camail, Hauberk, Platemail, Jazeraint Pants, Mail Chausses, Pauldrons, Sandals, Spur Sollerets
Accessories: Ring of Power, Ring of Deflection, Amulet vs. Hypno, Amulet vs. Sorcery
Staff/Rods: Stave of Missiles, Wand of Fireball, Wand of Rainbows
Scrolls: Fireball, Lightning, Crushing Hand, Cosmic Gate, Hold Monsters, Deep Freeze
Spellbooks: Bless, Featherfall, AntiMagic, Cosmic Gate, Hermetic Gag(Arcanum)
Consumables: Blink, Invisibility, Faery Water, Acid Splash, Paralysis Dust, Bag of Sparkles, Rock Salts, Cherry Wine, Clutcher Talon, Water Glass, Scrying Crystal, K.O. Rock
Other: Cobalt Sapphire, Locksmith's Glue

You will sometimes get a Perk Key drop after battles in this area.


ENEMIES
Blinkcat - Can Paralyze, Casts Sound Mind.
Bandersnatch
Dracosphinx
Salamander
KUBLAI AXIS SECTION
Kublai Axis - Map, Events, and NPC


1. Locked Door (Minor Lock Level V)

2. Vanguard Warehouse and Poster of the Entity (Master Lock Level X). If you cast Knock Knock to unlock this door Lieutenant Shrike will not appear. The first time you try and pick the lock on this door, or force it open, Lieutenant Shrike appears with no in-game flavor text and is very angry. See Lieutenant Shrike Encounters for more info.

3. Shock Troops Induction Center Door and Notice. (Master Lock Level XII). If you cast Knock Knock to unlock this door Lieutenant Shrike will not appear. The first time you try and pick the lock on this door, or force it open, Lieutenant Shrike appears with no in-game flavor text and is very angry. See Lieutenant Shrike Encounters for more info.

4. Locked Door (Minor Lock Level IV)

5. Gang of Card Playing Pirates. They give you some very interesting information and attack you. The big reveal, in case it is relevant later, is that they were hired by Lord Ahriman himself and accuse you of being a spy. There is nothing special about these Buccaneers, so I am not bothering with strats.

6. Acme Vending Machine

7. Notice. Flavor text and a Journal Entry.

8. Vanguard Secure Vault Door (Master Lock Supreme). Unlocked with the V.G. Vault Key. If you cast Knock Knock to unlock this door Lieutenant Shrike will not appear. The first time you try and pick the lock on this door, or force it open, Lieutenant Shrike appears with no in-game flavor text and is very angry. See Lieutenant Shrike Encounters for more info.

9. Locked Door (Major Lock Level VIII)

10. Barrel filled with rotten food. If you open it your party members are inflicted with Nausea.

11. Vanguard Academy Door (Master Lock Supreme). The first time you step here you will meet Lieutenant Shrike, and he becomes a Random Encounter after your first meeting here. If you have had a negative encounter with him before meeting him here, or if you chose to kill Mordecai in the Village of Crowl, he will still be angry unless you Bribed him. If not, he will be friendly but will not converse with you. If you wish to speak with him show him Krone's Commendation, which you can get by completing two tasks for Captain Krone in Village of Crowl and asking for it, or a Forged Recommendation, which you can steal from Chiang or buy from the Forger, both in Carnivale Bazaar(read to the end of this paragraph for another way around the Commendation). If you try to show him the Commendation while he is angry he will leave, so Bribe him into friendliness if you need to. Shrike will then ask if you want to join the Vanguard. Type YES to be told you need to perform three tasks, the first of which is to deal with Elias Conachur, and he will mark Conachur Cabin your map even if you have been there before. You do not lose the Commendation and you will be able to speak with him normally. If you type anything but YES, or don't type at all, the event ends and you will be able to speak with him normally. If you want to officially join after refusing ask him about QUEST and say YES.
If you want to skip showing Krone's Commendation/Forged Recommendation you can Recruit Elias Conachur and bring him to Shrike before being asked to (say YES to turn him over). Having the Wolf's Head ring is not enough.
As a side note, speaking with Balderdash gives Shrike two anger points.
For the three tasks, see Lieutenant Shrike Three Tasks at the bottom of this section for more info.
The door is unlocked with the Academy Key. If you cast Knock Knock to unlock this door Lieutenant Shrike will not appear. The first time you attempt to pick the lock or force the door open, Lieutenant Shrike appears with no in-game flavor text and is very angry. See Lieutenant Shrike Encounters for more info.

12. Locked Door (Minor Lock Level V)

13. Wooden Floor. LOOK at this spot to find papers piled on the floor and get a Journal Entry. They are shipping manifests that list a ship called Snark Mistress and a person named Black Pierre.

14. Welded Vanguard Secure Vault Doors. As the game tells you, you cannot pick or force open this door, thus Lieutenant Shrike will not appear if you try. The door is impossible to open, but you can get into the building another way.

15. Locked Door (Minor Lock Level IV)

16. Wooden Floor. LOOK at this spot to find a ripped up hymn book and some sawdust.

17. Locked Door (Major Lock Level VI)

18. Acme Vending Machine. Sells Archer supplies.

19. Acme Vending Machine and Door to the Ethergate to Crowl. Sells ammunition.

20. Treasure Chest. Click on it for a Quest Locker, which is for inventory management. It holds some minor Critical Items (wearble ones like Ruby Broach fit), generic equipment and potions, but not not most major ones (like Tablets).

21. Pushable Brick on the north wall. Click it to close the Pit right next to you.

22. Iron Warg. It is slow, but it gets a huge number of attacks, can deal extra damage when it Penetrates, and has two Breath Attacks that both do damage to multiple targets, but one is Fire based and the other leaves an Acid Cloud. There is a bug that either has to do with it using its Acid Cloud Breath or killing both back row characters (both happened at the same time both times this occured for me) where its AI breaks and it stops attacking, freeing you to beat it down without any resistance (version 1.2.0.25-R). It resists all controlling status effects and is immune to Unconsiousness, so you are in for a rough fight. It is vunerable to Lethal Blow, so hope for a lucky hit. Otherwise, make sure you have cast all of your buffs before attempting it.

23. Armored Zombies Battle. These are normal enemies in some areas and are easily controlled with status effects, so not really worth the effort of writing a strategy.

24. Potion Rack on Top of a Crate. Approach it to learn a bit about what is going on. The Potion Rack is holding ingredients for a Zombification potion. You can take the Potion Rack from the ground tile next to your inventory scroll and add it to your inventory for extra Potion and Drink storage space. It will not hold any potions that are Critical Items though.

25. Vault Locker a.k.a. Treasure Chest. You can get the combination by paying Ducat in Acme Vending Company. The combination is 3-6-5-2-1-4. You do not need to pay Ducat for it to work. The contents are listed in the Potential Loot section.


NPC KEYWORDS
Lieutenant Shrike (Random Encounter after first meeting): Elias/Conachur, Quest, Vanguard/Marines, Commendation
*You can steal Academy Key, Pagoda Key, and V.G. Vault Key. He does not care if you show the stolen Keys to him and will even (Improved) Identify them for you.
Kublai Axis - Shrike Encounters and Tasks
Lieutenant Shrike Encounters: When you try and pick or force open a Vanguard related door Lieutenant Shrike appears and becomes very angry. If you provoke him further he will likely attack, along with some Vanguard buddies. He is Bribable, and after giving him 8000 gold/4 Bribes (minimum) he will act normally, though if you try and Bribe him further he will always have at least two anger dots which you cannot get rid of. If you try and pick/force open another one of the doors he protects after already angering him once, it will take more money to appease him (12000 gold/6 Bribes minimum). This is mentioned above, but if you want to open locked Vanguard doors and not anger Shrike use Keys or the Knock-Knock Spell.
Note that if you chose to kill Mordecai it is going to take a lot more money to appease him.


Lieutenant Shrike Three Tasks: The first task is to deal with Elias Conachur. There are several ways to finish this part:
The first way is to Recruit Elias and meet with Shrike, then type YES and choose to Dismiss him (The game states that Elias is sent to Axis Gaol, but he is not there if you explore it afterward). If you say No (or anything else) Shrike will summon Vanguard Soldiers and Vanguard Marines and attack you. You can run from him if you do not want to kill Shrike, but he will be very angry with you the next time you meet. You can Bribe him back into a decent mood. The second way is to Steal the Wolf's Head ring, Recruit and Dismiss Elias for it, or murder Elias and take the ring afterward. Show Shrike the Wolf's Head ring for credit. He will take the ring from you.

The second task is to find and retrieve a Roc's Egg. Shrike will fill in your map of Blackspike Mountains and mark where an Egg can be found. You can finish this task before finishing the first if you want to, but it will not skip the first task and he will not accept it unless you have already stated that you want to join the Vanguard.
To complete the task either buy or steal the Large Bird Egg from Chuckles in Axis Gaol or go to Blackspike Mountains and get the Large Bird Egg from the marked spot (you can take this one even if you've finished this task). Give whichever one one you picked up to Shrike.
Note that there are more Eggs in Nests in Blackspike Crag and Blackspike Summit, which are not the spot Shrike marks. If you have already turned in an Egg you cannot take them. I still have to check trying to take them before you have finished Shrike's task
.

The third task is to take the Moongate Crystal from the Green Mandarin, who is found in Celestial Watchtower, which can be reached by going through the Parlour of the Mandarin. Shrike will mark your map where you can enter the Pagoda. You can finish this task before finishing the others if you want to, but it will not skip the other tasks and he will not accept it unless you have already stated that you want to join the Vanguard.
To finish the task show Shrike the Moongate Crystal and he will take it from you (You can Steal it back from him afterward).

The reward for finishing all three tasks is 50,000 gold and 4000exp for every character in the party. Shrike will also offer more items for sale. Both Shrike and Lord Ahriman will also acknowledge that you are a full fledged Vanguard Recruit, though that will not get you out of trouble for doing things they don't like.
Kublai Axis - Shops, Loot, and Enemies
SHOPS
Lieutenant Shrike:
Weapons: Elite Corpse Pike
Armor: Elite Corps Helm, Elite Corpse Scale, Elite Corps Leggings, Elite Vambraces, Elite Corps Boots
Added items for finishing his quest:
Weapons: Flamberge, Halberd Pike, Sabre Halberd, Crossbow
Thrown/Ammo: Flame Arrow
Armor: Pauldrons, Conch Helmet
Staff/Rods: Cadudeus of Life
Scrolls: Crushing Hand, Hold Monsters, Firestorm
Consumables: Cure Heavy Wounds, Stone To Flesh, Iron Rations

Acme Vending Machine (#6)
Scrolls: Divination (4 tokens), Mindread (5 tokens), True North (2 tokens), Locate Item (6 tokens), Knock Knock (3 tokens)
Consumables: Remove Curse (3 tokens), Cure Lt. Condition (2 tokens), True Seeing (3 tokens), Cherry Wine (1 tokens), Wonder Adhesive (3 tokens), Crimson Ambrosia (4 tokens), Iron Rations (1 token), Galen Apple (1 token), Baldercake (1 token)
Other: Luck Stone (6 tokens), Silver Spoon (1 token)

Acme Vending Machine (#18)
Thrown/Ammo: Barbed Arrows (1 token), Piercer Arrow (1 token), Cupid's Arrow (2 tokens), Sleeper Arrow (2 tokens), Humming Arrow (2 tokens), Poison Arrow (3 tokens), Stun Arrow (4 tokens), Flame Arrow (8 tokens), Drain Arrow (7 tokens)

Acme Vending Machine (#19)
Thrown/Ammo: Krakklers (12 tokens), Lead ball (4 tokens), Stone Bullets (5 tokens)


POTENTIAL LOOT
EVENT 20. Treasure Chest: Quest Locker

EVENT 24. Potion Rack on Top of a Crate: Potion Rack

EVENT 25. Vault Locker a.k.a. Treasure Chest:
Weapons: Flamberge, Elite Corps Pike, Skullbuster, Hammer of the Apocalypse, Senor Brainchopper, Seige Arbalest
Consumables: Centaur Bane, Viper Ashes, Medusa Dust, Gris Gris bag
*The loot inside this chest is static.

1. Shallow Water: Black Lotus

2. Shallow Water: Vending Token

3. Debris: Burning Oil

4. Treasure Chest (Major Lock Level IX)
Weapons: Flamberge, Halberd Pike, Sabre Halberd, Crossbow, Seige Arbalest
Thrown/Ammo: Flame Arrow
Armor: Conch Helmet, Pauldrons
Staff/Rods: Caduceus of Life
Scrolls: Crushing Hand, Hold Monsters, Firestorm
Consumables: Cure Heavy Wounds, Neutralize Poison, Stone To Flesh, Iron Rations x2
*The loot in this chest is static, and has the same loot as the other Treasure Chest(#6).

5. Wooden Floor: Vending Tokens

6. Treasure Chest (Master Lock Level XII)
Weapons: Flamberge, Halberd Pike, Sabre Halberd, Crossbow, Seige Arbalest
Thrown/Ammo: Flame Arrow
Armor: Conch Helmet, Pauldrons
Staff/Rods: Caduceus of Life
Scrolls: Crushing Hand, Hold Monsters, Firestorm
Consumables: Cure Heavy Wounds, Neutralize Poison, Stone To Flesh, Iron Rations x2
*The loot in this chest is static, and has the same loot as the other Treasure Chest(#4).

7. Crate
Consumables: Cure Lt. Wounds, Cure Heavy Wounds, Neutralize Poison, Remove Curse, True Seeing, Stink Bomb, Rock Salts, Baldercake, Spoiled Rations, Iron Rations, Cherry Wine, Lethe Liqeur
Other: Soothing Stone, Vending Token

8. Treasure Chest (Major Lock Level VIII)
Weapon: Rusty Sword, Broadsword, Duckbill, Battle Axe, Goupillon, Flagellum, Slingshot, Shortbow, Longbow, Slurbow, Knuckle Duster
Shield: Heraldic Shield
Instruments: Muting Lyre, Thistle Whistle, Cacaphony Harp, Halcyonic Lyre
Thrown/Ammo: Barbed Arrows, Piercer Arrow, Poison Arrow, Throwing Knive, Horn of Winter
Armor: Leather Hood, Wizard Cap, Bascinet, Flannel Shirt, Chainmail, Brigadine, Ringmail, Greaves, Vambraces, Sandals, Sollerets
Accessory: Ring Pro Frost, Ring of Protection, Ring of Featherfall, Amulet of Might
Staff/Rods: Freezer Rod, Stave of Missiles, Zapper Rod, Sparkler Rod, Ice Wand, Wand of Webs
Scrolls: Armorplate, Magic Screen, Locate Person, Locate Item, Magic Missle, Knock Knock, Mindread
Spellbooks: Raise Dead, Bless, Missile Shield, Remove Curse, Magic Bells, Knock Knock, Rainbow Rays (Arcanum)
Consumables: Neutralize Poison, Cure Paralysis, Remove Curse, Stone To Flesh, Bag of Sparkles, Rock Salts, Cherry Wine
Other: Cobalt Sapphire, Gold Leaf, Luck Stone, Soothing Stone, Vending Tokens

You can sometimes get Common Gate Key after fighting battles in this area. You will also sometimes get a Pole Fork after fighting Vanguard enemies, and Gauche after fighting Highwaymen.


ENEMIES
Vanguard Soldiers
Vanguard Marines - Has access to Thistle Whistle.
Brigands
Highwaymen
Buccaneers
Armored Zombies
Iron Warg - Extra damage on hit, has two Breath atacks (Fire and Acid Cloud). Resists all status effects.
Lieutenant Shrike - Has access to Thistle Whistle and can Summon more allies.
Carnivale Bazaar


1. Nailed Shut Crate. If you bought the document from the Forger(#12), check this crate for a Forged Recommendation, which can be used to get Shrike to talk to you.

2. Pyewacket's Chili Sardine Barbeque. A Fire Elemental Imp describes his food as able to make you cry like a baby and offers to sell them for 20 gold a piece. If you Accept, select a character for a scene. The Imp will leave (he does not return), leaving his Barrel unguarded, and your party can take a Hot Chili Sardine. You can use the Sardine to feed Ki-Rin in Parlour of the Mandarin.

3. Cooking Goat Skewer. Just an image, as far as I know.

4. Chiang's Emporium and Chiang a friendly Dybbuk NPC (that lives in a Djinn lamp...). You cannot read it's mind. It has a Forged Recommendation Letter that you can steal from it, which can be used to get Shrike to talk to you. It also sells Firewalkers, so keep that in mind if you haven't already picked up a pair or you run out of charges. Unlike some NPCs, you can get it to appear again without Resting or having to reload the area. Chiang will exchange exotic fish for experience and gold if you place them onto him. Mythacuda is worth 1000exp and 3000 gold. Weircat is worth 2000exp and 6000gold. Ichysaurus 3000exp and 9000 gold.

5. Port Hole / Aquarium Clicking on it tells you that Chiang collects exotic fish.

6. Clairvoyant. Click the window to talk to her. If you pay 50 gold she says she "can see it," then stops talking.

7. Carpets of Distinction Shop. If you pay 5000 gold you can choose one of three items: Rug of Smothering, Curtain of Concealment, or Carpet of Levitation. Once you buy one the salesman will leave and not come back.

8. Window. Click on it to see some shady people playing cards.

9. Wooden Floor. LOOK for some Vending Tokens. This spot is also a Safe Haven.

10. Diabolic Haberdashery Shop and Diabla. Diabla is a friendly NPC. As far as I know she does not have any special keywords, but when you Exit the encounter she will warn you not to go into the back of the shop. She will warn you again if you get near the red curtains in the northwest corner of the room.

11. Off Limits Bookshelf. If you touch it Diabla will cast a spell on you, then you will end up in Axis Gaol. As a side note, Shrike does not get angry with you for doing this, but Lord Ahriman will note that it happened.If you kill Diabla and touch the bookcase, nothing happens.

12. Official Document Forger. A man will offer to forge a letter of recommendation for you for 32,000 gold. If you accept you are told to go check a crate at the entrance of the Bazaar(#1).


NPC KEYWORDS
Chiang: I have not found any words that it reacts to in a special way.
*You can steal a Forged Recommendation from it. I don't know any other way of getting it.

Diabla: I have not found any words that she reacts to in a special way.
*Mindread will give you the word Kublai, but she does not give a special reaction to it. Even with high Diplomacy/Charm.


SHOPS
Chiang
Weapons: Bone Dagger
Armor: Conch Helmet, Gauss Boots, Waterwalkers, Firewalkers
Accessories: Ring of Sages
Spellbooks: Vivogenesis
Consumables: Dazzler Dust, Medusa Dust, Tai Gi Ar, Kejuro Ti Lungwa, Jar O 'Bugs, Water Glass, Chattery Teeth, Talisman of SpiderClimb, Dreamcatcher, Sack of Winds, Punch Puppet, Pandora's Box
Other: Soothing Stone

Diabla
Consumables: Horbor's Holy Hash, Centaur Bane, Copperthorn, Ranspur Agonite, Whiterot, Harpy Crown, Bitter Tuber, Archangelicus, Black Rose, White Byron, Valerian Root, Golden Flaxseed, Agrimony, Poison Dust, Halomancic Salts, Nematic Dust, Swamp Leech, Toadweed, Nightshade, Wolfsbane


POTENTIAL LOOT
EVENT 2. Pyewacket's Chili Sardine Barbeque: Hot Chili Sardine

EVENT 9. Wooden Floor: Vending Tokens (only listed as an event because it is also a Safe Haven)

You can sometimes get a Pole Fork drop after killing Vanguard enemies.


ENEMIES
Vanguard Soldiers
Executioner
Parlour of the Mandarin - Map and Events
It is not required, but the Moon Singer weapon (found in a Perk Chest in Samhain Mausoleum) makes all of the Mandarin areas easier.

Looking at this map while not completely exhausted, it's a pretty big mess. It still works as a reference, but I am marking it for clean up sometime in the future.


1. Locked Door. Unlocked with the Pagoda Key, which can be obtained through Lieutenant Shrike. The lock cannot be picked.

2. Plaque. Philosophical writing and a Journal Entry. It says that you get out from beneath a waterfall by going with the flow.

3. Plaque A hint and a Journal Entry. It says that you have to finish the Trial of Many Sticks or the door will stay shut.

4. Locked Door. Unlocked By completing the Trial of Many Sticks in the Donjon of the Mandarin.. The lock cannot be picked.

5. Plaque and Door A hint. The plaque says that you have to finish the ordeal of the Dragon Cauldron to open the door. The door is unlocked by finding the black pearl in Donjon of the Mandarin (#27 on that floor). The locked door cannot be picked.

6. Hole. Stepping on it leads to Donjon of the Mandarin and Drak Serat. Cast Featherfall to protect your party members and items. Closed by pulling a chain in Donjon of the Mandarin (#10 on that floor)

7. Hidden East Wall that can only be opened from the east side.

8. Pressable Spot on the south wall. Click it to remove the south wall.

9. Hole. Stepping on it leads to Donjon of the Mandarin. Cast Featherfall to protect your party members and items. Closed by pulling the nearby Chain(#11).

10. Hole. Stepping on it leads to Donjon of the Mandarin. Cast Featherfall to protect your party members and items.

11. Chain. Pulling it closes the nearby hole (#9).

12. Hole. Stepping on it leads to Donjon of the Mandarin. Cast Featherfall to protect your party members and items. Closed by pulling a chain in Donjon of the Mandarin (#18 on that floor)

13. Pressable Spot on the south wall. Click it to remove the south wall.

14. Pressable Spot on the west wall. Click it to remove the west wall.

15. Reflection of Mandarin on Glass. It gives you a Journal Entry for looking at it. The reflection talks, but it doesn't say anything important.

16. Hole. Stepping on it leads to Donjon of the Mandarin. Cast Featherfall to protect your party members and items. Closed by pulling a chain in Donjon of the Mandarin (#21 on that floor)

17. Pressable Spot on the east wall. Click it to remove the east wall.

18. Pressable Spot on the north wall. Click it to remove the north wall.

19. Pressable Spot on the west wall. Click it to cover the nearby hole(#20).

20. Hole. Stepping on it leads to Donjon of the Mandarin. Cast Featherfall to protect your party members and items. Closed by clicking a nearby spot on the wall(#19).

21. Beast Description and Hint Plaque. The beast is described as looking hungry. The plaque hints that strong bellies require fiery food. For the alternate way through if you have the Hot Chili Sardine that you can get at the Carnivale Bazaar, pick it up and place it on a character's USE icon while standing on this tile. The Beast will eat it and fall asleep, allowing you to pass unharmed.

22. Ki-Rin. If you have not used the Hot Chili Sardine on the tile before this one you must fight the beast. It can attack several times and can deal quite a bit of damage if it penetrates, but otherwise it doesn't seem to do anything special and has no special resistances. Cast Armorplate beforehand, use controlling status effects, and beat it down. You will get a couple Leg of Ham for your trouble.

Two of the Warp Tiles on this floor are one way. Warp Tiles that are marked with green letters are starting points. The ones marked with purple letters are landing points. If it does not have a green letter you cannot use it to Warp elsewhere, even if it looks like a warp tile. Warp Tiles are also Safe Havens.

There are three Spinner Tiles on this floor. If you get disoriented just look at your map. They only triggers once.

At some point during the several times real life interrupted my map making, Event #18 got lost. There are so many ups and downs to this place that I have forgotten where it should be marked. If you see a spot on the map above that looks open, but it is closed on your in game map, that would be #18 (it may be an event on another floor in the Pagoda as well...).
Parlour of the Mandarin - Loot and Enemies
POTENTIAL LOOT
1. Crate
Consumables: Cure Lt. Wounds, Cure Heavy Wounds, Cure Lt. Condition, True Seeing, Stink Bomb, Rock Salts, Iron Rations, Baldercake, Cherry Wine, Lethe Liqeur
Other: Soothing Stone

2. Treasure Chest (Major Lock Level VII)
Weapons: Longsword, Bone Dagger, Poison Dagger, Cat 'O ' Nine Tails, Bullwhip, Blowgun, Quarterstaff, Bo
Shields: Wooden Buckler
Instrument: Lyre of Slumber, Muting Lyre, Swaying Lute, Lethe Harp
Thrown/Ammo: Feather Dart, Poison Dart, Blowdarts, Flute of Chaos
Armor: Phrygian Cone, Leather Helm, Silk Robe, Cotton Cloak, Leather Jerkin, Leather Armor, Leather Pants, Sandals
Accessories: Ring Pro Fire, Ring Pro Frost
Staff/Rods: Caduceus of Healing, Stave of Missles
Scrolls: Identify, True North, Detect Secret
Spellbooks: Healing, Bless, Charm, Identify, Direction, Detect Secret
Consumables: Cure Lt. Condition, Bag of Slumber, Bag of Sparkles, Nematic Dust, Nausea Powder, Mandrake Root, Rock Salts, Red Pepper, Oatmeal Cookie, Leg of Ham, Pilgrim Tea, Cherry Wine, Lethe Liqeur, Amphorae (Restore Youth)
Other: Cobalt Sapphire, Silver Spoon

3. Barrel
Consumables: Cure Lt. Wounds, Cure Heavy Wounds, Cure Lt. Condition, True Seeing, Stink Bomb, Nematic Dust, Rock Salts, Spoiled Rations, Iron Rations, Oatmeal Cookie, Baldercake, Leg of Ham, Lethe Liqeur

4. Crate
Weapons: Rusty Sword
Consumables: Cure Heavy Wounds, Neutralize Poison, Remove Curse, True Seeing, Stink Bomb, Rock Salts, Spoiled Rations, Iron Rations, Baldercake, Cherry Wine
Other: Vending Tokens, Soothing Stone

5. Treasure Chest (Minor Lock Level IV)
Weapons: Longsword, Bone Dagger, Stiletto, Poison Dagger, Blowgun, Bullwhip, Cat 'O 'Nine Tails, Quarterstaff, Bo
Instrument: Lyre of Slumber, Muting Lyre, Swaying Lute, Lethe Harp
Thrown/Ammo: Blowdarts, Feather Dart, Poison Dart, Flute of Chaos
Shields: Wooden Buckler
Armor: Phrygian Cone, Leather Helm, Silk Robe, Cotton Cloak, Leather Jerkin, Leather Armor, Leather Pants, Sandals
Accessories: Ring Pro Fire, Ring Pro Frost
Staff/Rods: Caduceus of Healing, Stave of Missiles
Scrolls: Detect Magic, Detect Secret, True North, Identify
Spellbooks: Healing, Bless, Charm, Direction, Detect Secret, Identify
Consumables: Cure Lt. Condition, Bag of Sparkles, Bag of Slumber, Nausea Powder, Nematic Dust, Rock Salts, Red Pepper, Mandrake Root, Oatmeal Cookie, Leg of Ham, Pilgrim Tea, Cherry Wine, Lethe Liqeur, Amphorae (Restore Youth)
Other: Cobalt Sapphire, Silver Spoon

6. Barrel
Weapons: Rusty Sword
Consumables: Cure Heavy Wounds, Neutralize Poison, Remove Curse, True Seeing, Stink Bomb, Rock Salts, Spoiled Rations, Iron Rations, Baldercake, Cherry Wine
Other: Vending Tokens

7. Treasure Chest (Major Lock Level VIII)
Weapons: Longsword, Bone Dagger, Posion Dagger, Truncheon, Pole Fork, Lance, Bullwhip, Cat 'O 'Nine Tails, Quarterstaff, Bo, Blowgun
Shield: Wooden Buckler
Instruments: Lyre of Slumber, Muting Lyre, Lethe Harp
Thrown/Ammo: Humming Arrow, Feather Dart, Poison Dart, Flute of Chaos
Armor: Phrygian Cone, Leather Vestment, Leather Helm, Night Hood, Silk Robe, Leather Jerkin, Leather Armor, Leather Pants, Sandals, Spiked Bracer
Accessories: Ring Pro Fire, Ring Pro Frost, Ring Pro Magic
Staff/Rods: Stave of Missiles, Stun Rod, Caduceus of Healing, Torpedo Rod
Scrolls: Identify, Detect Magic, Detect Secret, Detect Magic
Spellbooks: Healing, Charm, Identify, Bless, Detect Secret, Armor Shield, Wizard's Eye
Consumables: Cure Lt. Wounds, Cure Lt. Condition, Stink Bomb, Bag of Chuckles, Bag of Sparkles, Bag of Whispers, Bag of Slumber, Nematic Dust, Mandrake Root, Rock Salts, Red Pepper, Spoiled Rations, Iron Rations, Oatmeal Cookie, Leg of Ham, Cherry Wine, Lethe Liqeur, Amphorae (Restore Youth)
Other: Cobalt Sapphire, Silver Spoon

8. Crate
Consumables: Cure Heavy Wounds, Neutralize Poison, Remove Curse, True Seeing, Stink Bomb, Spoiled Rations, Iron Rations, Baldercake, Cherry Wine
Other: Soothing Stone, Vending Tokens

9. Barrel
Weapons: Rusty Sword, Knuckle Duster
Instruments: Thistle Whistle
Scrolls: Locate Item
Consumables: Neutralize Poison, Cure Paralysis, Stone To Flesh, Remove Curse, Rock Salts, Cherry Wine
Other: Luck Stone, Soothing Stone, Vending Tokens

10. Barrel
Weapons: Rusty Sword, Knuckle Duster
Instruments: Thistle Whistle
Scrolls: Locate Item
Consumables: Cure Paralysis, Stone To Flesh, Sleep Sand, Halomancic Salts, Rock Salts, Cherry Wine, Faery Water
Other: Luck Stone, K.O. Rock


ENEMIES
Blood Leech - Can Drain Vitality.
Goblin Spider
Ogre Giant
Ninja-Gaiden Capable of Instant Kill. Will still attack the party when Charmed.
Grand Master
Ki-Rin
Donjon of the Mandarin - Map and Events WIP
Looking at this map while not completely exhausted, it's a pretty big mess. It still works as a reference, but I am marking it for clean up sometime in the future.


1. Landing Spot and Drak Serat. You land here from Parlour of the Mandarin and cannot return from this spot. Drak Serat is a Recruitable NPC. He gives you some information on what is going on. Asking him about TRAINING will give you a list of Skills he can train your characters in, though it is random whether or not they learn anything when you pay. He becomes a Random Encounter after your first meeting.

2. Instructions for the Trial of Many Sticks. The goal is to feed the Fire Elementals in the Barrels the right amount of stick so they can be killed. Killing both Fire Elementals will give you an audible click indicating one of the doors on the upper floor is now unlocked.

3. Barrel. The first step is to click the Barrel to open it. The second step is to click the Pile of Sticks to the south of it (#4) to feed the Fire Elemental. The third step is to pull the chain (#5). If you didn't feed it enough it will growl. If you feed it enough the Fire Elemental will destroy the Barrel and attack. Kill it. If you feed it too much, exit the room and come back to reset the puzzle. The correct answer is randomized. Click the chain in between feedings to get the right amount. If you need a strat you need magic damage/weapons to hit it. It is susceptible to Paralyze, Confusion, and Fear. This should be obvious, but don't use Fire based attacks.

4. Pile of Sticks. See Event #3 for instructions.

5. Chain. See Event #3 for instructions.

6. Barrel. The first step is to click the Barrel to open it. The second step is to click the Pile of Sticks to the south of it (#7) to feed the Fire Elemental. The third step is to pull the chain (#8). If you didn't feed it enough it will growl. If you feed it enough the Fire Elemental will destroy the Barrel and attack. Kill it. If you feed it too much, exit the room and come back to reset the puzzle. The correct answer is randomized. Click the chain in between feedings to get the right amount. If you need a strat you need magic damage/weapons to hit it. It is susceptible to Paralyze, Confusion, and Fear. This should be obvious, but don't use Fire based attacks.

7. Pile of Sticks. See Event #3 for instructions.

8. Chain. See Event #3 for instructions.

9. Pressable Spot on the north wall. Press it to get rid of the north wall.

10. Chain. Closes one of the holes in Parlour of the Mandarin when pulled(#6 on that floor).

11. Pressable Spot on the east wall. Press it to get rid of the east wall.

12. Landing Spot from Parlour of the Mandarin. You cannot return from this spot.

13. Pressable Spot on the south wall. Press it to get rid of the south wall.

14. Landing Spot from Parlour of the Mandarin. You cannot return from this spot.

15. Landing Spot from Parlour of the Mandarin. You cannot return from this spot.

16. Pressable Spot on the east wall. Press it to get rid of the east wall.

17. Pressable Spot on the north wall. Press it to get rid of the north wall.

18. Chain. Closes one of the holes in Parlour of the Mandarin when pulled(#12 on that floor).

19. Landing Spot from Parlour of the Mandarin. You cannot return from this spot.

20. Pressable Spot on the south wall. Press it to get rid of the south wall.

21. Chain. Closes one of the holes in Parlour of the Mandarin when pulled(#16 on that floor).

22. Pressable Spot on the west wall. Press it to get rid of the west wall.

23. Instructions for the Ordeal of the Dragon Cauldron. Pick the cauldron that contains the black pearl of wisdom or face the dragon's wrath.

24. Black Cauldron. If you click on it a Silver Dragon pops out to fight you unless you already found the black pearl. As far as I know there are no hints to the correct cauldron. Detect Secret will continue to go off in the spot, even when you have finished the ordeal.

25. Black Cauldron. If you click on it a Silver Dragon pops out to fight you unless you already found the black pearl. As far as I know there are no hints to the correct cauldron. Detect Secret will continue to go off in the spot, even when you have finished the ordeal.

26. Black Cauldron. If you click on it a Silver Dragon pops out to fight you unless you already found the black pearl. As far as I know there are no hints to the correct cauldron. Detect Secret will continue to go off in the spot, even when you have finished the ordeal.

27. Black Cauldron. If you click on it the magic vapors within will give you a black pearl and unlock a door upstairs(#5). As far as I know there are no hints to the correct cauldron. Detect Secret will continue to go off in the spot, even when you have finished the ordeal.

28. Landing Spot from Parlour of the Mandarin. You cannot return from this spot.

The map is missing a chunk. I don't know if that is because I locked myself out of that area by triggering something else, or if you come up from some other area later. Too tired now to look into it.
Donjon of the Mandarin - Keywords, Shop, and Enemies
NPC KEYWORDS
Drak Serat (Recruitable, Random Encounter): Training
*When asked about Training he will have Stealth, Evasion, Scout, Hand-To-Hand, Swordsmanship, Deflection, Ninjitsu, Powerstrike, and Iajutsu. What is available is determined by the class of the character you chose to speak with him. Select what you want and he will give you a price (not sure what determines the number). If you Accept Drak will take your money, sometimes give philosophical advice, and gain a friendly mood point. Whether or not your character gains a single Skill point in the desired Skill or not is random (the game will tell you if it is successful with green text), and only the character speaking to him can gain the point. If the character already has 100 Skill he will note it, but not give you further training.


SHOPS
Drak Serat
Weapons: Katana, Wakizashi, Ninjato, Tanto, Sai, To Ono, Naginata, Suan Tou Fung, Tonfa, Kusarigama, Moon Axe, Bo
Thrown/Ammo: Shuriken
Armor: Night Hood, Night Robe, Night Leggings
Consumables: Nematic Dust, Kejuro Ti Lungwa, Paralysis Dust, Talisman of SpiderClimb


POTENTIAL LOOT
You will sometimes get Common Gate Key drops after battles in this area.

ENEMIES
Blood Leech - Can Drain Vitality.
Fire Elemental - Ghost type. Regenerates Health. Has a breath attack that can deal damage and inflict Irritate. Immune to Unconsciousness, Sleep, Charm, Nausea, and Insanity. Absorbs Fire.
Goblin Spider
Shao-Tzu
Ninja-Gaiden Capable of Instant Kill. Will still attack the party when Charmed.
Grand Master
Ogre Mage
Celestial Watchtower


1. Porthole. Click it for some flavor text. Click on it after seeing all four Urn visions and the wall will disappear.

2. Fireplace. Click it for Ashes of Reverie (Critical Item).

3. Urn. Use Ashes of Reverie on it to reveal a vision of the Mandarin, which tells you it wants to talk about the path you chose to reach this place, then drones on for a bit, not really saying anything important.

4. Urn. Use Ashes of Reverie on it to reveal a vision of the Mandarin, which tells you it wants to talk about water and going with the flow, again not really saying anything important.

5. Urn. Use Ashes of Reverie on it to reveal a vision of the Mandarin, which tells you it wants to talk about fiery passion and desire, once again not really saying anything important.

6. Urn. Use Ashes of Reverie on it to reveal a vision of the Mandarin, which tells you it wants to talk about the black pearl, blah, blah, blah.

7. Green Mandarin. This guy knows a lot of things about a lot of stuff. Going through all of his keywords will give you some info and specific instructions on something to do in the future. Do not forget to ask him about the first underlined word he gives you: MUSIC. He rotates the generic things he says to you when you meet with him, talk to him, and leave. Once of the things he talks about is a divination he had where you will "walk backwards into your own footsteps to reach forward in time where the clock is hidden." It might be nothing, but it sounds like a hint and it doesn't hurt to jot it down.Unlike most NPCs he does not move from this spot, so you do not have to rest or reload the floor to get him to appear again. As a side note he does not react to you freeing Balderdash.


NPC KEYWORDS
Green Mandarin: You/Mandarin, Tabernacle/Music (gives you the Moongate Crystal), Pipes, (Lord) Ahriman, Balderdash/Wizard, Cathedral Bell, Diving Bell, Expedition, Fate/Destiny, Khan Raji, Kraken, Prophesy, Princess Dahlia, Clock/Metronome/Mysterium, Eldritch (unlocks it in the spellbook), Where (is) Ahriman, Where (is) Balderdash, Where (is) Khan Raji
*You can steal the Moongate Crystal from him, though there isn't any reason to. You can show him the stolen goods and he will not care. Stolen or not he will (Improved) Identify it, and tell you how to use it.


SHOPS
Green Mandarin
Weapons: No Dachi, Ninjato, Tanto, Full Moon, Chu Ko Nu, Kyogketsu Shogu
Thrown/Ammo: Humming Arrow
Armor: Mail Coif
Consumables: Nematic Dust, Kejuro Ti Lungwa, Paralysis Dust, Tai Gi Ar
Other: Jade Cornet, Luck Stone


POTENTIAL LOOT
EVENT 2. Fireplace: Ashes of Reverie (Critical Item)

1. Treasure Chest (Major Lock Level VIII)
Weapon: No Dachi, Ninjato, Wakizashi, Joust, Ball & Chain, Suan Tou Fung, Nunchaku, Moon Axe, Blowgun, Stone Bow, Chu Ko Nu
Instruments: Muting Lyre
Shield: Crusade Kite, Holy Heater
Thrown/Ammo: Feather Dart, Stone Bullets, Coronet of Chaos
Armor: Heaume, Mithril Armet, Leather Jerkin, Bronze Plate, Maximilian Plate, Platinum Armor, Golden Armor (Cursed, but recovers magic and probably health too), Jazeraint Pants, Mithril Greaves, Sandals
Accessories: Ring Pro Frost, Ring of Swordsmen, Ring of Sages, Ring of Polymorph, Periapt of Accursed Wind
Staff/Rods: Faerie Staff, Rod of Nightmares, Warwind Wand, Stave of Missiles
Scrolls: Deep Freeze, Firestorm, Recharge, AntiMagic, Earthquake
Spellbooks: Bless, Disintegrate
Consumables: Blink, Invisibility, Dazzler Dust, Rock Salts, Mirror Shard, Safety Glass, Talisman of SpiderClimb, Carpet of Levitation, Rug of Smothering, Dragon Control, Amphorae (Restore Youth)
*Pretty sure this chest pulls from the same loot table as the other one.

2. Treasure Chest (Major Lock Level VIII)
Weapons: No Dachi, Wakizashi, Ninjato, Joust, Moon Axe, Ball & Chain, Suan Tou Fung, Nunchaku, Stone Bow, Chu Ko Nu
Shields: Holy Heater, Crusade Kite
Instruments: Muting Lyre
Thrown/Ammo: Stone Bullets, Flame Arrow, Coronet of Chaos
Armor: Heaume, Mithril Armet, Leather Jerkin, Bronze Plate, Platinum Armor, Maximilian Plate, Golden Armor (Cursed, but recovers magic and probably health too), Jazeraint Pants, Mithril Greaves, Sandals
Accessories: Ring Pro Frost, Ring of Sages, Ring of Polymorph, Periapt of Accursed Wind
Staff/Rods: Rod of Nightmares, Stave of Missiles, Faerie Staff, Warwind Wand
Scrolls: AntiMagic, Recharge, Earthquake, Deep Freeze
Spellbooks: Bless, Disintigrate
Consumables: Blink, Invisibility, Bag of Sparkles, Dazzler Dust, Rock Salts, Cherry Wine, Safety Glass, Talisman of SpiderClimb, Dragon Control, Carpet of Levitation, Rug of Smothering, Amphorae (Restore Youth)
*Pretty sure this chest pulls from the same loot table as the other one.
Acme Vending Company


1. Skull Gate Unlocked by a nearby lever on the north side(#15).

2. Chain. Pull it to hear water move through pipes in the ceiling. This fills the Magic Bucket with water(#4).

3. Company History Room. There are several plaques behind glass in this room that you can read for Acme Vending lore and Journal Entries.

4. Magic Buckets and Mops next to a Dirty Glass Window. Pull the chain(#2) to fill the Magic Bucket with water. The Bucket and Mops will clean the window. Click the window for more lore and a word:LOOMPANIZOO

5. Slug Display Room. There is one plaque in this room that you can read for Acme Vending lore and a Journal Entry.

6. Jebleau Fontaine's Skeleton. LOOK at it for a Acme Service Ring.

7. Acme Vending Machine

8. Acme Vending Machine

9. Acme Vending Machine

10. Model M Acme Vending Machine. You cannot buy from it.

11. Model M2.4 Acme Vending Machine LOOK at it for Acme Slugs. You cannot buy from it.

12. Model F8.6 Acme Vending Machine. You cannot buy from it.

13. Model A1.0 Acme Vending Machine and Stone Face. You cannot buy from the Vending Machine. The Stone Face informa you that only people who know the password can pass. You can get the password by following the instructions for events #2 and #4. The password isLOOMPANIZOO. Typing the correct password opens the nearby Skull Gate(#14).

14. Skull Gate. Unlocked by typing the correct password at the nearby Stone Face(#13).

15. Lever. Unlocks the nearby Skull Gate(#1).

16. Ducat and the Tunnel Plumbers. After an introduction he will attempt to extort money from you. The amount varies, and seems to be a large percentage of whatever gold you have on hand, plus a slight randomization. If this is not your first meeting then Ducat will acknowledge if you have met him before, or if you have joined the Vanguard.
If you pay the amount is deducted from your total gold and he will tell you the Vault Locker Chest combination: 3-6-5-2-1-4
If you refuse he and his friends will attack, his friends consisting of a randomized amount of Highwaymen, Brigands, and/or Dark Rangers. Highwaymen and Brigands don't do anything special, but the damage they inflict can add up. Dark Rangers can cast some really nasty spells, so if they are there take care of them as fast as possible. Ducat himself can cast spells and Invoke his weapon to inflict Blind, but he usually chooses to strike for a significant amount of damage. As always, controlling status effects are the way to go, and they do not seem to have any resistances. Still, you might want to cast Armorplate and Magic Screen beforehand to protect your party members while you get things under control. When you win you will receive up to two Gauche (though sometimes you don't get any), Ducat's sword Daguerro, and Ring of Swordsmen. If you want the stats for the sword:
One Handed
5D8 Damage
Range 1
Sharpen
SYS10
25 Swordsmanship
TOHIT 30
Capable of Lethal Blow


17. Crate filled with rusty springs and bolts.

18. Barrel filled with old tallow.

19. Busted up Table.

20. Shattered Bottles on top of old twine.


SHOPS
Acme Vending Machine(#7)
Scrolls: Divination (4 tokens), True North (2 tokens), Locate Person (3 tokens)
Consumable: Garlic (2 tokens), Cure Lt. Wounds (3 tokens), True Seeing (3 tokens), Chattery Teeth (6 tokens), Nausea Powder (1 token), Lethe Liqeur (1 token), Undead Warder (5 tokens), Iron Rations (1 token), Galen Apple (1 token), Baldercake (1 token), Neutralize Poison (5 tokens)
Other: Soothing Stone (1 token), Silver Spoon (1 token)

Acme Vending Machine(#8)
Scrolls: Divination (4 tokens), True North (2 tokens), Locate Person (3 tokens)
Consumable: Garlic (2 tokens), True Seeing (3 tokens), Chattery Teeth (6 tokens), Nausea Powder (1 token), Crimson Ambrosia (4 tokens), Iron Rations (1 token), Galen Apple (1 token), Baldercake (1 token), Invisibility (9 tokens), Jack of Diamonds (6 tokens), Ace of Hearts (6 tokens)
Other: Soothing Stone (1 token), Silver Spoon (1 token)

Acme Vending Machine(#9)
Scrolls: Divination (4 tokens), Magic Moth (9 tokens), True North (2 tokens), Locate Item (6 tokens)
Consumables: Remove Curse (3 tokens), Stink Bomb (2 tokens), True Seeing (3 tokens), Evil Off (6 tokens), Wonder Adhesive (3 tokens), Crimson Ambrosia (4 tokens), Iron Rations (1 token), Galen Apple (1 token), Baldercake (1 token), Invisibility (9 tokens)
Other: Luck Stone (6 Tokens), Silver Spoon (1 token)


POTENTIAL LOOT
1. Deep Water: Vending Tokens

2. Deep Water: Vending Tokens

3. Floor: Vending Tokens

4. Pedestal: Acme Slugs

5. Floor: Vending Tokens

6. Treasure Chest (Master Lock Level XII): Vending Token x200 (four sets of 50)


ENEMIES
Electromaggot - Can deal magic damage.
Wrokwyrm
Electrapede - Can deal magic damage that also has a chance to Instantly Kill.
Tarantula
Brigands
Highwaymen
Dark Rangers - Can Blink (a.k.a. Flicker Out) and cast Spells, including those that inflict Silence, Drain, Web, Slow, and cause Instant Death, as well as buff with Enchanted Blade.
Ducat - Can cast Spells and inflict Blind.
Guard Barracks


1. Refreshing Fountain. Restores Vitality to any character that drinks from it.

2. Refreshing Fountain. Restores Vitality to any character that drinks from it.


POTENTIAL LOOT
1. Black Cauldron
Consumables: Mandrake Root

2. Barrel
Weapons: Rusty Sword, Knuckle Duster
Instruments: Thistle Whistle
Scrolls: Locate Item
Consumables: Neutralize Poison, Cure Paralysis, Remove Curse, Stone To Flesh, Rock Salts, Cherry Wine
Other: Luck Stone, Soothing Stone, Vending Token

You can sometimes get Locksmith's Key to drop, as well as Pole Fork drops from Barracks Guards


ENEMIES
Barracks Guards
Gaol Sewers
If the glaring white bothers you (Which seems like a bug. Pretty sure this place is supposed to be dark.), cast Biophosphor or Create Light to lessen it a little bit.


1. Purifying Fountain. Purifies any character that drinks from it. It probably lessens status effects, but I didn't have any when I found it the first time, so I was not able to test it.

2. Landing Spot from Axis Coliseum. You cannot return from this point.

3. Acme Vending Machine.

4. Forgotten Ranger's Skeleton. You can pick up the Huntsman Quarrel from the ground and put it in your inventory for more space and organization.

5. Locked Door. Locked with Major Lock Level IX. This door cannot be unlocked from the south side.


SHOPS
Acme Vending Machine
Scrolls: Divination(4 tokens), True North(2 tokens), Locate Person(3 tokens)
Consumables: Invisibility(9 tokens), True Seeing(3 tokens), Nausea Powder(1 token), Garlic(2 tokens), Iron Rations(1 token), Galen Apple(1 token), Baldercake(1 token), Crimson Ambrosia(4 tokens), Soothing Stone(1 token), Silver Spoon(1 token), Ace of Hearts(6 tokens), Jack of Diamonds(6 tokens), Chattery Teeth(6 tokens)


POTENTIAL LOOT
EVENT 4. Forgotten Ranger's Skeleton: Huntsman Quarrel


ENEMIES
Amoebic Slime
Toxic Amoeba
Blood Leech - Can Drain Vitality.
Spore Fungi
Crypt Cleaner
Acid Jelly
Axis Gaol


1. Awakening Spot. This is where your party is placed after you touch Diabla's Off Limits Bookshelf. LOOK at this tile for some Iron Rations and Spoiled Rations.

2. Straw. LOOK here for Royal Leaflet (Critical Item). Assay the Item and click the down arrow in the lower right hand corner of the window to read it for a hint: It says that a full pardon is offered to prisoners willing to volunteer for the arena. See Event #3 for more details on another thing you can do with it.

3. Straw. Rest here for a Ink Quill (Critical Item). Combine the Ink Quill with the Royal Leaflet to make Forged Pardon Letter(Critical Item). This is also a landing spot from Royal Aviary Park.

4. Barred Window. Click it to talk with a taunting guard. He will ask you what you want. One way to pass is to type VOLUNTEER, as the Royal Leaflet described. He will ask what you want to volunteer for. Type ARENA, once again as the Royal Leaflet described. Spend some time pacing around or bumping against the wall and the guard will call out to you again, opening the west wall next to the Barred Window. If you do it this way you cannot escape the second way, but you can still get 100% on this map eventually. The other way is to drop the Forged Pardon Letter onto the window (not while speaking to him) and he will open the nearby Gate(#5). If you escape this way you cannot ask the guard about volunteering and are therefore locked out of the Coliseum permanently.

5. Skull Gate. Opened with Gaol Key. See the second solution to Event #4 for more details on a second way to open it. You cannot pick the Gate.

6. Skull Gate. Opened with Gaol Key. You cannot pick the Gate.

7. Axis Gaol Keys Chest. Open it for the Gaol Key (8 charges). This spot is also a Safe Haven.

8. Skull Gate. Opened with Gaol Key. You cannot pick the Gate.

9. Skull Gate. Opened with Gaol Key. You cannot pick the Gate.

10. Skull Gate. Opened with Gaol Key. You cannot pick the Gate.

11. Skull Gate. Opened with Gaol Key. You cannot pick the Gate.

12. Skull Gate. Opened with Gaol Key. You cannot pick the Gate.

13. Skull Gate. As you approach the gate you will get whispered to by someone claiming to be a political prisoner. Opened with Gaol Key. You cannot pick the Gate.

14. Chuckles. A Recruitable friendly NPC straight out of your Ultima induced nightmares. There are a few Journal Entries you can get if you chat with him. I should also probably mention that he is the Jester class, which is really powerful. He sells Firewalkers, in case you need one. He becomes a random encounter after your first meeting. He also has a Large Bird Egg for sale (or you can steal it) which can be used to trick Shrike into thinking you have completed his second task.


NPC KEYWORDS
Chuckles(Recruitable, Random Encounter after first meeting): (Lord) Ahriman, Balderdash, Khan Raji, Prison, Escape
*If you steal from him he reacts, even if you have charmed him or the theft was successful.


SHOPS
Chuckles
Armor: Dionysian Garland (Cursed, Regens Vitality, MEN 33, 33 Astral Vision(?)), Tragic Pants of Fail (Cursed, -80 AC, Drains Vitality), Firewalkers
Spellbooks: Featherfall, Rainbow Rays (Arcanum)
Consumables: Bug Off, Stink Bomb, Dazzler Dust, Jar of Bugs, Ace of Hearts, Jack of Diamonds, Prankstone, Punch Puppet, Exploding Cigar, Pack of Jellybeans, Puppet of Doom, Large Bird Egg


POTENTIAL LOOT
EVENT 1. Awakening Spot: Iron Rations, Spoiled Rations

EVENT 2. Straw: Royal Leaflet

EVENT 7. Axis Gaol Keys Chest: Gaol Key

You will sometimes get Locksmith's Key drops after battles in this area.


ENEMIES
Turnscrew
Axis Coliseum


Sumogorathra will approach you after a while (you have time to pick up a few things if you want to). He is the very polite reigning champion who will talk to you a bit before attacking you. Sumogoratha gets quite a few attacks and favors physical fighting, but he can Roar (damage and Fear) and also casts the Leaping Sparks Spell. He does not have any resistances, and even seems relatively easy to turn to Stone (a rare-ish find for a "boss"), so try to inflict him with a controlling status effect.
Side notes to the fight: While Sumogoratha appears to be of non-Indian Asian origin, Moon Singer does not decapitate him. If you picked it up you can try throwing the Cargo Net once (it won't let you try twice in one battle), but I failed to hit every time I tried so I am unsure if it does anything. The Cargo Net will also disappear if you try to use the Trident like an item.

1. Skeletal Hand. LOOK at it for a Ring of Swordsmen.

2. Skeleton. LOOK at it to get a Trident and a Cargo Net.

3. Skeletons. LOOK at it for a Ring of Swordsmen.

4. Skull Gate. Once you have defeated Sumogorathra approach the Gate and the guards will open it for you.

5. Barred Window. Click the window and a nervous guard will speak and direct you to the nearby circle.

6. Chain. Pull the chain to open the "Victory Circle"(#7).

7. Victory Circle. It is closed by default. Pull the nearby chain(#6) to open it, allowing you to fall into the Gaol Sewers. Cast Featherfall to protect your party and Glass Items.


POTENTIAL LOOT
EVENT 1. Skeletal Hand: Ring of Swordsmen

EVENT 2. Skeleton: Trident, Cargo Net

EVENT 3. Skeletons: Ring of Swordsmen.


ENEMIES
Sumogorathra - Capable of Roar (Damage and Fear), and Casts Leaping Sparks.
Dominion Exemplar


Lord Ahriman is an NPC that you will Randomly Encounter in this area. There is a bit of bugginess to him:

If you have not joined the Vanguard and finished at least one of Shrike's tasks (which you have to join the Vanguard to do), and also have any Tablet in your inventory he will demand a Tablet by name. If you type YES you hand over the Tablet he asked for and he leaves. You can steal it back the next time you meet him and he won't ask for that specific Tablet again, but he will ask for any new Tablets you might have. If you refuse to give him the Tablet by typing anything else, or not typing at all, he will attack you and summon Vanguard Marines and Vanguard Bowmen. Ahriman is quite the mage, casting spells such as Armorplate, Magic Screen, Deflection Screen, Purify Air, Antimagic, Solar Flare, Firestorm, Lightning Bolt, Hailstorm, Crushing Hand, Life Drain, Disintegrate (Instant Death), and Destroyer Vortex. He can also Gaze (Instant Death). He will always retreat back a row after the first round. Ahriman is a little hard to Penetrate, but it's nothing Enchanted Blade can't help with. He does not seem to have any special resistances, so use controlling status effects as you would any other boss. As expected, killing Ahriman will anger Shrike and Diabla.
If you do not want him to take your Tablets or wish to avoid fighting, drop your Tablets off in a safe spot, trigger his encounter (you will be able to speak with him normally), then pick them up again afterward
.

If you've joined the Vanguard, have completed at least one of Shrike's tasks, and have not explored the Blackspike Mountains, it has the benefit of him not demanding a Tablet even if you have one, and he will not accept them if you try and give them away. If you want a battle at this point he won't give one to you, not even if you curse at him.

If you have joined the Vanguard, finished at least one of Shrike's tasks, and have also explored the Blackspike Mountains, Ahriman will start asking for Tablets again. With the exception of some slightly different text, it is still the same "hand them over or be forced to fight" event, with the tablets being Steal-able in later meetings if you hand them over. Once again, if you do not want him to take your Tablets or wish to avoid fighting, drop your Tablets off in a safe spot, trigger his encounter (you will be able to speak with him normally), then pick them up again afterward.

If you have joined the Vanguard, finished at least one of Shrike's tasks, and saved Princess Dahlia Ahriman will attempt to Curse your entire party (curable with the Remove Curse Spell, though other status effects inflicted as a result of the Curse will have to be cured by other means). He will not try to take your Tablets during this event. He won't try to Curse you again, but he will have three extra anger points and a little extra dialogue the next time you meet, but once again he will not take your Tablets. The time you meet after that he will try to take your Tablets, and he will shed two anger points.

If you speak with Balderdash (it does not matter if you recruit him or not), Ahriman will gain four anger points and will teleport you to Oblivion (If you do not free Balderdash he doesn't react to the Bell). He will acknowledge your escape from Oblivion the next time you meet him and lose three anger points, though he will ask for a Tablet afterward, if you have one on you. The meeting after that he will have completely forgotten about the incident, and lose the last anger point.

Other notes on interactions with him include the fact that he will know if you have touched the Deathstone (he will share his motivations with you if you have done it). He will have two anger points if you have been imprisioned because you touched Diabla's Off Limits Bookshelf in Carnivale Bazaar, and three anger points if you tried to pick or break down a Vanguard related door in Kublai Axis. Anger points will temporarily go away if you complete all three of Shrike's tasks, but two will come back after your next meeting with Ahriman if you went to Prison, even if you were incarcerated before the anger points were cleared. After doing other things for a while and coming back, the anger points will be cleared again. He will also acknowledge if you have found Pipes Majestyk, which you can show to him for a hint that they can be used to access the Clock. He also has some extra goofy dialogue if you have met him several times, he is in a good mood, and you joined the Vanguard (it might require that you have no Tablets in your possession). As for Keywords, you can talk with him on a number of subjects, one of which sounds like an end game scenario.

1. Monolith. Touch the Moongate Crystal to the Runes on the Monolith to teleport to Raven Wildes. You are also warped to this spot using the same method on the Monolith in Raven Wildes, or clicking the Monolith in the Astral Plane. You can get the Moongate Crystal from Green Mandarin in Celestial Watchtower, which can be reached through Kublai Axis.

2. Fishing Well. Click on it for a description of how deep it is. Put Fishing Line(100ft) onto the well to cast a line and pull up a Weircat. This completes a Miniquest and gives 1000exp to each member of the party. You get to keep the Fishing Line. See Event #4 in Sargasso of the Kraken for more information on how to get the Fishing Line(100ft). As for what to do with your prize, Chiang in the Carnivale Bazaar is interested in rare fish.

You get 150exp for each character in the party for climbing into the Blackspike Mountains. Cast Featherfall to protect your party and Fragile Items in case you fall.

The maps for the Blackspike Mountain Section are at the bottom of the guide, because some of the connections in that zone lead to areas that are clearly meant for endgame. That said, there is quite a bit to explore even if you are not ready to finish the game, so don't let that stop you from going there.


NPC KEYWORDS
Lord Ahriman: Hyperborea, Black Seed/Havoc Seed, Khan Raji, Balderdash, (Green) Mandarin, Princess/Dahlia, Skulheim, Shelach, Elias Conachur, Prison, (Lieutenant) Shrike, (Captain) Krone, (White) Owl/Exemplar, Waterport, Pirates, Kraken (acts as if it is defeated, even if it is alive), Pipes (Majestyk)
*If you cast Mindread on him he will say that he will read your mind instead, but nothing special happens.


ENEMIES
Night Lily - Can Poison.
Treant - Immune to Unconscious.
Man 'O 'The 'Woods - Immune to Unconscious.
Brigands
Dark Rangers - Can Blink (a.k.a. Flicker Out) and cast Spells, including those that inflict Silence, Drain, Web, Slow, Nausea and cause Instant Death, as well as buff with Enchanted Blade.
Wicker Cultists - Cast Spells. Can use invisibility. Can inflict Fear, Irritation, Confusion, Curse, and make characters Unconscious.
Mountian Giant
Vanguard Marines - Has access to Thistle Whistle.
Vanguard Bowmen
Lord Ahriman - Capable of Gaze(Instant Death) and Casts spells such as Armorplate, Magic Screen, Deflection Screen, Purify Air, Antimagic, Solar Flare, Firestorm, Lightning Bolt, Hailstorm, Crushing Hand, Life Drain, Disintegrate (Instant Death), and Destroyer Vortex.
ROYAL AVIARY PARK SECTION
Royal Aviary Park


1. Monolith. Touch the Moongate Crystal to the Runes on the Monolith to teleport to Gardens of Midnight.You are also warped to this spot using the same method on the Monolith in Zephyr Isles.You can get the Moongate Crystal from Green Mandarin in Celestial Watchtower, which can be reached through Kublai Axis.

2. Celestian Watchmen. You must be facing north to see them. They will ask you what your business is and open a text prompt. You can get the correct password by stealing and looking at Morraha's Password from Morraha in Kublai Cathedral, but you do not need the paper itself to pass. The password is HEFFALUMP.

3. Hole Stepping on this tile makes you fall into Axis Gaol. Typing the correct password to the Celestian Watchmen(#2) will close the hole.


POTENTIAL LOOT
Sometimes you get Perk Key drops from battles in this area.


ENEMIES
Black Bats - Can Disease.
Giant Bat - Can Drain Vit/Sleep.
Mudwasp - Can Irritate.
Glowmoth - Can Blind.
Dragonfly - Can Instantly Kill.
Condor
Kublai Cathedral


1. Stained Glass Window. Click it to see a dipiction of the White Owl floating above a Cathedral. You will get a Journal Entry.

2. Stained Glass Window. Click it to see a dipiction of the White Owl touching the tower of the Cathedral and imbuing it with magic. You will get a Journal Entry.

3. Stained Glass Window. Click it to see a dipiction of the White Owl sealing a long corridor to keep non-believers out of his Vault. You will get a Journal Entry.

4. Stained Glass Window. Click it to see a dipiction of the White Owl, Tablet in talon, flying between two moons. This is the hint you need to solve the Dial Puzzle(#8, #9, #10) You will get a Journal Entry.

5. Skull Gate. Unlocked by solving the Dial Puzzle and clicking the Lever(#10). You cannot pick the Gate.

6. Calming Fountian. Calms any character that drinks from it. I was not able to test the effect properly because I did not have an ailment at the time.

7. Locked Door (Major Lock Level VI).

8. Dial. The hint for the correct setting is found on one of the Stained Glass Windows(#4). The answer is Moon.

9. Dial. The hint for the correct setting is found on one of the Stained Glass Windows(#4). The answer is Moon.

10. Lever. Set the nearby Dials to the correct settings, then click the lever to open one of the Skull Gates(#5).

11. Locked Door (Major Lock Level IX).

12. Morraha. A friendly NPC. If you try to talk with her she says she is hungry. Drop any food item on her if you want to talk. Keep in mind that she will take the whole thing if there are multiple charges. Other than talking, there is one other important thing: you can steal Morraha's Password (Critical Item). I do not know of a nicer way to get it from her. Assay and read the paper for the password into the Imperial Palace: HEFFALUMP. BUG: In version 1.2.0.25-R she disappears forever after your first meeting. You do not need the Morraha's Password item to access the Palace, so as long as you know the password you cannot get stuck.

13. Bookshelf. Touch it to read "Concord with Ahriman." It tells you about how the Priests of the Cathedral sold the bell to Ahriman, which was then removed by Admiral Boondoggle. You will get a Journal Entry.

14. Skull Gate. You cannot pick the gate, but you can go around it another way.

15. Warning Plaque. Describes that the Spirit Jar is in the room beyond, and that anone caught trespassing will be sentanced to death.

16. Spirit Jar behind Glass. Once you have fixed, placed and raised the Cathedral Bell, pull the nearby chain to access this tile. Touch the Spirit Jar to release Balderdash, a Recruitable friendly NPC. Go through his keywords for more information on what is going on. He will recognize if you saved the Princess or not if you ask about her. As far as recruitment goes, he has great Health, Vitality, Magic, and excellent Stats.

17. Chain. You cannot pull it normally. Once you have placed the Cathedral Bell and raised it into the steeple with the Dial in the Bell Tower, pull the Chain to ring the Bell. This will break the nearby glass, as well as a nearby wall that will allow you to reach the Cathedral Vault.

18. Plaque. Click it for a Map of Kublai Cathedral, as well as a marking for the Megaera Vault.

19. Nothing but Walls. Once you are able to ring the Bell, do so and the east wall will crumble, allowing you access to the Cathedral Vault.


NPC KEYWORDS
Morraha: Balderdash, Cathedral Bell, Mandarin, Khan Raji, Kublai, Imperial Palace, Prison, Prophesy, Princess (you have to talk about this twice to get her to talk about Dahlia)
*You can steal Morraha's Password (Critical Item).

Balderdash (Recruitable): Balderdash: (Lord) Ahriman, Cathedral Bell, Demon, Mandarin, Intrepid, Khan/Raji, Kraken, Kroondergraff/(White) Owl/Exemplar, Kublai (Axis), Music/Harmony/Rhythm, Princess/Dahlia, Prophesy, Vanguard, Tablet, Nullspace, Metronome/Mysterium, Eldritch (Unlocks the Spellbook Page for characters in your party)


ENEMIES
Mad Monk - Casts Spells.
Bell Tower


1. Empty Bell Tower with Rope. You get a Journal Entry by clicking on it. You need four pieces to repair the bell: Two Bell Fragments, one found in Loch Titan and the other in Sargasso of the Kraken, a Bell Hasp found in Loch Titan, and a Bell Clapper found in Loch Lalain. Once you have collected them, combine both Bell Fragments to get Bell Jacket. Combine the Bell Jacket with the Bell Hasp to get Bell Casing. And finally, combine the Bell Casing with the Bell Clapper to get the Cathedral Bell. Put the Cathedral Bell onto the Rope you see while standing on this tile to place it. You can now click the Rope to ring the bell, but that's not the proper way to do it. See Event #2 for the next step.

2. Dial. You cannot interact with it normally. After you have placed the bell you can click the dial to retract the rope up into the steeple. The next step is to go down to the main floor and pull the chain at Event #17.


ENEMIES
Condor
Cathedral Vault


1. Plaque. Click it for some lore and a Journal Entry.

2. Plaque. Click it for some lore and a Journal Entry. This tile is also a Safe Haven.

3. Magic Green Gate. Use the Key of the Exemplar on it to make it disappear.

4. Treasure Chest. Click on it for the Megaera Tablet (Critical Item) and 6000exp for each member of the party.

5. Wall Lantern. Click it to reveal a Treasure Chest on the east wall. The contents are listed in the Potential Loot section.

6. Plaque. Click it for a description of what the Fountain can do for you.

7. Plaque. Click it for a description of what the Fountain can do for you.

8. Curative Fountain. It is describes as being a curative for wounds, but my party was healthy and healed while I was here so I was unable to test it.

9. Plaque. Describes the nearby pools of water as having the ability to cure afflictions.

10. Colored Light Dance Party. Restores Vitality and Magic when stepped on.

11. Colored Light Dance Party. I do not know what this one does, and since I did not have any afflictions I was unable to test it.


POTENTIAL LOOT
EVENT 4. Treasure Chest: Megaera Tablet (Critical Item)

EVENT 5. Wall Lantern/Treasure Chest:
Weapons: Dethskul, Sabre Halberd, Purifier, Mjolnir, Retribution
Accessory: Brisingamen
Consumables: Hobor's Holy Hash, Pilgrim Tea, Doom Chanter
*The items in this chest are static.

1. Treasure Chest (Major Lock Level VIII)
Weapons: War Hammer, Morningstar, Ball Flail, Cat 'O 'Nine Tails, Holy Symbol
Shields: Heraldic Shield
Instruments: Muting Lyre, Thistle Whistle, Cacaphony Harp
Thrown/Ammo: Lead Ball, Cupid's Arrow, Horn of Winter
Armor: Wizard Cap, Dionysian Garland, Psi Garland, Leather Hood, Bascinet, Leather Jerkin, Chainmail, Ringmail, Brigandine, Greaves, Vambraces, Battle Gauntlet, Sollerets, Waterwalkers, Firewalkers
Accessories: Ring Pro Frost, Ring of Protection, Ring of Featherfall, Amulet of Might
Staff/Rods: Zapper Rod, Freezer Rod, Ice Wand, Sparkler Rod, Wand of Webs
Scrolls: Mindread, Locate Person, Magic Screen, Magic Missile, Armorplate, Knock Knock
Spellbooks: Bless, Knock Knock, Magic Bells, Missile Shield, Firestorm, Raise Dead, Remove Curse
Consumables: Cure Lt. Condition, Evil Off, Bag of Sparkles, Cherry Wine, Soothing Stone, Luck Stone, Undead Warder
Other: Gold Leaf
Imperial Palace


1. Shallow Water. LOOK for some Vending Tokens. This tile is also a Safe Haven.

2. Keyhole. Use the Treasury Key to open the nearby wall.

3. Bookshelf. Click it to learn that Khan Raji is descended from the ancient philosopher-kings called the Paragons and get a Journal Entry.

4. Bookshelf. Click it to learn that the Paragons created the caste system of Kublai Axis and get a Journal Entry. This tile is also a Safe Haven.

5. Bookshelves. Click the north one to learn of a place called the "Grand Refuge of the Ancients" that lies underneath the Palace and get a Journal Entry. Click the west one to take the whole Bookcase for inventory management.

6. Bookshelf. Click it to see that it is filled with information on harvests and famine in ancient times and get a Journal Entry.

7. Stone Ornament. This tile is also a Safe Haven.

8. Stone Ornament. This tile is also a Safe Haven.


POTENTIAL LOOT
EVENT 1. Shallow Water: Vending Tokens

EVENT 5. Bookshelves (West Shelf): Bookcase

1. Treasure Chest (Master Lock Level XI)
Weapons: Rusty Sword, Broadsword, Awl Pike, Bec De Corbin, Goupillon, Flagellum, Threaded Lash, Slingshot, Shortbow, Longbow, Slurbow, Knuckle Duster
Instrument: Muting Lyre, Thistle Whistle, Halcyonic Lyre
Thrown/Ammo: Throwing Knive, Feather Dart, Poison Arrow, Sleeper Arrow, Horn of Winter
Shield: Target Buckler, Heraldic Shield
Armor: Bascinet, Flannel Shirt, Chainmail, Ringmail, Brigandine, Cestian Girdle, Copper Plate, Cuirass Leggings, Greaves, Vambraces, Sandals, Sollerets, Waterwalkers, Firewalkers
Accessories: Ring Pro Frost, Ring of Protection, Ring of Smiting, Ring of Featherfall
Staff/Rods: Stave of Missiles, Freezer Rod, Fizzlestick, Beholder Stave, Ice Wand, Zapper Rod
Scrolls: Locate Person, Locate Item, Mindread, Armorplate, Enchanted Blade, Magic Screen, Wither, Raise Dead
Spellbooks: Bless, Remove Curse, Missile Shield, Firestorm, Rainbow Rays (Arcanum)
Consumable: Cure Paralysis, Stone To Flesh, Sleep Sand, Bag of Sparkles, Halomancic Salts, Rock Salts, Cherry Wine, Luck Stone
Other: Cobalt Sapphire, Gold leaf
Royal Throneroom


1. Khan Raji is an NPC. Ask him about PRINCESS or DAHLIA for his request. I am not sure if typing YES when prompted is required for a reward (You can rescue the Princess without even talking with him), but he is very happy if you say it and will give you a Jeweled Scimitar (you can use this item to get past Skulheim Webs and bypass the lower floors of that area) and a Journal Entry. He will then ask you to ring the Bell in Skulheim's Skull Belfry so that he can send men to aid you in the rescue. He also tells you of a time limit (third planet in conjunction with the moon), but I think that is just flavor text. You can also ask him about AHRIMAN to learn about what happened.
If you recruit Princess Dahlia in Shrine of the Psychopomp, which is in Skulheim, and bring her here, Khan Raji will give you the Treasury Key (Critical Item). Dahlia will not leave your party when you do this.
Even though one of the options Princess Dahlia gives you is to tell her father she is there,
Khan Raji does not react to that and will not reward you (as of version 1.2.0.26-R).

The bookshelves in the Imperial Palace give a hint on another thing you can do with Khan Raji: Give him the Paragon you can retrieve from Ancients Level IV, which he will then put on display as a symbol of hope against Ahriman (Or at least that is what he describes. I wasn't able to see it anywhere). Doing so rewards you with 12,000 gold and 5000exp..
As a side note he does not react to you rining the Cathedral Bell or freeing Balderdash.


NPC KEYWORDS
Khan Raji: Balderdash, Princess/Dahlia, Ahriman, Lilith
*Mindread says you can ask about Father, Rescue, and Sacrifice, but he does not say anything special for these words.
**You can steal the Jeweled Scimitar and Treasury Key.
***You can steal the Paragon after you have given it to him, just like any other quest item. He does not react if you try and show him the stolen goods.
Imperial Treasure Keep


1. Keyhole. Use the Key of the Ancients to open the wall. The Key will disappear.


POTENTIAL LOOT
1. Treasure Chest (Major Lock Level IX)
Weapons: Beaked Axe, Awl Pike, Bec De Corbin, Fist Mace, Goupillon, Threaded Lash, Shortbow, Longbow, Slurbow, Knuckle Duster
Shields: Target Buckler
Instruments: Muting Lyre, Thistle Whistle, Halcyonic Lyre
Thrown/Ammo: Throwing Knive, Poison Arrow, Sleeper Arrow, Feather Dart, Cosmic Cryer
Armor: Burgonet, Flannel Shirt, Chainmail, Ringmail, Camail, Cestian Girdle, Platemail, Pauldrons, Vambraces, Cuirass Leggings, Sandals, Waterwalkers, Firewalkers
Accessories: Ring Pro Frost, Ring of Deflection, Ring of Smiting, Ring of Featherall
Staff/Rods: Beholder Stave, Stave of Missiles, Freezer Rod, Fizzlestick, Wand of Fireballs
Scrolls: Armorplate, Magic Screen, Enchanted Blade, Mindread, Wither, Raise Dead
Spellbook: Bless, Featherfall, Missile Shield, Firestorm, Hermetic Gag (Arcanum), Rainbow Rays (Arcanum)
Consumables: Cure Paralysis, Stone To Flesh, Acid Splash, Sleep Sand, Bag of Sparkles, Rock Salts, Cherry Wine, Water Glass, Luck Stone
Other: Cobalt Sapphire, Locksmith's Glue

2. Treasure Chest (Master Lock Level X)
Weapons: Broad Axe, Beaked Axe, Ball & Chain, Fist Mace, Cudgel, Morningstar, Threaded Lash, Poison Lash, Cestus, Composite Bow
Shield: Kite Shield
Instruments: Muting Lyre
Thrown/Ammo: Throwing Knive, Feather Dart, Stun Arrow, Sheolic Pipes, Cosmic Cryer
Armor: Burgonet, Flannel Shirt, Jazeraint Shirt, Camail, Platemail, Hauberk, Pauldrons, Jazeraint Pants, Mail Chausses, Sandals, Spur Sollerets, Firewalkers
Accessories: Ring Pro Frost, Ring of Power, Amulet vs. Hypno, Amulet vs. Sorcery
Staff/Rods: Faerie Staff, Wand of Fireballs, Wand of Rainbows, Stave of Missiles
Scrolls: Enchanted Blade, Lightning, Hold Monsters, Wither, Cosmic Gate
Spellbooks: Bless, Featherfall, AntiMagic, Cosmic Gate, Hermetic Gag (Arcanum)
Consumables: Blink, Invisibility, Acid Splash, Paralysis Dust, Bag of Sparkles, Cherry Wine, Faery Water, Scrying Crystal, Ace of Hearts, Clutcher Talon, K.O. Rock
Other: Cobalt Sapphire, Locksmith's Glue

3. Treasure Chest (Master Lock Level XI)
Weapons: Broad Axe, Beaked Axe, Cudgel, Fist Mace, Threaded Lash, Cestus
Shields: Target Buckler, Kire Shield
Instruments: Muting Lyre
Thrown/Ammo: Throwing Knive, Feather Dart, Sleeper Arrow, Stun Arrow, Sheolic Pipes, Cosmic Cryer
Armor: Burgonet, Flannel Shirt, Jazeraint Shirt, Camail, Lamellar, Copper Plate, Platemail, Cuirass Leggings, Pauldrons, Sandals, Spur Sollerets, Waterwalkers, Firewalkers
Accessories: Ring of Deflection, Ring of Smiting, Amulet vs. Hypno, Amulet vs. Sorcery
Staff/Rods: Fizzlestick, Stave of Missiles, Wand of Fireballs, Beholder Stave
Scrolls: Fireball, Mindread, Armorplate, Enchanted Blade, Wither, Hold Monsters
Spellbooks: Bless, Featherfall, AntiMagic, Firestorm, Cosmic Gate, Hermetic Gag (Arcanum)
Consumables: Acid Splash, Paralysis Dust, Bag of Sparkles, Halomancic Salts, Rock Salts, Cherry Wine, Water Glass, Scrying Crystal, Ace of Hearts, Luck Stone, K.O. Rock
Other: Cobalt Sapphire, Locksmith's Glue

4. Treasure Chest (Master Lock Level XII)
Weapons: Composite Bow
Shields: Runeshield
Thrown/Ammo: Poison Arrow, Piercer Arrow, Sonic Shock
Armor: Enchanter Hood, Enchanter Robes
Scrolls: Locate Item, Magic Moth
*The Items in this chest are static.

5. Treasure Chest (Master Lock Level X)
Weapons: Stormbringer
Armor: Scribers (20 Scribe)
Scrolls: Knock Knock, Detect Magic, Detect Secret, Locate Item, Magic Moth
Consumables: Fireseed, Clutcher Talon
*The Items in this chest are static.
Grand Refuge of the Ancients


1. Wall Glyphs and Treasure Chest. The chest is locked with Master Lock Level X. The loot inside is randomized, listed in the Potential Loot section. The Wall Glyphs change the cursor if you hover over it, but nothing happens if you click or LOOK at it.

2. Ganesh. Once you meet them they will start speaking about how you must be there for the Paragon and that they will only allow those they feel have good intentions to pass. They diss the White Owl, say they hope to see you again, and then disappear. It is possible that there is an action you can take that will make them block your path, but I don't know of anything specific.


POTENTIAL LOOT
EVENT 1. Treasure Chest (Master Lock Level X)
Weapons: Cat 'O 'Nine Tails*, Holy Symbol
Shields: Runeshield
Instruments: Muting Lyre, Phantasmal Harmonia (Phantasm - Interesting Graphics but I have no idea what the effect does)
Shield: Crusade Kite, Holy Heater
Thrown/Ammo: Lead Ball*, Coronet of Chaos, Pandora's Box
Armor: Mithril Helmet, Attic Helm, Leather Jerkin, Bronze Plate, Mithril Cuirass, Titanium Armor, Maximiliion Plate, Golden Armor (Cursed, but has Vitality and Magic regen), Sandals, Seven Leagues
Accessories: Ring Pro Frost, Ring of Sages, Amulet vs. Death
Staff/Rods: Apocalypse Stave
Scrolls: Earthquake, AntiMagic, Recharge
Spellbooks: Bless, Vivogenesis, Disintegrate
Consumables: Cure Lt. Condition, Jar O 'Bugs, Bag of Sparkles, Cherry Wine
Other: Gold Leaf*
*You always seem to get the marked Items. Everything else is randomized.

1. Pot
Consumables: Bag of Sparkles, Sleep Sand, Halomancic Salts, Amaranth, Poison Dust, Swamp Leech

2. Treasure Chest (Master Lock Supreme)
Weapons: Legend Maker, Nevermiss
Thrown/Ammo: Drain Arrow, Krakklers (x2)
Shields: Grand Turner
Armor: Cap of Perseus (Cursed. If you equip it the game will tell you that the character is invisible.)
Staff/Rods: Warwind Wand
Scrolls: Deep Freeze
Spellbooks: Summoning I (Eldritch)
Consumables: Jack of Diamonds
*The loot in this chest is static.

You will sometimes get a Perk Key or Common Gate Key to drop after battles in this area.


ENEMIES
Dragonfly - Can Instantly Kill.
Displacer - Can Blink and inflicts Paralyze.
Dark Faeries - Casts Spells. Can inflict Sleep, Charm, Hold, Confuse, Blind, and potentially summon Dragonfly.
Cockatrice - Can Petrify
Chimerasphinx - Uses Glowing Aura (Polymorph), Breaks Paralysis quickly.
Ancients Level II


POTENTIAL LOOT
Sometimes you get a Perk Key drop after battles in this area.


ENEMIES
Displacer - Can Blink and inflicts Paralyze.
Cockatrice - Can Petrify
Dracosphinx
Minotaur - Can Paralyze. Resists Fear and Insanity. Will attack the party when Charmed.
Ancients Level III


1. Ganesh appears here again and asks why you want to find the golden idol of the Paragon, then tells you that you will find what you seek if you clear yourself of ill motives and desires. Then they disappear again.

2. Wall Glyphs. Moving the cursor over them changes it (the cursor, that is), but clicking and LOOKing do nothing.

I don't know how to get into the missing part of the map. I couldn't find any pressable bricks and Detect Secret didn't pick anything up.


ENEMIES
Royal Jelly
Displacer - Can Blink and inflicts Paralyze.
Minotaur - Can Paralyze. Resists Fear and Insanity. Will attack the party when Charmed.
Ancients Level IV


1. Wall Glyphs. This one actually shows something when you click on it: "Picture Museum of the Fire Djinn.

2. Heiroglyphs / Stained Glass Window. Click it for a description of etherial Djinn from the "plain" of fire who have come to the physical world for various reasons.

3. Runes / Stained Glass Window. When clicked, the game lets you know that you need a character with the Ancient History Skill to decipher it. Choose a character with the skill, if you have one. It might take several tries, even if the character has a high skill, but if they are successful they will read the name of the Master of all Djinn and give you a Journal Entry: AXASHAZZAR.

4. Pictograph / Stained Glass Window. Click it to see the royal heirarchy of Djinn depicted in order of rank, with the Master of Djinn at the top.

5. The Piper. When you step on this tile it approaches you and sings a song, the lyrics typed below just in case it has to do with a puzzle later:
"It is time, it is time, for the end of time!!
It is time for the mime to sing a silly little rhyme, to say it is no crime to return to the slime!
(Insert musical/Panflute interlude)
The proud lords and ladies endure a respectable term, but none has respect for the Conqueror Worm!
The Piper wants them to hear that the night draws near, that all must pay the Piper when accounts are cleared!
The day is brief, eternity is not, everything descends into decay and rot!
Do not deny with disgust and dread, soon you too shall be scoured white in your graveyard bed!
(Insert more dancing and Panflute-ing)
Awake! Awake!
Now Sleep! And Sleep!"

After it finished you can ask it questions, but it just loops through some dialogue. Asking it YOU and JOB are a little worthwhile though, if you want to know more about who it is. The Piper becomes a Random Encounter after your first meeting, and the second time you see it they will acknowledge if you have touched the Deathstone.

6. Ganesh appears again, to encourage you and tell you that the Paragon is only a little further, after "burning feet and hearts" (they mean that quite literally), and then they disappear.

7. Ganesh again, to ask if you know what the problem in Hyperborea is, which they say is the desire to make the world into something it was not meant to be, and proceeds to equate the White Owl with Lord Ahriman. They tell you that you will meet one more time, then they disappear.

8. Treasure Chest (Master Lock Supreme). Open it for the Paragon (Critical Item). You can give this item to Khan Raji for some gold and exp. For the curious, Ahriman will not accept it.

9. Ganesh will appear here after you have taken the Paragon. They praise you and talk about how the Paragon is a symbol of hope that changes meaning depending on the generation that has it, wishes you well, then disppears for the last time.

If you want to use Firewalkers to traverse this floor without taking damage, you will need a minimum of 5 charges to cover the way to the end, plus a single static battle in the southeast lava area, and the return trip. You will need more if you want to get 100% map completion.


NPC KEYWORDS
The Piper: Other than small talk, I was unable to find any words it has a special reaction to.
*You cannot read its mind.
**You can steal a Flute of Oblivion from it.


POTENTIAL LOOT
EVENT 8. Treasure Chest (Master Lock Supreme): Paragon (Critical Item)

1. Treasure Chest (Master Lock Supreme)
Weapons: Excalibur, Crackatoa, Conundrum
Shields: Valiant
Instruments: Crankletin (Earthquake)
Thown/Ammo: Banishing Chords (Banish Undead)
Armor: Seven Leagues
Accessories: The One Ring (Cursed, but has Mana Regenration)
Scrolls: Raise Dead, Lightning*
Consumables: Scarab of Ra, Ace of Hearts
*The items in this chest are static, but sometimes you do not get the Lightning Scroll.


ENEMIES
Royal Jelly
Cockatrice - Can Petrify
Minotaur - Can Paralyze. Resists Fear and Insanity. Will attack the party when Charmed.
Neurophrites - Can inflict Insanity. Cannot be knocked Unconscious.
SKULL WILDERNESS SECTION
Skull Wilderness


1. Fishing Well. When you click on it the game mentions that you might be able to fish here with a long enough line. Put Fishing Line(100ft) onto the well to cast a line and pull up a Mythacuda. This completes a Miniquest and gives 1000exp to each member of the party. You get to keep the Fishing Line. See Event #4 in Sargasso of the Kraken for more information on how to get the Fishing Line(100ft). As for what to do with your prize, Chiang in the Carnivale Bazaar is interested in rare fish.

There is no arrow pointing the way to Fortress of the Dead on the in game map. I added it for easier reference.


ENEMIES
Stinkbug - Can Poison.
Mudwasp - Can Irritate.
Glowmoth - Can Blind.
Dragonfly - Can Instantly Kill.
Chlorazoid
Night Lily - Can Poison.
Treant - Immune to Unconscious.
Ghost - Can Irritate, Fear, Slow and Drain Magic.
Dark Rangers - Can Blink (a.k.a. Flicker Out) and cast Spells, including those that inflict Silence, Drain, Web, Slow, Nausea, and cause Instant Death, as well as buff with Enchanted Blade.
Fortress of the Dead


1. Skeleton Battle. There can be more than one, but I have only seen up to three. It is presented in a very dramatic fashion, but they are just regular enemies in this area. Skeletons can grab a character and deplete their FOO bar, but that doesn't do anything other than tell you your character is starving (or at least as of 1.2.0.25-R). They can also cause Fear. You cannot inflict Nausea or Insanity on them, but other controlling status effects work and they can be knocked Unconscious.

2. Skeletons. Click on them to find Cankerweight (Critical Item).

3. Cankerstone Monument. Clicking it reveals a message: Dedicated to the Four Kings of the Redoubt to celebrate their victory over the Arch Demon Asmodeus. Take the Cankerweight and place it onto the monument. This will open a pit to the south(#4).

4. Covered Pit. Uncover it by following the instructions for the Cankerstone Monument(#3). Step into the hole for a one way trip into Necropolix. Use Featherfall to mitigate damage and protect your items from breaking.

5. Iron Cauldron. If you click on it the game will ask you to pick a character to attempt to grasp shards of light inside. Whoever you choose gets an increase in Alchemistry Skill by a random amount (I don't know the exact range, but have seen +4 through +10), and teaches it to them if they didn't already know it.


POTENTIAL LOOT
EVENT 2. Skeletons: Click on them to find Cankerweight (Critical Item).

1. Skeletons
Weapons: Rusty Sword
Shield: Crusade Kite
Armor: Camail
Staff/Rods: Sparkler Rod
Scrolls: Hold Undead
*These items are static.

2. Deep Water: Ring Pro Frost

3. Wooden Slats:
Scrolls: Detect Magic, Firestorm
Spellbooks: Fire Shield, Antimagic, Knock Knock
Consumables: Viper Ashes
*These items are static.

You sometimes get Locksmith's Key after battles.


ENEMIES
Xombi - Can knock characters Unconscious.
Festerboil - Can Irritate and Disease. Resists Cold.
Ungrateful Dead - Can inflict Irritate and Insanity.
Skeleton - Can deplete FOO and cause Fear. Immune to Nausea and Insanity.
Skeleton Champion - Can Drain Magic. Will still attack the party when Charmed.
Necropolix - Map and Events
Warning: I normally don't promote save scumming battles, but enemies in this area can permanently drain STR on contact and the game does not give you any warning or even a description of it happening. I do not know the exact enemy that can drain Stats in this particular dungeon (might be Tomb Guardians "Grab"). If you don't want to deal with secret trolling that could potentially and permanently make a physical based character worthless, save often and check your character's stats after every battle. If you end up with a bad physical character the only solution I can think of is to replace it with an NPC. UPDATE: There is an in game solution. See this thread: http://gtm.steamproxy.vip/app/650670/discussions/0/2765630416826557750/?ctp=2


1. Landing Spot from Fortress of the Dead. You cannot return this way.

2. Asmodeus. The demon will tell you his story, and tasks you with finding the skulls of the four betraying Kings and placing them with their other remains in return for being freed from the Necropolis. He also warns you that if you take any treasure he will attack you. He leaves this spot after talking with you. Even though the monument above and the demon says there were only four kings, you have to find and properly place five skulls to leave.

3. Bad Waters Fountian. Inflicts Disease on whoever drinks from it.

4. Draining Light Dance Party. Drains magic from the entire party every time you step on it.

5. Skeleton. Touch it for the Accursed Skull of Uzuk (Critical Item).

6. Touchable Bricks. Touch the north wall and select a character to drink from a secret Curative Fountain. Seems like it is infinite use.

7. Treasure Chest. Major Lock Level VIII. Contains the Accursed Skull of Lir (Critical Item).

8. Treasure Chest. Major Lock Level VIII. Contains the Accursed Skull of Ra (Critical Item).

9. Minotaur Statue with Bowl. Touching it describes embers in the bowl that are cool to the touch. Your characters will automatically do something to the statue. Click the statue twice more, which causes it to turn and destroy a wall(#10). There is a plaque that describes what your characters do and what will happen one tile south of the statue, but you do not need to read it.

10. North Wall. It will be destroyed when you touch the Minotaur Statue with the Bowl(#9).

11. Treasure Chest containing the Accursed Skull of Amon (Critical Item).

12. Skeleton. Touch it for the Accursed Skull of Hoth (Critical Item).

13. Skull Gate. Unlocked by placing all five skulls in their proper Urns. You cannot pick the lock.

14. Urn. Place the Accursed Skull of Hoth onto it. As far as I know there is no in game hint that this Urn goes with this Skull, other than the fact that no other Skull works.

15.Urn. Place the Accursed Skull of Lir onto it. As far as I know there is no in game hint that this Urn goes with this Skull, other than the fact that no other Skull works.

16.Urn. Place the Accursed Skull of Uzuk onto it. This is the only one with a Stone Face that reacts to the placement. As far as I know there is no in game hint that this Urn goes with this Skull, other than the fact that no other Skull works.

17.Urn. Place the Accursed Skull of Amon onto it. As far as I know there is no in game hint that this Urn goes with this Skull, other than the fact that no other Skull works.

18.Urn. Place the Accursed Skull of Ra onto it. As far as I know there is no in game hint that this Urn goes with this Skull, other than the fact that no other Skull works.

19. Asmodeus. If you abided by his terms he will let you pass unharmed and he will leave from this spot. If you took loot from the two Treasure Chests (the one in the warp tile room does not seem to count) he will fight you.
If you choose to fight over the loot: Asmodeus sticks to physical attacks most of the time, but will occasionally cast Earthquake, Comet of Doom, Deathwish, and Destroyer Vortex (He seems very bad at casting, as he will often Fizzle or Backfire. In my first battle with him he killed himself with Destroyer Vortex...). He also has the ability to attack characters who have successfully Hidden and seems to target them first, though that could be a coincidence. He can rarely save against Sorcery, but does not seem to have any special resistances to controlling status effects. You get nothing special for defeating him, but the amount of experience you get from killing him is pretty high (15104exp, 1208 gold).

There is a little exploit if you want the treasure without a fight. Simply don't take it until you meet with him the second time, then go back and collect it afterward.

20. Pushable Brick on the north wall. Clicking it reveals a Treasure Chest with a Major Lock Level VIII. The loot is listed in the Potential Loot section.

The warp takes you to the Cankerstone Monument in the Fortress of the Dead.
Necropolix - Loot and Enemies
POTENTIAL LOOT
EVENT 5. Skeleton: Accursed Skull of Uzuk (Critical Item)

EVENT 7. Treasure Chest (Major Lock Level VIII): Accursed Skull of Lir (Critical Item)

EVENT 8. Treasure Chest (Major Lock Level VIII): Accursed Skull of Ra (Critical Item).

EVENT 11. Treasure Chest: Accursed Skull of Amon (Critical Item).

EVENT 12. Skeleton: Accursed Skull of Hoth (Critical Item).

EVENT 20. Pushable Brick and Treasure Chest (Major Lock Level VIII):
Weapons: Crossbow
Thrown/Ammo: Medusa Barb
Armor: Hoodoo Tunic, Hoodoo Robes, Hoodoo Hoodie
Consumable: Clutcher Talon
OtherK.O. Rock
*The loot in this chest is static.

1. Treasure Chest (Major Lock Level IX):
Weapons: Longsword, Bone Dagger, Gauche, Truncheon, Duckbill, Bipennis, Pole Fork, Lance, Quarterstaff
Shields: Wooden Buckler
Instruments: Muting Lyre, Lethe Harp, Cacaphony Harp, Hotfoot Banjo
Thrown/Ammo: Barbed Arrows, Throwing Knive, Needle Darts, Feather Dart, Poison Dart
Armor: Leather Vestment, Leather Helm, Mail Coif, Flannel Shirt, Leather Armor, Sandals, Spiked Bracer
Accessory: Ring Pro Fire, Ring Pro Frost, Ring Pro Magic, Amulet of Might
Staff/Rods: Stun Rod, Sparkler Rod, Torpedo Rod, Stave of Missiles, Caduceus of Healing, Caduceus of Life
Scrolls: Knock Knock, Detect Magic, Divination
Spellbooks: Healing, Identify, Fire Shield, Armor Shield, Wiard's Eye, Knock Knock
Consumables: Cure Lt. Wounds, Cure Heavy Wounds, Cure Lt. Condition, Remove Curse, True Seeing, Stink Bomb, Bag of Slumber, Bag of Whispers, Rock Salts, Spoiled Rations, Iron Rations, Baldercake, Oatmeal Cookie, Cherry Wine
Other: Cobalt Sapphire, Soothing Stone

2. Treasure Chest (Major Lock Level VIII)
Thrown/Ammo: Sheolic Pipes
Armor: Firewalkers
Accessories: Amulet vs. Death
Scrolls: Hold Monsters, Wither, Crushing Hand, Magic Screen
Consumables: Repel Undead, Faery Water
*The loot in this chest is static.

You will sometimes get a Locksmith's Key as a drop after battle.


ENEMIES
Amoebic Slime
Flesh Grubs - Can Disease.
Cophrophages - Can Disease.
Festerboil - Can Irritate and Disease. Resists Cold.
Xombi - Can knock characters Unconscious.
Skeleton - Can deplete FOO and cause Fear. Immune to Nausea and Insanity.
Skeletal Champion - Can Drain Magic. Will still attack the party when Charmed.
Lich Lord
The Tomb Guardians - Can "Grab" (no in game description of what it does)
Asmodeus - Casts Spells such as Earthquake, Comet of Doom, Deathwish, Destroyer Vortex (can inflict quite a few status effects).
SKULHEIM SECTION
Skulheim - Events and NPC
Warning: I normally don't promote save scumming battles, but enemies in this area can permanently drain STR on contact and the game does not give you any warning or even a description of it happening. In this dungeon, I know that Grue (Banish Undead / Soul Harvester Instrument work against them) are capable of perma-draining STR, but other enemies have this secret ability as well. If you don't want to deal with secret trolling that could potentially and permanently make a physical based character worthless, save often and check your character's stats after every battle. If you end up with a bad physical character the only solution I can think of is to replace it with an NPC. UPDATE: Another solution listed in this thread: http://gtm.steamproxy.vip/app/650670/discussions/0/2765630416826557750/?ctp=2

It is not required and will not work on everything, but the Soul Harvester Instrument (found by killing Knorlos Knossos in Observatory of Knossos, which is reached by going through the Gideon region) can make Skulheim areas easier. Having the Jeweled Scimitar (received or stolen from Khan Raji in Imperial Palace) will allow you to bypass the lower floors to progress.


1. Lilith. She is a Recruitable friendly NPC. There is a lot you can ask her about this area, which is detailed in the NPC Keywords section. Talking with her can give you hints on how to proceed. When you meet her again she will warn you to leave. She does not react to Renfeeld, Orloch, or Dahlia, and they do not react to her. Having her in your party will not stop the Nosferatu from attacking you. She does not care when you kill them. She will also help you kill both Shelach and Psychopomp. If you talk to her after killing Shelach she praises you, but refuses to converse with you out of hate and you can no longer Recruit her.
CORRECTION: I misinterpreted the status icon and it may be that she doesn't get a random infliction, I probably just overburdened her. I need a new save to test it, though I am hoping it still is a neat betrayal.

2. Barred Window and Skull Gate. Click the Barred Window and someone will ask if you are a friend of the darkness. For the hint on what to do you might remember hearing about the Children of Shelach all the way back in the Cenotaph of the Black Lich. That, along with other hints such as the Samhain connection, should make you think of Hobknob and how it was described. To pass show the gatekeeper behind the window the Bane of Hobknob and they will open the Gate. You do not lose the item.

3. Random Fight. I have seen this fight be against Hellhounds, Festerboil, Cophorphages, and Grue. Be very careful against Grue. They have a chance to knock a characer unconscious if they Penetrate. They can also use magic, such as Dispel Magic. The game does not tell you this, but when their attacks connect they can permanently drain the STR of their target (They are not the only enemy with this secret capability). They will still attack the party if you inflict them with Charm, so use Paralysis and Unconsciousness (if you use Hammer/Mace weapons) to control them. The Hold and Banish Undead Spells, along with the Soul Harvester Instrument (which casts Banish Undead), works very well against them.

4. Plaque. There is nothing special about it other than a bit of flavor. It describes a bat on top of Skulls and a grinning Harvest Moon.

5. Skull Door. You can walk around to the other side of it. You cannot pick the Gate.

6. Plaque. A bit of flavor and a Journal Entry. Shows a family crest consisting of a black bird resting on a shield with two skelatal hands touching in the center.

7. Skull Door. You can walk around to the other side of it. You cannot pick the Gate.

8. Bad Water Fountain. Petrifies any character that drinks from it.

9. Bad Water Fountain. Paralyzes any character that drinks from it.

10. Strange Skeleton. Just some flavor. The game describes a classic Vampire, without actually saying the word.

11. Hole. Leads to Pits of Skulheim. You do not have to fall to enter the Pits. If you want to use it in that way, cast Featherfall to avoid damage and protect your breakable items. To cover it solve the Pit Control Puzzle(#12, #14, #15).

12. Lever. Solve the dial puzzle (#14, #15) and use the lever to close the hole at (#11) or (#23), depending on the settings.

13. Pit Control Instructions Plaque. Tells you the obvious and gives you a Journal Entry.

14. Two Dials. The hints are found in the Pits of Skulheim. To close the pit at (#11) your hint is S.S.S.S. and the answer is to set both dials to Moon. To close the pit at (#23) your hint is N.S.E.W. and the answer is to set the Dial on the south wall to Star, and the Dial on the west wall to Lightning. This should be obvious, but only do one solution at a time for both sets of dials (#14 and #15).

15. Two Dials. The hints are found in the Pits of Skulheim. To close the pit at (#11) your hint is S.S.S.S. and the answer is to set both dials to Moon. To close the pit at (#23) your hint is N.S.E.W. and the answer is to set the Dial on the east wall to Sun, and the Dial on the south wall to Moon. This should be obvious, but only do one solution at a time for both sets of dials (#14 and #15).

16. Treasure Chest that contains Skull Ruby (Critical Item).

17. Treasure Chest that contains Skull Ruby (Critical Item).

18. Skull Gate. To unlock it use both Skull Rubies on the Gate. You cannot pick the Gate.

19. Web. It can be removed by using Quantum Ichor (obtained in Sepulchre of Shades) or Jeweled Scimitar (obtained from Khan Raji) on it.

20. Web. It can be removed by using Quantum Ichor (obtained in Sepulchre of Shades) or Jeweled Scimitar (obtained from Khan Raji) on it.

21. Plaque. More flavor text and a Journal Entry. [spoilers]It says that the life blood of the stone that fell from the heavens lies below.[/spoilers]

22. Pushable Brick on the south wall. I do not know what it does at the moment, so take care when pressing it. I wasn't able to find anything that changed on this floor.

23. Hole. Leads to Pits of Skulheim. You do not have to fall here to enter the Pits. If you want to use it in that way, cast Featherfall to avoid damage and protect your breakable items. To cover it solve the Pit Control Puzzle(#12, #14, #15).

24. Clutch of Nosferatum. This is a fight against a random amount of Nosferatu, usually two or three groups with four each, and sometimes Incubi and Blood Leech. They are very fast and while they don't seem to deal too much damage their numbers can add up. They can also Charm, so watch out for that. Vamphyri are not considered Undead, so Hold/Banish Undead will not work against them. Paralyze works well to keep them contained as you pick them off one by one. You can also knock them unconscious. I don't know much about Incubi, because the one time I was able to get them to appear I did not fight. Speaking of, if you do not want to fight recruit Count Orloch, who will get them to leave. Orloch also receives a point in Mythology for doing this..

I do not know where that last 1% on the map is. UPDATE: According to Wizard's Eye, the last 1% is to the left of the red arrow leading to Skull Wilderness, which is impossible to get to.
Skulheim - Keywords, Loot, and Enemies
NPC KEYWORDS
Lilith (Recruitable, Random Encounter after first meeting): Exile/Banished, Master/Psychopomp, Samhain, Spider/Arachnid, Vamphyr, Vampire, Shelach, (Count) Orloch, Where (is) Shelach, Where (is) Orloch
*Note that when you ask about Orloch the word destroy is underlined, but she does not respond to it. You can also Mindread the words Infection and Renfeeld, but she does not have an important response to either.


POTENTIAL LOOT
EVENT 16. Treasure Chest: Skull Ruby (Critical Item)

EVENT 17. Treasure Chest: Skull Ruby (Critical Item)


ENEMIES
Cophrophages - Can Disease.
Festerboil - Can Irritate and Disease. Resists Cold.
Vampire Bat
Blood Leech - Can Drain Vitality.
Hellhound
Phantom - Ghost Type.
Xombi - Can knock characters Unconscious.
Ungrateful Dead - Can inflict Irritate and Insanity.
Grue - Can permanently drain STR on contact. Casts Spells such as Dispel Magic and can knock characters Unconscious. Will still attack the party when Charmed.
Revenant
Nosferatu - Can Charm.
Incubi
Pits of Skulheim
I suggest saving often to protect your physical fighters. See the Warning above the map of Skulheim for more details.


1. Landing Spot from Skulheim. You cannot return this way.

2. Lantern and Plaque. It is too dark to read the plaque. Aquire and use a Coal Ember on the Lantern to light it. Sadly, Create Light and Biophosphor do not work. After it is lit you can read the plaque. It says: "Belfrey Pit Northeast N.S.E.W."

3. Lantern and Plaque. It is too dark to read the plaque. Aquire and use a Coal Ember on the Lantern to light it. Sadly, Create Light and Biophosphor do not work. After it is lit you can read the plaque. It says: "Central Crypt Pit S.S.S.S."

4. Landing Spot from Skulheim. You cannot return this way.

5. Unusual Fountian. Drains Vitality and Magic from whoever drinks from it.

6. Instruments of Torture. Just flavor text.

7. Skeletons. More flavor text.

8. Minotaur Statue "Forge". Click on it to get two Coal Ember (Critical Item).


POTENTIAL LOOT
EVENT 8. Minotaur Statue "Forge": Coal Ember (Critical Item) x2

Sometimes you can get a Perk Key after battles in this area.


ENEMIES
Black Bats - Can Disease.
Vampire Bat
Shriekers
The Tomb Guardians - Can "Grab" (no in game description of what it does)
Sepulchre of Shades


Renfeeld, a recuitable NPC, is a Random Encounter on this floor. He does not seem to tell you anything that Lilith hasn't already covered. Having him in your party will not stop the Nosferatu in Skulheim from attacking you. When I had him in my party against Shelach, she would always be very fast, even with a party that would go first otherwise. It could be coincidence, but it was consistant through all of my tests. He has no special reaction to Lilith, Orloch, or Dahlia, or if you use him to fight Shelach or Psychopomp. If you return to him after killing Shelach he praises you, but refuses to converse with you our of hate and you can no longer Recruit him.

1. Treasure Chest that contains Shades Key North (Critical Item). You need to stand on Lava to get it, so USE Firewalkers (equipping doesn't work) or make sure your characters have more than 30hp each (anyone less than that will probably die unless they are saved by DES).

2. Fountain of Night. Use one of Arachne's Vials on it to obtain Vial of Night Mists (Critical Item). If you also have Vial of Spirit Essence you can merge them together in your Item Workshop for Prematter Ectoplsm (Critical Item).

3. Skull Gate. Unlocked by using Shades Key South. You cannot pick the Gate.

4. Treasure Chest that contains Shades Key South (Critical Item). You need to stand on Lava to get it, so USE Firewalkers (equipping doesn't work) or make sure your characters have more than 30hp each (anyone less than that will probably die unless they are saved by DES).

5. Fountain of Spirits. Use one of Arachne's Vials on it to obtain Vial of Spirit Essence (Critical Item). If you also have Vial of Night Mists you can merge them together in your Item Workshop for Prematter Ectoplsm (Critical Item).

6. Skull Gate. Unlocked by using Shades Key North. You cannot pick the Gate.

7. Ceiling Drip. Clicking on the Jar will give you a Journal Entry and a description of the black liquid inside. Use Prematter Ectoplasm on the Jar to receive Quantum Ichor with 12 charges. Using Quantum Ichor is one of two ways to destroy Webs.

8. Plaque. Clicking on it reveals some lore, if you didn't already learn it from the friendly NPCs. It depicts a "star" falling from space, and a young girl approaching the glowing stone. The girl touches the stone and transforms, then begins to spread the infection by touching others. The transformed beings then build a castle around the space rock to protect what is inside of it, and in turn the stone infects the castle itself with liquid evil essence. Above the carvings there is an eye shooting rays over everything.

9. Barrel. Click on it for two Arachne's Vials (Critical Item)

10. Barrel. If you click on it you will be attacked by Flesh Grubs.


NPC KEYWORDS
Renfeeld (Random Encounter, Recruitable): Master, Psychopomp, Samhain, Shelach, Spider/Arachnid/Vamphyr/Vampire, Where (is) Shelach
*Like Lilith, even though destroy is underlined when he talks about it the word does not trigger any response. Despite the fact that Lilith tells you to ask him about Infection, he does not have a response for that either.


POTENTIAL LOOT
EVENT 1. Treasure Chest: Shades Key North (Critical Item)

EVENT 4. Treasure Chest: Shades Key South (Critical Item)

EVENT 9. Barrel: Arachne's Vials (Critical Item) x2


ENEMIES
Packrat
Flesh Grubs - Can Disease.
Hellhounds
Spectre - Ghost Type. Can cast Chilling Touch.
Homunculus
Gargoyle Mage
Belfry Tower L1


ENEMIES
Black Bats - Can Disease.
Belfry Tower L2


ENEMIES
Black Bats - Can Disease.
Belfry Tower L3


ENEMIES
Black Bats - Can Disease.
Vampire Bat
Skull Belfry


1. Bell. Touching the rope causes the bell to ring loudly, with a note that it can be heard all the way to Kublai Axis. Doing so gives you a Journal Entry. The in game map icon for the bell is a ladder going up, but I was unable to find any way to climb the rope. Khan Raji asks you to ring this bell for his quest and says that he will send aid, but I was unable to find any difference between ringing the bell or not ringing it. Even the enemy encounters were the same, for the most part (I recorded more battles after ringing the Bell, but not by much).

2. Skeletons. Touch it for the Bones of Paladar. You can cast Raise Dead on them to return Paladar to life. You can recruit him, but other than that I am unsure if he does anything else.


NPC KEYWORDS
Paladar (Recruitable, Wherever you resurrect him at): Catechism


POTENTIAL LOOT
EVENT 2. Skeletons: Bones of Paladar.
Antechamber of Orloch


1. Plaque. Just some flavor text and a Journal Entry.

2. Acme Vending Machine. It has 7 tokens already in it.


SHOP
Acme Vending Machine: Crimson Ambrosia (1 token)


ENEMIES
Gargoyle Mage
Orloch's Vault


1. Lever. Click it to close the Pit to the northwest(#2).

2. Pit. Pull the lever to the southeast to close it (#1).

3. Unlit Lantern. If you recruit Count Orloch he will open a path here on the north wall, giving you access to his Treasure Vault.

4. Decanter. Clicking on it describes that it is filled with pulsating red liquid. I tried to do something with it, but couldn't figure out anything specific (tried putting booze in it, Crimson Ambrosia, Quantum Ichor). It might just be flavor text.

5. Count Orloch is a recruitable NPC. Talk with him if you want to know more about him, and what is going on in Skulheim. If you choose to recruit him (worth doing if you like lore) he gives you Batwing Ring (Cursed), Ring Pro Magic, Repel Undead Potions, Dazzler Dust, and an Anti Magic Spellbook. Recruiting him gives you access to his Treasure Vault and allows you to pass the Nosfuratu in the ground floor of Skulheim without a fight. He has no special reactions to Lilith, Renfeeld, or Dahlia, nor does he react if you use him to fight Shelach or Psychopomp. After meeting him he disappears (in patch 1.2.0.25-R). I was unable to get him to appear again. If you choose to work around the bug and do not talk to him until after killing Shelach, his dialogue about her reflects the fact that she is dead. He will still be Recruitable. This spot is also a Safe Haven.

6. Bookshelf. Click it and Count Orloch will fill you in on more lore. If you come here after killing Shelach and Psychopomp his dialogue does not change.

The bookshelves and are just for flavor text and jokes.

The open parts on the map do not indicate doorways.


NPC KEYWORDS
Count Orloch (Recruitable): Exile/Banished, Master/Psychopomp, Shelach, Infection, Lilith, Renfeeld, Princess/Dahlia, Sacrifice, Where (is) Shelach, Where (is) Master/Psychopomp
*You can steal all of the stuff he gives you if you recruit him. He does not care if you show them to him, and he will not identify anything.


POTENTIAL LOOT
1. Treasure Chest
Weapons: Composite Bow, Ball & Chain, Fist Mace, Morningstar, Broad Axe, Beaked Axe, Poison Lash, Cestus
Shields: Kite Shield
Instruments: Muting Lyre
Thrown/Ammo: Stun Arrow, Throwing Knive, Feather Dart, Sheolic Pipes, Cosmic Crier
Armor: Burgonet, Flannel Shirt, Jazeraint Shirt, Lamellar, Camail, Platemail, Hauberk, Jazeraint Pants, Mail Chausses, Pauldrons, Sandals, Spur Sollerets
Accessories: Ring Pro Frost, Ring of Deflection, Ring of Power, Amulet vs. Hypno, Amulet vs. Sorcery
Staff/Rods: Stave of Missiles, Wand of Rainbows, Wand of Fireballs, Faerie Staff
Scrolls: Deep Freeze, Hold Monsters, Lightning, Crushing Hand, Fireball
Spellbooks: Bless, Featherfall, AntiMagic, Cosmic Gate, Hermetic Gag (Arcanum)
Consumables: Blink, Invisibility, Faery Water, Acid Splash, Paralysis Dust, Bag of Sparkles, Water Glass, Scrying Crystal, Clutcher Talon, Rock Salts, Cherry Wine
Other: Cobalt Sapphire*, K.O. Rock, Locksmith's Glue

2. Treasure Chest (Master Lock Level XI)
Weapons: Beaked Axe, Awl Pike, Shortbow, Longbow, Fist Mace, Cudgel, Threaded Lash, Cestus
Shields: Target Buckler
Instruments: Muting Lyre, Halcyonic Lyre
Thrown/Ammo: Sleeper Arrow, Stun Arrow, Feather Dart, Throwing Knive, Sheolic Pipes, Cosmic Cryer
Armor: Burgonet, Flannel Shirt, Chainmail, Camail, Cestian Gridle, Jazeraint Shirt, Copper Plate, Platemail, Cuirass Leggings, Vambraces, Pauldrons, Sandals, Spur Sollerets, Waterwalkers, Firewalkers
Accessories: Ring Pro Frost, Ring of Deflection, Ring of Smiting, Amulet vs. Hypno
Staff/Rods: Fizzlestick, Beholder Stave, Stave of Missiles, Wand of Fireballs, Freezer Rod
Scrolls: Cosmic Gate, Fireball, Wither, Hold Monsters, Armorplate, Enchanted Blade
Spellbooks: Bless, Featherfall, Firestorm, Missile Shield, AntiMagic, Hermetic Gag (Arcanum)
Consumables: Stone to Flesh, Acid Splash, Paralysis Dust, Sleep Sand, Bag of Sparkles, Halomancic Salts, Rock Salts, Cherry Wine, Water Glass, Scrying Crystal
Other: Cobalt Sapphire*, K.O. Rock, Luck Stone, Locksmith's Glue

3. Treasure Chest
Weapons: Fist Mace, Cudgel, Awl Pike, Bec De Corbin, Threaded Lash, Shortbow, Longbow, Cestus
Instruments: Muting Lyre, Halcyonic Lyre
Thrown/Ammo: Sleeper Arrow, Stun Arrow, Feather Dart, Throwing Knive, Sheolic Pipes, Cosmic Cryer
Shield: Target Buckler
Armor: Burgonet, Flannel Shirt, Chainmail, Camail, Cestian Girdle, Jazeraint Shirt, Copper Plate, Platemail, Cuirass leggings, Vambraces, Pauldrons, Sandals, Spur Sollerets, Waterwalkers, Firewalkers
Accessories: Ring Pro Frost, Ring of Deflection, Ring of Smiting, Amulet vs. Hypno
Staff/Rods: Freezer Rod, Beholder Stave, Stave of Missiles, Wand of Fireballs, Fizzlestick
Scrolls: Wither, Fireball, Enchanted Blade, Armorplate, Cosmic Gate, Hold Monsters
Spellbooks: Bless, Featherfall, Firestorm, Missile Shield, AntiMagic, Hermetic Gag (Arcanum)
Consumables: Stone To Flesh, Acid Splash, Paralysis Dust, Sleep Sand, Bag of Sparkles, Halomancic Salts, Rock Salts, Cherry Wine, Water Glass, Scrying Crystal
Other: Cobalt Sapphire, K.O. Rock, Luck Stone, Locksmith's Glue


ENEMIES
Spectre - Ghost Type. Can cast Chilling Touch.
Loom of Shelach


1. Skull Gate and Lever. Unlocked by the lever on the east side of the Gate. Cannot pick the Gate.

2. Acme Vending Machine

3. Treasure Chest. If you cast Knock Knock to unlock the chest you are free to take the contents without any trouble. However, if you try to pick the lock manually you will be attacked by The Spawn of Shelach. They are very fast, so try and have protective spells up before you engage them if you can. They can Drain HP and heal themselves, use Web (Paralyze), and spit Deadly Poison which seems to be an Instant Kill. They also have a Grab and Gaze (Hold) move to watch out for. They do not seem to have any special resistances to controlling status effects or Unconsciousness. Charm works pretty well, as they will attack each other when inflicted with it. The chest is safe to open after the battle, with the contents listed in the Potential Loot section.

4. Plaque. A Journal Entry and some information: The first water of the all-seeing eye is shade's breath and space vaccuum; The Water of Night. It seems like this was meant to be a hint for the puzzle in Sepulchre of Shades, but since you have to finish that puzzle or have another item that bypasses it to get here I suppose it's just flavor text.

5. Plaque. A Journal Entry and some information: The second water of the all-seeing eye is universe binding ether; The Water of Spirits.It seems like this was meant to be a hint for the puzzle in Sepulchre of Shades, but since you have to finish that puzzle or have another item that bypasses it to get here I suppose it's just flavor text.

6. Plaque. A Journal Entry and some information: The third water of the all-seeing eye is cosmic knot liquescence outside of creation; The plasm before time.It seems like this was meant to be a hint for the puzzle in Sepulchre of Shades, but since you have to finish that puzzle or have another item that bypasses it to get here I suppose it's just flavor text.

7. Plaque. A Journal Entry and some information: The last water of the all-seeing eye is a dark goat's black milk, who has a thousand children; The quantum ichor.It seems like this was meant to be a hint for the puzzle in Sepulchre of Shades, but since you have to finish that puzzle or have another item that bypasses it to get here I suppose it's just flavor text.

8. Web. It can be removed by using Quantum Ichor (obtained in Sepulchre of Shades) or Jeweled Scimitar (obtained from Khan Raji) on it.

9. Hole. Falling into it leads into the Womb of Shelach. Cast Featherfall to protect your party and glass items.

The red stars on the map represent a Dark Zone. Use the same tactics you used back in Deepsink Project to deal with it.


SHOP
Acme Vending Machine:
Thrown/Ammo: Cosmic Dart (12 tokens)
Consumables: Faery Water (5 tokens), Viper Ashes (4 tokens), Psi Garland (6 tokens), Black Pearls (3 tokens), Blood Tamarinde (2 tokens), Talisman of Spiderclimb (6 Tokens), Dazzler Dust (3 tokens), Evil Off (6 tokens), Acid Splash (3 tokens), Water Glass (7 tokens), Wand of Webs (6 tokens), Warwind Wand (10 tokens), Terror Stave (4 tokens)


POTENTIAL LOOT
EVENT 1. Treasure Chest (Major Lock Level IX)
Armor: Fingers (+20 Lockpicking)
Consumables: Neutralize Poison, Invisibility, Zephyr Cola, Acid Splash
*The loot in this chest is static.

1. Treasure Chest (Master Lock Level XII)
Weapons: Rusty Sword, Broadsword, Battle Axe, Bec De Corbin, Flagellum, Goupillon, Shortbow, Longbow, Slurbow, Slingshot, Knuckle Duster
Shields: Heraldic Shield
Instruments: Muting Lyre, Thistle Whistle, Halcyonic Lyre
Thrown/Ammo: Piercer Arrow, Sleeper Arrow, Poison Arrow, Feather Dart, Throwing Knive*, Horn of Winter
Armor: Wizard Cap, Bascinet, Flannel Shirt, Chainmail, Brigandine, Ringmail, Copper Plate, Cuirass Leggings, Greaves, Vambraces, Sandals, Sollerets, Waterwalkers
Accessories: Ring Pro Frost, Ring of Protection, Ring of Smiting, Ring of Featherfall
Staff/Rods: Stave of Missiles, Ice Wand, Freezer Rod, Zapper Rod, Wand of Webs, Fizzlestick
Scrolls: Mindread, Magic Missile, Armorplate, Magic Screen, Locate Item, Locate Person, Enchanted Blade
Spellbooks: Bless, Raise Dead, Magic Bells, Missile Shield, Remove Curse, Firestorm, Rainbow Rays (Eldritch)
Consumables: Neutralize Poison, Cure Paralysis, Stone To Flesh, Sleep Sand, Bag of Sparkles, Rock Salts, Cherry Wine
Other: Cobalt Sapphire, Gold Leaf, Luck Stone, Vending Token

2. Treasure Chest (Master Lock Level X)
Weapons: Broadsword, Beaked Axe, Bec De Corbin, Awl Pike, Goupillon, Threaded Lash, Shortbow, Longbow, Slurbow, Knuckle Duster
Shields: Target Buckler, Heraldic Shield
Instruments: Muting Lyre, Thistle Whistle, Halcyonic Lyre
Thrown/Ammo: Sleeper Arrow, Feather Dart, Throwing Knive, Cosmic Cryer
Armor: Bascinet, Flannel Shirt, Chainmail, Ringmail, Camail, Cestian Girdle, Copper Plate, Cuirass Leggings, Vambraces, Pauldrons, Sandals, Sollerets, Waterwalkers, Firewalkers
Accessories: Ring Pro Frost, Ring of Deflection, Ring of Smiting, Ring of Featherfall
Staff/Rods: Beholder Stave, Freezer Rod, Stave of Missiles, Ice Wand, Fizzlestick
Scrolls: Hold Monsters, Armorplate, Magic Screen, Enchanted Blade, Wither, Mindread, Locate Item
Spellbooks: Bless, Missile Shield, Raise Dead, Firestorm, Rainbow Rays (Arcanum), Hermetic Gag (Arcanum)
Consumables: Cure Paralysis, Stone To Flesh, Acid Splash, Sleep Sand, Bag of Sparkles, Halomancic Salts, Rock Salts, Water Glass
Other: Cobalt Sapphire, Luck Stone, Locksmith's Glue

You can sometimes get a Common Gate Key and Locksmith's Key after battles in this area.


ENEMIES
Ghost - Can Irritate, Fear, Slow and Drain Magic.
Spectre - Ghost Type. Can cast Chilling Touch.
Phase Spiders - Can Poison.
Gargoyle Mage
Fire Elemental - Ghost type. Regenerates Health. Has a breath attack that can deal damage and inflict Irritate. Immune to Unconsciousness, Sleep, Charm, Nausea, and Insanity. Absorbs Fire.
The Spawn of Shelach - Can Drain HP, Web (Paralyze) and spit Deadly Poison which seems to be an Instant Kill. They can also "Grab" (No in game description. Might be permanent STR drain) and Gaze (Hold).
Womb of Shelach
I suggest saving often to protect your physical fighters. See the Warning above the map of Skulheim for more details.


Smashing every egg on this floor will give you 1000exp when you descend to the next one, but Shelach seems to move faster, but has less overall health if you do it. You can destroy the eggs after killing her if you want to avoid that. See Event #7 in Shrine of the Psychopomp if you want more details.

1. Landing Spot from Loom of Shelach. You cannot return this way.

2. Egg. Clicking it will destroy the egg.

3. Egg. Clicking it will destroy the egg.

4. Egg. Clicking it will destroy the egg.

4. Egg. Clicking it will destroy the egg.

5. Egg. Clicking it will destroy the egg.

6. Egg. Clicking it will destroy the egg.

7. Egg. Clicking it will destroy the egg.

8. Egg. Clicking it will destroy the egg.

9. Egg. Clicking it will destroy the egg.

10. Egg. Clicking it will destroy the egg.

11. Egg. Clicking it will destroy the egg.

12. Egg. Clicking it will destroy the egg.

13. Lever. Click it to close the Pit on the north side of the map(#17).

14. Egg. Clicking it will destroy the egg.

15. Egg. Clicking it will destroy the egg.

16. Egg. Clicking it will destroy the egg.

17. Pit. Close it by using the lever in the east side of the map(#13).

18. Lever. Unlocks the Skull Gate in the north side of the map(#21)

19. Egg. Clicking it will destroy the egg.

20. Egg. Clicking it will destroy the egg.

21. Hole in Ceiling and Skull Gate. Approach the hole and an old woman's voice will speak to you. It's Shelach, who says she knows the smell of her own children's blood and accuses you of killing babies, even if you haven't smashed any eggs or killed any Spawn of Shelach yet. You will then be attacked by multiple Fireballs that hit random party members, each one able to deal randomized damage up to 56 (perhaps more). Use the Fire Shield Spell, or any Fire Resistant equipment you might have, such as Ring Pro Fire, to lessen the amount of damage your characters will take. The Skull Gate is unlocked by using the north lever(#18).

22. Pit. Use the lever on the opposite side of the first inner path to cover it(#23).

23. Lever. Click it to cover a Pit on the opposite side of the first inner path(#22).

24. Skull Gate. Unlocked with the lever on the west side of the first inner path(#26)

25. Pit. There is some in game text about this Pit, but you cannot cover it as far as I know.

26. Lever. Click it to unlock the Skull Gate on the south side of the first inner path(#24).

27. Lever. Click it to open the nearby Skull Gate(#28).

28. Skull Gate. Unlocked with the nearby lever(#27).

29. Hole in Ceiling. Once again you will be attacked with Fireballs and taunted. Cast Fire Shield and equip Fire Resistance equipment to protect your party.

30. Egg. Clicking it will destroy the egg. This tile is also a Safe Haven.


POTENTIAL LOOT
You sometimes get Common Gate Key and Locksmith's Key to drop after battles in this area. You can also sometimes get Throwing Knive after defeating Mystagogues.


ENEMIES
Festerboil - Can Irritate and Disease.
Ungrateful Dead - Can inflict Irritate and Insanity.
Phase Spiders - Can Poison.
Grue - Can permanently drain STR on contact. Casts Spells such as Dispel Magic and can knock characters Unconscious. Will still attack the party when Charmed.
Mystagogue
The Spawn of Shelach - Can Drain HP, Web (Paralyze) and spit Deadly Poison which seems to be an Instant Kill. They can also "Grab" (No in game description. Might be permanent STR drain) and Gaze (Hold).
Shelach's Website
I suggest saving often to protect your physical fighters. See the Warning above the map of Skulheim for more details.


If you smashed every egg in the Womb of Shelach you will get a text event and 1000exp when you enter this floor. Doing so seems to make Shelach move faster during her battle, but gives her less overall health. If you want to avoid that you can destroy the eggs after you kill her. See Event #7 in Shrine of the Psychopomp if you want more details.

1. Web. It can be removed by using Quantum Ichor (obtained in Sepulchre of Shades) or Jeweled Scimitar (obtained from Khan Raji) on it.

2. Skull Door. You can walk around it.

3. Skull Door. You can walk around it.

4. Skull Door. You can walk around it.

5. Skull Door. You can walk around it.

6. Web. It can be removed by using Quantum Ichor (obtained in Sepulchre of Shades) or Jeweled Scimitar (obtained from Khan Raji) on it.

7. Queen's Dinner Meal Recipe. Click on the plaque to see the ingredients and get a Journal Entry. Sprig of Parsley, Cream De Menthe, Cheddar Cheese, Cinnamon, Cooking Wine, Lamb Cutlet.

8. Boiling Cauldron. Click on it to discover that there is Beef Broth inside. Use the Sprig of Parsley, Cream De Menthe, Cheddar Cheese, Cinnamon, Cooking Wine, and Lamb Cutlet on the Cauldron. When you add all of the ingredients the game will still tell you that it isn't done yet, but click on it afterwards to get Catering Meal(Critical Item).

9. Barrel. Click on it for Sprig of Parsley (Critical Item).

10. Web. It can be removed by using Quantum Ichor (obtained in Sepulchre of Shades) or Jeweled Scimitar (obtained from Khan Raji) on it.

11. Skull Gate. Unlocked with the lever on the eastern part of the floor(#15).

12. Barrel. Click on it for Cream De Menthe (Critical Item).

13. Barrel. Click on it for Chedder Cheese (Critical Item).

14. Pushable Brick on the north wall. Touch it to reveal a Treasure Chest, with items listed in the Potential Loot section.

15. Lever. Clicking it unlocks the Skull Gate in the northern part of the floor(#11)

16. Web. It can be removed by using Quantum Ichor (obtained in Sepulchre of Shades) or Jeweled Scimitar (obtained from Khan Raji) on it.

17. Barrel. Click on it for Cinnamon (Critical Item).

18. Barrel. Click on it for Cooking Wine (Critical Item).

19. Barrel. Click on it for Lamb Cutlet (Critical Item).

20. Plaque. Just some flavor text. The nearby Skeleton also has a little flavor text. Neither of them give Journal Entries.

21. Stained Glass Window. Click it and choose a character. I am not sure what is needed for a successful roll (My high Int/Wis/Dev Sage had the best luck at triggering it, but that could be coincidence), but if the character succeeds they get Death Resistance (I have seen up to +10) and find a Ring of Protection. You can keep trying if you fail, but you can only trigger the event once.

22. Skull gate. Unlocked by following the instructions for events #8 and #23.

23. Barred Window and Green Wall with a Tapestry. Click the bars on the window to be told only caterers are allowed. Use the Catering Meal on the window and the nearby Skull Gate will be unlocked(#22). I have no idea what is up with the Tapestry, which has the wall texture of the Imperial palace and the Kublai Axis coat of arms on it.

24. Plaque. A map of the floor, which fills out your own map when you click on it. In hindsight, I should have numbered this earlier but I am too lazy to change everything.

25. Group of Coffin Caterers. After a lengthy lecture they will attack you even if you have Count Orloch in your party. They can Drain HP and Vitality, Gaze (Charm), Paralyze, Curse, Hold, and casts spells such as WitchHex, Brain Rot, Black Plague (Inflicts Disease), Hold Monsters, Midnight Sphere (Inflicts Disease, Poison and Transfix), and Shadow Phase (Blink self buff). They can also summon Packrats and Black Bats. Luckily they are pretty slow, so you should be able to get some controlling status effects off on them before things get out of hand. They are susceptible to most status effects and Unconsiousness, except Insanity. Charm causes them to fight each other, so that is a good choice (though some of the spells they cast will always target the party, such as Hold Monsters), though they do seem to have a small amount of resistance to mesmeric effects. If a character gets Charmed or Confused, have them Hide to keep them from doing something stupid (This tactic works for most Wizardry-like games that allow you to select actions for inflicted characters, so if you didn't already know this keep it in mind for other games). When you win you get Leg of Ham, Iron Rations, and Cherry Wine.

26. Web. It can be removed by using Quantum Ichor (obtained in Sepulchre of Shades) or Jeweled Scimitar (obtained from Khan Raji) on it.


POTENTIAL LOOT
EVENT 9. Barrel: Sprig of Parsley (Critical Item)

EVENT 12. Barrel: Cream De Menthe (Critical Item)

EVENT 13. Barrel: Chedder Cheese (Critical Item)

EVENT 14. Treasure Chest:
Weapons: Unholy Symbol
Accessories: Periapt of Accursed Wind (Cursed)*, Ring of Featherfall
Staff/Rods: Caduceus of Healing, Sparkler Rod
Scrolls: AntiMagic, Cosmic Gate, Deep Freeze
Consumables: Crimson Ambrosia*, Invisibility
Other: Luck Stone
*You always seem to get Periapt of Accursed Wind and Crimson Ambrosia.

EVENT 17. Barrel: Cinnamon (Critical Item)

EVENT 18. Barrel: Cooking Wine (Critical Item)

EVENT 19. Barrel: Lamb Cutlet (Critical Item)

1. Treasure Chest (Major Lock Level VI)
Shields: Runeshield*
Accessories: Amulet vs. Death
Staff/Rods: Terror Stave, Wand of Webs
Spellbooks: Featherfall
Consumables: Talisman of Spiderclimb*
Other: Acme Slugs*
*Marked Items are always there.

You sometimes get Common Gate Key after battles in this area.


ENEMIES
Packrat
Black Bats - Can Disease.
Ungrateful Dead - Can inflict Irritate and Insanity.
Phantom - Ghost Type.
Phase Spiders - Can Poison.
Mystagogue
Grue - Can permanently drain STR on contact. Casts Spells such as Dispel Magic and can knock characters Unconscious. Will still attack the party when Charmed.
The Spawn of Shelach - Can Drain HP, Web (Paralyze) and spit Deadly Poison which seems to be an Instant Kill. They can also "Grab" (No in game description. Might be permanent STR drain) and Gaze (Hold).
Coffin Caterers They can Drain HP and Vitality, , Gaze (Charm), Paralyze, Curse, Hold, and casts spells such as WitchHex, Brain Rot, Black Plague (Inflicts Disease), Hold Monsters, Midnight Sphere (Inflicts Disease, Poison and Transfix), and Shadow Phase (Blink self buff). They can also summon Packrats.
Shrine of the Psychopomp
I suggest saving often to protect your physical fighters. See the Warning above the map of Skulheim for more details.


1. Plaque. Some flavor text and a Journal Entry. This area is described as leading to the wedding chamber.

2. Stone Face. Some more flavor text and a Journal Entry. The Stone Face praises the "eye".

3. Glowing Orb. Click on it, then choose a character to receive some Wisdom (I always seem to get +6, but the amount is probably random) and a cutscene vision. If you have been skipping the lore bits until now it will give you an idea of how this place came to be, but for folks who have been poking around and talking with NPCs this information is not new.

4. Skull Gate with a Young Woman beyond it. The woman begs you to free her before she is sacrificed. The game assures you that you have time to save her. Use the Key of Psychopomp to open the Gate.

5. Stone Face. Click on it and it will tell you that the princess cannot be taken from her cell while she waits for her betrothed. This tile is also a Safe Haven.

6. Two Plaques. Both just show the title of the next room. Marriage Chamber

7. Hole in Ceiling, as well as a description of the room. After a bit of flavor text you are approached by Shelach, who attacks. She uses Deadly Poison (Instant Death), and casts some pretty powerful spells such as Acid Cloud, Spiking Earth, Destroyer Vortex (Can inflict Disease, Poison, Irritate, Nausea). She can also Paralyze, but I didn't catch what move inflicts it (might have been a byproduct of Disease). Very rarely her spells will backfire on her, but I wouldn't count on that to save you. If you broke all of the eggs in Womb of Shelach or have Renfeeld with you* she is very fast and will likely move first. Another side effect of breaking all of the eggs is that she seems to have less overall health. If you did not break any eggs in Womb of Shelach*, she is very slow, so if you have been diligent with upping the SPE of your characters it is likely they will all be able to take their turn before she does. She has some resistance to Charm(was not able to inflict it), Unconsiousness(was able to inflict it frequently despite the resistance), Sorcery(can still hit her with it, just tougher to land), some Caustic spells (Insect Swarm), Fire damage, and Cold damage, but other controlling status effects land just fine. That said, she breaks out of Paralysis very quickly, so watch for that. If you have a Bard or Sage that is slower than the rest of your party with a Lethe Harp or Paralysis Spell you can keep her Paralyzed when it counts. For magic damage, things like Acid Cloud, Poison/Toxic Vapors, and Destroyer Vortex work pretty well. The Vitality Drain Spell is pretty crazy if you have it. The game doesn't actually tell you this via text, but she has some sort of health regeneration (you can see it on the red enemy health bar). Even without it she has a lot of health, so this fight can take a really long time unless you can manage a lucky Lethal Blow. Make sure you don't have to be anywhere for a while before you attempt it. After you win you get Key of Psychopomp (Critical Item).
*It could just be coincidence that she was slower when I chose not to break the eggs in Womb of Shelach, but the results were consistant during my testing. The Renfeeld thing could be coincidence as well, or just due to his average SPE (he had a base of 48 when I picked him up), but I could never get the first hit with him present in any of my Shelach attempts with him, using the same party I used for all of my other attempts. Even casting Haste didn't help. Dismissing him always fixed the issue.

8. Princess Dahlia is a friendly, Recruitable NPC. She has a lot of things to say about her situation, Depending on what you ask her, she asks for an escort or for you to tell her father. If you Recruit her she asks for you to take her to her father (at Imperial Palace) and gives you the Key of the Ancients.
Bug Warning: If you leave her after your first meeting, she disappears forever (at least in patch 1.2.0.25-R), so be aware of that. Also only escorting her via recruitment seems to work for the quest.

9. Minotaur Statue with Bowl. Click on the Bowl to get the Arachne Tablet (Critical Item). If you are able to take the Tablet normally, Psychopomp appears and attacks you. It is capable of a lot of things, including Gaze (no idea what this does) and Mindflay (Insanity), and can cast spells such as Dancing Lights, Antimagic, Blinding Flash, Solar Flare (Blind), Psyonic Blast (Insanity), Rainbow Rays, Disintegrate (Instant Death), Revealer Mist, True Seeing, and Mirror Image. It does Fizzle spells every once in a while, but I wouldn't rely on that fact. Like Shelach, it has hidden HP regen. It isn't very fast, but it resists Mesmeric effects (Sleep, Charm), Mental effects (Fear, Insanity), System effects (Unconsiousness), Hold, and Nausea, so that leaves you with Paralysis. It is easier to hit with magic than Shelach, and seems to have a lot less HP, so the fight should not last too long unless you have some really bad luck. After you win you receive a Psychopompic Orb.
If you don't feel like fighting, make sure your inventory is full before clicking on the Bowl. The Tablet will drop safely to the ground, where you can exchange it for another item. This does not trigger the Psychopomp fight.
*I should note that I had no Renfeeld speed issues against Psychopomp.

The red stars indicate a Dark Zone.


NPC KEYWORDS
Princess Dahlia: Father/Khan Raji, Rescue, Princess, Psychopomp, Sacrifice, Cell/Prison, Shelach, Virgin, Orloch, Lilith, Renfeeld
*You can steal a Key of the Ancients from her.


POTENTIAL LOOT
EVENT 9. Minotaur Statue with Bowl: Arachne Tablet (Critical Item)

Treasure Chest
Weapon: Widower, Winged Justice, Massacre
Thrown/Ammo: Dralkar's Fury
Shield: Necromantle
Armor: Mithril Armet, Mithril Cuirass, Mithral Greaves, Battle Gauntlet
Staff/Rods: Caduceus of Life
Scrolls: Magic Moth
Consumables: Invisibility, Amphorae (Restore Youth)
Other: Silver Spoon
*The items in this chest are static.


ENEMIES
Xombi - Can knock characters Unconscious.
The Ungrateful Dead - Can inflict Irritate and Insanity.
Grue - Can permanently drain STR on contact. Casts Spells such as Dispel Magic and can knock characters Unconscious. Will still attack the party when Charmed.
Mystagogue
The Spawn of Shelach - Can Drain HP, Web (Paralyze) and spit Deadly Poison which seems to be an Instant Kill. They can also "Grab" (No in game description. Might be permanent STR drain) and Gaze (Hold).
Shelach - Has HP Regen. Can use Deadly Poison (Instant Death), and casts spells such as Acid Cloud, Spiking Earth, Destroyer Vortex (Can inflict Disease, Poison, Irritate, Nausea). She can also Paralyze, but I didn't catch what move inflicts it. Resists Mesmeric effects (Charm), System effects (Unconsciousness), some Caustic spells (Insect Swarm), Sorcery magic, Fire damage, and Cold damage.
Psychopomp - Has HP Regen. Capable of Gaze (no idea what this does) and Mindflay (Insanity), and can cast spells such as Dancing Lights, Antimagic, Blinding Flash, Solar Flare (Blind), Psyonic Blast (Insanity), Rainbow Rays, Disintegrate (Instant Death), Revealer Mist, True Seeing, and Mirror Image. Resists Mesmeric effects (Sleep, Charm), Mental effects (Fear, Insanity), System effects (Unconsiousness), Hold, and Nausea.
RAVEN WILDES SECTION
The only way to reach this area of the game is by using the Moongate Crystal (the Mandarain in Celestial Watchtower has it) on the Monolith in Dominion Exemplar. You can also get here by going through Castle Moravia you have the Moravia Key(Imprisoned Start only), but you would still need to use another Monolith to teleport.
Raven Wildes


Philchit. He is a friendly, recruitable NPC who is a Random Encounter in this area. He is very open about being a Thief. You can ask him some questions regarding the Tabernacle of Music. If you have Golden Armor equipped he will note it if you ask him about GOLDEN LOCK as well as some talk about having the Golden Lock turned into Golden Armor.. As far as recruitment goes, he has low stats and skills considering the time it takes to get here, but he will level up quickly and talk to you in a few places inside the Tabernacle of Music if you bring him along. I was unable to find a negative to recruiting him, so as far as I know it is safe to do so. If you do not recruit him, the next time you meet him after unlocking and exploring the Tabernacle of Music, he will acknowledge that you did it. You can show him the Golden Lock and the Pipes Majestyk and he will Identify them, as well as talk about them. For the Pipes he will tell you that they have something to do with the Throne of the Skald Maestro, but I think that's just a reference to where you picked it up. For the Lock he tells you to take it to Crowl's Blacksmith (Smithers).

1. 1. Monolith. Touch the Moongate Crystal to the Runes on the Monolith to teleport to Dominion Exemplar. You are also warped to this spot using the same method on the Monolith in Dominion Exemplar. You can get the Moongate Crystal from Green Mandarin in Celestial Watchtower, which can be reached through Kublai Axis.

2. Moaning in the Bushes.

3. Dark and Narrow Path with Bird Sounds.

4. Startled Starlings.

5. Cooking Boar Meat.


NPC KEYWORDS
Philchit: Disarm, Golden Lock, Golden Armor, Blacksmith, Music, Shock, Tabernacle (of Music), Vanguard/Marines/Military


POTENTIAL LOOT
You will sometimes get Locksmith's Key after battles in this area.


ENEMIES
Warlocks
Jackalope - Has a Breath attack.
Blinkcat - Can Paralyze, Casts Sound Mind.
Werewolf
Werelion
Dark Warren
The party cannot sleep in this area, so make sure you are prepared for that as you explore.


1. Mushroom Spores. Stepping on this tile will inflict the whole party with Nausea.

2. Broken Brown Bottles / Urn. Click them for a Fungal Anodyne.

3. Mushroom Spores. Stepping on this tile will inflict the whole party with Nausea.

4. Skeleton. LOOK for some Spoiled Rations, Neutralize Poison, and Swamp Leech.

5. Skeleton. LOOK for a Martel De Fer and Locksmith's Glue.

6. Mushroom Spores. Stepping on this tile will inflict the whole party with Nausea.

7. Mushroom Spores. Stepping on this tile will inflict the whole party with Nausea.

8. Flaming Sword on a Pillar. Click the Pillar underneath the sword to receive Entropy Sword. LOOKing at the sword once you have it (you may need to Identify/Assay first) reveals that a human soul is trapped within it. Assay also describes it as a Mascot. USE the Sword and the Sword Ego NPC will appear. I don't really know much about them, other than the fact that they are recruitable and have really high vitality, magic, and stats.

9. Yuggoth. The game describes it as the origin of the spores and goo in this cave. It has a lot of attacks, hits very hard, has a tendancy to focus on your back row characters, and can cast Black Plague (Disease). Hide can be effective for avoiding its attacks. It resists Cold, Air, System, Mental, and Death Effects, and is immune to Nausea, Fear, Insanity and Unconsciouness. You can still get Sleep, Confusion, Charm, and Paralyze to land though. You can even turn it to Stone or Poison it. Rainbow Rays can work, and it can also be effected by Acid Cloud. As a side note, while I was testing Yuggoth's abilities it bugged out and stopped attacking in a similar manner that Iron Warg did for me; as soon as my back row characters were both dead and Acid Cloud was in play (version 1.2.0.26-R).

There are spinner tiles/effects on this floor. It is very obvious when you trigger them. Use your map to get your bearings if you need to.


NPC KEYWORDS
Sword Ego (Wherever you USE the Entropy Sword at, Recruitable): Other than small talk I was unable to find any words that they have a special reaction to.
*You cannot use Mindread


POTENTIAL LOOT
EVENT 2. Broken Brown Bottles / Urn: Fungal Anodyne

EVENT 4. Skeleton: Spoiled Rations, Neutralize Poison, Swamp Leech

EVENT 5. Skeleton: Martel De Fer, Locksmith's Glue

EVENT 8. Flaming Sword on a Pillar: Entropy Sword

Treasure Chest (Master Lock Level XI)
Weapons: Super Monster Maul (10D8, Save 90, TOHIT 20), Doom Fists(6D6, Save 50, Poison), Scourge (6D6, Save 10, TOHIT 25), Snapshot
Shields: Odysseus (AC 58, AQU16, Regenerates Health)
Instruments: Terrortunes (Dread)
Thrown/Ammo: Coronet of Chaos
Armor: Mirthril Armet, Mithril Cuirass, Mithril Greaves
Staff/Rods: Apocalypse Stave
Spellbooks: Time Stop(Eldritch)
*The items in this chest are static.

You will sometimes get Locksmith's Key drops after battles in this area.


ENEMIES
Amoebic Slime
Shriekers
Myconorids - Can Paralyze.
Acid Jelly
Yuggoth - Casts Black Plague(Disease). Resists Cold, Air, System, Mental, and Death Effects, and is immune to Nausea, Fear, Insanity and Unconsciouness.
Tabernacle of Music
You can save time by having the Braided Golden Cord in your inventory before you try to explore this place.


1. Door Sealed with Golden Lock. If you click on it, when you choose a character they will be shocked and take damage. You cannot pick the lock. Place the Braided Golden Cord that you can get in Bestiary Underground on the door. If you do this before you have clicked on the door you will still have to choose someone to take damage, so there is no way around it. This will remove the Golden Lock, which you can then take, and unlock the door. As far as hints that this is the correct solution, I admit that I brute forced it by trying to put something gold on the Golden Lock. If there is a better hint out there that I missed or glazed over, especially since Gold is a conductive material so the gold-on-gold thing isn't very intuitive, let me know and I will credit you. As a side note clicking on the door after removing the lock still gives you the warning. You will not take damage though. As a sidenote, if you have Philchit in your party he will warn you of the shock damage and give you a vague hint before you try clicking on it, but you still cannot get around the damage.

2. Keyhole. Put the Orchestral Key on it to remove the wall.

3. Wall Glyphs and Chest. Click them to be told to place the Master's Bell, Wand, and Book into the chest to pass. Put the Maestro's Bell, The Mabinogian, and the Conductor's Wand into the Chest. After that you can click on it to close the Chest and be praised by a disembodied voice, but that is optional. MINOR BUG: When you place things in the chest the name of the item will sometimes either not show, or list a completely different item. It does not effect the puzzle, so don't worry about it.(version 1.2.0.26-R)

4. Wall Glyphs. Click it for a warning that the entrance to the secret school is only for initiates of the inner ear.

5. Locked Door and Wall Glyphs. Click the sign to be told that only fools may enter. After placing the three items in the nearby chest (see #3), equip the Dunce Cap on a character and touch the door. If you have not placed the items the door will not open. Once the door is open you can remove the hat. The Dunce Cap is cursed, so you will have to remove it with a consumable or the Remove Curse Spell. You cannot pick the door.

6. Chain. Pull the chain for a Bard Trove Key.

7. Treasure Chest (Master Lock Level X). There are several items in it, including the Orchestral Key (Critical Item). The rest of the loot is listed in the Potential Loot section. This tile is also a Safe Haven.


POTENTIAL LOOT
EVENT 6. Chain: Bard Trove Key

EVENT 7. Treasure Chest (Master Lock Level X)
Instruments: Phantasmal Harmonia, Muting Lyre*
Thrown/Ammo: Sheolic Pipes*, Horn of Winter*
Consumables: Dazzler Dust, Faery Water
Spellbooks: Bless*, Charm*, Magic Bells*
Other: Orchestral Key (Critical Item)
*Unmarked Items are static, marked items are random.


ENEMIES
Dragonfly - Can Instantly Kill
Cockatrice - Can Petrify
Chimerasphinx - Uses Glowing Aura (Polymorph), Breaks Paralysis quickly.
Ghost Bard
Dark Faeries - Casts Spells. Can inflict Sleep, Charm, Hold, Confuse, Blind, and potentially summon Dragonfly
Lower Tabernacle


1. Bed. Click on it to find a Bard's Coin (Critical Item). As well as a hint that the owners of the Tabernacle may have had their own currency for purchasing school supplies. This is a hint for the Library. You can click the other beds in this room for descriptions, but they are nothing important.

2. Moldy Bones. You can click it for a description, but that's it.

3. Wall Glyphs and Urn. Click the Wall Glyphs to read the Library's policies: Check in to check out. Leave a Book to Retrieve a Book. Lazy people will be fined. These are your hints on what to do in the Library. For what to do: Put the Bard's Coin on the Urn to pay the late fee. You have to do this step first.

4. Bookcase. Click to to show the contents of the shelves: Books on Mathmatics and Vibrations.

5. Bookcase. Click it to learn about three student Bards of the Tabernacle: Leon, Darian, and Juneval, who were present during a war in a place now known as "The Haunted Wastes." They managed to escape and brought back three treasure chests of loot. This is a Hintabout three chests that can be unlocked with special keys, but you can also unlock them with the usual methods.

6. Bookcase. Click to to show the contents of the shelves: Sheet Music

7. Bookcase. Click to to show the contents of the shelves: It shows you several titles that I am too lazy to type out.

8. Bookcase. Click to to show the contents of the shelves: A Book called The Mabinogion with the subtitle "The Secret School" sticks out. When your party tries to take it, a Skull will tell you that there are outstanding fines for the Book and that you should talk to the Librarian. For what to do: After you have paid the late fee (see #3), place the Encyclic Syllabus on the Bookshelf to get The Mabinogion (Critical Item). You have to do each step in order or it will not work.

9. Barrel. Approach it to have the game describe it as a stool for the class clown. Click on it to get a Dunce Cap (Critical Item), along with a description for younger folks who might not know what it is; a tool teachers once used to emotionally traumatize struggling or disruptive students into working harder or general compliance.

10. Chalkboard. Other than the description there doesn't seem to be anything important about it.

11. Chalkboard. Click on it to learn that Kroondergraf used visual aids to help students learn the harpsichord, one of which was to match keys with the colors of ordinary items. This is a hint.

12. Chalkboard. Click on it to see a chalk drawing of an owl and tonal chords, along with depictions of fruits and vegetables. This is also a hint.

13. Bed. Click it to see a book titled Encyclic Syllabus (Critical Item) under the pillow that was checked out of the Library 200 years ago by Filcher Fivefingers. The party will take the Book, and make note that a fine is probably due. Philchit will comment if you have him with you. You can click the other beds in this room for descriptions, but they are nothing important.

14. Bed. Approach it to be told that a book has been left on it.
Version 1.2.0.25-R and previous: You can pick up a Barding Kit from the ground and place it in your inventory for item management. The Barding Kit from Ruins of Gideon shares an inventory with this Barding Kit, so having both wastes an inventory space.
Version 1.2.0.26-R and beyond: This item was supposed to be removed, but it is still there is you are using a save created prior to the release of 1.2.0.26-R.

15. Mural. Click it to see a depiction of Bards, using Lyres, hanging out around a Lemon Tree.

16. Mural. Click it to see a depiction of Eggplants sprouting from discarded guitars and flutes.

17. Mural. Click it to see a depiction of Cucumbers growing out of Mandolin strings.

18. Mural. Click it to see a depiction of Bards singing in a gazebo covered in Grape vines.

19. Mural. Click it to see a depiction of Tomatoes growing out of a Bass Drum.

20. Mural. Click it to see a depiction of A maiden being fed Blueberries by her lover.

21. Stained Glass Window / Harpischord. Click on it to see colored keys: Blue, Green, Purple, Red, Black, Yellow. This puzzle is very awkward, since some assumptions have to be made to get it correct, and you have to guess one part of it. Fortunately, it is easy to work through. For hints two of the chalkboards on this floor (#11 and #12) teach you that the colors are represented by fruits and vegetables, and the murals in this room show you which fruits and vegetables you need to solve it... sort of: For the logic behind it:
First, we are assuming that each fruit and vegetable is their ripened, healthy color.
Blue is Blueberry.
Green has to be Cucumber so it is not Tomato or Grapes.
Yellow is Lemon, so it cannot be Tomato.
Red is Tomato so it cannot be Grapes.
That leaves Grapes and Eggplant for purple and black. Technically neither Grapes nor Eggplants are the color black, though both can look awfully close to it and there are varieties titled "Black Grapes" and "Black Beauty Eggplants" in the real world. In the game you can find grapes that are purple in color, but are called "Black Pearls". So from here you take a stab in the dark (or trial and error) and conclude that Purple is Grapes and Black is Eggplant.

You can get the correct order by using the locations of the Murals. Start at the Maiden/Blueberries and go clockwise around the room. I was unable to find a good hint about the starting point (Maybe it's the fact that it has nothing to do with music, or the vague books on love found on one of the bookshelves?), so if anyone knows of one please let me know and I will give you credit. The solution is: Blue, Red, Purple, Yellow, Black, Green. When solved a hidden nook opens up and you can take the Maestro's Bell.


POTENTIAL LOOT
EVENT 1. Bed: Bard's Coin (Critical Item)

EVENT 9. Barrel: Dunce Cap (Critical Item) (Cursed, MEN-25)


ENEMIES
Dragonfly - Can Instantly Kill.
Cockatrice - Can Petrify
Air Elemental
Ghost Bard
Dark Faeries - Casts Spells. Can inflict Sleep, Charm, Hold, Confuse, Blind, and potentially summon Dragonfly.
Orchestral Collonade


1. Treasure Chest (Master Lock Level XI). You will find a Conductor's Wand (Critical Item) inside.

2. Treasure Chest (Master Lock Surpreme). Unlocked with Bard Trove Key (which disappears). If you try to pick the lock, a random amount of Warlocks will appear and attack. They are the same as any other Warlock. After they are defeated you are free to try and pick the lock. If you cast Knock Knock the Warlocks will not appear. The contents of the Chest are listed in the Potential Loot section. This tile is also a Safe Haven.

3. Colored Light Dance Party. Stepping on it drains Vitality and Magic from your party.

4. Colored Light Dance Party. There are no negative effects to stepping on it (that I know of). It might decrease ailments inflicted on your party members if you step on and off of it, but I did not have an ailment at the time so I was unable to test it.

5. Colored Light Dance Party. There are no negative effects to stepping on it (that I know of). It might decrease ailments inflicted on your party members if you step on and off of it, but I did not have an ailment at the time so I was unable to test it.

6. Colored Light Dance Party. Stepping on it polymoprhs your entire party into Rats, Frogs and Ducks.

7. Polished Mirror and two Wall Glyphs. If you click on the mirror it gives you a glimpse of a different room filled with a rotating field of energy, and the narrator comments that it may be the Metronome Mysterium. The Wall Glyphs confirm those thoughts.

8. Treasure Chest (Master Lock Supreme). Unlocked with Bard Trove Key (which disappears). If you try to pick the lock, a random amount of Warlocks will appear and attack. They are the same as any other Warlock. After they are defeated you are free to try and pick the lock. If you cast Knock Knock the Warlocks will not appear. The contents of the Chest are listed in the Potential Loot section.

There is a fun description in the northeastern room, but it is not important.

The Warp tile (marked with an A) takes you to Throne of the Skald Maestro. It is a two way Warp, so you can come back to this spot by using the Warp Tile on the other side.


POTENTIAL LOOT
EVENT 1. Treasure Chest (Master Lock Level XI): Conductor's Wand (Critical Item)

EVENT 2. Treasure Chest (Master Lock Supreme/Bard Trove Key)
Weapons: Thunderbolt (6D8 damage, Lethal, Save 100, Sharpen, GAL25, 10 Swordsmanship, ToHIT 10, HITVS 20 vs. Electricity)
Shield: Runeshield
Armor: Platinum Helmet, Platinum Armor

EVENT 8. Treasure Chest (Master Lock Supreme/Bard Trove Key)
Thrown/Ammo: Krakklers
Armor: Sorcerian (SOR10, 35 Scribe)
Accessories: Glamour (Safe Haven)
Staff/Rod: Faerie Staff
Scrolls: Reflection
Consumables: White Bryon, Luck Stone
*The loot in this chest is static.

1. Treasure Chest (Master Lock Level IX)
Weapons: Broadsword, Awl Pike, Beaked Axe, Bec De Corbin, Goupillon, Shortbow, Longbow, Slurbow, Threaded Lash, Knuckle Duster
Shields: Target Buckler, Heraldic Shield
Instruments: Muting Lyre, Thistle Whistle, Halcyonic Lyre
Thrown/Ammo: Throwing Knive, Feather Dart, Sleeper Arrow, Poison Arrow, Cosmic Cryer
Armor: Bascinet, Flannel Shirt, Camail, Ringmail, Cestian Girdle, Copper Plate, Cuirass Leggings, Vambraces, Sandals, Sollerets, Waterwalkers, Firewalkers
Accessories: Ring Pro Frost, Ring of Deflection, Ring of Smiting, Ring of Featherfall
Staff/Rods: Stave of Missiles, Ice Wand, Freezer Rod, Beholder Stave, Fizzlestick
Scrolls: Mindread, Locate Item, Hold Monsters, Wither, Armorplate, Enchanted Blade
Spellbooks: Bless, Firestorm, Raise Dead, Missile Shield, Hermetic Gag (Arcanum), Rainbow Rays (Arcanum)
Consumables: Cure Paralysis, Stone To Flesh, Acid Splash, Halomancic Salts, Sleep Sand, Bag of Sparkles, Rock Salts, Cherry Wine, Water Glass, Luck Stone
Other: Cobalt Sapphire, Locksmith's Glue

2. Treasure Chest (Major Lock Level VIII)
Weapons: Gauche, Battle Axe, Duck Bill, Bipennis, Truncheon, Pole Fork, Lance, Flagellum
Instruments: Muting Lyre, Hotfoot Banjo, Cacaphony Harp
Thrown/Ammo: Throwing Knive, Needle Darts, Feather Dart, Barbed Arrows, Piercer Arrow, Stone Bullets, Horn of Winter
Armor: Leather Vestment, Leather Hood, Wizard Cap, Mail Coif, Flannel Shirt, Leather Armor, Brigandine, Greaves, Sandals, Spiked Bracer
Accessories: Ring Pro Frost, Ring Pro Magic, Ring of Protection, Amulet of Might
Staff/Rod: Zapper Rod, Sparkler Rod, Stave of Missiles, Torpedo Rod, Caduceus of Life
Scrolls: Magic Missile, Divination, Knock Knock, Remove Curse
Spellbooks: Bless, Fire Shield, Knock Knock, Armor Shield, Magic Bells
Consumable: Cure Heavy Wounds, Neutralize Poison, Remove Curse, True Seeing, Stink Bomb, Bag of Whispers, Bag of Sparkles, Bag of Chuckles, Rock Salts, Spoiled Rations, Iron Rations, Baldercake, Cherry Wine, Wonder Adhesive, Soothing Stone
Other: Cobalt Sapphire, Gold Leaf, Vending Token

3. Treasure Chest (Major Lock Level IX)
Weapons: Rusty Sword, Broadsword, Awl Pike, Bec De Corbin, Flagellum, Goupillon, Slingshot, Shortbow, Longbow, Slurbow, Knuckle Duster
Shields: Target Buckler, Heraldic Shield
Instruments: Muting Lyre, Thistle Whistle, Halcyonic Lyre
Thrown/Ammo: Throwing Knive, Feather Dart, Piercer Arrow, Horn of Winter
Armor: Bascinet, Flannel Shirt, Chainmail, Ringmail, Brigandine, Cestian Girdle, Copper Plate, Cuirass Leggings, Greaves, Vambraces, Sandals, Sollerets, Waterwalkers
Accessories: Ring Pro Frost, Ring of Protection, Ring of Smiting, Ring of Featherfall
Staff/Rod: Fizzlestick, Freezer Rod, Ice Wand, Stave of Missiles, Zapper Rod, Ice Wand
Scrolls: Locate Person, Locate Item, Armorplate, Magic Screen, Magic Missiles, Raise Dead, Mindread
Spellbooks: Bless, Firestorm, Raise Dead, Missile Shield, Remove Curse, Rainbow Rays (Arcanum)
Consumables: Cure Paralysis, Stone To Flesh, Bag of Sparkles, Sleep Sand, Halomancic Salts, Rock Salts, Cherry Wine, Luck Stone
Other: Cobalt Sapphire, Gold Leaf, Vending Token

You will sometimes get Perk Key drops after battles in this area.


ENEMIES
Dragonfly - Can Instantly Kill.
Warlock
Cockatrice - Can Petrify
Ghost Bard
Air Elemental
Dark Faeries - Casts Spells. Can inflict Sleep, Charm, Hold, Confuse, Blind, and potentially summon Dragonfly.
Psyclops - Regenerates HP. Can inflict Confusion and Insanity. They will still Screech when Charmed. Cannot be made Unconscious and are Immune to Mental effects and Drain, and resist Sonic effects.
Throne of the Skald Maestro


1. Chain. Pull it for a Bard Trove Key.

2. Chain. Pull it for a Bard Trove Key.

3. Treasure Chest (Master Lock Supreme). Unlocked with Bard Trove Key (which disappears). If you try to pick the lock, a random amount of Warlocks will appear and attack. They are the same as any other Warlock. After they are defeated you are free to try and pick the lock. If you cast Knock Knock the Warlocks will not appear. The contents of the Chest are listed in the Potential Loot section.

4. Throne of the Skald Maestro. Approach it for a fun graphic, description, and some philosophical stuff. After the scene is finished you will get Pipes Majestyk (Critical Item).

There is a fun description in the northwestern room, but it is not important.

The Warp tile (marked with an A) takes you to Orchestral Collinade. It is a two way Warp, so you can come back to this spot by using the Warp Tile on the other side.


POTENTIAL LOOT
EVENT 1. Chain: Bard Trove Key

EVENT 2. Chain: Bard Trove Key.

EVENT 3. Treasure Chest (Master Lock Supreme/Bard Trove Key)
Weapons: Seige Arbalest
Thrown/Ammo: Flame Arrow, Poison Arrow
Armor: Woodsman (Cursed, EAR24, 16 Scout, Has Haste charges)

EVENT 4. Throne of the Skald Maestro: Pipes Majestyk (Critical Item)

1. Treasure Chest (Major Lock Level IX)
Weapons: Rusty Sword, Broadsword, Slingshot, Battle Axe, Bec De Corbin, Flagellum, Goupillon, Shortbow, Longbow, Slurbow, Knuckle Duster
Shields: Heraldic Shield
Instuments: Muting Lyre, Thistle Whistle, Halcyonic Lyre
Ammo/Thrown: Throwing Knive, Feather Dart, Barbed Arrows, Poison Arrow, Piercer Arrow, Horn of Winter
Armor: Wizard Cap, Bascinet, Flannel Shirt, Chainmail, Ringmail, Copper Plate, Cuirass Leggings, Greaves, Vambraces, Sandals, Sollerets
Accessories: Ring Pro Frost, Ring of Protection, Ring of Smiting, Ring of Featherfall
Staff/Rods: Zapper Rod, Fizzlestick, Wand of Webs, Stave of Missiles, Ice Wand
Scrolls: Raise Dead, Knock Knock, Mindread, Locate Person, Locate Item, Magic Screen, Magic Missile
Spellbooks: Firestorm, Raise Dead, Remove Curse, Missile Shield, Magic Bells, Rainbow Rays (Arcanum)
Consumables: Neutralize Poison, Cure Paralysis, Stone To Flesh, Wonder Adhesive, Sleep Sand, Bag of Sparkles, Rock Salts, Cherry Wine, Luck Stone
Other: Cobalt Sapphire, Gold Leaf, Vending Token

2. Shallow Water: Vending Tokens


ENEMIES
Dragonfly - Can Instantly Kill
Cockatrice - Can Petrify
Ghost Bard
Air Elemental
Dark Faeries - Casts Spells. Can inflict Sleep, Charm, Hold, Confuse, Blind, and potentially summon Dragonfly
Psyclops - Regenerates HP. Can inflict Confusion and Insanity. They will still Screech when Charmed. Cannot be made Unconscious and are Immune to Mental effects and Drain, and resist Sonic effects.
CASTLE MORAVIA SECTION
Ramparts of Moravia


1. Landing Point when you use the Moongate Crystal] on the Monolith in Great Hall of Samhain. You cannot return from this tile, but there is a Monolith only a few steps away.

2. Monolith. Touch the Moongate Crystal to the Runes on the Monolith to teleport to Great Hall of Samhain. I am not sure if it works if the Orbs are not lit on the Samhain side.


ENEMIES
Ghost - Can Irritate, Fear, Slow and Drain Magic.
Castle Moravia


1. Lever and Skull Gate. Click the lever to unlock the Skull Gate.

2. Skull Gate. I didn't have it on me at the time, but I'd bet that this gate is unlocked with the Moravia Key, in which case the Key isn't terribly valuable since you can enter the castle from the Ramparts. You cannot pick the Gate.

3. Skull Gate. Unlocked with the lever behind the hidden wall to the south(#4).

4. Lever. Unlocks the eastern most Skull Gate to the north(#3).

The stairs leading to Moravia Level II are marked as a Safe Haven by the game, but you can never stand there.


POTENTIAL LOOT
Treasure Chest (Master Lock Level X)
Weapons: Martel de Fer, Ball Flail, Ball & Chain, Morningstar, Spoked Mace, Halberd Pike, Joust, Cranequin
Shields: Crusade Kite, Holy Heater
Instruments: Muting Lyre, Phantasmal Harmonia
Thrown/Ammo: Throwing Knive, Flame Arrow, Feather Dart, Coronet of Chaos
Armor: Mithril Armet, Flannel Shirt, Bronze Plate, Platinum Armor, Maximiliian Plate, Golden Armor (Cursed, but has Vitality and Magic regen), Jazeraint Pants, Mithril Greaves, Battle Gauntlet, Sandals
Accessories: Ring Pro Frost, Ring of Swordsmen, Ring of Sages, Ring of Polymorph, Periapt of Accursed Wind
Staff/Rods: Warwind Wand, Faerie Staff, Rod of Nightmares, Stave of Missiles
Scrolls: Antimagic, Crushing Hand, Firestorm, Lightning, Recharge, Deep Freeze
Spellbooks: Bless, Disintigrate, Invisibility (Arcanum), Recharge (Arcanum - Note that this spell seems to be bugged), Illusion (Arcanum)
Consumables: Invisibility, Dazzler Dust, Bag of Sparkles, Rock Salts, Faery Water, Cherry Wine, Talisman of SpiderClimb, Jack of Diamonds, Dragon Control, Mirror Shard, Prankstone
Other: Cobalt Sapphire


ENEMIES
Skeleton - Can deplete FOO and cause Fear. Immune to Nausea and Insanity.
Basilisk
Reaver
Werewolf
Moravia Level II


POTENTIAL LOOT
Treasure Chest (Master Lock Level XII)
Thrown/Ammo: Dulcet Courage
Armor: Night Hood, Night Robe, Night Leggings
Scrolls: Remove Curse, Recharge*
Spellbook: Deadly Blades (Eldritch)
*The loot in this chest is static, though you will sometimes not get the Recharge Scroll.

You will sometimes get Perk Key drops after battles on this floor.


ENEMIES
Xombi - Can knock characters Unconscious.
Skeleton - Can deplete FOO and cause Fear. Immune to Nausea and Insanity.
Skeleton Champion - Can Drain Magic. Will still attack the party when Charmed.
Werewolf
Basilisk
Moravia Level III


POTENTIAL LOOT
Treasure Chest (Master Lock Level XII)
Instruments: Strings of Agony
Staff/Rods: Apocolypse Stave, Caduceus of Life
Spellbooks: Destroyer Vortex (Eldritch)
Consumables: Scrying Crystal
*The items in this Chest are static.


ENEMIES
Skeleton - Can deplete FOO and cause Fear. Immune to Nausea and Insanity.
Reaver
Basilisk
Moravia Level IV


POTENTIAL LOOT
Treasure Chest (Master Lock Level XII)
Weapons: Cranequin
Instruments: Orchestrion (Rainbow Rays)
Thrown/Ammo: Demon Killer
Armor: Firewalkers
Staff/Rod: Ice Wand
Spellbooks: Detect Invisible (Eldritch)
Consumables: Water Glass
*The items in this chest are static.


ENEMIES
Xombi - Can knock characters Unconscious.
Skeleton - Can deplete FOO and cause Fear. Immune to Nausea and Insanity.
Skeleton Champion - Can Drain Magic. Will still attack the party when Charmed.
Reaver
Werewolf
Basilisk
Moravia Level V


POTENTIAL LOOT
Treasure Chest (Master Lock Level XII)
Shield: Necromantle (DEA10)
Armor: NecroHelm (Cursed, DEA10), NecroHood (Cursed, DEA10, 10 Necromancy), NecroShroud (Cursed, HP/Vit/Mana drain probably don't make the good stats worth it), NecroSkirt (Cursed, DEA10, 10 Necromancy)
Staff/Rod: Necrostave (Cursed, 6D6 Damage, DEA25, TOHIT 20, HITVS 50 vs Undead), Warwind Wand
Spellbooks: Etherwarp (Eldritch), Moonbeam (Eldritch)
*The items in this chest are static.


ENEMIES
Xombi - Can knock characters Unconscious.
Skeleton - Can deplete FOO and cause Fear. Immune to Nausea and Insanity.
Skeleton Champion - Can Drain Magic. Will still attack the party when Charmed.
Reaver
Werewolf
Basilisk
Moravia Level VI


1. "Energizing" Fountain. Any character that drinks from it will be inflicted with Poison and Disease.


POTENTIAL LOOT
Treasure Chest (Master Lock Level XII)
Weapons: Stone Fists (6D8 Damage, SAVE 50, Poison, DEA25, TOHIT 40, HITVS 75 vs Mythical and Evil. Bugged to do absolutely nothing in combat as of version 1.2.0.26-R.)
Armor: Cap O 'Rushes (SPE10, 12 Archery)
Accessories: Amulet vs. Sorcery
Spellbooks: Summoning II (Eldritch)
*The loot in this chest is static.


ENEMIES
Skeleton - Can deplete FOO and cause Fear. Immune to Nausea and Insanity.
Reaver
Basilisk
Werewolf
Moravia Level VII


1. Energizing Fountain. Fills Vitality for any character that drinks from it.


POTENTIAL LOOT
Treasure Chest (Master Lock Supreme)
Instruments: Phantasmal Harmonia
Weapons: Minigolf Mallet of Doom (4D12 damage, Save 90.)
Armor: Cap of Perseus (Cursed, EAR16)
Accessories: Amulet vs. Death
*The items in this chest are static.


ENEMIES
Skeleton - Can deplete FOO and cause Fear. Immune to Nausea and Insanity.
Reaver
Werewolf
Basilisk
Dragon Carps
Man 'O 'War
OBLIVION SECTION
Oblivion - WIP
You can reach this place by speaking to Balderdash (whether you recruit him or not does not matter), then finding Lord Ahriman in Dominion Exemplar, who will teleport you here. I cannot say this for certain, but killing Ahriman probably cuts you off from the east side of this area.


1. Starting Point after Lord Ahriman teleports you here. This tile is also a Safe Haven.

2. Acme Vending Machine. This tile is also a Safe Haven.

3. Bed. Clicking on the Bed reveals that this is where the Entity (a.k.a. Giant Golden Baby) sleeps, though how your characters could possibly know that is beyond me. You can also take Baby Quilt Cover which completes a Miniquest and gives 100exp to each member of the party.

4. Orb on a Pedestal. Touching the Orb teleports you back to Dominion Exemplar. This is a one way trip.

Every tile on the east side of this area is a Safe Haven.

I do not know how to reach the west side of this area yet.


SHOPS
Acme Vending Machine
Scrolls: True North (2 tokens), Locate Item (6 tokens)
Consumables: Leg of Ham (1 token), Iron Rations (1 token), Divination (4 tokens), Remove Curse (3 tokens), Cure Paralysis (4 tokens), True Seeing (3 tokens), Evil Off (6 tokens), Wonder Adhesive (3 tokens), Crimson Ambrosia (4 tokens), Stone To Flesh (6 tokens), Neutralize Poison (4 tokens), Galen Apple (1 token), Baldercake (1 token), Cure Heavy Wounds (6 tokens)
ASTRAL PLANE SECTION
Astral Plane
Currently, the only way I know to get to this area is to find the Bottle Djinn, speak his name, then speak the correct password, which uses up one of your wishes. The password is ABBAKOOKOO. I do not know of any in game hint that leads to actually getting here, though there are many references to this place throughout the game. You cannot return here through the above method again, so make sure you do what you want to do before leaving.


1. Monolith. Clicking on it teleports you to the Dominion Exemplar Monolith. As far as I know, it's a one way trip. The Moongate Crystal has no special effect on it.

2. Earth Titan approaches you for a fight when you step on this tile. it isn't any different from any other Earth Titan that you can find in an end game area.

3. "Secure" Treasure Chest (Master Lock Level XII). The contents are listed in the Potential Loot section.

There is a strange patch of dirt near the Treasure Chest. It is probably just a graphical glitch.


POTENTIAL LOOT
EVENT 3. "Secure" Treasure Chest (Master Lock Level XII):
Weapon: Dragonslayer (Cursed, good stats)
Shield: Diamond Luna (Cursed, good stats)
Armor: Mithril Armet, Mithril Cuirass, Mithril Greaves


ENEMIES
Earth Titan - Regenerates HP. Immune to Charm, Unconsciousness. Breaks Paralysis easily.
BLACKSPIKE MOUNTAINS SECTION
You can enter the Blackspike Mountains from Dominion Exemplar, which is found adjacent to Kublai Axis.
Blackspike Mountains
The climbing in this area can be pretty rough. You might want to grind out some Climbing Skill elsewhere if you haven't already, though the descent to Kroondergraf's Hollow could be used. Make sure you have access to Featherfall and use as much spell power as you can if you can cast it yourself. Lower power will not protect you on some of the climbs; rank 5 (60mp) isn't enough. Rank 7 (84mp) should do the trick though. Talisman of SpiderClimb might work, but I have not tested it yet.


1. Mr. Zyrinx is an NPC who introduces himself as an agent of Reality Hijinx sent to exchange "faulty equipment" for a working product and says that he will reward you if you find the Black Seed and bring it to him. He urges you to not trust Mr. Nebulon. If you chose the Sanctuary Start some of this should sound familiar. After meeting him here he becomes a Random Encounter in this area.

2. The Ascent and Descent near this marker link up with one another. Successfully climbing gives 200exp to each member of the party.

3. The Ascent and Descent near this marker link up with one another. Successfully climbing gives 200exp to each member of the party.

4. Roc's Nest. Clicking on it will give you a Large Bird Egg. This is one of the items Shrike is looking for. You can still take the egg, even if you have finished Shrike's task

Climbing to Blackspike Crag gives 225exp to each member of the party.


NPC KEYWORDS
Mr. Zyrinx (Random Encounter after your first meeting): (Mr.) Nebulon, Reality Hijinx, Black Seed/Havoc Seed, (White) Owl/Exemplar
*You cannot read his mind.


ENEMIES
Packrat
Jackalope - Has a Breath attack.
Mountain Giant
Roc
Storm Dragon
Kroondergraf's Hollow


1. Treasure Chest (Master Lock Level X). The loot is random and listed in the Potential Loot section. This tile is also a Safe Haven.

2. Barrel. Click on it it find that it is filled with metal rings and ball bearings. The game notes that they are not valuable.

3. Crate. Click on it to find that it is filled with metal junk. The game notes that nothing inside is valuable.

4. Kroondergraf is a very friendly Recruitable NPC. I wasn't able to find any good keywords for him, but as a recruit he is really good if you are willing to put the effort into finding and using Spellbooks on him, and one of the few that actually come with armor. BUG WARNING: In version 1.2.0.25-R, once you meet him or dismiss him from your party he disappears forever.


NPC KEYWORDS
Kroondergraf (Recruitable): Job/Toys, Inventions/Contraptions, Balderdash
*You cannot read his mind.


POTENTIAL LOOT
1. Treasure Chest (Master Lock Level X)
Weapons: Cat 'O 'Nine Tails*, Holy Symbol, Undead Warder
Shield: Target Buckler, Heraldic Shield
Instruments: Muting Lyre, Halcyonic Lyre
Thrown/Ammo: Lead Ball, Horn of Winter
Armor: Leather Jerkin, Chainmail, Ringmail, Camail, Cestian Girdle, Copper Plate, Sandals, Sollerets, Pauldrons, Vambraces, Battle Gauntlet, Cuirass Leggings, Waterwalkers, Firewalkers
Accessories: Ring Pro Frost, Ring of Smiting, Ring of Deflection, Ring of Featherfall
Staff/Rods: Fizzlestick, Freezer Rod, Ice Wand
Scrolls: Locate Item, Hold Monsters, Wither, Magic Screen, Armorplate, Mindread
Spellbooks: Bless, Featherfall, Missle Shield, Firestorm, Cosmic Gate, Raise Dead
Consumables: Cure Lt. Condition*, Bag of Sparkles, Cherry Wine, Water Glass, Clutcher Talon, K.O. Rock
Other: Gold Leaf*, Locksmith's Glue
*Marked items seem to always be in the chest.

You will sometimes get a Perk Key drop after battles in this area.


ENEMIES
Wrokwyrm
Tarantula
Blackspike Crag


1. Mr. Nebulon is a friendly NPC who introduces himself as an agent of Reality Hijinx sent to exchange "faulty equipment" for a working product and says that he will reward you if you find the Black Seed and bring it to him. He urges you to not trust Mr. Zyrinx. If you chose the Sanctuary Start some of this should sound familiar. His interations are almost the same as Mr. Zyrinx, except that he does not respond to his rival's name. He becomes a random encounter after meeting him the first time.

2. Roc Nest. If you click on it after you have already turned in a Large Bird Egg to Shrike the game will tell you to leave it alone and you will not take it. I still have to check coming to this spot before you have finished Shrike's task.

3. Roc Nest. If you click on it after you have already turned in a Large Bird Egg to Shrike the game will tell you to leave it alone and you will not take it. I still have to check coming to this spot before you have finished Shrike's task.

Successfully climbing to Blackspike Summit gives 250exp to each member of the party.


NPC KEYWORDS
Mr. Nebulon (Random Encounter after your first meeting): Reality Hijinx, Black Seed/Havoc Seed, (White) Owl/Exemplar
*You cannot read his mind.


ENEMIES
Roc
Mountain Giant
Earth Titan - Regenerates HP. Immune to Charm, Unconsciousness. Breaks Paralysis easily.
Silver Dragon
Blackspike Summit


1. Roc's Nest. If you click on it after you have already turned in a Large Bird Egg to Shrike the game will tell you to leave it alone and you will not take it. I still have to check coming to this spot before you have finished Shrike's task.

2. Crosspost Marker. Click on it for a little message.


POTENTIAL LOOT
1. Shallow Water: Talisman of SpiderClimb


ENEMIES
Jackalope - Has a Breath attack.
Roc
Mountain Giant
Storm Dragon - Breaks Paralysis easily.
Dominion Crevasse


1. Roasting Pig.

2. Roasting Venison.

3. Olaf Gigunda is a friendly, Recruitable NPC. I was unable to find anything important about him. He becomes a random encounter after your first meeting.

4. Mountain Giant Battle. He doesn't seem any different than the regular enemies in this place.

5. Mountain Giant Battle. He doesn't seem any different than the regular enemies in this place.

Climbing down into the Dominion Caverns gives 125exp to each member of the party.


NPC KEYWORDS
Olaf Gigunda (Recruitable, Random Encounter after first meeting): Giant, Vanguard/Soldier/Military


POTENTIAL LOOT
You can sometimes get Perk Key and Locksmith's Key to drop after battles in this area.


ENEMIES
Mountain Giant
Colossus Adder - Can Instantly Kill.
Salamander
Earth Golem - Immune to Unconsciousness. Breaks Paralysis easily.
Dominion Caverns
While I won't go so far as to say that you absolutely need Firewalkers to traverse this floor, you really should bring a pair or two with a decent amount of charges to get to where you need to go and back. Technically if your characters have decent HP and you have items and magic that can heal hp/mp you can make it, but I wouldn't recommend it. Chiang (Carnivale Bazaar) and Chuckles (Axis Gaol) both sell some if you need them. Bought Firewalkers always have 3 charges, so buy out or steal the Shop inventory to get them to restock more if you need more charges. The Firewalking effect only lasts for 6-9 uninterrupted steps (it's random); the effect disappears when you touch normal ground or engage in battle (Do not trust the icon. It does not disappear when it should).


1. Cooking Fire with Meat.

2. Cooking Fire with Meat.

3. Skeleton. Click on them to get the Codexian Bones. Successfully casting Raise Dead on the bones brings Codex Troll to life, an NPC that you can Recruit. It is a Bard with extremely high stats, so it's worth considering if you like having NPC party members.

The yellow dotted line shows one variation of the fastest route to the Lair of the White Owl (16 steps across Lava).

The missing 1% on the map are the two enclosed dark squares on the map. I was in a rush for the lower part of the map, but I can tell you that there are no obvious buttons or hidden walls for the one that is closer to the top. I either missed some hidden buttons somewhere or they are unaccessable. I will recheck the area once I have a party that has better resources to search the floor again.

There is an advantageous interaction between two intended behaviours in version 1.2.0.25-R (probably earlier versions as well) that will probably be fixed once the creator notices. I'm putting it behind spoiler tags in case you don't want it to ruin your experience: Standing on Lava and performing actions such as healing takes "turns", but does not trigger Lava damage. This is intended behaviour. Every action you take advances time (turns), including actions that result in nothing, which fills character MP. This is also intended behaviour. Simply spam the Autoheal action and the chosen character will heal others as their MP fills up. One with fast mana regen works best, and being able to swap between at least two characters is even better. If every character in your party has at least 31hp or more you can slowly traverse the floor this way without Firewalkers, though it takes an extremely long time and will effect the age of your party members. Note that this will drain your Vitality, so you are still in danger if you get a battle.


NPC Keywords
Codex Troll (Recruitable, Wherever you raise him at): Other than small talk type words (which are amusing), I wasn't able to find anything special that they react to.
*You cannot use the Mindread spell.


ENEMIES
Fire Beetle - Can Irritate. Has a Fire based Breath.
Electrapede - Can deal magic damage that also has a chance to Instantly Kill.
Salamander
Homunculus
Earth Golem - Immune to Unconsciousness. Breaks Paralysis easily.
Earth Titan - Regenerates HP. Immune to Charm, Unconsciousness. Breaks Paralysis easily.
Lair of the White Owl - WIP


1. Pedestal in the Darkness. Click on it for a description of the sound of fluttering wings and lightning. Eventually the Orb on top of the pedestal will light and the White Owl appears. Ask it about TABLET and it will describe each one that you are missing and give you Exemplar Codex (Critical Item). When you are ready to say GOODBYE it will give you more information on itself, and when you EXIT it will reveal even more and give you Final Notice (Critical Item). It also asks for Milk and Fruity Jelly Beans. I don't know if that is a joke, or if it actually wants those items. Another thing it tells you (because it keeps talking...) is to put things EXACTLY the way you found them, which may or may not be a hint. I don't know yet. It does not seem like you can speak with the Owl again once you leave (might have to reload the area).

2. White Owl's Garbage.

3. Broken Furniture.

4. Bed. If you sleep here the game describes that you are covered in fleas and bedbugs.

5. Bed. Click on it for World Mgr. Monthly (Critical Item), Page 59 (Critical Item), and Page 72(Critical Item).


NPC KEYWORDS
The White Owl: Tablet (gives you Exemplar Codex), Codex, Cromlech, Metronome/Mysterium/Clock of Fate, Black Seed/Havoc Seed
*Attempting to read its mind gives you an interesting message, but not the intended effect.
**You cannot Charm the Owl.


POTENTIAL LOOT
NOTE: I did not have a lot of time available to me when I was doing this map, so the loot listed below is only for one check. I will come back to this list in the future (probably at a point where I am ready to end the game) and fill out the list properly then.

EVENT 5. Bed: World Mgr. Monthly (Critical Item), Page 59 (Critical Item), Page 72(Critical Item).

1. Barrel
Weapons: Ball & Chain, Poison Lash
Armor: Mithril Armet, Jazeraint Shirt
Accessories: Amulet Vs. Hypno
Thrown/Ammo: Sheolic Pipes
Staff/Rods: Wand of Rainbows
Scrolls: Lightning
Spellbooks: Bless
Consumables: Invisibility, Prankstone
Other: Cobalt Sapphire
*This list has only gone through one check.
Pendulum Hall - WIP


1. Ducat and the Tunnel Plumbers. Ducat and his friends will attack you here. It does not matter if you paid him off previously.
His friends consist of a randomized amount of Highwaymen, Brigands, and/or Dark Rangers. Highwaymen and Brigands don't do anything special, but the damage they inflict can add up. Dark Rangers can cast some really nasty spells, so if they are there take care of them as fast as possible. Ducat himself can cast spells and Invoke his weapon to inflict Blind, but he usually chooses to strike for a significant amount of damage. As always, controlling status effects are the way to go, and they do not seem to have any resistances. Still, you might want to cast Armorplate and Magic Screen beforehand to protect your party members while you get things under control. When you win you will receive up to two Gauche (though sometimes you don't get any), Ducat's sword Daguerro, and Ring of Swordsmen.


2. Magic Green Gate. Unlocked with the Key of the Exemplar. You do not lose the Key.

3. Open Treasure Chest. Place the Lachesis Tablet inside of it to close the lid. No other Tablet works on this spot. This tile is also a Safe Haven.

4. Open Treasure Chest. *WIP* Place the (Insert Correct Tablet here) Tablet inside of it to close the lid. No other Tablet works on this spot. This tile is also a Safe Haven.

5. Open Treasure Chest. Place the Atropos Tablet inside of it to close the lid. No other Tablet works on this spot. This tile is also a Safe Haven.

6. Open Treasure Chest. *WIP* Place the (Insert Correct Tablet here) Tablet inside of it to close the lid. No other Tablet works on this spot. This tile is also a Safe Haven.

7. Open Treasure Chest. *WIP* Place the (Insert Correct Tablet here) Tablet inside of it to close the lid. No other Tablet works on this spot. This tile is also a Safe Haven.

8. Open Treasure Chest. *WIP* Place the (Insert Correct Tablet here) Tablet inside of it to close the lid. No other Tablet works on this spot. This tile is also a Safe Haven.

9. Open Treasure Chest. *WIP* Place the (Insert Correct Tablet here) Tablet inside of it to close the lid. No other Tablet works on this spot. This tile is also a Safe Haven.

10. Open Treasure Chest. Place the Aurora Tablet inside of it to close the lid. No other Tablet works on this spot. This tile is also a Safe Haven.

11. Clock Face/Dial. Clicking on it describes your party pressing buttons, but they do not stay depressed.

Note that there are nine hints for Tablets, but there are only eight Open Treasure Chests.
I guess that means there only eight Tablets out in the world to get before you can pass this point
.


ENEMIES
Brigand
Highwaymen
Dark Rangers - Can Blink (a.k.a. Flicker Out) and cast Spells, including those that inflict Silence, Drain, Web, Slow, Nasuea, and cause Instant Death, as well as buff with Enchanted Blade.
Ducat - Can cast Spells and inflict Blind.
RECRUITABLE NPCs POST AVIAN MOUNTAINS
GlibGlub
Saurian Male Warrior
Found: Saltwyrm Caves (Random Encounter after first meeting)
Recruit: After you save him, ask him.
Equipment: Harpoon (Cannot reequip it if you take it off)
Dismissed: Loch Titan (Still need to check)


MARTIAL SKILLS
Archery
Axe&Scimitar
Bladesmanship
Hammer&Mace
Lash&Chain
Shield
Slings&Bolas
Spear&Lance
Staff&Rod
Swordsmanship


PHYSICAL SKILLS
Climbing
Evasion
Hand-to-Hand
Inspection
Scout
Stealth
Swimming
Throwing


MENTAL SKILLS
Assaying
Barter
Incantation
Invocation
Mythology
Scribe
Sorcery


SPELLS
Purify Air
Cure Light Cond
Little Daisy
Feyfolk Female Thaumaturge
Found: Inside a Barrel in Snark Mistress
Recruit: Save her and ask
Equipment: Stiletto
Dismissed: Village of Crowl (Still need to check)


Note that she is a very good character for the beginning of the game.


MARTIAL SKILLS
Bladesmanship
Hammer&Mace
Slings&Boas
Staff&Rod


PHYSICAL SKILLS
Climbing
Evasion
Hand-to-Hand
Inspection
Scout
Stealth
Swimming
Throwing


MENTAL SKILLS
Alchemistry
Arcanum
Assaying
Barter
Incantation
Invocation
Mephistics
Mythology
Nature Lore
Scribe


SPELLS
Blinding Flash
Dancing Lights
Cure Light Condition
Confusion
Magic Screen
Greech the Leech
Wolfin Male Ranger
Found: Nerukzan Woodlands (Random Encounter)
Recruit: Just ask him and he will join.
Equipment: Shortbow, Dirk, Barbed Arrows, Flannel Shirt, Flannel Pants, Moccasins
Dismissed: Nerukzan Woodlands (Random Encounter)


MARTIAL SKILLS
Archery
Axe&Scimitar
Backstabbing
Bladesmanship
Hammer&Mace
Lash&Chain
Shield
Slings&Bolas
Spear&Lance
Staff&Rod
Swordsmanship


PHYSICAL SKILLS
Accuracy
Climbing
Evasion
Hand-to-Hand
Inspection
Lethal Blow
Lockpicking
Scout
Stealth
Swimming
Throwing


MENTAL SKILLS
Alchemistry
Assaying
Barter
Incantation
Invocation
Mephistics
Mythology
Nature Lore
Scribe


SPELLS
Cerebral Shield
Snivels
Rhattu Male Ranger
Found: Nerukruel Pyramid (Random Encounter after first meeting)
Recruit: Find him in his hiding spot (a Barrel), then ask him.
Equipment: Shortsword
Dismissed: Nerukzan Woodlands (Random Ecnounter)


MARTIAL SKILLS
Archery
Axe&Scimitar
Backstabbing
Bladesmanship
Hammer&Mace
Lash&Chain
Shield
Slings&Bolas
Spear&Lance
Staff&Rod
Swordsmanship


PHYSICAL SKILLS
Accuracy
Climbing
Evasion
Hand-to-Hand
Inspection
Lethal Blow
Lockpicking
Scout
Stealth
Swimming
Throwing


MENTAL SKILLS
Alchemistry
Assaying
Barter
Incantation
Invocation
Mephistics
Mythology
Nature Lore
Scribe


SPELLS
Sleep
Irritation
Slow
Poison
Medea
Human Female Necromancer
Found: Wherever you resurrect her.
Recruit: Cast Raise Dead on her Bones, which are found in Barrow Arbor.
Equipment: Poison Dagger, Stave of Missiles
Dismissed: Hecatombs of the Sphynx (Still need to test this)


MARTIAL SKILLS
Bladesmanship
Slings&Bolas
Staff&Rod


PHYSICAL SKILLS
Climbing
Evasion
Hand-to-Hand
Inspection
Scout
Stealth
Swimming
Throwing


MENTAL SKILLS
Arcanum
Assaying
Barter
Incantation
Invocation
Mythology
Necromancy
Scribe


SPELLS
Energy Bolt
Cure Disease
Cure Heavy Wounds
Cure Light Cond
Cure Paralysis
Cerebral Shield
Charm
Confusion
Magic Screen
(No Infernal or Necromantic Spells...)
Krellspar
Leonar Male Ranger
Found: Desolation of Gideon (Random Encounter)
Recruit: Just ask him and he will join.
Equipment: Nothing
Dismissed: Green Quandary (Still need to check)


MARTIAL SKILLS
Archery
Axe&Scimitar
Backstabbing
Bladesmanship
Hammer&Mace
Lash&Chain
Shield
Slings&Bolas
Spear&Lance
Staff&Rod
Swordsmanship


PHYSICAL SKILLS
Accuracy
Climbing
Evasion
Hand-to-Hand
Inspection
Lethal Blow
Lockpicking
Scout
Stealth
Swimming
Throwing


MENTAL SKILLS
Alchemistry
Assaying
Barter
Diplomacy
Incantation
Invocation
Mephistics
Mythology
Nature Lore
Scribe


SPELLS
Dancing Lights
Magic Missle
Cold Shield
Comet of Doom
Silence
Strength
Armorplate
Cure Heavy Wounds
Cure Light Condition
Charm
Fizzle Field
Hold Monsters
Magic Screen
Crushing Hand
Finger of Death
Elias Conachur
Human Male Ranger
Found: Conachur's Cabin in Harradan Groves (There is a bug in 1.2.0.25-R where he will disappear forever if you do not recruit him after your first meeting.)
Recruit: Enter Conachur's Cabin, unlock the locked door, find the hidden manacles, then try to leave and he will appear. Simply recruit him from there.
Equipment: Nothing, but he gives you Wolf's Head when you recruit him.
Dismissed: Harradan Groves (In patch 1.2.0.25-R I could not find him again)


MARTIAL SKILLS
Archery
Axe&Scimitar
Backstabbing
Bladesmanship
Hammer&Mace
Lash&Chain
Shield
Slings&Bolas
Spear&Lance
Staff&Rod
Swordsmanship


PHYSICAL SKILLS
Accuracy
Climbing
Evasion
Hand-to-Hand
Inspection
Lethal Blow
Lockpicking
Scout
Stealth
Swimming
Throwing


MENTAL SKILLS
Alchemistry
Assaying
Barter
Diplomacy
Incantation
Invocation
Mephistics
Mythology
Nature Lore
Scribe


SPELLS
None
Axe Ego
Human Male Ranger
Found: Use the Entropy Axe found in the Caverns of Zandrithar
Recruit: Just ask.
Equipment: None
Dismissed: Astral Plane is what the game says, but he will reappear if you USE the Entropy Axe again.

HP, Vitality, Magic, Stats, and Skills are really high.


MARTIAL SKILLS
Archery
Axe&Scimitar
Backstabbing
Bladesmanship
Hammer&Mace
Lash&Chain
Shield
Slings&Bolas
Spear&Lance
Staff&Rod
Swordsmanship


PHYSICAL SKILLS
Accuracy
Climbing
Evasion
Hand-to-Hand
Inspection
Lethal Blow
Lockpicking
Scout
Stealth
Swimming
Throwing


MENTAL SKILLS
Alchemistry
Assaying
Barter
Incantation
Invocation
Mephistics
Mythology
Nature Lore
Scribe


SPELLS
Cure Disease
Cure Light Cond
Chuckles
Drow Male Jester
Found: Axis Gaol
Recruit: Get the Gaol Key inside the Axis Gaol, then unlock his cell.
Equipment: Pointy Stick
Dismissed: Axis Gaol (Random Encounter)

Has very high stats.


MARTIAL SKILLS
Archery
Axe&Scimitar
Backstabbing
Bladesmanship
Deflection
Hammer&Mace
Lash&Chain
Shield
Slings&Bolas
Spear&Lance
Staff&Rod
Swordsmanship


PHYSICAL SKILLS
Climbing
Evasion
Hand-to-Hand
Iajitsu
Inspection
Iron Hands
Lethal Blow
Lockpicking
Music
Ninjitsu
Robbery
Scout
Stealth
Swimming
Throwing
Trickery


MENTAL SKILLS
Assaying
Barter
Incantation
Invocation
Mephistics
Mythology
Scribe
Sorcery


SPELLS
Blinding Flash
Dancing Lights
Leaping Sparks
Magic Missile
Charm
Magic Bells
Crushing Hand
Drak Serat
Human Male Assassin
Found: Donjon of the Mandarin
Recruit: Just ask.
Equipment: None
Dismissed: Donjon of the Mandarin


MARTIAL SKILLS
Archery
Axe&Scimitar
Backstabbing
Bladesmanship
Deflection
Hammer&Mace
Lash&Chain
Shield
Slings&Bolas
Spear&Lance
Staff&Rod
Swordsmanship


PHYSICAL SKILLS
Climbing
Evasion
Hand-to-Hand
Inspection
Iron Hands
Lethal Blow
Lockpicking
Ninjitsu
Robbery
Scout
Stealth
Swimming
Throwing


MENTAL SKILLS
Alchemistry
Assaying
Barter
Incantation
Invocation
Mephistics
Mythology
Scribe


SPELLS
Blinding Flash
Deflection Screen
Sleep
Stinking Cloud
Ventriloquism
Haste
Irritation
Slow
Strength
Armorplate
Cerebral Shield
Enchanted Blade
Fizzle Field
Lilith
Vamphyr Female Necromancer
Found: Skulheim (Random Encounter)
Recruit: Simply ask her.
Equipment: Dirk
Dismissed: Skulheim (Random Encounter)

When I recruited her she was randomly inflicted with Heavy/Encumbrance*. Resting removed it temporarily, but she became inflicted again eventually.
*Note that I misinterpreted what the affliction's icon was when I initially tested her, and by the time I realized it I was well past able to re-recruit her to make sure I didn't actually go over her weight limit, so it might not be a random infliction. My guess is that after I equipped her normally she was hit with a STR stat drain that messed with her max weight and I didn't notice it. I still need to test it though.

Her special power Holds enemies, instead of Charm.


MARTIAL SKILLS
Bladesmanship
Slings&Bolas
Staff&Rod


PHYSICAL SKILLS
Climbing
Evasion
Hand-to-Hand
Inspection
Scout
Stealth
Swimming
Throwing


MENTAL SKILLS
Arcanum
Assaying
Barter
Incantation
Invocation
Mythology
Necromancy
Scribe


SPELLS
Chilling Touch
Cone of Cold
Crushing Hand
WitchHex
Brain Rot
Renfeeld
Vamphyr Male Thaumaturge
Found: Sepulchre of Shades (Random Encounter)
Recruit: No special recruitment conditions.
Equipment: Nothing
Dismissed: Sepulchre of Shades (Random Encounter)

His special power is a Paralyzing Gaze, instead of Charm.


MARTIAL SKILLS
Bladesmanship
Hammer&Mace
Slings&Boas
Staff&Rod


PHYSICAL SKILLS
Climbing
Evasion
Hand-to-Hand
Inspection
Scout
Stealth
Swimming
Throwing


MENTAL SKILLS
Alchemistry
Arcanum
Assaying
Barter
Incantation
Invocation
Mephistics
Mythology
Nature Lore
Scribe


SPELLS
Fire Shield
Fizzle Field
Paladar
Human Male Templar
Found: Wherever you resurrect him.
Recruit: Find his Bones in Skull Belfry inside of Skulheim, then cast Raise Dead to resurrect him.
Equipment: Longsword, Kite Shield
Dismissed: Kublai Axis (Still need to check)


MARTIAL SKILLS
Archery
Axe&Scimitar
Bladesmanship
Hammer&Mace
Lash&Chain
Shield
Slings&Bolas
Spear&Lance
Staff&Rod
Swordsmanship


PHYSICAL SKILLS
Climbing
Evasion
Hand-to-Hand
Inspection
Scout
Stealth
Swimming
Throwing


MENTAL SKILLS
Assaying
Barter
Diplomacy
Incantation
Invocation
Litany
Mythology
Scribe


SPELLS
Fireball
Leaping Sparks
Magic Missle
Missile Shield
Armorplate
Enchanted Blade
Magic Bells
Count Orloch
Vamphyr Male Sage
Found: Orloch's Vault in Skulheim (There is a bug in version 1.2.0.25-R that causes him to disappear forever after your first meeting if you do not recruit him.)
Recruit: Just ask
Equipment: Poison Lash (Cannot reequip if you take it off), Poison Dart. Gives you Batwing Ring (Cursed), Ring Pro Magic, Repel Undead Potions, Dazzler Dust, and an Anti Magic Spellbook when recruited.
Dismissed: Orloch's Vault (I was unable to meet him again in patch 1.2.0.25-R)

His special power Holds enemies, instead of Charm.


MARTIAL SKILLS
Bladesmanship
Metallurgy
Slings&Bolas
Staff&Rod


PHYSICAL SKILLS
Climbing
Evasion
Hand-to-Hand
Inspection
Lockpicking
Music
Scout
Stealth
Swimming
Throwing


MENTAL SKILLS
Ancient History
Arcanum
Assaying
Barter
Diplomacy
Incantation
Invocation
Mephistics
Mythology
Nature Lore
Scribe
Sorcery


SPELLS
Deflection Screen
Missile Shield
Hold Monsters
WitchHex
Brain Rot
Princess Dahlia
Drow Female Bard
Found: Shrine of the Psychopomp in Skulheim (There is a bug in version 1.2.0.25-R that causes her to disappear forever after your first meeting if you do not recruit her.)
Recruit: Kill Shelach for the Key of Psychopomp, use the Key on her Cell, then ask her.
Equipment: Poison Dagger. Gives you Key of the Ancients when you Recruit her.
Dismissed: Imperial Palace (Could not find her in version 1.2.0.25-R)


MARTIAL SKILLS
Archery
Axe&Scimitar
Backstabbing
Bladesmanship
Hammer&Mace
Lash&Chain
Shield
Slings&Bolas
Spear&Lance
Staff&Rod
Swordsmanship


PHYSICAL SKILLS
Climbing
Evasion
Hand-to-Hand
Inspection
Lockpicking
Music
Robbery
Scout
Stealth
Swimming
Throwing


MENTAL SKILLS
Arcanum
Assaying
Barter
Diplomacy
Incantation
Invocation
Mephistics
Mythology
Scribe
Sorcery


SPELLS
Cold Shield
Charm
Fizzle Field
Balderdash
Drow Male Wizard
Found: Inside the Spirit Jar in Kublai Cathedral (I could not seem to find him again after the first meeting. He might be a character that disappears in patch 1.2.0.25-R)
Recruit: Go through all of the steps to free him, then ask
Equipment: Quarterstaff, Phrygian Cone, Wizard Robe, Sandals
Dismissed: Kublai Axis (I couldn't seem to find him. He might be a character that disappears in patch 1.2.0.25-R)

He has very good Health, Vitality, Magic, and Stats.


MARTIAL SKILLS
Bladesmanship
Slings&Boas
Staff&Rod


PHYSICAL SKILLS
Climbing
Evasion
Hand-to-Hand
Inspection
Scout
Stealth
Swimming
Throwing


MENTAL SKILLS
Arcanum
Assaying
Barter
Incantation
Invocation
Mythology
Scribe
Sorcery


SPELLS
Dancing Lights
Fire Shield
Firestorm
Magic Missile
Deep Freeze
Fog of Frost
Freezing Sphere
Deflection Screen
Hurricane
Armorplate
Earthquake
Flesh to Stone
Philchit
Human Male Thief
Found: Raven Wildes (Random Encounter)
Recruit: Just ask
Equipment: Shortword
Dismissed: Raven Wildes (Random Encounter)


MARTIAL SKILLS
Archery
Axe&Scimitar
Backstabbing
Bladesmanship
Hammer&Mace
Lash&Chain
Shield
Slings&Bolas
Spear&Lance
Staff&Rod
Swordsmanship


PHYSICAL SKILLS
Climbing
Evasion
Hand-to-Hand
Inspection
Lockpicking
Robbery
Scout
Stealth
Swimming
Throwing


MENTAL SKILLS
Alchemistry
Assaying
Barter
Incantation
Invocation
Mephistics
Mythology
Scribe

SPELLS
-None-
Sword Ego
Human Male Pirate
Found: Find the Entropy Sword in Dark Warren, then USE it.
Recruit: Just ask.
Equipment: None
Dismissed: The game says he goes to the Astral Plane, but to get him back simply USE the Entropy Sword again.

Has a very high amount of Hitpoints, Vitality, Magic, and Stats.
His special is Cone of Cold, according to his status screen.


MARTIAL SKILLS
Archery
Axe&Scimitar
Backstabbing
Bladesmanship
Hammer&Mace
Lash&Chain
Shield
Slings&Bolas
Spear&Lance
Staff&Rod
Swordsmanship


PHYSICAL SKILLS
Climbing
Evasion
Hand-to-Hand
Inspection
Lethal Blow
Lockpicking
Robbery
Scout
Stealth
Swimming
Throwing


MENTAL SKILLS
Assaying
Barter
Diplomacy
Incantation
Invocation
Mephistics
Mythology
Scribe
Sorcery


SPELLS
Haste
Dispel Magic
Fizzle Field
Kroondergraf
Human Male Sage
Found: Kroondergraf's Hollow (in version 1.2.0.25-R, once you meet him he disappears forever)
Recruit: Just ask
Equipment: Quarterstaff, Red Hood, Red Tunic, Red Robes, Sandals, Ring Pro Magic
Dismissed: Kroondergraf's Hollow (in version 1.2.0.25-R, once you dismiss him he disappears forever)

He has a very high amount of Vitality and Magic.


MARTIAL SKILLS
Bladesmanship
Metallurgy
Slings&Bolas
Staff&Rod


PHYSICAL SKILLS
Climbing
Evasion
Hand-to-Hand
Inspection
Lockpicking
Music
Scout
Stealth
Swimming
Throwing


MENTAL SKILLS
Ancient History
Arcanum
Assaying
Barter
Diplomacy
Incantation
Invocation
Mephistics
Mythology
Nature Lore
Scribe
Sorcery


SPELLS
Fireball
Firestorm
Cone of Cold
Flesh to Stone
Crushing Hand
Rainbow Rays
(No Psych or Astral spells...)
Olaf Gigunda
Giant Male Berserker
Found: Dominion Crevasse
Recruit: Just ask.
Equipment: War Maul
Dismissed: Dominion Caverns (Still have to check)


MARTIAL SKILLS
Archery
Axe&Scimitar
Bladesmanship
Hammer&Mace
Lash&Chain
Shield
Slings&Bolas
Spear&Lance
Staff&Rod
Swordsmanship


PHYSICAL SKILLS
Berserking
Climbing
Evasion
Hand-to-Hand
Inspection
Lethal Blow
Scout
Stealth
Swimming
Throwing


MENTAL SKILLS
Alchemistry
Assaying
Barter
Incantation
Invocation
Mephistics
Mythology
Scribe


SPELLS
-None-
Codex Troll
Drake Male Bard
Found: Wherever you resurrect him.
Recruit: Find his Bones in Dominion Caverns, then cast Raise Dead to resurrect him.
Equipment: Halcyonic Lyre
Dismissed: The game just has him leave with no destination listed.

He has ridiculously high stats.


MARTIAL SKILLS
Archery
Axe&Scimitar
Backstabbing
Bladesmanship
Hammer&Mace
Lash&Chain
Shield
Slings&Bolas
Spear&Lance
Staff&Rod
Swordsmanship


PHYSICAL SKILLS
Climbing
Evasion
Hand-to-Hand
Inspection
Lockpicking
Music
Robbery
Scout
Stealth
Swimming
Throwing


MENTAL SKILLS
Arcanum
Assaying
Barter
Diplomacy
Incantation
Invocation
Mephistics
Mythology
Scribe
Sorcery


SPELLS
Cure Heavy Wounds
Cure Light Wounds
OTHER STUFF
The Nine Tablets Hints - Shrine of the Raptor
These are hints found in the Shrine of the Raptor that can only be read by players who start in the Shrine. The text is as follows:

"Mine talon sets word in prose to say
Nine tabula writ I to lead the way
The first of time and entropy is
held secure by aerial lofted key
I writ thee... Lachesis."
The above is referencing the Mechano Owl, and the Key you get when you finish that puzzle. You are required to get the Key to progress, and the Tablet itself is in the Vault of the Exemplar, the last stop before you exit the Avian Mountains.

"Within the depths of the Ziggurat
this tablet in shadow rescquiat
To retrieve it thou shalt expiate
The beast who feasts on sins he ate
I writ thee... Nemesis."
This hint references Nerukruel Pyramid. Explore it, kill Grendel, unlock the Magic Gate with the Key of the Exemplar, then take the Tablet. Don't forget to turn off the Eye before you try to leave.

"Amidst recess of arboreal den
Guarded by his woodland ken
The Mighty Wicker rests his throne
upon this puzzle etched in stone
I writ thee... Atropos"
This one is referencing the Grove found in Barrow Arbor, the base of the Druids of the Fertile Crescent, a large majority of which will try to kill you even if you try to be nice to them. Simply fight your way there, kill The Wicker Man, and take the Tablet.

"A holy note in the great steeple
Must disturb the hush of the people
The wall gives way to thundrous peal
And discloses the abode of my seal
I writ thee... Megaera."
This hint is referring to Kublai Cathedral in Royal Aviary Park and requires a lengthy quest that takes you on a scavenger hunt through the Lochs near the City of Waterport to complete. You must find four pieces of a Bell that have been sunk in the water, put it together, place the Bell back in the Cathedral, raise the Bell, then go to the main floor of the Cathedral and pull a chain to ring it. Doing this will open the way to the Cathedral Vault, where the Tablet can be found beyond the Magic Green Gate, which must be unlocked with the Key of the Exemplar like all of the others.

"This tablet is given to evil Queen
She dwells in darkness sight unseen
Her fertility and offspring royal
Shall hold my stone in safety loyal
I writ thee... Arachne."
This hint references Shelach, who dwells beneath Skulheim. Kill her and take the Tablet from the statue in the same room, then kill Psychopomp.

"Water dwellers preserve my tokens
A secret traced and never spoken
The emblems of the scaly clan
Are drawn upon the burning sand
I writ thee... Scylla."
This hint is referring to the Saltwyrm Caves, found underneath Waterport and home to an aggressive tribe of Troglodytes. Do what you need to do to access the cave, explore until you need to input a special code, use the Key of the Exemplar, then take the Tablet.

"Gold Lady alone before the sea
The harp will sing this melody
Summon up through fathoms five
The kelpy chariot from deepest dive
I wit thee... Aurora"
Apparently, this hint is left over from an earlier version of the game, which is why it has nothing to do with how you get the Aurora Tablet, unless you count the fact that the guy who has it, Knorlos Knossos, drops Seven League Boots and two instruments, one of which is a Harp. That is really stretching it though. Anyway, find and kill Knorlos Knossos in Observatory of Knossos, which can be reached by going through Gideon.

"To demons I cast thee tablet mine
Who trapped within the spike do pine
For freedom to rage upon the land
Deferring not to mortal man
I writ thee... Thanatos"

"I soared up on the highest wind
To find a ruler of serpents in
She doth guard my glyph to wait
The eggs of asps to incubate
I writ thee... Gorgon."
NPC Topics
This is a list of NPC topics you can type in to get extra lore bits, basic information, or another reaction other than not understanding you. This list is no where near complete, not every NPC is going to react to every keyword, and some require Diplomacy or Charm. I am jotting them down as I find NPCs that react to them. They are in alphabetical order within their catergory and contain spoilers, so don't use it if that bothers you. Words marked with brackets are either only for reference to what the topic is referring to, or are unneeded when trying to ask about them.


SMALL TALK
Amazing
Assist / Help / Hint
Bribe / Donation
Farewell / Goodbye - Ends Conversation
Grapevine / Rumor
Good Morning / Good Afternoon / Good Evening / Greetings / Hello / Hi
Help / Hint / Assist
Job / Profession / Trade
Join / Draft / Recruit
(Pressing Enter Without Typing Anything)
Rumor / Grapevine
Thank(s)
Where (is) type-name-here
You

PEOPLE / CREATURES
Admiral (Tellurious) Boondoggle
(Lord) Ahriman / Warlord
Ancestors / Elders
Apprentice
Arachnid / Spider
Argosyre
Balderdash
Beast / Lycan / Lycanthrope / Werewolf
Bishop
Blacksmith / Smith
Chiang
Clara
(Little) Daisy
Dartagnan
Daughter
Deep One
Demon
Diabla
Djinn
Drak Serat
Elders / Ancestors
Elias Conachur
Entity / Golden Baby
Esoph
Father
Father / Khan Raji
(Saint) George
GlibGlub
Golden Baby / Entity
Gorgonra / Methuselah
Gorlo
Greech
Grendel / Soul Eater
Hobknob
(Samhain) Horror
Insect / Wasp
Kelpie / Seahorse
Khan Raji
Kraken
Krellspar
(Captain) Krone
Kroondergraf
(Black) Lich
Lilith
(King) Loogmar
Lieutenant Shrike
Lycan / Lycanthrope / Beast / Werewolf
Lysandra
(Green) Mandarin
Master
Master / Psychopomp
Medea
Mermaid
Methuselah / Gorgonra
Mistral
Mordecai
Morgana LeFay
Morraha
Naga
(Mr.) Nebulon
(Jaqque) Nefarge
Neriad
Nick
Olaf Gigunda
(Count) Orloch
(White) Owl / Winged Exemplar
Philchit
(Black) Pierre
Princess / Dahlia
Psychopomp / Master
Raghilda
Renfeeld
(Little) Rosy
Seahorse / Kelpie
Shelach
(Lieutenant) Shrike
Sir Coffergus
Sister
Smith / Blacksmith
Snivels
(Vanguard) Soldier
Soul Eater / Grendel
Spider / Arachnid
Strangers
Trimestes
Vermint
Virgin
Warlord / (Lord) Ahriman
Wasp / Insect
Werewolf / Beast / Lycan / Lycanthrope
Wicker (Man)
Winged Exemplar / (White) Owl
Wizard
(Mr.) Zyrinx

ORGANIZATIONS
Expedition
Marines / Military / Vanguard
Pirates
Reality Hijinx
Ukluk (Mining Company)
Vanguard / Marines

LOCATIONS
Aquavia
Aquifer
Bahoment (Megalith)
Barrow Arbor / Grove
Bridge / Chasm
Bronze Cauldron
Catacombs
Cell / Prison
Cenotaph
(Samhain) Chasm
Crusade Temple
Entrance / Threshold
Eyrie
Forest / Woodlands / Woods
Forge
Ghost City / Gideon
Green Way
Grove / Barrow Arbor
Hive
Holy Road
Hyperborea
Imperial Palace
Kublai Axis
Library
(Loch) Lalain
Loch Titan
Museum
Nullspace
Path
Prison / Cell
Raven Wildes
Samhain
Sargasso
Snark (Mistress)
Spirit Caves
Tabernacle (of Music)
Threshold / Entrance
Village (of Crowl)
Waterport
Water

ITEMS / TRANSPORTATION
All Seeing Eye / Chrytosphere / Eye of Nerukzan
Amulet / Astrixus
Black Seed / Havoc Seed
Boat / Ship / Intrepid
(Ruby) Broach
Book
Cathedral Bell
(Dead Ringer) Chart
Clock of Fate / Metronome Mysterium
Commendation / Recommendation
Contraptions / Inventions
Chrytosphere / All Seeing Eye / Eye of Nerukzan
Depetrify
Diving Bell / Helmet
Eldritch (Magic)
Eye of Nerukzan / Chrytosphere / All Seeing Eye
(Spirit) Goblet
Gold / Treasure
Golden Armor
Golden Hand / Hand of Glory
Golden Lock
Havoc Seed / Black Seed
Inventions / Contraptions
Key
Marque
Metronome Mysterium / Clock of Fate
Music
Pass / Ticket
Pipes (Majestyk)
Potion
Recommendation / Commendation
Ship / Boat
(Seahorse) Signet
Tablet
Ticket / Pass
Tome (of the Spider)
(Deep One) Totem
Toys
Treasure / Gold
Wand

OTHER IMPORTANT STUFF
Astral Vision
Catechism
Contest
Coward
Cursed / Damned
Destiny / Fate
Escape / Leave
Exile / Banished
Fate / Destiny
History
Infection
Prophecy
Quest / Mission
Rescue
Sacrifice
Scandal
Shock
Training

RACES
Aeorb
Barrower / Dwarf
Drake
Drow / Dark Elves
Durendil
Duroch (Mal)
Feyfolk / Fairy
Human
Giant / Titan
Leonar
Naga / Snakemen
Rhattu
Saurian / Lizardmen / Troglodyte
Vamphyr / Vampire
Wolfin

ACTIONS / SKILLS
Accuracy
Adventure / Quest
Arcanum
Archery
Assaying
Axe
Backstabbing
Barter
Bladesmanship
Climbing
Diplomacy / Politics
Evasion
Firearms
Hammer
incantation
Inspection
Invocation
Lance / Spear
Lash
Lockpicking
Magic / Sorcery / Wizardry
Mephistics
Mythology
Quest / Adventure
Recruit
Refund
Robbery
Rod / Staff
Scout
Scribe
Shield
Sorcery / Magic / Wizardry
Spear / Lance
Staff / Rod
Stealth
Swimming
Swordsmanship
Throwing
Training
Wizardry / Magic / Sorcery

PROFANITY
As(-word that Steam won't let me type out) - Will cause most NPCs to hate/fight you
Ba(-word that Steam won't let me type out) - Will cause most NPCs to hate/fight you
Bi(-word that Steam won't let me type out) - Will cause most NPCs to hate/fight you
Co(-word that Steam won't let me type out) - Will cause most NPCs to hate/fight you
Cu(-word that Steam won't let me type out) - Will cause most NPCs to hate/fight you
Di(-word that Steam won't let me type out) - Will cause most NPCs to hate/fight you
Fa(-word that Steam won't let me type out) - Will cause most NPCs to hate/fight you
Fu(-word that Steam won't let me type out) - Will cause most NPCs to hate/fight you
Pi(-word that Steam won't let me type out) - Will cause most NPCs to hate/fight you
Sh(-word that Steam won't let me type out) - Will cause most NPCs to hate/fight you
Missing / Wanted Information
This list does not include things relating to unfinished maps (that I know of) and is a checklist for me to reference once the maps are done and I am ready to do a proper full playthrough for testing. If you know about any of this, or know of something that I have missed, let me know and I will give you credit. There are spoilers below, so don't look through it unless you are prepared for that.

1. Raghilda's Depetrify Potion quest. I know where to get the stuff, but I still need to find the time to do it. Nightshade can be bought from Diabla in Carnivale Bazaar. Amaranth is found in several places as random loot, and can also be bought from Elias Conachur in Conachur's Cabin. Mandrake Root can be found in a few places as randomized treasure, and bought Elias Conachur in Conachur's Cabin or an Acme Vending Machine in Catacombs.

2. Find any in game hint about Little Rosy's Sister. She does not react to the word Sister (she tells you to talk to Raghilda). Both Little Rosy and Trimestes react to Little Daisy's name, and Little Rosy reacts to her kidnappers name and location, but I could not find a way to get that information before actually finding Little Daisy.

3. Check to see if the Armory Key works on the chests in the Armory before you milk the lock for Skill Points.

4. Does Q'orl do anything? Is there any way to get to the Astral Plane (besides the Bottle Djinn)?

5. What is the Cockatrice Feather, found in Bestiary Underground, for?

6. Figure out how to open the locked gates in Smuggler's Hideout.

7. Where do you use the Deep One Totem found in Saltwyrm Caves? Glib-Glub talks something about a circle in the sand but I do not recall ever finding anything like that. The enemies you kill mention Yog-Soggoth, but I have not seen another reference to that either.

8. Is there any way to "save" Admiral Boondoggle from the Intrepid? Can't seem to recruit him, and you can't seem to tell others that he is there.

9. Is there any friendly way to get the non-critical Shellhorn Salepsis from Neriad in Loch Titan? Healing Nick doesn't do it.

10. Is there a way to get information about the Bottle Djinn without looking at the game's code?

11. Is there a non-murder solution to getting the Mollusk Master and Pierre's Chest Key from Black Pierre? Joining his crew does not do it. Jaqque Nefarge and Black Pierre don't have any Keywords via Mindread that reveal anything. Charm/High Diplomacy+FEL Bard couldn't get anything helpful from either NPC. Nick seems to have bugged text for Pierre (as in he says nothing and the prompt disappears), so that could be it.

12. Is there a way to get into the closed off space in Donjon of the Mandarin?

13. Is there a way to get into the closed off space in Ancients Level III?

14. Is the Baby Quilt Cover used for anything? Horn of Horror, found from the Nether Owl Chest in Nether Passage, is marked as Critical. Why? Mirror of Reflekshun, found in Gideon Reservoir, is marked as Critical. Why? Forgot to try using it on Knorlos Knossos.

15. Still need to try giving Milk and Jelly Beans to the White Owl. You can buy Pack of Jellybeans from Chuckles in Axis Gaol. Neutral Medium might count as milk and can be bought from Raghilda, or found in very few places in randomized treasure chests.

NPCs: Need to check if Gorlo, Junga Din, Sir Coffergus, Medea, Greech, Krellspar, Chuckles, Drak Serat, Paladar, Balderdash, Kroonergraf, Olaf, and Codex Troll have reactions to any areas when recruited, or at least areas close to them.
Credits
lor1keet: Let me know that the "Colored Light Dance Party" in Shrine Subterranea will reduce the duration of negative status effects.

Rpguy: Let me know how shop restocking actually works, and poined out Gorlo never seems to catch you during Robbery attemtpts (at least in the patch tested on).

Gemmary: Found three items in the Event 13 Chest in Halls of Reflekshun that I missed: Poison Lash, Firestorm Spellbook, AntiMagic Scroll. Found that you can Rest at the Cocoon tile in Tower of Knossos to be warped back to the Megalith.

Kayerts and iqzulk of the RPG Codex forum: I was pointed to them as a reference for information about the Bottle Djinn, which they got by looking in the game's code.
Drama Corner
To the few folks telling me about plagerism: I appreciate that your heart is in the right place, but I don't really mind. This information should be free for all and if it takes someone copy/pasting from this guide to help someone out there enjoy the game more, that's enough for me. I give permission for anyone to use anything in this guide, maps included, as long as it is made available for free.

To the person plagiarizing: Greetings, folks maintaining the Grimoire Wiki! Or at least the person utilizing this guide. I have taken a brief look at the site and it looks really nice. Once I am out of my "avoiding-spoilers" mode I will definately take a closer look. I am really glad I can help you out and I don't care that you haven't credited me, but I did want you to be aware that the information that was copied is not complete and has changed with version 1.2.0.26-R, and also contains my old spelling errors and missed words (Cleaned up in this guide when I find them. For example, susceptible is spelled with an i, not an a. My fingers just aren't as good at spelling as my eyes are.). You might want to fix that up when you have the time (I only know of the Monsters section), or just drop into this guide from time to time to see if there is anything new you can copy. The weekend is the best time to check, since I usually stick to minor cleanup and double testing stuff then, rather than focusing on new info. Sorry about the messiness.

To anyone else who wants to go out of their way to conact me directly to say that I am an ♥♥♥♥♥♥♥ for trying to provide information that I know about before the manual is released: I'm not sure what the problem is? I'm not demanding that anyone play before the manual comes out. In fact, if you are the type of person who refuses to play a game without a manual I say that's fine. Games are for fun and people should play them on their own terms. The information I have typed up is for folks who are okay with playing without a manual but just want some basic info that works to get started. Also, I am not a mindreader. If I type up information and a question you have in your head isn't answered you have to actually ask it to get a response.

For folks who want to cause drama: Please don't. I'm not interested.
26 Comments
Deathman.Kenshi 1 Apr @ 7:45am 
Pendulum Hall - WIP
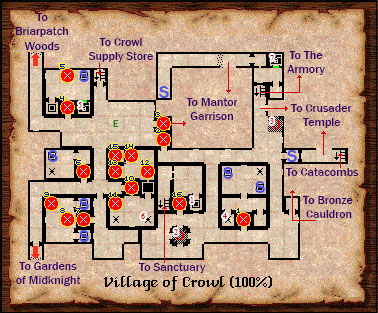
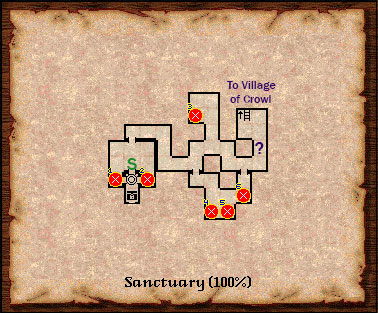
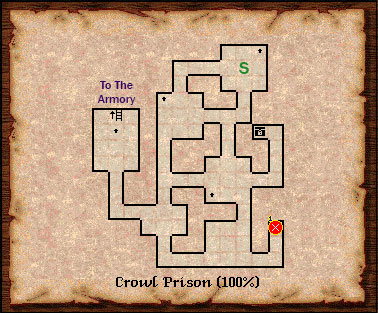
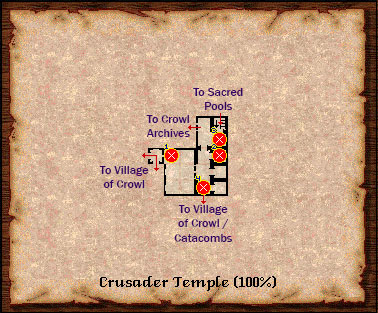
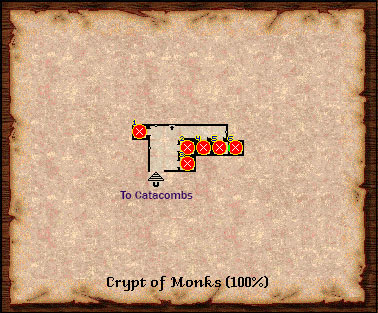
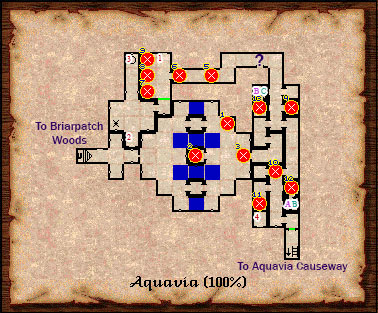
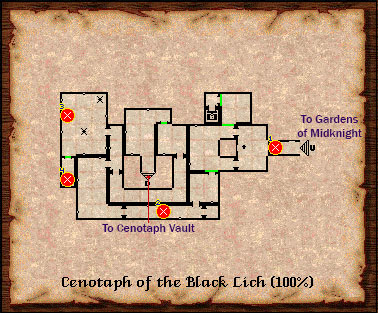
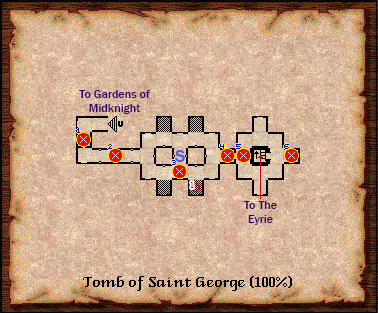
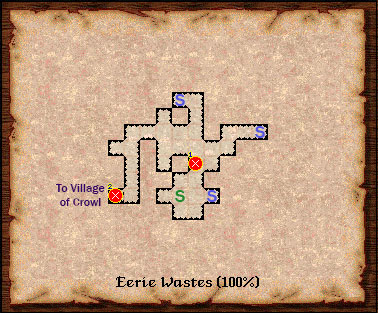
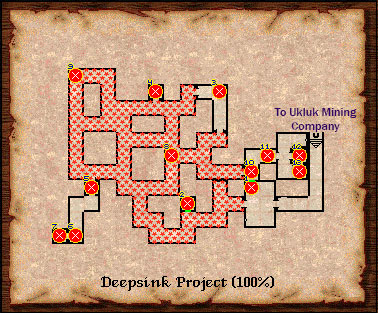
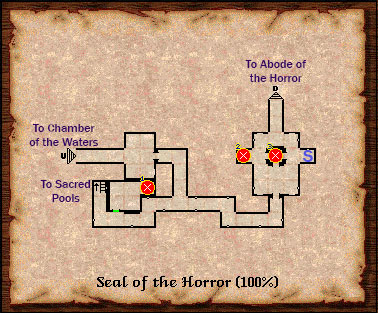
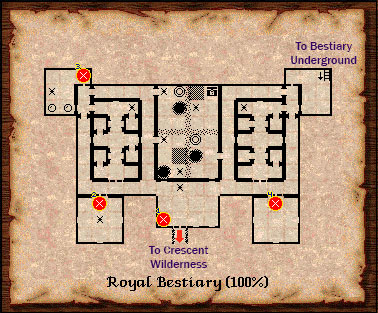
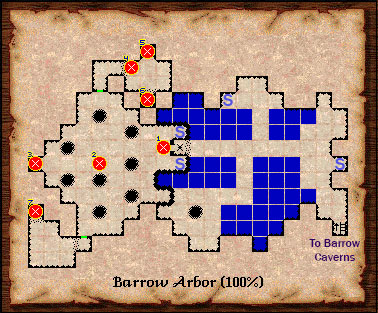
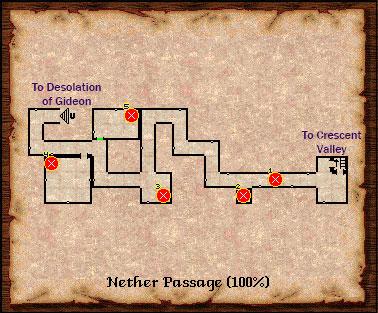
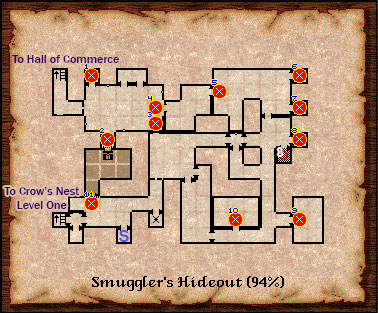
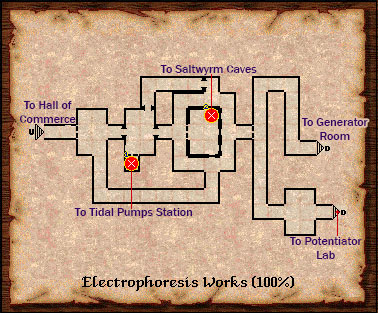
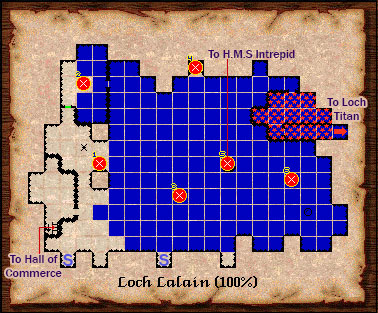
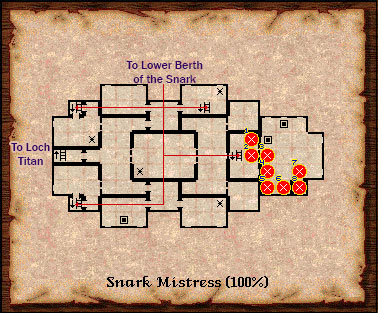
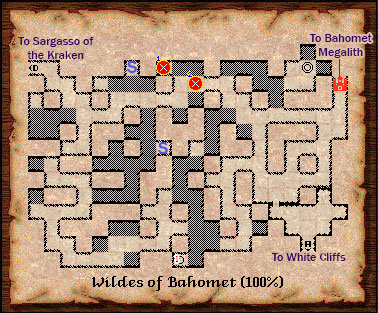
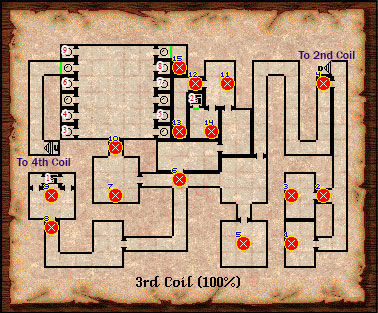
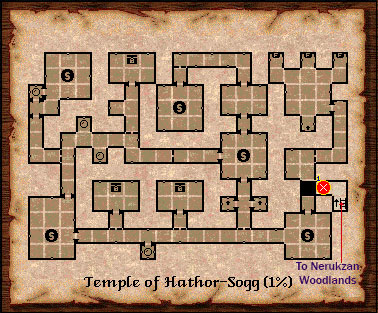
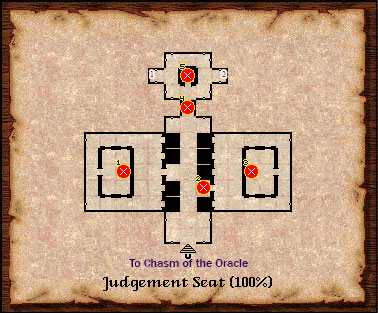
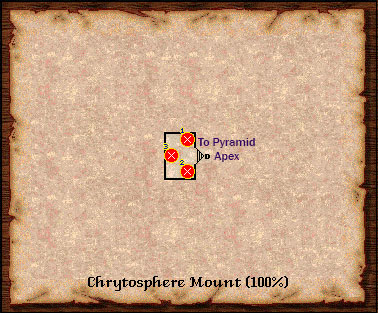
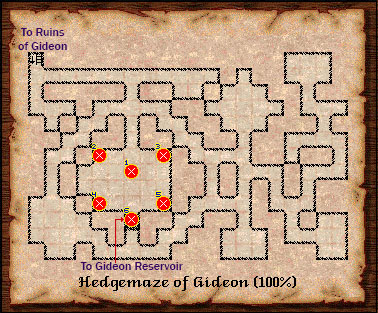
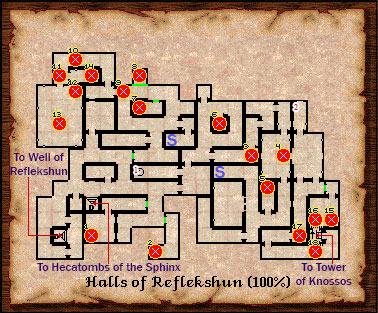
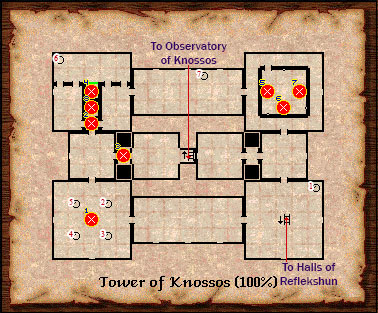
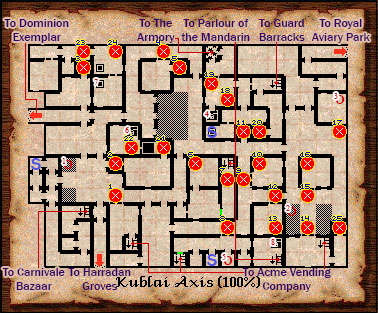
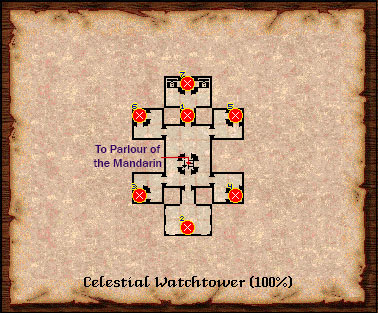
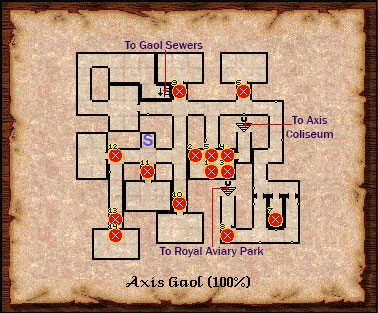
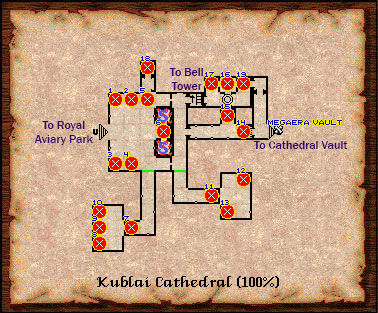
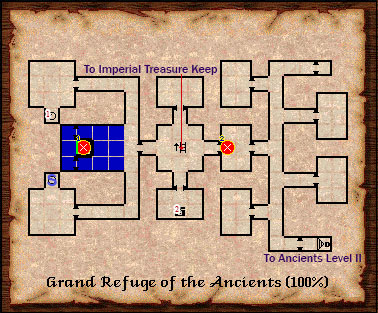
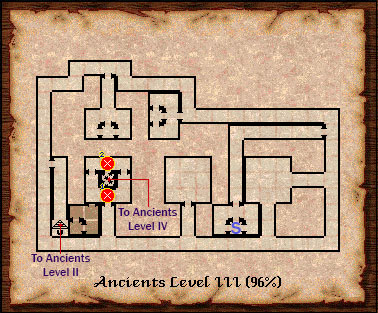
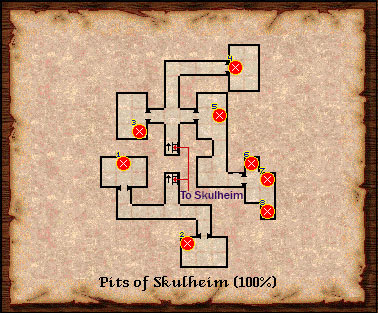
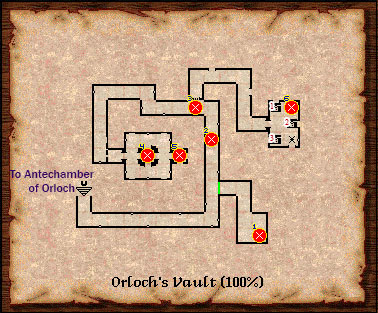
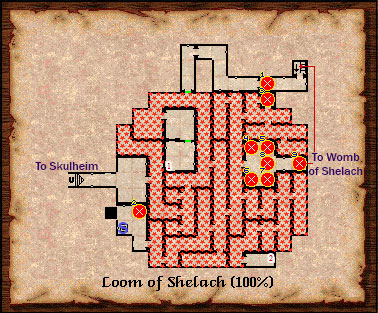
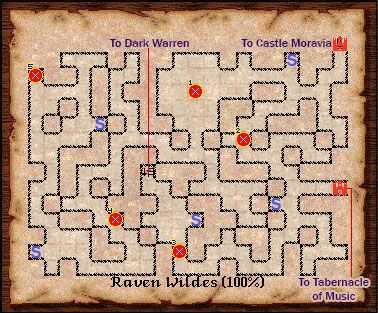
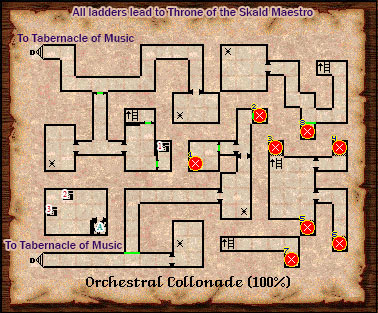
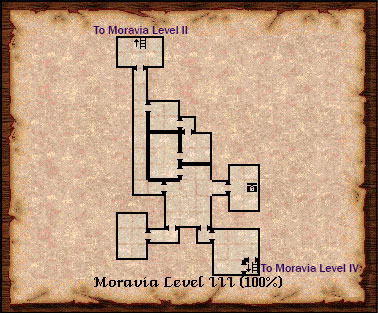
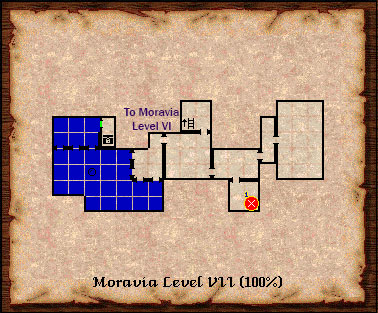
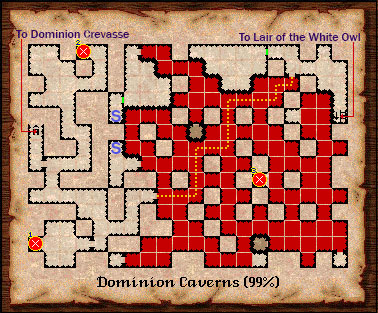
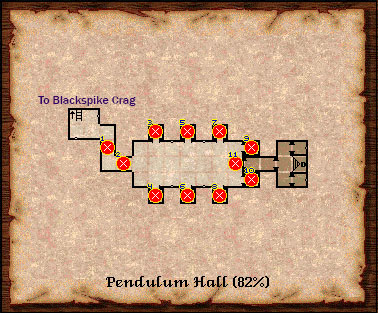
Chest numbered 4 on map - Arachne Tablet

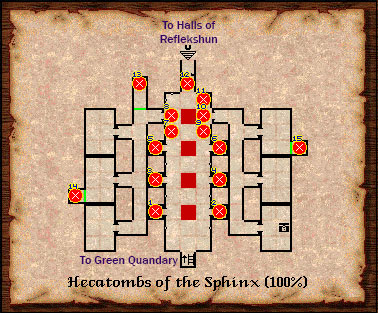
Random Enemies Ecounter >
Nightfiend (3,6k exp, 1100 gold)
Displacer Beasts (2k exp, 600 gold)
Dragon Tyrant (1,5k exp, 480 gold)
Dracosphynx (1,1k exp, 350 gold)


Pretty decent map for grinding if you can one turn kill them :)
JV4Lyf 19 Dec, 2020 @ 2:18pm 
This is a pretty great guide; in tandem with some of the party creation guides available, it makes the early game a lot more manageable. I'm not very far at the moment (struggling with the Green Hand Gang atm), but I have to say, the game is a lot of fun. Thanks for the guide!
burritonator 5 Sep, 2020 @ 1:34pm 
Hi,

Back when I played before, the guides I found were incomplete. The wiki page for the game still only goes as far as the Deepsink Project. I can see that this guide goes much further than that. Does this guide go all the way through to the end of the game?

Thanks!
buddhatude 9 Jun, 2020 @ 7:09pm 
3. When you have the Deep One Totem identified, its bonus info in the journal says: "You find the sight of this stone head in your alternate hand will be intimidating to Trogs. Equip it to proceed in their domain with some measure of safety."
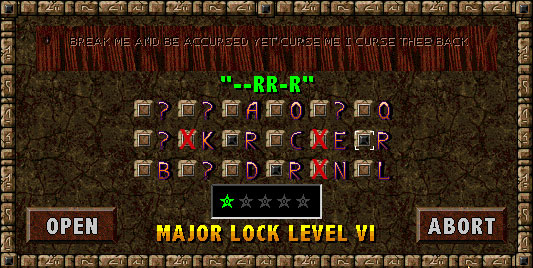
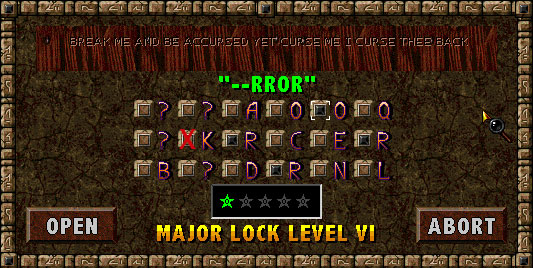
Now, I didn't get to try it because I didn't have a convenient save BUT I do wonder if this is a way to bypass that godawful four-in-a-row Trog Warrior battle.
buddhatude 9 Jun, 2020 @ 7:09pm 
First, thanks so much for this guide - it's amazing. I don't know if you're still updating, but:

1. Jacque Nefarge can serve as an infinite identify.
2. I also found that if you show him the Deep One Totem, he ID's it -- But he also gives you the code for the pillar!!
"a pitcher of a waterhorse at 12 o'clock, followed by a lobster and then a turtle. After that which they draw themselves a tuna, sea-wench, and a porpoise going clockwise. [Then they say] OH TOH YOG SOGGOTH or somesuch nonsense. [...]" So this gives you a friendly way to get the info other than stealing his diary.
But also:
Lady Error 20 Jan, 2019 @ 11:45am 
Note: In Grimoire V2 there are now houses (appear as cities on maps) in the Raven Wildes, Gideon Hedgemaze and other places. The one in Raven Wildes is called Evil Place and can only be entered at midnight with a password (click on the Grimoire logo to see the time of day). The one in Gideon Maze is called the Teosophist Lodge and requires a password too. Sitll looking for those.
Lady Error 20 Jan, 2019 @ 10:49am 
I'm not the one who copied the early version of your walkthrough to the Grimoire Wiki, but I credited you now and put a link to this complete walkthrough there: http://grimoire.wiki/index.php/Locations
Laedric 14 Jan, 2019 @ 5:45am 
Many thanks to you for the hard work writing this guide!
It`s especially important because the developer seems not to be able (and/or willing) to write a manual during the next centuries....
VorpalMace 22 Dec, 2017 @ 3:13am 
Some info about the pouches you couldn't figure out: I managed to store keys and rings in the Quest Pouch, and gems in the Snakeskin Puch.
The Weak  [author] 10 Sep, 2017 @ 3:59pm 
Good observations Gemmary.

For the Monolith thing I was looking for a hint that point to sleeping at the monolith speciifically, rather than just sleeping in general. I suppose it could be argued that it is the only "strange spot" other than the web, but the game is usually good at offering more direct hints.

For the skeleton, there are a lot of places in the game where a hand shows up but nothing happens if you click or LOOK at it. That said, I did not even try sleeping at the skeleton. That's a really good thing to know, especially since you could potentially soft lock there if that wasn't the case and you didn't have the weapon! I will add that and credit you.
As a side note, you can sleep at the monolith again after the webs are cut and it will still teleport you as well.