Adam's Venture Origins

Adam's Venture Origins

68 ratings
[EN] Walkthrough
By Vic=HKC=
English walkthrough for the game - I've seen from the second chapter that the previous guides for the three parts and for Chronicles, while being still helpful, wouldn't cover everything.
3
2
   
Award
Favorite
Favorited
Unfavorite
Introduction
As you can see on the screenshots, I'm playing in French, which means that the chapters titles aren't those found in the English version.

Also, I've done some copy-paste from my previous guides, so if I forgot to change something, feel free to point it.

Enjoy!
Oxford
Wake up after two minutes if you want an achievement. Speak with your father on the right. You'll learn that he has a new assistant. Look at the bookcase to understand that Genesis is your father's obsession. Then, use the world globe for fun (and for progressing into an achievement). Look at the fireplace to read the sentence on it.


By the way, on the bookcase, you can see the ancient design of Adam, as an easter egg.


Get out of the room and go the right then forward in the hall. Keep going until you see an open door leading to outside. Take that exit and follow the path until you see another door.

Keep going until you see a sign "Gallery". Go the right at the sign.

So, this is how you met the lovely Evelyn! Help her to open the library by solving a puzzle involving the paintings. You need to make sure that every coat of arms is associated with the right painting. Inspect that wall to begin.

  • 1st coat of arms (moon, sun and stars) = 2nd painting (moon)
  • 2nd coat of arms (treble key) = 4th painting (gramophone)
  • 3rd coat of arms (snake around the chalice) = 1st painting (snake)
  • 4th coat of arms (bird and lys) = 5th painting (bird in a cage)
  • 5th coat of arms (sword and shield) = 3rd painting (soldier/officer)


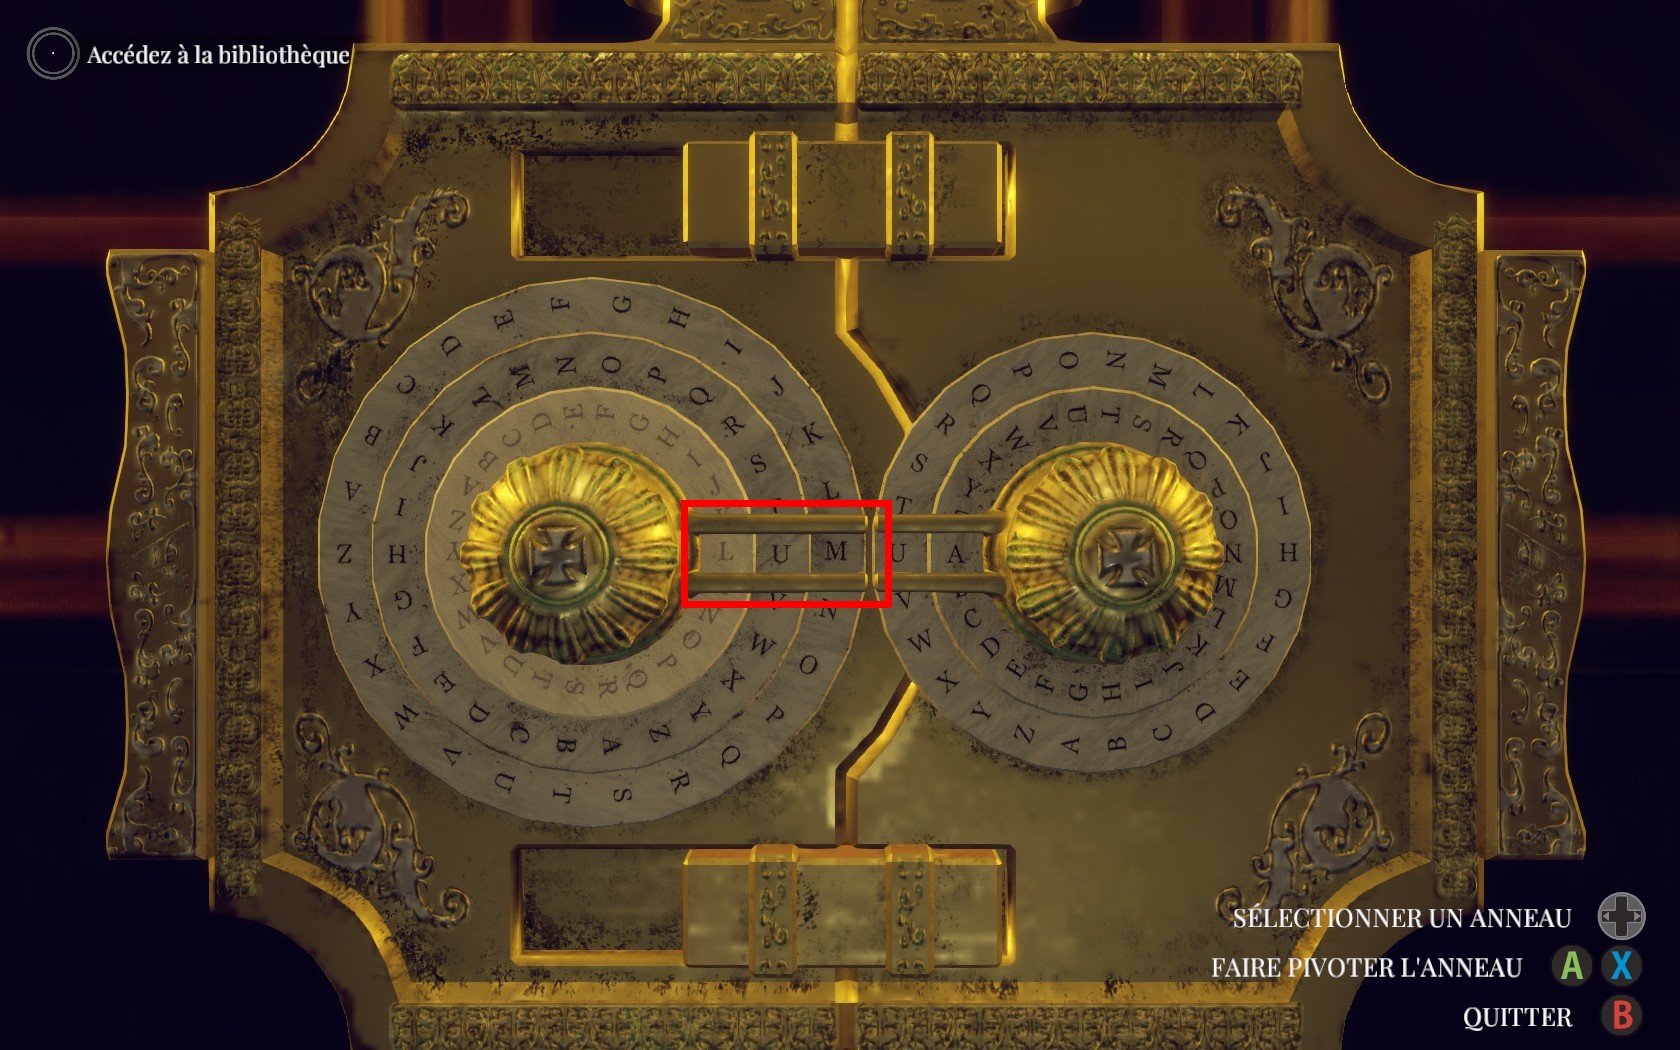
You discover the word LUMEN.

Follow Evelyn. If you don't see her anymore, just get out of the gallery and come back to the hall. Take the left stairs to find the library door.


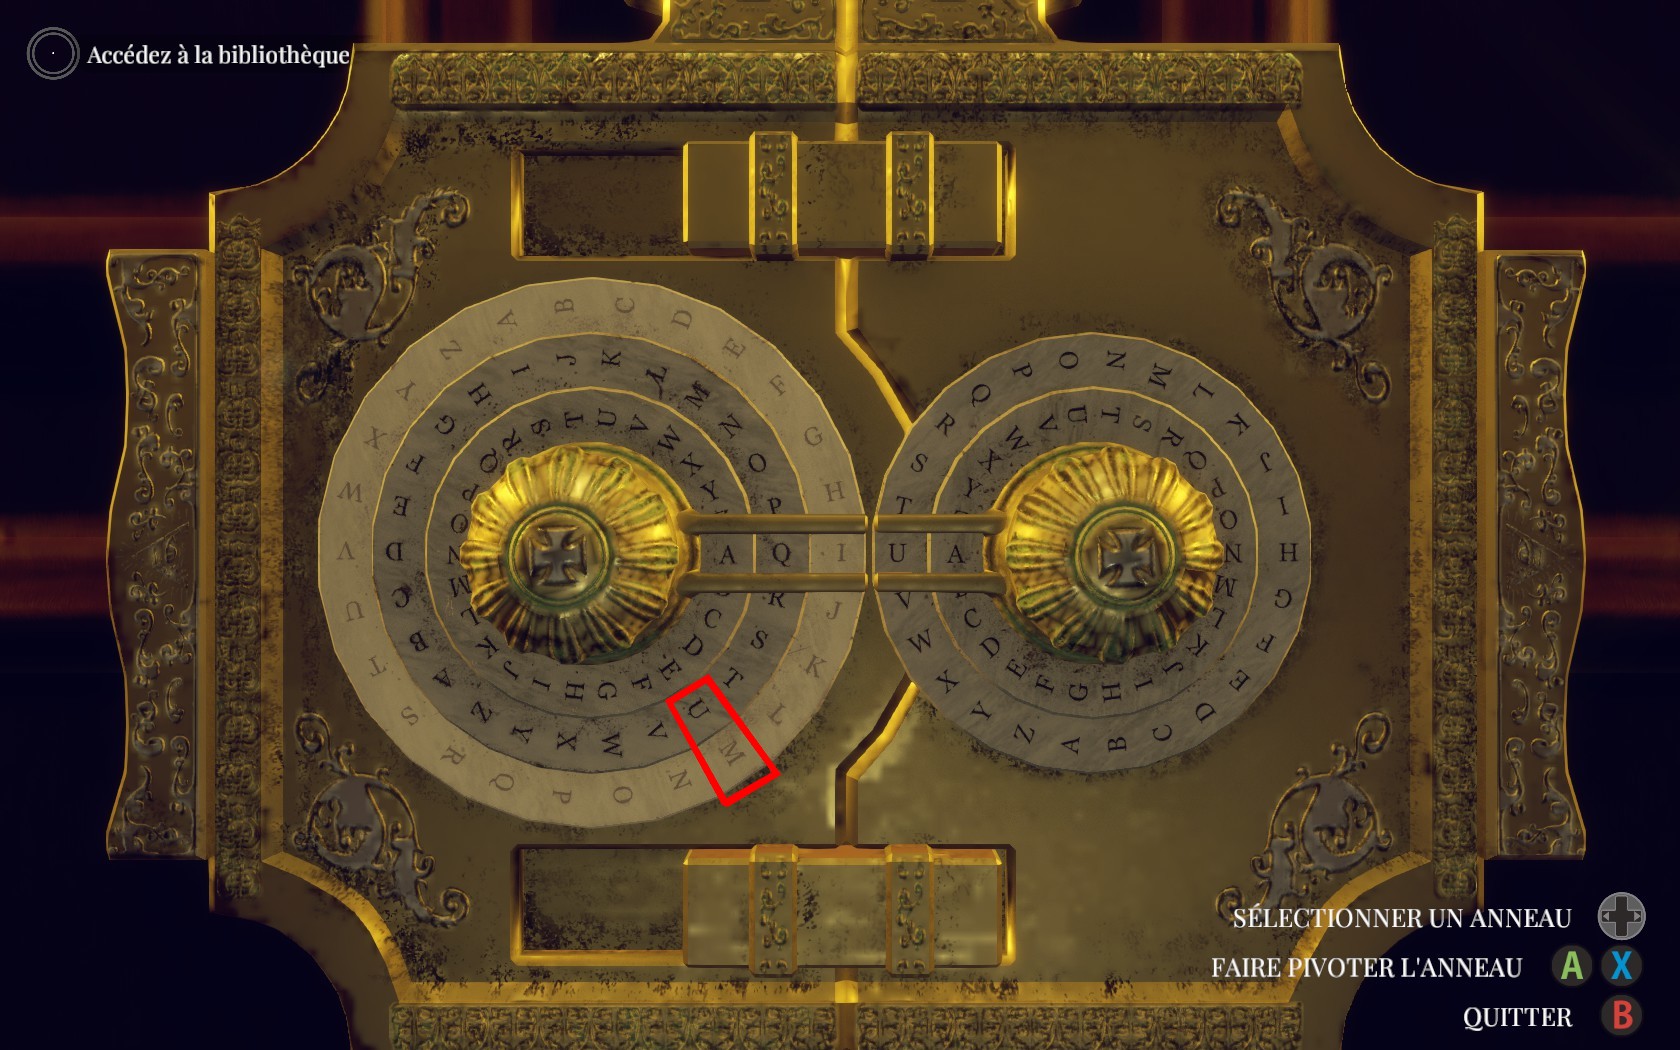
You need the word LUMEN to appear in the central rectangle. Each circle is moving differently but you can find a pattern.

  • First column = Chosen circle
  • First line = Other circles
  • If I choose a circle in the first column, how many letters will they go back?

Outer left circle
Middle left circle
Inner left circle
Outer right circle
Inner right circle
Outer left circle
-1
-2
-3
-3
-4
Middle left circle
-1
-1
-2
-3
-4
Inner left circle
-1
-1
-1
-3
-4
Outer right circle
-1
-2
-3
-3
-4
Inner right circle
0
0
0
0
-1

Now, this is the solution you want. You'll understand the explanation better.
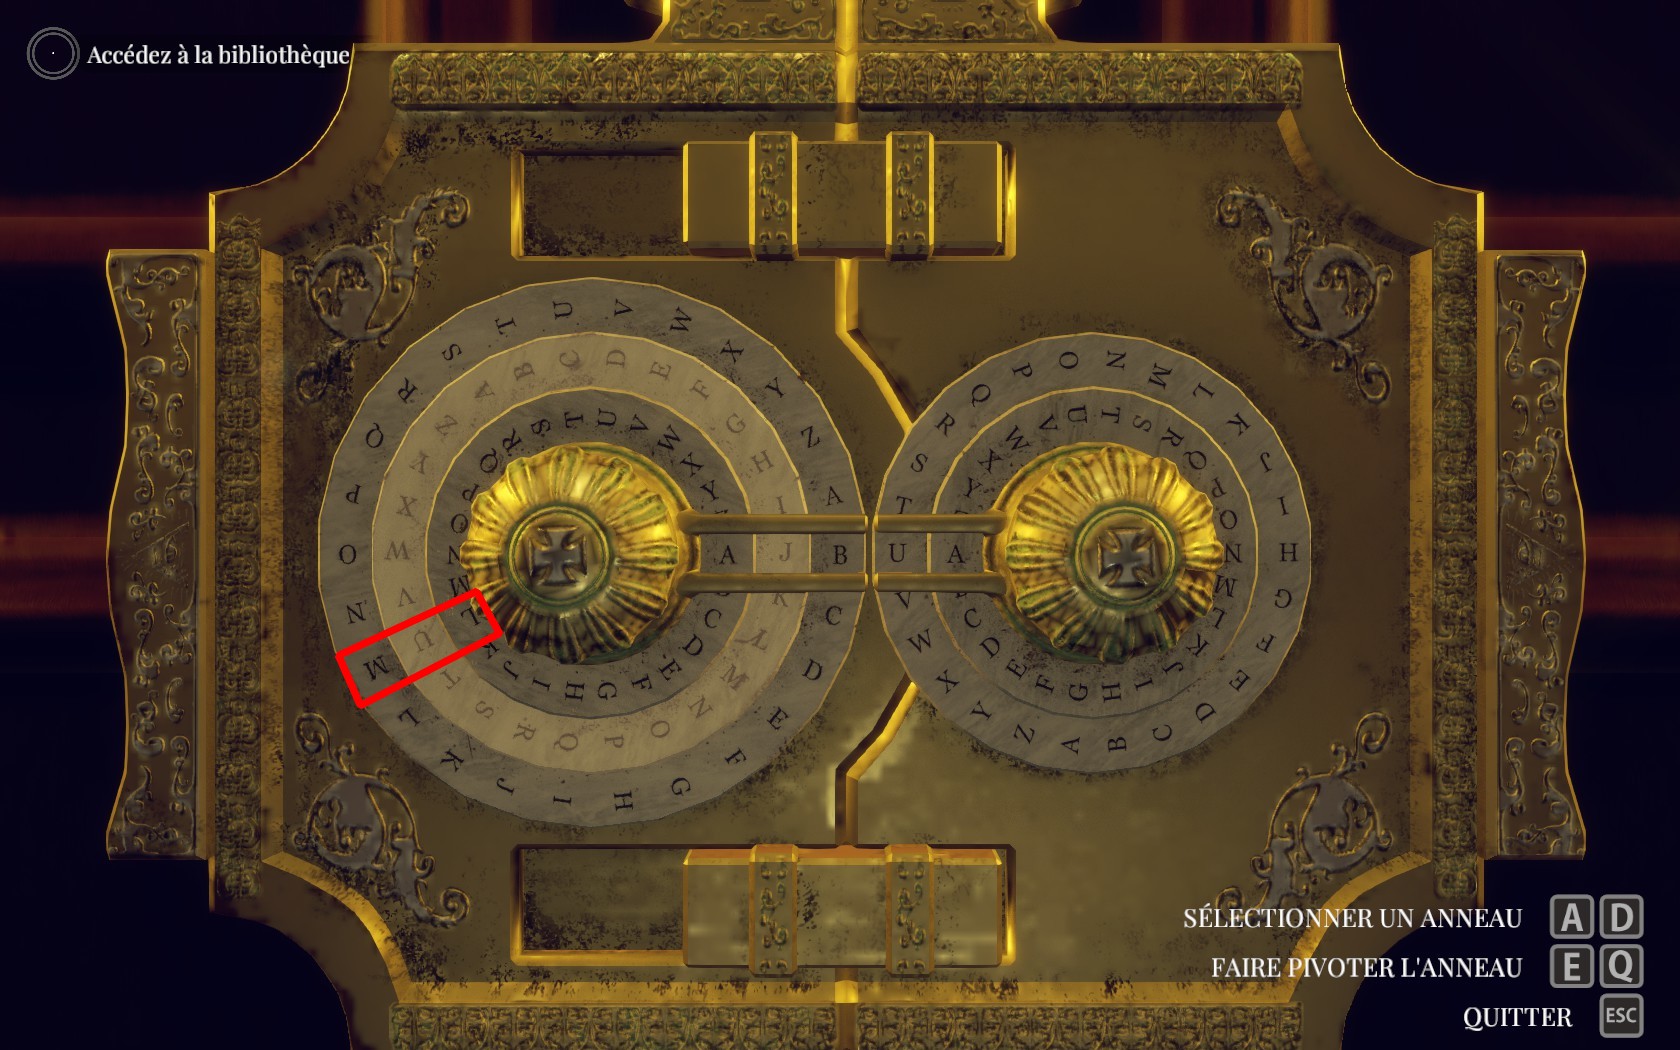
  • Choose the outer left circle and turn it until the U on the middle circle is aligned with the M to make UM.
  • Choose the middle left circle and turn it until UM is aligned with the L on the inner circle.
  • Choose the inner left circle et turn it until LUM is in the central rectangle.
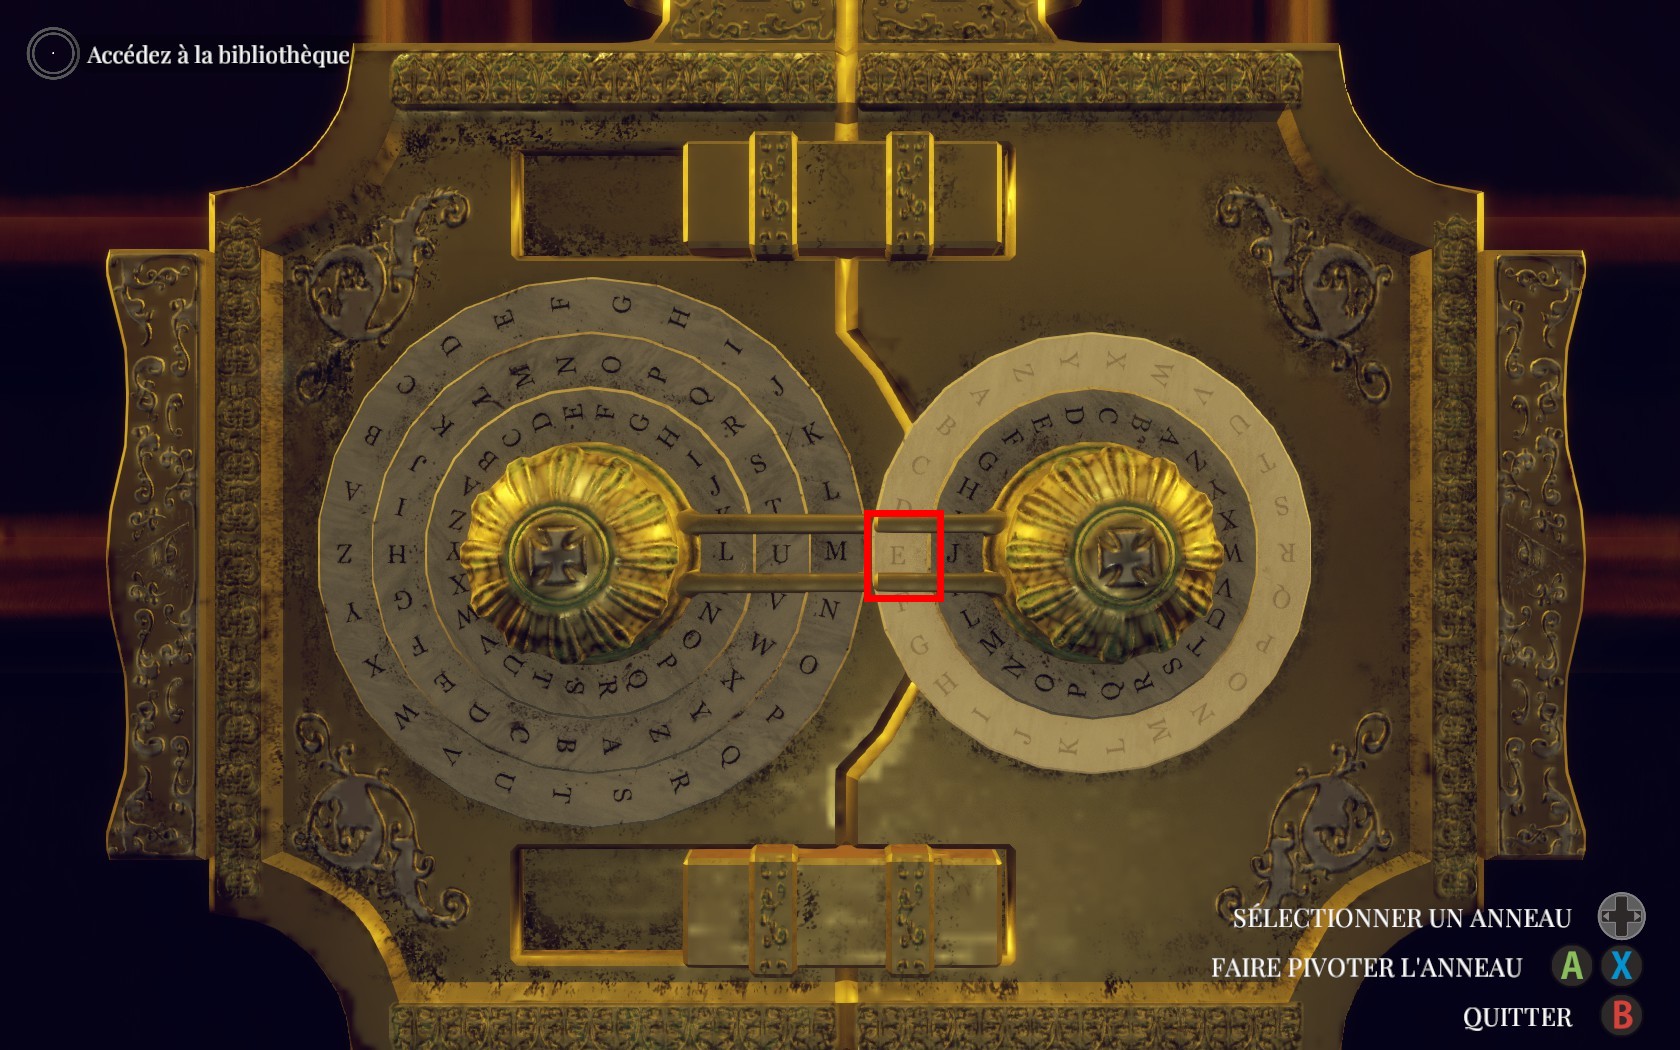
  • Choose the inner right circle and turn it until N is in the central rectangle.


To make progress for an achievement, spin the globe.


You need to find a book that's always looking at you or something like that. Go to the end of the library to find a bookcase with an eye at the top. Inspect it.


  • Select the right ladder and move it to the right then twice up.
  • Select the middle ladder and move it to the right then down then left.
  • Select the last ladder and move it to the left then up then right. Once you're done, move it down.
  • Select the top ladder to make it go down and then left.
  • Select the only bottom lader that can move to make it go to the top.
  • Select the now-free bottom ladder and move it up then left.
  • Select the top one and move it down then left.
  • Do the same for the other one.
  • Make the third ladder go to the top.
  • Make the bottom piece go up.
  • Move the last piece to the right.


Climb up the ladder and take the book.


Enter the secret passage and follow the path. Then follow Evelyn and open the door. Enter your father's office. After the cutscene, take the book on the desk and put it on the fireplace.
The Depths of Oxford
This section is very different from the original game. The puzzles have been removed and the swinging with the grapplehook is explained.

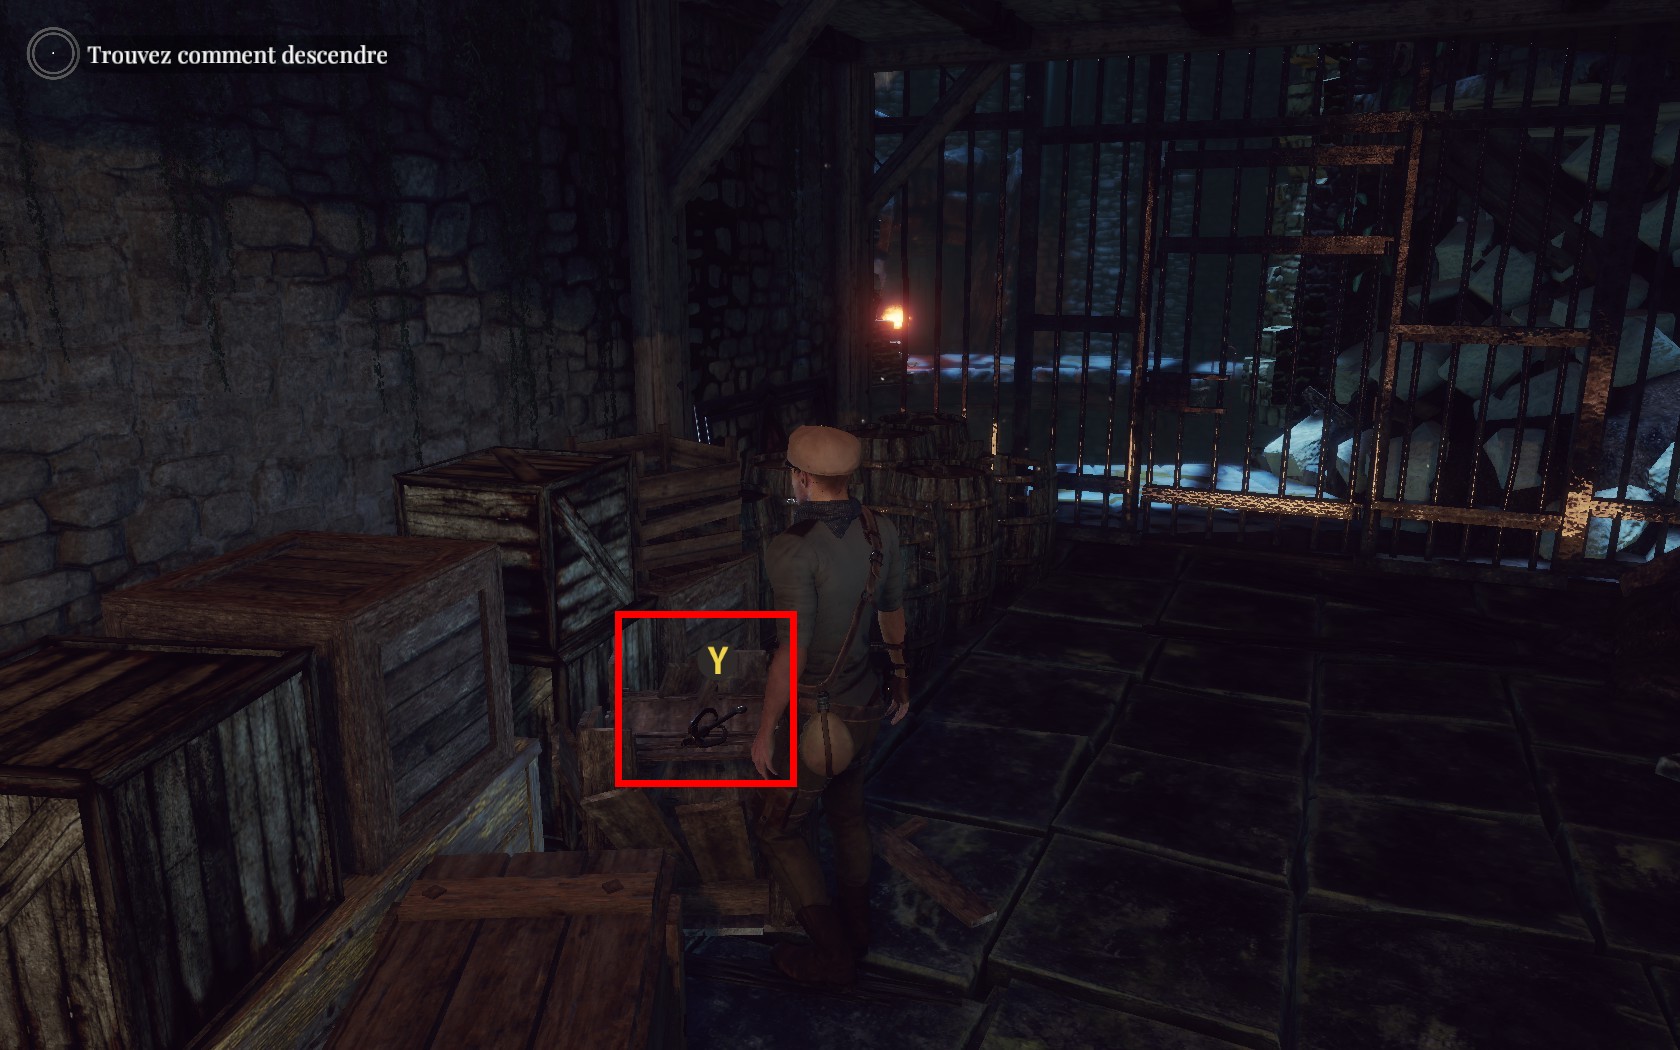
Anyway, after the fall, wake up. Take the hook on the crate then open the door. See the ring above? Well, if you see an X (for controller) or an F (for keyboard), you can throw your hook and swing. Do it then once on the other side, climb down the ladder.


You're going to climb down a lot, so do it where you can safely land. After a moment, you're going to see a bridge that isn't lowered. Use your hook to lower it. Cross it then climb down to the next ring.


Swing to the other side and keep going down until you arrive at the bottom of the pit.

You can see a gate clearly closed. At it opposite side, you'll find an overture with stairs. Follow that path, open the door and use the lever in front of you. It will open the gate.


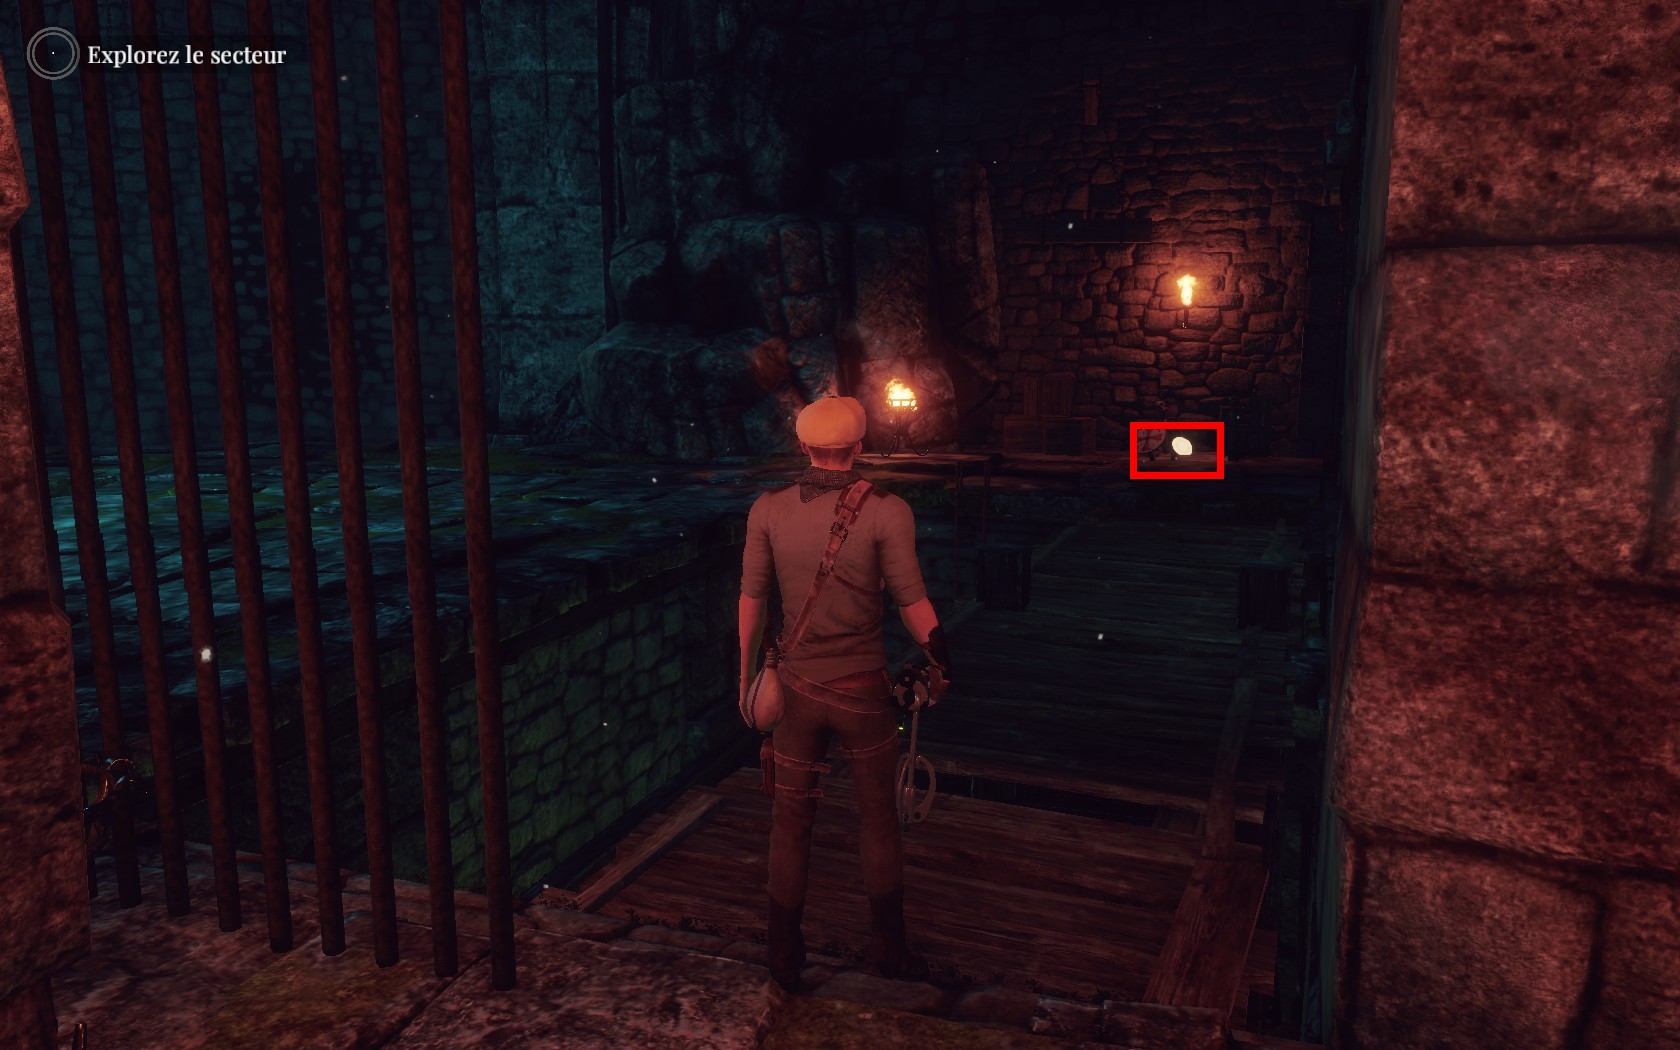
Go back to the newly opened path and follow it to see a blinking plate. By the way, Adam has a torch on him, you can light it thanks to the fire around. Take the plate then do a series of swings.


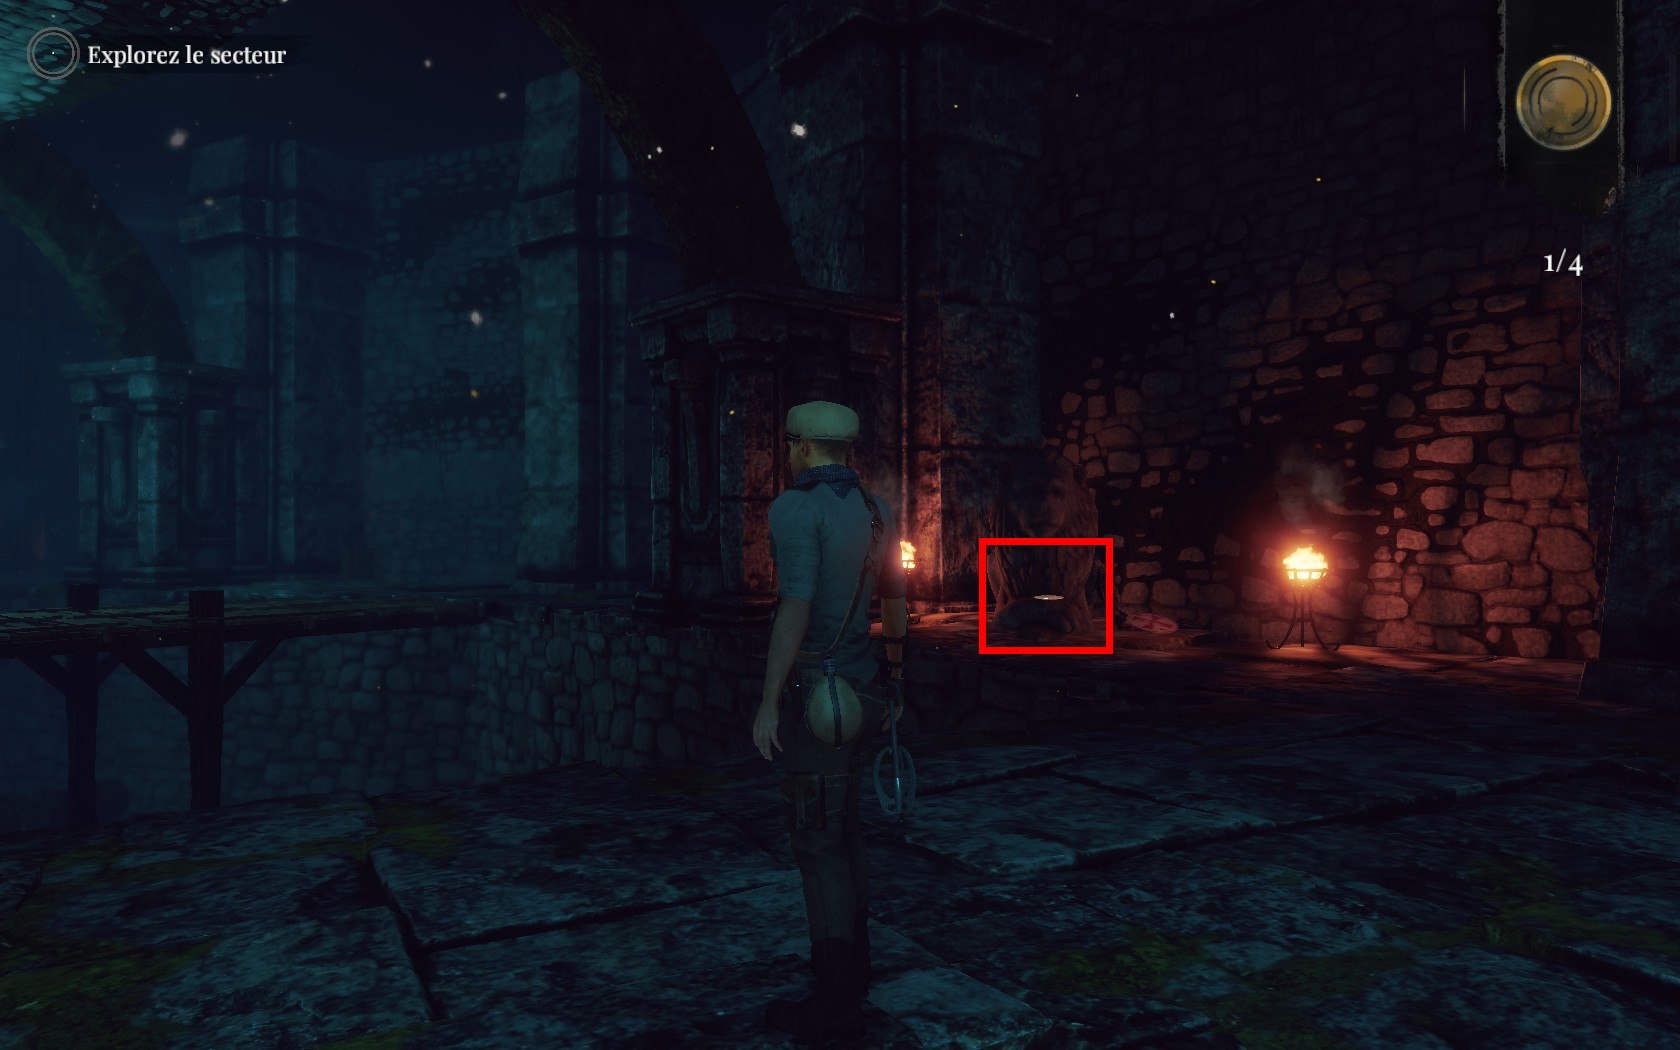
After the first series, you'll find another plate. It's easy to see where they are, apart the blinking, it's the only places where you have fires.


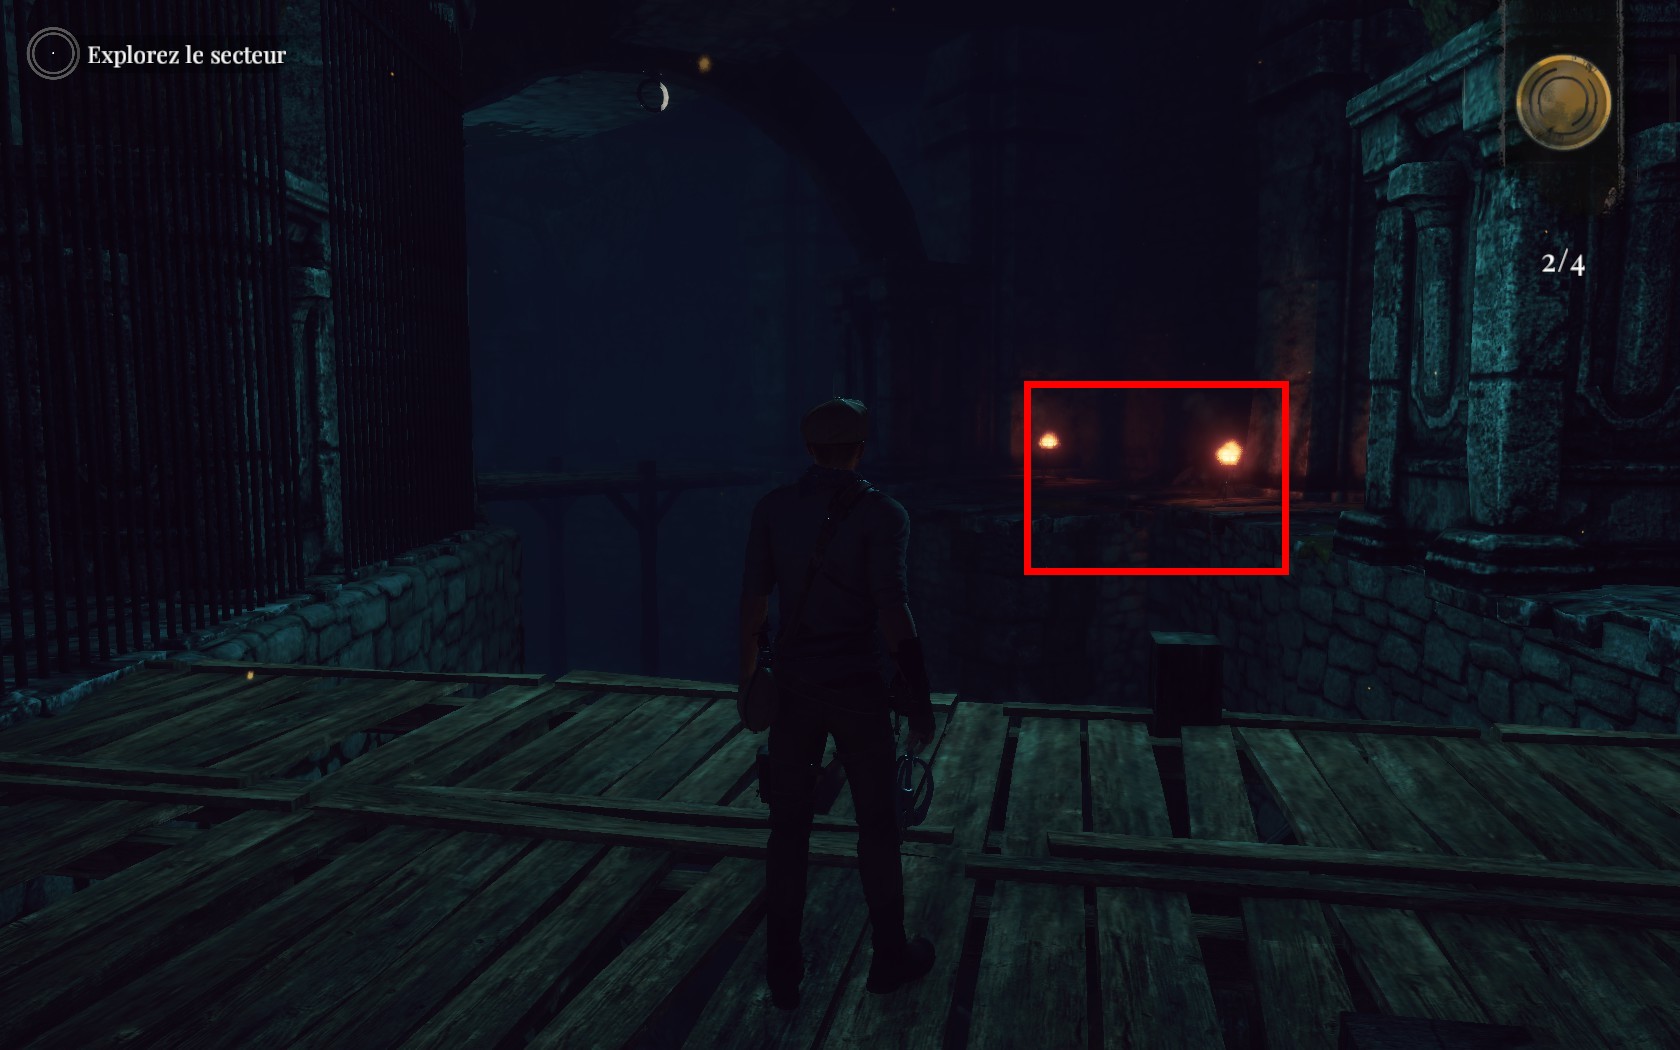
Swing again then land where the third plate is.


Do the last series of swings and climb up the stairs to find the last plate. After than, go back down and pass the overture on the right. Climb up to find yourself back at the bottom of the pit.


Go back to the map room and use the plates on the solar systems in front of all alcoves to find your next destination.

Route de Luz, 1925
After speaking to the mailman for a first time, speak with him again. He'll give you a wrench.


Go to the truck and inspect the motor. The result of the next puzzle can look like that.


The result of the next puzzle can look like that.
First row:
Full solution


Get in your car.
Luz, France
Knock on the door. Saint-Omair will tell you that he needs the crate on the roof. Bring it near the lift on the right. Put it in it then use the boiler next to the lift. You have to reach 27 in pressure. You begin at 12. The solution beyond is working:
  • +8
  • +12
  • -5


Climb the ladder up to speak with the professor. After the discussion with Evelyn, go to her right to begin the path to windmills. Lower the bridge then go the first windmill.


You need first to connect to the fuse 9:
  • down to +1
  • down to +1
  • right to +3
  • right to +2
  • up to + 2
  • right to 9
Then you need to go to the fuse 13
  • right to +7
  • down to -2
  • down to -2
  • left to +4
  • down to -5
  • right to -2
  • right to +3
  • right to +1
  • up to -1
  • up to +1
  • right to 13


Use the rope to reach another roof. There, you can lower the two brigdes but the right one is just leading to the professor, so cross the other. Use the windmill.


You need first to connect to the fuse 2:
  • right to -3
  • down to +2
  • left to -1
  • down to -1
  • right to +1
  • right to -1
  • up to -1
  • right to 2
Then you need to go to the fuse 21
  • right to +1
  • down to +2
  • left to +4
  • down to +1
  • right to +1
  • down to +1
  • right to +3
  • right to +2
  • up to +1
  • left to +2
  • up to -3
  • up to +2
  • right to +1
  • down to +2
  • right to 21


Evelyn will call you for help, so grab the rope to reach her roof. Then climb the ladder up and repair the third windmill.


You need first to connect to the fuse 8:
  • down to +2
  • down to +3
  • right to -1
  • up to +2
  • up to +1
  • right to +2
  • down to -4
  • right to 8
Then you need to go to the fuse 14
  • down to +1
  • right to -3
  • down to +4
  • left to -2
  • down to +4
  • right to +2
  • right to -3
  • right to -1
  • up to -2
  • left to +3
  • up to +5
  • up to -1
  • right to -2
  • down to -3
  • right to 14


Then, make a double swing to another roof, open the door and go to the left to go back to the professor. Talk with him. Once he finished his... coffee, follow him and grab the ladder.
Templar Church, Luz
After the professor stops talking, spin the globe for the final time and to get an achievement.


Use the projector on the table, the goal being to reproduce the circles shown. You have different solutions and keep in your mind that you have twice the same circle colored on a row or on a
column.


Here's one solution:
  • First row: Outer - Middle - Middle
  • Second row: None - Inner - Outer
  • Third row: Inner - Middle - Outer


Given the fact that I had to redo the episode as I didn't catch the new solution for the bells puzzles, I solved the projector differently, proof that you have different ways to solve it.


After the explanations from Saint-Omair, follow him and Evelyn to the Templar Church. Once there, you can light the gravestones if you want or even turn the statues but it's not like that you'll find the secret crypt.


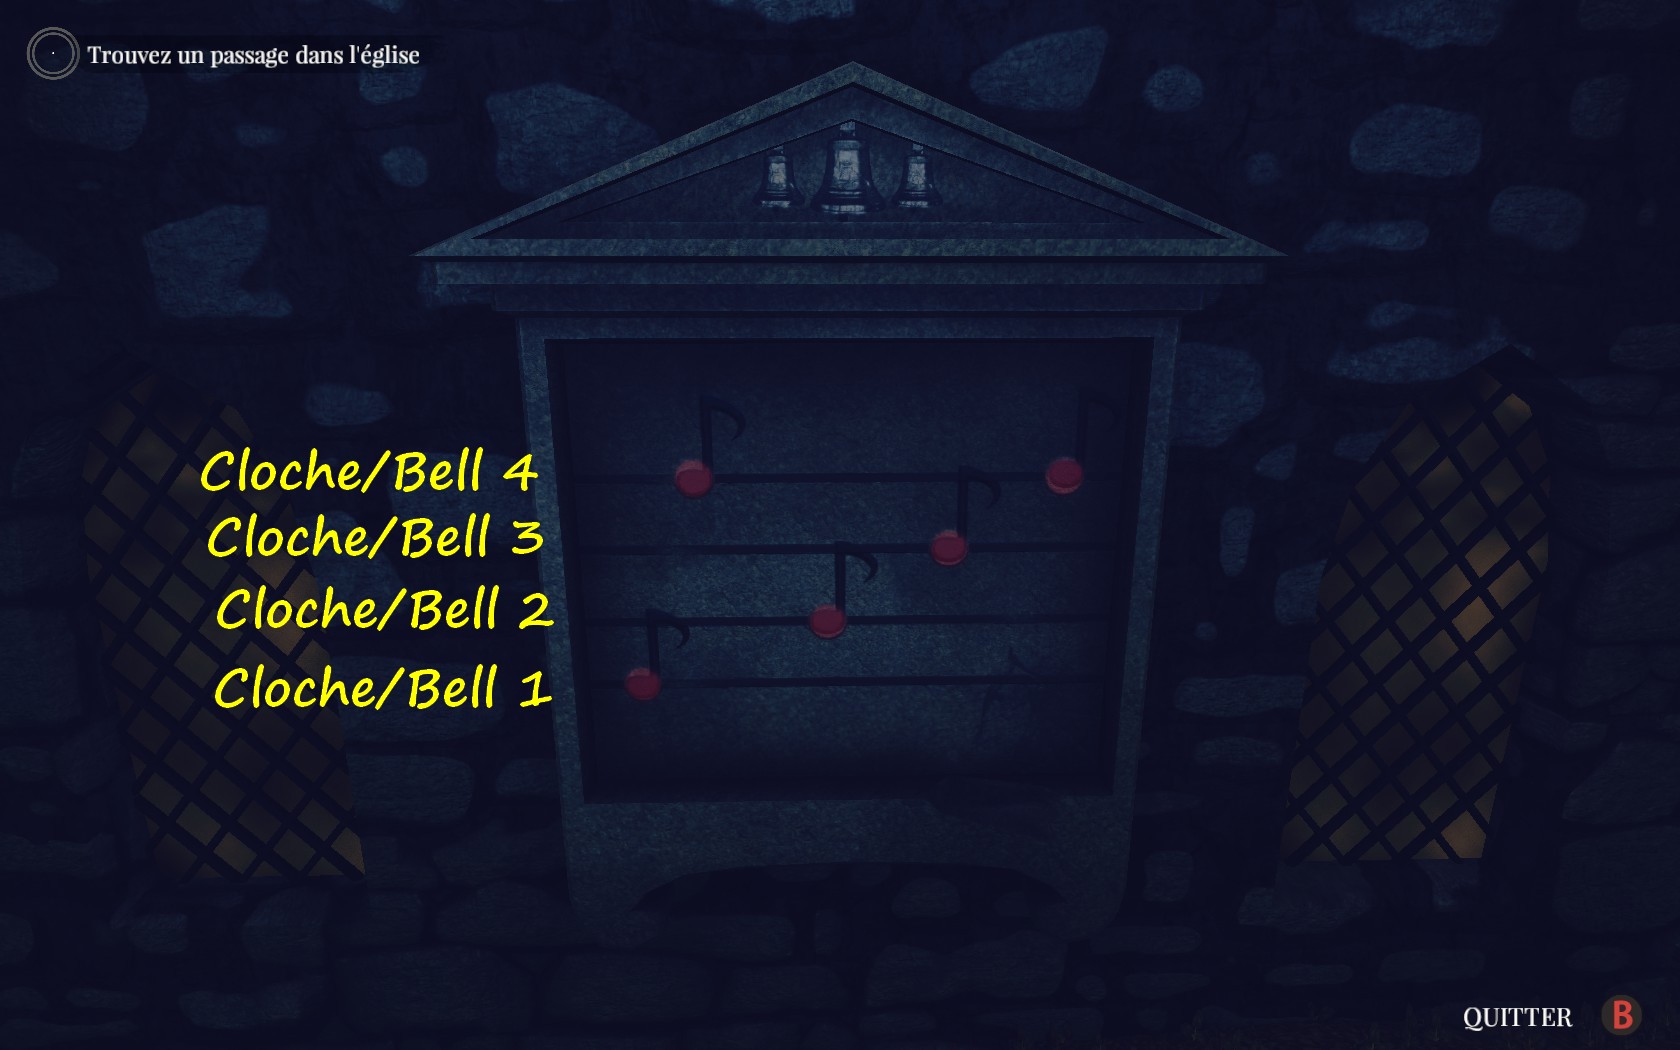
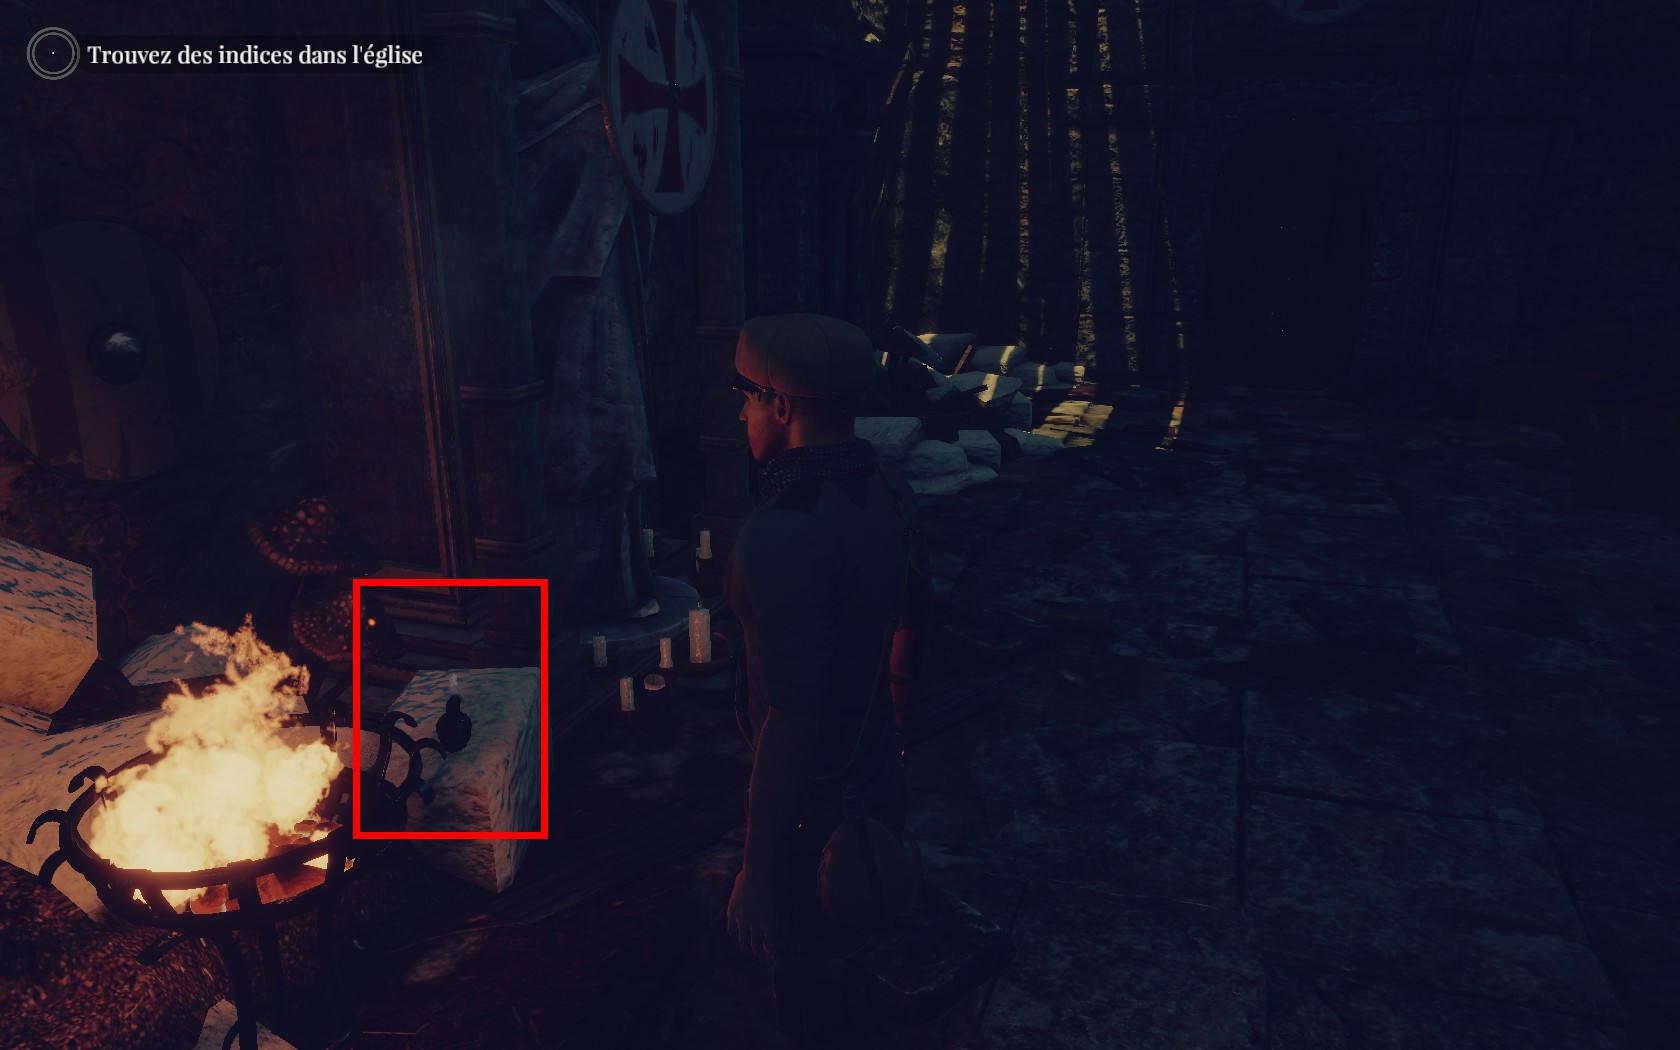
Go to the right side of the church to see a music sheet.


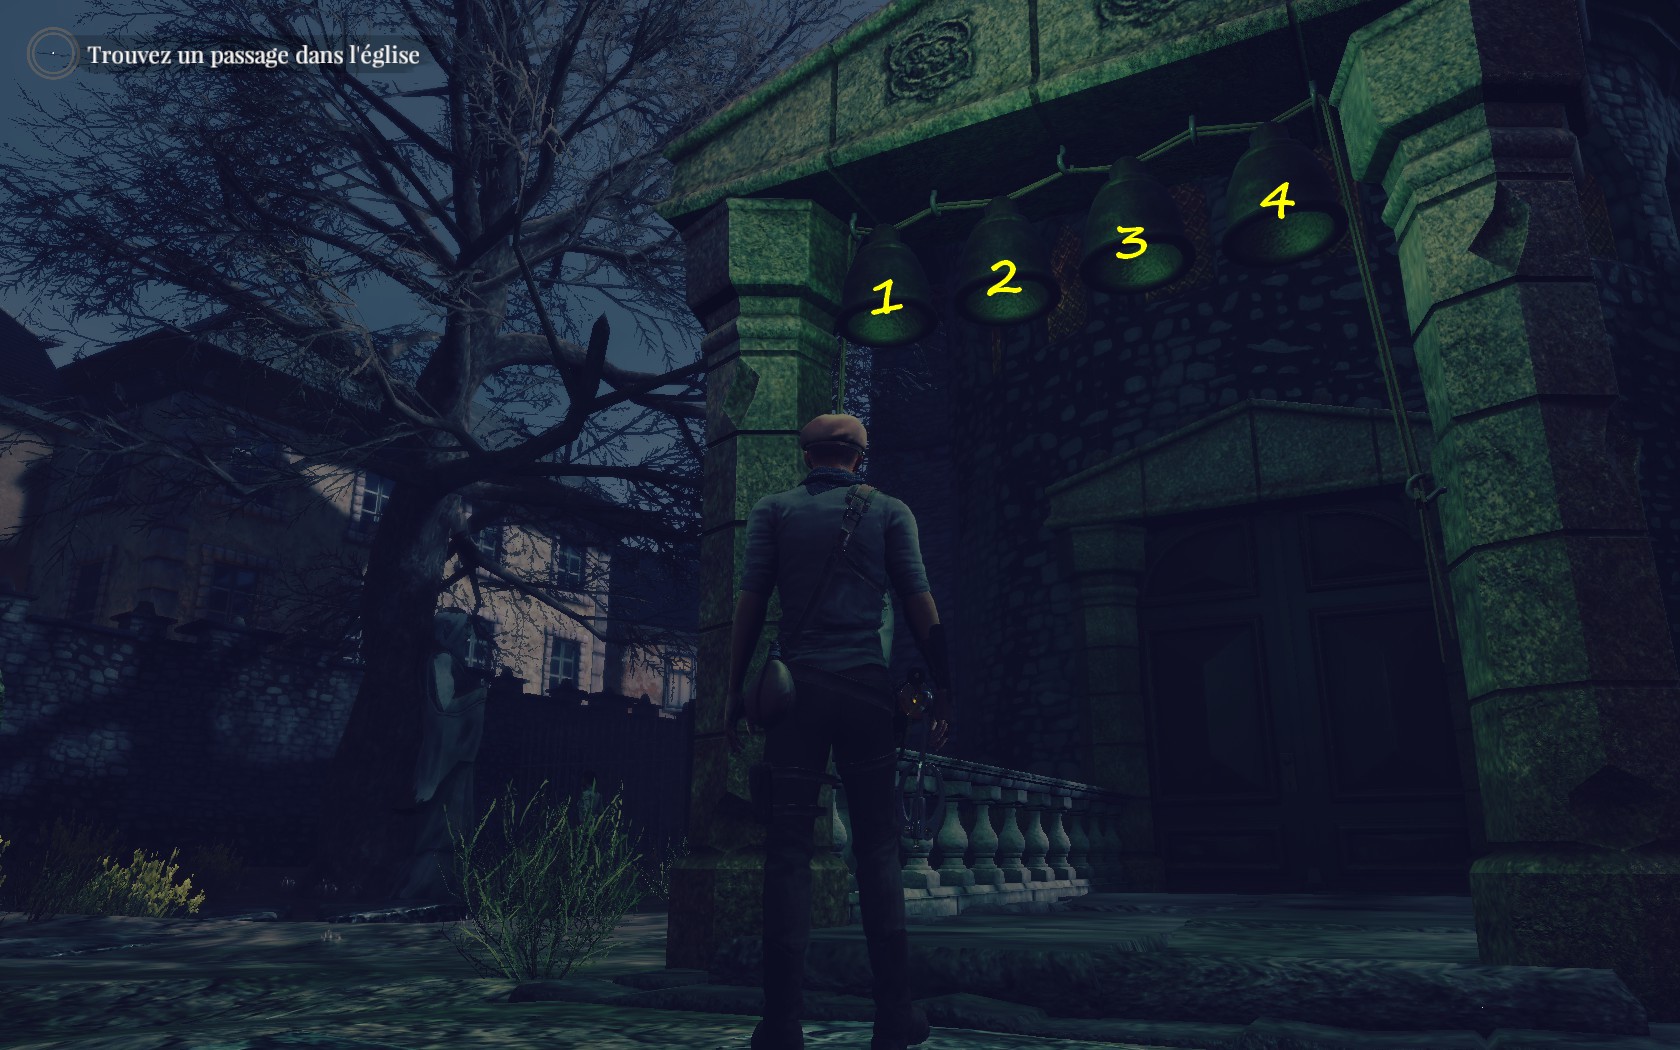
Then go to the bells before the entrance. You need to ring them as shown on the wall. The puzzle is easier than in the previous games. Here's the solution: 1-4-2-3-4.


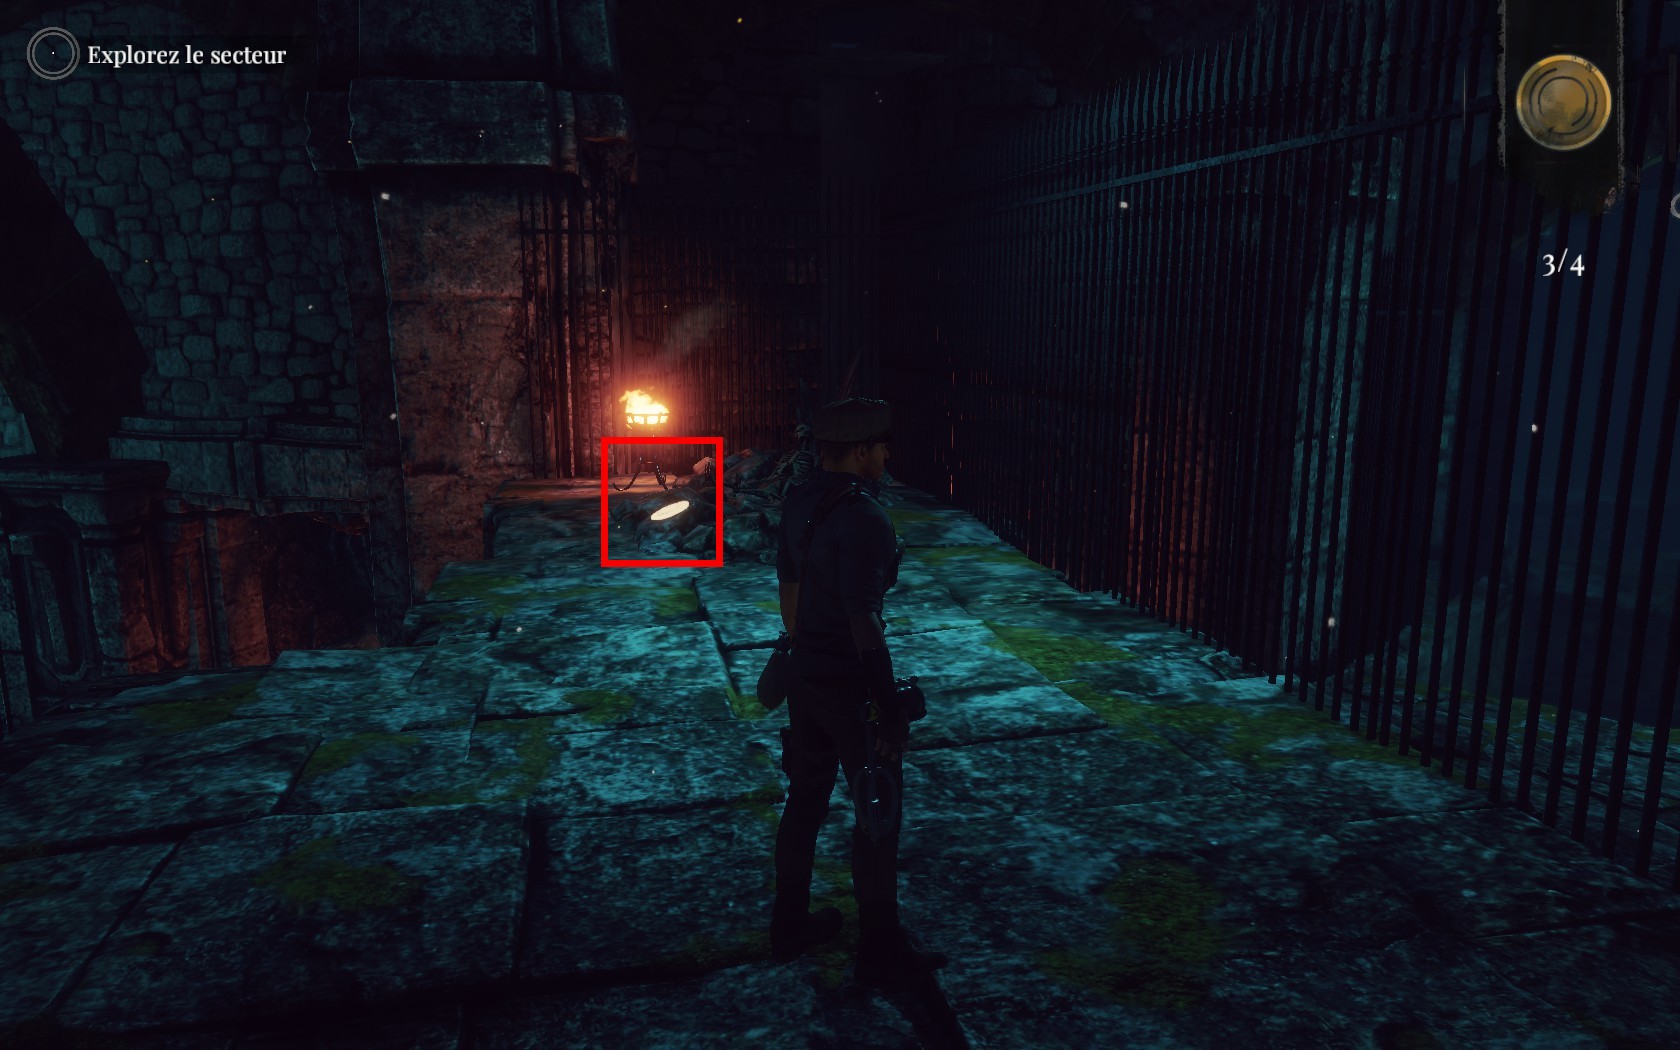
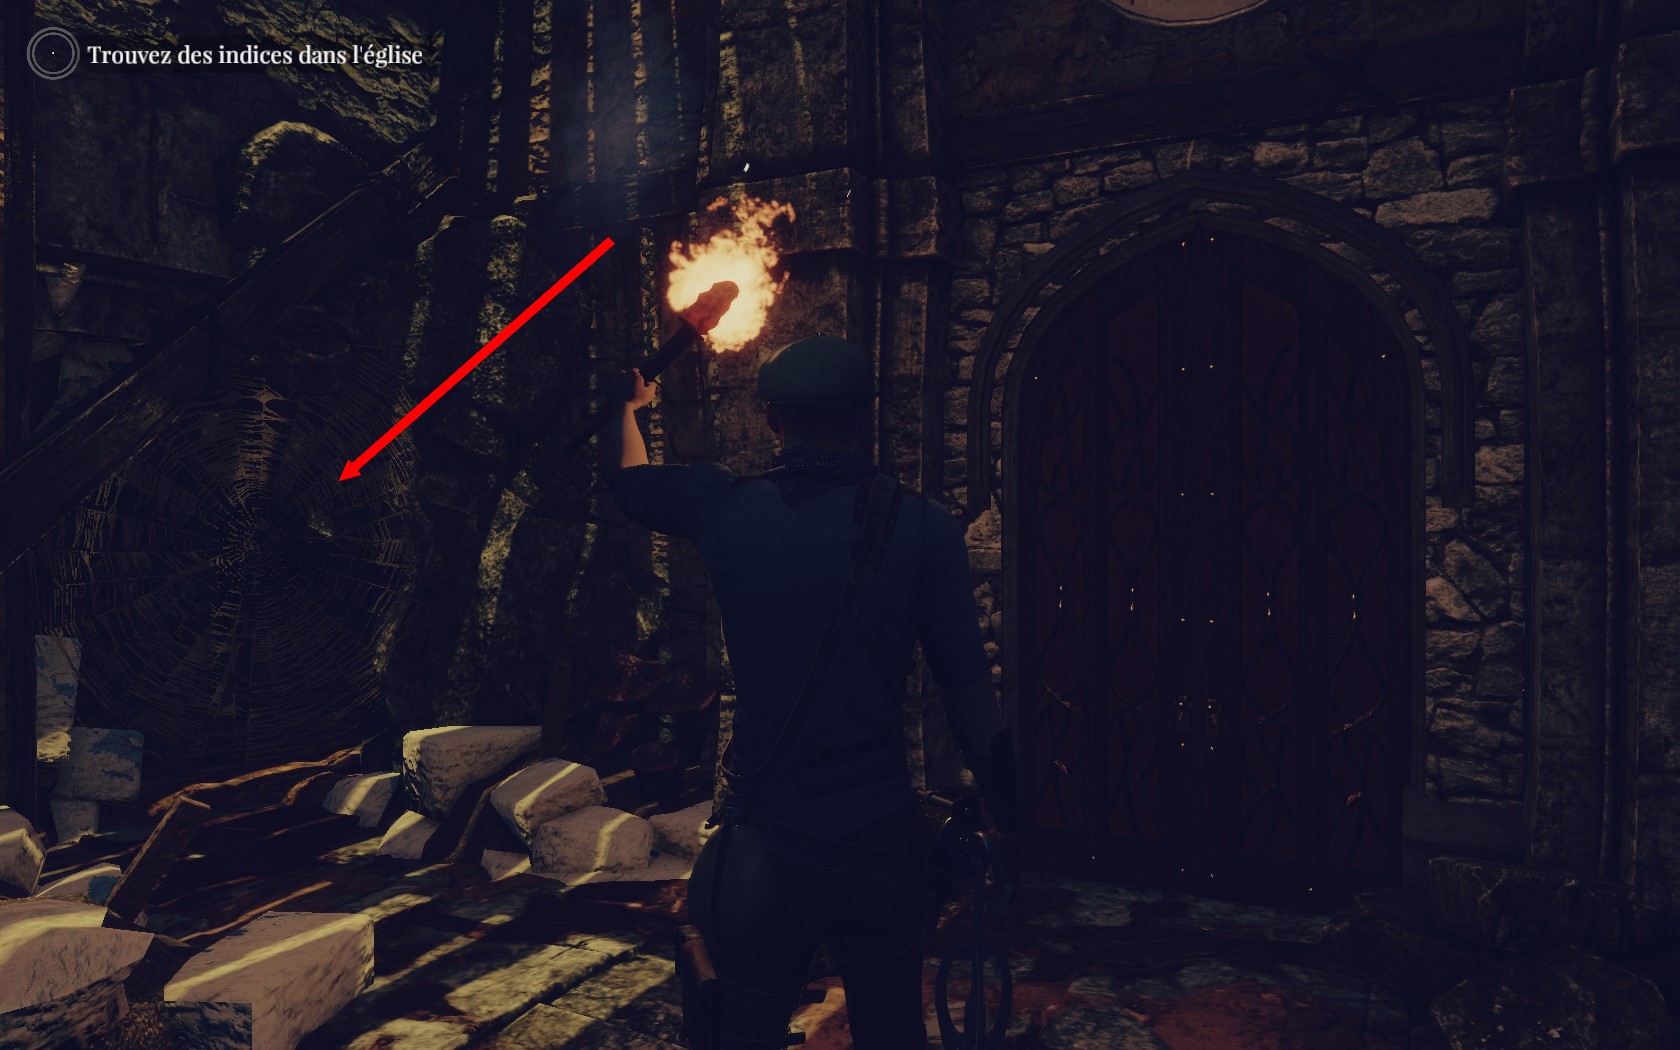
Enter the crypt and take the torch next to the fire. Light it then go to the door. On its left, you'll see a spiderweb. Burn it and follow the passage.


Once you're in the next room, you can light the fires near the door. You'll see a lever. Use it to open the door and the cage where the treasure lies.

At the Gate of Eden
When you take control of Adam, follow the path until you see a Clairvaux sign. Follow the arrow and use the cart. There, you'll have a little sequence of using the hook or dogde some obstacles.... or not.


Once you're out of the cart, Evelyn will talk to you. Then, go near the fire on the right, light your torch and follow the left path up to the professor. After the talk, go back down and look at the TNT machine just to the left of the door.


The goal here is to build a path from the barrel to the bottom by turning pipes and without any end not connected to another pipe. Activate the lever to see if you're right and to make some TNT.


Go back to the Professor and put the explosives near the rocks. Go to the professor and use the detonator. Follow the group. Then go down. But guess who is falling?
The Search Begins - I
After the fall, wake up and follow the only path you can access. Ignite your torch to have some light.


Follow the path until you see a giant head. Swing to reach it. On the left, you'll see a series of steps to climb.


At the top, crouch and follow the path. Going to the left or to right lead to the same room. Once outside, continue to climb the steps.


At the top, grab the ledge and go to the left. At your destination, you can let it go and follow the path. Lower the brigde and continue.


Swing across the pit and keep climbing. Use the rope. Use the lever and go to the passage that opened on your right. Use the rope.


Keep going down and go through another passage. You'll be back at the beginning. Use the lift then go forward.
The Search Begins - II
Go forward. Ignite your torch, cross the brigde and go to the first pole. Parts of it are missing. You can choose to go on the left or in the middle if you look at the top of the room. The order has no importance, as far as you're doing both rooms.


Left
Use your hook to swing on the left platform. You'll arrive in a room with a strage device in the middle after crossing a bridge. If you look to the left and the right, you'll see levers. Use them with your hook and grab the missing part of the pole which was hidden in the device. Come back to the main room.


Middle
Use your hook to swing to the middle platform. You'll arrive in a room with a strange device in the middle. Turn around and climb the steps. Then do a double swing to land at the top of the wooden structure. Turn right or left (depending on the side you chose) and use your hook to bring the lever down. Do the same but this time, on the other side, by using the rope to get down. You've opened the device! Take the missing part of the pole and go back to the main room.


Main
Use the missing parts on the pole. Then make sure that the following message is showing - sorry for the French in it. However, I'll use the screenshoots for the previous game as it was only in English.


"So these three things remain
Faith, Hope and Love
But the greatest of these is Love"

Now, you can swing to the right platform. Take the first gate piece then lower the bridge, cross it, swing to the other side and solve the next puzzle.


The next puzzle requires you to guess which numbers are hidden and which ones you need to make 10 on each row and column. However, the best way to solve the puzzle is just to rotate every number... Here's the solution

IV
I
V
IV
II
IV
II
VII
I


Enter the door.
A Leap of Faith
Go forward, ignite your torch and burn the spiderweb.


Once in the main room, go to the left waterfall to enter a new room. Climb the steps on your left.


Lower the bridge, cross it then go down. Climb again the structure in front of you. Look at the pole on your right.


The following message should appear:


"Everything can distract you
Look beyond the material world
Take the leap of faith"

Use the rope and go back to the main room. Now take the right waterfall and take the lever


Go back to the main room and go to the closed gate. Use the lever on its place.


Follow the path, then use your hook to swing behind the waterfall. Keep going until you're in front of a door with the same puzzle than earlier.


III
I
VI
V
III
II
II
VI
II


Pass the door to reach the next episode.
A Full Spectrum I
Use your hook to lower the bridge and cross it. Turn left to enter a big cave.


Go to the pole and make this message appear.

"I am the Light who follows me
Will never walk in Darkness
But will have the Light of Life"


Go to the end of the room and climb the steps up, which are next to the exit path, between the two fires. Use your hook to make a series of swings to the entrance of the room then turn around and swing to the platform on the right.


Use the lever then climb to the rope. Use it to reach the other side and use the lever there.


Use the hook to swing again and to reach safely the ground. Then go to the ice statue and the colored altars.


Push the statue to the light beam and then move again the statue so that the colored beams touch their altars.


Go to the newly opened exit.

Use the rope on the left to reach the other side. Use the legdes to reach an overture and pass through it.


Keep going down until you reach another door with a puzzle.


I
I
VIII
I
VIII
I
VIII
I
I

Enter the door.
A Full Spectrum II
Ignite your torch and just follow the narrow path until you can reach safety. Keep going and use the rope.


Jump to the platform on the left and then on the other platform. Climb the steps and turn around once at the top.


Jump to the platform and use the rope. Then climb up.


Follow again a narrow path until you can swing. Swing again and follow the path until the next ring. Swing again and keep going.
Hold On To Your Belief
Keep going to the instruments and climb on the tree platform to reach a pole.


"The wind blows where it wills
And you hear its sound
So it is with all born of the spirit"


Then go back to the instruments and bring them on the pipes. You'll know when you're on the right one if the instrument is moving.


Enter the waterfall room and climb up. Cross the lake and and go to the cage to find the missing pieces. Or another way to reach it is to go to the right and to lower the bridge.


Then climb up and once at the top, turn around and jump. Swing to reach the exit.
Eden
Go to the rope and use it. Join Evelyn and the Professor.


Solve the puzzle.


The big drawings (outer ring) must point towards their painting pieces. The hand must be at the top (meaning that in the inner ring, it should be the sun).


Use the altar and place your pieces so that the signs are the same of those on the inner ring.


Follow Evelyn and climb in the cart. Stay crouched until you reach outside Then follow the path to the plane.
Airport
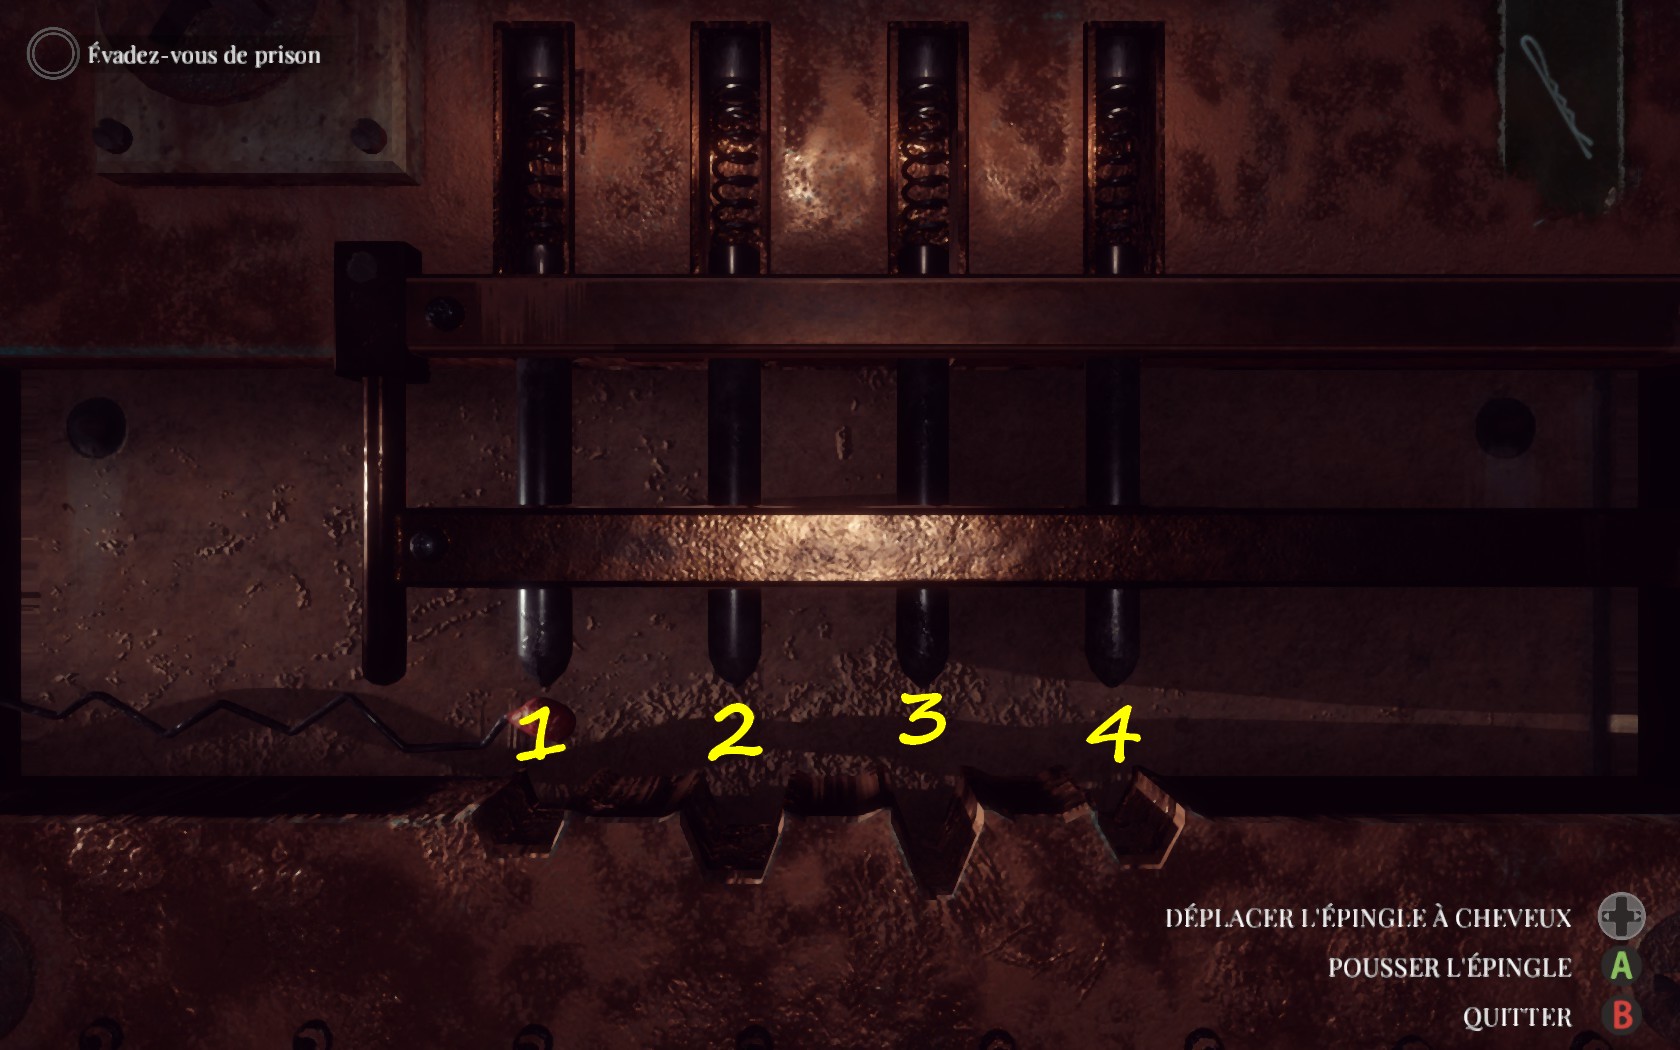
Now that you're a prisoner, your first goal is to escape. Look at the door and Evelyn will give you an hairpin.


The solution is 3-4-2-1-3.


Exit the cell and go forward to find a rope to use. Keep going until Evelyn warns you.


Then, it's a little sequence of stealth: go behind the wooden platforms when the light is moving away from you. Then run to the river on the side.


Follow the path and enter the garage.


Your mission is to find fuel for the car. Exit the garage by behind and crouch to enter the building on your right.


When the guard can't see you, run to the right and just enter between two packs of crates. Take the fuel and exit.


Come back to the entrance point, wait for the guard to pass you and go to the left and left to see the exit.


Once outside, turn to the right and enter the next building.


Go to the end of the room, where the exit is and when the guard is showing his back to you, go under the shelf on the left. Go to the right and crouch under another shelf. When the guard is moving away, go in front of you and take the fuel. Then come back to the exit and go outside.


Once outside, go behind the farthest tent. Then go around it and enter it (without being seen by the guard). Take the last fuel.


Go outside the tent and go behind the little shack. You'll find a ladder. Climb it up then jump on the platform in front of you and climb the ladder up. On the roof, you just need to swing to the other side and climb down to join Evelyn. Use the car to finish the episode.
Jerusalem
Follow the road ahead of you. Once in town, you can speak to the guard but he will not let you enter the area. Go to the left and turn to the left. Enter the house.


Climb the ladder then the stairs. Use your hook to swing to the other side. Jump then in the street.


Walk in the street, then turn to the left. Keep going until you're at the feet of a series of stairs. Instead of taking them, climb the crates and grab the pipe. Climb and jump in the street.


Keep going until you reach a place with Envelyn already inside. Follow her. After the cutscene, come back to the market and find the stall on the right with a pipe.


Climb on the stall. Take a series of swings to land on a roof. Climb higher to find a boiler.


The solution is to press the following buttons
  • -10 (you're kinda forced to it as adding pressures will result in a fire)
  • +7
  • -10
  • +7
  • -10
  • +7
  • -10

Open the trap next to the boiler. Once outside the house, pass the newly opened door and open the next one.

Excavation Site
Follow the path and enter the tent. Then go to the absence board and solve the puzzle.


  • William
  • Catherine
  • Brian
  • Alan
  • Rose
  • Thomas

Then go where Evelyn is standing and use the electric board to solve a puzzle. The solution is 2-2-3.


After Evelyn climbs the ladder, do the same. Use the rope.


When you're in the camp, you can speak to the guard at the barrier but you need a badge to advance. Speak to the guard in the last tent and enter it to repair the radio.


After that, the guard will need you to make some repairs with boilers. Follow him. Speak again with him to access the puzzle.


Press the following buttons - just for you to know, the first one is +7 and the third one is +11
  • -17
  • +7
  • -17
  • +23
  • -9

Speak with the guard again. Then go show your badge to the one at the barrier. Go to the left then try to use the rope. You fall near the boiler (or you can simply climb down thanks to the ladder too...)


The values for the buttons are the following: -24, +7, -12, +17, -8.

Press the following buttons
  • -24
  • +17
  • -12

Climb the ladder behind you and reuse the rope. Once on the other side, follow the path.

Solomon's Temple
After your fall, you'll need to open the door with Solomon's family tree. In each alcove, you'll find a tree drawning at each stade of its life. And each stade is in reality a member of the family. Go to the door to unlock the puzzle. Investigate each alcove. Use the door to unlock the puzzle.


  • Hand planting a tree: David
  • Full tree: Nathan
  • Growing tree: Shobab
  • Tree freshly out of the ground: Shimea


Lights should appear on the door. They have a different color. You will have to direct a purple beam on Solomon's name thanks to the device in front of the door.


To make a purple beam, you'll need the blue and the red glasses. The inner ring has only a red glass, so put it in front of the door. The blue glass will be on the middle ring. Finally, the outer ring will lead your light to Solomon's name which is the highest one.


Pass the door and swing to the other side or wait until Evelyn has passed the ladder to take it. Go to the next room.


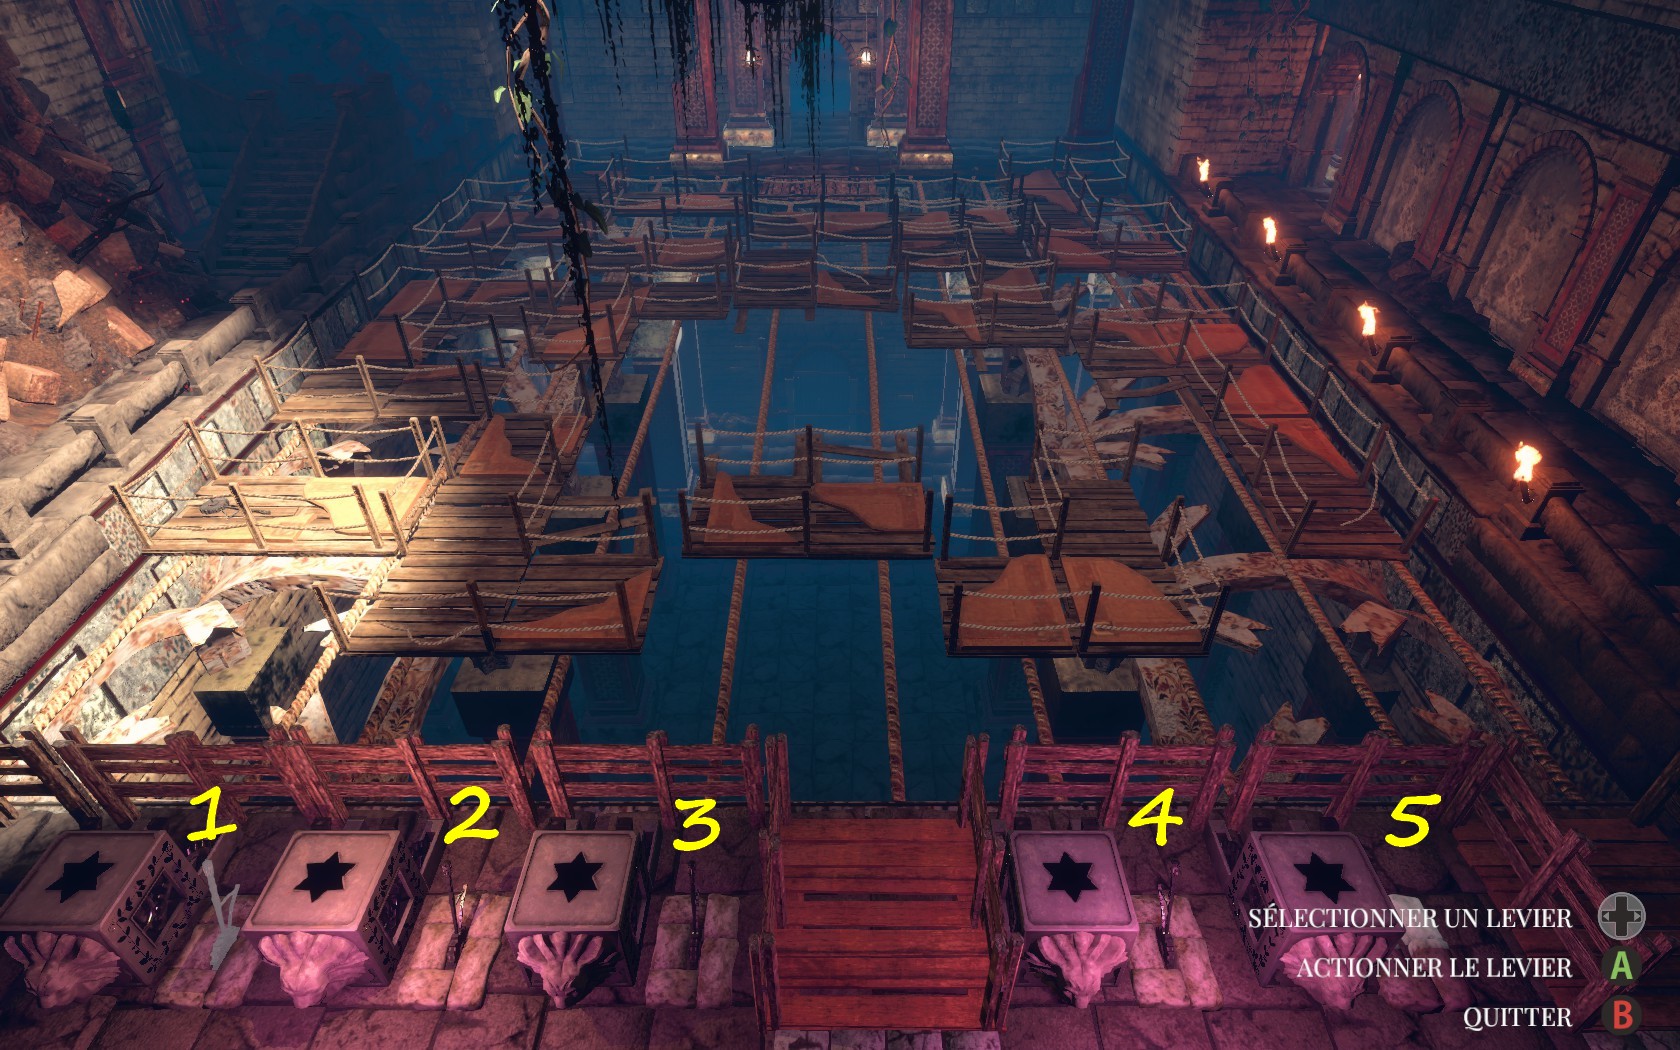
Go to the levers to notice that one is missing. In reality, it is hidden on the moving platforms. To reach it, use the levers in the following order (lever being the far left one).
  • lever 2
  • lever 3


Exit the puzzle and go take the missing lever and use it on its place.


  • lever 5 (missing lever)
  • lever 4
  • lever 3
  • lever 3
  • lever 2
  • lever 5


Follow the path, then swing to the other side. Follow the path to the top then do a series of swings. Keep going until arriving in a new room.


There go to the water and use your hook to lower a column. Climb it to keep going. The use the lift by pulling the lever.


Once in the hallway, use the lever next to the gate where Evelyn is to open it. Then go to the puzzle next to the amphora door.


The goal is to align the disks to create a path for the water. Each disk is going into a direction and will do a turn without stopping. Follow this sequence
  • Activate the "gold" disk
  • Activate the "purple" disk when the parts of the water path are aligned.

Solomon's Throne Room
Adam, being Adam, manages to upset Evelyn. She leaves you alone (no worry, you'll find her later).

Ignite your torch, then ignite the empty vase on the left. Keep going to the puzzle.


As you can see, the VI is stuck in front of the clover. And if you looks at the equations on the wall, you can see a clover. It means that it represents the number 6.

To find the other values, start by the last equation (rectangle x triangle).
  • 1 = sun
  • 2 = rectangle
  • 3 = triangle
  • 4 = diamond
  • 5 = circle
  • 6 = clover

Check by yourself
  • circle x sun + sun = clover || (5x1)+1 = 6
  • rectangle x rectangle = diamond || 2 x 2 = 4
  • rectangle x triangle = clover || 2 x 3 = 6

Then, move each number in front of their symbols.


Go to the open door. Follow the path until you find yourself in a room with several fires. Use the lever between them to free the access to the ladder. Climb it down.


Go to the disks puzzle.


  • Activate the "purple" disk
  • Activate the "gold" disk when the "purple" has moved once.
  • Activate the "red" disk when it's aligned with the "purple"


Pass through the door and use the lift at the end of the hallway.


You'll find Evelyn and a new disks puzzle. Inspect them and let Evelyn talk.


The following sequence is hard in timing.
  • Activate the "purple" disk.
  • At the second move of the "purple", activate the "red" and the "gold" disks.
  • When the "purple" disk is aligned with the "blue" one, activate the "blue".


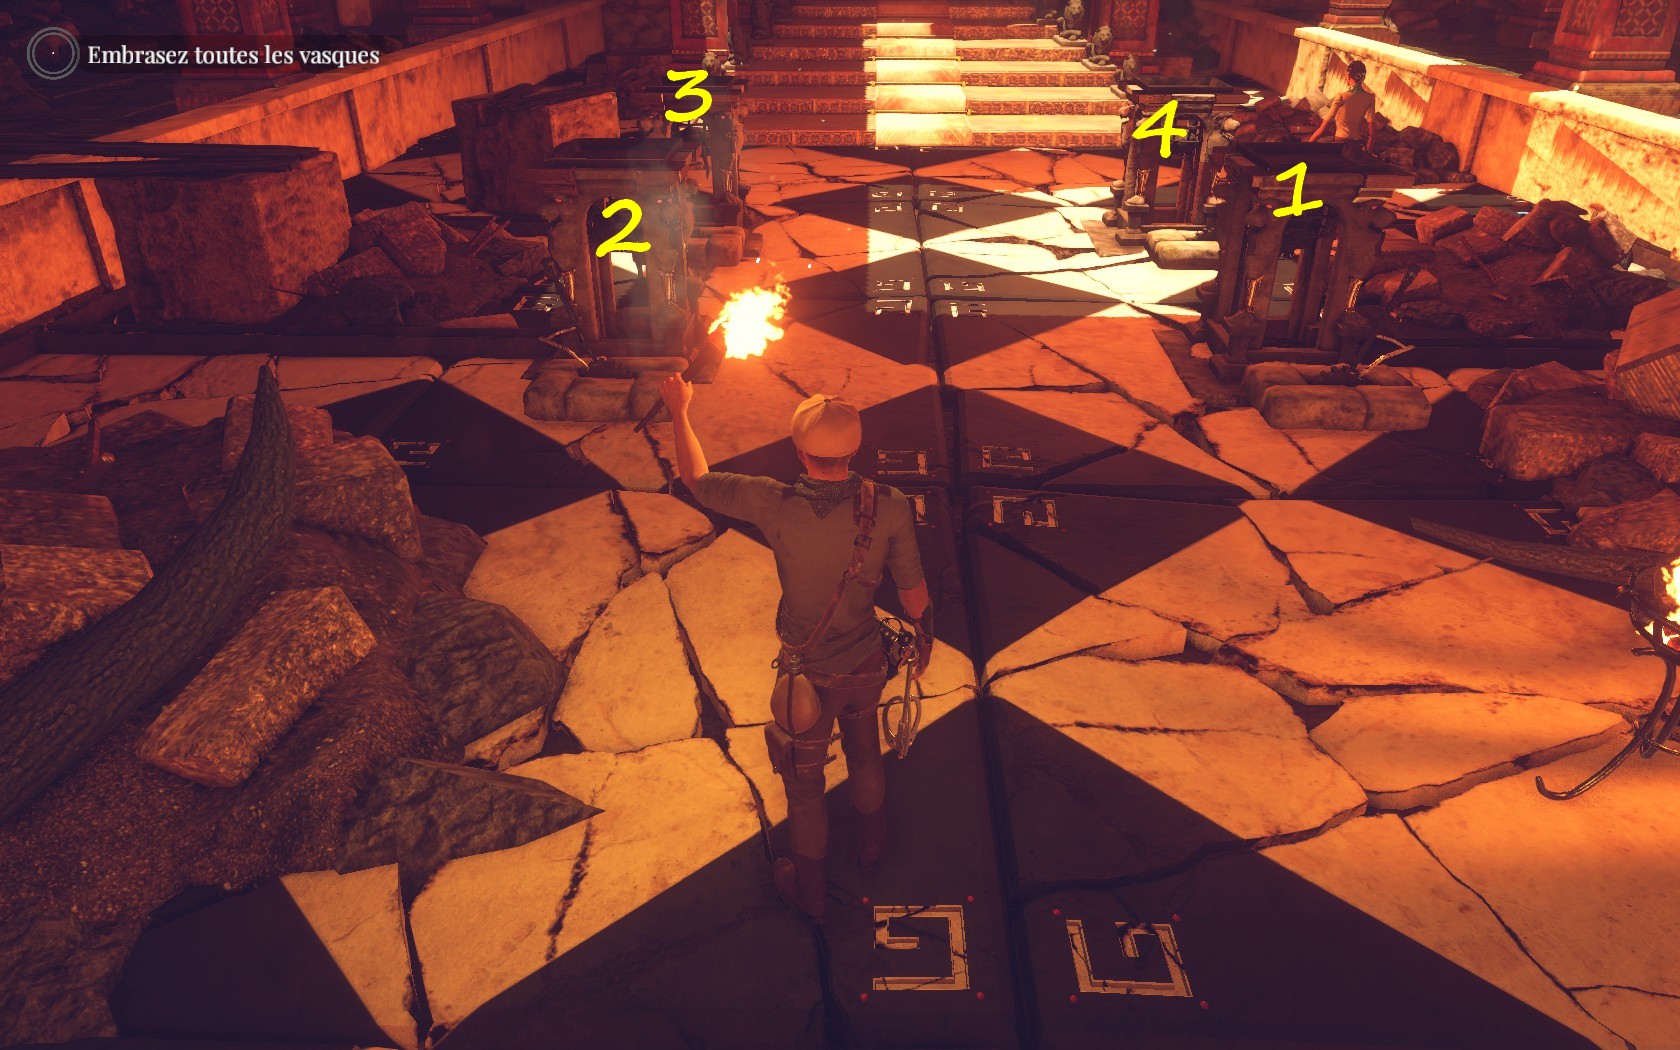
Ignite your torch then light each fire in that order and use the levers next to them - the clue to the order is on the floor.
  • bottom right
  • bottom left
  • top left
  • top right


Go behind the throne to find a pool.


Use your hook to lower a pillar to make a bridge and go to the other side. Use the lift.


Then you find yourself in a big room where you'll do some swinging. Keep going to the puzzle.


You have to make a green flower on the top, a blue one on the right, a yellow one on the bottom and a red on the left. Each mechanism turns. The middle one is the only that can carry the gems around.


Follow the path to reach the book and use it.


After the cutscene, follow Evelyn. When the bridge is destroyed, swing your way to the other side and follow the path.


Mine - I
Well, you have a knack to be inconscious. After the cutscene, wake up and follow the path. Climb up then crouch in the little overture and get to the big room. Get down and use the cart. Open the gate.


During the sequence, don't forget to use the hook to change the path of the cart. At the end of your journey, use your hook on the ring and do some swinging until you reach safety.


Follow the path and use the lift by pulling the lever. Climb the ladders and use the rope to reach the maze.


Enter the maze. First, you need to reach the lit square. It will trigger the bridge that will let you advance. The arrows are triggering fences.


  • Up
  • Down
  • Left
  • Left
  • Up
  • Right
  • Lit square for the bridge
  • Down
  • Down
  • Right
  • Down
  • Left
  • Left
  • Up
  • Down
  • Left
  • Up
  • Up
  • Left

You can choose any cart. However, your path will be a little different - more stealth for the left side and more danger on the cart ride.


Left
Stay crouched and don't forget to use your hook in the middle of the cart ride. Once you're finished, go to the left of the barrier and climb up. Fall to the other side.


Climb again and then you'll have to reach a bomb. Follow the path and jump to grab the ledges. Then let go on the other side.


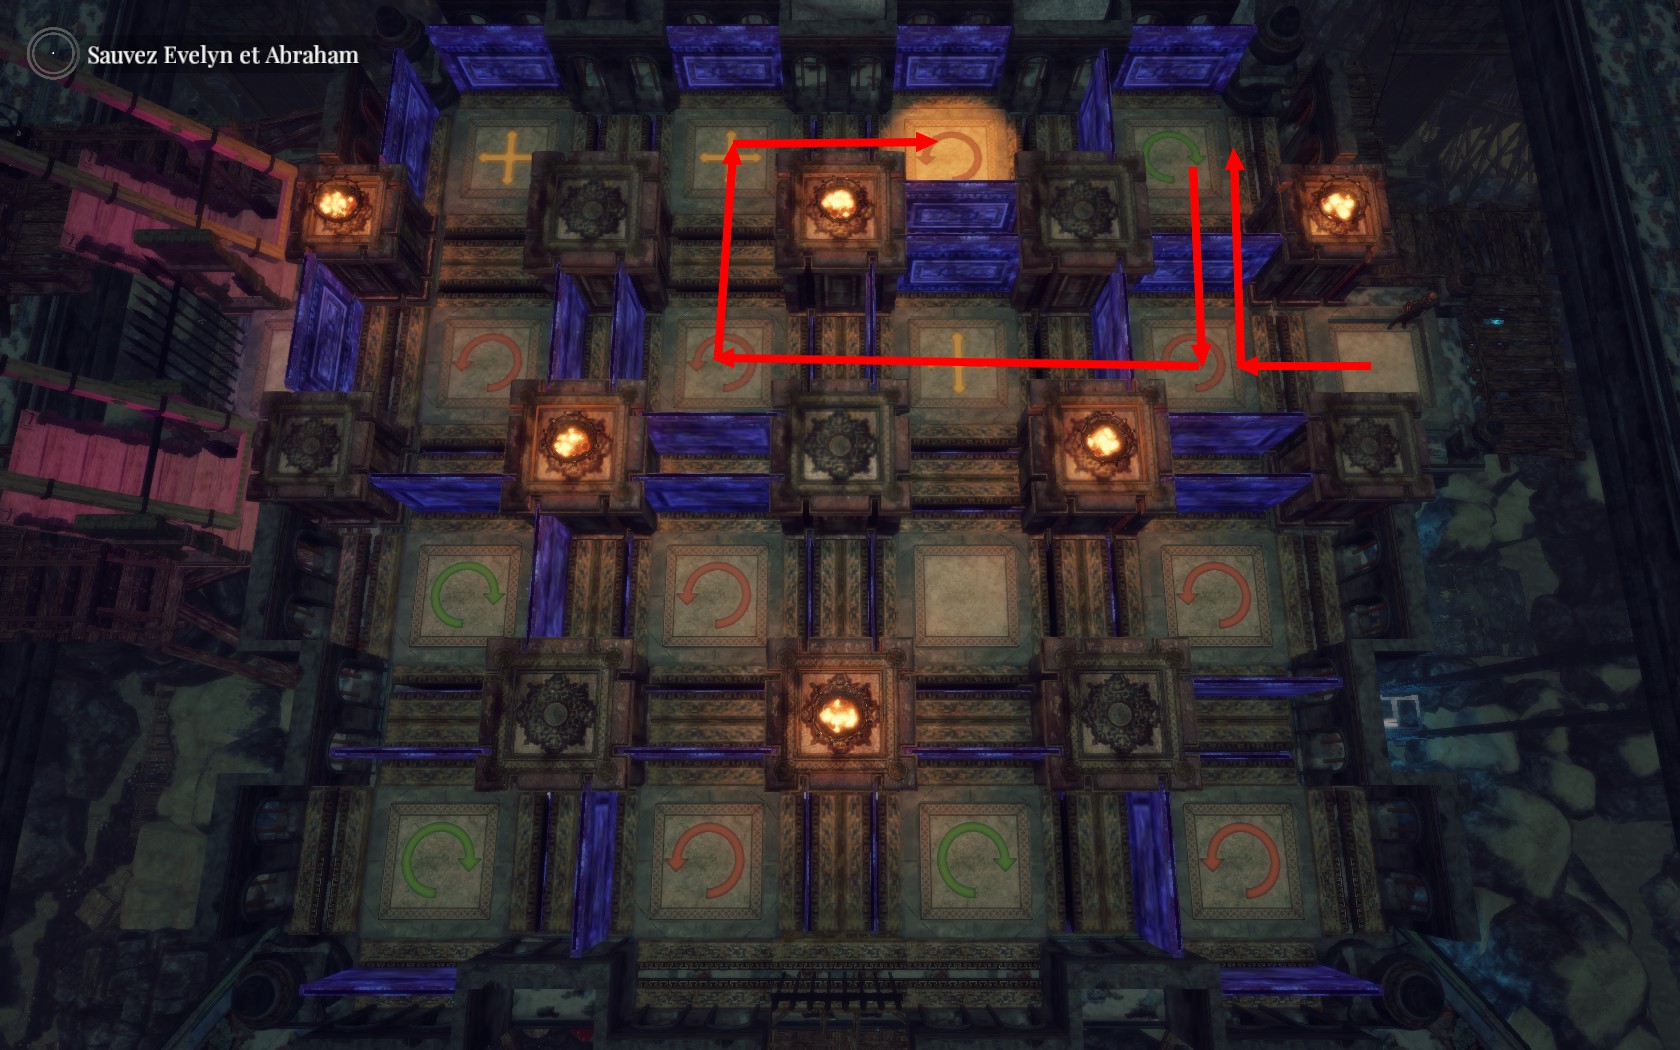
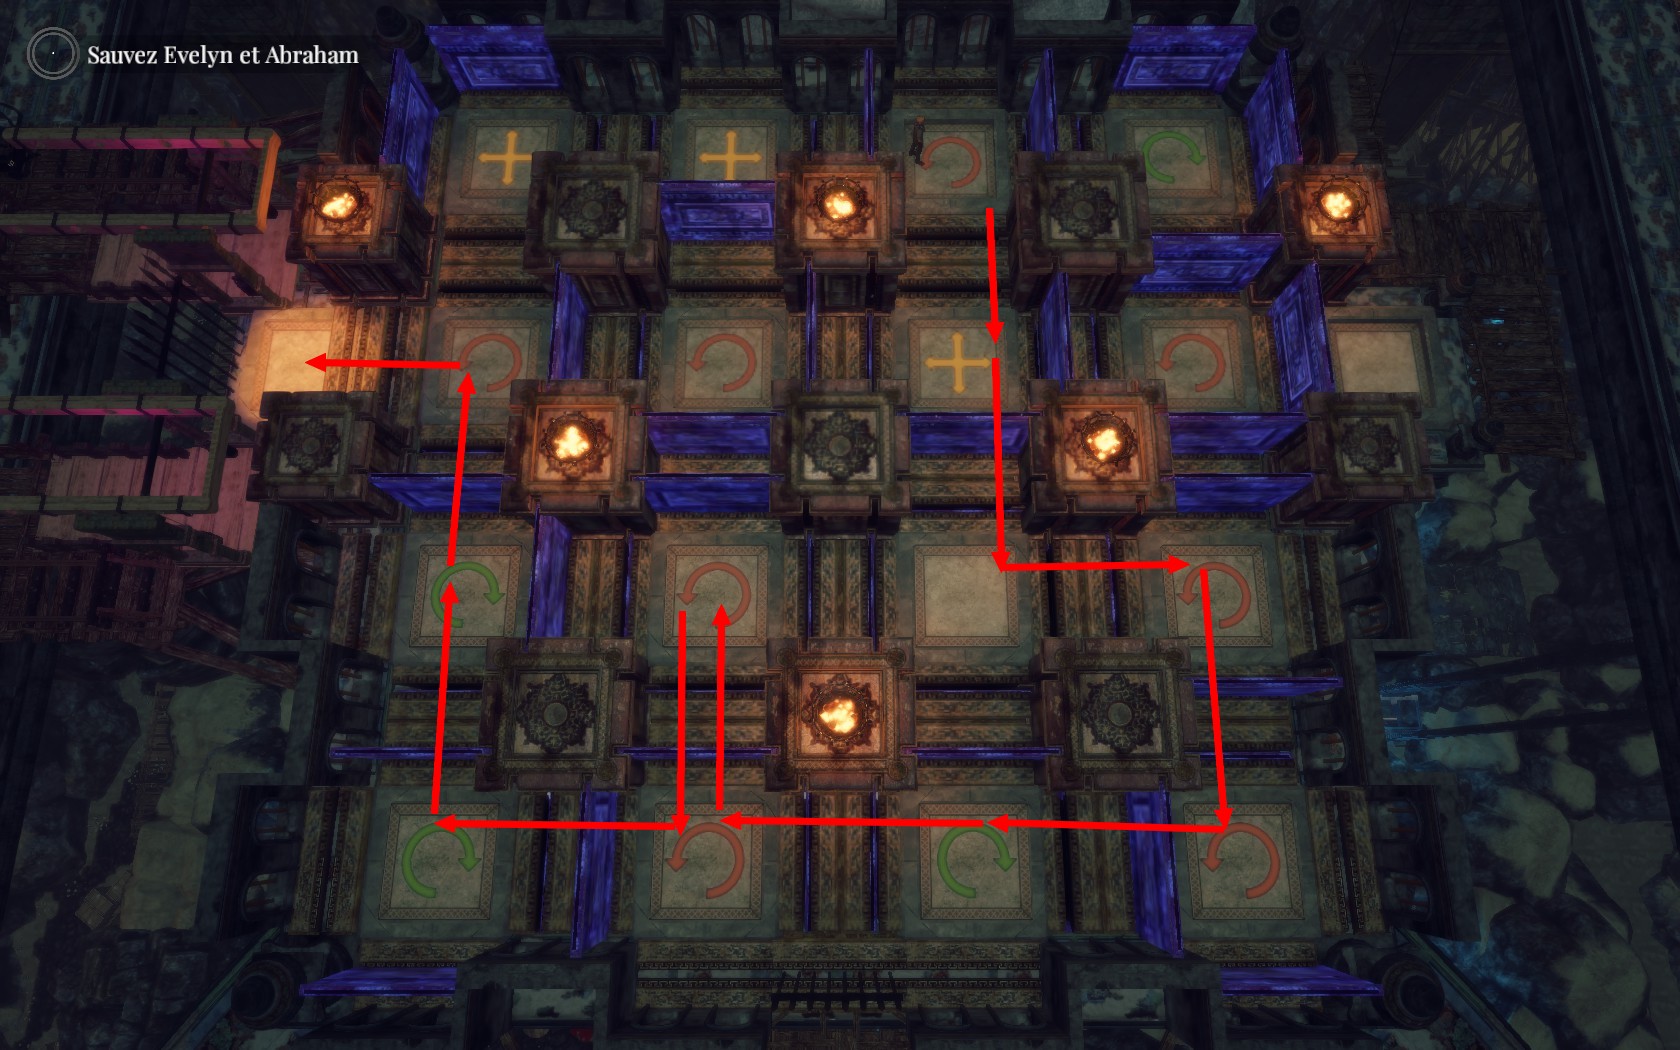
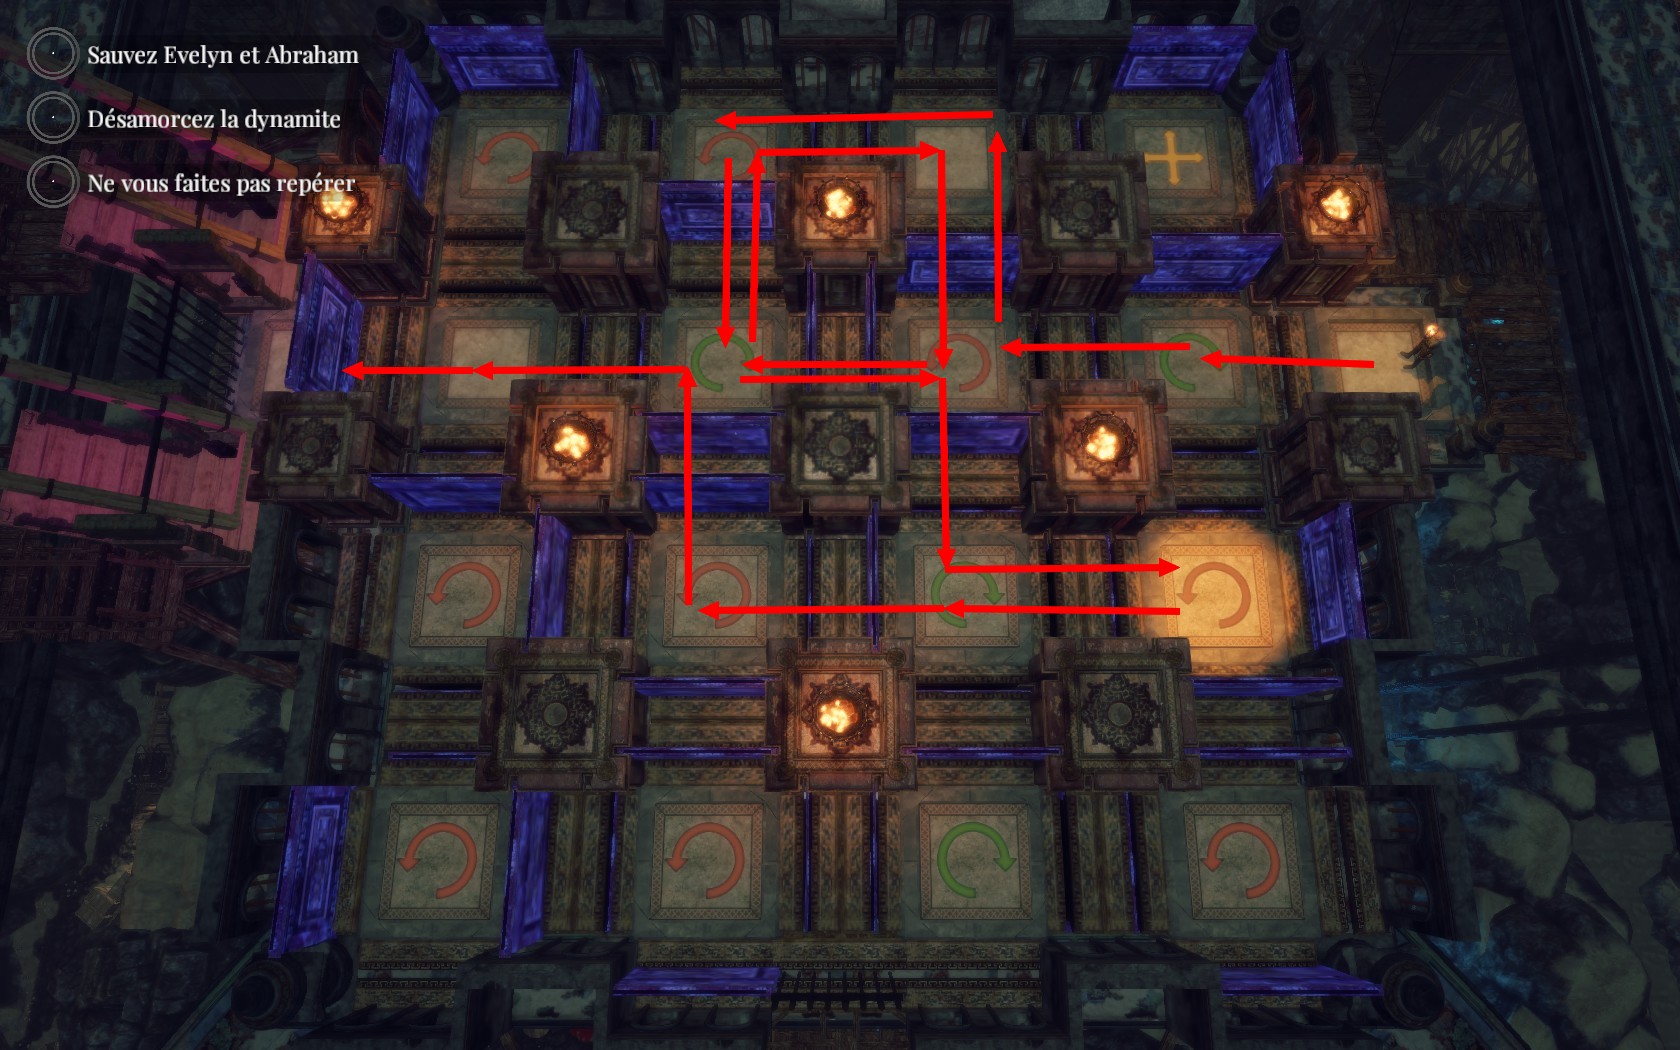
Go straight forward and avoid the guard. Disarm the bomb.


  • Both lights of the third line
  • First light of the fourth line


Go across the camp and avoid the guard until you reach a small overture. Crouch and follow it.


Then you have to avoid again guards until you can reach stairs (use the wall on the other side of the second guard to stay hidden). Climb up and go down.


Skip to the section Maze N°2.

Right
You have to crouch on the cart sequence. Once you're at destination, follow the path. You can also see through the bars that there is a bomb. Keep going until you see the crates. To go to the bomb, it's just going straight.


Disarm the bomb:
  • Second light in the first line
  • The light alone in the third line
  • Second light on the fourth line


Then go to your left and climb up. You have a stealth sequence. Just avoid the guards by using any crates or altars to hide. Then climb up at the second guard spot.


Jump and go down.


Skip to the section Maze N°2.

Maze n°2
If you already did this maze, skip to End.

Reach the lift. Use it for your second go at the maze - don't forget to jump before.


  • Left
  • Up
  • Left
  • Down
  • Up
  • Right
  • Down
  • Left
  • Right
  • Down
  • Right
  • Lit square for the bridge
  • Left
  • Left
  • Up
  • Left

Then take the other cart. Go see above the walkthrough for the side you're going to do and then come back for the end.

End
Take the lift then jump and follow the path. After the cutscene, use the cart.


Mine - II
It's a little cart ride. Stay crouched. Use your hook at wise time near the water towers.


Your goal here is to unhook your father and Evelyn from the madman. There is a place where you have to do it. The screenshot shows you the entrance of the bridge. However, you have a window of only a second or two to do it.


Once it's done, when you're at the end, use your hook to avoid falling to your death by pulling the first and third levers.


Enjoy the end.
Achievements not story-related
Heavy Sleeper

At the beginning of the first episode Oxford, just keep sleeping for two minutes. When your father is saying "Heavy sleeper", you'll get the achievement.

Globetrotter

You have to spin the three globes found in Oxford (your father's office and library) and in Luz (in the Templar Church).


Copyright
CC-BY-NC Vinciane Amorini - July/August 2017
9 Comments
maunty 26 Sep, 2024 @ 11:29am 
If the dynamite solution is not work, then try:
1 )
o x
o
x
o x
o o

2)
o
o o
x x
x o
o o
--球场翱尼尔-- 24 Apr, 2021 @ 6:36pm 
Thank you good sir
reaper 9 Sep, 2020 @ 1:14pm 
thank you very much for your guide, it really helped
The Phantom Chicken of CS_Italy 10 Aug, 2020 @ 2:33am 
Noticed a typo. Polarity is backwards on an connection for fuse 8. TY for the guide!

You need first to connect to the fuse 8:
down to +2
down to +3
right to -1
up to +2
up to [-]1***
right to +2
down to -4
right to 8
Chane 29 Jul, 2020 @ 1:41pm 
A perfect guide. :cozyspaceengineersc:
Thank you very much!
silenthero 26 Feb, 2020 @ 1:21pm 
Great guide - thanks, helped tremendously in few situations where I simply couldn't advance on my own.

In general I'd also vote for moving the non-story achievement section to the top, but on the other hand you can replay the episodes and do the necessary actions via this way (like I did with the "Heavy Sleeper" one). So it's not really a must.
Squeaky Fengy 22 Feb, 2019 @ 10:15am 
thanks man nice Guide:lunar2019grinningpig:
A_Phosphorus_Invention 28 Aug, 2018 @ 1:46pm 
The two pictures for the dynamite puzzles and their explanations are reversed. Excellent guide, thank you!

I'd also advise you put the 2 achievements that are not story related at the top, right after the introduction so players don't miss them.
S.T.A.R.S Leon S. K. 18 Dec, 2017 @ 3:47pm 
Like always a very good work <3 Thank you