Killing Floor 2

Killing Floor 2

Not enough ratings
High-speed pursuit. (Fast classes roster)
By Randaru
Dash across the killing floor, making raging Fleshpounds bite your dust! This guide is focusing on two main fast classes in the game - Field Medic and Berserker (sorry, GS mains). Welcome and thank you~!
   
Award
Favorite
Favorited
Unfavorite
Welcome to the race!
This guide will be covering the most notable "fast" classes of this game, namely Berserk(er) and Medic. As a one-trick pony swift class player and a person who highly distastes the Gunslinger (although I respect good GS players), I feel pretty confident in what I am going to discuss with these guidelines, as one may find them useful for teamplay or (mostly) public survival. Also, note that this is mostly for Hell on Earth difficultly, and somewhat for Suicidal public runs with 5 weighted teammates, as lower difficulties don't cause much trouble no matter how you play them. Please note that this guide doesn't cover gameplay basics, even class-related ones, considering a user reads it for self-improvement purposes, not for taking his first steps in the game.

Before I start explaining each class specifics, let me talk over all things that these classes have in common, and what makes them unique and highly valuable.

The first thing is what's important for the pub-play part of this guide. Both classes are faster than most of the others (as the title says) and, unlike the third fast class aka Gunslinger, are highly self-sustained. Both classes have survivability increasing skills, high speed that allows them to outrun most of threats and ways to replenish health faster than any other class while being on the move. This means, no matter what goes wrong, you always can turn the tide of a match as long as you avoid making harsh mistakes.

The second part is vital for the teamplay, it is quite notable and simple: both classes are the backbone of any team composition. Sure, there are tryhard ways to survive on the killing floor without any of theese two, but Medic as the main source of healing and Berserk as the main impregnable target for even the largest zeds are the fool-proof way of winning every match if used correctly.

The third notable part is that these classes don't struggle in dealing with threats of any kind. Their toolkits have little something for everyone: all kinds of trash zeds, medium zeds, large zeds and bosses are in disadvantage by default against these two compared to other classes. You can both protect yourself from any threat when fighting as a team or be able to overcome every obstacle while the last man standing. And if this doesn't make you want to play Medic or Berserker - I can't believe anything does.
ON YOUR MARKS: FIELD MEDIC
Medic playstyle varies from player to player: he may be your average teammate-focused healer with buff skills and high healthbar caution who makes his team preform the best, or he may act as a fully operative damage dealer, targeting trash or focusing his fire with the other team, making sure no one dies or gets in a tight spot between his shots.
Stationary healer/buffer or combat support - not only player preference to decide: chosen skills also play a big part in definition of Medic's role. I will try to explain which situation or playstyle requires you one or another skill from each tier to be used.
Skilldex
Symbiotic Health/Resilence
Theese skills are both survival-related.
Symbiotic Health not only allows you to recover from injuries pretty quick as long as there is a damaged ally nearby, but also increases your maximum health pool, which gives you better chances for surviving oneshot attack (by oneshot I mean getting killed in a matter of second, not in literally one blow), thus slightly overshooting your second skill.
The second option, Resilience, helps you survive in a tight spot, increasing your chances of surviving a oneshot and improving your performance in last man standing situation.

Between these two, I would prefer Symbiotic Health for most of the situations, even if you are running solo. Bigger health pool also improves your survivability - mathematically, it provides you with around one third of Resilience sustain, considering both KF2 percentage counting and possibility to make full use of Resilience resists. Resilience still has it's situational uses: it's somewhat effective if you are not the only medic on your team, in boss fight with a team of complete imbeciles or in the corner stand which I will cover a bit later.

Adrenaline Shot/Combatant Doctor
Combatant Doctor is what makes you a fast class. Adrenaline Shot can be arguably useful in duo runs, but I can't imagine any other situation where you would take it over extra speed, thus survivability for the Medic.

Focus Injection/Acidic Rounds
Both skills are not actually vital. Injection is hard to carry out at it's full potential even in a team with good communication, and acid's best part is a chance to render trash zeds to panic, making them start running around instead of focusing you, bodyblocking the rest of their horde and probably even dying of poison in process, which is unlikely, but possible.

Coagulant Booster/Battle Surgeon
A tough decision between being able to make your ally nearly invulnerable to oneshot attack and being able to protect yourself from any threat on your own and greatly increase your last man standing performance. Battle Surgeon makes you kill smaller things in less hits, and bigger things in less time; if you are confident that your teammates are good/bad enough to make full use of oneshot resistance - you should use it. If you have plans for a tanking teammates and good cooperation - you don't really need extra damage as things are unlikely to go south for you.

Airborne Agent/Zedative
Agent is the most common choice, but it doesn't mean it is better than the second option. It's pros are extra self-sustain in a pinch and possible random heals of nearby teammates. It has two cons, the first is obvious while the second only comes when you experience it on your own. Firstly, it is the same healing source as simple syringe: it stacks overall healing but doesn't increase it's speed, so this skill is most useful for less skilled doctor or occasional self-healing when you can't stop for a quickheal and have no options to make use of Symbiotic Health skill. The second con is not so obvious, but pretty important: every time the cloud activates, it shakes screens slightly for medic and significantly - for surrounding teammates (only on default server settings; it acts as an explosion for some reason). If there's a Commando on your team and you stand near a Sharpshooter or other damage dealer who tries to take his aim - he is likely to hit Alt+F4 before Zed Time ends.

Zedative's damage calculation is somewhat broken, so relying on it as on a good damage source is not good. It will do some damage, but not as much as you hope. On the other hand, slowing a larger Zed can be helpful, if not vital. "Zedated" enemy can't chase you or slower allies, neither he can reach the target with attack he already started. If you are confident in your healing abilities and your marksmanship - take this skill and save some nerves for your aiming teammates.
Itemization
I am not quite sure if there is any viable item combination except medic rifle and medic shotgun. I mean, you can always experiment with the options, but his classic combo certainly goes above all, and I will try to explain how to make your best of it.

The rifle, despite it uses 9x19mm rounds (it is actually an SMG, SUB2000-alike) has the hardest recoil in the game, so I highly recommend aiming down sights, crouching right when you start shooting, and firing in separate mouse button clicks instead of holding the button. This weapon is arguably the best choice in the game for fast chained headshots on trash Zeds, and you kill most of those just in one headshot, if not in one bodyshot with Battle Surgeon skill on. Has the most healing capabilities and dart capacity among the other weapons. Has a frustrating magazine ammo bug since the first game launch, I can bet a dollar it won't get fixed past release date.

The shotgun's low damage and high distance damage falloff is highly compensated with it's semi-automatic high firing speed mode and devastating point-blank headshots. Using damage bonus skill, you are likely to kill a Siren in one headshot and a Scrake (in full team roster) in about one magazine if you aim each shot perfectly (and quickly). It also kills trash - even a Gorefast - with a point-blank bodyshot. Heals less per dart and has smaller dart capacity than the rifle - heal with it if you may need to shoot someone dead any second, or switch back to your rifle, if else.

The pistol is your starting item, it heals very little, depletes it's dart pool in just two uses, but precise shooting kills trash fast, and it's shove attack is one of the best in the game. Don't use it for Bloats (they're resistant to this specific pistol, use your Beretta instead) or for rapid fire (aim for the head, use your shove attack or scalpel instead).

The SMG is a waste of money optional weapon for first waves. It heals slightly more than a pistol and have the exact same two darts to use until depleted. It does less damage than a pistol, but is more accurate, more rapid and has somewhat low recoil. Is not ammo-efficient against enemies bigger than trash. Use it if you can't shoot for ♥♥♥♥ are sure that rapid fire is what's needed or you are in later waves and your team didn't give you any money.
Tips and tricks
When you enter the killing floor as Medic, you have different goals to achieve and mini-objectives to complete. Your main priority is healing your teammates and attacking whatever attacks you. Your secondary target is trash that attacks your teammates and sirens that reach them with their scream. If everything else is secured, you need to either focus fire on large zeds with your team, or kill trash far away.

Aggroing faraway Scrakes and Fleshpounds, rambo-mode if you are not the only survivour, blocking line of sight and retreat paths and refusing to help your teammates make you a douche_bag medic and not a vital part of your team.

You don't need high DPS to kill trash, and don't have to act in a flash when in safe environment, so you are privileged to take your aim for a precise headshot. Use this to be ammo- and money-efficient team member.

Your darts are heat-seeking and aim for your injured teammates. They don't go past obstacles, such as terrain, enemies or fully-healed teammates, but they CAN curve around those slightly, even if you don't see your target.

Zed-time glitches heat-seeking so you are less likely to hit targets with darts on close-to-medium range (4:3 screens are the most affected somehow). Sprint toggle and shooting from sprint have a very high chance that your dart will go straight ahead and not for your allies. Aiming down sights improves the curve, but it may ignore some targets that are completely out of your line of sight. Jumping doesn't affect the darts.

When entering Zed-time while running Zedative skill, and you have no other things to do, you may shoot not aggroed largies one bullet for each. Bravo: you've just delayed their approach by a second.

Buffs do not apply properly on fully-healed allies. Sometimes they work, sometimes they don't. Your grenades seem to stack buffs only once per ally, just like armor in previous field medic perk version.

Your personal Syringe is also affected by your perk-related cooldown reduction, making you heal yourself faster than the others. But you already know that... hopefully.

The fleshpound doesn't stop raging until he hits a target. If this is your only chance, consider knife parry as a way to (hopefully) survive his attack, if every single hit point matters and you're in a relatively safe environment. The parry itself blocks some damage, and it also knocks you back away from your enemy, ideally making him miss his second attack entirely in process.

When you saved enough money for a serious weapon, throw your medic pistol to someone who may need it - Berserk, Commando, Support, Gunslinger and flamethrower Firebug have a free weight unit for it until the end of the game. Just make sure they know what to do with it and wouldn't sell it right away. As for your last two weight units, just buy dual Berettas - their rapid fire does more damage against big Zeds than medic pistol's.

If you are as good as boxed, search for the corner where only one large Zed can approach you at once. They exist on every map and may look like a corner with obstacles or a short dead-end corridor thingy, like on eva point around the bottom of the escalator. Throw a grenade under your feet, pull out your shotgun, backpedal to the wall, bravely shout "For tonight we dine in hell!" in your voice chat and get ready to face largies one by one. This tactics is surprisingly effective, providing you with 60% survivability without Resilience (much greater with one) as long as you fire at your maximum speed, land every headshot and don't run out of ammo or grenades. Large enemies struggle to reach you because of AI problems and getting hit from behind by other Zeds, so you can handle many of them at once and somewhat likely survive the round.
But don't prioritize this way of self-defence over running away if you have that option.
ON YOUR MARKS: BERSERK(ER)
Many people dislike the new Berserk perk, mainly because now he is unable to combine movement speed, health pool and resistances. But as for me, Tripwire's berserk remaster was the most precise rework in Killing Floor 2, if not in entire game industry. He got exactly what he needed when used pre-patch: passive health regeneration, player skill-related damage mitigation via parrying, and, of course, tons of damage to deal with large zeds. Berserk is your average "high risk, high reward" character when it comes to solo or public plays, and a highly-sustained team member with high game mechanical impact on the round outcome.

The Berserk, as I see him, should act like a suicidally brave barbaric douche_bag, while deep in his brain he should be calculating his moves ten steps ahead and making sure anything works for him. I'll try to make his guide match this definition.

Just like with Medic, let's jump straight onto perk skills and define his loadouts for different situations.
Madskillz
Dreadnaught/Skirmisher
Skirmisher is what makes you fast and self-sustained, when Dreadnaught makes you the same medic pillow as you were pre-patch, but worse. Let's not discuss this one, shall we?
I don't mean Dreadnaught is bad. It can be used for holding a choke point in room control situations, but it simply doesn't fit in this guide.

Vampire/Butcher
This perk is pretty optional. Less experienced players either prefer Vampire as it is more mistake-friendly, or prefer Butcher and fail to survive with it. But the only situation Vampire shines at is when you have to protect a team which doesn't have a Medic - and this team is most likely doomed anyways. In balanced team roster, this skill renders Medic poor and may prevent him from healing himself via Symbiotic Health, which is vital for his survival.

Butcher works best when either team or time is on your side - meaning when you have a medic or when you are the last man standing. Vampire gives you sustain against trash waves, but they are not your biggest problem: neither in team, nor when you're the last man standing. Vampire doesn't stack with normal healing, as it doesn't help you to stand against larger Zeds, as taking them down in less hits is more importand than healing some health from them and a couple of occasional Clots wandering around.

Resistance/Parry
Parry would be a great skill-based tool for Berserker, if not put against what makes him useful in combat against more than one enemy. Sure, it gives you tons of damage once you parried a large Zed's attack. But counting on parrying or even blocking every single attack trash Zeds throw on you is naive, if not stupid, and dealing with trash is a large part of what you do on the killing floor.

Resistance mitigates most of the damage you have to take while tunnel-visioning specific Zed or a large group of enemies, thus increasing your chances to survive a surprise oneshot attack or getting boxed in, and improving your recovery speed after taking some hits if you are in running situation. It also lets you go full man-mode to take a large Zed out even if he has a horde of trash around. And yeah, you don't have to run in fear from sirens and prioritize Bloats. I've never seen a situation where I'd rather take Parry instead of Resistance.

Smash/Massacre
Massacre doesn't really have a large impact on Bers damage output. Shovel's swift strikes are garbage in both situations. Katana's and knife's swift combinations provide a good crowd control to kill the enemy no matter what damage they deal. Light strikes are too slow for Zweihander and usually used to deal with the weakest trash faster. And Pulverizer... why would you use it for swift strikes anyway?

Smash greatly improves your single blow damage, allowing you to obliterate a huge group of Zeds in one mighty swing. It is also a better option against large Zeds, as cutting your distance to land a single attack is way safer than swinging for three or more times, while it also provides a guaranteed stumble if the Zed wasn't stumbled for a few seconds. And bigger overall DPS increase even on Katana's heavy attacks drives the last nail into Massacre's coffin.

Spartan/Berserker Rage
I hope you know what the answer is.
Variety of destruction
Movement in different direction when initiating a hit results in a different hit (or hit combo, if you are holding light attack button). But you already know that.
What you might not know is that hitboxes and other stats, like range and damage, vary from hit to hit not even between heavy blows, but between strikes in one specific combo.
Note that damage of any attack is slightly lower for secondary targets.

Moving forward will result in a devastating overhead blow, or in an overhead hit followed by two or three more swings across the screen. These attacks' range varies from weapon to weapon, but it usually does the most damage and has a pretty obvious hitbos, tho it sometimes confirms hit on a chest rather than on a head, if you are pointing it incorrectly. Repeatedly using this attack looks ugly, but has decent DPS output, especially on larger Zeds.

Moving sideways results in medium-to-long range horizontal swing or series of swings, fool-proof way in dealing damage to one, if not all of the enemies in front of you. Most likely to be blocked by Gorefasts, but also most likely to hit at least something. Doesn't deal high damage to a single target (which doesn't matter if your target is not a large Zed), but slices through weaklings like a sharpened razor through a feather. If you can cut or cripple every single head in front of you with this strike - consider yourself a good Berserker player.

Moving backwards results in low-to-medium range attack with an overhead (or crowbar uppercut) flailing animation, or in short-range series of wide cross hits. Does more damage, than a horizontal swing, but less than an overhead forward blow. Really bad hitbox demands a user to aim this attack properly. The easiest way to preform an attack while back-pedaling.

Quick melee results in a wide (instead of pinpoint) shove for blunt weapons and a forward thrust for sharp weapons. Has low range (moderate for Zweihander and Katana), but pretty quick and packs bigger stumble power than a light hit. Sharp weapons can also headshot for extra damage and extra stumble power.

Alt-fire provides you a block in front of you, which then may result in a parry, if timed just before the hit connects with you. Block mitigates from one fourth to around a half of incoming damage, while parry helps you avoid more (for higher tier weapons - way more) than half damage. Successful parry stumbles the Zed with a special animation. Some attacks (glowing red weapon) are "unparryable" - damage mitigation suffers penalty while Zed doesn't stumble, but rather knocks you back outside of it's range.
Bringing OMGWTFBBQ to the gun party
Crovel, shovel+crowbar is your starting item. You can neither dig with it nor use it as a lever arm. It's light swift attacks are more light, than swift, taking two to three hits to kill a Clot without any speed advantage over heavy strikes. Your heavy blows, however, have a good range, horizontal swings have arguably the best melee hitbox in the game, and they pack enough damage and stumble power to deal with any small threat, and sometimes with larger Zeds.

Knife/Katana are toothpicks that act in nearly the same way, just Katana is obviously a better version with improved damage and range. Your main tool against multiple opponents while wielding these blades are your light attacks - they nearly guarantee you will control the entire crowd you hit, and all of your attacks, especially horizontal, are nearly instant and repeat in a blink of an eye. Your heavy blows are used against single targets or small groups of tasty headshots.

Zweihander is a big @$$ sword of yours that is quite slow, but does incredible swing and bash damage with every hit. Long enough to cut Bloat's head off from outside of its vomit range. Kills most of trash Zeds in just one blow. Does so much damage that one Zed-time is usually enough to reap a Scrake apart in full team roster match.
All hits should be used cautiously because of rather slow swinging speed. If possible, charge your attack before approaching a target, then quickly cut your distance (and Zed's head off). Use light attacks only as a way to deal faster with weak targets, not as a main damage source.

Pulverizer is a sledgehammer with a perpendicular pump-action shotgun mechanism and a magazine filled with Chinese petards instead of buckshot. It's sole purpose is to maximize your melee performance against Fleshpounds and bosses. Avoid using it against any other targets, or in Zed-time, as changing magazine or even reloading the mechanism after a single hit aren't affected by your Zed-time skill.
The explosion may hit targets in area larger than a physical strike, but the strike itself is rather small and should be pointed in larger Zed's head for terrible, terrible damage.

Eviscerator is a badass compressor saw launcher with a bigger spinning saw to tear apart enemies in close range as long as you have gasoline. Actually, when you're out of fuel, this weapon still can be used for slow, but deadly melee attacks using quick melee button. You can block or even parry with it, but block setup is superbly slow.
Melee saw doesn't have much of a DPS, so is only for cutting down trash that interferes with your aiming at bigger targets. Yes' it's weapon's sole purpose is to kill large Zeds and bosses. Not only that, you also need to score every single headshot on them. But wait, there's more! You can't aim down sights, your projectiles travels slowly and at unpredictable angle, your laser pointer lies more than Sean Murray and saw's hitbox is so large that it usually scores a hit on target shoulder despite it flies straight through it's head.
Ready to throw this weapon into a trash bin? Hold your horses, because, while being the hardest to aim, this weapon is the best to deal with large Zeds, as you don't trade any of your mobility, like most of other classes, to deal tons of damage in a matter of a click. You kill a Scrake in two precise headshots (or even one, if you don't have many teammates with you), and a Fleshpound dies in three. You also remain prepared to deal with all the trash around without having to switch your weapons back and forth. Some of your sawblades even land nearby for a pickup, although they usually end up in a high ceiling or far in a corn field.

Nailgun is a pile of garbage that acts like a shotgun with quick ricocheting projectiles. While dealing notable damage, it leaves it's user very vulnerable and unable to fulfill a frontline role.
Mostly used by newbies making their first steps in the game - at higher levels, it's a sign of a lamer or a player who likes the challenge.
Git gud
Turn on your in-game music, set it on max volume and turn on vocals.

You should be public enemy number one for the Zeds. Engage as many enemies at once as you can handle. If you can make a train out of every single largie on the map - do it. If you die - shame on you, but learn from your mistakes and do better. Don't make all the Scrakes angry just in case.

Set your Sprint to "toggle". Learn to turn it off when you fight with light strike combos or attempt to parry (it messes those up) and then turn it on back again. Otherwise you should always stay in the sprint mode as it allows you to quickly avoid being attacked or swarmed by trash without blocking and parrying.

Blocking enemies (I mean enemies that block your attacks, not you blocking them) don't prevent you from damaging other targets you hit. The best way to deal with a blocking enemy is a heavy forward blow that hits a side that the enemy is not currently blocking.

Parry Fleshpounds no matter what. It takes 0.1 of a second to flick your parry on and off, and their attacks are very predictable. Scrakes can be simply outsprinted even mid-fight, just don't let them corner you. Parrying a Scrake is harder than it sounds.

When fleeing and entering Zed-time - consider turning around and cutting down the nearest largie. Prioritize Scrakes and close-by Husks.

When approaching a Husk in melee combat - never stop hitting it and don't hug him in point-blank range.

Don't break line of sight with your Medic for too long if you are in risk of losing more than half of your health. Preforming a suicide dive, don't expect anyone to follow you, and take your chances in fleeing in a pinch. When running to the next group of enemies, shoot a couple of healing darts into your allies.

Don't quickheal in enemy proximity, you lose your bonus speed when holding the Injector syringe and can lose way more than 20 HP you just replenished. You also lose your real-time speed for switching to syringe in Zed-time.

Don't drag your team down by fleeing any threat. If you do nothing but run all the time in attempts to be the last man standing... well, you will be, as your team is literally having a ballast, but you won't survive a boss unless you have enough skill to stay with your team till the bitter end and still be the last survivor. Remember, running away doesn't make you any more skilled than slow classes, unless you fought your best to protect them, no matter how bad they are.
READY, SET, RACE!
And so you find yourself dashing through the killing floor. There always are DOs and DONTs when it comes to using your speed to your advantage, which I will attempt to explain here.

You can sprint full-speed in any direction. That's right, you can turn your view wherever you want and still be on the way without speed penalty. If you need to, say, see if the Fleshpound on your tail is aggroing, you can backpedal while looking at your pursuer. Just make sure you watch where you run from time to time.

Actions break sprint only for a brief moment of their animation. You can easily see it when using sprint toggle. If you are OK with using this feature which is somewhat broken (I mean technically, not in terms of balance), I highly recommend doing so. Attack animations on some small arms is so quick that you can literally shoot without really breaking your sprint.

Know what area you should run around. If your team is holding their positions, but you got more attention from enemies than you can handle, chances are it will be a smart idea to run around the area your team is holding (as long as it is open and wide) and not as far away as possible. If you are feeling lucky, you can also get moar Zeds on your tail - almost nobody can chase you down as long as he is behind you.
If you have to pedal to the metal away from where you are - avoid choke points and corridor routes. Most of official maps have several open areas connected to each other, where you can maneuer as long as it is not filled with Zeds entirely, and if it is - you can run to another room and so on. You should know these areas and make your foes chase you around them, because else they will just respawn in front of you in some corridor as soon as you break your line of sight with them.

Fleeing from the boss, run around circular obstacles. This works the best against the Patty. There is such obstacle on each official map (train in the forest, armored transport thingy on the outpost and so on), sometimes even more than one. I won't explain any further, rather privileging you to witness game's AI miracles on your own.

Fight or backpedal on the open. Remember what's going on behind you when approaching a tight area you have to run through. You should be looking only forward from now on and until you carve your path to the open again. In theese situations, rather trade some HP for fast kills than backup from enemy attacks. The meaning of this is simple - on the open, you can run into something occasionally, get hit and keep going, while in corridor areas a single enemy hit may corner you for your pursuers' joy.

Listen to the game. Your game SFX gives you important feedback, such as:
1) Getting hit, obviously.
2) Large Zed spawns, potentionally in front of you.
3) Fleshpound aggroed on you enrages.
4) Nearby Scrake starts his enraged attack.
You hear theese sounds over the others and no matter what (I mean if you have SFX on, of cource). 2nd and 3rd ones even make your music quiet so you can hear them correctly, and are map-wide.

Fight back, dummy! Running doesn't win games, you are supposed to fight back whenever you can. The first things to prioritize are no Scrakes and not even Fleshpounds, but trash. A Scrake can damage you, a Fleshpound can damage you more, but if a single forsaken crawler standing in your way like an indesputable obstacle when enraged Fleshpound is on you can result in a game loss. Think of Zed trash like they are extra terrain obstacles that can even damage you or block choke points sometimes, and kill them mercilessly.
The second priority are Fleshpounds and enlarged enraged Scrakes. Those are the enemies that usually damage you while you are on the run. Kill them one by one in the open.
Unraged Scrakes are not a threat. There is no difference between one calm Scrake and ten ones, as long as you kill them one by one and got rid of every other enemy's existance.
HELP US IMPROVE!
Found a mistake, a typo, have a wisdom to share on the subject or thoughts about adding something on the list? Please share your thougths down in comments! I am not a novel writer, but I tried my best at writing this, and I want to keep doing so to improve this guide even further!
10 Comments
Argyrodes 8 Oct, 2016 @ 12:18am 
You'll get nerfed soon. Don't worry.
Mem 7 Oct, 2016 @ 11:21pm 
Excellent guide! As fellow berz i can sign under almost every word.
Tech 7 Oct, 2016 @ 7:12pm 
Maybe you can as well remove the last section.
Aejus 5 Oct, 2016 @ 3:12pm 
Berserker is such an annoying class. Always in the line of fire, always blocking your path, always getting killed...
deeveejay 5 Oct, 2016 @ 12:47pm 
"your laser pointer lies more than Sean Murray"

Ahahahahaha :)

Great guide BTW :)
non1337jerkface 3 Oct, 2016 @ 3:16am 
Give the zerk section of my guide a shot since like most of the players, you have been deceived by TWI's amazing description skills. I'll list some important points here.
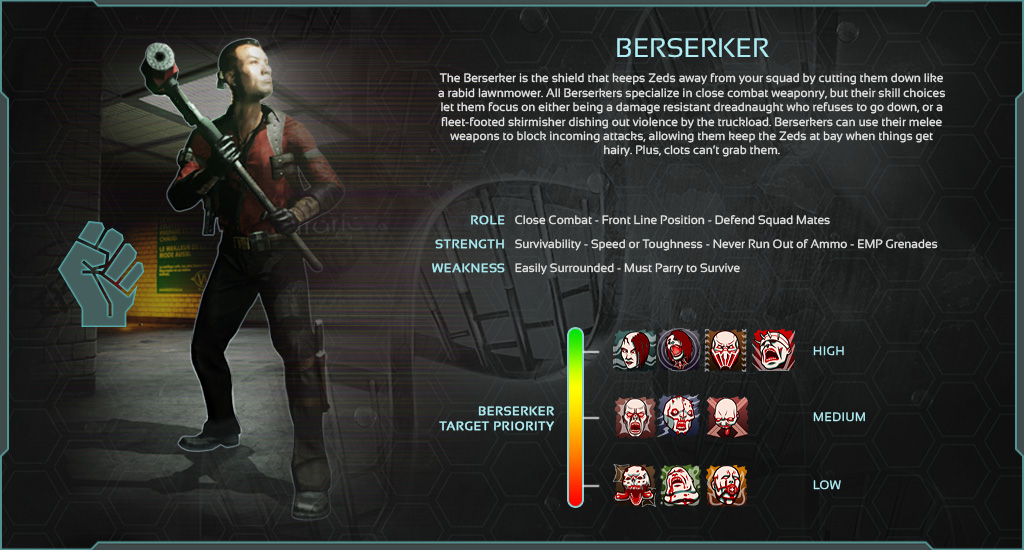
Parry: Damage bonus applies even if you are not in parry state. That means you parry only for superior resistance than the other skill. Parry is just a straight damage increase skill as parry is not working properly.
Massacre: Let me correct it. It has NO impact because it gives NO damage to light attacks. Good, skill working as intended.
Rage: TWI coded in zeds to run away when you use rage in this update, to make you have a hard time using the one zed time extension that you have (on any perk other than commando, but zerk in this context.) Since apparently they think it's cheap that when zed time happens zerk instantly heals for 50% hp.
Randaru  [author] 3 Oct, 2016 @ 2:10am 
Maining theese two doesn't mean I don't play everything else. Swat just doesn't make it into this guide because he is not a great runner in a long term. Meanwhile a Gunslinger doesn't make it because he's very high-risk-low-reward type of class, demanding higher skill to play him on average level, and I haven't spent enough time learning him to place into this guide.
El Salvador Super Power 2030 2 Oct, 2016 @ 8:21pm 
swat with its first perk that adds increased speed while aiming down sites is a very speedy class good for zooming around in solo which is mainly what i play in my spare time, should give it a shot
Randaru  [author] 1 Oct, 2016 @ 12:09pm 
The Running part and missing Medic tip are on!
CobaltNinja 1 Oct, 2016 @ 8:59am 
Pretty good guide! Quite detailed.
gobba go fasb