Hyperdimension Neptunia Re;Birth1

Hyperdimension Neptunia Re;Birth1

108 ratings
ALL EVENT BOSSES with Fortify Enemies - An In-Depth Guide to Nep
By ずー and 1 collaborators
Can't beat certain bosses? Simply want to see how hard the game is on Fortify Enemies?
BONUS: Contains general tips AND explanation of game mechanics for luls!
This super in-depth guide will help you raise your Nep-Nep game, regardless* of your current skill level!
*Some reading required
   
Award
Favorite
Favorited
Unfavorite
Preface
I'm just a gamer dude trying to write a guide for a game I like okay? :(
I'm zhulov3rz and I wrote this crappy guide. The other dude didn't write it, but he's here to help me make sure the crap here isn't *that* crappy.
Here's my stats for my main file and the Fortify Enemies file respectively on the off chance that someone actually cares.

None of the things below have been *really* researched on, and are mostly from observarion and time spent discovering mechanics. This guide also contains a LOT of opinions, which are obviously not facts. You should be a competent enough person to understand the difference, right? RIGHT?
Still, constructive criticism is highly valued. If you have anything of value to comment or critique, go ahead and let me know!

This guide contains minor SPOILERS! However, due to the nature of the guide this is hard to avoid. I'll be mostly disregarding the plot here and simply be talking about strategies, tactics and tips. The videos featured only shows the fights for the most part (bar 1 or 2 funny dialogue lines). If you think knowing the amount of events in the next chapter is a spoiler, you should probably not read about the next chapter until you're ready for it. Common sense I suppose, but we live in a world where that isn't too common.

Steam guide sections has a limit of 1500 characters per section. That explains the abundence of parts.
Wall of text warning! Don't worry, there are at least reference videos to break up the reading.
This guide contains around 6237 words before amendments. After that I stopped counting...
My apologies to people who picked up videogames hoping to never have to read again.
General Mechanics: Attacks
Attacks in this game are very simple, most of the info is sufficiently self explanatory for most intelligent sentient beings. One of the most important thing to take note about this window is the POWER of a skill. This power is the TOTAL power for that skill, which accounts for all hits of the attack. In this case, the attack has ONE hit which has 400 power, in other cases however, should hit count be greater than one, lets say x hits for a skill with y power, then each hit does y/x per hit.

Guard Damage however, functions differently. Guard damage is the total amount of damage done to an enemy's guard guage PER HIT of the skill. If a skill has x hits and does y guard damage, the entire skill does x*y guard damage. I'm not even sure how this is supposed to be intuitive, but that's how the game works.

Note that the things above apply to all types of skills, that is SP, Combo and EXE skills.

Now another thing to know about is EXE Drive finishers (Not to be confused with the EXE finisher combos), when attacking a special monster (Which assumably are bosses, but there are some monsters in the colosseum that count too) most EXE drive skills will deal additional damage and hits. These hits are NOT reflected in the information display screen.

Attack stat (STR/INT) cannot exceed 9999 base. At the attack cap, going into HDD does not increase damage, but using STR/INT buffs do raise damage. This is probably because stat boosts/reductions are a % based multiplier.
General Mechanics: Enemy Defense
Basic observation on defense, it seems to be a subtractive formula. This means each hit damage is affected by the defense of the target monster before being applied. This is the reason why single hit attacks may be better that multi hit attacks as it loses less damage trying to overcome the defense of the target (in addition to most of them having way more base damage).
So the guard system works in the same way as you might expect it to. Enemies have higher defense when the guard is not broken, once the guard is broken (blue bar is empty), enemies take greatly increased damage. The UI might deceive you. You can guard break an opponent mid attack, this causes subsequent hits to land for more damage. If the "GUARD BROKEN" blue text is flashing on the bar despite it NOT being empty, the first hit of damage will deal damage as if it was actually broken, before returning to normal damage. I have no idea why it works that way.
Once a monster's guard is broken, it'll automatically recover around 20% of it's gague when it gets its turn.
One thing that's easy to miss is the fact that you don't have to break guard to do more damage. As the guard gague drops, your damage gradually increases very slightly, presumably due to the defense slowly dropping.
General Mechanics: Boss Aggro
Here's an interesting mechanic, bosses in this game will favour the target with more max HP, and by having one character with significantly more HP, you can draw 80%-90% of all hits. This is far easier to do in the beginning of the game where items such as the Stamina Ring and Life ring add so much HP that it's almost +100% your current max HP. Bosses seem more likely to target less max HP targets when their health is low (in some cases <50% hp). This is only from observation from early game bosses, since it's really hard to have a setup with significantly more HP on one character than everyone else in the mid to late game.
General Mechanics: Attack Order
The order of attack displayed during battle in the top right hand corner is only true if all players and enemies used Defend every turn. It seems that it is calculated purely based on the shortest delay skill available. This doesn't mean it's not reliable, but it means that it only serves as a guide. Each skill has a hidden delay value to it. I don't entirely know what each value actually is, but it seems that lower CP combo skills have a shorter delay while higher CP skills have a higher delay. EXE drive delays are also pretty long. The "Shortens Wait" ability or "Act Fast" chip seems to make that delay less. Combo Link (The skill for CPUS that unlocks at level 70 that allows you to use another 3 more combo skills) causes you to use 3 more combo skills which is the reason why the next turn may take a lot longer to come by.
General Mechanics: Flanking
So one thing I nearly forgot to mention is the fact that flanking exist in this game. It may not be immediately obvious, but it seems that flanking increases your damage. Assumably, this is due to some sort of lowered defense of the enemy when flanking rather than an actual damage boost. You also seem to hit more frequently when flanking, although I dont have any data for this and it's purely by observation at this point. The difference between flanking the sides and flanking the back seems to be essentially negligible, but there *may* be an increase in attack accuracy that I missed out.

To flank, you should be facing perpendicular to the boss, i.e looking at their sides. Interestingly, flanking bonuses apply to EXE skills too, so you should definitely cast your EXE drive skills from the side of a boss to further increase that damage. That's mostly the basics of how flanking works, which is sufficient enough to get you through the game.
Combo Optimization
Configuring your combos for maximum output is relatively important. Under normal conditions you would use mostly power skills to blast through normal monsters and early bosses. It's only mid game where rushes become more important than having power skills. You *can* have two different configurations, one for normal monsters and one for bosses and tough enemies, but that's generally a lot more hassle than it is worth.

What you want to do is to ditch all the break moves in favour for filling out the power and rush slots. The only character with efficient break attacks is Neptune, who has break attacks that can be stronger and more cost effective than her rushes.

Normally when you're having trouble deciding on your combos, you can consider the following
1. Is your character attacking or supporting in bosses?
A character who's supporting should be more focused on having rushes. This allows them to utilize their "free" turns to get a bit of charge. These characters also may be weaker in the attacking department, so the hits matter more than the damage.

On the other hand, attackers may need the burst from power skills (especially early game) to clean up normal monsters and as a finisher for bosses.

2. How fast is your character compared to the others in your party?
You want characters which are slower to affect your exe charge speed less. So Ideally you'll have your fastest character be your best rusher. This isn't always possible, but it's a nice consideration.
Additional Combo Tips
Edit: As pointed out in the comments, EXE finishers DO increase the EXE gague but it's hard to notice because the gague fades out when the finisher is used and the audio queue isn't played when the gague goes up a level.
Symbol attacks do add to the EXE Gague (albiet insignificant), you can tell as there is an audio queue when your gague goes up a level when you symbol attack.
This changes quite a bit (compared to the first version of this section). You want one with high hits and one with high damage in order to have a good balance between the ability to rush and the ability to push for more damage.

About elemental attacks. It actually does not matter that much if your rush skill is elemental. Worst case scenario is that the enemy resists that element and you do a grand total of zero damage. However, it will still add charge to the EXE gague. Since your primary goal of rush skills is to fill that gague as quickly as possible, it doesn't matter how much damage your rushes actually do in the grand scheme of things. I can think of maybe 1 or 2 exceptions and that's when dealing with skill jammers. However, there is/are only one fight(s) involving skill jammers in the entire story and the only other case you'll have to deal with them are in the level 900+ colosseum fights, which are a different deal altogether.

Power skills on the other hand are best left non-elemental. You don't want to deal zero or greatly reduced damage when you're using power skills. So this is great for consistency. As for EXE finishers, try to have at least 1 non-elemental exe finisher. It's not always possible, but you should have at least 1 non-elemental for consistency. Having situationally better elemental finisher is cool and all, but it's not great if you suddenly find it doing reduced damage in a fight that matters.

Because EXE finishers are a thing, you actually want to try and not use the last EXE charge unless you're sure you're finishing the boss off with that attack. The DPS loss from that last chage might bite you if you're not careful enough. In addition, in post-game CPUs have combo-link at level 70 which requires 1 exe charge to be used.
General Tips

  • Attack buffs seem to last around 5 turns.
  • The UI for the Order of attack changes dynamically depending on skills used.
  • Always buy the latest armor. A new set appears in shops at the beginning of each chapter
  • Single hit power skills are better early game
  • Multi hit rushes are more important mid to late game
  • The hidden items in the maps are randomly drawn from a fixed pool of items.
  • There is only 1 hidden item per map, but it respawns when you leave the area.
  • There are a few fixed spawn points for the hidden items, but they are chosen randomly each time.
  • Some monsters have a 360 degree field of vision
  • A character's ability (traits that are applied only to that character) is not shown on the coupling menu. It can only be seen by using the status menu and pressing the ability option.
  • If you are debuffed for a certain stat, say STR down, casting the buff for that stat gives you the buff AND overrides the original status.
  • Moving all your characters forwards in the battle formation can make grinding significantly faster in most cases.
  • Having your buffing character go first can actually be more useful on occasion than having your attacker go first.
Viral Enemies And You
As interesting as it sounds, Viral enemies are by far the most threatening thing in a Fortify Enemies playthrough. It's basically like facing multiple bosses capable of dealing 70-90% of your HP in one hit especially if you're at the "ideal level" for that area. As you reach the middle of the game, they'll also be capable of survivng one or more EXE attack. Excercise addition caution and try not to take these monsters lightly. There is nothing worse than getting a game over from a non-boss monster while grinding. A little extra caution can save you a lot of grief.
Youtube Playlist
If you prefer to simply catch all the videos in sequence instead of staring at my wall of text in between videos, you can check out the full playlist here: Hyperdimension Neptunia Re;birth 1 Fortify Enemies Playlist
Chapter 1 - Amnesiac Plot
Now just a foreword, it is not possible to legitmately have fortify enemies on chapter 1 of a new file. I enabled it with a cheat by using a good old memory editor. To try this for yourself, you need to at least have the first dungeon unlocked on a new file. You also need another file with fortify enemies already unlocked and crafted. On your old file, search for 07 as the value in your preferred memory editor. Toggle fortify enemies off, now change the value to search for to 03. Repeat this process until you find that you're left with one address. Without closing your client, load your other new file and use your memory editor to change that address to 07. Save the file. Congradulations, you've now got fortify enemies on for no reason!

Now this is really useless in early super game, monsters hit you for about twice as much, but that's all that's noticable. It's not until you get to the chapter end boss that the difference gets noticable.

Now I don't have the first fight with guard vermin (where you learn about HDD) because it's basically a 20 second video.

Early game is more about the grind than it is about knowing what you're facing, as long as you put in the time and effort to grind that level high enough, you'll be fine. The heavy demand for grinding early game can be rather off-putting, but nonetheless a small price to play to experience such a masterpiece.
Here's the first fight with guard vermin, not too much, even if you poorly optimize your combo setup, you'll pull through fine. He just deals more damage to annoy you on fortify enemies.


And now the arfoire fight. Due to the forced loss before the actual fight starts, it doesn't actually matter how much HP or SP you lose/use up before the actual fight. The fight where you realise what you're actually dealing with when you enabled fortify enemies, she hits you for 50%-90% of your max HP at this point. Not too much strategies other than bring healing items as your maxhp won't be high enough for compa's heal to be of *too* much use. I suggest making full use of quests from the guild to acquire credits.
Chapter 2 - BLACK HEART & Hraesvelgr
This is black heart, pretty much the most notorious boss in the game, to the point she deserves her own section. One of the issues I faced when I first started playing this game was the lack of good healing items. She would do more damage than I could recover in one turn.

For this fight chances are you dont have insane amounts of money to buy a metric tonne of healing items, so what you want to do is instead invest in buying life rings. These increase the value of compa's heal which allows you to use her healing over simply spamming items which isn't nearly as effective.

HOW DO I AFFORD LYFE REENGS?!?!
That's simple, you do QUESTS from the GUILD! Maybe that's too difficult for you, in that case good luck grinding money anywhere. Seriously though, the guild is serious money early game, getting about 500-1000 credits per quest is really good for being able to afford the life rings. There isn't one quest in particular that i'd heavily recommend, although I prefer quests that reduce the "Other" shares so that it's easier to obtain the true end in the same playthrough.
Chapter 2 - BLACK HEART
Keep neptune STR buffed most of the time, she'll be the only one doing reasonable amounts of damage. Compa should be used for support only, unless it's advantageous to use her to guard break for a really damaging turn (you need a way to capitalize on this by having a STR buffed neptune going next ideally). IF should be a secondary attacker, but also supporting when necessary. If you're suddenly taking a large amount of burst from Black heart, you may want to use IF's turn to heal to increase the heals per turn to prevent you from losing your health pool due to attrition. Your goal is to end the fight as quickly as possible, healing items are limited and so is compa's SP. Dragging out this battle will NOT work in your favour.

The prefight strategy is rather simple, save resources and try not to burn too much SP. Using some SP is unavoidable but ideally you want to have more than 70% HP going into black heart.

Black heart herself has a couple of attacks. Paralyse Fencer, Venom Fencer and Tricolor Order. In this case the most important thing to note is the paralyse because you do not want to burn turns due to your characters being paralysed. Bring the appropriate items to play around this. Once again, end this fight fast so that you don't lose to yourself.
Chapter 2 - Thelad Sanctuary
Boss lizard isn't strictly a boss. He just has a tonne of HP. It's more of an easy fight to compensate for the difficulty of the later part of this chapter. Make sure you configure noire's combo attacks before you start so you don't take 12 centuries to finish.

Slash dog actually made me game over when I first played this game. The trick is that as the fight progresses, he'll use skills that have a MUCH larger area of effect. These skills WILL hit whoever is in melee range. If you are too far, he'll use generic elemental breath attacks which are quite painful as well.

If you're struggling to manage the mass amount of damage each party member is taking, have only 1 or 2 characters attacking it, but play around elemental breath attacks by not standing in a straight line or anything that might get 2 characters hit by it.
Chapter 2 - Avenir Storage
This is the first even fight here. As a benchmark, if you're struggling with this fight here, you should simply reload your save and grind more. These are simply normal monsters in this area with more HP.

So killachine and the fight leading up to it is a ridiculously hard difficulty spike, being a dungeon that you cannot leave from (save getting an eject button early) and with 3 fights in succession without being able to resupply. Personally i'd advise against training in the dungeon because there's a good chance you'll need your healing items for the boss instead of for whatever damage you take from the monsters while training. You also want to make sure you have plenty of supplies so you don't run out like I did in the video. Being prepared is half the battle.

There's a weapon for noire in the corner of the square room with the tough foe. This should help you, unless you're a fool like me and forgot entirely about it.

Unlike earlier battles, noire is your main damage dealer here, she has ability "Ignore Enemy Traits" which means her slashes do full damage on mechs while neptune does not. If you're still struggling you may consider grinding all the way to level 20, which I did on my first playthrough of the game.

By this point neptune should have Mega D drive, which is absurdly broken in terms of power to CP ratio. i.e you should use it. Because of this alone will make neptune's damage on par to or better than noire's.

Try not to forget to equip all your items, unless you intend to be an idiot like me.
Chapter 3 - Two Large Reasons
The momus messenger after dropping one of the most amusing lines from a insignificant characters simply makes you fight a bunch of random common enemies. Simple fight.

Here's your first fight with vert and without nep-nep. The main thing is that vert is mostly a magic attacker, but most of her combo skills are physical. Also by this point you may not have exe drive skills (unlocked at level 25) especially if you're playing without fortify enemies. Main difference you'll see is that the bosses in chapter 3 will bend over if you use exe skills unless you have fortify enemies where in that case they'll eat a few of them. You don't need exe skills to beat this boss, but it makes is far easier.

Another thing to note about this area are the Metal Dogoos, which are basically the best grind mob in the game until you get to like chapter 7. If you're missing them a lot, which will happen (Metal dogoos outspeed my party until like chapter 5), you should prep that EXE gague. It can be challenging to acquire level 25 in this area without at least 1 AOE EXE to begin with, so feel free to grind elsewhere should it be too inefficient.

Finally the chapter end boss. Under *normal* circumstances, you'll two shot her with EXE moves. However, this is fortify enemies. Her health and ability to take hits is MUCH more respectable. This is one of the fighs where despite the forced loss in between, you carry over the EXE gague from the previous fight. Ending with the exe gague high will ensure that your second fight is smooth sailing. One thing to note, Arfoire probably has more HP in the second battle, but it's barely significant iirc. You should be obviously using Vert, there are many reasons to do so other than the obvious two very large ones staring at you. In other news, the debuffs from her EXE drive are pretty useful.
Chapter 4 - Killachine: Electric Boogaloo
Chapter 4 is one of the longer if not longest chapter in the game. Difficulty varies from "Smooth Sailing" to "Hardest fight".

First we enjoy our pokemon references, then we go beat up a giant dragon. At this point, bosses are essentially rinse and repeat with not much to play around. It's not like you have to avoid standing on fire or anything, its not *that* sort of game.

Boy, I hope you like Killachines, because here's MK2. You get Blanc for this fight but she isn't a Noire. The best part about blanc is the ability to use her to tank damage for you! The not so good part? Just about everything else. Okay she's not *that* terrible, but compared to the other CPUs, she has a lot of defense but loses out greatly in terms of speed. You do get a 8 hit rush attack out of her, which is cool and all, but the issue is with how frequently you can get that out of her. Her damange isn't super amazing either and she lacks ignore enemy traits. Her EXE drive is fine and has good range but suffers HEAVILY from damage capping issues especially when you're not killing bosses. But enough bad talk about Blanc, her presence as a CPU already makes her more valuable than the makers you have at this current time.

On the bright side, this time you have Vert, who will mostly be doing god's work because magic attack characters are magic. *gets shot*
There are too many things that lack magic defense (MEN) which makes Vert highly valuable.

Here's MK3 and v1.01. MORE KILLACHINES WHAT JOY! HOPE YOU LOVE FIGHTING THESE SAME MODELS. This fight isn't hard, the only thing that might throw you off is the fact that its two killachine fights back to back. Most people dont see the second one coming. This time you have MAGES. who is arguably one of the better characters to put in your party... that is if the game had 4 active members. Anyway her magic attack stat is nuts so make good use of that.

Chapter 4 - Skill Jammers
And now the only fight in the game which gave me a game over on fortify enemies. In fact this fight I reset about 3-4 times and got 2 game overs. Definitely one of, if not, the toughest in this entire playthrough. I mean seriously, If you looked at the level of my characters since the previous video, I jumped 5 whole levels just to be able to clear this. Partially the problem is being underleveled due to skipping a lot of the monsters thanks to metal dogoos being more efficient, but its also the fact that you can take tonnes of damage in one turn with no way to heal yourself.

This is one of the fights in the game where you may even consider using the switch function (the rarely used feature which lets you change the active character with the partner). I didn't use it though, because you really have to spend credits to equip the other characters you plan on using.
Anyway if you're a m0ron like me, you'll think that the elemental weaknesses of these jammers are the same as the ones in the collosseum. That's not entirely true, they're quite different. In addition to NOT recovering 109000 HP per turn, the jammers here actually take reasonable damage from weapon attacks. However, magic attacks are likely still better. I recommend having at most 1 physical attacker. You can do with more, but I think exploiting elemental damage bonus is more effective. So according to my lack of research, ITEM jammer is wind weak while SKILL jammer is ice weak, fire immune.

Another item that would have helped is HDD activation full heal, however I don't recall being able to obtain that this early in the game, so that's probably not an opton too. Simply make sure that you burst down the jammers as fast as possible. Using things that "Shortens Wait" or with "Act Fast" is good as well. I didn't use any discs, because I'm far too lazy to actually acquire good chips.

Finally for the conclusion of chapter 4, we fight Arfoire again. You lose blanc/vert one event before this, but you gain them back just before the fight anyway. The key is to acquire EXE charge with the other characters in the party before the fight to make it easier, something that I obviously failed to do since I apparently love tempting fate. Fake White Heart recovers just under 5K HP per turn, which is a small portion of 1 exe skill, but still more than one turn of rushing in most cases. This once again encourages the use of burst and buffs to keep your entire party at maximum DPS potential. Get the EXE charges you need, and annihilate this boss.
Chapter 5 - And So, three days later...
Chapter 5 is really short, it's one of those chapters you *accidentally* clear. First off you got a really easy curb stomp fight against a bunch of normal monsters. This is probably just a plot driven "HEY LOOK YOURE PRETTY STRONG NOW" moment.

And so, three days later.... You face the Panzer followed by CPU Breaker. Panzer fight is really easy. No point farming EXE like I foolishly did, since you do NOT preserve your gague between fights. Take note from my mistake, this thing is perfectly capable of dealing around 7k damage to one party member with that giant "Beam" attack literally called beam. Unfortunately at this point It's still quite hard to keep your health high since your healing item options are still rather limited even if you try to unlock the new plans. This is the earliest point in the game you'll have a good "End game" healing item, blanc manju. You need to go to soulsac cave with add enemies and beat up the dogoo. Even though the Dogoo and the shampuru have relatively similar HP, the shampuru has FAR more stats and will make your life miserable if you fight it. The jelly dropped by the Unplanned Dogoo will allow you to complete the plan for the Blanc Manju which restores 100% of HP and gives you +tec boost.

After the panzer fight, you get another forced loss and then followed by the CPU breaker fight. If you're underleveled, using MarvelousAQL isn't a bad idea, but I generally prefer to stick to the standard CPU setup which is tried and tested.
Chapter 6 - Bad Things™ Happen
A lot of time is spent on simply plot advancement at this point. Nothing really happens in terms of gameplay changes. This fight is not hard, you even keep the EXE gague after the forced loss. (This forced loss feature arfoire and CPU Killer, although Arfoire has significantly less HP, no time for that though, we're not talking about beating these fights here.) The key thing to do BEFORE this fight is to train your characters. This is because of storyline and plot related reasons. If you do not train your characters before this boss, you may regret not doing so as the next chapter will be much harder and unforgiving. This is admittedly hard to do, since at this point metal dogoos are less appealing and the normal dungeon EXP is starting to catch up. If you're a lunatic who decided to unlock the dungeons like Millenium Labyrinth and above, it can be possible to train there, although the monsters are absurdly difficult with fortify enemies at this current level (iirc EDGE does about 8k damage at this point, and defeating Antares for the Magical Reactor 3 is no simple task either)
It can't be helped if you lack the willpower to train, I did too. Chapter 7 is going to be challenging regardless.(and the longest of the last 4 chapters)

Note that from this boss you gain a 1.15k/1.15k armor which if you have weaken enemies on, apparently causes you to take no damage from bosses for a while. On fortify enemies however, it seems like the only decent armor available.

Chapter 7 - Leanbox Wing
I'll be documenting chapter 7 in the order that I did it in this run. In my first playthrough of this game I did it in the order Planeptune, Lastation, Leanbox, Lowee which is the order you first visit each town in. However, judging by monster EXP and level of the partners given to you, it appears the intended order is Planeptune, Lastation, Lowee, Leanbox.

Enough about that, I did Leanbox first this time because I think it's the most straightforward area and the boss isn't challenging, plus you get Vert, who's objectively still the best CPU in terms of straight up being irreplacable.
Leave it to me to screw up my equipment management though.

So here's the fight against Fake Green Heart. Like I said in the earlier chapter, you'll probably be underleveled due to the general lack of efficient EXP around this point of the game. Good thing you have Tekken, who's level 60. You can utilize her to beat the fight if you decide to switch the party members around and configure her combos, which I was simply too lazy to do. The butterfly mobs in this area is the best EXP until you unlock the final dungeon in the game. However, grinding in this chapter is really inefficient due to how you dont have your full party. There is a weapon in each area for the respective CPU, in this case, we have a new spear for Vert in one of the treasure chests in this map. I believe neptune is the only one who does not receive a weapon from a treasure chest of the respective area. As pointed out in the comments this is incorrect. There's a weapon for Neptune and a rod for MAGES. in there somewhere.

As for actual fight notes, she recovers 10k hp per turn. IF's exe is actually amazing at this point of the game as well, since her weapons are so good. In fact IF is really strong until the super late DLC levels where all the other CPUs get their strongest weapons while the makers get sacked into a corner. Life rings are still useful at this point of the game, you can see that IF just dies in 1 hit due to not having one.
Chapter 7 - Lastation Wing
Here's the first fight with fake black heart. As usual, there's a shiny new weapon for noire in this map, in the second area of the level, the extreme dead end corner (The exit for Avenir Storage #3) wih a bunch of chests holds 1 weapon for noire. You only get CyberConnect2 after winning this fight. Nothing too interesting about this fight. It's not easy if you're very underleveled, but with some preparation this is still one of the easier fights of the few.

And now we have the rematch fight. It's just the more HP grind as usual. Not much that is noteworthy or too different from other bosses. Attack buffs are still very important here as you need to make full use of the advantages you have.
Chapter 7 - Planeptune Wing
You start miles away from fake purple heart in this fight. You can always buff yourself while waiting for her to come to you. Using IF as your primary attacker is probably a good idea.

Here's the second fake purple heart fight. Try not to be caught off guard by her 360 degree AOE attack. Other than that this fight will go down very similarly to every other fight in the game.
Chapter 7 - Lowee Wing
This was probably the hardest chapter 7 fight in my first playthrough. The key here, other than to remember to acquire the new weapon for Blanc in the map, is to try to get White heart as close to guard broken as possible (All bosses regenerate guard per attacking turn at this point, but the key is to ensure that it's within burst range). When you have a few EXE moves to spare, burst her down. Once her guard is broken, your attacks will deal significantly more damage in this case. Note that she has less guard than most other bosses in this chapter, making this feat easier than it sounds. Other than that, simply use blanc to support, rush and help survive, since for some reason on all my playthroughs she's the most underleveled.
Chapter 7 - Momus Intensifies
Now that you have all your party members back, don't trigger the next event in planeptune yet! Go and acquire a few more levels and recovery items so that you're better prepared for facing the last few bosses in the game. After you've done all that, then you can go back to planeptune to trigger the event.

Now you fight Momus again! This time he's harder! Are we witnessing some sort of trend? Hopefully not! Anyway you simply have to beware for some burst. His "Virus Attack" is probably the strongest attack he has. Other than that the attacks aren't that threatening. Note that this is the point of the game where neptune gets downgraded to support due to the other CPUs getting their "legendary plot driven weapon". Still that's not too great of a deal.

And finally Neptune gets her HDD back and you face momus once more. His attacks hit a little harder in this fight, but it's still going to go pretty much the same way the first fight did. Simply crush him and move along. Oh by the way, this is the last Event fight in the game to feature "To Hell" as the battle theme (Which is used in all chapter end fights except for chapter 8) Enjoy!
A Prelude To The End
A couple things before I begin on chapter 8. There are two endings to this game. It doesn't change anything about the final fight, but the true end has 1 more fight after the normal end. To get the true ending, Other shares must be 0% and the remaining shares must all be 2X% where X is a number 0 to 9. The easiest way to get Other shares to 0% is the "I want to be famous" quest in the guild which gives +5% planeptune shares and -5% other shares for beating a boss. To spread the remaining shares equally, you'll want to unlock the colosseum for maximum speed. Plan the battles you choose to take carefully and then simply do them a bunch of times. Most fights give around 10k+ EXP, which is actually great for leveling as that's almost the same amount gained from 1 fight in Road To Celestia.

Another thing you may consider doing is completing the plan which allows you to exceed the damage cap. The plan for the ring required to complete the break damage limit plan is found on the world map, and the items to complete the plan are rather spread out, but easily obtainable at this level. One thing to note is that this isn't really necessary. Neptune exceeds the damage cap by default, and one of your other two characters can equip Histy's Bookmark dropped from Momus which will allow you to break the damage cap as well.

If you're doing the true end, having the CPU candidates (unlocked at 50% shares of each respective area except Leanbox which doesn't have a handheld console) makes it super easy (although you will want to get some levels on them first). Having the DLC characters works too, but I chose to not touch them at all in this playthrough just to keep it as vanilla as possible.
Chapter 8 - The End
And now for the final fights. The first fight is meant to be a pushover, you start miles away from her, which gives you the chance to buff yourselves first. It doesn't sound necessary, but you will want to finish her with normal attacks so that you will have as much gague as possible going into the remaining fights. Her attacks aren't exactly threatening, but it's fine to expend a few healing items here just to play it safe. Use 1-2 exe attacks to cut up most of her HP and just rush her to death.

After more dialogue, she transforms into a dragon, gee this sure isn't like any other RPG game I know of....
Main thing to be aware of in this fight is "Dragon Raid". It hits for like 18k damage which is essentially an instant kill. It also has a large enough area to be able to hit more than 1 character. Spread yourselves around well so that you can play around it. Things will get ugly really quick if you keep allowing her to down your characters one by one. Stop attacking to stabalize. Despite the fact that AOE Resurrection/healing items and skills exist, they are mostly useless due to the fact that you have to group your characters closely to get it to work, which simply means that you're taking unecessary damage. If you're doing the true end, be sure to end the fight with at least 1 EXE charge. High HP on Neptune isn't really necessary since most characters will level up between the fights anyway.
Chapter 8 - True End Fight
Finally if you've qualified for the true end, you'll face Arfoire once more as Neptune solo (No other characters except: Histore, Plutia, Peashy, Nepgear, Uni, Rom and Ram can assist in this fight, but you must have them in your ACTIVE party before starting this event.) Arfoire has basically very little HP, but you want to make sure that you don't get destroyed by her attacks when the fight starts. If you're forced into and endles loop of having to heal just to survive, this fight will turn bad rather quickly. Luckily you should have sufficient damage to one shot her with an EXE skill.
Credits
Thanks to everyone who bothered to read the wall of text until this far!

Also thanks to IFI for porting this amazing game to steam and taking all my money and subsequently spare time (no regrets!).
Shoutouts to Logic2Stronk for proofreading this guide and being the main influence in getting me to buy the game.

Also the thumbnail for the guide is taken from my fight with the Ultradimension Dogoo! (The level 999 colosseum fight from the DLC). You can check it out here: LINK

I'm not sure if I'll do a guide for Neptunia Re;birth 2 at the moment.
Edit: MAAAAAAAAAAAAYBE
9 Comments
Against All Anarchy 29 Nov, 2018 @ 7:59pm 
Its kind of late but... w/e

Just wanted to thank you to make my first playthrough of any Neptunia game a lot more enyoable for me. I didn´t understood anything in this game and struggeld alot against Black Heart (like i think most ppl do on their first attempt xD). Thanks to you that changed

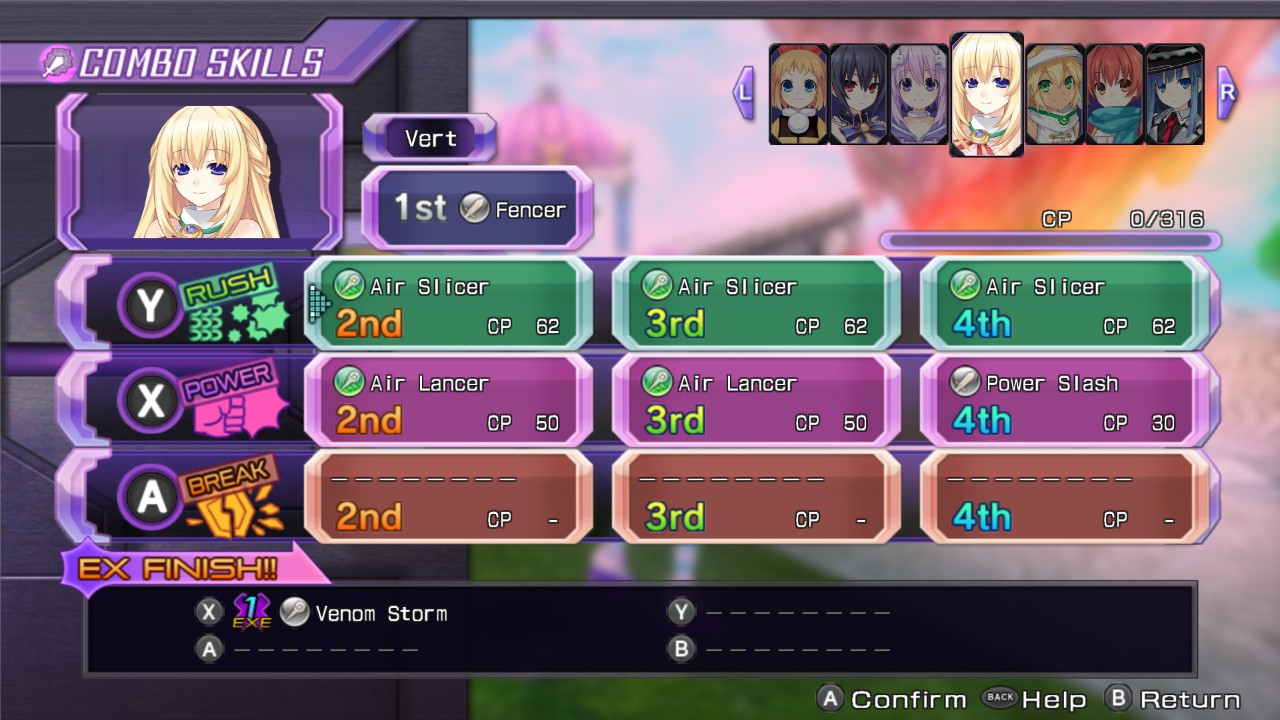
Though it might sound like heresy to you but...idk my Blanc were alot stronger than my Vert so i ended up benching Vert...what is she doing so great that i miss? And what is making Blanc so bad while i can´t see why?
ずー  [author] 3 May, 2016 @ 4:28am 
@Anzuko Thanks for letting me know. I've corrected the error :Nepgear:
Nice to know that I've been helpful :SisterRom:
Anzu 3 May, 2016 @ 3:43am 
in "Chapter 7- Leanbox Wing" you wrote "There is a weapon in each area for the respective CPU, in this case, we have a new spear for Vert in one of the treasure chests in this map. I believe neptune is the only one who does not receive a weapon from a treasure chest of the respective area." Actually there is a sword for Neptune (Esperance) in the dungeon (as well as a rod for Mages) :sgsmile:

& thanks for the guide, it helps alot!
Sparrowx17 12 Sep, 2015 @ 6:00am 
thanks
L'Antica 30 Jun, 2015 @ 8:04am 
Helps a lot
Thanks for the guide!
ずー  [author] 25 Jun, 2015 @ 5:24am 
@あたらしい!
Ah so that explains it. Thanks for the correction. I will amend the guide accordingly. :nepnep:
Kransthow 25 Jun, 2015 @ 5:22am 
"It is not known if EXE finishers actually affect the EXE gague. However, casual observation over 100 hours of playing the game shows that it's probably not the case."

EXE finishers absolutely affect the EXE gauge, It is extremely easy to notice when using rush EXE finishers on groups with the final fantasy disc. It can be hard to tell normally though as the gauge doesn't show during finishers and if you go up a gauge level the audio prompt will not play.
Chromo 24 Jun, 2015 @ 9:15am 
Amazing guide.Thanks a lot for supporting the community.You helped me a lot! :)
Gaze 21 Jun, 2015 @ 5:13pm 
thanks and nice guide