
47 ratings

Create a dungeon on UnEpic [EN]
By Guybrush
Learn how to make an epic dungeon from A to Z on UnEpic
Favorite
Favorited
Unfavorite


| 1,362 | Unique Visitors |
| 59 | Current Favorites |
Guide Index

Overview
Introduction
Unlock the tools
Create a dungeon
Moving in the dungeon
The tools 1
The tools 2
The monsters 1
The monsters 2
The traps
Dialogs
Create a boss
The advanced editor : introduction
The advanced editor : room configuration
The advanced editor : water
The advanced editor : decorations
The advanced editor : lights
The advanced editor : backgrounds
Files location
Publishing the dungeon
Tips and tricks
It's your turn
Comments
Introduction
Welcome, everyone.
I am the creator of the three "Scabb Dungeon" maps. I think a lot of persons hates me because of my dirty tricks, so I decided to apologize, by sharing my experience with the UnEpic editor.
As we can’t find a full guide on the Internet, and as I personally met people wanting one, I decide to be the one creating it. I hope it will help to increase the number of architects on this game.
Don’t be afraid by how long this guide is, I am sure you won’t need everything, and some things will be obvious to you.
You can skip the parts you don’t need, but I suggest you read it anyway to pick up all the tips and warnings I give about all the tools, concepts, mechanisms, etc…
You can easily navigate through all the chapters thanks to the summary on the right.
If you want to add some information, or if you think I should have chapters about some things, don't hesitate to talk about it in the comments.
I apologize if I make English mistakes.
La version française est ici : http://gtm.steamproxy.vip/sharedfiles/filedetails/?id=391220353
Unlock the tools
Unlocking
I know that if you want to make a dungeon, you probably already have the tools, but as I wrote from A to Z in the description, we will start from the beginning.
However, if you didn’t unlock them yet, or if you just did it, I suggest you to wait a bit and play some existing dungeons before, to know more about the game.
To obtain the tools, you will need to go in the second dungeon of UnEpic : The search for Magic.
You will have to go in this room :
 Don’t criticize my wonderful skills with Paint, thanks
It is also possible that the tools are after the boss room. In that case, you can’t miss them.
Sorting
Once you’ve unlocked the tools, you will be able to use them. However, to leave the editor, you have to do a “Force exit”, to prevent your character from saving its progress while making the map.
The problem it creates is that you can’t save the tools you put in your shortcut bar (tools work like skills/spells), and if you’ve rearranged your tools inventory, it will be reset to its initial state.
Even so, there is a solution (of course so, I am not here for nothing).
You can go in the “Hero’s home”, set up your shortcuts, sort your tools in your inventory (A button on the PC, if you didn’t rebind) if you want, then save, to keep it like it is.
I will let you sort your architect inventory as you wish, but for the shortcuts, I recommend you to keep at least those one.
-
Wall
-
-
-
Bulldozer
-
Ladder
-
Light
-
-
Night ambient light
-
Destroy monster
-
Magic starfish
-
Night vision
Now, we should be able to start.
Create a dungeon
Create a map
Now that we have all the tools in our hands, it’s time to start.
To create a map, you will have to go back to the first screen, and click on : Multiplayer > My dungeons
Then, choose a type of map, so most often a cooperative map.
Select a character that unlocked the tools, and where they are sorted, and click on “Own maps” (Translated in French by “Levels 6-10” on the picture).
Select then "Create new dungeon", or select a dungeon you already started.
 Thanks Captain Obvious
Finally, choose a name for your dungeon (It is not definitive).
The features of the map
Your map has features that you can change anytime.

If it is technically possible to finish the dungeon alone, even if it is hard, set the required number of players at 1. Else, set it at the minimum required to finish the dungeon.
For the “Arcade mode”, it allows you to define your dungeon as an arcade dungeon (What ? Isn’t that clear ?).
Actually, an arcade dungeon is a dungeon where you don’t play with your own character, and nothing will be saved at the end of it.
You define the level each player will have when entering the dungeon, 20, for example (don’t slobber, I told you nothing was saved).
Of course, the characters won’t start with an appropriated stuff, fitting their level. You will have to give it to them at the beginning.
Don't forget to often save your dungeon by selecting "Save map".
Moving in the dungeon
Before describing all the tools, let me tell you a bit more about how to move as being the Dungeon Master.
Don’t trust his big stomach compared to the others heroes, Ricky is far more agile ! Indeed, he is able to jump in the air, as much as he want (like a double jump, but with more than two jumps).
Magic Starfish allows you to teleport yourself where you want in the room, as long as there is a floor to land. You just need to point a place with your cursor, and use the tool. That’s why it is important to assign it as a shortcut.
 Magic Bellows works like the “Halo” and allows you to teleport back to the place defined as the beginning of the castle.
You can also teleport in each room, using the map and clicking on the right room.
You will most of the time be placed near the bottom right corner.
If the room is full, you will be placed at the center.
If the room is empty, it will create a platform on the center, and remove the background decoration on this tile, if there is one.
 Portal of Architect will force the teleportation in a room via the map at a specific place. There are shiny lights where it is placed, but this won’t be visible when playing the dungeon.
Don’t trust his big stomach compared to the others heroes, Ricky is far more agile ! Indeed, he is able to jump in the air, as much as he want (like a double jump, but with more than two jumps).
Magic Starfish allows you to teleport yourself where you want in the room, as long as there is a floor to land. You just need to point a place with your cursor, and use the tool. That’s why it is important to assign it as a shortcut. Magic Bellows works like the “Halo” and allows you to teleport back to the place defined as the beginning of the castle.You can also teleport in each room, using the map and clicking on the right room.
You will most of the time be placed near the bottom right corner.
If the room is full, you will be placed at the center.
If the room is empty, it will create a platform on the center, and remove the background decoration on this tile, if there is one.
Portal of Architect will force the teleportation in a room via the map at a specific place. There are shiny lights where it is placed, but this won’t be visible when playing the dungeon.
The tools 1
We are now in the part you are probably all waiting for : the tools.
You can access them thanks to your architect inventory (Switch between “tools” and “monsters” with the button K, or Y on console).
I will try to explain them in a logical order.
The traps will be explained in another part.
All the tools are like spells, and require having the feet on the ground.
Wall
Creates/Removes a wall in front of you, if there are no obstacles. An obstacle can be a mechanism, a lamp, a ladder, a door, a coffin, etc…
Floor
Removes the floor under your feet, or create one
If you stand on the edge of a platform, you will be able to create a floor. It will place either a floor or a wall, depending on the configuration of the room.
Bug : If you create a platform with this method to fill a hole leading directly to the lower room, the game will crash.
Roof
Creates/removes a platform above your head.
As for “Floor”, you can stand on the edge of a platform to work on the next tile.
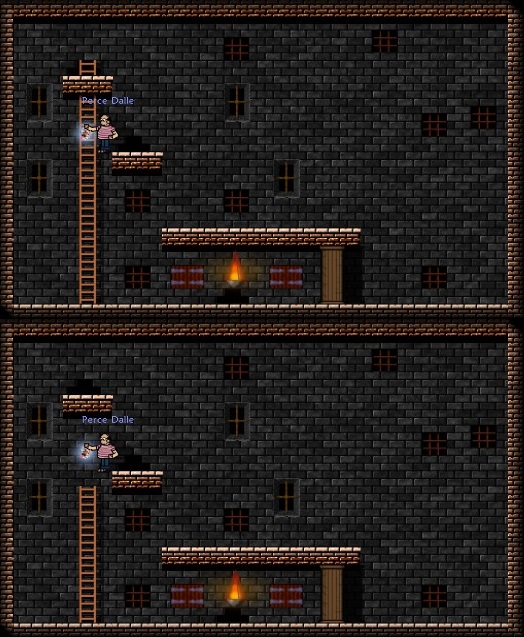
Ladder
Allows you to place a ladder at your current position. Using the tool on top of a ladder will increase its size. A platform is automatically added on top of the ladder.
It is impossible to place a ladder on the edge of a room
Using the tool at the base of a ladder will remove the whole ladder.
If you stand in the middle of a ladder, being on the edge of the next platform, you will be able to remove the platform on top.
Bulldozer
By selecting a zone with a “drag and drop”, and then using the tool, you will place a wall on each selected tile. Using it again will remove them.
You can easily place platforms remotely by using this tool twice, it will remove the walls, and replace those on the lower line with platforms.
To avoid creating platforms while removing walls, you can select an extra lower line.
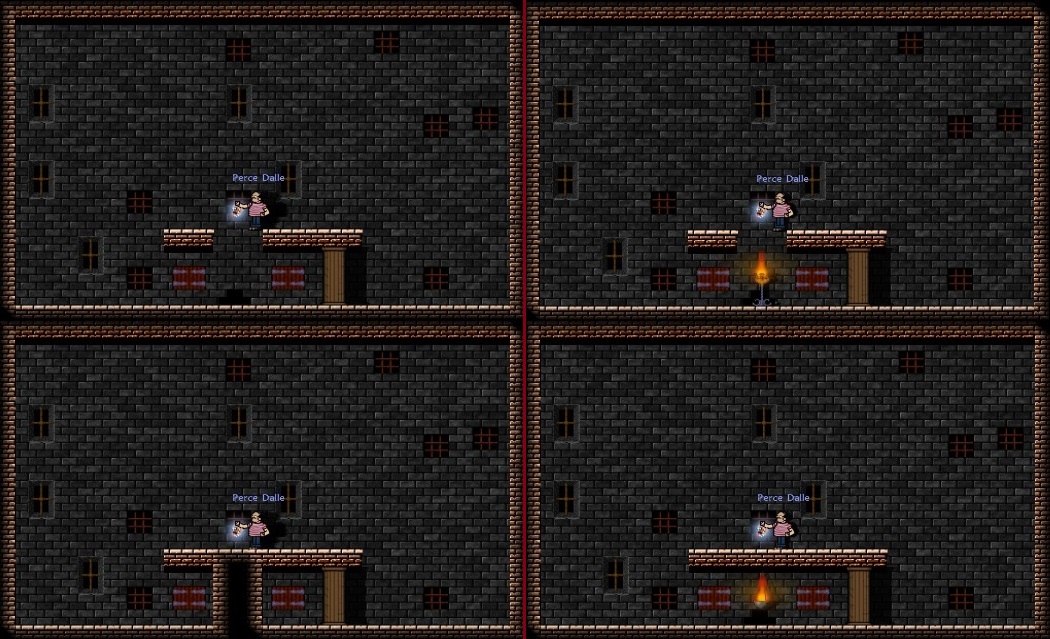
Light
Creates/Removes a switched off lamp (even if you light it with the Dungeon Master, it will be off when playing the dungeon). The lamp will stick the roof or the wall, depending on where you place it.
It is supposed to be a five tiles free space between two lamps, but it is possible to break this rule if the lamps are in a different zone, meaning they are separated by a wall, with no openings. You can remove the walls after, to have two close lamps.
It is possible to place a lamp in the void, while standing on the edge of a platform.
It is impossible to place a lamp on the edge of the room.
Permanent light
Works exactly the same way as the “Light”, and will already be lit while playing the dungeon.
Night ambient light
Creates/Removes a blue light.
The light bulb won’t be visible while playing the game.
It is possible to place a light bulb in the void, while standing on the edge of a platform.
 Lighting
Switches on/off all the light of the room, except the permanent lights and the night bulbs.
 Backgrounds
Allows you to change the background of the room, it will also change the ladders, walls and platforms to fit the new layout.
It will only change the current room.
All this tools won’t be needed later, as we will have access to a better editor, but it is important to know how they works, and what are the rules that stick to them.
 Tomb
Tomb
Creates/Removes a coffin.
It is possible to place a coffin in the void, while standing on the edge of a platform.
 Chest
Chest
Creates/Removes a chest.
The chest is placed empty. To fill it in, you will have to drop an item in front of it.
It is not possible to create a chest with a random content.
It is possible to place a chest in the void, while standing on the edge of a platform.
 Chest with item
Works exactly the same way as the chest, except that the content isn’t alterable.
It will give a random scroll, bombs, etc… It is not possible to obtain a Meeting scroll this way (I think that the illumination scroll neither).
 Porte
Porte
Creates/Removes a door, giving access to the parallel room.
Removing the wall under one of the two door will remove this door, without touching the other one, resulting in a one-way door.
It is possible to place a door in the void, while standing on the edge of a platform.
 Exit door
Creates/Removes the exit door.
You must have a free space above the door to place it, but you can fill it after.
It is possible to place an exit door in the void, while standing on the edge of a platform (but it would need to really be a twisted person).
 Flag
Flag
Creates/Removes a capture flag in the conquest mode. You can’t use it in cooperative mode.
You must have a free space above the door to place it, but you can fill it after.
It is possible to place flag in the void, while standing on the edge of a platform.
 Goal
Goal
Creates/Removes a goal on the race mode. You can’t use it in cooperative mode.
You must have a free space above the door to place it, but you can fill it after.
It is possible to place goal in the void, while standing on the edge of a platform.
 Start player
Allows you to place the starting point of the dungeon for the corresponding player.
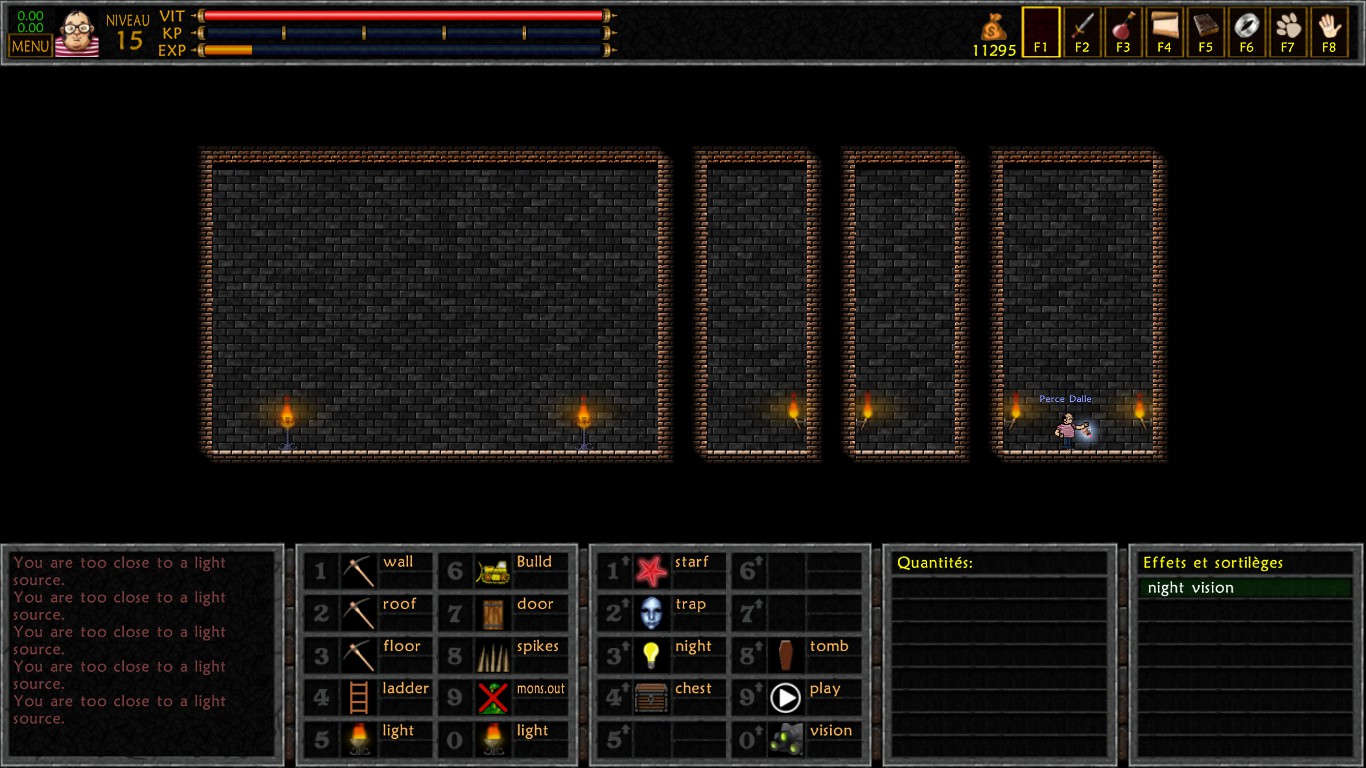
Night vision
Allows you to have a total vision of the room, without requiring light sources.
This tool is very useful, but don’t remember to disable it quite often, to see what the players see when they play the map.
You can access them thanks to your architect inventory (Switch between “tools” and “monsters” with the button K, or Y on console).
I will try to explain them in a logical order.
The traps will be explained in another part.
All the tools are like spells, and require having the feet on the ground.
The appearance of the dungeon
WallCreates/Removes a wall in front of you, if there are no obstacles. An obstacle can be a mechanism, a lamp, a ladder, a door, a coffin, etc…
FloorRemoves the floor under your feet, or create one
If you stand on the edge of a platform, you will be able to create a floor. It will place either a floor or a wall, depending on the configuration of the room.
Bug : If you create a platform with this method to fill a hole leading directly to the lower room, the game will crash.
RoofCreates/removes a platform above your head.
As for “Floor”, you can stand on the edge of a platform to work on the next tile.
LadderAllows you to place a ladder at your current position. Using the tool on top of a ladder will increase its size. A platform is automatically added on top of the ladder.
It is impossible to place a ladder on the edge of a room
Using the tool at the base of a ladder will remove the whole ladder.
If you stand in the middle of a ladder, being on the edge of the next platform, you will be able to remove the platform on top.
BulldozerBy selecting a zone with a “drag and drop”, and then using the tool, you will place a wall on each selected tile. Using it again will remove them.
You can easily place platforms remotely by using this tool twice, it will remove the walls, and replace those on the lower line with platforms.
To avoid creating platforms while removing walls, you can select an extra lower line.
LightCreates/Removes a switched off lamp (even if you light it with the Dungeon Master, it will be off when playing the dungeon). The lamp will stick the roof or the wall, depending on where you place it.
It is supposed to be a five tiles free space between two lamps, but it is possible to break this rule if the lamps are in a different zone, meaning they are separated by a wall, with no openings. You can remove the walls after, to have two close lamps.
It is possible to place a lamp in the void, while standing on the edge of a platform.
It is impossible to place a lamp on the edge of the room.
Permanent lightWorks exactly the same way as the “Light”, and will already be lit while playing the dungeon.
Night ambient lightCreates/Removes a blue light.
The light bulb won’t be visible while playing the game.
It is possible to place a light bulb in the void, while standing on the edge of a platform.
LightingSwitches on/off all the light of the room, except the permanent lights and the night bulbs.
BackgroundsAllows you to change the background of the room, it will also change the ladders, walls and platforms to fit the new layout.
It will only change the current room.
All this tools won’t be needed later, as we will have access to a better editor, but it is important to know how they works, and what are the rules that stick to them.
Some accessories
TombCreates/Removes a coffin.
It is possible to place a coffin in the void, while standing on the edge of a platform.
ChestCreates/Removes a chest.
The chest is placed empty. To fill it in, you will have to drop an item in front of it.
It is not possible to create a chest with a random content.
It is possible to place a chest in the void, while standing on the edge of a platform.
Chest with itemWorks exactly the same way as the chest, except that the content isn’t alterable.
It will give a random scroll, bombs, etc… It is not possible to obtain a Meeting scroll this way (I think that the illumination scroll neither).
PorteCreates/Removes a door, giving access to the parallel room.
Removing the wall under one of the two door will remove this door, without touching the other one, resulting in a one-way door.
It is possible to place a door in the void, while standing on the edge of a platform.
Exit doorCreates/Removes the exit door.
You must have a free space above the door to place it, but you can fill it after.
It is possible to place an exit door in the void, while standing on the edge of a platform (but it would need to really be a twisted person).
Flag Creates/Removes a capture flag in the conquest mode. You can’t use it in cooperative mode.
You must have a free space above the door to place it, but you can fill it after.
It is possible to place flag in the void, while standing on the edge of a platform.
Goal Creates/Removes a goal on the race mode. You can’t use it in cooperative mode.
You must have a free space above the door to place it, but you can fill it after.
It is possible to place goal in the void, while standing on the edge of a platform.
Start player Allows you to place the starting point of the dungeon for the corresponding player.
Night vision Allows you to have a total vision of the room, without requiring light sources.
This tool is very useful, but don’t remember to disable it quite often, to see what the players see when they play the map.
The tools 2
The mechanisms
All the mechanisms can’t be placed on the edge of a room.
Use the mechanism once again to remove it.
 Lock
LockCreates/Removes a lock.
In its initial state, it is possible to use the lock even if you don’t have a key. You need first to link a kind of key, by dropping it in front of the lock.
You can also link a skull key to this lock.
It is possible to place a lock in the void, while standing on the edge of a platform.
 Skull lock
Works the same way as the “Lock”, but it will consume the key when used.
You can also link a colored key to this lock.
 Create key
Allows you to create a key of the specified color.
It is possible to assign a key to a lock by creating the key while standing in front of the lock.
 Destroyable wall
Creates/Removes a destructible wall in front of you. You can either use it in an empty tile or in an existing wall to replace it.
 Lever
LeverCreates/Removes a lever.
A lever will activate all the triggers linked to levers in a room (two levers in the same room will always activate the same thing).
It is possible to place a lever in the void, while standing on the edge of a platform.
 Presence
Works the same way as a lever, invisible, that activates when a player steps on it.
 Dialog
Creates/Removes a red dialog bubble.
You can place many dialog bubbles in the same room. Each bubble will need to have a player on it to activate the dialog. There can be only one dialog (text) in one room.
Activating the dialog will activate all the triggers linked to dialogs in the room.
It is possible to place a dialog bubble in the void, while standing on the edge of a platform.
 Checkpoint
 Convert all the red dialog bubbles in the room in blue dialog bubbles (working like coffins).
 Restart levers and dialogs
 Allows you to reset the dialogs and levers in the current room.
 Sliding ladder
 Is used on a ladder to make it appear only if a lever is activated.
 Sliding platform
 Is used in the void or on a platform to make it appear only if a lever is activated.
 Sliding floor
 Is used in the void or on a platform to make it disappear if a lever is activated.
 Sliding wall
 Is used in the void or on a wall to make it disappear if a lever is activated.
 Dialog mechanisms
 Work the same way as the lever mechanisms, when the dialog of the room is activated.
You can notice that the dialog is the only trigger able to make a wall appear.
 Light mechanisms
 Work the same way as the lever mechanisms, when all the lights of the room are activated.
 Monster mechanisms : room
 Works the same way as the lever mechanisms, when all the monsters of the room are killed.
If a monster reappear in the room, for whatever reason, the mechanisms will reset, and reactivate when the monsters are killed again.
Warning ! If a monster fall in the void (I mean jump in a hole leading to the bottom room), he will not be considered as dead, because he will be stuck in air, even if we can’t see him anymore. In that case, you will never be able to activate the mechanisms, and it might be game over (you can maybe try to reset the room, by going far enough of this room).
 Monster mechanisms : zone
 Works the same way as for the “room” mechanisms, when all the monsters in the zone are killed.
The difference between zone, and room, is that a zone is a portion of a room. The zones of a room are separated by walls.
In the following picture, the different colors represent the different zones of the room.

Warning ! If you open walls or platforms with some mechanisms, the form of the zone may change and risks to not fitting your expectations anymore.
 Activates dungeon
 Allows you to activate your dungeon to be able to play it almost as if you were playing it for real, without needing to leave the editor. You can reactivate it to be back in editing mode.
After activating it, you can still use your architect tools via the architect window.
The monsters 1
Now, let’s talk about the local wildlife.
To access the monsters, open your architect window, and press K.
Don’t forget that there is a limited number of monsters you can put in a room (traps count as monsters).
The monster will face the direction you were when you placed it.
You can’t place monsters to close to each other, or too close to a wall.
Destroy monster
Allows you to remove each type of monster. I recommend keeping it in the shortcut bar.
 Turn monster
Allows you to change the monster direction.
 Enable/disable monster
Is used on a monster label to make it appear only when a lever is activated.
The barrels works the same way as monsters, and will give you… well, barrel content, actually.
You have to know that the “Helmets” and the “Poison balls” refuse to be placed on the top of the room.
Finally, some monsters are grumpy. The "Burried skeleton" refuse to be on a platform, and the "Gelatinous cube", The "Octopus", and the "Tentacle" refuse to be placed in the void, or to close to the edge of a platform.
Now, you have to know that it is possible to create your own monsters. You can either edit the existing ones, or creating one from a new basis. It is the utility of the “Dummy Monsters”. They are monsters intended for customization, to avoid sacrificing an existing creature.
Let’s see what the options are with a “Dummy”.

In the tab “Customize”, a lot of features appear, and will allow you to create our own monster. While selecting one of these features, a pop-up will appear, describing it, and asking for the numerical value corresponding to your choice.
I will describe each of them.
To access the monsters, open your architect window, and press K.
Don’t forget that there is a limited number of monsters you can put in a room (traps count as monsters).
The basics
To place a monster, just use the one you want to place, and a label with the corresponding monster will appear on the ground. To remove it, you have to use the same monster at the label position.The monster will face the direction you were when you placed it.
You can’t place monsters to close to each other, or too close to a wall.
Destroy monster Allows you to remove each type of monster. I recommend keeping it in the shortcut bar.
Turn monster Allows you to change the monster direction.
Enable/disable monster Is used on a monster label to make it appear only when a lever is activated.
The barrels works the same way as monsters, and will give you… well, barrel content, actually.
You have to know that the “Helmets” and the “Poison balls” refuse to be placed on the top of the room.
Finally, some monsters are grumpy. The "Burried skeleton" refuse to be on a platform, and the "Gelatinous cube", The "Octopus", and the "Tentacle" refuse to be placed in the void, or to close to the edge of a platform.
Customization
Now, you have to know that it is possible to create your own monsters. You can either edit the existing ones, or creating one from a new basis. It is the utility of the “Dummy Monsters”. They are monsters intended for customization, to avoid sacrificing an existing creature.
Let’s see what the options are with a “Dummy”.
Customize
In the tab “Customize”, a lot of features appear, and will allow you to create our own monster. While selecting one of these features, a pop-up will appear, describing it, and asking for the numerical value corresponding to your choice.
I will describe each of them.
- Level : Set the level of the monster. It will only influence the experience given when killed. Give a level equal to the level of your dungeon, and a bit higher for stronger monsters. Be careful with the amount of gold earned while playing your dungeon, it mustn’t be too high.
- HP : Set the amount of HP. Look at the HP of existing monsters to have an idea of the right amount to give.
- HP extra player : Set a number of extra HP per number of player in the dungeon. If you set it at 100, the monster will have +100 HP with two players, and +300 HP with four players.
- Run speed (alerted) : Set the speed of the monster when he is running after you. Your own speed is 100.
- Walk speed (unalerted) : Set the speed of the monster when he is patrolling.
- Size : Set the size of the monster, between 10% and 200%. 10% is almost invisible, and 200% is bigger than a tile.
bug : If you create a too big monster, his head will be hidden by the roofs if they are placed on tile above, and when he will be patrolling, if he meet a wall, he will continue walking into it, unable to detect it, so he will never go back. He will detect the holes without problems. - Monster size type : Set the size type of the monster. It has no visual influence, but the weapons and skills having special abilities depending on the size of the monster will be affected by this feature ( ex : axe skill Axe-ecution).
- Monster type : Set the type of the monster. For example, a skeleton will be able to be controlled by arcane.
- Body image : Set the body of your monster. Sometimes, you can choose the color of the cloths via the RGB system (Red Green Blue). You can directly type blue, red, etc… for simple colors, but if you want to use a more specific color, I suggest you to look for its RGB code on the internet. For example, the RGB code for Magenta is R:255 G:0 B:255. You will have to type 2550255 in the text input field.
- Head image : Set the head of your monster.
- Team : Set the team of the monster. Several teams are possible :
- Ally : The monster is an ally, you can’t hit him anymore. The only way to kill him is an AOE spell able to kill the other players as well (ex : fire balls, frost breath, dead cloud, etc…). He will attack monsters set as enemy. They don’t need to be killed to activate the mechanisms bound to the death of the monsters.
- Ennemy : The monster is an enemy (it is the default value), and will attack you and the monsters set as ally.
- Neutral : The monster will attack nobody, even aggressive monsters, and nobody will attack them. These monsters must be killed to activate mechanisms bound to the death of the monsters.
- Aggressive : The monster will attack all monsters except neutral ones and other aggressive monsters. It is like a third faction.
- Aggressive untouchable : It is the same as aggressive, but the monster can’t be attacked. A mine wagon is aggressive untouchable.
- Ennemy untouchable : It is the same as aggressive untouchable, but in the “Enemy” faction.
- Ally : The monster is an ally, you can’t hit him anymore. The only way to kill him is an AOE spell able to kill the other players as well (ex : fire balls, frost breath, dead cloud, etc…). He will attack monsters set as enemy. They don’t need to be killed to activate the mechanisms bound to the death of the monsters.
- IA default : Set the behavior of a monster when he isn’t in fight mode. (when he is not chasing you, actually). There are 6 possibilities :
- Go back : The monster walks as much as possible, go back, and repeat.
- Go back + search : The monster acts more randomly, he walks, turn back sometimes, and make pauses and look around while he reach an edge.
- Go back + search + chat : Same as previous, but will sometimes stop to talk with the same creatures.
- Static : The monster won’t move at all.
- Static turn random: The monster will stay at the same place, and will turn back sometimes.
- Static sleepy : The monster won’t move, and will sometimes fall asleep.
- Go back : The monster walks as much as possible, go back, and repeat.
- IA attack : Set the behavior of the monster once he found an enemy. There are 2 possibilities :
- Seeker : The monster will rush on his target. If you set it to a mage or an archer, he will wait to reach the player before shooting.
- Static : The monster won’t move, and will wait for the enemy to be at range.
- Seeker : The monster will rush on his target. If you set it to a mage or an archer, he will wait to reach the player before shooting.
- Weapon : Gives a weapon to the monster. It is impossible to not give a weapon to a monster (except in some cases you can see lower).
- Attack damage : Set the number of raw damages dealt by a monster hit (or an arrow).
These damages are reduced by armors and robes. - Attack speed : Set the attack speed of a monster with melee weapons, between 50ms and 3000ms (1000ms = 1 second).
- Bow/Wand delay : Set the attack speed of the monster with a ranged weapons, between 0ms and 60000ms (minimal speed is defined with the attacking animation).
The monsters 2
- Attack extra : Set an extra effect when the monster hits you. There are 7 possibilities :
- Poison X : Adds a poisoning effect which strength depends on the number.
- Steal ring : Steals a ring to the victim
Bug : This feature doesn’t work. - Acid X : Adds a acid effect which strength depends on the number, that corrodes the armor.
- Steal weapon : Steals a random weapons.
Warning ! If players leave the room, or take too much time killing the monster, recovering the weapon isn’t 100% sure. - Burn : Adds a burning effect
- Slippery hand: Add the effect "Slippery hand" that makes players drop their current weapon.
- Trapped : Add the effect "trapped” that reduces the speed and prevents the players from jumping for one second.
- Poison X : Adds a poisoning effect which strength depends on the number.
- Spell #x : These fields allow you to set the spells used by the monster. It is pointless to give two offensive spells, he will use only one. You can use the other fields to give him defensive or supportive spells, such as elemental protection, or healing. It is possible that some spells refuse to work properly. Also, monsters won’t use spells against monsters immunized to that spell.
It is also impossible to change the damage dealt by a spell, so you will have to take care about giving a spell adapted to the level of the dungeon. - Spell delay : Set the delay between two spells, regardless of which spell he throws.
- Is invisible : Turns the monster invisible, he can be seen by invisibility detection methods.
- Can see invisible : : Allows the monster to see, and then attack, the invisible things.
- Seen with infravision : Allows the monster to be invisible to the mental “Infravision” spell, that allows players to see all the monsters in the room, even in different zones, as shown in this picture.
- Reset to default : Reset all the fields, even concerning the loot and the resistances.

Let’s see the "Spawn monster" field, now. It allows to choose a monster that will be summoned by your customized creature. Once done, four fields appear :
- Spawn type : Set the reason why the monster is summoned. There are 7 possibilities :
- Continuous : The monster summons continuously when players enter in the room for the first time.
- Incubate: : The monster summons a creature after a given delay, and die in the process. Killing the monster before the incubation will prevent the creature from spawning.
- Ennemy at sight : The monster summons creatures while in fighting mode.
- When being hit : The monster summons a creature each time he is hit.
- Ennemy in the zone : The monster summons creatures when an enemy is in the same zone.
- When dying : The monster summon a creature after being killed.
- Summon by spell : The monster summons a creature each time he uses the appropriate spell, that you must give to him in one of the “Spell” fields.
- Continuous : The monster summons continuously when players enter in the room for the first time.
- Spawn delay : Set either the delay between two spawning, or the delay of incubating.
- Spawn number : Set the maximum number of creatures your monster will spawn before stopping.
- Spawn max in room : Set the maximum number of spawned creatures that can be in same time in the room. This maximum can’t be higher than 64.
Warning ! A monster will always summon a monster in the same team as him. It is impossible to summon an ally monster with an enemy monster, and vice versa. Teams will be converted while summoning.
Also, a summoned monster will always be looking to the right at first.
[tip from Igor] : The boss can summon all kind of teams properly.
As I previously said, It is also possible to customize the existing monsters. They sometimes have unique characteristics, and won’t have all the fields dummies have.
For example, we can’t give a weapon to slugs, we can’t change the head of a snake, etc…
Other monsters, like walking armors, can’t use ladders.
It is important to know all these details, to use all the possibilities of the customization.
For example, if you want to be sure a monster will throw spells at you, without using his weapon, there is a trick. You can’t make a dummy without weapons, but you can use one of the trees.
Warning ! If you customize the common skeletons, then the skeletons created by arcanist players will also be the customized skeletons as long as they play your dungeon, that can be very annoying. As an example, when I created Scabb Dungeon, the skeletons created by arcanists were summoning the final boss, so I had to face 3 of them at the same time !
Warning, if you try to give spells to some creatures, that have no spell animation, you might risk to make your game crash. I once tried to make a chicken spitting fire (no comments), but it didn’t work. Save before testing.
Customize loot
In the "Customize loot" tab, you can choose what the monster will drop, once defeated.
Click on “item” to select an item (the skull key isn’t in the list. This item can’t be dropped by a monster). Then choose the chance percentage for this item to be dropped.
If you select a stackable item, set the number you want to see appearing, starting with the maximum value. The amount will be randomly chosen between the min and the max value.
You can then add other items.
Warning ! The sum of the percentages of all your items must be inferior or equal to 100%. A monster can drop only one item at once, it is then useless to set two items at 100%. The dropped item will be chosen thanks to the percentages.
If the sum is higher than 100%, they will be written in red.
Customize resistance
In the "customize resistance"tab, you can change the different resistances, depending on the type of damage : default, dagger, sword, mace, axe, polearm, arrow, fire, frost, arcane, poison, acid, alteration, mental, light, shadow, and ray.
Set the value at 100% means the monster will take normal damage from this kind of damage.
An inferior value means he will be more resistant, and a superior value means he will take more damage from this.
You can choose to put nothing, so the monster will be immune to this source of damage. A monster immune against mental can’t be controlled.
You can also write “avoid”, to make the monster avoid the damage source. The difference with immunity is that if I set a monster immune to fire, he will intercept fireballs. With “avoid”, the fire ball will continue its way.
“Shadow" is a unique damage source dealt by “Dead cloud”.
That’s over for monster customization. Possibilities are endless, so I invite you to test as much as possible. I didn’t talk about barrels, but they work exactly the same way, and you can change their appearance thanks to the “Skin” field. You can also use them as random content chests.
The traps
Let’s talk about traps, now, even if they are not all “traps”, strictly speaking.
 Spikes
Creates/Removes spikes.
Spikes are the most deadly trap. It is impossible to prevent dying while falling into it.
It is impossible to place them on the edge of the room.
To die from the spikes, you have to fall from one tile above, else, it is possible to go through it without troubles. That’s why it is possible to do both following jumps without dying.

Warning ! Lags may prevent players from dying, and make them land into the spikes safe.
 Gas jet
Creates/Removes a gas tube, propulsing players when they are activated. The editor will prevent you from placing one on a platform. You have to place it on above a wall. You will either need to place it in the void, standing on the edge of the floor, or removing the wall once the tube is placed.
 Gas jet tile
Creates/Removes a pressure plate on the ground. It works exactly the same way as placing a monster, with the restrictions included. You may notice that it is also possible to customize them, but most of the features won’t work, and you risks in the worst case to make your game crash. You can eventually make it spawn monsters, and make the plate invisible.
When someone walks on this pressure plate, all the gas tubes of the room will be activated.
You can make a small zone with some of them, with a monster walking on them, to make them activating continuously, like shown in this picture.

Warning ! If the air propulsing output rate is too fast, and with no interruption, players risk to be stuck on roof ad vitam aeternam.
 Up firebolt trap
Creates/Removes a pressure plate on the ground. It works exactly the same way as placing a monster, with the restrictions included. You may notice that it is also possible to customize them, but most of the features won’t work, and you risks in the worst case to make your game crash. You can eventually make it spawn monsters, and make the plate invisible. You can also try to give them weapons, it will have some fun results, but almost impossible to exploit.
When a player steps on this pressure plate, a fireball will appear from a wall in the same line. The wall can be chosen thanks to the “Turn monster” tool. If there is no wall, nothing will happen.
In a corridor, the only way to avoid it is to crouch.
 Down firebolt trap
Works exactly the same way as his collegue.
In a corridor, the only way to avoid it is to jump.
 Spear trap
Creates/Removes a spear trap.
It is placed like the other pressure plate traps, is a bit larger, and it is impossible to place it on a platform, you will need a wall underneath (of course, spikes must come from somewhere).
You can edit it to make it apply an “extra damage”, such as poison or acid.
 Bear trap
Creates/Removes a bear trap.
Works exactly the same as the spear trap, without the platform restriction.
 Rock
Rock
Creates/Removes a falling rock.
It is placed like a monster. It is possible to edit it, including its size. It is subject to gravity, and will kill people in its path. A monster immune to “Default” damage source won’t take damage from it.
It is quite annoying to test traps with these rocks, because they stay where the landed, even after reusing the testing tool that activates the dungeon. You will have to reload the editor to test it again, or replace the rocks each time.
 Rolling rock
Creates/Removes a rolling stone (a rock, not a singer).
Works exactly the same way as a rock, except it will roll, without stopping, bouncing on the walls.
 Bouncing rock
Creates/Removes a bouncing stone.
It is placed like a monster. It is the only rock that doesn’t kill instantly. The only way to use it is to make it appear thanks to the "enable/disable monster" tool. Once it appears, it falls, goes through the walls and platforms, bouncing on one floor per line, and then disappear.
Using this trap accurately is quite hard, as it is also impossible to give it an orientation. It will fall randomly to the right or to the left.
 Mine wagon
Works exactly the same way as the “Rolling rock”.
Take notes about the fact that pressure plates traps can’t be placed in the void, or too close to the edge of the floor.
Spikes Creates/Removes spikes.
Spikes are the most deadly trap. It is impossible to prevent dying while falling into it.
It is impossible to place them on the edge of the room.
To die from the spikes, you have to fall from one tile above, else, it is possible to go through it without troubles. That’s why it is possible to do both following jumps without dying.
Warning ! Lags may prevent players from dying, and make them land into the spikes safe.
Gas jet Creates/Removes a gas tube, propulsing players when they are activated. The editor will prevent you from placing one on a platform. You have to place it on above a wall. You will either need to place it in the void, standing on the edge of the floor, or removing the wall once the tube is placed.
Gas jet tile Creates/Removes a pressure plate on the ground. It works exactly the same way as placing a monster, with the restrictions included. You may notice that it is also possible to customize them, but most of the features won’t work, and you risks in the worst case to make your game crash. You can eventually make it spawn monsters, and make the plate invisible.
When someone walks on this pressure plate, all the gas tubes of the room will be activated.
You can make a small zone with some of them, with a monster walking on them, to make them activating continuously, like shown in this picture.
Warning ! If the air propulsing output rate is too fast, and with no interruption, players risk to be stuck on roof ad vitam aeternam.
Up firebolt trap Creates/Removes a pressure plate on the ground. It works exactly the same way as placing a monster, with the restrictions included. You may notice that it is also possible to customize them, but most of the features won’t work, and you risks in the worst case to make your game crash. You can eventually make it spawn monsters, and make the plate invisible. You can also try to give them weapons, it will have some fun results, but almost impossible to exploit.
When a player steps on this pressure plate, a fireball will appear from a wall in the same line. The wall can be chosen thanks to the “Turn monster” tool. If there is no wall, nothing will happen.
In a corridor, the only way to avoid it is to crouch.
Down firebolt trap Works exactly the same way as his collegue.
In a corridor, the only way to avoid it is to jump.
Spear trap Creates/Removes a spear trap.
It is placed like the other pressure plate traps, is a bit larger, and it is impossible to place it on a platform, you will need a wall underneath (of course, spikes must come from somewhere).
You can edit it to make it apply an “extra damage”, such as poison or acid.
Bear trap Creates/Removes a bear trap.
Works exactly the same as the spear trap, without the platform restriction.
Rock Creates/Removes a falling rock.
It is placed like a monster. It is possible to edit it, including its size. It is subject to gravity, and will kill people in its path. A monster immune to “Default” damage source won’t take damage from it.
It is quite annoying to test traps with these rocks, because they stay where the landed, even after reusing the testing tool that activates the dungeon. You will have to reload the editor to test it again, or replace the rocks each time.
Rolling rock Creates/Removes a rolling stone (a rock, not a singer).
Works exactly the same way as a rock, except it will roll, without stopping, bouncing on the walls.
Bouncing rockCreates/Removes a bouncing stone.
It is placed like a monster. It is the only rock that doesn’t kill instantly. The only way to use it is to make it appear thanks to the "enable/disable monster" tool. Once it appears, it falls, goes through the walls and platforms, bouncing on one floor per line, and then disappear.
Using this trap accurately is quite hard, as it is also impossible to give it an orientation. It will fall randomly to the right or to the left.
Mine wagon Works exactly the same way as the “Rolling rock”.
Take notes about the fact that pressure plates traps can’t be placed in the void, or too close to the edge of the floor.
Dialogs
Now, you have everything in hand to make interesting dungeons.
However, dialogs are important, and mustn’t be neglected. They give a spirit to your dungeon.
To place a dialog bubble in a room, check out the “Dialog” tool in the “The tools 1” section.
Be aware of the fact that there can be only one dialog per room. To create it, you need to go in the involved room, and go into the following menu :
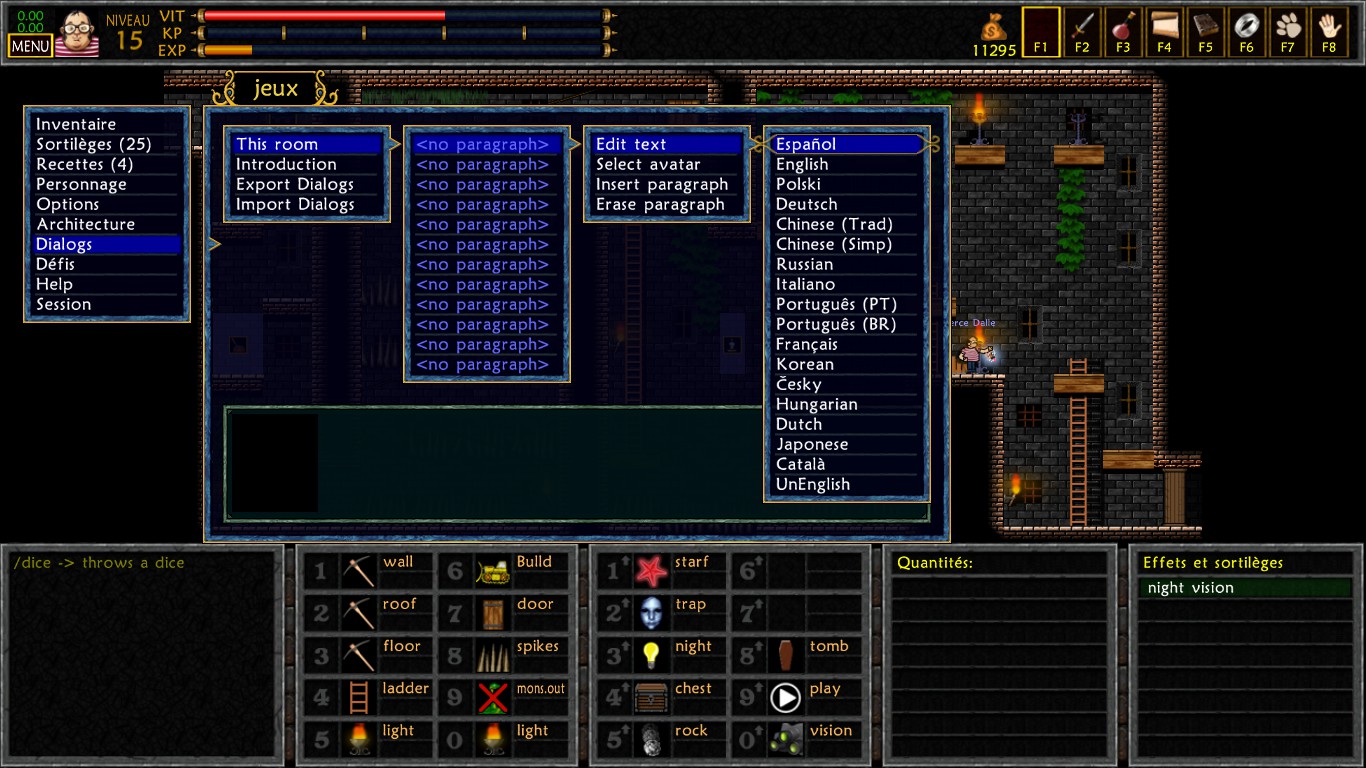
"Introduction" allows you to make the dialog that appear when you launch the map.
"This room" allows you to set the dialog in the current room.
Click next on the first “<no paragraph>”.
"Select avatar" allows you to choose the character speaking.
"Edit text" gives acces to a list of languages. Select the one in which you want to write your dialog. You can rewrite it selecting another language, translating into the corresponding one each time. If, for example, you write “Je suis français”, selecting the French language, and then you write “I am English”, selecting the English version, then people having the game set in English will see “I am English”, and people with the game set in French will see “Je suis français”.
If you didn’t translate the game in all languages, the English one is shown by default to others. If you didn’t write English dialogs (which I really don’t recommend), the game will select the upper language in the list.
To make a line break, just write “\n” at the end of your line.
Bug : If you write some specific symbols, the game will crash when the dialog is activated. Think about saving before, if you want to write some of them (example : " < ").
Click on the next “<no paragraph>” to make the next cue.
Try to respect, at least a bit, the personality of each character, that you can discover while playing the solo or multiplayer stories.
You can export the dialogs as a .txt file, to edit them more easily, and then import them. To know the location of this file, go to the “Files location” section of this guide.
Take care not to import dialogs before exporting them, or you risk to erase all what you wrote, as there are no warning pop-up.
If you want to write dialogs in several languages (which I highly recommend if you can afford it), I suggest you to write all languages at the same time, each time to write something in a room. If you decide to write them once everything is done, it risks to be very long, boring and your motivation risks to fall down quickly.
Dialogs require a lot of work, and it’s sad to see that they are almost never read.
However, dialogs are important, and mustn’t be neglected. They give a spirit to your dungeon.
To place a dialog bubble in a room, check out the “Dialog” tool in the “The tools 1” section.
Be aware of the fact that there can be only one dialog per room. To create it, you need to go in the involved room, and go into the following menu :
"Introduction" allows you to make the dialog that appear when you launch the map.
"This room" allows you to set the dialog in the current room.
Click next on the first “<no paragraph>”.
"Select avatar" allows you to choose the character speaking.
"Edit text" gives acces to a list of languages. Select the one in which you want to write your dialog. You can rewrite it selecting another language, translating into the corresponding one each time. If, for example, you write “Je suis français”, selecting the French language, and then you write “I am English”, selecting the English version, then people having the game set in English will see “I am English”, and people with the game set in French will see “Je suis français”.
If you didn’t translate the game in all languages, the English one is shown by default to others. If you didn’t write English dialogs (which I really don’t recommend), the game will select the upper language in the list.
To make a line break, just write “\n” at the end of your line.
Bug : If you write some specific symbols, the game will crash when the dialog is activated. Think about saving before, if you want to write some of them (example : " < ").
Click on the next “<no paragraph>” to make the next cue.
Try to respect, at least a bit, the personality of each character, that you can discover while playing the solo or multiplayer stories.
You can export the dialogs as a .txt file, to edit them more easily, and then import them. To know the location of this file, go to the “Files location” section of this guide.
Take care not to import dialogs before exporting them, or you risk to erase all what you wrote, as there are no warning pop-up.
If you want to write dialogs in several languages (which I highly recommend if you can afford it), I suggest you to write all languages at the same time, each time to write something in a room. If you decide to write them once everything is done, it risks to be very long, boring and your motivation risks to fall down quickly.
Dialogs require a lot of work, and it’s sad to see that they are almost never read.
Create a boss
Making a boss is quite a complex thing.
I didn’t work a lot with this, so I recommend you to download this txt file I made from the tuto on the forum which is not available anymore:
mediafire com/view/9w3tu5tmx3vl97d/boss_editor txt
(replace spaces by dots)
Pay attention to the SKIN EDITOR part, it will explain how to set the hitboxes of your boss properly.
If you try to use the boss like he currently is, you will obtain this :
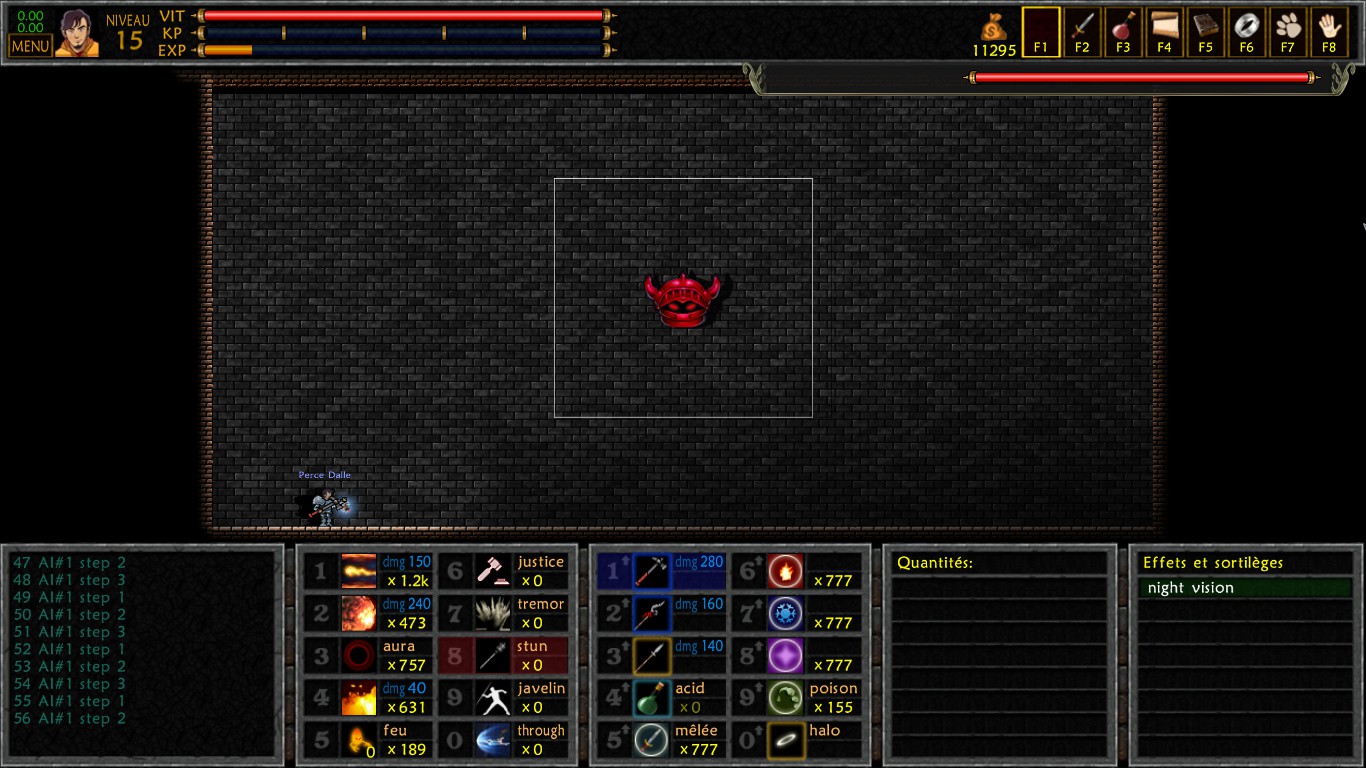
In the current state, even if you give him an IA, you will have to give it proper hitboxes, or it will be really bugged.
To start, you will need these tools, to place the boss in your dungeon :
 Invokeur
Creates/Removes a boss summoner. You can place more than one in the same room, but they will all disappear if you activate one.
 Boss
Boss
Allows you to place the boss like a monster. It is also possible to place more than one boss in the same room. They will all be summoned at the same time, but it is possible that you have to face some bugs with the HP bar display, as they all share the same HP pool.
You can set the resistance and the loot the same way as for monsters.
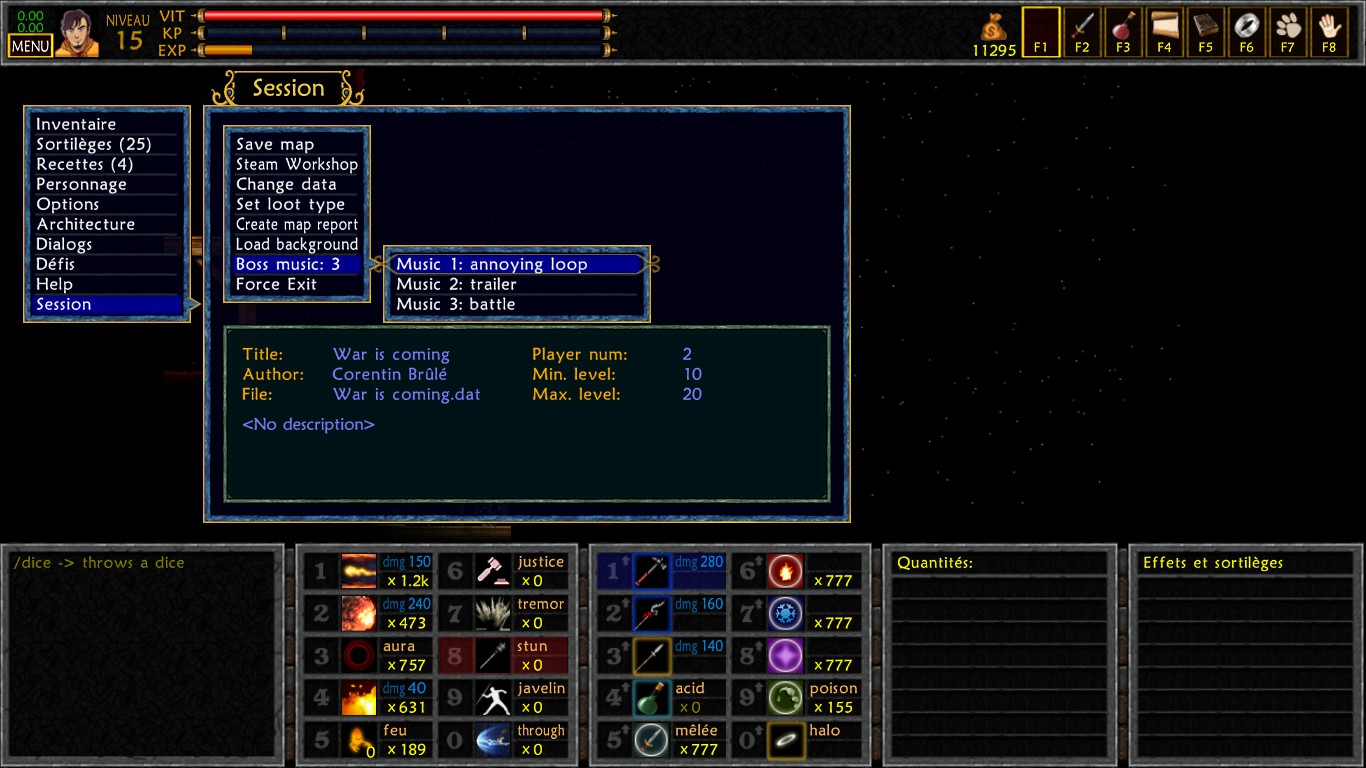
It is possible to change the played music during the boss fight in this menu :
Nothing can force you to use such boss in a dungeon. You can aswell make a strong customized monster, or whatever your imagination tells you.
However, I have to admit that a real boss is classier than a customized monster. The problem with them is that the monster risks to be stuck if players attack too fast, and be unable to counterattack.
I didn’t work a lot with this, so I recommend you to download this txt file I made from the tuto on the forum which is not available anymore:
mediafire com/view/9w3tu5tmx3vl97d/boss_editor txt
(replace spaces by dots)
Pay attention to the SKIN EDITOR part, it will explain how to set the hitboxes of your boss properly.
If you try to use the boss like he currently is, you will obtain this :
In the current state, even if you give him an IA, you will have to give it proper hitboxes, or it will be really bugged.
To start, you will need these tools, to place the boss in your dungeon :
InvokeurCreates/Removes a boss summoner. You can place more than one in the same room, but they will all disappear if you activate one.
Boss Allows you to place the boss like a monster. It is also possible to place more than one boss in the same room. They will all be summoned at the same time, but it is possible that you have to face some bugs with the HP bar display, as they all share the same HP pool.
You can set the resistance and the loot the same way as for monsters.
It is possible to change the played music during the boss fight in this menu :
Nothing can force you to use such boss in a dungeon. You can aswell make a strong customized monster, or whatever your imagination tells you.
However, I have to admit that a real boss is classier than a customized monster. The problem with them is that the monster risks to be stuck if players attack too fast, and be unable to counterattack.
The advanced editor : introduction
A more advanced editor exists, that appeared later than the one I showed you until now, that will allow us to earn some time on a few points.
I call it “advanced” editor, but it is impossible to do a whole dungeon with only it. Actually, it almost only helps to improve the dungeon thanks to sound or visual effects.
You can access and leave this editor with the button E (take care of the caps lock button).
If you have remapped your buttons, you may have to free the E button, because you can’t edit it for the editor.
Once you are on the editor, you can access five different tabs, thanks to the buttons F1, F3, F6, F7, and F8.
The advanced editor : room configuration
This is the default tab. You can come back to it with the F1 button.
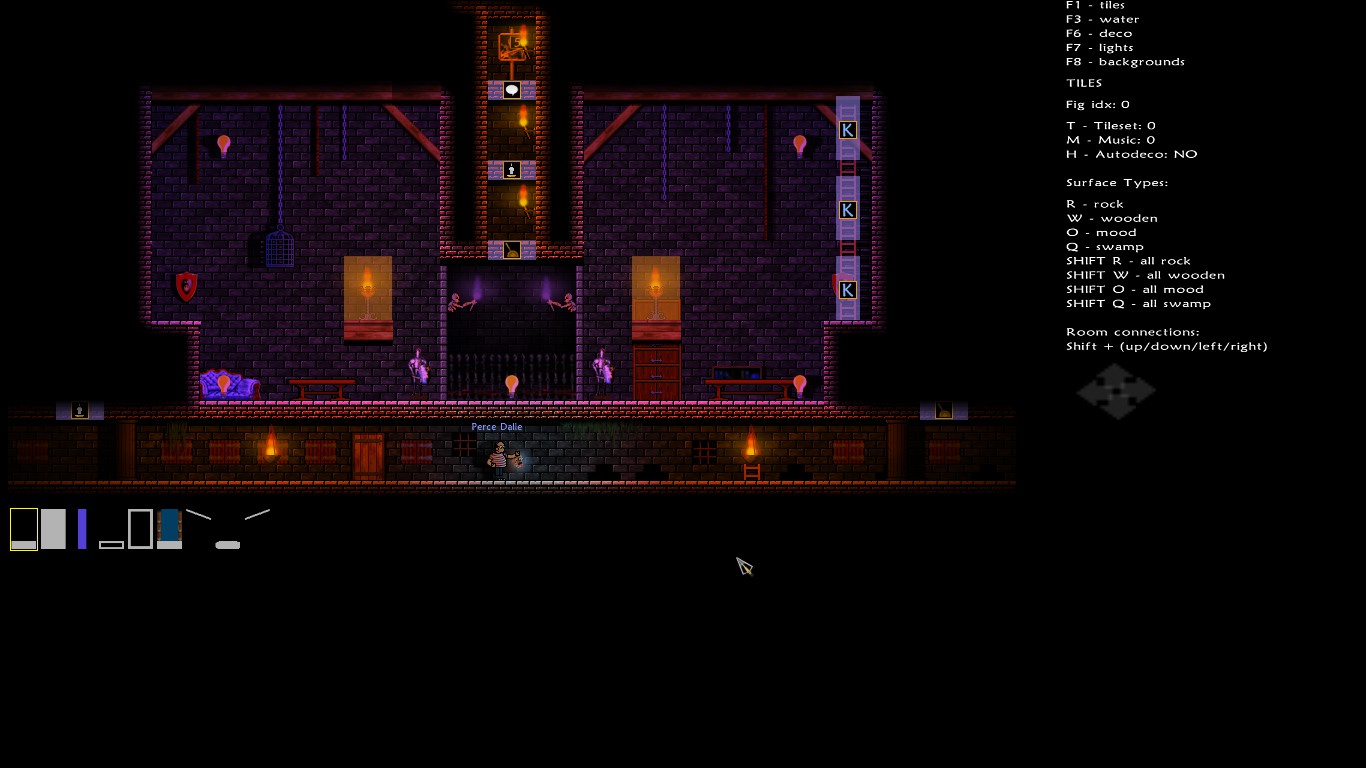
You can see on the bottom left corner that you have a bunch of tools you can select.
These tools will allow you to place walls, platforms and ladders much more efficiently. You can use the right click to remove.
About the ropes, their behavior can be a bit complicated.
When you place a piece of rope, it will detect the other pieces, and adapt to create a single long rope.
The problem is that a rope can only be five tiles long on a single row. Beyond that, the editor will consider that it is another rope. Look at this picture to understand better.
To place a rope in a more intuitive way, I suggest you to place the pieces one after the other, starting from the top, like this.
All these tools allow you to break the rules we saw in previous sections. For example, it is possible to place a ladder on the edge of the room. It is also possible to remove a wall under a monster or trap that need one, and replace it with a platform.
However, take care, because if those rules exit, it is for a reason, and I suggest you to be cautious if you break them. The monsters I was talking about may for example disappear if you activate the room, or launch the editor again, in which case you will have to replace them again each time (playing the map for real won’t affect anything, don't worry).
Actually, most of the classical tools refresh the room each time you use them, while those one don’t, and while refreshing, the editor corrects some of the problems in the room. You can break the rules, but try not to refresh the room.
In the top right corner, some fields appear, with a letter associated. Press this letter to activate the matching effect. All these effects only concern the current room.
Finally, if you open your map before accessing the editor with E, you can set the arrows on the map coming from the room you are currently in, to indicate to the players from which side they can leave the room.
Building tools
You can see on the bottom left corner that you have a bunch of tools you can select.
These tools will allow you to place walls, platforms and ladders much more efficiently. You can use the right click to remove.
- Platform : Allows you to place platforms.
- Wall : Allows you to place walls.
- Ladder : Allows you to place ladders
- Invisible platform : Allows you to place invisible platforms (a black shadow will still remains).
- Invisible platform : Allows you to place invisible walls (a black shadow will still remains).
- Liftgate : Allows you to place liftgates.
- Rope : Allows you to place ropes.
- Blue platform : Allows you to place blue platforms.
About the ropes, their behavior can be a bit complicated.
When you place a piece of rope, it will detect the other pieces, and adapt to create a single long rope.
The problem is that a rope can only be five tiles long on a single row. Beyond that, the editor will consider that it is another rope. Look at this picture to understand better.
To place a rope in a more intuitive way, I suggest you to place the pieces one after the other, starting from the top, like this.
All these tools allow you to break the rules we saw in previous sections. For example, it is possible to place a ladder on the edge of the room. It is also possible to remove a wall under a monster or trap that need one, and replace it with a platform.
However, take care, because if those rules exit, it is for a reason, and I suggest you to be cautious if you break them. The monsters I was talking about may for example disappear if you activate the room, or launch the editor again, in which case you will have to replace them again each time (playing the map for real won’t affect anything, don't worry).
Actually, most of the classical tools refresh the room each time you use them, while those one don’t, and while refreshing, the editor corrects some of the problems in the room. You can break the rules, but try not to refresh the room.
Configuration of the room.
In the top right corner, some fields appear, with a letter associated. Press this letter to activate the matching effect. All these effects only concern the current room.
- T-Tileset : Allows you to change the design of the walls, platforms and ladders.
- M-Music : Allows you to change the music in the room.
- H-Autodeco : Allows you to enable and disable the automatic decoration. This will change your life, and not only for the best. Yet, it is essential to disable it, if you want to change the configurations and decorations of a room. If you let it enabled, decorations and backgrounds will be reset if you launch the editor again (even while working on other rooms, sometimes). Once disabled, you won’t be able to use the “Background” tool.
The most important thing about disabling it, is that there are side effects :
The first one is that the “Spike”, “Lock”, and “Gas jet” tools benefit from the automatic decoration. So when you will place them, they won’t have their decoration anymore, meaning that they will be invisible (or almost invisible, for the lock). You will have to place manually a spike, a gas tube, or a lock decoration, for each of them, to make them visible for the players. It is actually also a good thing, it allows you to use alternative decorations (you can also let them invisible if you want).
The next side effect is quite more embarrassing. When you will place some objects, like coffins, chests lamps, boss summoners, and many others, they will be invisible first. To make them appear, you will need to either refresh the room, or more simply leave the room and enter again same steps to make them disappear.
Sorry for the block of text. - R-Rock : Allows you to change the sound when the player steps on the ground. Affects the tile under the cursor. The played sound is a rock pavement ground (default sound).
- W-Wooden : Allows you to change the sound when the player steps on the ground. Affects the tile under the cursor. The played sound is a wooden ground.
- O-Mood : Allows you to change the sound when the player steps on the ground. Affects the tile under the cursor. The played sound is an earthy ground.
- S-Swamp Allows you to change the sound when the player steps on the ground. Affects the tile under the cursor. The played sound is a wet ground (sewers).
Press Ctrl plus the matching letter to apply it for all the tiles with a floor in the map.
These values are automatically placed if you use the “Background” tool, while the automatic decoration is enabled.
Finally, if you open your map before accessing the editor with E, you can set the arrows on the map coming from the room you are currently in, to indicate to the players from which side they can leave the room.
The advanced editor : water
You can access this tab with the F3 button.

Here, you can place blue, green, or red water. Use right click to remove it.
This water isn’t affected by gravity, so you can place it in the void (that’s ugly).
To make the water appear (or disappear), leave the room and enter again.
Here, you can place blue, green, or red water. Use right click to remove it.
This water isn’t affected by gravity, so you can place it in the void (that’s ugly).
To make the water appear (or disappear), leave the room and enter again.
The advanced editor : decorations
You can access this tab with the F6 button.
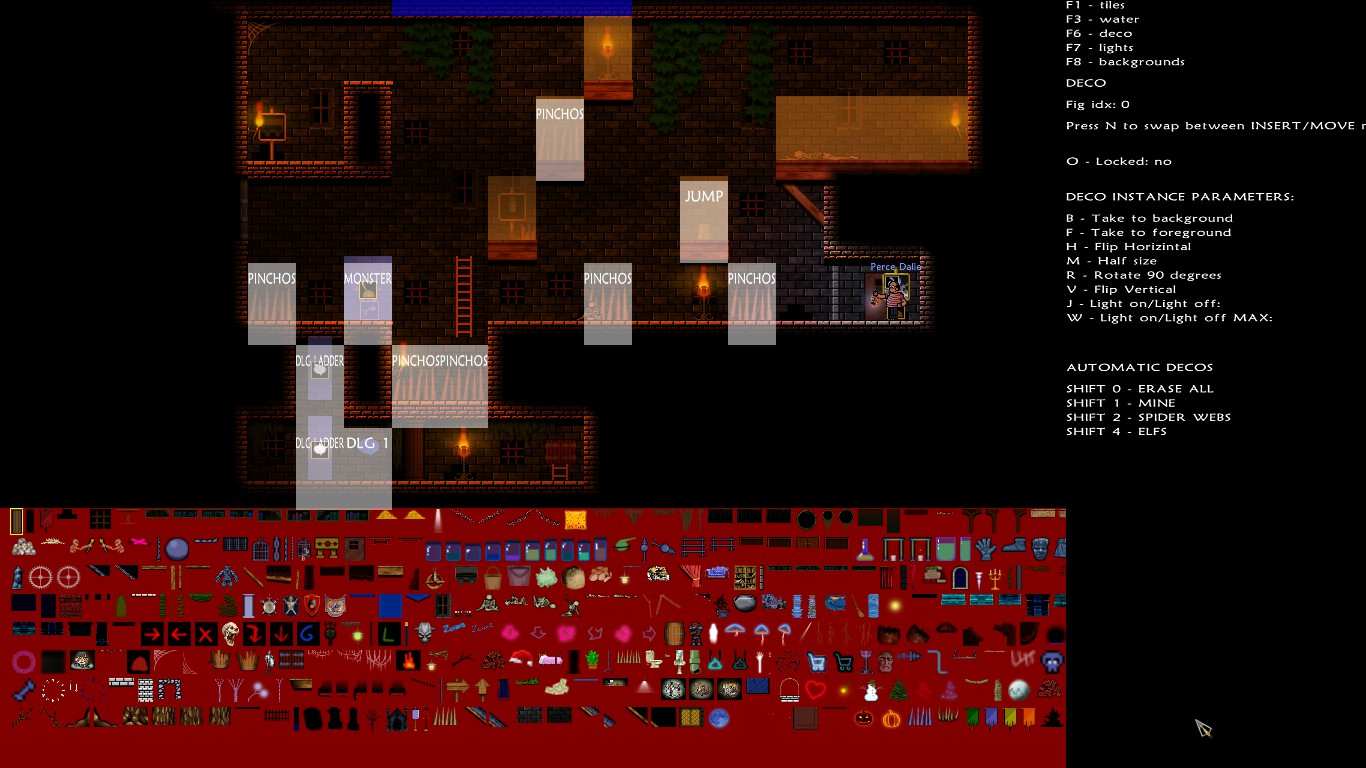
Thanks to this tab, you will be able to decorate your dungeon.
First, be sure you have disabled the automatic decoration in the F1 tab.
To place a decoration, select it on the red bar, and then click where you want to place it.
By pressing N, you will switch in edition mode, and you will be able to move your decorations with a “drag and drop”, or to remove them with a right click. Press N again, or select a new decoration in the list to be able to place decorations again.
When you move a decoration, you will make it move 8 pixels by 8 pixels. You can hold shift to do it by 1 pixel notches.
Some decorations will be invisible, except during Christmas. They will be visible when you open the editor, but not when you close it. Those decorations are easily identifiable (Christmas tree, winter hat, snow balls, etc…). The Halloween decorations, such as pumpkins don’t have any time restrictions, they are regular decorations.
On the top left corner, you have a list of features that allow you to manipulate the decoration under your cursor, by pressing the appropriate letter.
These two last tools will allow you to make your decoration blink. I will give you an example :
If I set the following parameters to a decoration A : W = 2, J = 1
And the following parameters to a decoration B : W = 2, J = 2
We will have :
second 1 : A visible, B invisible
second 2 : A invisible, B visible
restart
With another example, a decoration C with : W = 4, J = 3
We will have :
second 1 : C invisible
second 2 : C invisible
second 3 : C visible
second 4 : C invisible
restart
You have to know that there are two types of decorations. The first ones are foreground decorations, the others background decorations.
Foreground decorations will mask the players, and even the walls and platforms.
Background decorations will stay behind players, walls, and platforms.
It is impossible to place a foreground decoration behind a background one, even with the B and F tools
Also, some decorations will always refuse to be placed behind others, even if they are at the same level (ex : the spirit box).
About the automatic decoration tools, don’t trust what’s written.
You can press 3 to automatically place cobwebs (you will have to remove all of them manually, so take care).
You can press 1 to place earth on the floors, and = to cancel.
The numbers must be pressed on the alphanumerical keyboard.
Take care with the “Night vision” tool when you place the decorations. It is possible that they turn blue or black if you place them partially hidden by walls or platforms, to give them some shadow effect. You won’t be able to see this if you have your night vision active. I recommend you to often turn it off to see what the players will see, when you are decorating your rooms.
Warning ! If you place too much decorations in a room, your dungeon risks to refuse to launch, in the editor as for a normal game (It seems that you have time before this happen).
Thanks to this tab, you will be able to decorate your dungeon.
First, be sure you have disabled the automatic decoration in the F1 tab.
To place a decoration, select it on the red bar, and then click where you want to place it.
By pressing N, you will switch in edition mode, and you will be able to move your decorations with a “drag and drop”, or to remove them with a right click. Press N again, or select a new decoration in the list to be able to place decorations again.
When you move a decoration, you will make it move 8 pixels by 8 pixels. You can hold shift to do it by 1 pixel notches.
Some decorations will be invisible, except during Christmas. They will be visible when you open the editor, but not when you close it. Those decorations are easily identifiable (Christmas tree, winter hat, snow balls, etc…). The Halloween decorations, such as pumpkins don’t have any time restrictions, they are regular decorations.
On the top left corner, you have a list of features that allow you to manipulate the decoration under your cursor, by pressing the appropriate letter.
- O-Locked : Allows you to lock a decoration, you can’t highlight/select it anymore, so you can’t move or remove it. Some decoration are locked by default (like the first decoration, the column, I think), and you will have to unlock it if you want to remove them.
- B-Take to background : When many decorations are stacked on top of eachother, you can use this to make one go behind the others.
- F-Take to foreground : When many decorations are stacked on top of eachother, you can use this to make one go in front of the others.
- H-Flip horizontal : Allows you to flip the decoration horizontally.
- H-Flip vertical : Allows you to flip the decoration vertically.
- M-Half size : Allows you to reduce the size of the decoration by half. Using it again will reset the picture to its normal size.
- O-Rotate 90 degrees : Allows you to give the decoration a 90 degree rotation to the left. Using it again will reset it to its normal position. You can combine this with the flipping options to turn the decoration in all directions.
- W-Light on/light off max : Allows you to set a number of seconds associated to the picture.
- J-Light on/light off : Allows you to make the decoration blink. It will appear at the second you chose, in a loop of the number of seconds you selected with W.
These two last tools will allow you to make your decoration blink. I will give you an example :
If I set the following parameters to a decoration A : W = 2, J = 1
And the following parameters to a decoration B : W = 2, J = 2
We will have :
second 1 : A visible, B invisible
second 2 : A invisible, B visible
restart
With another example, a decoration C with : W = 4, J = 3
We will have :
second 1 : C invisible
second 2 : C invisible
second 3 : C visible
second 4 : C invisible
restart
You have to know that there are two types of decorations. The first ones are foreground decorations, the others background decorations.
Foreground decorations will mask the players, and even the walls and platforms.
Background decorations will stay behind players, walls, and platforms.
It is impossible to place a foreground decoration behind a background one, even with the B and F tools
Also, some decorations will always refuse to be placed behind others, even if they are at the same level (ex : the spirit box).
About the automatic decoration tools, don’t trust what’s written.
You can press 3 to automatically place cobwebs (you will have to remove all of them manually, so take care).
You can press 1 to place earth on the floors, and = to cancel.
The numbers must be pressed on the alphanumerical keyboard.
Take care with the “Night vision” tool when you place the decorations. It is possible that they turn blue or black if you place them partially hidden by walls or platforms, to give them some shadow effect. You won’t be able to see this if you have your night vision active. I recommend you to often turn it off to see what the players will see, when you are decorating your rooms.
Warning ! If you place too much decorations in a room, your dungeon risks to refuse to launch, in the editor as for a normal game (It seems that you have time before this happen).
The advanced editor : lights
You can access this tab with the F7 button.

In this tab, you will be able to place torches, braziers, and even some chests very easily.
As for decorations, you can press N to switch in editing mode, to move or remove them with a right click.
When you are in editing mode, you can press B to switch on or off a light. You can also do it on a chest to open or close it.
A torch lit this way will be a permanent light.
The advanced editor : backgrounds
You can access this tab with the F8 button.
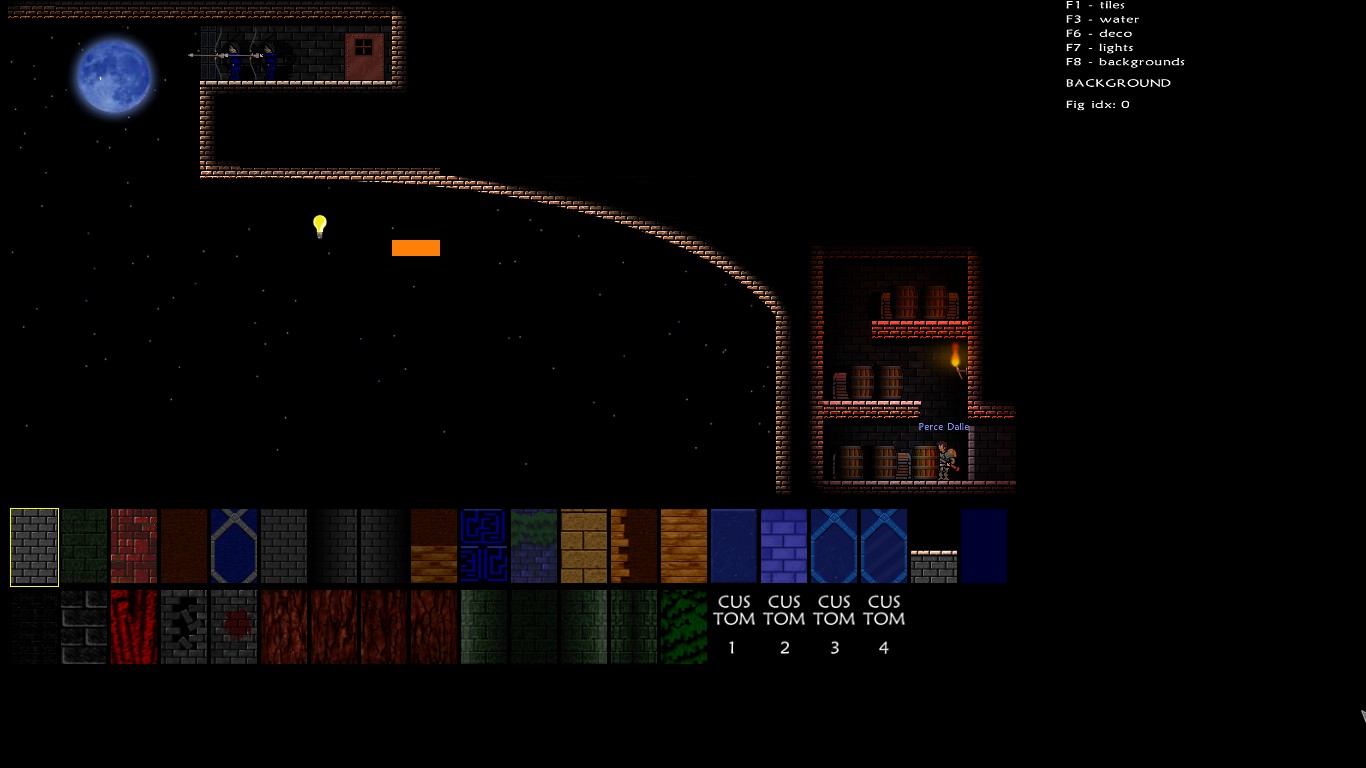
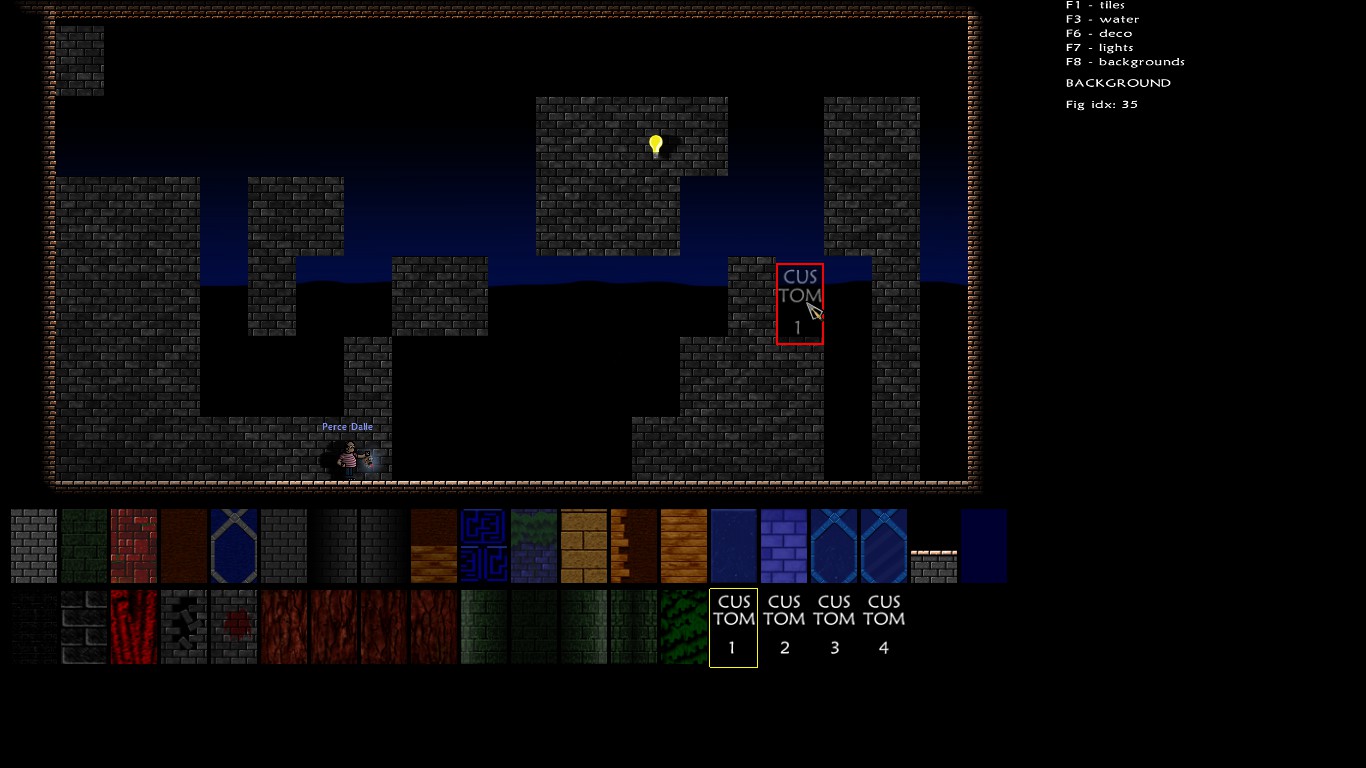
In this tab, you will be able to change the appearance of the background on a tile. Select the picture you want, and click where you want to apply it. A double click will apply it on the entire room.
The four last pictures represent respectively a red, green, yellow, and blue layout.
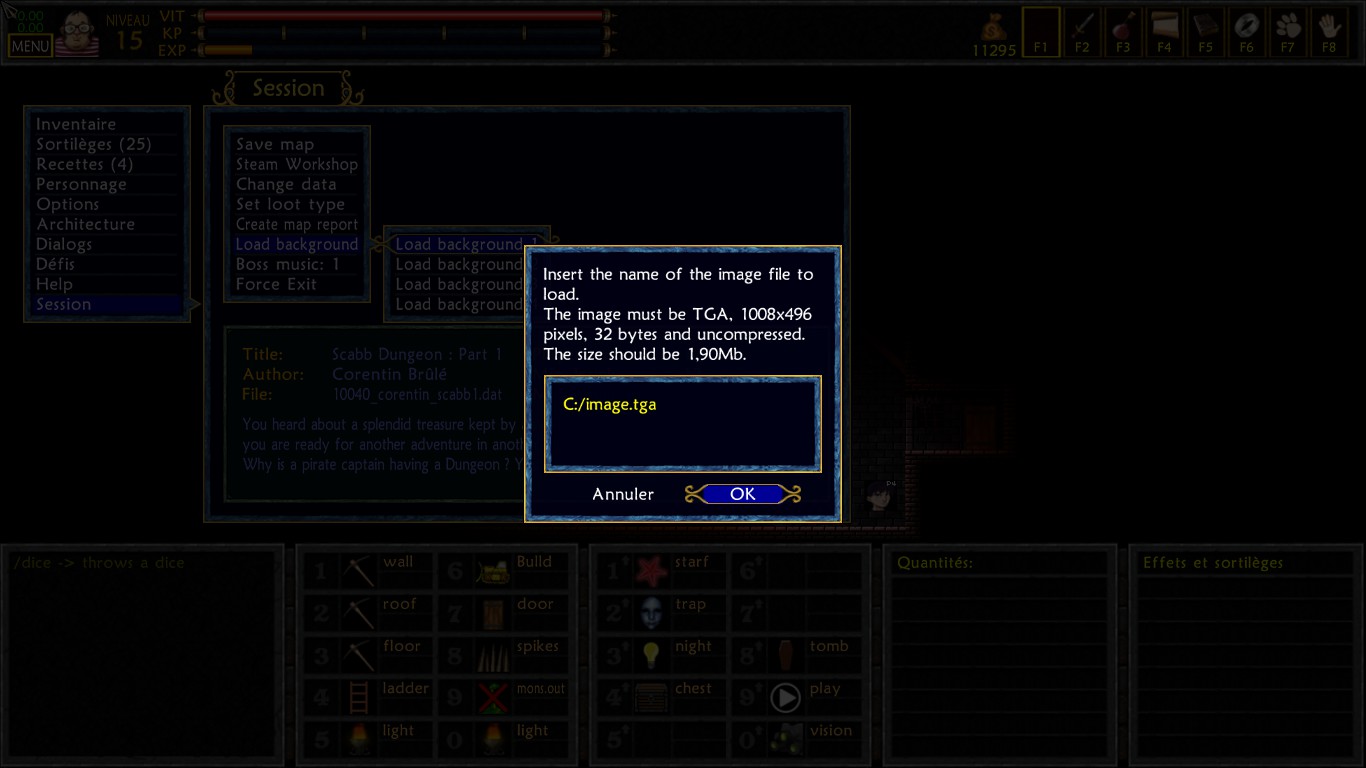
However, they are here to allow you to import your own background.
Actually, a background picture is a big image having the size of the entire map. I created this one :
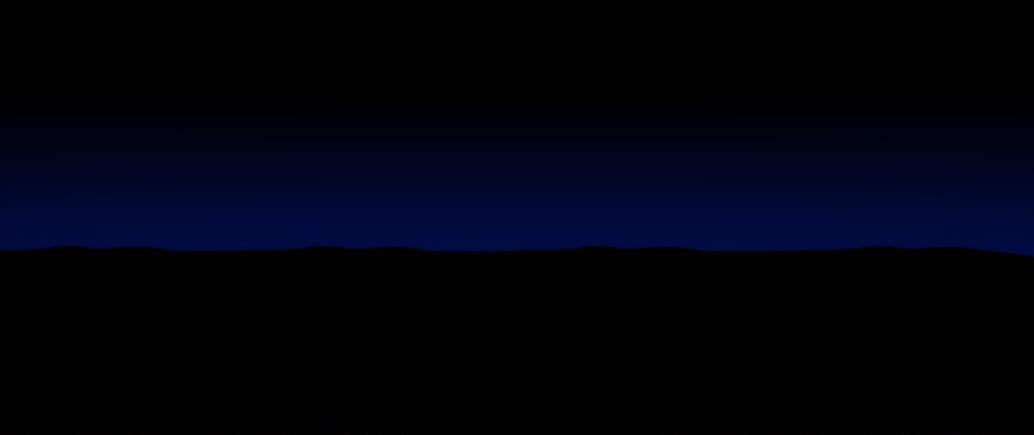
The picture must be 1008x496 pixels. You must then convert it in a .tga picture (with an alpha channel), not compressed, of 32 bytes.
I am not an expert about this matter, also I recommend you to make some research on the Internet if you are not familiar with this. Me, I am using Photofiltre 7.
Next, you have to go in the following menu, and import your picture by writing its location.
You can then place it.
Warning ! Some backgrounds hide the decorations and the doors.
In this tab, you will be able to change the appearance of the background on a tile. Select the picture you want, and click where you want to apply it. A double click will apply it on the entire room.
The four last pictures represent respectively a red, green, yellow, and blue layout.
However, they are here to allow you to import your own background.
Actually, a background picture is a big image having the size of the entire map. I created this one :
The picture must be 1008x496 pixels. You must then convert it in a .tga picture (with an alpha channel), not compressed, of 32 bytes.
I am not an expert about this matter, also I recommend you to make some research on the Internet if you are not familiar with this. Me, I am using Photofiltre 7.
Next, you have to go in the following menu, and import your picture by writing its location.
You can then place it.
Warning ! Some backgrounds hide the decorations and the doors.
Files location
To find the file corresponding to your dungeon, go into your steam folder, and follow this path :
Steam\SteamApps\common\Unepic\maps
You will find two files with the name of your map.
The "MyDungeon.dat" is the editing map, on which you work as the architect.
The "MyDungeon.map" is the playable map. It is recreated each time you save.
You will also see “MyDungeon.dat.xxxxxxxxxx.copisegu" files, if you already made some saves.
When you save, your old "MyDonjon.dat" will become a “MyDungeon.dat.xxxxxxxxxx.copisegu”, and a new "MyDungeon.dat" is created, with the current data. You can come back to previous saves by removing the "xxxxxxxxxx.copisegu" of a file, and removing the current "MyDungeon.dat".
There will also be the "MyDungeon.dat_dialogs.txt" and "MyDungeon.dat_report.txt" files.
They contain all the dialogs of the map, and some information about your dungeon, such as the monsters used, and experience given.
You can also cut the dungeon in two (or more) parts.
When I created Scabb dungeon, there was only one big dungeon. I cut it in three pieces. To do so, you just have to copy and paste the .dat file, and rename them. Then you just have to replace the starting points and exit doors in each map.
Publishing the dungeon
To publish your dungeon, you have to go in the following menu.
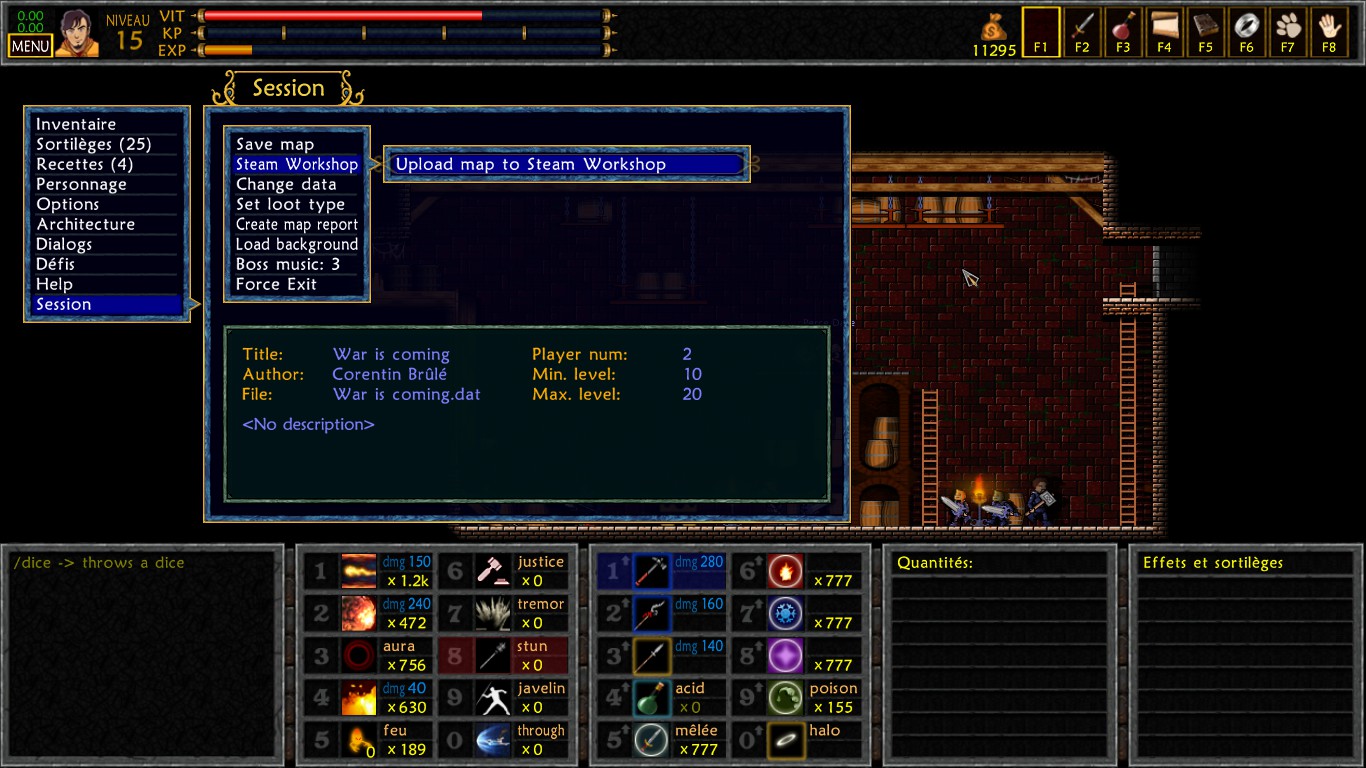
If you didn’t set a description, publishing won’t be allowed.
Before publishing, you can use “create map report” that will create a report (I know what you’re going to say) that sums up all the loot you can obtain, all the existing monsters, and the experience you can earn when playing the dungeon.
The following line means that a character level 6 will level up to the level 8, and earn 10% of its experienced bar leading to the next level.
"> Level 6 -> Level 8 + 10% EXP"
I can only recommend you to wait until your dungeon is finished before posting it, because people testing it won’t have the will to do it again once you have finished it. I don’t think it is useful to post a test, just realized for fun, just for the pleasure of posting.
Finally, try to create a nice description on Steam, with nice pictures, to make people want to test your map.
Bug : If you upload your map to the Steam Workshop, the editor will then ask you to upload modifications, instead of overwriting all the data. The problem is that if you delete the map from the Workshop, the editor won't know it, and will still ask you to modify the current uploaded content. As a consequence, it will fail, because you can't modify something that doesn't exist. To be able to upload once again, you will have to remove your "MyDungeon.dat" file, and replace it by the latest "copisegu" file, to come back to a previous version (see the "Files location" chapter for more details).
Tips and tricks
This section will allow me to give you some tips, recommendations and tricks, as soon as they come to my mind. This part will probably grow sometimes, when I think about something new.
I want to precise that all I am going to say is only suggestions based on my personal opinon. You are of course free to do whatever you want, especially if it is well justified by the context.
I want to precise that all I am going to say is only suggestions based on my personal opinon. You are of course free to do whatever you want, especially if it is well justified by the context.
- Take care about how long your dungeon is. Even if all the rooms are really fun, players will always get bored and wait for the end of the dungeon. Also, it is not common to have four free time hours in front of us to play.
- When you are creating jumping rooms, if you place spikes , try to make sure that the player can know there are spikes on the bottom. If a player always have to fall to see what’s waiting for him, it is an unfair cause of death and frustration.
- Don’t forgot to use permanent lights in your dungeons. Don’t force the player to use all of them, it’s not a Torch Simulator.
- Try to avoid situations where the player is attacked while reading a dialog.
- Think about creating dungeons with big opened rooms. People often craft dungeon only filled with restricted corridors.
- Be generous with the coffins. When players risk to die a lot in a room, give them close coffins. Don’t make them walk kilometers In empty rooms neither, and don’t make them redo a very hard room many times.
- Very important : when you create a dungeon, you don’t have lags. It won’t be like so when players will test your map. The rocks, wagons, or everything with a close timing stage will have to be done to help a bit players having lags. You can for example create a shortcut for players, once one of them has succeeded.
- [Tip from Igor] : Take care with the room transitions with people having lags. While the poor guy wll wait hours for his screen to display the next room, his character, even if he can't see it, will continue to go forward through the new room, activating triggers, traps, dialogs, and being hit by inhabitants on his way. If he meet the edge of a platform on his way, he will stop just before falling. You can use this to avoid catastrophies. Once the player change the room for real, his character will teleport back to the edge of the room, where it was supposed to appear (except if he died during this period).
- Very important too : test, test, and retest each room of your dungeon.
- Be aware of all the existing spells, that can ruin some mechanisms. Here is a list of the most annoying spells : Mind Control, Phase door, Invisibility, Fire spirit, Latent life.
- If your dungeon requires a high number of powders, give them quite often.
- Give gold rewards adapted to the level of the dungeon. Enough, but not too much. I think that in some of the official maps, monsters are giving too much gold.
- To obtain the loot you want to place in your chests, create a monster, and make him loot what you want. Then kill him, take the loot and drop it in front of a chest.
- Warning ! Avoid at all cost to place triggers in the very first room. They risk to bug, or to be already activated for non host players. If you want an example, in “Escape from the Orcish Unfort”, there is a breakable wall in the first room , that sometimes refuses to disappear.
I suggest you to create a special room, only to welcome the players, with no triggers in it. You can think about just using a door for that. - Take care of the first room. The first impression is always decisive. People will judge you on it.
- Try to be original. Make some clever traps, that are not obvious. The lever with boulders on top of it won’t surprise anyone, and it will only be irritating. The objective of a game is to have fun, actually.
The most important objective of a trap is to be surprising. That said, try to always give a way to avoid the trap, either with caution, or with reflexes. The worst case is to make an unavoidable trap, even if you know where it is. - It is possible to make a monster explode on his own by making it incubate a creature, and setting the number of summoned units at zero.
- [Tip from Igor] : Be cautious with the Sky ring, it can ruin your designs if you forget it. Be also sure that your jumping stages can be done without it, because you may have forgotten to remove it while testing.
- [Tip from Igor] : If you want to cover platforms with decorations, it can be hard to make something nice looking. In that case, think about using an invisible platform.
- Try to give a spirit to your dungeon, by respecting a decorative theme. Also use monsters that fit your theme, and not too much diversified.
It's your turn
Voila ! Now, it is your turn to make a dungeon, you have all the tools in your hands
Don’t hesitate to share your own tips in the comments, I may add them in the guide. Let’s improve it together, and show to the world how beautiful our community is, and LET’S SQUASH THEIR FACE UNDER OUR FEET !! BHEUAHAHAHArgkof..kof..keuf...
Herr, maybe not, actually, but you have the idea.
Come on ! It’s your turn, now !


that or a game like unepic to play with friends and create dungeons more effective and easily.
You need to take a look at this chapter -> The advanced editor : backgrounds
An outside room is usually a custom background, then you remove all the walls (go in the room above and remove the lower tiles if you strugle to remove the top tiles of your room) then light it up with the invisible light bulb. You can't really make a daylight room, because of the limited tools, it will have to be a night time ambiance (unless you find some tricks I don't know about)
About making a video tutorial, I don't think I still have it in me. I made this tutorial more than 7 years ago ^^