The Long Dark

The Long Dark

574 ratings
[UPDATING] A Sandbox Survival Guide to The Long Dark
By Willkwi
After finding no complete guides that satisfied what I was looking for, I decided to make my own guide for the Long Dark. It gives me something to do between classes, and I enjoy sharing my information with others.
2
4
5
   
Award
Favorite
Favorited
Unfavorite
Author's Notes and Version History
While this guide is "complete", The Long Dark is still in development and is continually updated. In turn, this guide, too, will be updated regularlly until I feel I can fairly call it a complete sandbox guide. I try to update the guide with new content within a week after The Long Dark is updated.

This guide, though generally based, uses numerical values and information tuned to the Voyageur (medium) difficulty. As a result, certain sections on wolves, weather, or other tuned values may be incorrect.


0.1, February 1st, 2015 - General shape of guide, about 30% completed.
0.1.1, Feb. 2nd, 2015 - Half completed Dealing With Stats, slight edits based on feedback.
0.2, Feb. 3rd, 2015 - Finished Dealing With Stats and Things That Will Kill You as well as re-wrote the section on Mystery Lake, including much more content. Added more to Your First Step and Strategy. Medical Afflictions finished. About 40% done.
0.2.1, Feb. 4th, 2015 - Began work on the Visibilty and Night section, minor edits.
0.2.2, Feb. 6th, 2015 - Began to update for version 192.
0.3, Feb. 8th, 2015 - Finished updates for 192, completed Repairs and Harvesting. Finished the Visibility and Night section. Began work on the Gear section.
0.3.1, Feb. 9th, 2015 - Finished Gear section, for now- will likely update/revise.
0.3.2, Feb. 10th, 2015 - Updated information on torches and the section on night.
0.4, Feb. 12th, 2015 - Finished the section on Weather. May revise eventually.
0.4.1, Feb. 15th, 2015 - Added a Tips and Tricks section. This will be continuously updated over time.
0.4.2, Feb. 17th, 2015 - Revised information on bears after further testing.
0.5, Feb. 22th, 2015 - Created a new section for bears, finished half of dealing with wolves, wrote section on wildlife. About 65% done, estimated completion on March 7th.
0.6, Mar. 4th, 2015 - Wrote Tracking, Crafting, and Herbs and Plants section. Finished Wolves section. Five sections remain before "completion". About 82% done, estimated completion on March 8th.
0.7, Mar. 6th, 2015 - Wrote the bears section. Intending to revise and add more content to a lot of sections if time presents itself. Still on track for Sunday the 8th.
1.0 Release, Mar. 7th, 2015 - Added and wrote Achievements and Experience Modes. Wrote Pleasant Valley, Coastal Highway, Rifle Locations and Usage, the End section. Offical release.

1.0 - Released March 7th, 2015. Further updates will be grammar, spelling, revisions based on responses, and game updates.
1.1 - Released April 14th, 2015. Fixed a few outdated details. Began updating to v218.
1.2 - Released May 17th, 2015. Fixed a few outdated details. Fully updated the guide to Unity 5. Accurate to v228.
1.3 - Released July 15-17th, 2015. Fully updated the guide to v244. Added content and updated the full guide. Finished all recent sections. The guide is now nearly 140% the size of the previous version.
1.4 - Released September 20-21th, 2015. Fully updated the guide to v265. Updated all outdated values and information.
1.5 - Released January 15-20th, 2016. Fully updated the guide to v302. Updated all outdated values and information.

2.0 - Started July 2nd, 2016, finished ####. A complete revision of the entire guide, bringing it up to date with the Sandbox gamemode.

Without further delay, I present to you the largest and most expansive guide on the Long Dark written to date.
INFORMATION - Where this guide stands
As of current, I cannot keep up with updating my guide at such a rapid rate. Now that it is Summer and I've got a bit of a break, I'll be attempting to revise the entirety of the guide.
Introduction
You awake in the midst of a snowstorm. Your crashed plane lies buried in the snow behind you. It's nearly dark, and you're getting cold and hungry; you need to find shelter. Welcome to The Long Dark.
Your First Step and Strategy
Quickly look around your surroundings. Are you in immediate danger? Can you see apt shelter? Will the sun be setting soon? Check what the temperature feels like and your current stats by pressing [Tab]. The main killer on your first day is the most passive; cold (See: "Dealing With Stats"). Life or death can be seconds when you first spawn - do not waste time checking your inventory immediately. If there is an active wind, hug a rock wall from the general origin. From there, your only goal is to find a home; you're never too far from civilization. Enterable structures will provide more warmth than old barns, but you cannot set a campfire indoors, leaving you in the moderately cold air if a stove is unavailable. Once you have thoroughly warmed up, loot said home or structure, finding any available food or water, which you can eat through your inventory, accessible by pressing the "i" key or by clicking the central section of the radial menu, accessed by pressing [Space]. Since you default with a bedroll, sleeping shouldn't be a problem as long as it is above freezing. Wait out the night and prepare to move at daybreak.

"Now what," you may ask. Well, it depends how you'd like to play. As of v.349, there are two ways to play. One- which is limited- run around the world, lasting to day 150 and up simply by stealing processed foods. The other is to hole up somewhere with a rifle, hunt, and survive. Once you've got your needed gear, find a place to live or prepare to move often. In your first day, the Voyageur difficulty gets a quick but temporary advantage - wolves and bears will not spawn in the first 12 hours of your survival, and may not spawn for up to 12 more hours after that. The Stalker difficulty, however, is not so lucky. Use this grace period to get started on a bow or check around for a rifle. In this game, time is a precious gift; you cannot afford to wait around in a house. If you're locked down by wolves, darkness, or weather, spend those moments harvesting, repairing, and crafting.
The Survival Menu
As mentioned earlier, pressing [Tab] will bring you to the survival menu. Here you will see roughly how many hours of light (or darkness) you have left, the effective air temperature, your hunger, thirst, cold, and fatigue, your condition, and your calorie store. This menu will stay open as long as you hold tab and can be kept open even when moving around.

Each of these informational statistics are important to your survival and are explained in detail later in the guide - look for the titled sections.
The Radial Menu
The Radial menu, opened by holding [Space], is essential to your survival. It has 9 sections to it, all of which are useful and easy to access.

Inventory: Centrally located and the same as pressing the " i " key, the inventory allows you to see and equip all goods on your person as well as giving your CarryWeight / 30kg (66lb). Overloading this limit will increase your fatigue and calorie decay, slow you down, and increase your chance of a sprained ankle (See: "Medical Afflictions"). Travel as lightly as possible when you can; if you're staying around Mystery Lake, you can leave some of those canned goods behind in the Camp Office. Keep your rifle about you, but there's no reason to pack more food than a Walmart on your back.

Light Sources: Directly north on the wheel, light sources will allow you to see all handheld options you have for finding your way in the dark (and allows for much better distinction between wood and cardboard matches so you don't burn off your supply of high quality fire tools).

Journal: Northeast on the wheel is your journal, an all-purpose center of information, giving you your days survived, a view of your leveled skills, historical information for your game, a place to log your thoughts, and an archive of your collectibles. Be warned that having this open will not pause your game.

Weapons: East on the menu, this grants easy access to your arsenal of weapons, though I would recommend using the weapons hotkey to grab a gun for defense unless you're very handy with the radial menu.

First Aid: Opens the medical overlay, which allows you to take care of various conditions inflicted by falls, attacks, or food, as long as you have the proper supplies. This can be done from your inventory, too, but this organizes it in a much nicer fashion. This menu cannot be opened unless you have negative affliction(s), even if you have active positive effects.

Drop Decoy: Working the same as the decoy hotkey, this will drop some tasty food to get an interested wolf off your tail. Much more reliable than flares as of v.349.

Crafting: allows for the handcrafting of simple items, even when it is dark. Useful to kill time or when you're in need of some quick utility items like tinder.

Campcraft: This menu allows you to start a campfire or build a snow shelter (for more information, read the snow shelter section following). Also allows you to place a bedroll if you don't manage to lose or ruin your starting one. This acts a portable bed, but WILL NOT prevent a wolf from eating you. If your bedroll is really low on condition and you can find another (they're very common in the Quinoset Gas Station located in the Town Site in Coastal Highway), harvest that up fast. That's 10 pieces of cloth that are priceless when you get to late-game survival. As long as you have a reliable base, a bedroll is almost unnecessary. As of v.244, you can select the "Bedroll" option in a car to sleep in said vehicle. It will give you a warmth bonus as of v.349. Bedrolls can also be used in snow shelters

Emergency Stim: equips an emergency stimpack, ready to be used. See the medical section for details.

Snow Shelters
Dealing With Stats/Debuffs
The four main factors to losing your life are Cold, Fatigue, Hunger, and Thirst. All four of these play into survival, and when maxxed out, will slowly drop your Condition, which is basically your "health bar". However, when properly managed, stats are simply a trivial matter that exists only to take up your time maintaining them. Debuffs, seen in the lower right hand corner (Starving, Food Poisoning, Bleeding) are effects that are results of attacks, falls, or maxxed stats, and will steadily decrease your condition (or in certain situations impair your speed.)

Cold: This is the most likely thing to kill you at the start of the game. Cold is a factor based on (Air Temperature - Clothing Boost) + (Wind Chill - Clothing Windchill Boost). If the Feels Like temperature is above 0 degrees Celsius, your cold will go down. The same effect applies, reversed, below 0 degrees Celsius. Holding a flare, lighting a fire, or keeping a lit lantern will increase the air temperature. Entering a structure or hugging a wall from the direction of the wind will negate or seriously reduce any windchill. By hugging walls and holding a light source, you can maximize your time in the elements.

Fatigue: I'm convinced this only exists to irritate you and waste time. Fatigue will increase at a steady rate over time, but sprinting or performing hard activities like harvesting firewood will greatly increase the rate. Sleeping will decrease this stat as well as drinking coffee (though a small amount, if you've lost a bedroll this can keep you alive at night.) A rather unknown fact- sleeping for two hours at a time will do more for you than sleeping two one-hour segments. If your fatigue maxes, rather than just sleeping on the floor, you'll slowly die. I guess taking the nap on the floor is too good for you. You can sleep in cars by clicking the Bedroll option in the Survival Menu. This will NOT decay your bedroll but provides no warmth bonus.

Thirst: While scary, this will do little harm to you except when you oversleep. Summit Soda must have a huge marketing deal, because it's damn near everywhere, and if you can't manage to find some, you can melt snow at any fire and boil/purify it down to a safe, heavy, steady supply of water. As far as I know, thirst goes up at a consistent rate but can be increased or decreased by certain foods (Pinnacle Peaches, Salty Crackers).

Hunger: As with all stats, this is tedious, but actually has the potential to kill you. At the start of the game, packaged food is everywhere, but two weeks in you'll start finding a lot less. At that point, it's time to hunker down, set up snares, load your rifle, and get ready to hunt. Raw/cooked meat will lose condition at a steady rate and keeping it outside will not slow this as of v.183. Cooked meat lasts a surprisingly long time, so keeping at least two days' worth of food (as well as mass-produced water) is wise, especially if an aggressive blizzard locks up an entire day. Don't assume this is something easy to keep down; prioritize this by day 10.

Condition: As previously mentioned, this is your 'health' bar. Starting at 100%, this will slowly go down (or rapidly) if you have any debuffs, excluding Sprained Ankle. To regenerate Condition, you need to sleep without maxxed stats. As with fatigue, sleeping for three hours at once is much better than three segments as the healing boost follows a parabola. Most beds will heal roughly 2% for one hour, about 5% for two hours, increasing, but certain beds such as the bed in Trapper's Homestead is significantly better (from memory, I believe Trappers's heals 2.5x more; that may be a bit off, but it's significantly increased.)

A list of debuffs, for reference;
Starving, Dehydrated, Sprained Ankle, Freezing, Exhausted, Bleeding, Food Poisoning.
How to Do Things
Before I get into describing things, this will tell you how to actually do them. Basically, I'll just go through a few semi-confusing UI via the magic of screenshots.

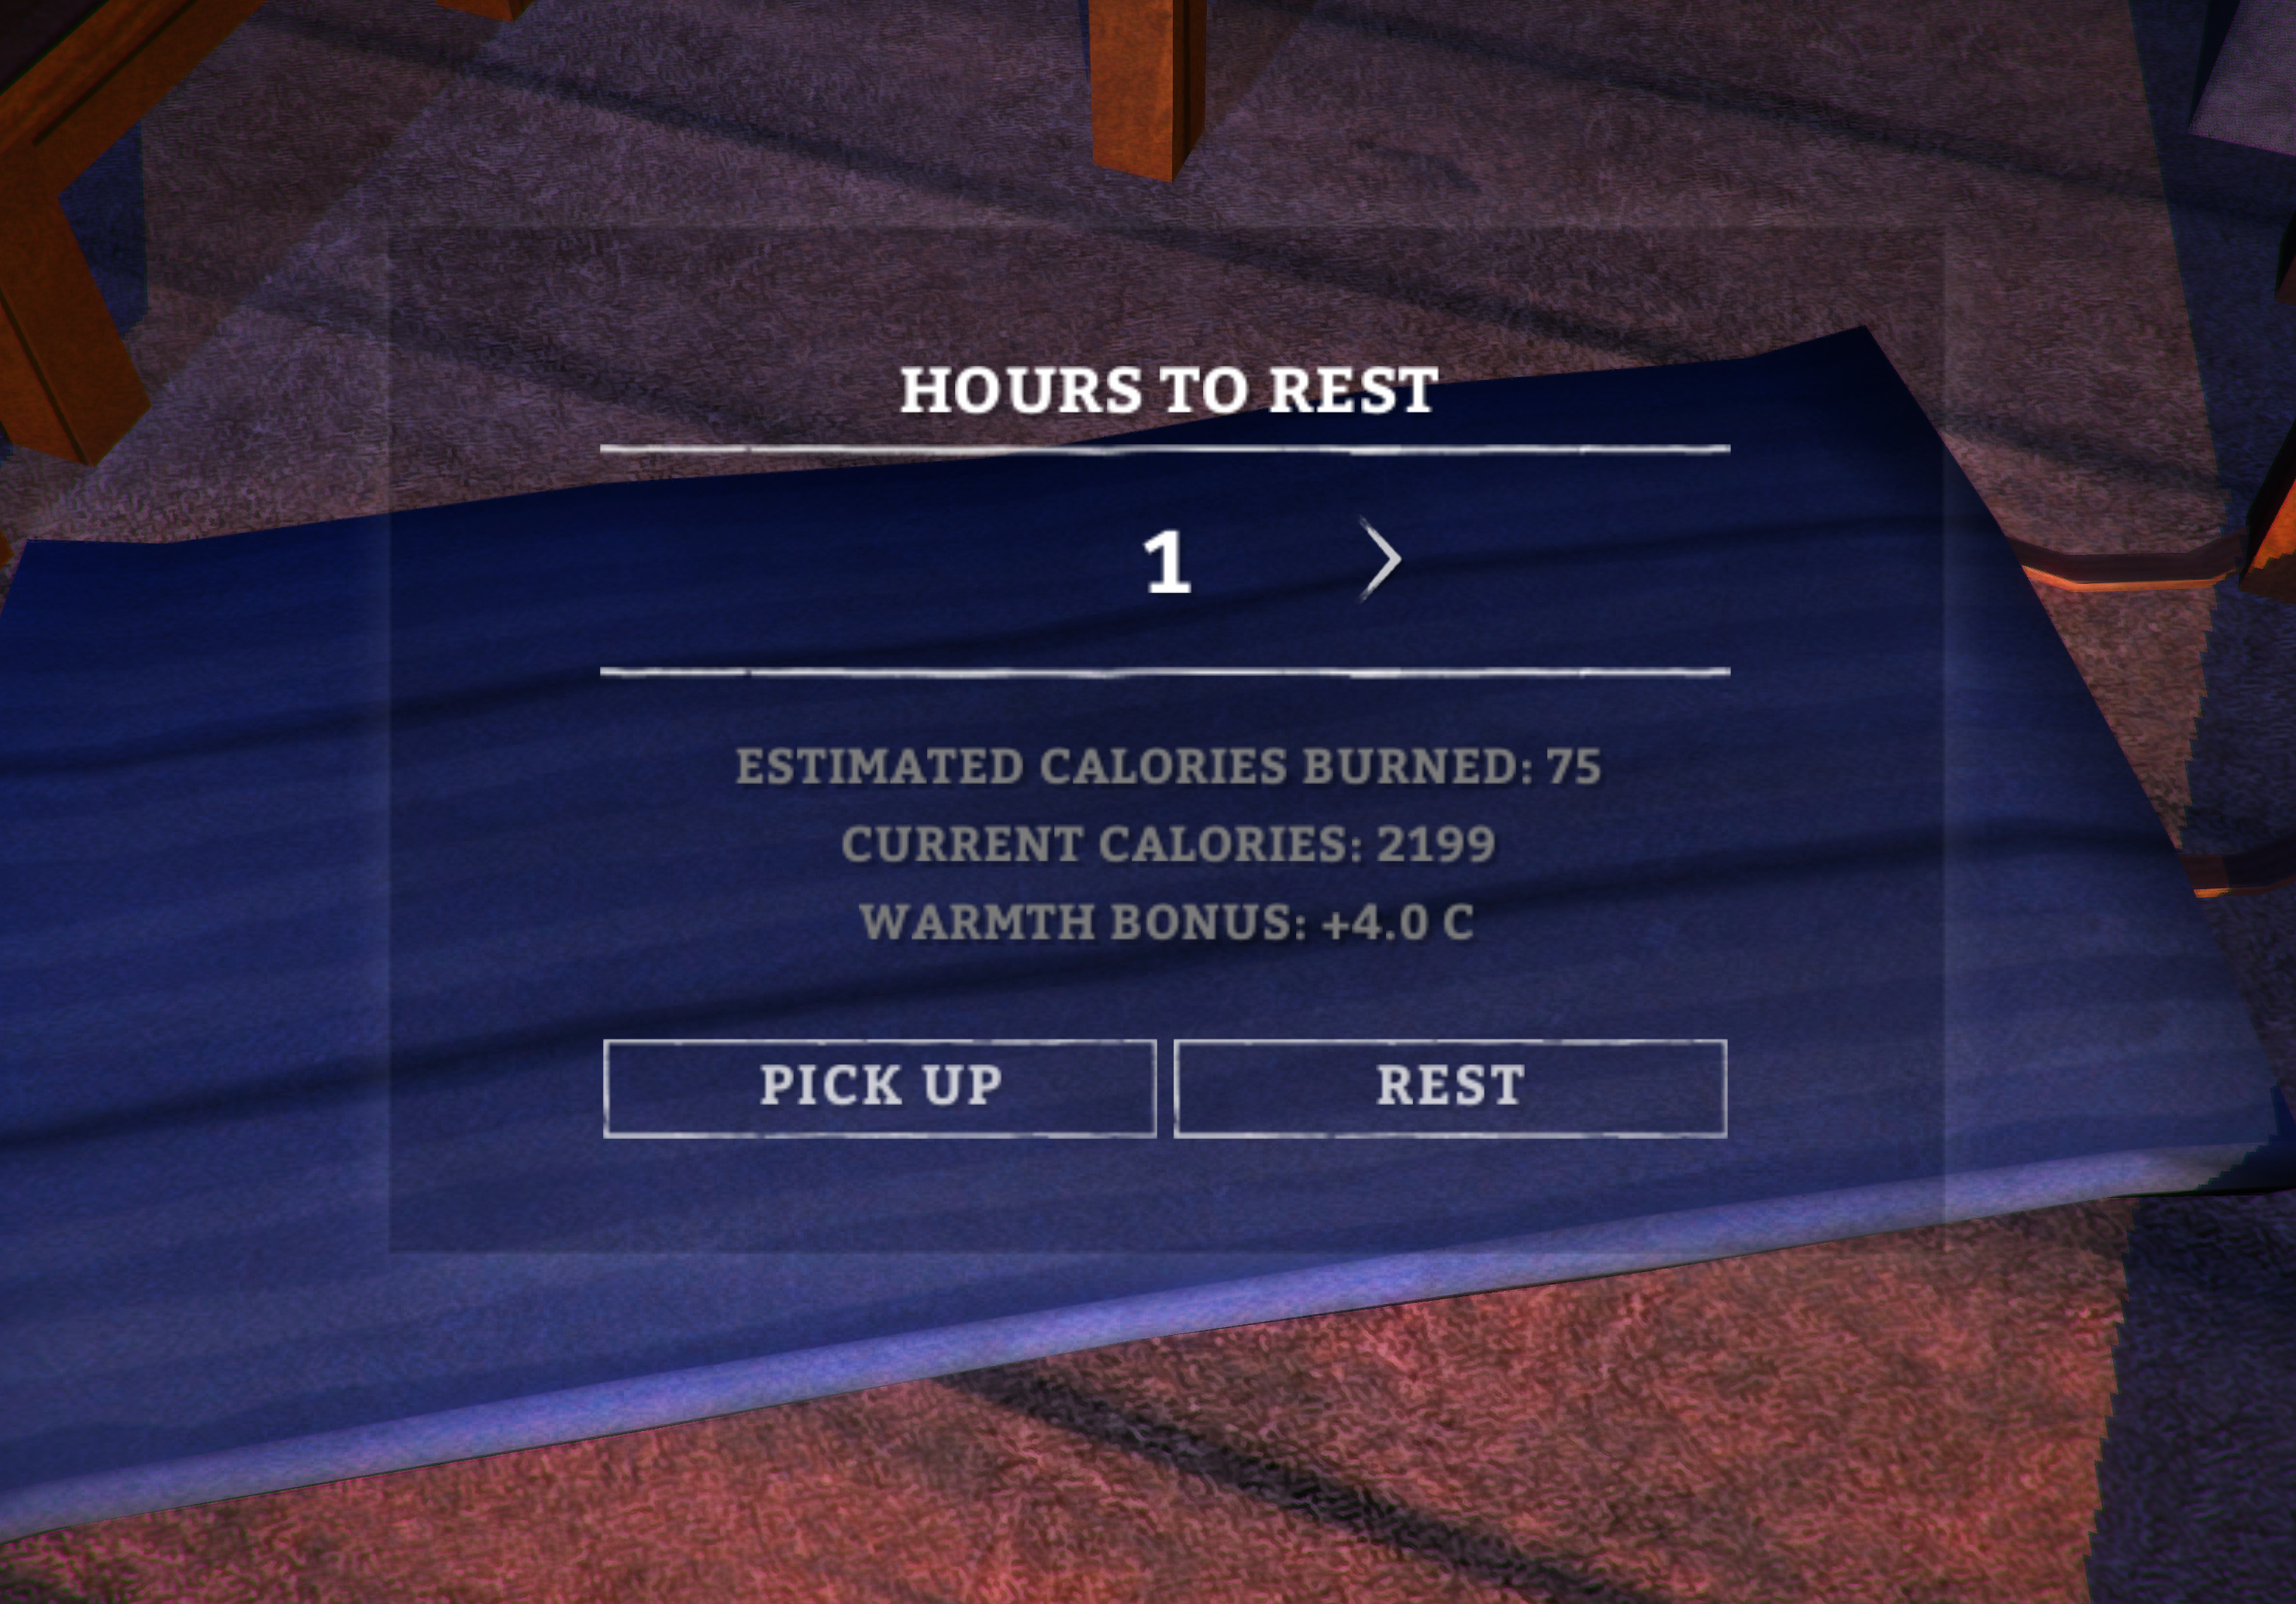
This one is rather simple.
  • PICK UP will return the bedroll to your inventory.
  • REST will allow you to sleep.
  • < and > will change the duration of hours spent sleeping.
  • CALORIES BURNED is how much hungrier you'll be when you wake up.
  • As always, the Escape key or CANCEL will leave the menu.

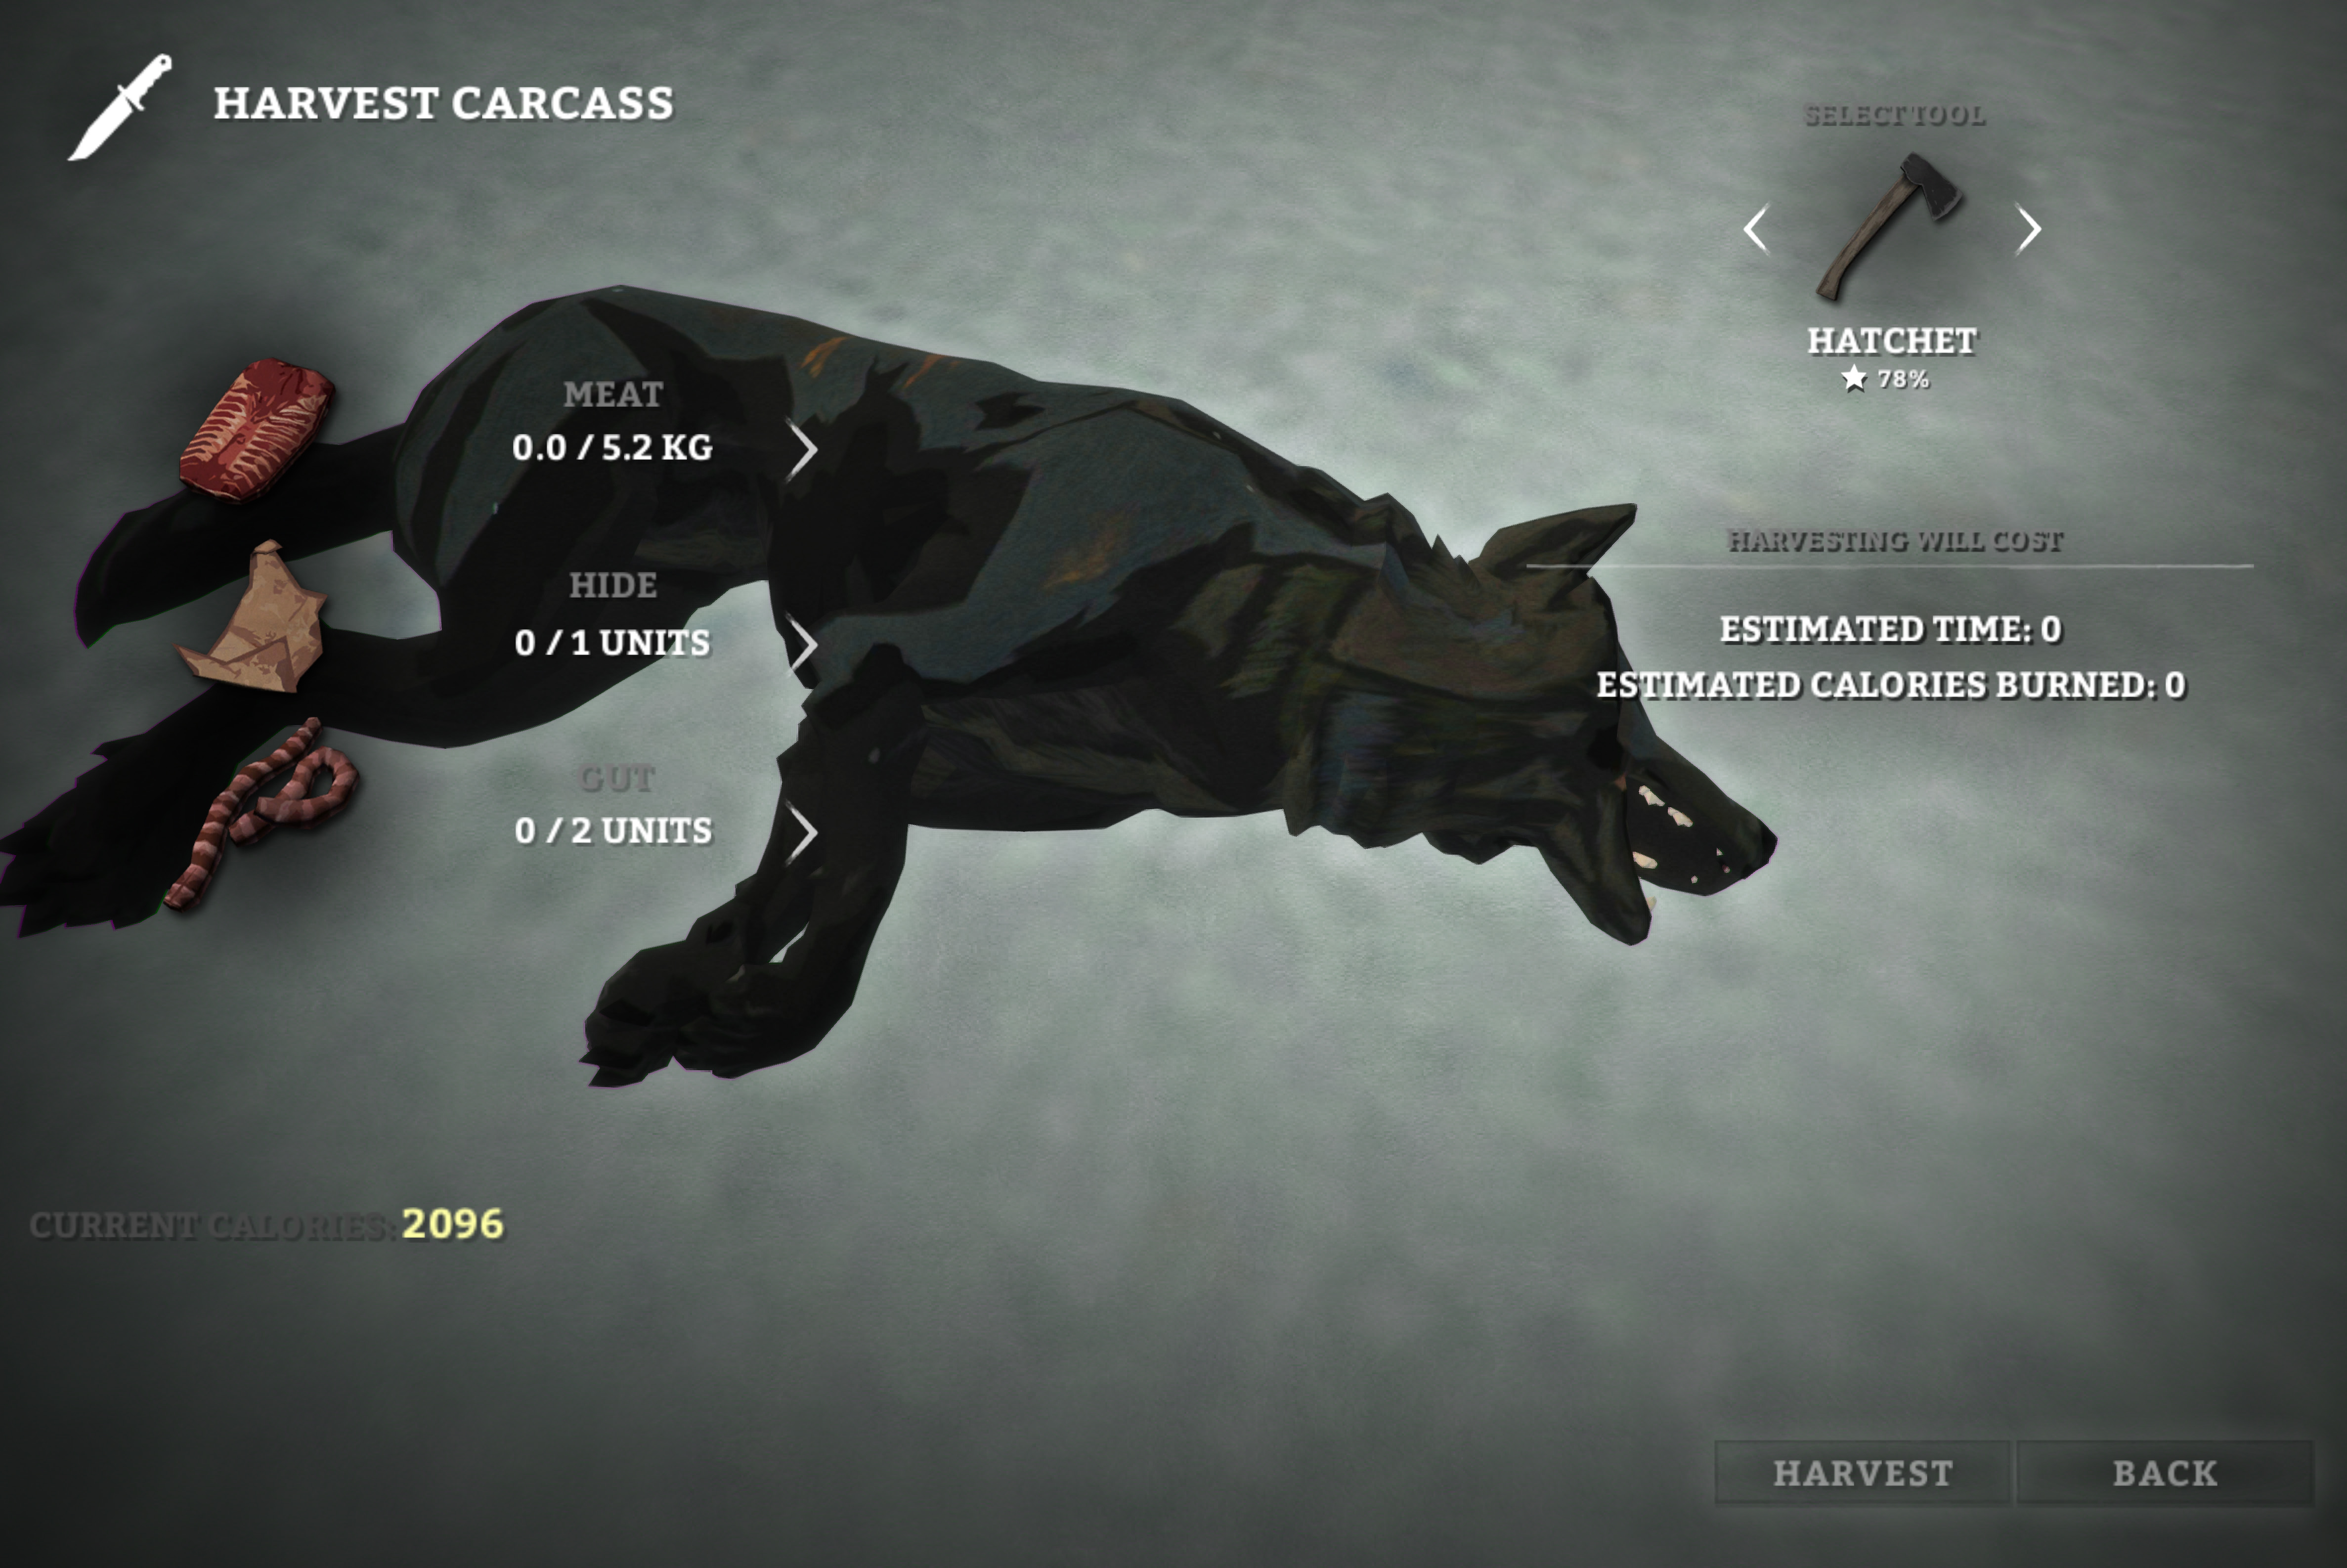
This menu will stay consistent depending on any sort of game.
  • The left side shows what is present, and how much of it, on the carcass, as well as your current calories.
  • The right side shows you how much time and calories it will take as well as the tool you're using.
  • < and > by the materials will change how much of that item you will harvest.
  • < and > by the tool will change what tool you'll harvest with (it'll decay the tool).
  • To begin harvesting your material of choice, click HARVEST.
  • As always, the Escape key or BACK will leave the menu.

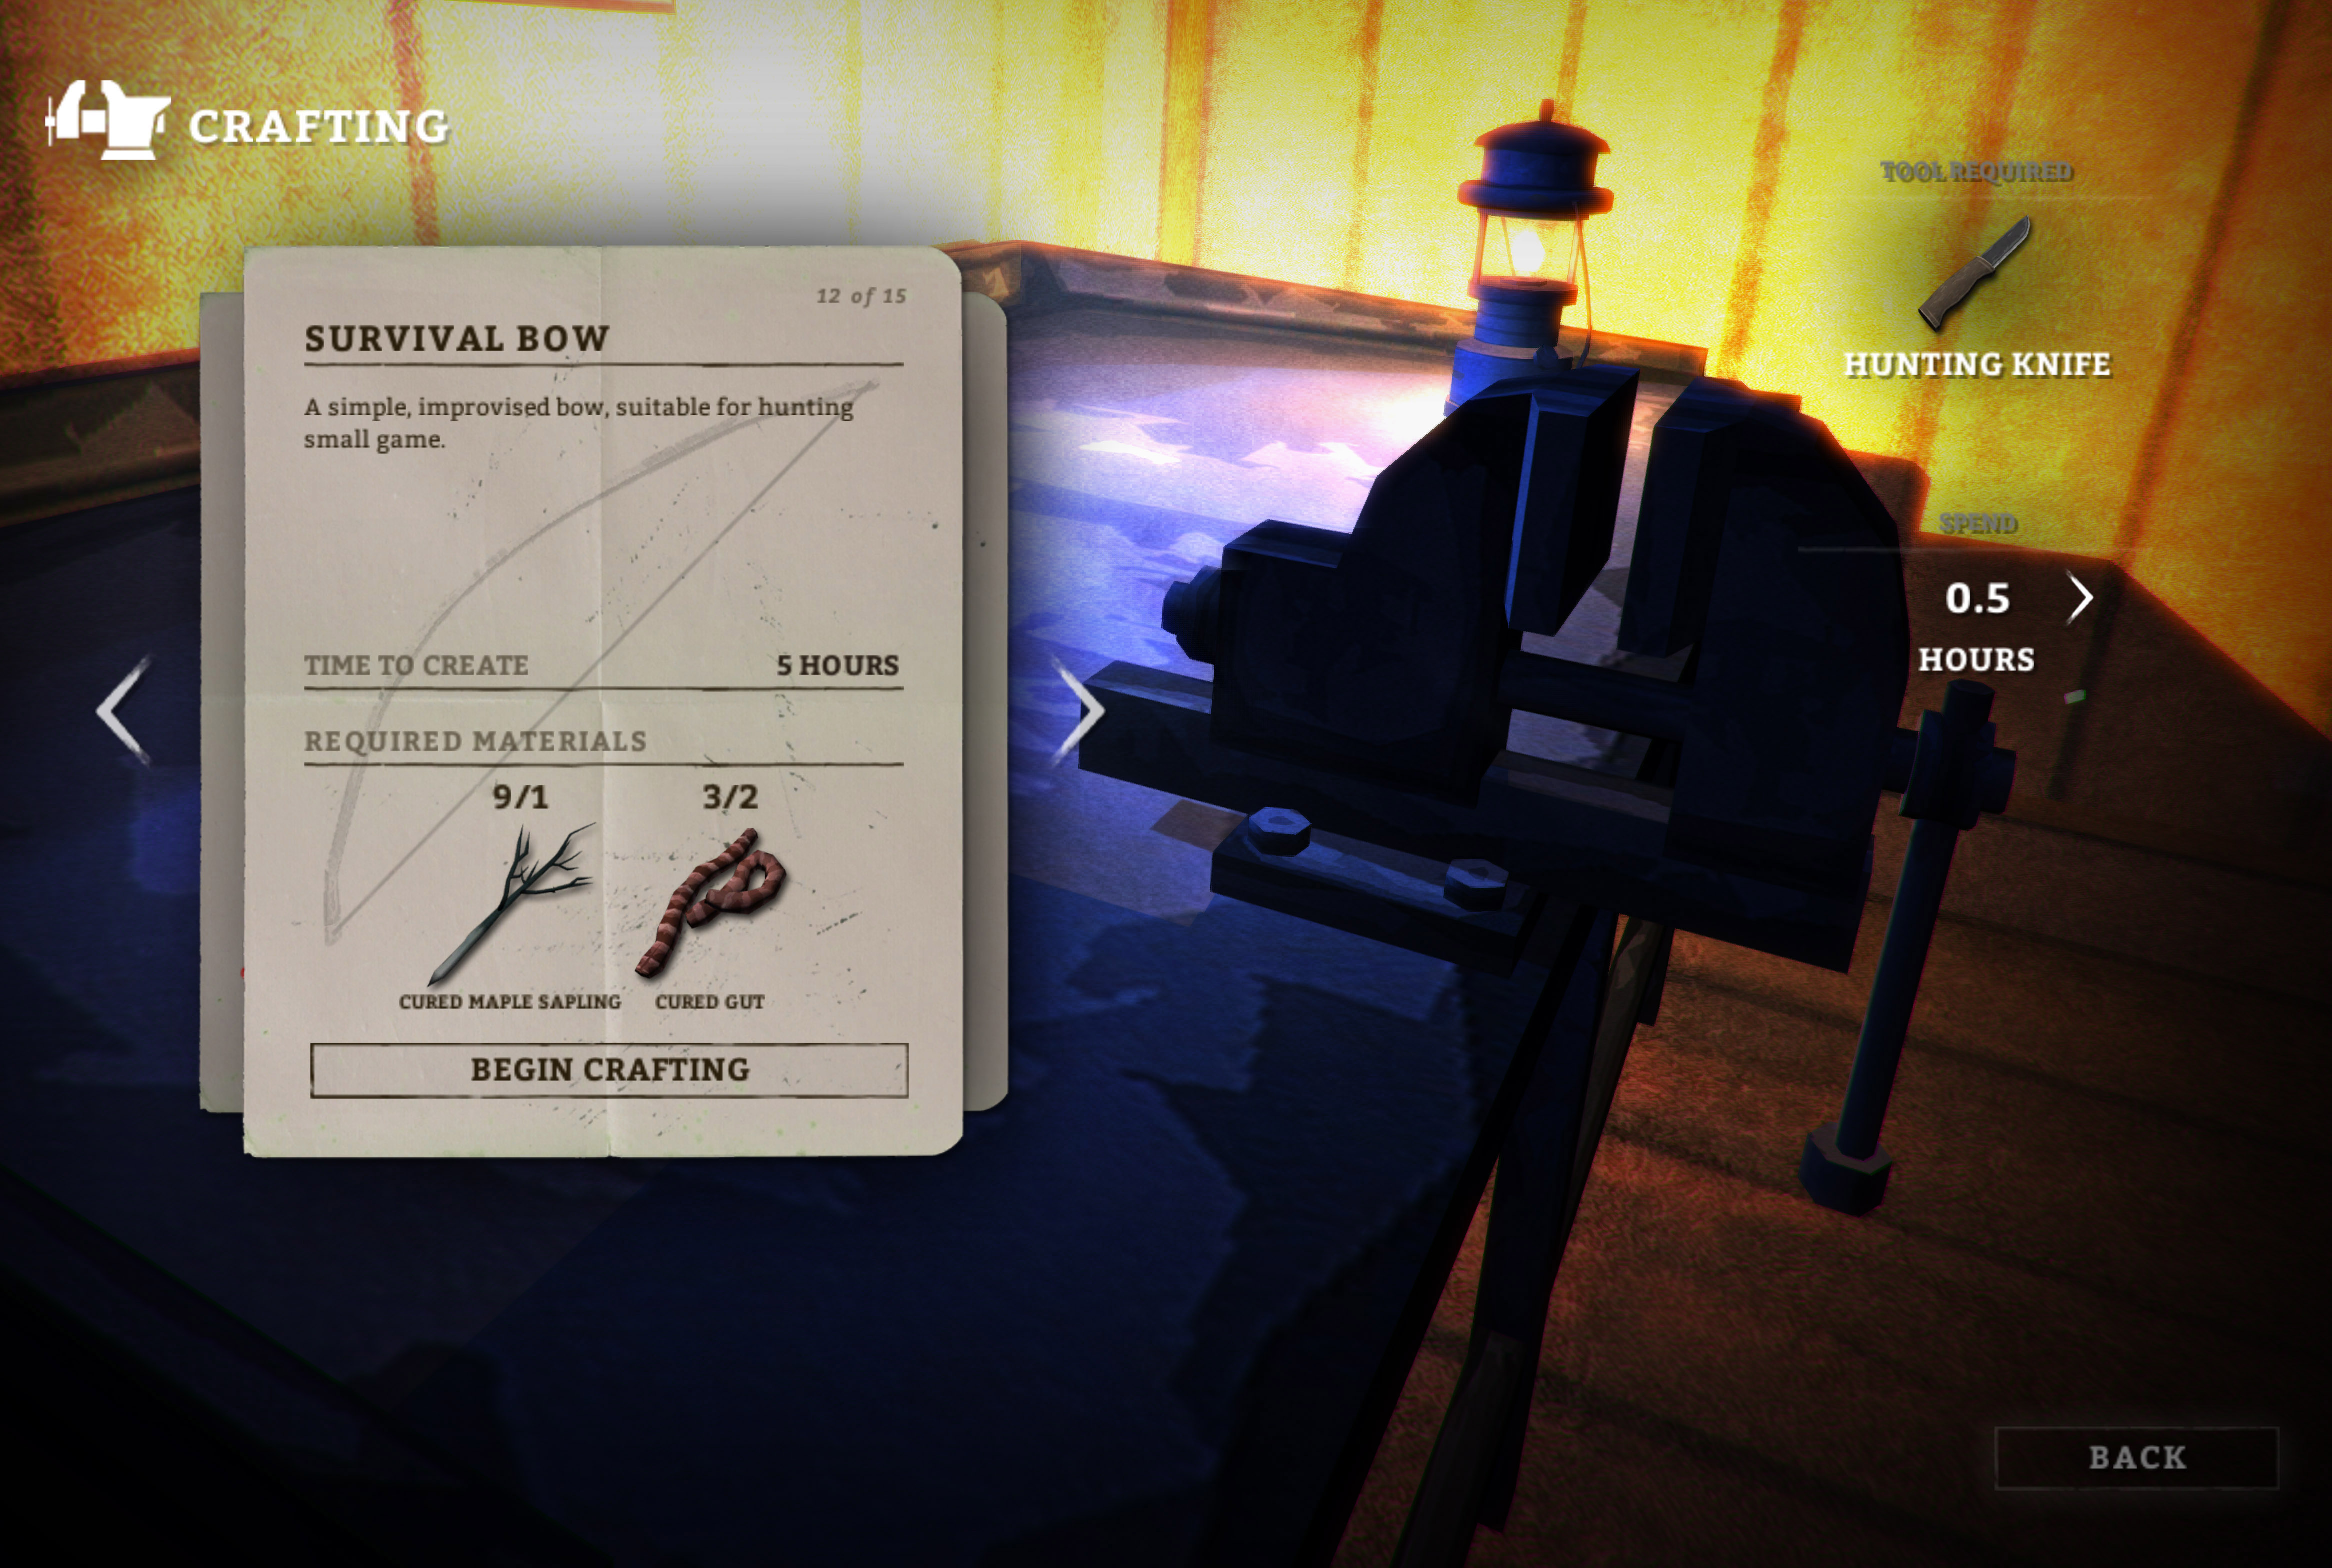
This menu will stay consistent depending on any sort of crafting item. This menu is reached via a workbench, found all across the world.
  • The left side shows what you're currently crafting, what is needed, how much of that you have, and how long more it will take.
  • The right side shows the required tool (if there is one) and how much time you'll spend crafting.
  • < and > by the crafting item will change how what you're making.
  • < and > by the time will change how much you spend crafting.
  • To begin crafting, click... BEGIN CRAFTING. To continue crafting, the button is in the same place.
  • As always, the Escape key or BACK will leave the menu.

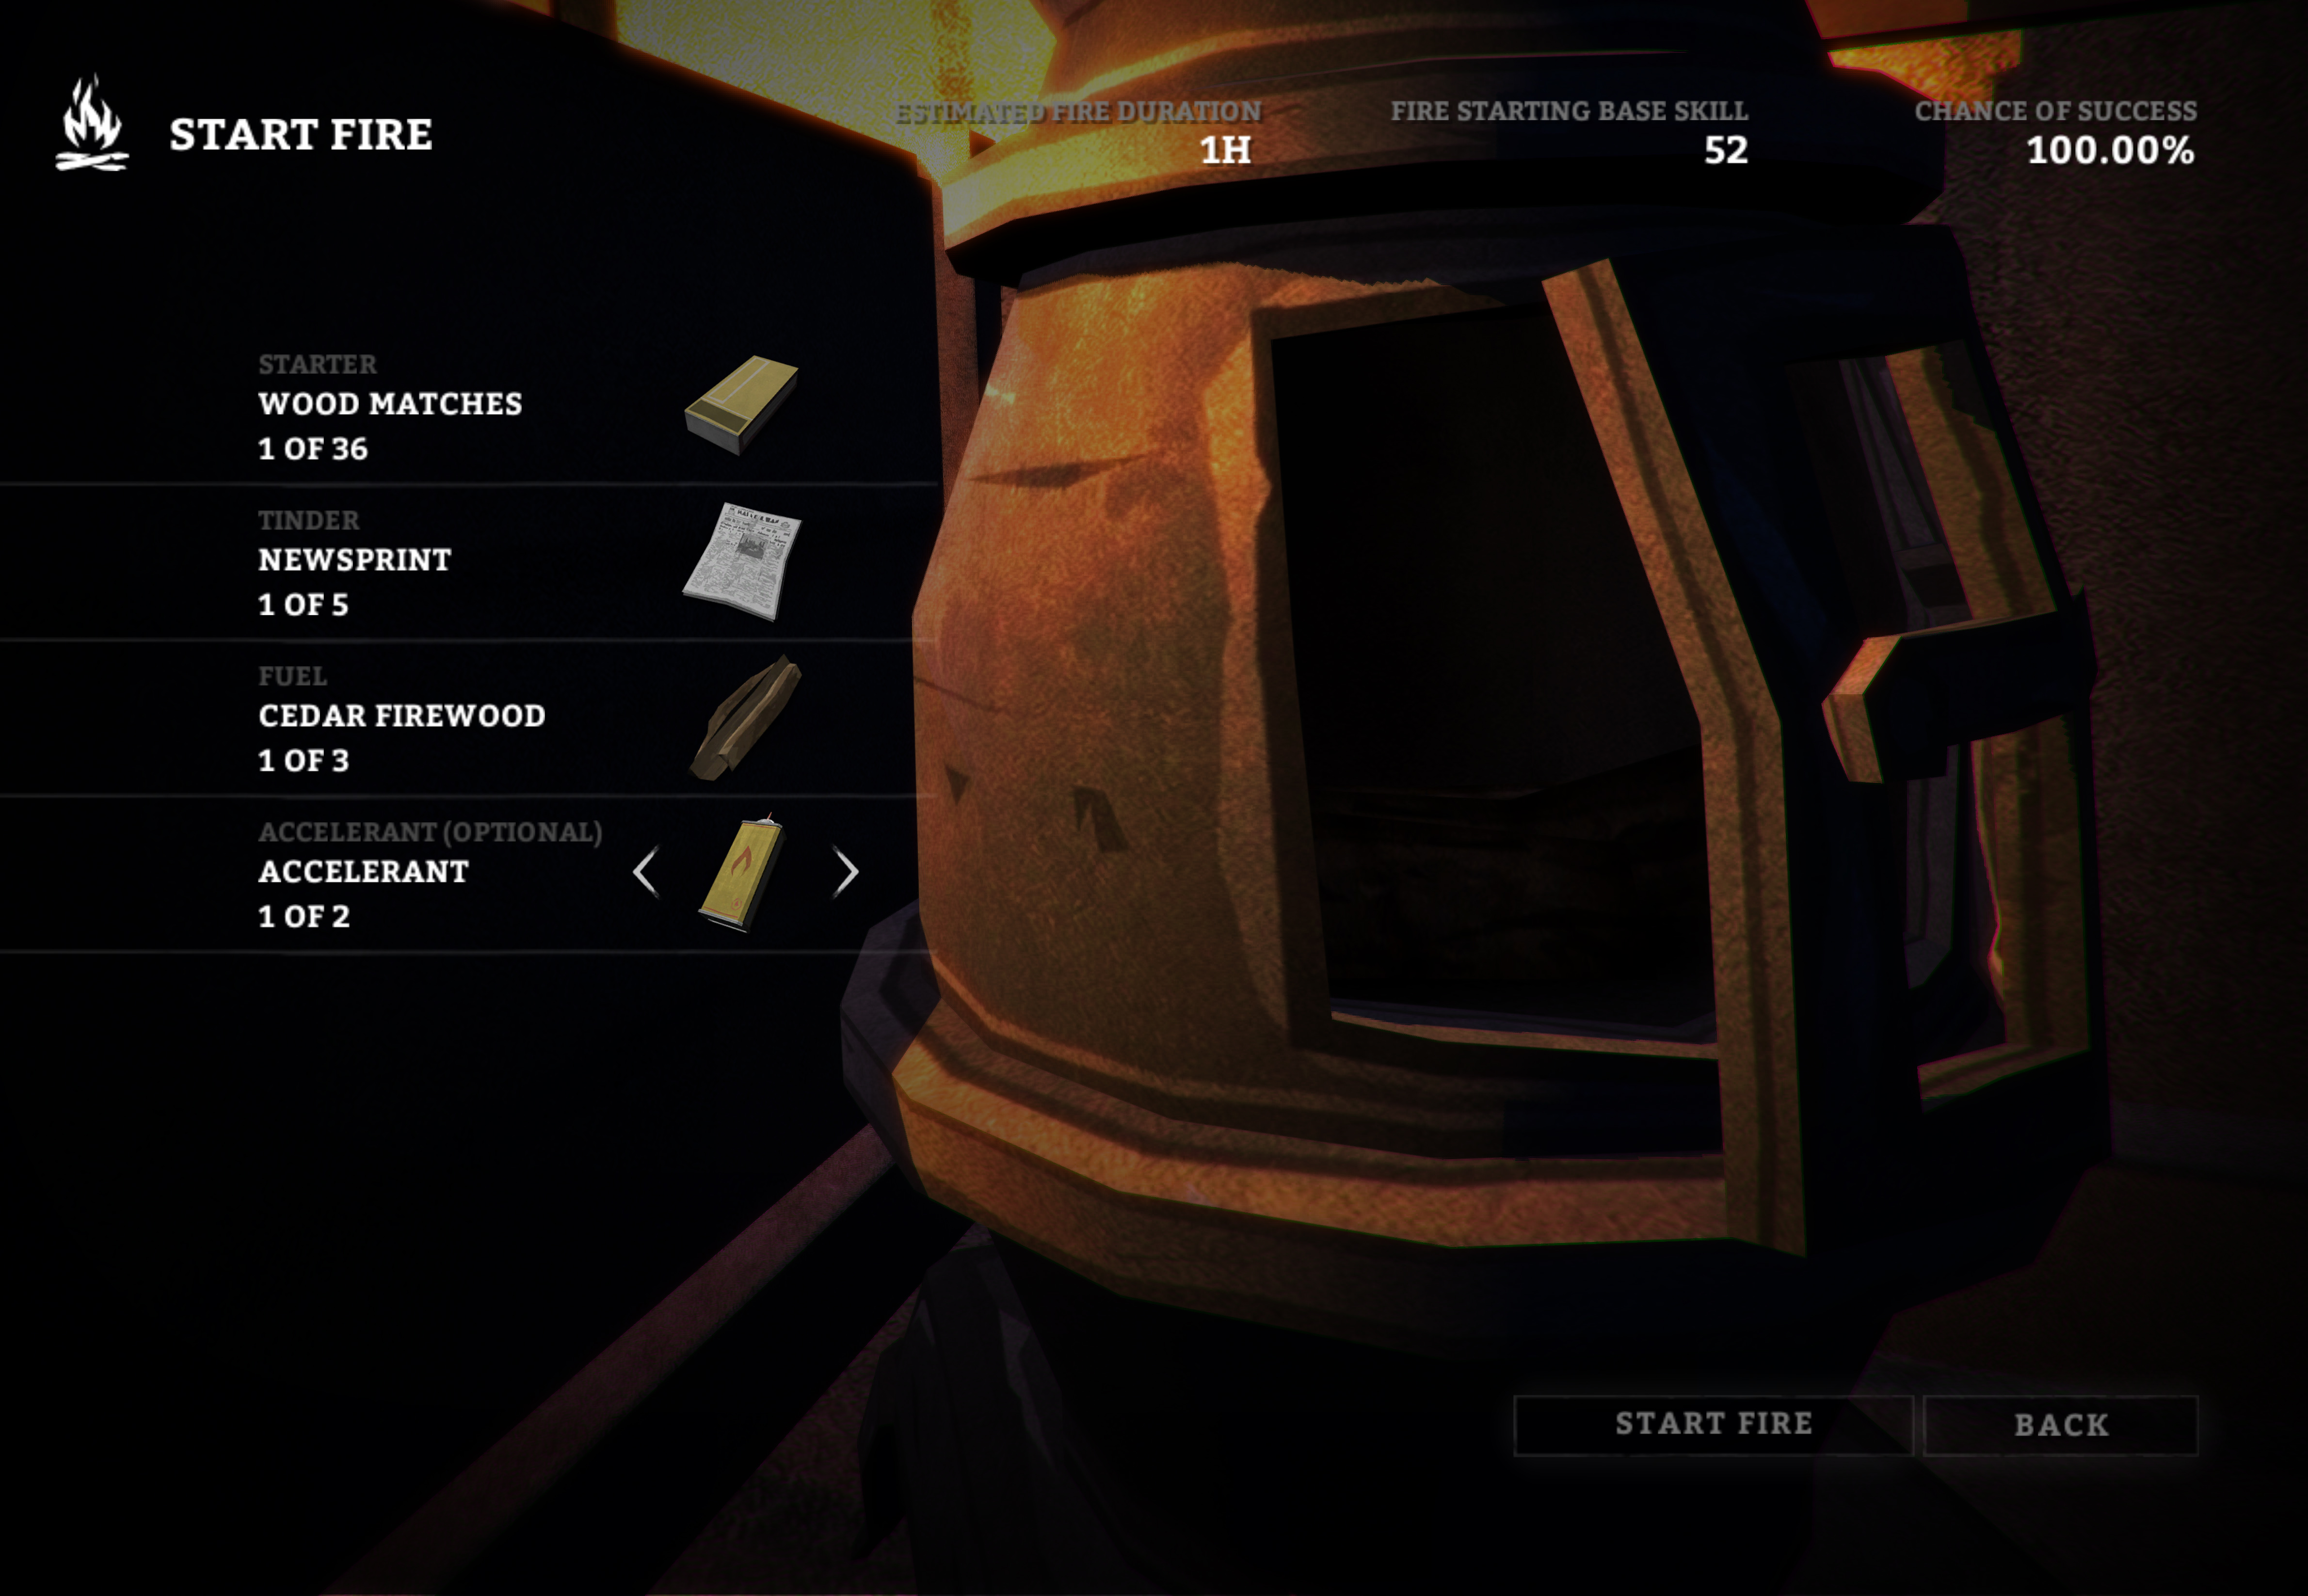
This menu will stay consistent depending on any sort of fireplace or campfire.
  • The left side shows what you'll be using to start the fire.
  • The top side shows the fire length, your firestarting skill, and your chance of succeeding.
  • < and > will change the current item you'll be using for that specific slot.
  • Starting the fire can be done when you're ready near the bottom.
  • As always, the Escape key or BACK will leave the menu.

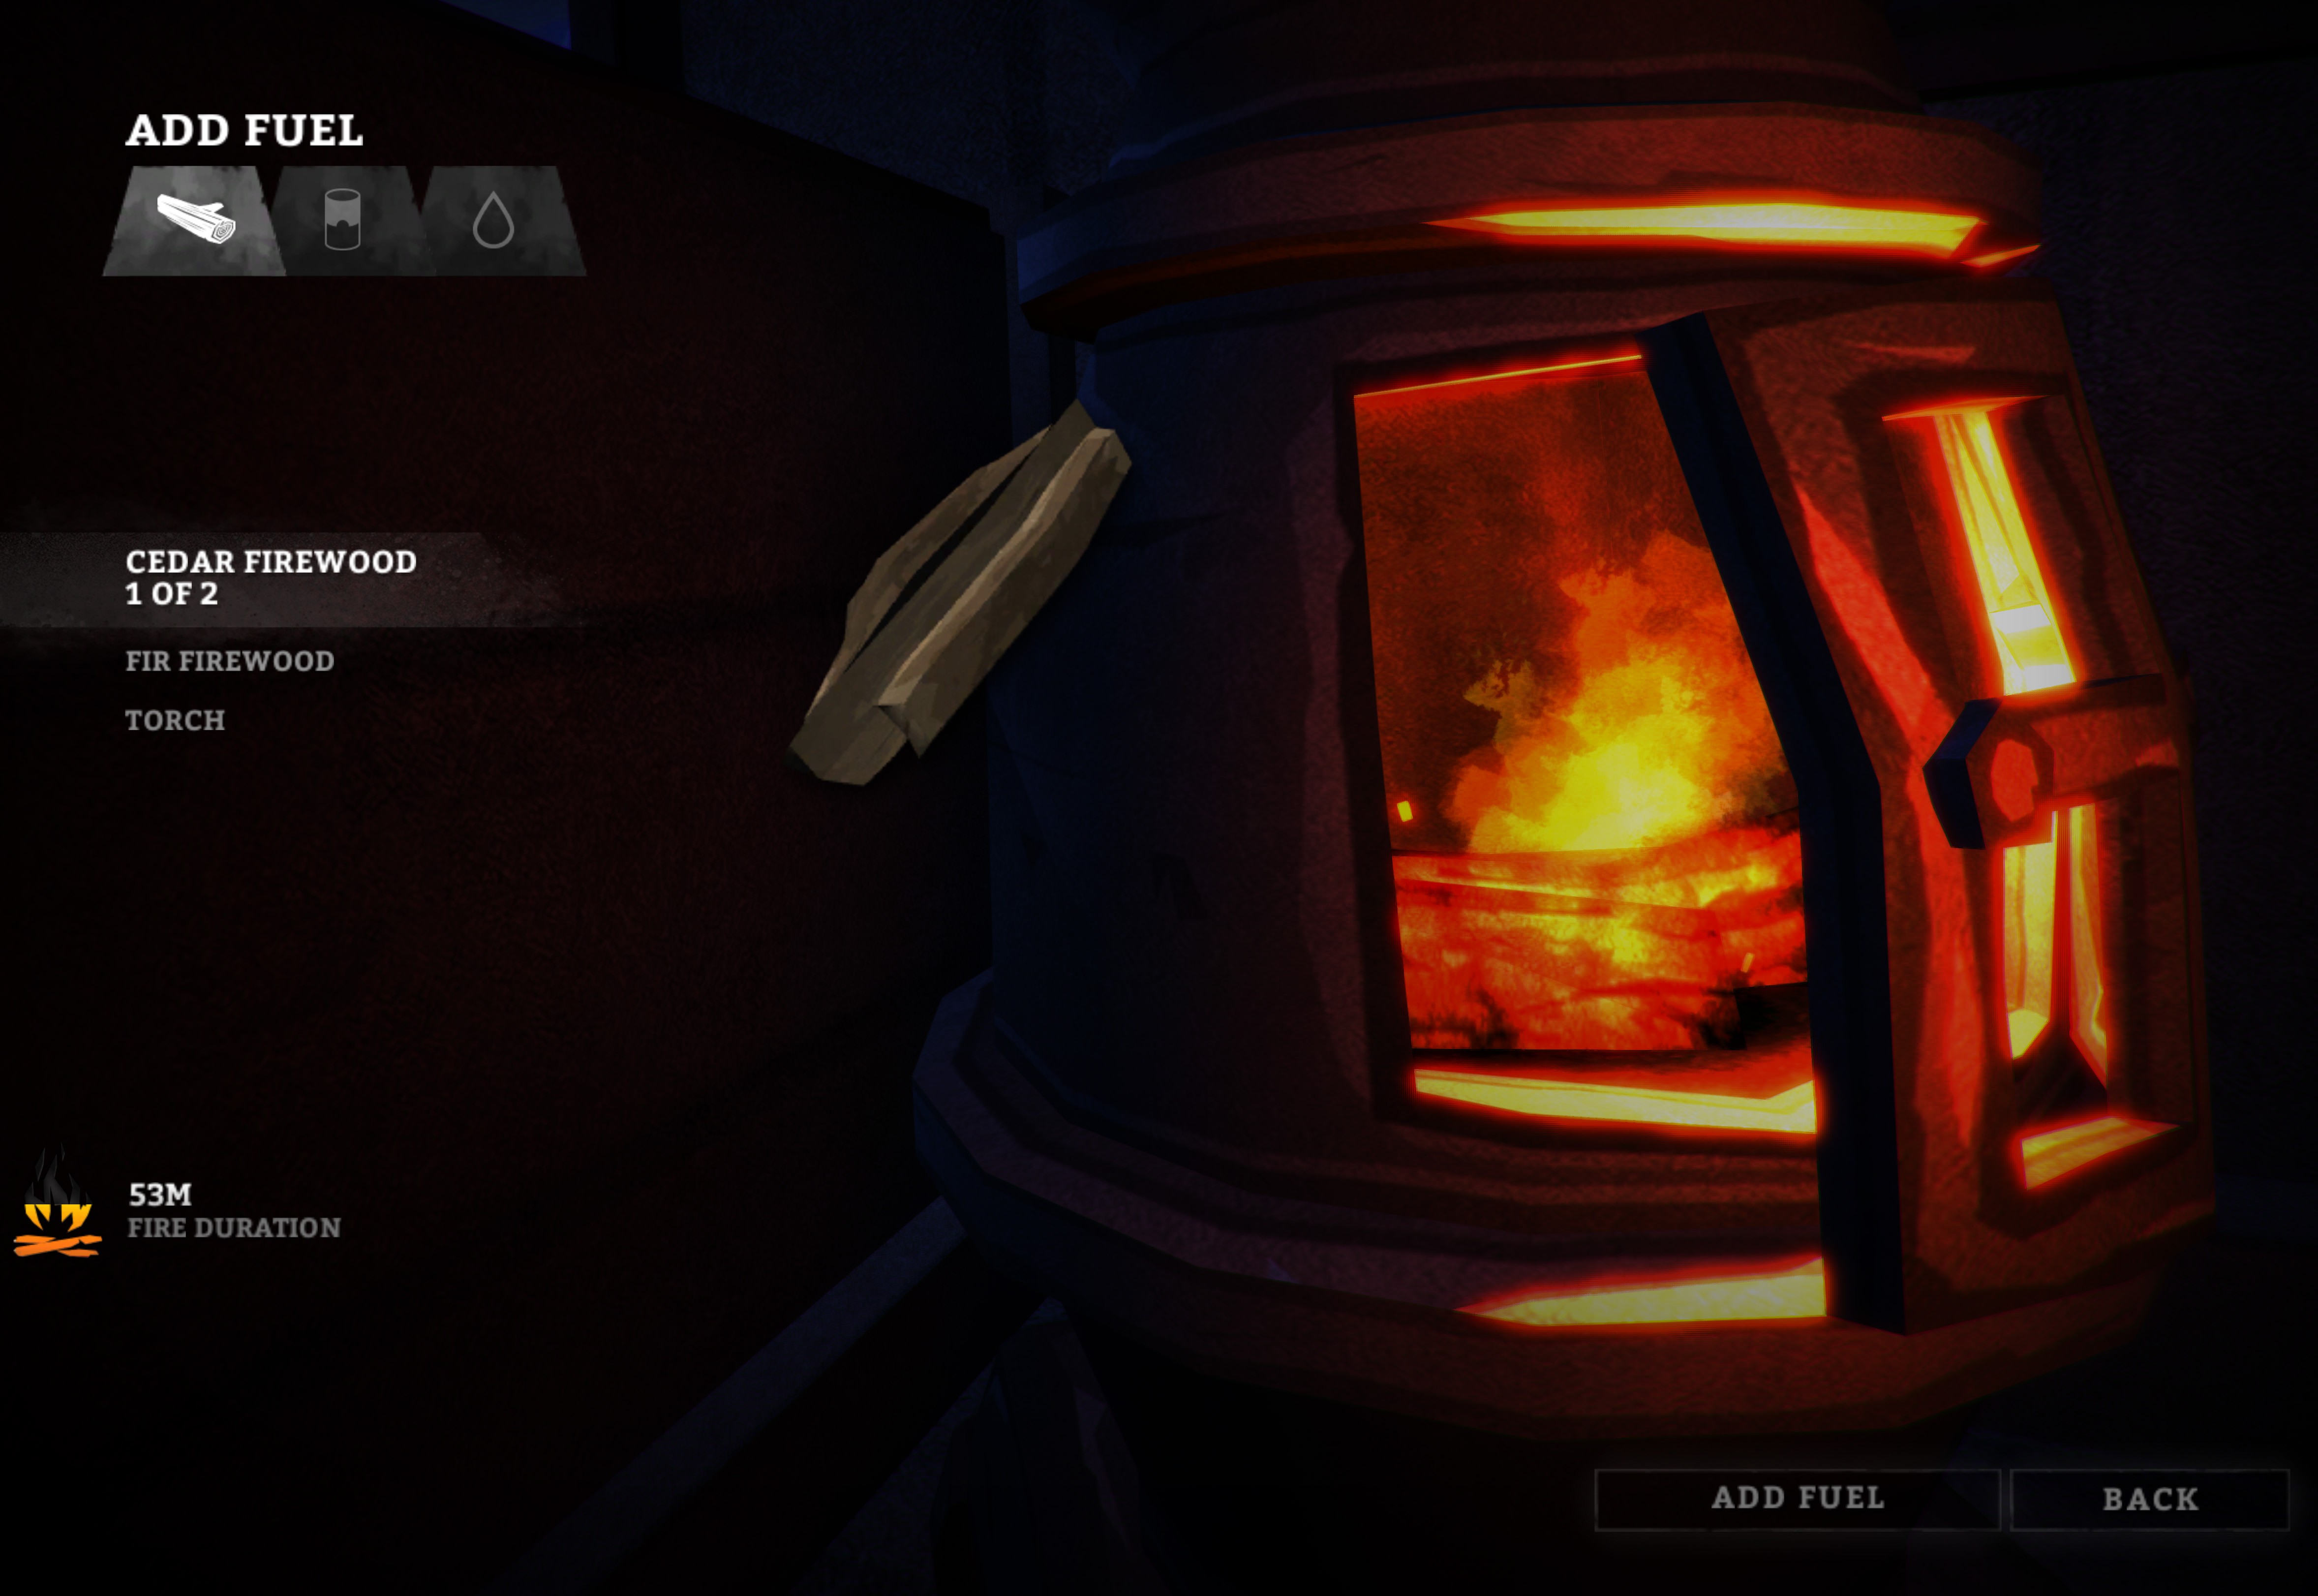
This menu will stay consistent depending on any sort of fire.
  • The left side shows the fire duration and the tabs for snow and water, food preperation, and adding fuel. Each action can be done by selecting the material and clicking the corresponding button at the bottom.
  • Use your mouse to select items.
  • As always, the Escape key or BACK will leave the menu.

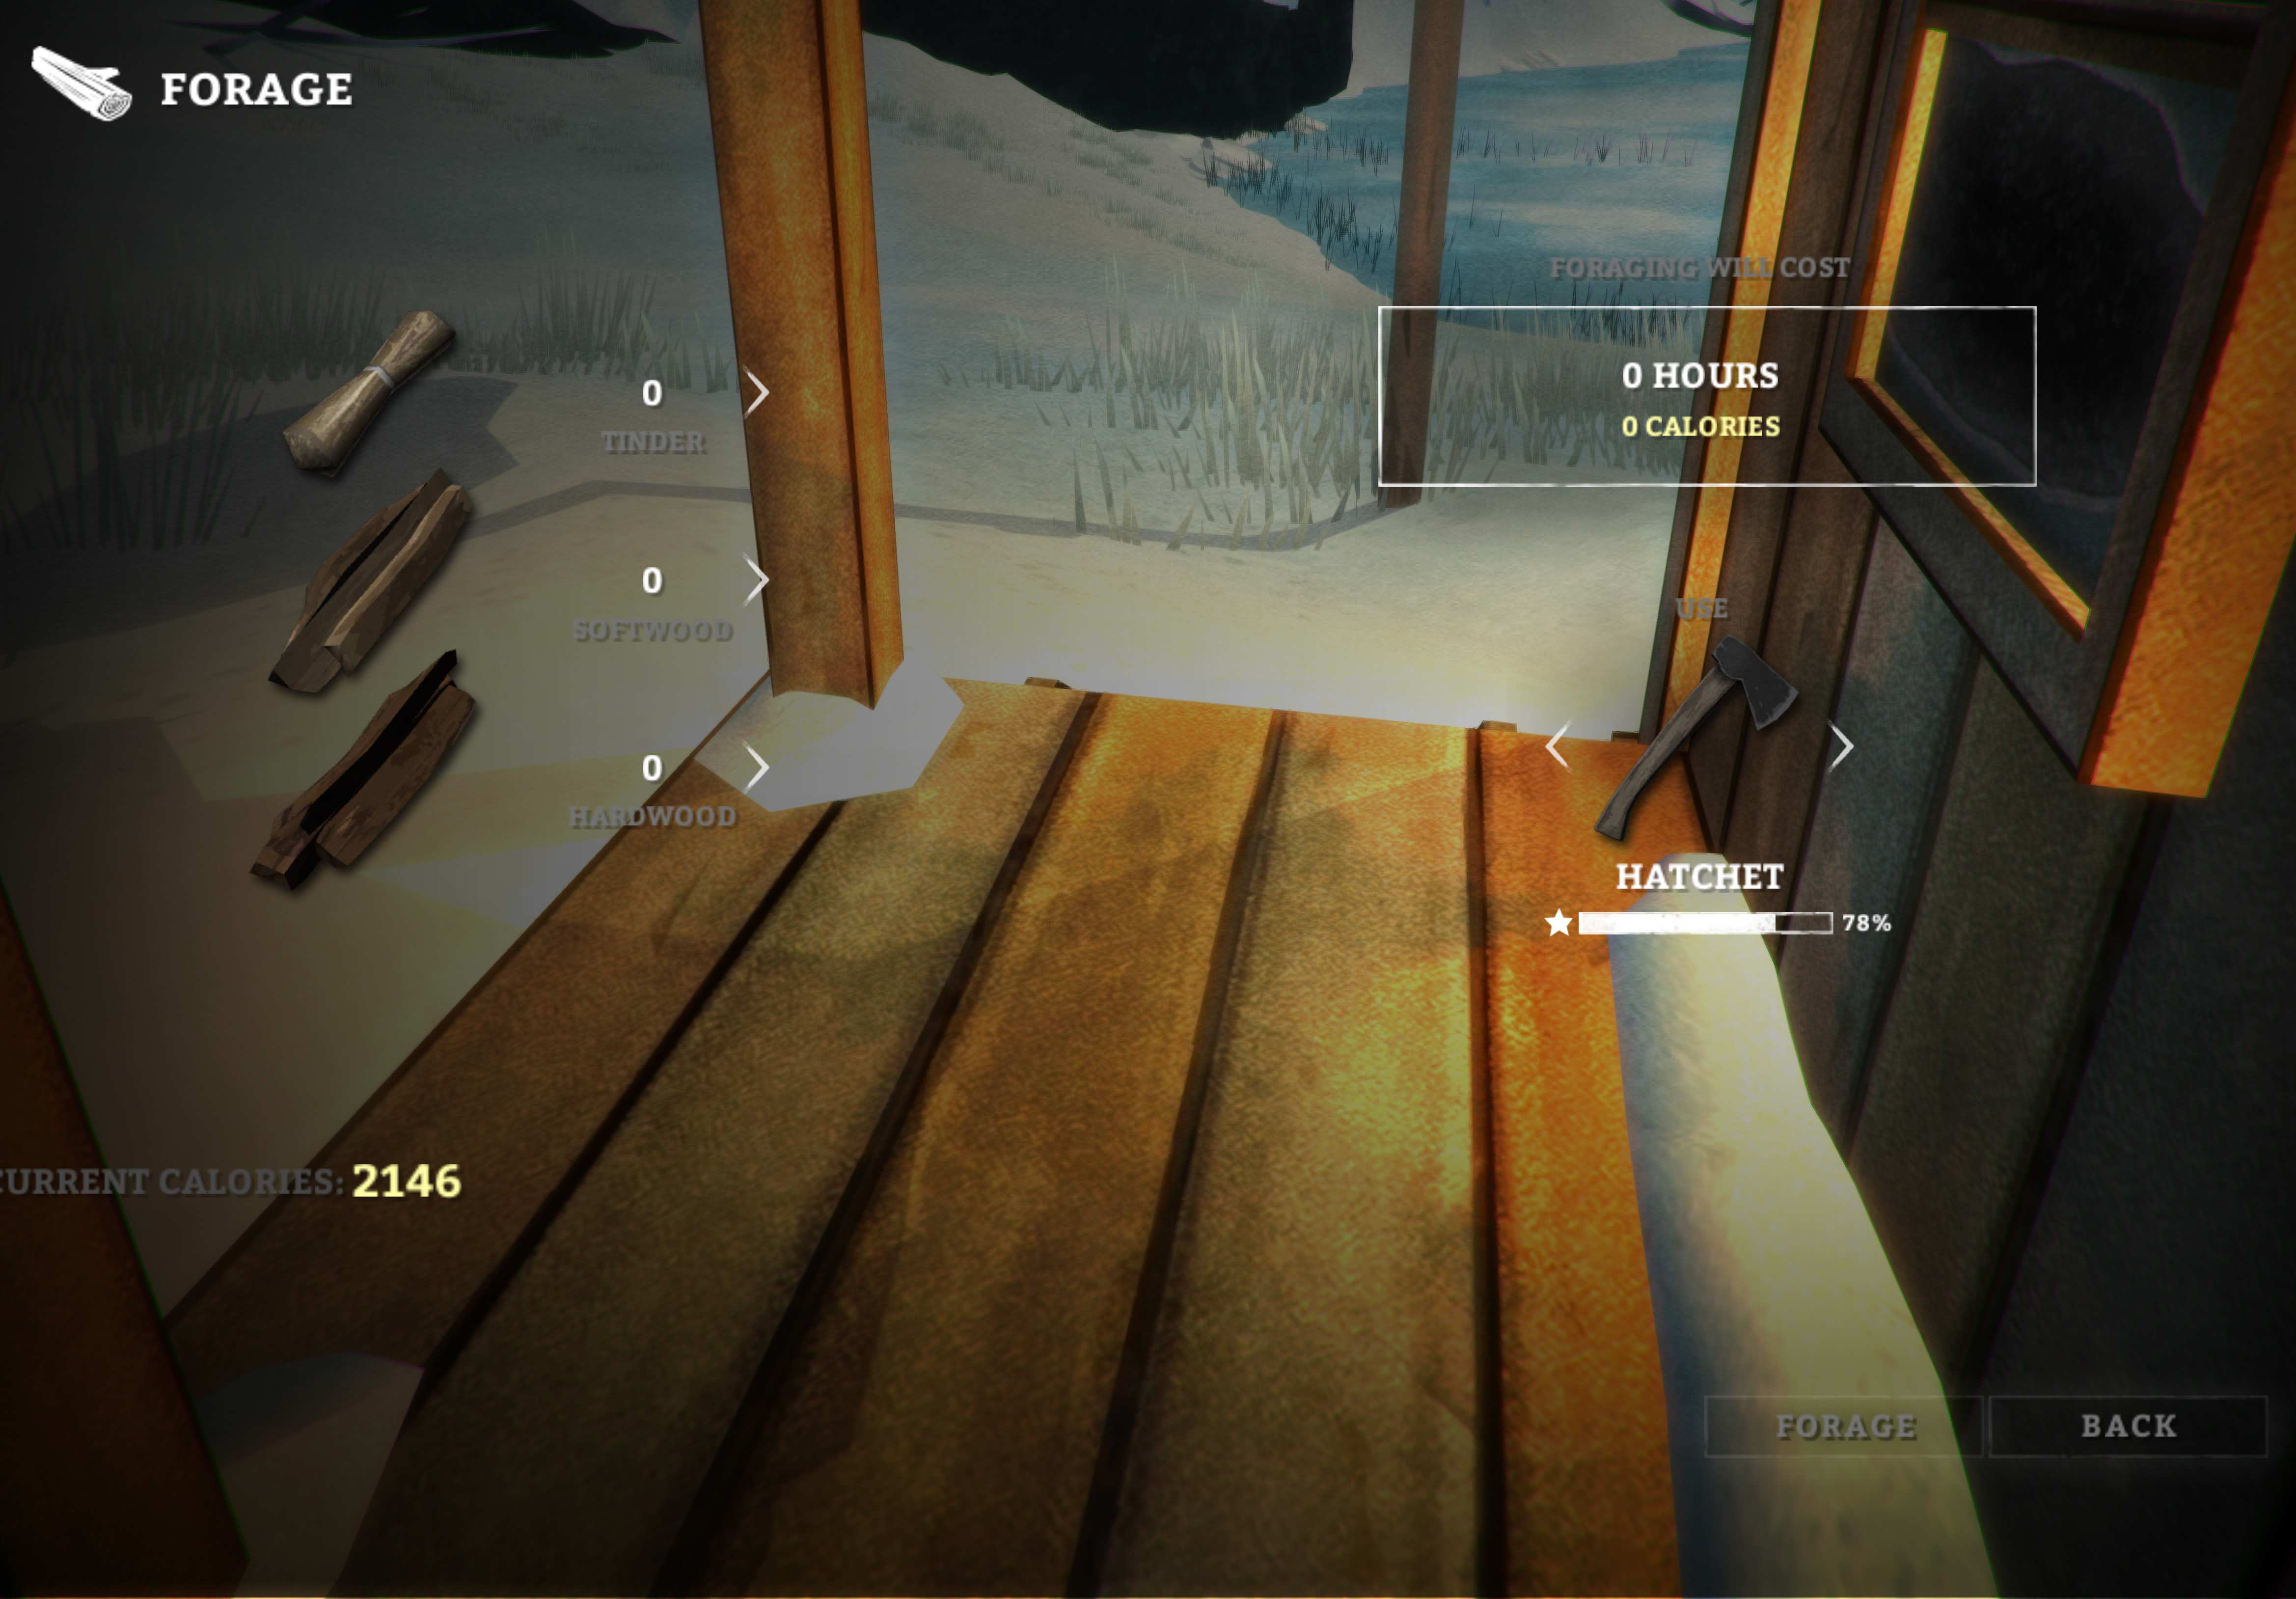
This menu will stay consistent depending on where you are.
  • The left side shows what you'll be harvesting, and how much, as well as your current calories.
  • The right side shows the tool, duration, and calories burned.
  • < and > will change the number of items harvested.
  • Foraging can be done when you're ready near the bottom.
  • As always, the Escape key or BACK will leave the menu.

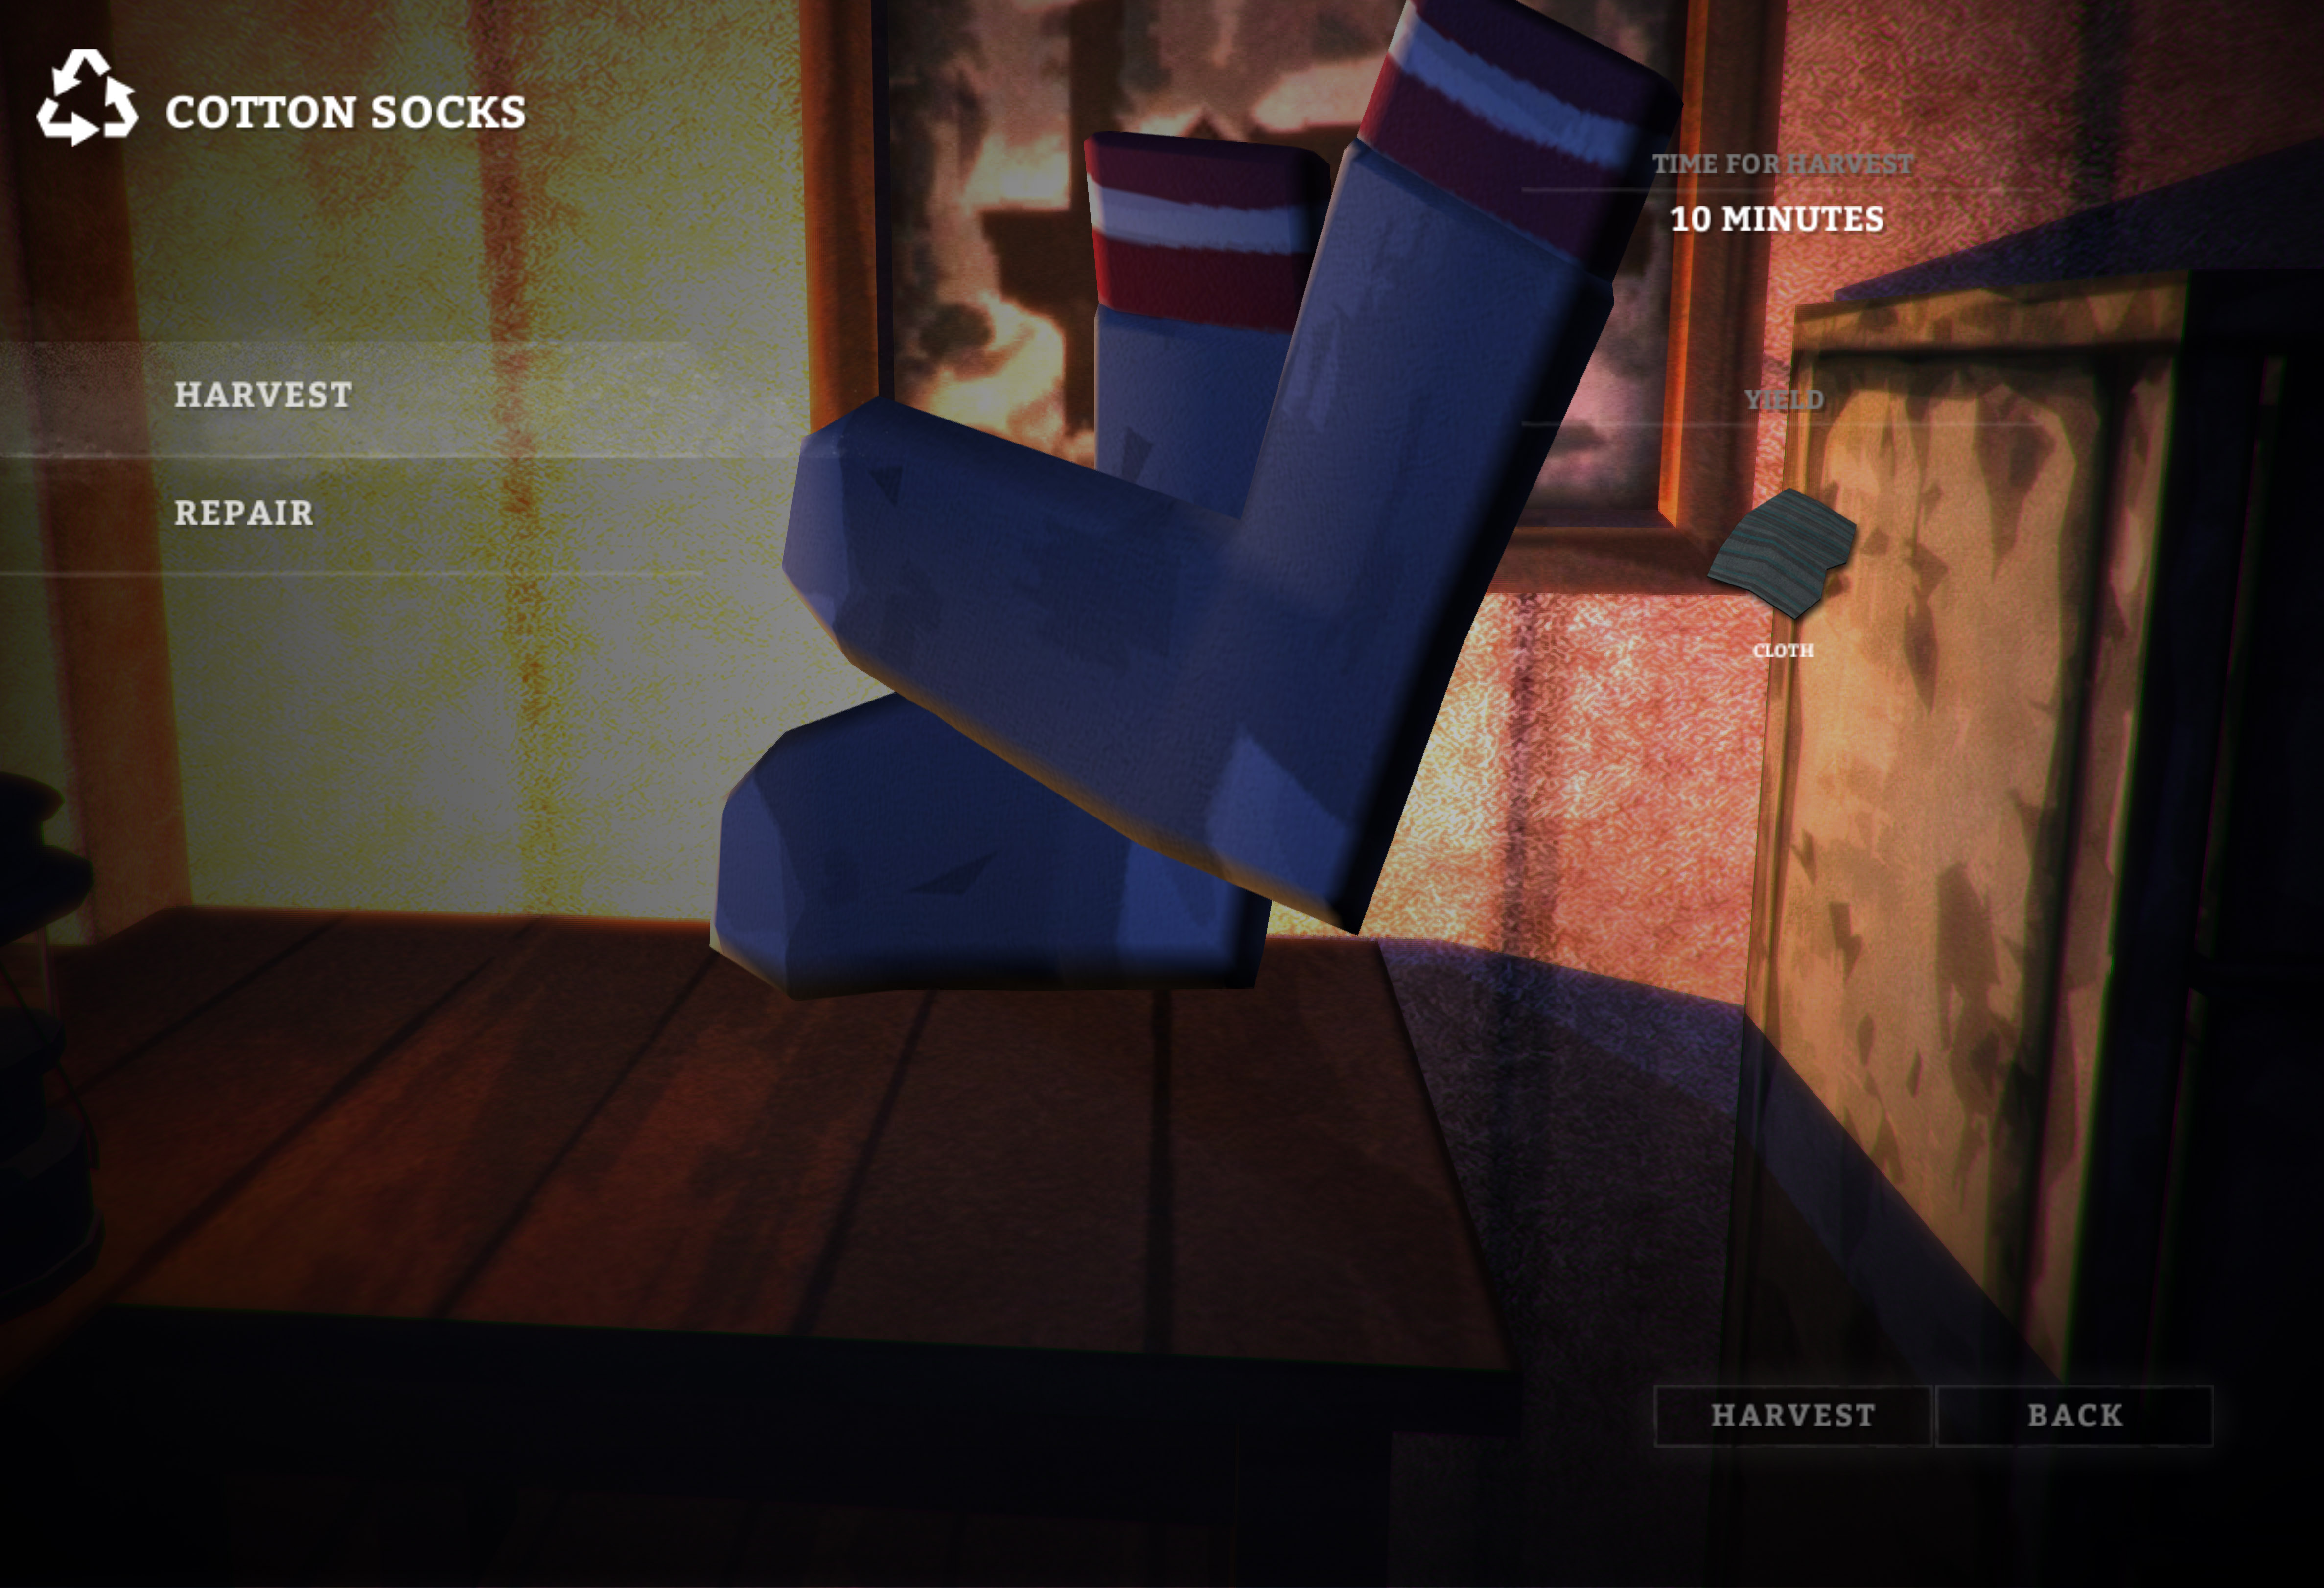
Reached by clicking the Actions under an item page in your inventory.
  • The right side shows your products and time to harvest said item.
  • Harvesting can be done when you're ready near the bottom.
  • As always, the Escape key or BACK will leave the menu.

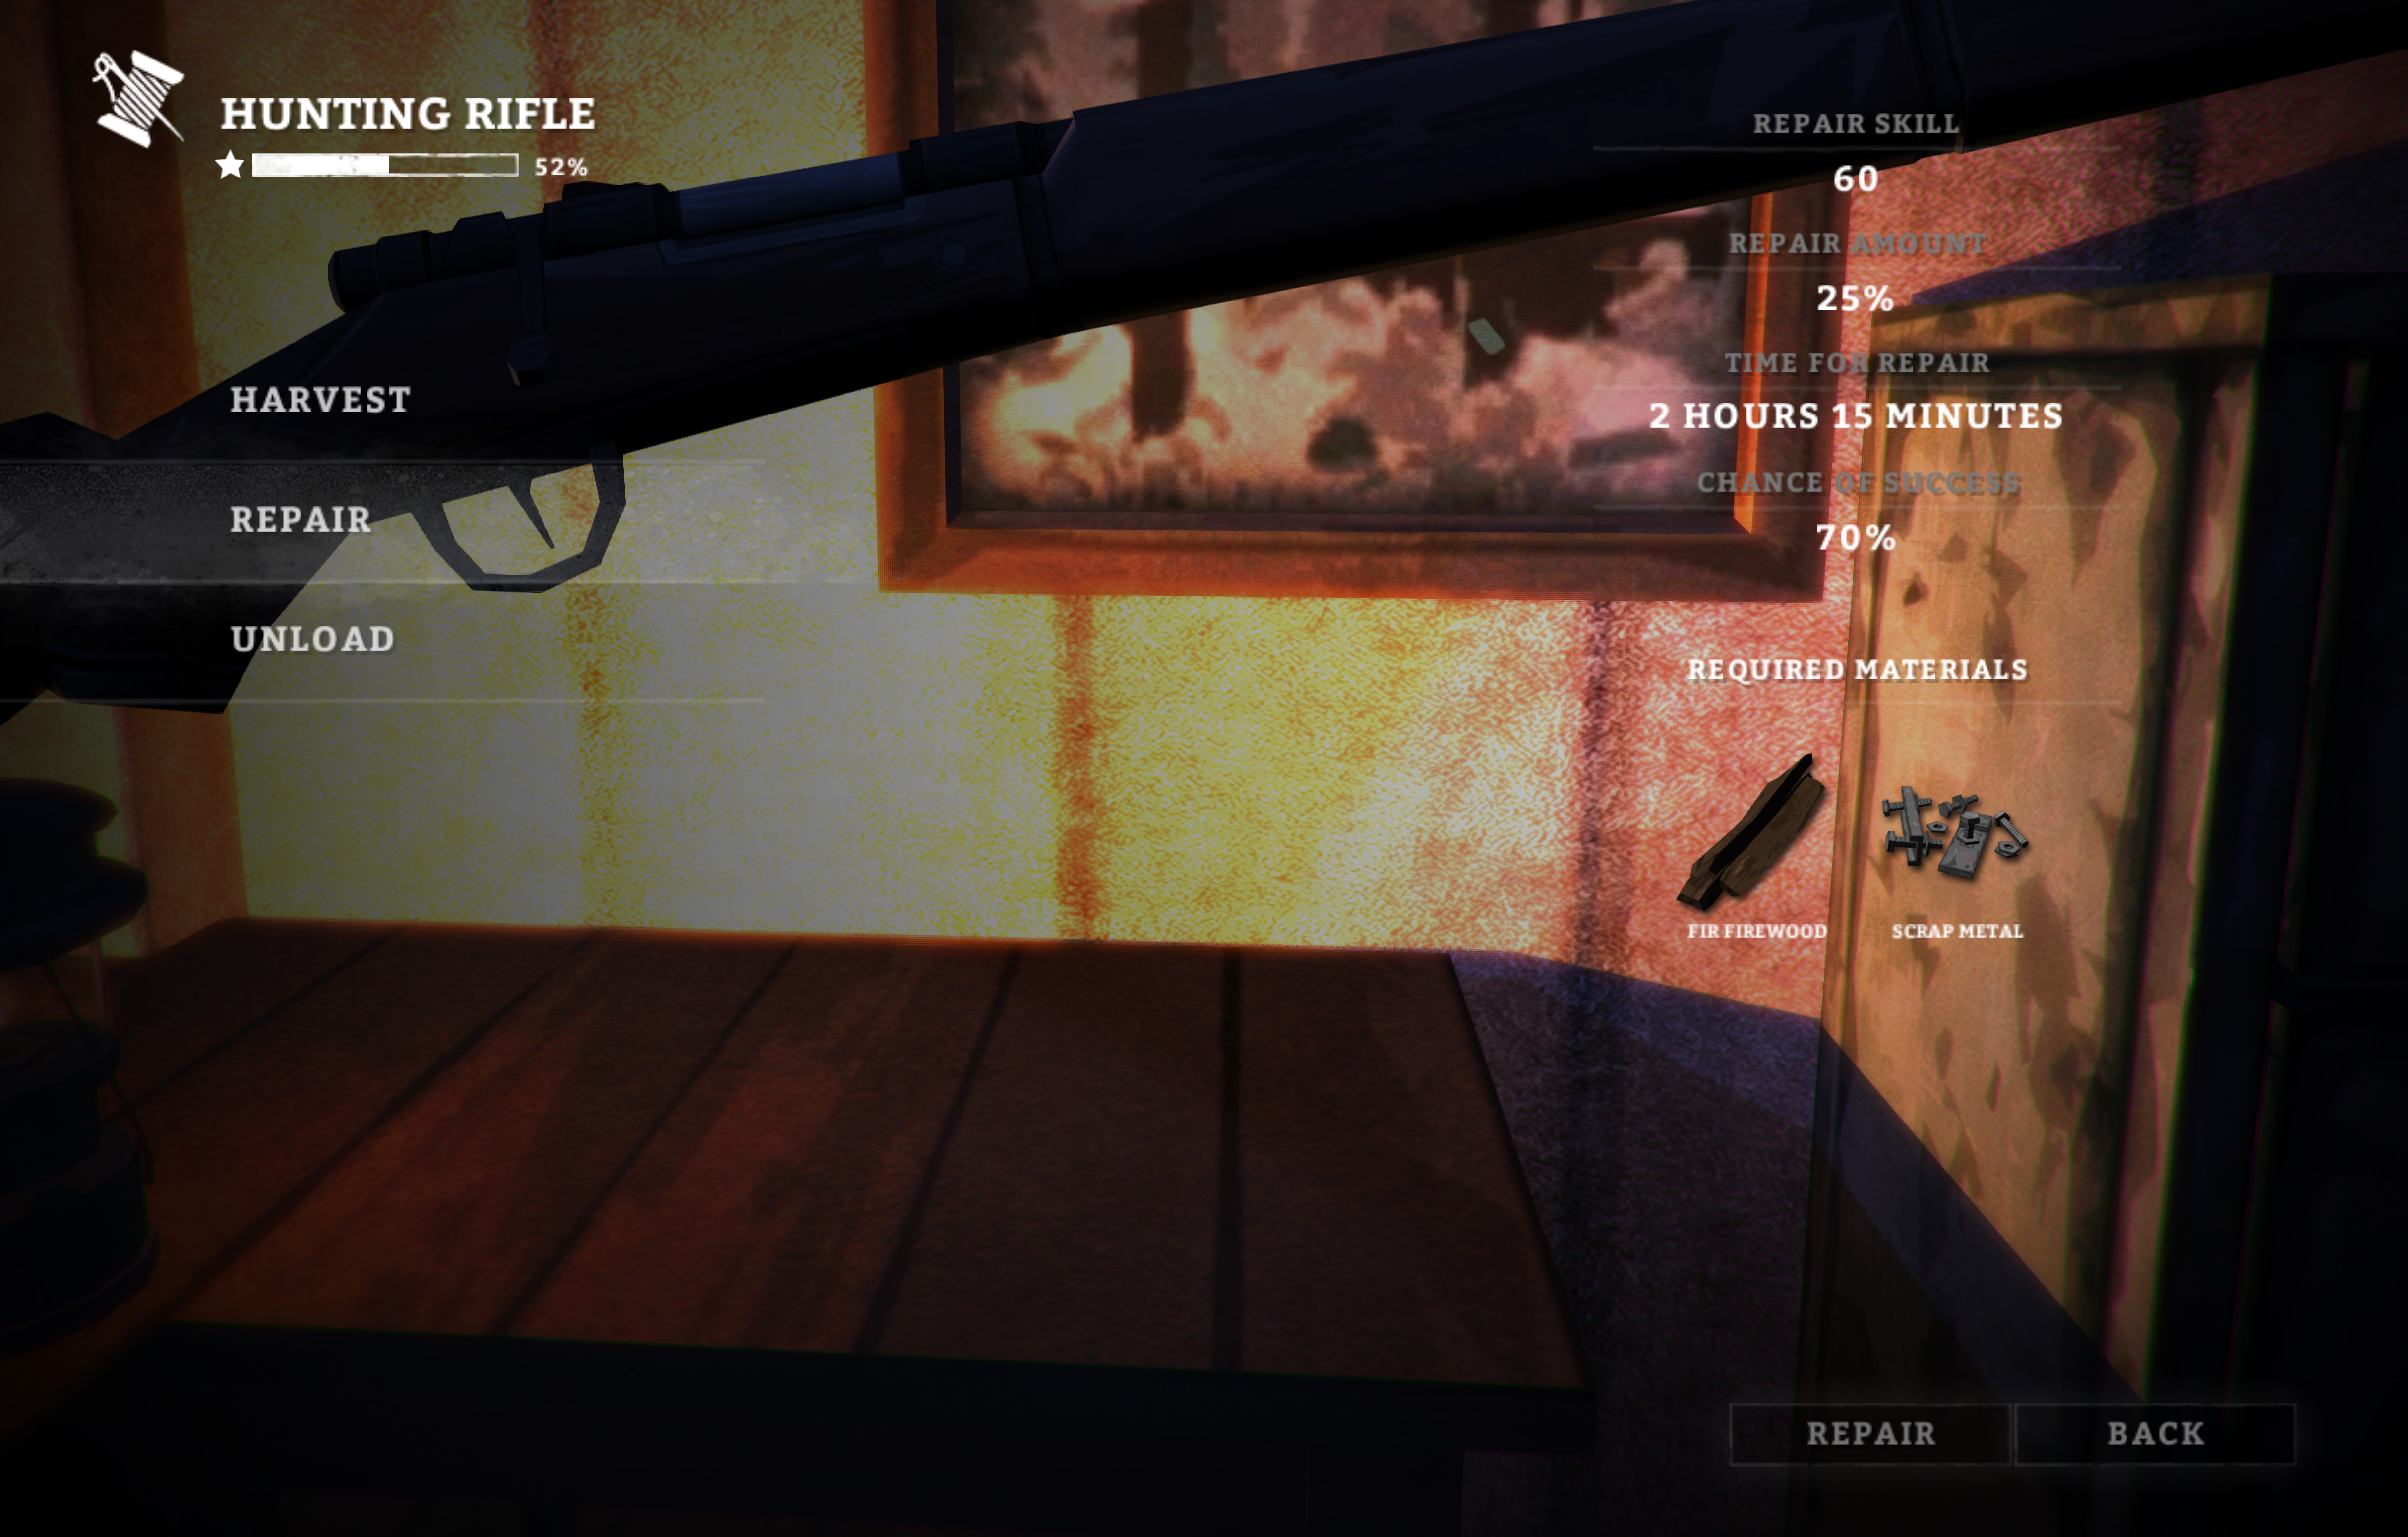
Reached by clicking the Actions under an item page in your inventory.
  • The right side shows the time, the repair amount, your repair skill, the chance of success, and the required materials.
  • Repairing can be done when you're ready near the bottom.
  • As always, the Escape key or BACK will leave the menu.
Tips, Tricks, and Helpful Advice
So if you're looking for a bit of help in the game but have the basics down, this is a good place to be. Simply put, I'm just going to spew lesser-known information out here in bulletpoints as I remember it. If you don't feel like reading through this whole hunk of notations and ramblings I call a guide, this is a good thing to peruse.

  • You can sleep in cars as of v244 by choosing the Bedroll option in the Survival Menu. This will provide no warmth bonus, but it will not decrease your Bedroll's condition and can be performed even without possessing a Bedroll (basically, you can sleep whenever in vehicles, though it's cold).
  • People knock flares, but don't waste these things. Four times out of five, these will keep a wolf at bay as long as you light AND THROW IT with a few meters distance. As of v244, however, holding a flare WILL keep a lone wolf away while you face it. Sometimes. I would just save yourself the trouble and throw the flare, unless you want to keep your corpse well-lit for your hungry pal.
  • Torches are even more effective than flares, but they work differently. As far as I know, throwing them will do you absolutely no good. Rather than throw them, brandish them with left click to scare off predators.
  • Bear Skin Bedrolls and Wolfskin Coats will not prevent attacks, but actually do help towards your attack vs scare ratio. Like I said, it may not save you, but it'll give you a better chance.
  • Things like snares or clothing items can be harvested whether broken, at 10%, or 100%, and will wield the same amount of resources. Make sure you get a good use out of the item before turning it into reusable materials. This may be changed, but as of v.199 this is still viable.
  • Simple tools (or quality, if you're luckier than I am) cannot repair themselves, but if you have two sets you can repair one with the other, allowing for "infinite" usage as long as scrap metal remains plentiful. Sewing kits are more common, but cannot be repaired or harvested and will simply break.
  • Cattails you see in frozen lakes aren't just decoration- you can harvest them for a 150 calorie snack and two pieces of tinder. Not much, but Mystery Lake alone can have enough food for four or five days.
  • Animals are not random or unpredictable, especially wolves. Every thing they do represents their behavior, and with practice you can learn whether the wolf will run off or try to eat you before it's close enough to be a threat.
  • Bears, unlike wolves, don't hate you; they just like to defend their territory. Unless you're actively hunting them, give them a moderate berth and circle around them. If you're not encroaching on their area, they won't enter yours.
Visibility and the Night
Though the daytime may be scary, the night should fill you with dread. It damn well deserves its reputation; there's a reason you rarely see any experienced players put up footage of half of the time of The Long Dark. The main reason is obvious- it's dark. However, if you do get stuck outside or are forced to move by hunger or other reasons, this is not a death sentence. The rules of the night are different than that of day, but with practice, one can master this long darkness as if it were day. Things to be aware of are as follows.

Cold: You've been warned. It will get significantly colder at night. If you are starving, you have no choice to move, but low condition will be a disadvantage. You will start freezing before you make it to shelter whether you have a flare out or not. As it so often is, the best course of action is to hustle. When it comes down to starving or making a midnight sprint, you've just got to go for it.

Wolves: Wolves are (from experience) more active at night. They will patrol around and they are most certainly hungry and take advantage of the dark. They will hear you from farther and pursue you. You are in their element and they have total control over you; this is not daytime. You cannot draw your gun from 20 meters and pop him in the head. He WILL see you before you see him. Do not bother trying to accurately place shots. You have only one advantage at night - when you see a wolf, his eyes will glow a horrifying yellow color. When you see this, light a flare, toss it, and run the other way. Always be ready for a fight; if you hear the growl sound, you may only have seconds.


Disorientation: if you're not careful, it's easy to get lost especially on expansive maps like Pleasant Valley. The darkness shields most recoginizable landmarks and if you're uncomfortable or new with the region you're in, keeping a central focus point (or just waiting out the darkness) is useful. The sky, except when weather is blocking it, stays lit enough to give you a marker to look at well enough to keep you headed in one direction. If you're wandering around in a blizzard at night, though, getting lost may not matter anymore.

Now, how do we deal with the dark? Why, we do our best to make it go away. This can be done with plenty of things, and ranging in effectivity and cost.

Flares: while it gives off light, this is a last resort- people claim these are useless against wolves, but I've only rarely had one fail me. Basically, light is not what these are for, but sound, instead. That doesn't mean, however, you can't use it if you're lost in the dark. Lasts for an hour as of v199. More on using this against wolves in the Fighting Wolves section.

The Storm Lantern: burning kerosene, this tool will do you well. Most effective in structures for finding loot, this can still hold its weight outside. It burns kerosene at a mildly rapid rate and has condition so it should be used sparingly. It will do nothing for you against wolves besides give you a clear view of what's about to eat your face.

Torches: basically, this is a more effective flare. You recieve two for two cloth, 1/5 liter of Kerosene (jerry can), and a reclaimed wood at a Workbench, making it semi-expensive. As of v.193, you can harvest both burnt-out torches to duplicate a reclaimed wood, though this isn't really gamebreaking. Lasting for an hour as of v199, you can throw with right click (don't) and brandish it to scare away animals with the left click. More on using this against wolves in the Fighting Wolves section.

Repairs and Harvesting
An important part of all your gear is condition. Certain things like packaged food cannot be "repaired", per se, but your clothes, tools, and weaponry can all be fixed up, or taken apart. Any good survivalist keeps his or her gear in ready-for-action condition.

Materials for Repairs
Cloth: the main go-to for most anything clothing based, this is a nonrenewable resource and can only be made by taking apart articles of clothing. In emergency situations, it can be harvested into bandages. If you are in desperate need, your bedroll is an effective tradeoff for 10 cloth. Transition to animal-based clothing ASAP.

Leather: the other part of clothing repairs, this is used for footwear and deer-based craftable clothing. It can be found, harvested, or looted from deer corpses. It needs to cure before use for nearly a week; see the section on curing items.

Wolf and rabbit hides: exclusively used for repairing their respective clothing items. It needs to cure before use for nearly a week; see the section on curing items.

Scrap metal: found or harvested, scrap metal is mostly for repairing your tools, like the storm lantern or hunting rifle. Can be created into handy arrowheads.

Fir firewood: used for complex repairs in conjunction with scrap metal and is necessary in the hatchet, hunting rifle, and knife. Obviously, this can be foraged.


To actually repair an item, find the one you intend to fix in your inventory. Click on it and click "Repair" under the "Actions" button to begin repairs. Each repair has a time and failure rate based on your repair skill. Repairing clothes requires sewing kits (common in medical kits) while tools need simple, or quality, tools. Repairs will return a certain percentage of condition to the item if successful- not always the full amount. Harvesting works similarly. To take apart an item for materials, click the button next to repair. Items at 0% and 100% will return equal resources so get a full use out of an item if possible. Keep in mind this cannot be undone, so so this only with extra gear or in emergencies (ie, no bandages and you're bleeding out). These two skills will play a major role in your game from day 2 to 200.
Fires 101 (OLD)
How to actually do all of this can be found in the Doing Things section above.

It's a cold world out there- you're going to need a fire. Fires can be started at placeable campfires and stoves. First off, fuel type; there are five. Reclaimed wood burns 30 minutes and is not easy to light. Foragable in buildings. Cedar firewood (softwood) lights well but burns for one hour. Fir firewood (hardwood) burns an hour and a half but is moderately tricky to light. Both hardwood and softwood are foragable outdoors. Firelogs burn for two hours but is unforagable and weighs in at 2kg, making it less than ideal if you're traveling. Books, found in homes, burn 18 minutes and take awhile to start, but have a very high lighting chance. Now you and the wolves can destroy sources of knowledge!

You will also need tinder (foragable) and a fire source. Harvesting Newspapers and Newspaper rolls will also give Tinder Plugs, multiplying your supply. Matches are common, but not as reliable as firestrikers or a magnifying glass. Accelerant or kerosene will increase your chances of success. Once lit, you can add more wood, cook food, melt snow, boil water, and warm up. Firestrikers are condition-based but last a lot longer than matches, while the magnifying glass can only be used in direct sunlight.
Shelter
Picking your shelter will be an essential part to your survival. If you're holing up somewhere, make sure you've got a good base of operations. If you'll be passing through, make sure you've got something warm enough to get you through the night. The way I see it, there's five shelters ranging from really bad to pleasant. Depending on what's available, you've got to make the best of whatever you can get.

Hollow tree: boy, if you're spending a night in one of these, Pleasant Valley kicked you real hard in the teeth. It's going to get real cold in there so get a fire going as close to you as you can lest the wind blow it out. Honestly, night or not, it may be a better call to follow the rockwall nearby; a cave with significantly increase your chances of survival.

Broken/burned building: well... at least you've got more space than that tree. Get a fire going and huddle into a corner away from the wind and pray that a wolf doesn't come for a midnight snack.

Outdoor shelter: things like fishing huts or green barn-sheds. It'll probably keep you alive. Campfire going all night, though, and get out of any potential wind.

Caves: these are actually better than houses sometimes. Found along outer walls of each section of the map. They're in Pleasant Valley for sure, and less commonly found in Mystery Lake. If you get a fire going up in here, it'll be really toasty, but if you're bedrolling up with your clothes on, you probably won't even need a fire. Of course, better safe than sorry, plus it really sets the mood. Careful, though, as bears tend to spawn right around caves. Or in caves. On you. When you're asleep. Fires are nice.

Walk-in homes: the "ultimate" shelter, though these can actually get really cold, especially if they don't have a stove. These all promise safety from wolves and bears, however (except for the dam. Don't sleep in the dam unless you're doing it after eating some wolf steak). If you can find one, these or caves are your ideal destination.

Rope Climbing (INC)
Curing - What and How
So you've got everything you need to make that Wolfskin coat! This is going to be awesome! ...but no, it won't be, not yet, because you need to cure your materials. Many animal products and natural resources need to be cured before they can be used for upwards of two weeks.

What needs to be cured:
  • Animal Gut - 5 days to cure
  • Deer hide - 5 days to cure
  • Wolf hide - 7 days to cure
  • Bear hide - 12 days to cure
  • Rabbit hide - 3 days to cure
  • Maple saplings - 6 days to cure
  • Birch saplings - 4 days to cure

Curing things is actually really simple. Just throw it down on the floor inside a building. And wait. Yeah, that's about it.
Gear You're Going to Want
Alright, so now we're stuck in the Canadian wilderness. We don't have enough gear, so let's go steal some for ourselves! Not like anyone else might want to survive using their own gear they legitimately obtained! But besides that, what do we want? And by want, I mean, this is what you really, really want if you're trying to survive.

Hunting Rifle: your multi-purpose self-defense hunting tool! Designed to accurately kill anything you might want to point it at, ammo comes limited, making this a sparingly-used tool. Condition can also become a problem, but as long as you use this smart you'll do fine. I'd keep it with you, but it weighs 4kg (8.8lb), which is a significant chunk of your maximum carry. See the section on this tool for locations and such.

Hunting Knife: trust your life to this tool. Keep it maintained, keep it shiny, keep it on you. When it comes to a bare-bones power struggle between a wolf and you, this can give you the advantage to win a fight. I've survived on 4% before (damned Log Sort - don't ever go there unless you're really desperate, more in the Coastal Highway section) after killing the wolf attacking me. Besides defending yourself, however, this is useful for making coats and harvesting carcasses; a necessity on day 25+.

Hatchet: a simple hatchet, easy to find and easy to use. Handy for harvesting carcasses as well as cutting wood and saplings; once again, a necessity on day 60+. It's pretty easy to maintain and is well worth carrying around for 1kg. If you have to, leave it on the floor in your base and use it to cut wood harvesting times down by 40%.

Bedroll: now that these have condition (as of v.192), and due to the scarce civilization in Pleasant Valley, this can become your best friend. Extra bedrolls can replace your current one as they're rather common; each spare roll can be taken apart for 10 cloth, which is always absolutely useful. Basically, don't keep it with you unless you're making a long journey, but make sure to stash one somewhere. The Bearskin bedroll is very nice, but I wouldn't go out of your way to make one unless you've already actively hunted a bear.

The Survival Bow: once crafted, you get about 50 shots, and it cannot be repaired, but it is much more cost effective than a rifle with reusable, craftable ammunition. If you can master this bow, you'll add a couple hundred days to your survival time. If you see saplings around, gather them all up, especially maple - there's no reason not to fill your house with bows.

Animal Clothing: technically not a "looted" item, but all four articles of clothing provide a very high warmth bonus. If you're living somewhere, prioritize this - at least it will stave boredom. Keep in mind, however, these are really heavy. They're useful as hell, but keep an eye on your encumberment.

The Storm Lantern: very useful when looting or at night; something you'll really want the first 25 days, but after that it becomes less helpful and can be made into scrap metal when you really need it.

Things that are too heavy or too ineffective to bother keeping: by day 30, can openers are nearly useless- harvest them for metal. The same goes for things like prybars and jerry cans which are only useful scrap metal after day 20 or so.
Things That Will Kill You (OLD)
So what are you really up against? There are plenty of things that can kill you, but only one will get you eventually. When your condition hits 0%, that's it. Knowing your enemy is your first step to outmaneuvering its attacks against you close to indefinitely.

Exposure: lethal the first five days, this will consistently tear at your clothing and increase your cold bar. With proper looting and crafting, good clothes will slow or negate this effect minus the worst of blizzards.

Wolves: the staple threat of any wilderness survival game, wolves are dangerous only to the unprepared. Any properly informed survivor can use wolves to their advantage in hunting and eating. To deal with them, read the next section.

Bears: that's right, bud, it's bears. They'll take more than one bullet and will really eat your face quickly. However, this is balanced by the fact that they're semi-docile; they defend their territory, give you ample time to back off if you watch its behavior, and will only actually attack you if you're harassing it or trying to make it into a bedroll. Once they jump you, however, there's no fight- you'll regain consciousness with bleeding and infection debuffs and very low condition, nearly a death sentence. Interestingly enough, on Voyageur (and maybe Stalker) bears cannot actually directly kill you unless you are already seriously hurt.

Hunger: The longer you survive, the more this will strive to kill you. Eventually, you'll be constantly combatting this with snares, arrows, and gunfire. See "Dealing with Stats".

Dehydration: Though scary, it's unlikely this will be the cause of your demise after day three. If you can reliably start a fire, this will be little more than an annoyance to you. See "Dealing with Stats".

Exhaustion: Rather than sleep on the floor, you'll just slowly die when exhausted. Unless you lost your bedroll, this shouldn't ever kill you; and really, it still shouldn't kill you. In emergency situations, drink a whole lot of coffee and tea. You may go into sugarshock, but you won't die standing up, exhausted. See "Dealing with Stats".

Blood Loss: Currently obtained only from wolf and bear attacks, as far as I know this will last until it kills you, but I've never stayed bleeding after it dropped me 20% (will research this if I get time). It can be resolved with a bandage (bandages can be made by harvesting cloth).

Food Poisoning: Caused by packaged food at low condition (around ~30%), raw meat, and cooked meat (small chance). This will eventually heal away, but it'll leave a big dent in your condition. It can be healed with ten hours of sleep and antibiotics- an expensive waste of time. There's really no reason to be scared of this, however; I've never ever gotten food poisoning from canned goods, and the only time I actually obtained this was by accidentally eating raw meat (it looks too similar to cooked meat).

Things that may bring about death: though not the direct cause of death, falling through ice on the Coastal Highway will soak your clothes (they need to be heated at a fire) and inflict the Freezing effect as well as drop you down 10% condition. If unprepared, you might as well wait to freeze; death is not far away. Blizzards, similarly, will get you lost easily and tear your clothes apart, leaving you stark naked in the snow.
Things to Kill Other Things With
Now it's time to turn the table on those damned wolves, and there's no harm hunting your dinner on the way. If you're going out for vengeance, do it on a full stomach.

Prybar: the most basic of weapons is a kilogram of painted steel. Useful only for opening the rare locked containers, this may get you an extra can of food and a toque per region. Equipped during a wolf struggle, it grants +10% damage. It's not much, but I'm fairly certain any wolf will be more likely to run away if you're beating the ♥♥♥♥ out of it with a crowbar.

Hatchet: now we're talking blades. Handy for harvesting wood or carcasses, this is a tool to hang on to. With +25% damage, this isn't messing around anymore.

Hunting Knife: the god of the Canadian wilderness. No self-respecting survivor would be caught dead without one of these. Clocking in at +50% damage, this has saved my life countless times when the .303 rifle has failed. I do not leave home without it.

Snare: while not a weapon, this will consistently bring you food. Set an armful of these down where you see rabbits and come back a day later. Harvest any broken snares and remake them at a work table with some gut.

The .303 hunting rifle: now we've reached the one area humans surpass wolves: technology. Firing a high caliber bullet, this will mortally wound or instantly kill anything it hits. The gunshot will scare off most all wildlife nearby, but remain wary. Do not assume you are safe when you are carrying a rifle. The reality is, you are never safe. Making this mistake will cost you your life.

The almighty lord Survival Bow: basically, you get 50 high-damage arrow launches from a new survival bow. Its ammo is cheap, deadly, and reusable. If you're really a fan of not starving, this is going to be essential when your ammunition count dwindles from your rifle. I recommend gathering every sapling you see - why not, they weigh very little.
Rifle Locations and Proper Usage (OLD)
So you're looking for a gun, then. Well, you'll obviously need ammunition, but let's start with the firing tool. Keep in mind there may be locations missing- if so, the comments exist.

Mystery Lake spawns
  • On the trail by a corpse behind the camp office
  • Behind the Lone Lake cabin by a corpse
  • On a shelf in the Trapper's Homestead
  • In the Forestry Lookout
  • (?) In hunting blinds by Clearcut and Alan's Cave
  • In the Derailed Train Car by a corpse
  • On a walkway in the main section of Carter Hydro Dam
  • Under the bridge near Carter Hydro Dam

Coastal Highway spawns
  • In the Abandoned Lookout
  • By a corpse on the Misanthrope's island
  • (?) By a corpse near the waterfront cottages
  • Occasionally in homes at the Coastal Townsite
  • In a car at the end of the road on Coastal Highway (by the waterfront cottages)
  • In Fishing Huts (the one by Jackrabbit Island for sure)

Pleasant Valley spawns
  • In the Homestead office, leaning on the left cupboard
  • In the Homestead master bedroom, under the bed
  • In the Radio Tower shed by the tower.

Cross Map spawns
  • (?) In the trunks of cars

Now, bullets. These are more hidden than any other item and are rather small. Loose rounds can be found lying in homes, within backpacks, on corpses, in fishing huts, and occasionally in safes. Boxes of five are common in hunting blinds, safes, and plentiful in Carter Hydro (beware of dog signs as well). I usually find 25 through Mystery Lake and 20 in Coastal Highway. Use ammo sparingly.

As far as proper usage goes, keep your gun well maintained. Higher ccondition means higher accuracy. Aim for the head if you can. Do not aim where the middle bar is, but above and between the two outer bars. Use the white dot as reference for HORIZONTAL position. Vertically, the white dot is inaccurate. Pick your shots well.
An Archer's Guide (OLD)
Well, let's be honest, you're not going to be able to manufacture .303 rounds out in the Canadian wilderness, and eventually conventional ammunition is going to get scarce. When that happens, it's time to get creative and start working on a bow. First off, let's look at some differences it has from the hunting rifle. ( - ) are downsides, ( + ) are your benefits.

Pros
  • fires arrows rather than bullets
  • much more reliably obtained (with the rifle, you rely on finding one; at least you know exactly how to obtain a bow)
  • arrows can be reused and maintained
  • ammo is craftable
  • doesn't scare away passive animals
Cons
  • takes longer to aim, draw back, and fire
  • projectiles are significantly less accurate with significantly more drop over range
  • cannot be repaired
  • harder to obtain compared to the rifle
  • doesn't scare away aggressive animals
The bow is not by any means a direct upgrade to the rifle, but its longevity greatly surpasses the rifle despite it breaking so easily. If you intend to make a long survival attempt, you almost certainly will end up relying on your bow. Therefore, this section gives you a full run-down on obtaining and operating your new best friend.

Obtaining a bow and arrows

Unlike rifles, bows are much harder to find - you'll likely have to create one. The bow itself is surprisingly simple to make, requiring only two gut harvested from any carcass and a cured maple sapling. Gut is easy to find, but saplings can be harder to locate. Saplings will always be below or near their respective trees (basically anything without leaves). The locations are randomized each game, but they're usually along common pathways. Keep in mind, though, you cannot harvest saplings without a hatchet. Once you have the materials, you'll need to cure them (see the section on curing items). Crafting can be done at a workbench. It takes 5 hours with the required tool, a hunting knife.

Ammunition, surprisingly, is a lot trickier. You'll need scrap metal, feathers, and birch saplings to create arrows. Scrap metal is easy to come around with, and will create two arrowheads. Feathers can be found near corpses, under said crows that circle them. They're pretty common, but three are needed per arrow. Once again, birch saplings are the hardest part. Once you do cure some birch, each one will create three arrow shafts. All of these and the arrows themselves are craftable at a workbench, requiring various tools.

Using the bow takes time and practice. If you can afford it, take a few practice shots. Make sure to land the arrows in snow - depending on what they hit, arrows will lose a certain amount of condition.
An Unlikely Weapon, the Distress Pistol (INC)
A Brief Explanation About Decoys
When you're playing The Long Dark, you won't always have a gun, ready to go. Your bow takes time to draw, or maybe you left it back in the Camp Office. You're not always going to have a weapon. Hey, maybe you're even out of flares, or wasted them checking those lakeside cabins. Or maybe you just want to save your bullets for that buck that trots by every morning at 6. Basically, this section explains your fall-back, your safeguard, your steak-or-be-steak option.

Really, wolves and bears aren't interested in killing you. They're just hungry. The decoy system is something rarely ever used, yet it's incredibly useful. Maybe this didn't need it's own section, but basically, pressing "4" by default will drop your most enticing article of food. Unless that wolf is reeeaaal close to you, it's going to pick the food that's not running away from it. This section is only here to remind people that this exists. When you're running around at 20% in fog, you're not going to line up a shot very well. Better to give up your dinner than be something else's.
Dealing with Wolves
One of the big three eliminators in the Long Dark, these things are dangerous- but predictable. There are three levels to avoiding death by wolf- monitoring, deterring, and attacking. Wolves are the most advanced AI in the game, but remain very predictable, with eight "behaviors".

Patrolling: at a slow pace, this is the walking behavior. The wolf will move from node to node until it finds a point of interest.

Hunting: when a wolf detects a deer or rabbit while patrolling, it will break into an incredibly fast sprint after it, usually getting its target unless said target goes up an 80 degree hill.

Eating: after a decoy has been dropped or it has caught some prey, it will begin to eat it temporarily, time varying on size. While in "Eating" wolves have a seriously reduced, but not negligible, detection range. If you're dumb enough to get close enough to it, it'll jump on you. Don't give it the chance.

Interested: When a wolf sees or smells you while on a patrol, it will pursue you at a moderate speed. When in detection range, it will enter either fleeing or stalking behaviors. This chance depends on difficulty, whether or not you have a flare or torch lit, whether you're wearing a wolfskin coat or not, whether you're in a bearskin bedroll, and whether or not you're bleeding.

Fleeing: on random chance, a wolf may sprint off similarly to deer when they detect you.

Stalking: a stalking wolf is following behind you and will make growling noises. This means you don't have long.

Attacking: once a wolf actually gets a top you, a struggle will begin. Explained lower down in this section.

So, if a wolf is nearby, attempt to avoid it or sneak by- unnecessary confrontation can mean death. If you hear growling noises, you've failed, and it's time to move to Stage 2. If you hear a yipping noise, said wolf is running off anyway.

If a wolf growls, check your surroundings quickly. If you're headed downhill or on a road, you *should* be able to outrun them if unencumbered and sprinting. If not, turn around. Without time to make a campfire, you have limited options. If you have a flare, light it and toss it quickly, and bail way out the other direction. If you've got time to light a torch, do so, and do not throw it, but left click at him to hopefully keep him at bay. If you're without either, if you can accurately get a shot off in time, do, but don't waste a bullet on a fast-moving target too close to you.

If everything else fails and that wolf is real hungry, get ready for a fight. You will automatically equip your best CQC weapon (See: Things to Kill Other Things With). A wolf will do initial damage before you even get a chance to fight back (12-20%), so 100% condition is obviously ideal. To charge an attack, left click, and to hit, click right. The screen top will show the Wolf's health, with your condition and your attack power in the bottom. It may not save you, but giving a wolf a few wounds with a knife is your best bet.

As of v.215, Wolf AI has been updated. Running WILL make a wolf more aggressive if one is actively chasing or stalking you. Standing still will cause the wolf to approach much more slowly- if you start to panic and run, you're in trouble. Remain calm and you'll have more time to get a shot off safely.
Dealing with Bears
Bears, though similar to wolves, function on very different AI. The biggest difference- they're much less aggressive. Besides being very uncommon, they're located mostly in Pleasant Valley and rarely in Mystery Lake and Coastal Highway. However, if one does find an interest in you, follow a similar procedure to dealing with wolves. First off, evaluate your surroundings. Are you going to outrun a bear? Probably not, but what you're not going to do is kill one while it's charging at you, and you're not going to kill it during a struggle. Here are your options.

Outrun: sadly, this is likely your best option. Bears will haul at you, but not usually faster than wolves. It's a risk as your back is turned towards your opponent, but it's worth taking. Take the path of least resistance- downhill, with the wind, and on roads to maximize your chances of getting away. Ideally, get inside a structure, obviously.

Shoot to kill: this depends on how much distance you have. It'll take at least two headshots to bring down a bear, which is costly and unlikely at best. It's not the best option, but it's possible. If you can manage a shot to the heart, it will drop instantly.

Struggle combat: this isn't actually an "option", but I need to bring it up. The biggest difference between wolves and bears is that bears are freakin' huge. If one does get on top of you, there's no fighting it. You're pinned hard, and will wake up after the fight with 5-20% condition, which can basically spell death.

As far as hunting bears goes, the rifle or bow are clearly the only options. Maximize your distance without becoming too inaccurate and have a sprint escape planned. Honestly, they're a pain in the neck to kill and expensive, so do it only sparingly when looking for a bedroll or while posessing a surplus of ammo.

My recommendation, though: if you're a crack shot, go for it. One bullet to the heart will net you enough meat to feed you for weeks.
Ideal Hunting Grounds (OLD)
Right. I'm just going to list off some ideal (based on safety and potential) hunting places per animal per map. In case you didn't know where to be looking. These are the number one (and maybe two) spots for each animal, in my opinion, factoring in attack likelihood, nearness to shelter, and population density.

Deer
Mystery Lake - The rarely traveled pathway north of the Deadfall, nearer to the Camp Office. Coordinates are 780, 820. Refer to map in Mystery Lake section.
Coastal Highway - Along the entire ocean, but particularly on the ice just in front of the Coastal Townsite. Very close to town buildings, but wolves do patrol by.
Pleasant Valley - the grove nearby the Pleasant Valley homestead as well as the fields nearby. Coordinates are about 1000, 1000. Shelter is a bit of a walk.
Desolation Point - near the entrance to Mine No. 3 near the very edge of the region by the coast.

Rabbits
Mystery Lake - Nearby Trapper's Homestead. Coordinates are about 150, 310.
Coastal Highway - At the Rabbit Grove. Shelter close by. Refer to map in Coastal Highway section.
Pleasant Valley - pretty much anywhere between Pleasant Valley outbuildings and the surrounding woods. Watch for wolves.
Desolation Point - near the entrance to Mine No. 3 and around the stone church by the coast.

Wolves
Mystery Lake - Derailment site. Be wary, there are very often more than one wolf nearby.
Coastal Highway - Log sort. Be very, very wary. There are almost always multiple wolves here. Approach by sea.
Pleasant Valley - The central fields offer clear vision and nearby shelter. You'll find wolves everywhere in this region, but visibilty is good.
Desolation Point - between Hibernia Processing and the broken bridge has a high population of wolves.

Bears
Mystery Lake - Right near Trapper's Homestead.
Coastal Highway - Coastal Town Site. Watch for wolves.
Pleasant Valley - the Birch forest near the destroyed cabins. Bears are very common here. Close to good shelter.
Desolation Point - the cave right near the broken bridge nearly always has a bear.
Tracking
If you manage to hit an animal, possibly excluding bears, with a .303 or arrow without killing it, it will most likely run off (reasonably). It'll very likely bleed out, but it's also going to haul ass. It'll leave behind a small or large trail of blood on the snow depending on how serious the injury is. The blood trail persists until snowfall or heavy wind as of v244. Following said trail will lead you to the corpse, but it is known to disappear through a glitch if next to a rock face or at a >75° slope. Also handy for finding corpses, within a day or two of death any kill lost through poor weather should be locatable, though in low condition. Deer corpses may also indicate high wolf density in an area especially if it isn't a set spawn. Bunny corpses always indicate a wolf population.

Though not tracking, bunnies will make a shuffling sound when near. Deer will make a heavy clop sound, while wolves will make a loud patter easily mistakable as a deer. Wolves leave footprints, but fade way too quickly to be anything other than an indicator that you should look behind you. Your own footsteps will remain longer than blood trails in weather and are handy for reverse navigation.
The Weather (OLD)
Ah, if there's one thing beautiful in a game that looks like a moving painting, it's the weather. However, this is also one of the most lethal things this game offers. The entire weather system is dynamic, and will vary in difficulty and length by the game difficulty. Time of day effects the air temperature, but weather and wind will decrease the temperature and increase the windchill.

Clear weather will provide the least amount of a cold factor, and will have little to no windchill effects. This is the ideal time to move around and harvest carcasses, and will give you plenty of time to work, especially between the warmer hours of 10AM and 5PM.

Wind, while not bad alone, will increase the windchill, and unless you are hugging a surface from the direction of the wind's origin, it will increase the Feels Like and windchill. Windchill bonus from clothes will work to negate this, but heavier winds will ignore such futile efforts. Like all weather, wind is dynamic, so it will spin and change direction, and standing with something between you and the location of the wind WILL work to keep you warmer- not significantly, but it can be the difference between a fire keeping you above freezing or below.

Fog will set on seriously fast with a comedic sky change and can seriously inhibit vision. If you don't have a good sense of direction, moving in fog is unwise- it is easy to get lost, and getting lost in The Long Dark is never a good idea.

Snowfall does little more than drop the air temperature and look pretty. Hey, it really is beautiful, though.

Blizzards will combine fog, wind, and snowfall into a hellish storm that will tear apart your clothing at a significantly higher rate. You will be below freezing in this weather no matter what clothes you're wearing, and without shelter this can mean your demise. The last thing any traveler wants to see is the sudden grey color of the sky while trekking along a treacherous route.
Cutting your Losses
Why does this need to be a section? It really doesn't need to be.

Your life is more important than the food you have with you, or the deer carcass in the blizzard. There'll be more deer. You'll get more food. You won't survive harvesting a carcass in a blizzard or being chased down by a wolf on low condition.
Mystery Lake
A perfect blend of forest and civilization, this map is absolutely beautiful. Most locations are safe, and it almost resembles a vacation destination.

Notable spots:

The derailment. Please heed my warning- do not go here. The loot is moderate, but the danger is overboard. At the center of the map, wolves are constantly swarming and will trap you in a train car. Any attempts to loot this site may leave you like the frozen corpses laying nearby, if the bodies littered everywhere wasn't enough of a warning.

The Trapper's Homestead. With easy access to all types of wildlife, this is a great place to hole up for months at a time. Easily the best hunting and survival site in Mystery Lake. However, it is not without danger- wolfs patrol nearby and can hide behind the rocks on the pathway up to the house. I make this a big point because this has ended my run once after I was left in a blizzard with 10%.

Carter Hydro Dam. While holding solid loot, this dam contains something else. The wolf Fluffy resides in here, and will aggressively attack you until one of you dies. As soon as you enter, light a flare, toss it, and wait with the rifle drawn. Be prepared for a fight. Also, keep in mind that there is no bed in here; bring your bedroll or have a lot of coffee with you (once again, I write from experience.)

The Camp Office. A central location with two stoves and moderate loot, it's very likely you'll stop here at some point. It's a very nice safehouse and will service you well for your trips between Trapper's and the Dam.

Lone Lake Cabin. Though not much, it's shelter, and is rather isolated. Though quite rare (I've found it maybe twice in about twenty runs), a corpse may spawn behind the structure with a rifle. Since I usually loot these for the food in the first two days, finding a rifle here is a pleasant surprise.

Clearcut. Simply a flat, well forested area, wolves and deer like to populate this area. Houses one or two bunker locations and a hunting stand.

The Logging Camp. Nothing special, but is a good spawnpoint, nearly always holding a hatchet and/or prybar as well as a storm lantern. It'll bring you an extra day of packaged food.

Unnamed Lake and Cabin. You'll rarely ever end up here, but if you do, hey, it's shelter and there's some good hunting grounds. Watch for wolves.

The Bunker. I've never personally found this, but it will always spawn in a random location (9 or 10 spots) in Mystery Lake. It will typically hold a rifle (most likely, but you'll almost certainly have one by then anyway) and plenty of food/water as well as bullets, but it's quite a pain reaching.
Coastal Highway
As close to civilization as you'll get, this map is less friendly that Mystery Lake and lacks the "feel" of the first region, but it's still moderately sized and full of interesting places.

Notable spots:

The log sort. I'm starting here for a reason- this place is an absolute deathtrap. Like, seriously, please, don't bother coming here. You get one house, a trailer, and an outdoor workbench. There will ALWAYS be 3-5 wolves here. They flock here like birds. Unless you are on Pilgrim, get off the road when approaching and walk around on the sea; it'll save you a lot of trouble.

Quinoset Gas Station. Located in the townsite, this place has a lot of food and tools, as well as anywhere up to 15 sodas. If you can get here safely, it makes for a nice restocking zone and a central location.

Train Unloading. Probably the first place you'll go if you come from Mystery Lake. It's neat, with a common hatchet spawn and a trailer.

Abandoned Lookout. Up near Pleasant Valley, think Forestry Lookout absolutely pillaged. Search through the debris carefully as boxes of ammo and hunting knifes are commonly hidden under chairs or by the cupboard.

Misanthrope's Homestead. On the left of the two islands, has a stove and some loot as well as a rifle spawn on the island (covered in the rifle section).

Jackrabbit Island. Similar to the above without a stove. High rabbit population.

Waterfront Cottages. On the far left of the highway are three homes with fairly plentiful loot. One has a stove, one is usually burned down. Rabbits and wolves tend to pass by.

Bear Creek Campground. It's out of the way, but cool. Lots of rabbits and herbs, with a small cabin nearby.
Pleasant Valley
About twice the size of the first two regions, this map is expansive. It's easy to get lost and civilization is sparse and far between. If you're up for a challenge or want to go full-out mountain man, this is where you should be.

Notable Spots:

The Homestead. On the frozen field, this is marked by a grain silo. It's a very large home with a cellar and has some good supplies.

The Barn. On the frozen field, this is cold but is well equipped with tools. Nearby rabbits and deer.

Heartbreak Bridge. A brownish iron-wrought bridge, this is near some homes worth looting on either side.

Contemplation Bridge. Well, it looks cool. Nothing to do here, though. If you're here, you're near the barn.

Misty Falls Picnic Area. Far off the traveled path nearby one of the two brown bridges. It's beautiful with some loose food, usually an MRE, a waterfall, and a cave. It's cool. Nearby rabbit spawns. Hunter's Blind nearby up the hill on the side by the cave.

Pensive Pond. Picnic spot nearby. Some loose loot. It's close to the Cave entrance towards Mystery Lake.

Signal Hill. Some nice loot. Nearby Pensive pond and the Cave.

The Second Bunker: I've never personally seen this, but there's somewhere between 8 and 10 spots for another bunker chilling in the hills of Pleasant Valley. If you find it, congratulations, but don't go looking for it on a region like Pleasant Valley lest you become an icicle lost in the wilderness.
Desolation Point (INC)
Timberwolf Mountain (INC)
Intermediate Zones (OLD)
With v215 the Long Dark got a large improvement towards transition zones. These are spaces between large regions like Mystery Lake. This section will go through the now rather expansive zones that are currently in the game.


The Ravine: The latest version of this zone is actually a very viable place to live. Mystery Lake's half is well stocked with plants and all sorts of animals (I've never seen a wolf here, but that doesn't mean they're not there) and a few caves. They're a crashed train nearby with a little bit of loot. The Coastal Highway half now features the same old bridge and a little bit of open space. The divide is crossed by a felled log and later a very large rail bridge. Saplings are common all around.

Mine No. ?: If you couldn't already call this game a horror game, this sells it. A dark, twisty mine full of ambient noises. There's no potential to live here, especially with the incessant darkness, but there's some loose loot and a lot of lantern fuel. They're no creatures in here, but travel by quickly- if your light dies, so will you.

Carter River: First off, there ARE wolves here. Rabbits are also common. There's a lot of loose loot by the dam, and saplings are sprawled around. Small caves with loot lie along pathways. It's a rather linear, semidangerous area - it looks pretty, though, and allows access to the underside of the Carter Hydro Dam, which holds some moderate loot. It connects Mystery Lake and the Cave zone.

The Cave: Filled with loose firewood and other small goodies, there's nothing living here, but it's dark and eerie. It very often has a bedroll in the largest room and connects Carter River and Plesant Valley. Not a very good place to hole up, but it's safe. Moderately.

Crumbling Highway:

Mine No. 3:
Medical Afflictions (OLD)
One of the six main sections of the Survival Menu, First Aid is all about taking care of your injuries. Afflictions are the results of struggle events and certain consumables. With proper medical supplies, they aren't a serious issue, but when gear starts running scarce, this could be what brings you down.

Sprained Ankle: From taking a fall of about 1.5m or higher, the sprained ankle deals condition damage when first inflicted and applies the Sprained Ankle debuff, which slows movement and adds a limp screen effect. This is easily healed, with either four hours of sleep or two painkillers (very common- you'll almost certainly find a bottle upstairs in the camp office).

Dysentery:

Blood Loss: Automatically inflicted by a struggle event, this will continue to harm you until you've bandaged yourself. Bandages can be crafted by harvesting cloth.

Food Poisoning: Uncommon, but can throw a serious wrench in your plans. Acquired from unclean water, low condition food, raw meat, or rarely from cooked meats, this required antibiotics and ten hours of sleep. It will continue to drop your condition until it heals (unlikely), you die, or you've healed yourself.

Though not a medical affliction, to use Water Purification Tablets, find them in your inventory under First Aid and click Use. It will clean one litre of water. This can also be done through the fire menu (I don't know why it's there, but it's an option).
Remedies and Harvestable Plants
Eventually, you'll run out of produced medications- antibiotics, painkillers, antiseptic. Basically, this is your guide to plant life and emergency first aid. First off, keep in mind you can produce two bandages by harvesting cloth- an irreversible and expensive trade, but there aren't any alternatives. It's your pants or your life.

Plants you can find are as follows. Cat Tails are located on pretty much any frozen lake, and will give you some tinder and some 150 (as of v.201) cal. food, which seems insignificant, but you can get around 4500 cal. from Mystery Lake alone. Reishi mushrooms are found on tree stumps and can be brewed into tea, as with rose hips, which are found on dying bushes. Finally, Old Man's Beard Lichen are found on dead trees and looks like green moss. It can be made into antiseptic bandages.

Rieshi and rose teas will both provide warmth bonuses and can be made at a fire as long as you have some water. Reishi Tea will work as an alternative to antibiotics, while Rose Tea behaves like painkillers. Bandages can be crafted with lichen at workbenches to make antiseptic bandages, negating antiseptic. At current, herbal medicine is very limited, but adventageous if the plants are covieniently located and conventional supplies have dwindled.
Wildlife
Well, it may seem quiet in the wilderness, but you're not alone. Animals are everywhere and are much better suited to the climate. They're all certainly faster than you and will likely see you before you see them, so be prepared. A note before I go over them; wind does effect your "detection" range, as does carrying meat or bleeding.

Deer: one of the best meat-yielding animals, these will run away from you as soon as they catch on to you. They're worth about 9kg of meat, 4 cuts of leather, and 2 units of gut. One .303 will kill or lethally injure if you manage to hit them at the necessary range.

Rabbits: small and weak, these aren't worth a bullet but can be easily snared. They'll bring you in 1 unit of rabbit skin and about 1.2kg of meat, but as of v.183 they do not provide gut (this may be changed in v.192+).

Crows: these cannot be killed, but will hover in groups of three or four over any type of carcass, including corpses. This is a good way to find your kills the morning after a snowstorm, or know where wolves are hunting. As of v.233, they will occasionally leave feathers below them.

Wolves: one of the more common creatures, these may choose to pursue you and will begin a struggle if they manage to attack you. A bullet will do significant damage and inflict bleeding, and a shot to the face (which is easy in a charge) will put them down. They yield around 5kg of meat, 2 gut, and 1 wolf pelt.

Bears: yeah, your good ol' fashioned black bear. Only appearing in Pleasant Valley, these are semi-aggressive and territorial. They will only attack from close distances, but will take anywhere up to 5 bullets to kill. They yield a very large amount of meat, bearskin, and gut, almost making it worth the strife.

Fish: the least active wildlife, mostly because it only appears dead or caught. Found by fishing in holes in fishing huts, these have some of the highest calorie counts in the game and are an unlimited resource as long as you have enough hooks (15-25 sets can be found across ML and CH). However, they're really heavy.
Crafting Stuff
A trademark of the survival genre, making things! But what can we actually make? A good question- a lot of stuff. To make an actual item, you'll need a workbench. Things like bandages are not making something, technically, but decomposing. Crafting can take a very long time, but a hunting knife or sewing kit (possibly tools) will halve the time. All hours in the guide is full time without a tool.

Bear Skin Bedroll: requiring 4 bear skins and 5 cloth, this is a bedroll warmer than your starter roll. Has a chance to scare off wolves and takes 33.3 hours.

Wolfskin Coat: requiring 4 wolf pelts and 4 gut, this is an incredibly warm (and heavy) coat. Takes 50 hours to complete.

Deerskin Boots: requires 10 leather and 4 gut, is very warm. Takes 25 hours.

Rabbitskin Mitts: requires 4 rabbit skin and 2 gut, is warm. Takes 10 hours to complete.

Snare: used for capturing rabbits, requiring one gut and one reclaimed wood. Takes 30 minutes to create without tools (don't waste tool quality speeding it up).

Line (2): one gut. Used in fishing tackle, but very common in green lake huts and always in the camp office on the workbench. Takes 15 minutes.

Hook (3): requires one scrap metal and 20 minutes. Don't waste your resources on this unless you're maintaining a lifestyle based around fishing- the camp office always has one on the table and they're extremely common in green lake huts.

Fishing tackle: if you hadn't found one of good condition yet, this will combine a line and hook for ice fishing. Takes 10 minutes.

Torches (2): using one reclaimed wood, two cloth, and 0.20l of Kerosene (jerry can), this will give you two anti-wolf torches that must be lit before use, which takes time and supplies. Takes 15 minutes, and by harvesting the burned-out torches you can "duplicate" reclaimed wood (as of v.192).

Old man's beard lichen bandage: taking 3 lichen and 1 bandage, its basically an antiseptic bandage. Takes 15 minutes.

The Survival Bow: With a cured maple sapling and two gut, this technically takes 10 hours, but a hunting knife is required, halving it to 5 hours.

Arrow shaft (3): quickly made in 30 minutes, this just takes a hunting knife and some cured birch sapling.

Simple arrow: 1.5 hours mixed with a shaft, head, and three feathers will give you a reusable arrow.
Forges and Forging (INC)
Experience Modes
Though this guide is typically based off data and research from the Voyageur difficulty, it wouldn't be a complete guide without giving an overview of the three experience modes. Added in Alpha v.181, these are basically your difficulties. They will edit weather length, power, animal population, loot spawns, average air temperature, calories burnt, and a few smaller things (i.e. wolf flight/fight likelihood). As of now there is no ability to define custom settings, but I haven't given up hope. I'll try to run through these without restating everything said in game.

Pilgrim (easy): a very good, albeit semi-bland, difficulty mode. It's biggest feature being the semi-docility of the wildlife, you will be the top of the food chain. Hunger and other stats will increase about half as fast with slight variance, and weather will clear fast and be warm enough to walk though even in blizzards. Loot is plentiful, and this difficulty does not miss the easy mark. Good for getting achievements but there is no Pilgrim leaderboard. Wolves and bears will now fight back when provoked or when you walk up to them and steal their food.

Voyageur (medium): the setting prior to v.183, this is the average. Weather, wolves, and consumption are all well balanced. This is the balance of survival and death, and is not easy nor hard- it's just straight survival. Good for a balanced, true experience.

Stalker (hard): welcome to the MLG leagues. Now we've got an unbalanced set of stats and wolves combined into a well-rounded hard mode. Everything mentioned above is tweaked in the favor of nature. Deer are harder to approach and wolves are everywhere. Good for a challenging or entertaining (depending on how much you scream when a wolf grabs you through a door) game session.
Achievements
Another section I felt I should tack on to have a complete guide as all 22 achievements pertain to the Sandbox mode in v.200. Here's a quick, semi-vague run down.

Day achievements (1, 2, 5, 10, 15, 20, 30, 40, 50, 100, 200): these will come as you survive, requiring only remaining alive til the day counter reaches the desired number. For quickest results, play on Pilgrim.

Pacifist: this will require you to avoid wolves more than usual and to refrain from killing things. Basically live nomadically without the weight of a rifle. Much easier on Pilgrim. Harvest pre-spawned carcasses and scare wolves off their kills with flares as often as possible. Gathering Cat Tails will give you up to four days extra.

Silent Hunter: similar to Pacifist, but you are now allowed to shank wolves. Easily done on Pilgrim and in conjunction with Pacifist. Harvest pre-spawned carcasses and scare wolves off their kills with flares as often as possible. Gathering Cat Tails will give you up to four days extra.

Night Walker: survive from 8pm to 8am outdoors (not in things like the forestry lookout). A good strategy is to gather up food and firewood and hole up in a fishing hut or green or brown shed with a fire. From there, sleep away your sorrows, ideally on Pilgrim.

Beneath a Starry Sky: repeat above til awarded. Fishing is another good way to pass the night.

Exploration Game: simply put, go everywhere but both bunkers. This is mostly just time consuming and can be done more effectively with slower stat decrease on Pilgrim.

Waste Not, Want Not: get a lot of bullets. Shoot deer. Eat them. Make boots. Easier on Pilgrim.

It was THIS big!: a 5kg fish is a hefty one, but it's doable. Mostly, spend a lot of time fishing- Mystery Lake is a good place for this with the Camp Office close by.

Wrapped in Furs: Kill a lot of stuff and wear them. Gather a good bit of bullets and use snares for rabbits.

Natural Healer: Coupled well with Happy Harvester, this can be done quickly along the outskirts of Pleasant Valley.

Happy Harvester: Coupled well with Natural Healer, traveling around Pleasant Valley and Mystery Lake will give you the quickest supply of plants.

Living off the Land: On Pilgrim, you can live over 10 days just off the Cattails on Mystery Lake- if you gathered a supply, this is doable eating only Cattails. You're allowed to shoot anything that moves and cook it anywhere, and as long as you're not consuming any human-produced items you're all good.
The Inevitable End
In case you hadn't caught on, you can't "win" in Sandbox mode. You go until your data corrupts, you get up and enter the real world, or you, well, die. The first two are unlikely and death is something that will happen. I've already covered how to delay death; this section is for when it comes to you anyway.

You'll get to a point, freezing to death and lost in a blizzard in Pleasant Valley, where you know you're dead- one of the worst parts is how slow it comes. Once it strikes, be happy to know it's over. Death and losing is always disappointing in a game, but it happens. The best thing you can ever do is learn from your failure. What led up to your death? Were you gambling risk versus time? How will you do better next time? The Long Dark claims everyone eventually; its all about endurance.

"It is better to have survived and died than to have never survived at all," -Me, probably
Closing Notes
Well, I hope you've found this guide helpful. I wrote this on and off between classes while juggling classwork from February 1st to March 8th. I'm glad to say it's finally done, and can be truly called a complete guide. Updates will be fewer now, but I intend to periodically update it with fresh information.

Many thanks, and a positive rating and/or a favorite for my work is always appreciated. Feedback is also helpful and can be posted in the comments below, or, if a good deal's worth, you're welcome to send me a message.

Toodles.


~If anyone wants to make a new cover for this guide, I'll certainly appreciate anything you send to me. May not be able to use it, but I'll give it a fair shot. Current image works as a placeholder.
112 Comments
Landlyn 20 Nov, 2022 @ 3:19pm 
cool guide
Solstice Initiative 16 Oct, 2020 @ 10:32am 
Side note for the Prybar- It's most useful in Mystery Lake, specifically in the Carter Hydro Dam (and also in Mountain Town with the Orca Gas Station plus all the cars, but that's special) - Once you get past those locations, you're probably going to want to look for a hacksaw instead to get the crates on the almighty Timberwolf Mountain. If you do- bring a map. Shift + Tab exists for a reason. Look a map up, and use it often.
chrgeller00 2 Aug, 2017 @ 8:18pm 
I have played initial game for long time-[- but new update is killing me.Pleases tell me how to get knfe out of my hand so I can play Charlene
loopy 11 Dec, 2016 @ 11:14am 
GRATE guide just a little too long and winded:)
Mochnant 7 Nov, 2016 @ 8:26am 
Great guide, hope you find the time to update some of the outdated sections!
Willkwi  [author] 5 Oct, 2016 @ 10:51am 
Pleasant Valley isn't all that bad. Looking directly off the cliff face, the farm house should be visible. Great place to get days of food and easy condition healing!
Raymond 5 Oct, 2016 @ 6:17am 
Oh s***, I keep wandering through the dam and now I am lost into the Pleasant Valley. A noob in the Pleasant Vally... I just want to find some sign of civilization, cant believe I wander into such dangerous place.
Does this mean I am going to die?
I am in Voyager difficulty. I found a Radio tower outpost, have enough food and water to hold up a few days. But my condition is currently bellow 50% without debuff. Shoudl I stay there for a day or immediately move right on the next morning? I dont want to die again T.T
rlong9000 27 Jun, 2016 @ 2:14am 
Hey, I have a new cover for the guide if you want it, but I'm a complete idiot when it comes to the social aspects of Steam, so if you or someone else listening in could let me know how to private message people on Steam so I can send you the cover image, I'm all ears. ^.^"
Gecko-[GER] 8 May, 2016 @ 5:49am 
Yes keeping those guides up to date is a constant work and very time consuming.
Hoots 21 Apr, 2016 @ 11:19pm 
A very well built guide but missing some up to date things such as the new challange modes and new menus. But you did say you were busy with work/school so understandable