Team Fortress 2

Team Fortress 2

139 ratings
MvM Robot field guide: Tanks
By The Killer Duck
Welcome to MvM robot field guide! Where we take a look at different robots you will encounter in Mann Vs Machine and provide tips and tricks on how to deal with them.

This guide will focus on the slow, hulky tanks called the, what else, tanks!
   
Award
Favorite
Favorited
Unfavorite
Meet the tank
Tanks are giant blue armoured vehicles that travel towards the bomb hatch at a slow speed. They have a bomb of their own, and their aim is to take it to the hatch and deploy it before the team of 6 mercs can destroy it.

Tanks in-game can be indicated by their unique symbol during set-up time:


Characteristics
  • Tanks move at a 25% speed of the mercs.
  • Their health varies. It is affected by the length of the path they must travel and the intended difficulty of the wave. You can look at a chart showing all the tanks, what waves they are on and how much health they have Here on TF2 Wiki.
  • Cannot be:
    • ignited
    • sapped
    • bodyblocked
    • milked
    • regain health via the conch
    • jarated
    • backstabbed
    • headshotted
    • healed
    • no uber from using the ubersaw
    • repaired via wrench
    • raged
    • airblasted
    • marked for death
    • crit/mini-crit boosted
  • Tanks can take mini-crit damage if the Soldier activates his buff banner.
  • Have a 75% minigun resistance, making the heavy a weaker class for destroying tanks.
  • There is a chance that you can get crushed by the tank via squashed against a wall if the player is in the correct position at the right time. This will be noticeable when the tank is taking turns or moving through tight spots.
  • Appear on every map except Mannhattan.
  • The design of the tank changes on the final wave of missions. It now has black and white strips. Im actually serious, check the TF2 Wiki link and look. The white strips do not affect the tank's properties in anyway except for looks.
Tank spawn points
Here I will show you where the tanks come from inside a first person view.

Decoy


Coaltown


Mannworks
Both tanks that come through both gates originate from one point but the wave decides what tank goes through what gate.

Gate 1


Gate 2


Bigrock


Rottenburg
Tank route maps: Legend (what this and that means)
The next few sections will have lots of colours and shapes. This legend will inform you of what's what.

Red dot: Tank spawn point
Blue line: Tank path
Blue X: End of tanks path/the hatch
Blue arrows on blue lines: Direction of tank
Green arrows: Help with directing where the tank is going
Brown line: Rottenburg barricade
Yellow dot: Where a tank enters an area where it cannot be damage and where it comes back out.
Tank route: Decoy
Time from moment of spawn to 'wave failed' notice: 1 minute and 26 seconds
Tank route: Coaltown
Time from moment of spawn to 'wave failed' notice: 1 minute and 53-54 seconds
Tank route: Mannworks
(Route 1) Time from moment of spawn to 'wave failed' notice: 1 minute and 46 seconds
(Route 2) Time from moment of spawn to 'wave failed' notice: 2 minutes and 32 seconds

Seeing that it tanks longer for the tank on route 2 to reach the hatch, it would be of best interest to attack the tank that's on route 1 first.
Tank route: Bigrock
Interior
Exterior
Time from moment of spawn to 'wave failed' notice: 2 minutes and 28 seconds
Tank route: Rottenburg
(Route 1) Time from moment of spawn to 'wave failed' notice: 2 minutes and 49 seconds
(Route 2) Time from moment of spawn to 'wave failed' notice: 2 minutes and 31 seconds
A small list of the fastest times/times recap
1: Decoy (1 min, 26 secs)
2: Mannworks route 1 (1 min, 46 secs)
3: Coaltown (1 min, 53-54 secs)
4: Bigrock (2 mins, 28 secs)
5: Rottenburg route 2 (2 mins, 31 secs)
6: Mannworks route 2 (2 mins, 32 secs)
7: Rottenburg route 1 (2 mins, 49 secs)
What to do as each class: Introduction
In MvM, you will have to play as different classes in order to fill in different roles in order to win. The next 9 sections will go over what to do against a tank with all 9 classes.

One thing to bear in mind is that some classes will obviously do more damage than others, which can also apply to the weapons used as well. The link below is a damage spreadsheeet made by Hacked Exhale showing all of the mathamatical details of damage done by the class's weapons.

https://docs.google.com/spreadsheets/d/1xvjPQtSAd9rTK6VGueQS9XWVpLEiaQh02zmA2JpltWg/edit?pli=1#gid=0
As Scout....
The majority of Scouts in MvM are primarily used to collect cash and make giants easier to kill. So when a tank is around, it's often best to leave it alone.

Well, there are rules to this.

Do not attack the tank if:
  • There is money left to be picked up
  • Giants are around and they have to be milked'n marked

However, if the above are not happening and you have a moment, it would be nice for both yourself and everyone you meet to attack the tank with your scattergun. The Soda popper and the Shortstop are the best for this as it can deal the most damage the quickest out of its siblings when there is enough cash for it to be upgraded.

Also, a few people are getting confused with what im saying here. Scout IS good at tank busting, but one of his main jobs in MvM is to get cash. As a result, most scouts you will be spending money on mobility, resistances and milk, which i why im saying to leave it alone for the most part.

Otherwise, don't worry about it and you'll be fine.
As Soldier....
The Beggar's bazzooka is a very good weapon to use on tanks. If you max out reload speed and tap the fire button, it will work like the stock launcher, only it has a bottomless clip. This means you can do damage quicker as there is no need to reload.

However, you will quickly run out of ammo on the beggars because you will fire off all your rockets very quickly. Make sure that 1 point into ammo capacity is one of the first few things you get on your shopping list. That and damage as well, as your rockets will cause a more hurtful effect.

The buff banner is a secondary weapon that can also be used to provide you and anyone around you with mini-crits, dealing extra damage. This will make killing tanks easier and help surrounding classes have an easier time doing damage. Just make sure your teammates are close enough so they can benefit from its effects.
As Pyro....
Seeing that the phlog can provide free crits when performing enough damage on enemies, it is the best choice when it comes to dealing with tanks. But before activating the crits, make sure you have a sufficient amount of ammo before flaming. Running out of ammo during your crit period isn't nice.

As such, when you are following the tank and attacking it, remember where ammo is lying around on the map so you can pick it up and continue attacking. Memorising where the closest ammo box is a difference between failure and success.

Ammo capacity is a good idea for the pyro as you can then visit ammo boxes less often, but that should be considered later in the game, as other important upgrades (Move speed, damage, health on kill) are required to handle the tougher waves of robots.

Other than that, M1 till the tank explodes.
As Demoman....
The grenade launcher can do more damage than the stickylauncher when it comes to tanks. That being said, you shouldn't be upgrading it if you are a medic picker demo (A demoman who focuses his upgrades on the sticky launcher).

Much like the scout, the demoman should help in attacking the tank if there is no medics to get rid of, or robots in general. If you are playing as grenadeknight (A demoman who has stock/loch n load with chargin' targe) and taking priority in killing tanks, then this rule is off the board.
As Heavy....
Because the tank boasts a 75% minigun resistance, heavies are strongly advised to focus their attention on the bomb rather than the tank. If there is nothing left to shoot or you have a moment, you can pour some damage over the tank to help your tank busters eliminate it faster.

Also, in-experienced medics with the kritzkrieg will often pick you to uber.

DO NOT LET THEM

It is important to tell them that tanks have a large minigun resistance and that they should uber another class, like the Soldier or the Pyro. That way the tank can be dealt with much faster and life will be much better for all of you.
As Engineer....
An engineer's attention should be on the bomb alongside the heavy which can be a good combo in caretaking the bomb while the tank busters deal with the tank.

But if there's nothing else, you can assist in demolishing the tank.

The stock wrench has a nasty habit of performing a lot of random crits. When you reach your reach your wrench and max out it's firing speed, you can perform quick 195 whacks which will give your team less health to work on. This combined with the sentry in it's auto mode can really drain a lot of the tank's health.

But if you aren't using the stock wrench, there's always the wrangler and FR crits.
As Medic....
A medic with a kritzkrieg can be devastating towards tanks if he uses his ubercharge. When performing your ubercharge, make sure to use this priority list to get the most damage done out of the moment:

Beggars soldier > Pyro > Soldier > Grenadedemo > Stickydemo

It's often better to leave classes like the Scout, Sniper, Spy and the Engineer alone as they will be either focus their upgrade attention into mobility/buildings or their weapons aren't cut out to doing massive amounts of damage compared to other classes like the Soldier or Pyro.

If you have the shield ready, you can perform some damage of your own by activating it. You can still heal and uber people, meaning you can cause some extra damage as well as healing and ubering on the go.

If you are using another medigun by any chance, please remember to not uber. It sounds silly that I say something like this, but it happens.
As Sniper....
Again, do not engage the tank if there are medics to be killed or mobs that need wiping up. Let more powerful tank busters handle the tank.

But if you can spare a few seconds/struggling against tanks, there are 2 things you can do:

1: Crit canteens and no scope
If you have maxed out your reload speed on your sniper rifle, you can buy crit canteens and quickly do hundreds of damage per shot to diminish the tanks health.


2: Bushwackin
If you have the bushwacka and a buff banner soldier, you can max out your firing speed on your bushwacka to deal fast 195 swings, just like the engi's stock wrench on a lucky horseshoe spree.
As Spy....
Yet again, leave the tank alone if there are medics around or if you are a money spy, cash lying on the field.

When assisting when there's time, the dimondback's crits can help as well as maxing out your knife's swing speed and slapping the tank with it.

And PLEASE, DO NOT SAP THE TANK, IT'S NOT A BUILDING OK?
T.H.E E.N.D
By what you have read throughout this guide, you should become more familiar with tanks, how they operate and what to do when one is on the field.

Now, get out there and show them that thousands of health means nothing!

Thanks for reading, I hope I have managed to help you (:
99 Comments
AppleTank 11 Dec, 2019 @ 11:53am 
Can you get Gunslinger crits on the tank?
Cytokyne 28 Aug, 2017 @ 2:32pm 
Might be notable that Tanks cannot be affected by the Bleed effect (e.g Southern Hospitality)
Chipbeam 30 Nov, 2015 @ 2:33pm 
If you're playing resist Scout, it's probably better to shoot the tank then trash.
Also damage Scout is a thing y'know
:P
Logar3 8 Oct, 2014 @ 1:40am 
you have i think i got better by just reading it
AEON-512 16 Sep, 2014 @ 7:21pm 
the sniper can deal HUGE dam with the mechian
vietcongbongdong 16 Sep, 2014 @ 6:29am 
i didnt never knewed that tanks have 75% minigun resistance
FUCK THIS I TRIED EVERYTIME TO DESTROY THE DAMNED TANKS WITH THE MINIGUN
Illius 15 Sep, 2014 @ 8:18pm 
Hey, I was thinking of making a "Robots of MvM" guide, myself. If I do, would you mind if I linked this guide to it? Or would you prefer if I didn't so you could do it yourself (mine would be a large guide containing all the general robots, and then explain the 'unique' variants.)
Spython 15 Sep, 2014 @ 2:17pm 
I suggest you not to use Air Strike unless playing with friends, as it had worse damage output than stock rocker launcher or even Black Box, mainly thanks to it's damage reduction that has bigger effect than one might think at first glance.
Rytops 15 Sep, 2014 @ 1:40pm 
Regarding my previous comment about the Airstrike, I know recognize (thanks to botspan for pointing it out) about the price for using an upgraded airstrike. The Airstrike does have amazing damage output, but at the cost of Money and ammunition exspenses. I do not suggest using the airstrike in the beginning of the game. (Especially those that start you off with $400) I usually use a different rocket luancher until i get to wave 4 or 5 (depending on the money collection capabilities of the scout...if there even is one) Then later, use my refund credit to use my money on the airstrike.
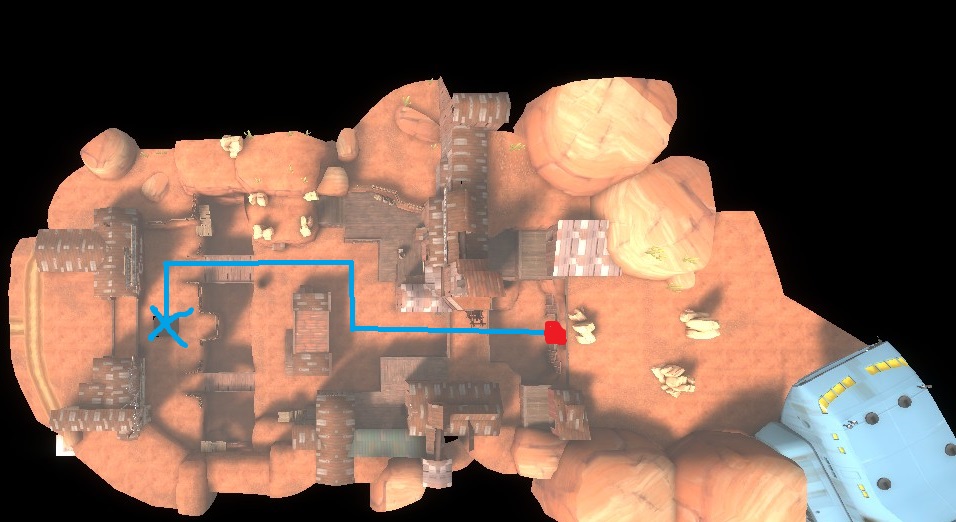
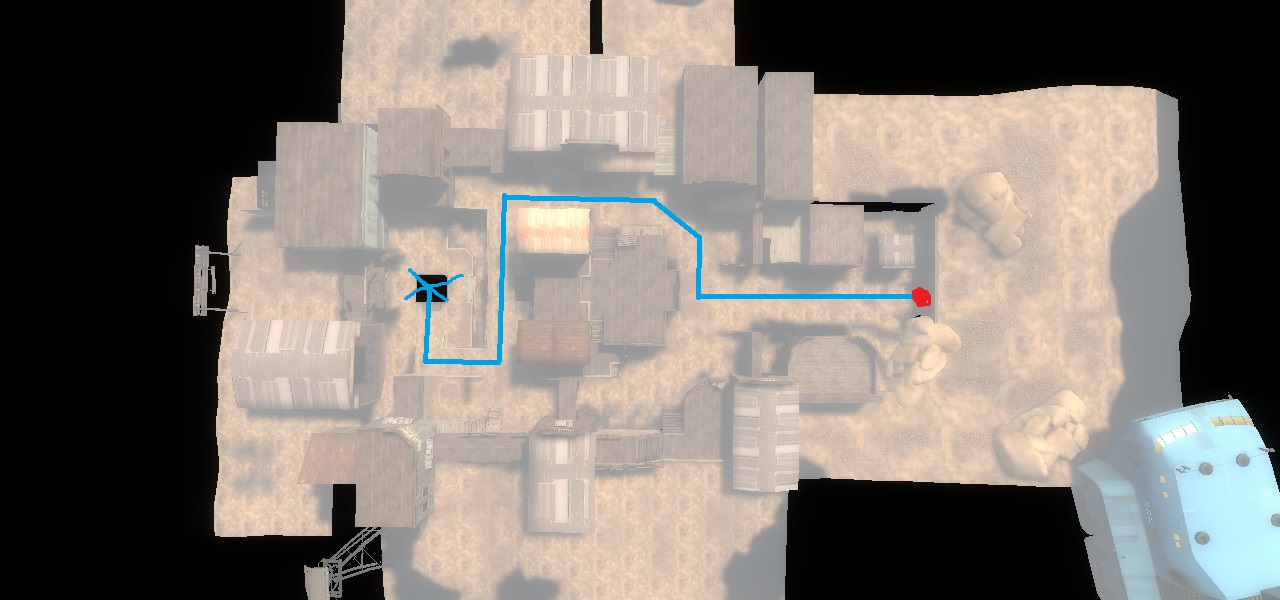
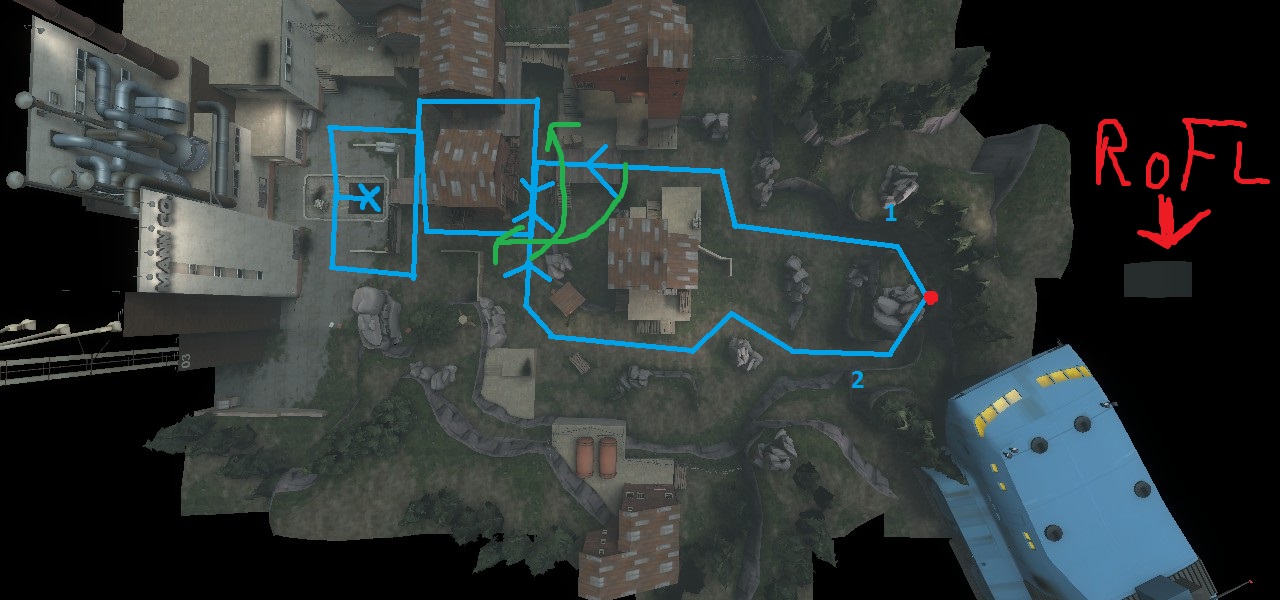
[[[The Only MvM Maps that I suggest using the Airstrike on at the very start are Mannhatten, Big Rock, and Wave 666, otherwise save up]]]

If you want amazing firepower, and you can afford the money, use the airstrike! Besides, it is not the most expensive weapon out there...


"It Costs $400,000 dollars to fire this weapon... for twelve seconds..."

~Heavy, explaining the Specs on his Minigun~
Rocket Racer 15 Sep, 2014 @ 11:01am 
Just because all of theese tips that i didn't know i completed ghos town!